Start here
• Affinity Photo tutorials
The tutorials
1. Affinity Photo vs Photoshop
2. RAW editing with Affinity Photo
3. Focus merge with Affinity Photo
4. Replace a sky in Affinity Photo
5. Moody mono in Affinity Photo
6. Six Affinity Photo landscape tips
7. Color correction in Affinity Photo
8. Live Filters in Affinity Photo
9. Create a classic wet plate look
10. Remove objects in Affinity Photo
11. Paint an abstract portrait
12. Enhance skintones in Affinity Photo
13. Create HDR in Affinity Photo
14. Replace a sky in Affinity Photo
15. Affinity Photo double exposures
16. Affinity Photo Denoise tool
17. Affinity Photo retouching
18. Restore old family portraits
19. Change clothes in Affinity Photo
20. Create super-charged sunsets
Watch video: How to retouch portraits in Affinity Photo
Amongst the masses, the term ‘Photoshopped’ has become a byword for digitally enhanced portraits. These days, though, it’s not just Photoshop that lets you carry out these kinds of edits.
Affinity Photo offers a range of powerful portrait-enhancing tools, from those that let you remove marks and imperfections, to dedicated features for skin softening. What’s more, the layer-based workflow of Affinity means that these edits can be done on separate layers, so you always have the option to control the strength of an effect, or go back to an earlier stage.
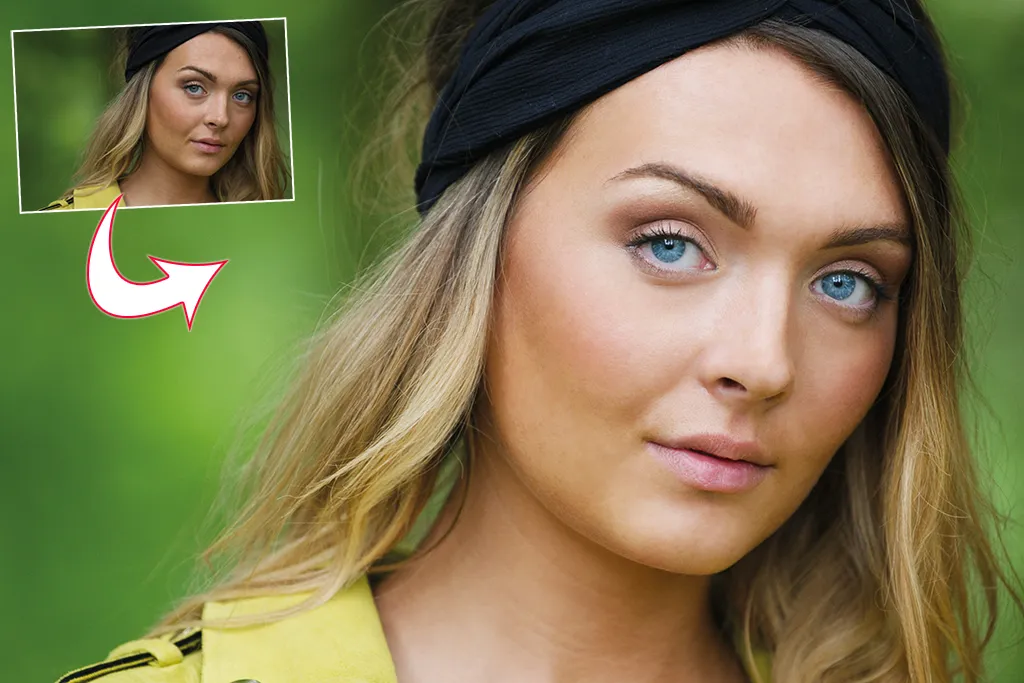
Here we’ll explore several key retouching techniques that you can apply to almost any portrait. Along the way we’ll encounter many key features in Affinity Photo. Portrait retouching is often about enhancing different areas of a face – we boost the eyes, soften the skin, sharpen the lashes and so on. We can use layer masks to confine effects to specific areas of the shot. This is a key skill not just for retouching, but for all kinds of editing.
We’ll employ the powerful High Pass filter in two contrasting ways. First we’ll use it to create a subtle softening effect, which we can confine to the skin with a layer mask. We can also use High Pass for a sharpening effect over details like the eyes, lashes and lips. As such, it’s a useful filter for boosting portraits.
Read more:
Step 1: Patch over blemishes

Open a portrait in Affinity Photo. Duplicate the bottom layer with Cmd/Ctrl+J (we’ll edit this layer to preserve our original), then grab the Patch tool from the toolbar. Zoom in close, then use the tool to drag selections over blemishes. Next, click on a clean sample area nearby to fix the blemish.
Step 2: Smooth eye bags

Grab the Clone tool and hit ‘2’ to set the tool opacity to 20% (this way we can gently soften patches). Go to the tool options at the top and set the layer blend mode to Lighten. Hold Alt and click to sample a clear patch of skin below the eye bag, then paint to clone and soften the darker patch of skin.
Step 3: Soften the skin

Once you’re done patching and cloning, duplicate the layer again with Cmd/Ctrl+J, then go to Filter>Sharpen>High Pass. Set Radius to around 9 (or play with other values) and hit Apply. Set the layer blend mode to Overlay, then go to Layer>Invert. This creates a subtle softening effect.
Step 4: Paint a mask

We need to confine the softening effect to the skin. Hold Alt and click the Layer Mask icon at the bottom of the Layers panel to add a full black mask that completely hides the layer. Highlight the mask in the Layers panel. Grab the Brush tool, set your colour to white, then paint to gradually reveal the effect over the skin.
Step 5: Sharpen fine details

Duplicate the second-from-bottom layer, drag it to the top of the stack, and go to Filters>Sharpen>High Pass, setting a radius around 1.7. Hit Apply and change the blend mode to Overlay, giving a sharpening effect. As before, add a mask to confine the effect to the eyes, lashes, lips and fine detail.
Step 6: Boost the eyes

Click the Adjustments icon and choose Curves. Plot a shallow S-shaped curve to add punch. Next, make another Curves layer and plot a stronger S-shape. Add a mask and paint to reveal the stronger contrast over the eyes.
Quick tip
As well as the High Pass technique, Affinity Photo also offers a dedicated Frequency Separation command (Filers>Frequency Separation) for retouching. This separates the high frequency (the fine details, lashes, lips, skin pores) from the low frequency (the wider colours and tones that make up the skin) making it easy to edit one separately of the other. So it means you can smooth out rough patches in the skin while retaining the all-important texture, which helps to prevent the plasticky look that plagues bad portrait retouching.
About N-Photo magazine
This tutorial originally appeared in N-Photo, the monthly newsstand magazine for Nikon photographers. Why not subscribe to a print edition, and have the magazine delivered direct to your door every month?
Alternatively, we have a number of different digital options available, including:
• Apple app (for iPad or iPhone)
• Zinio app (multi-platform app for desktop or smartphone)
• PocketMags (multi-platform app ideal for Android devices)
• Readly (all-you-can-eat digital magazine subscription service)
If you wanted a printed version of any of our most recent issues we have a selection of back issues to choose from in our online store.
Read more:
• Photography tips and tutorial videos
• The best photo editing tools and accessories
• The best desktop computers for photo editing
• The best photo-editing laptops right now
• The best photo editing software today

