How to reduce noise in Affinity Photo: using the Denoise tool selectively
Here's how to create a quick and easy double exposure effect in Affinity Photo using layers and layer blending creatively
Start here
• Affinity Photo tutorials
The tutorials
1. Affinity Photo vs Photoshop
2. RAW editing with Affinity Photo
3. Focus merge with Affinity Photo
4. Replace a sky in Affinity Photo
5. Moody mono in Affinity Photo
6. Six Affinity Photo landscape tips
7. Color correction in Affinity Photo
8. Live Filters in Affinity Photo
9. Create a classic wet plate look
10. Remove objects in Affinity Photo
11. Paint an abstract portrait
12. Enhance skintones in Affinity Photo
13. Create HDR in Affinity Photo
14. Replace a sky in Affinity Photo
15. Affinity Photo double exposures
16. Affinity Photo Denoise tool
Watch video: How to use the Denoise tool in Affinity Photo
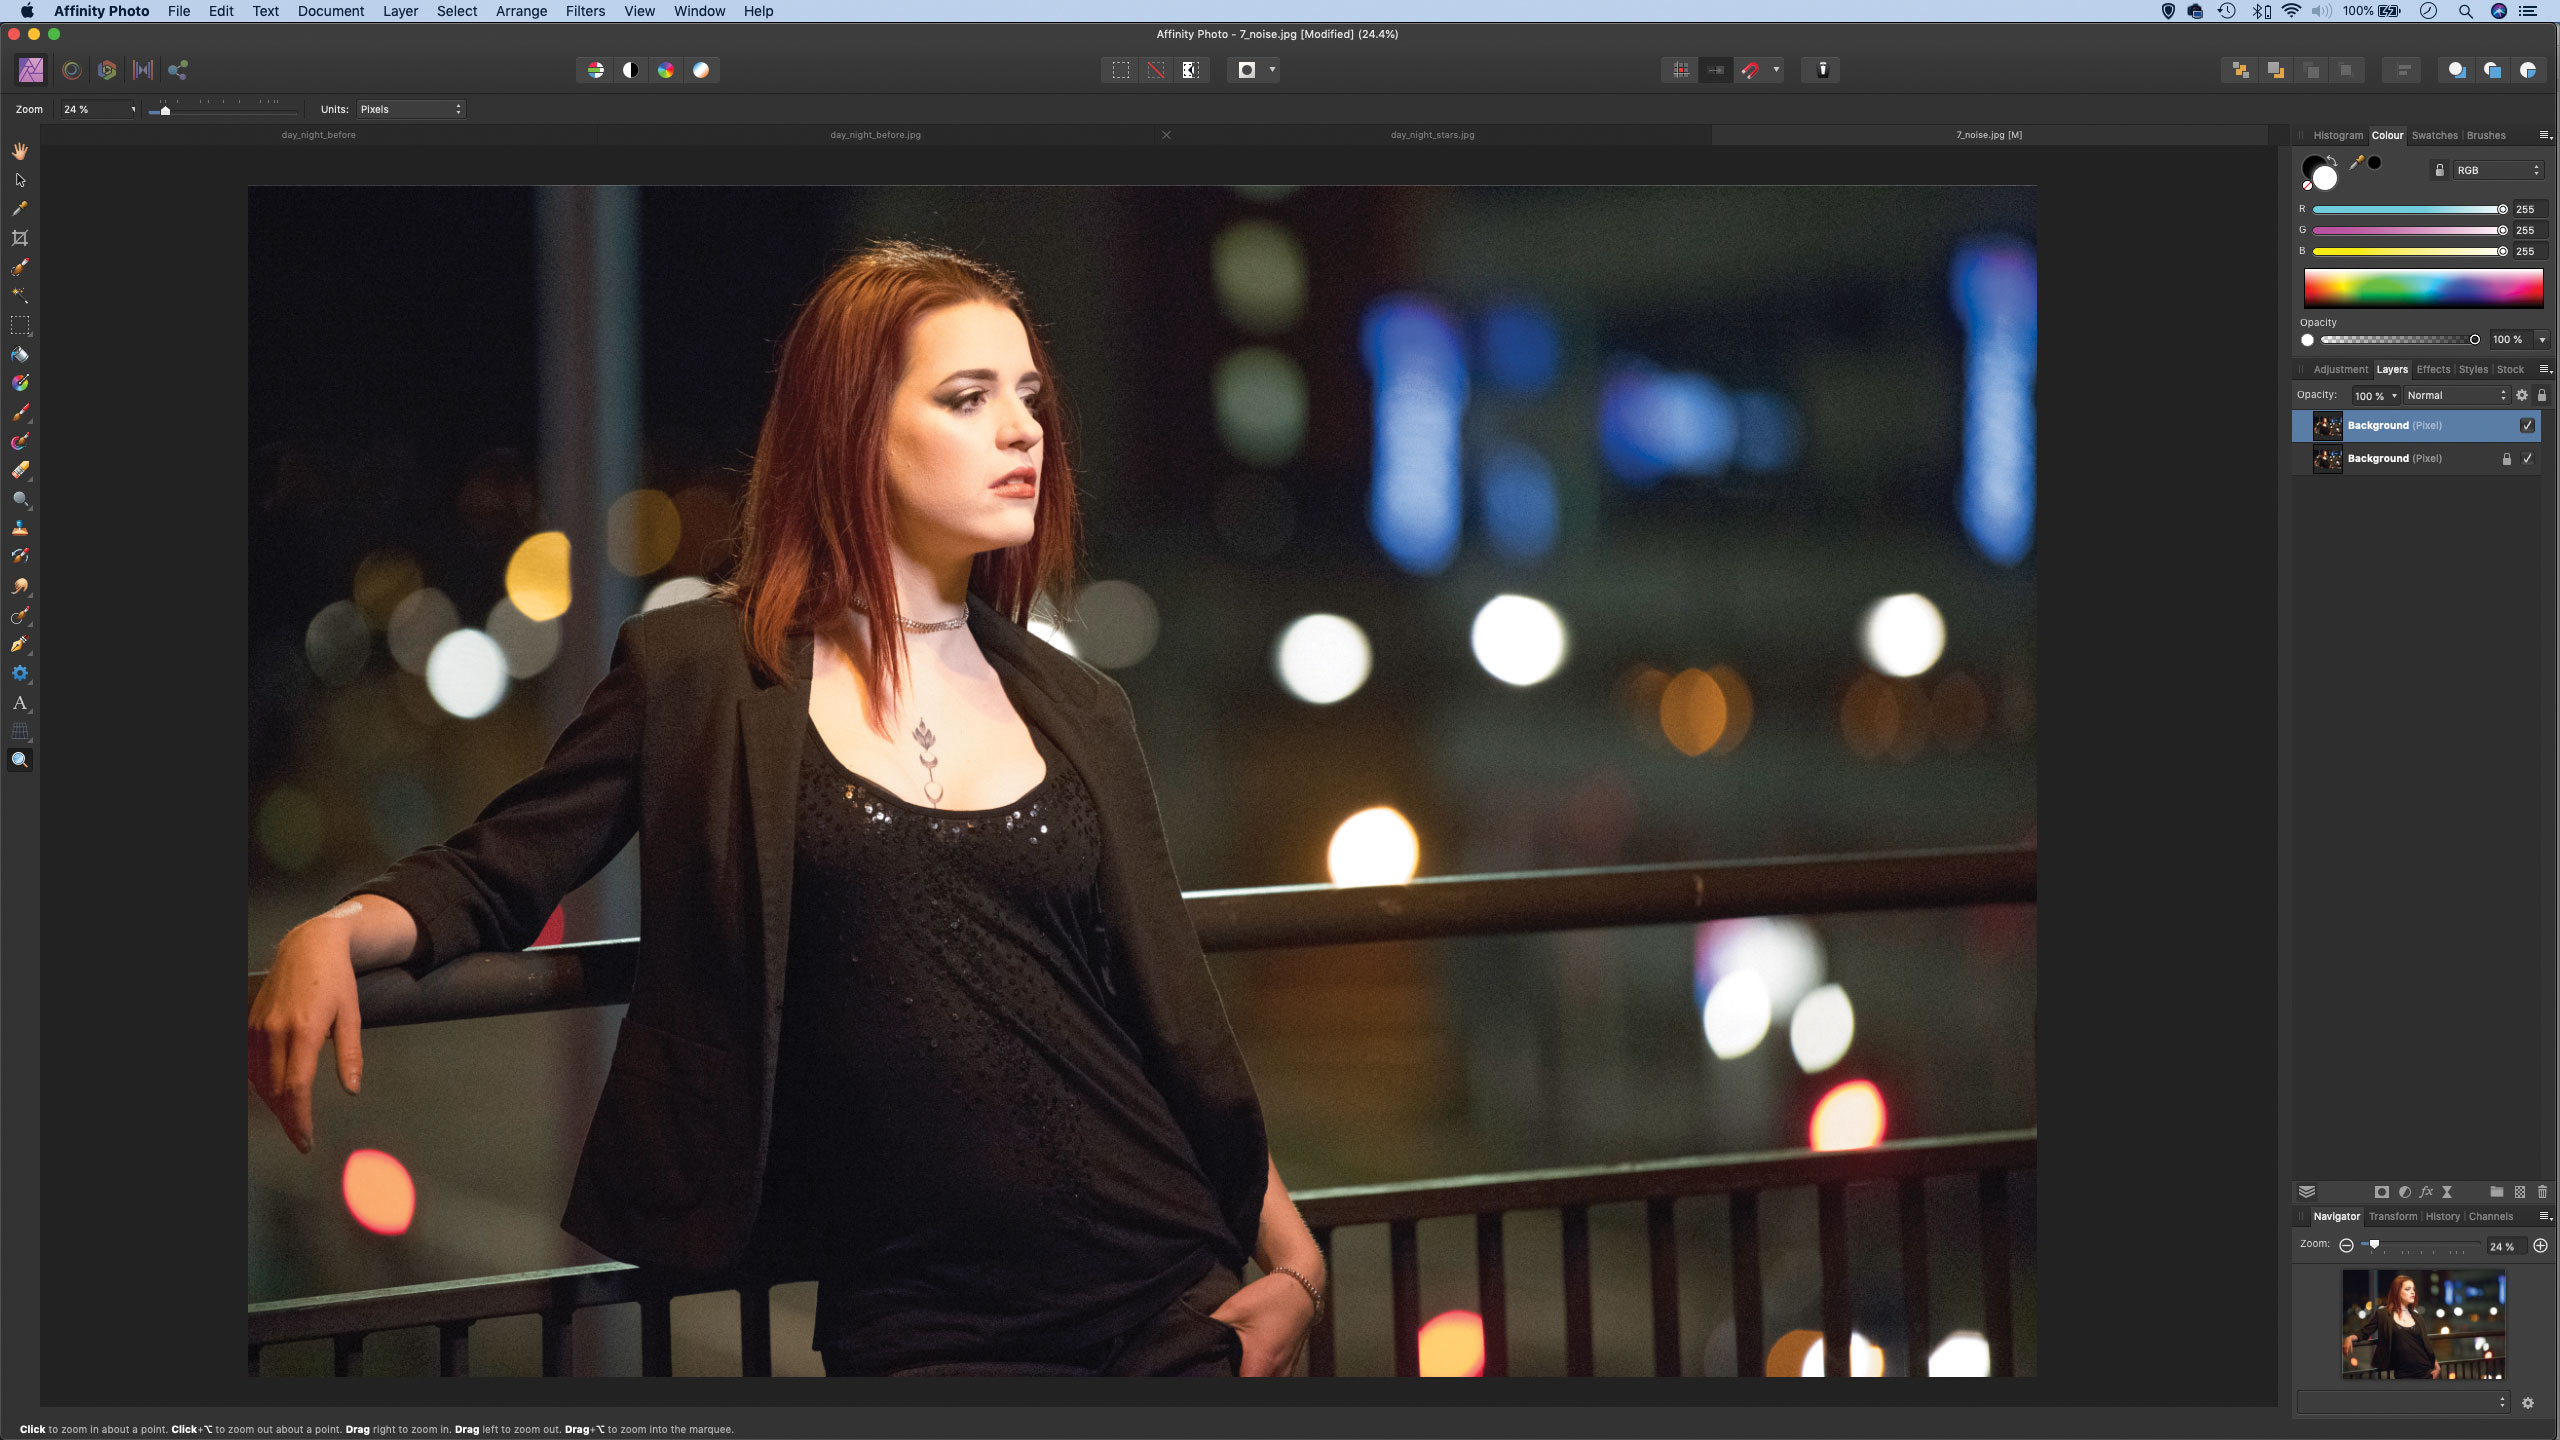
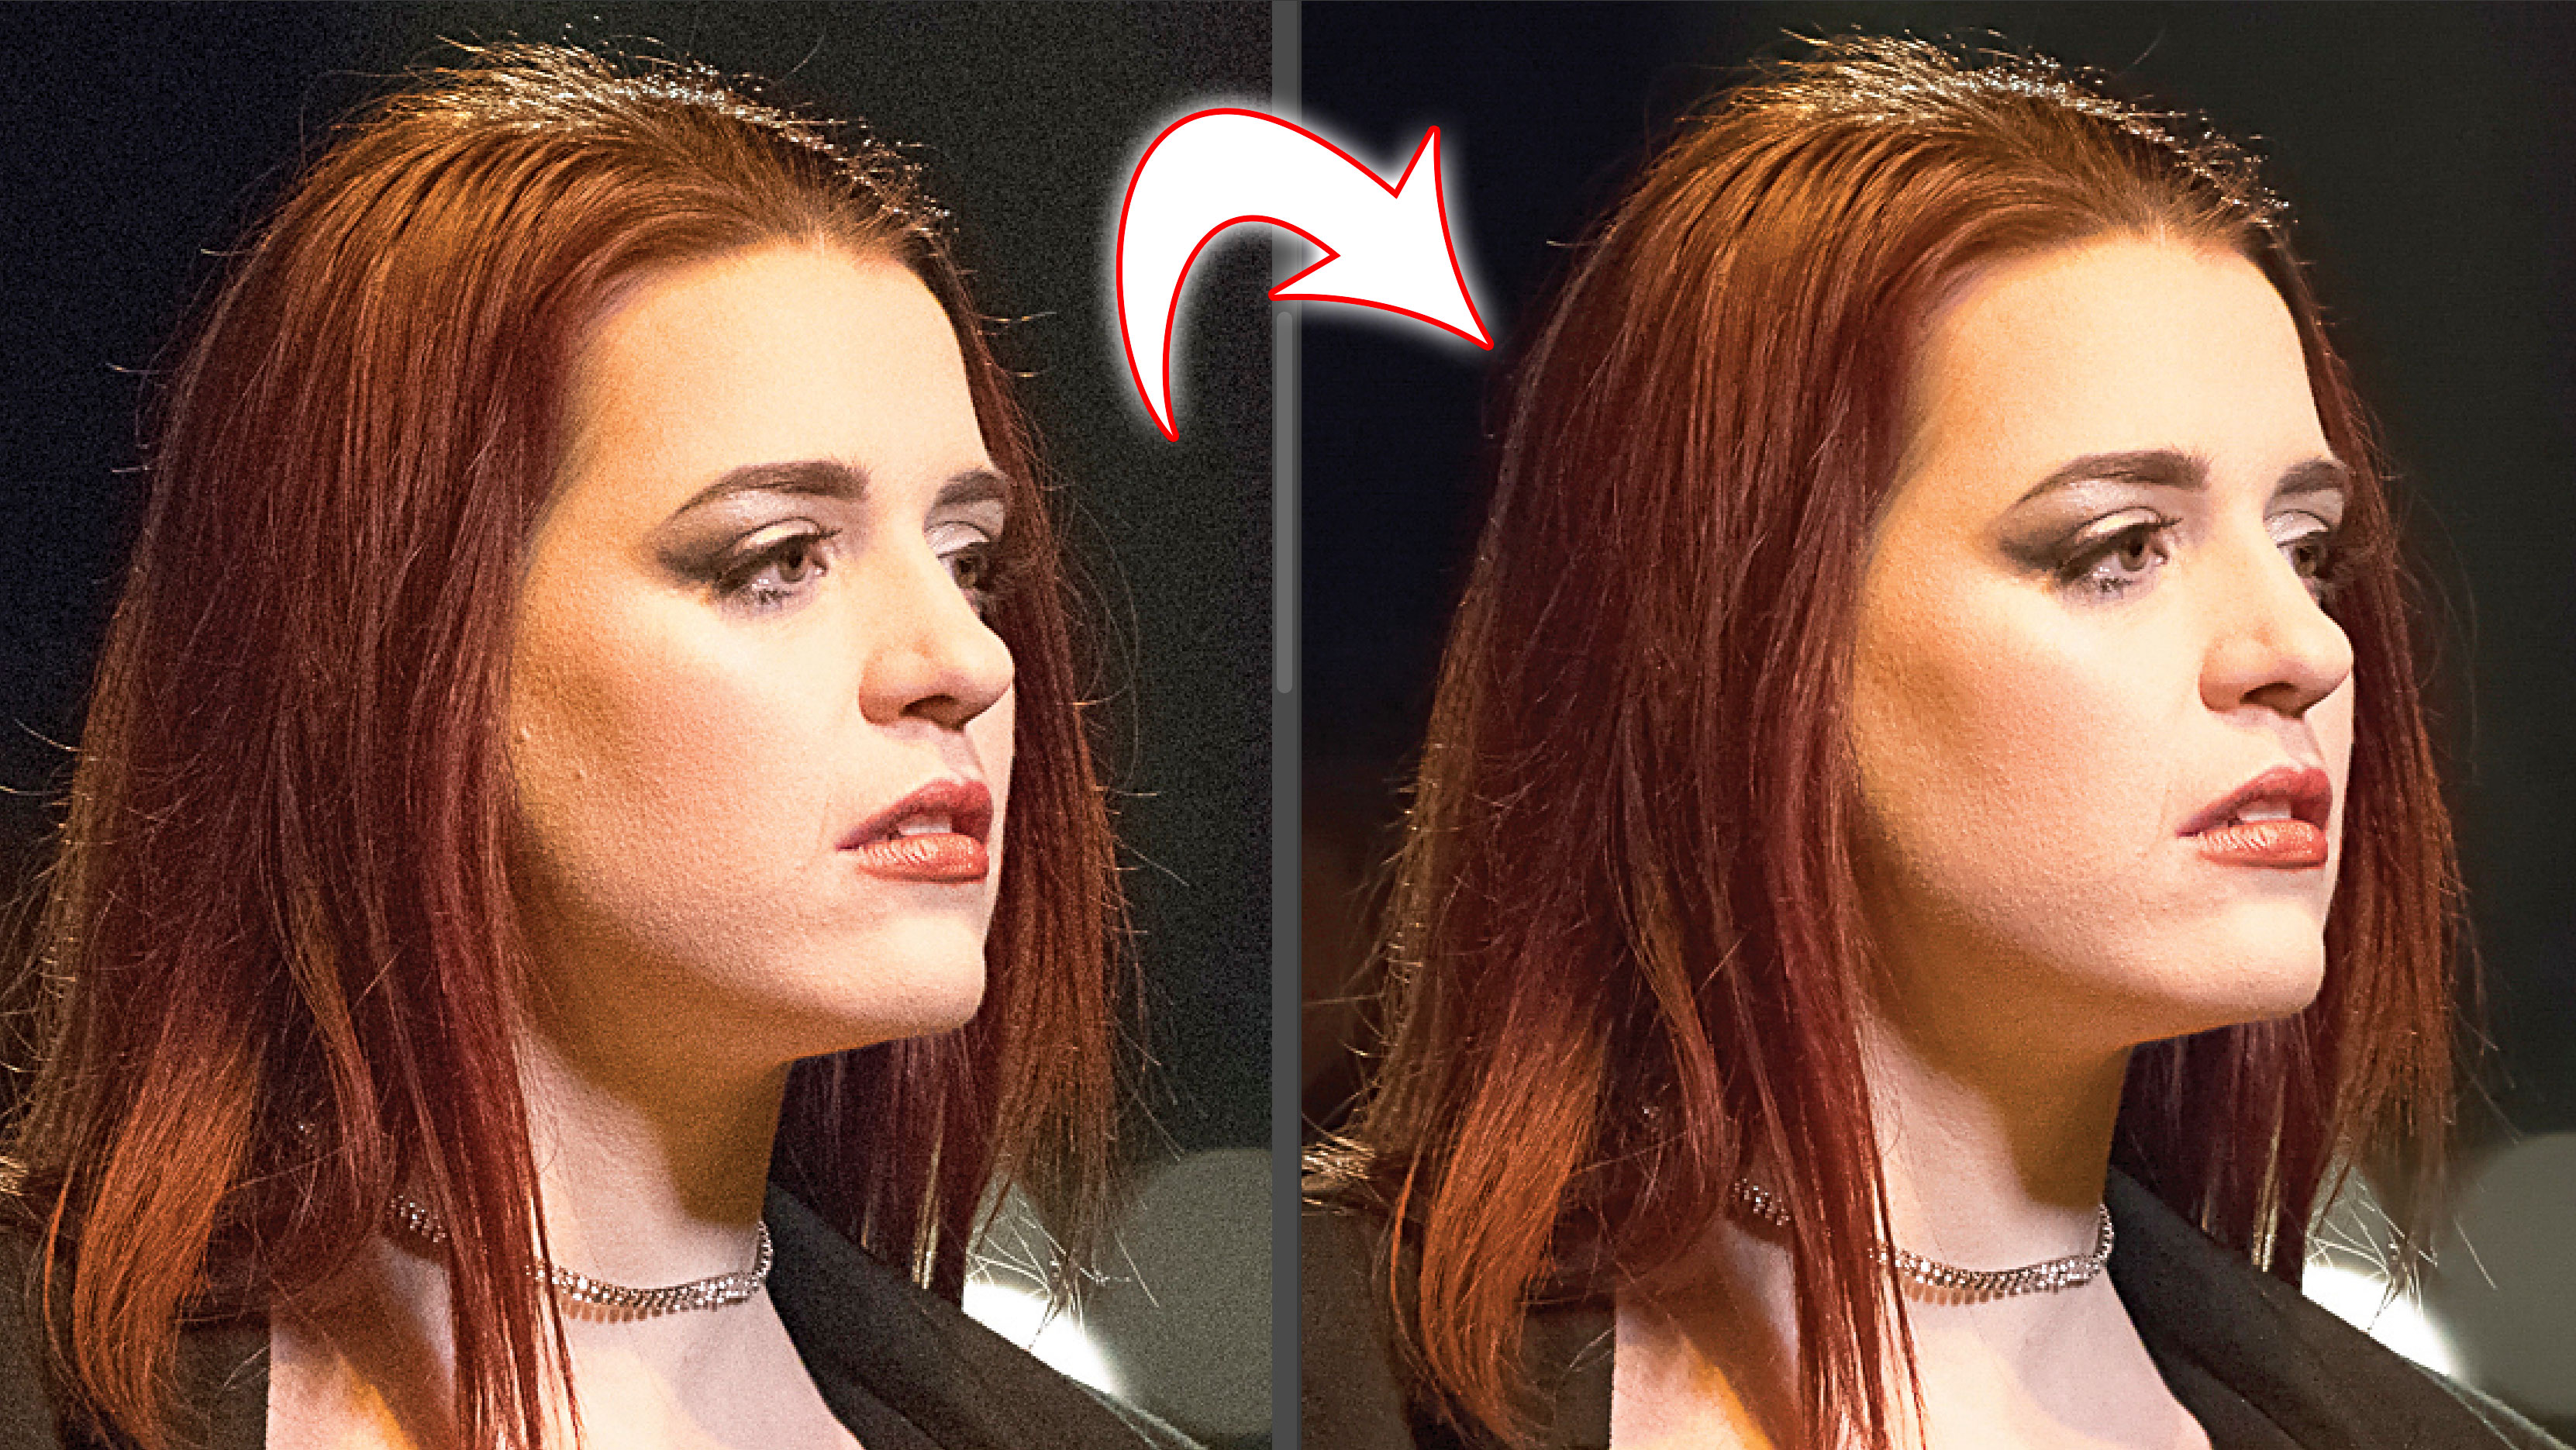
Recognise this photo? It's the one we used for our photo-editing basics article #1 My photos are too noisy. This time, we'll see what Affinity Photo's Denoise tool can do to improve this high-ISO image.
When shooting in low light it’s often necessary to increase your ISO to get an acceptable exposure. But this is to the detriment of image quality, resulting in nasty grainy noise.
Luckily, modern cameras are performing better and better in low light. Imaging software is improving too, as recent tweaks to Affinity Photo’s demosaicing and noise algorithms demonstrates. With simple controls and good results, Affinity’s Denoise command can improve even terribly noisy photos, like this low-light portrait, which was shot at ISO 22,800.
However, the inevitable problem with noise reduction is a loss of detail. The command works by blurring out the grainy noise in the image, but by nature this has an effect on the fine details in the subject. It’s especially apparent with high ISO images like this, and even more obvious when the backdrop beyond the subject is blurred out, as it is here. It’s a conundrum: we want to apply stronger noise reduction in the blurry areas where a loss of detail doesn’t matter, but we want to retain detail in the subject.
The solution is to apply two different Denoise settings to two separate versions of the image – one for the backdrop, the other for the subject. This way we can match the amount of correction to the varying level of detail across the image.
We achieve this by using a layer mask to control what is visible or hidden on one of our two Denoise layers, allowing the other layer to show through underneath.
The best camera deals, reviews, product advice, and unmissable photography news, direct to your inbox!
Read more:
Step 1: Duplicate the layer
Open your shot in Affinity and head to the Photo Persona (if you open a Raw you can also apply noise reduction in the Develop Persona’s Detail panel). First, duplicate the ‘Background’ layer with Cmd/Ctrl+J to make a copy, we’ll then apply our noise reduction to this to keep it non-destructive.
Step 2: Zoom to actual pixels
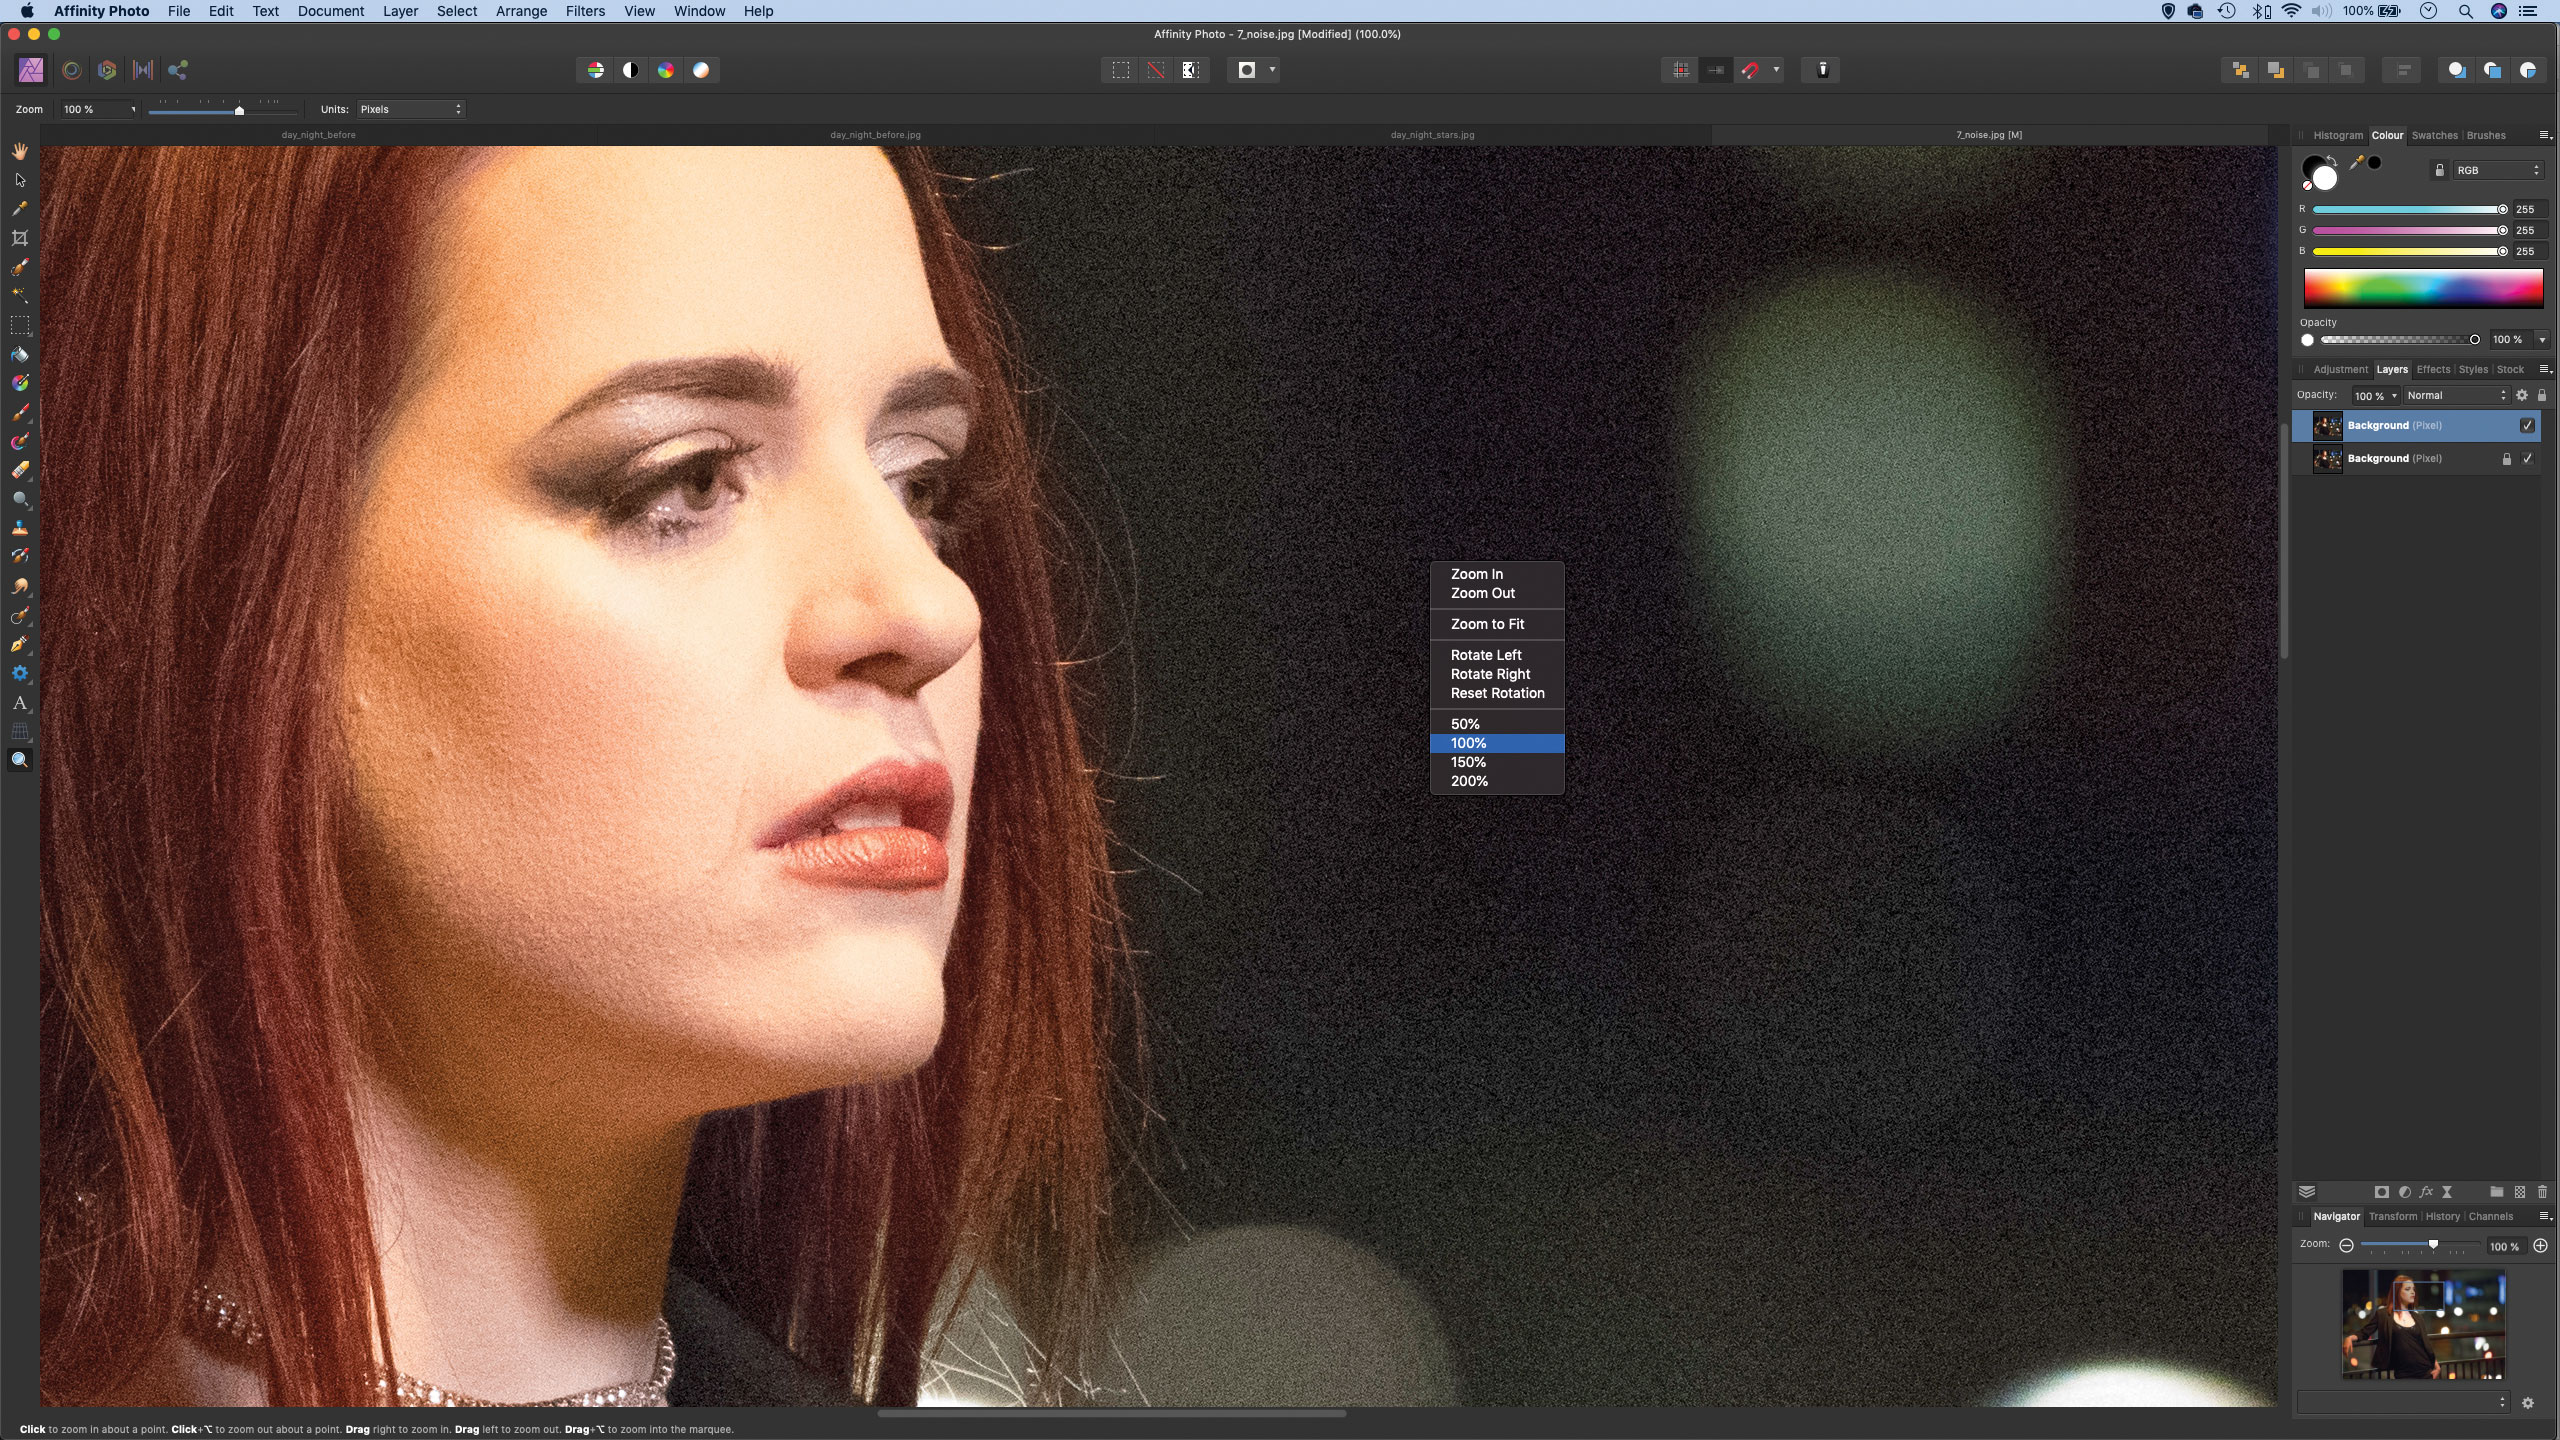
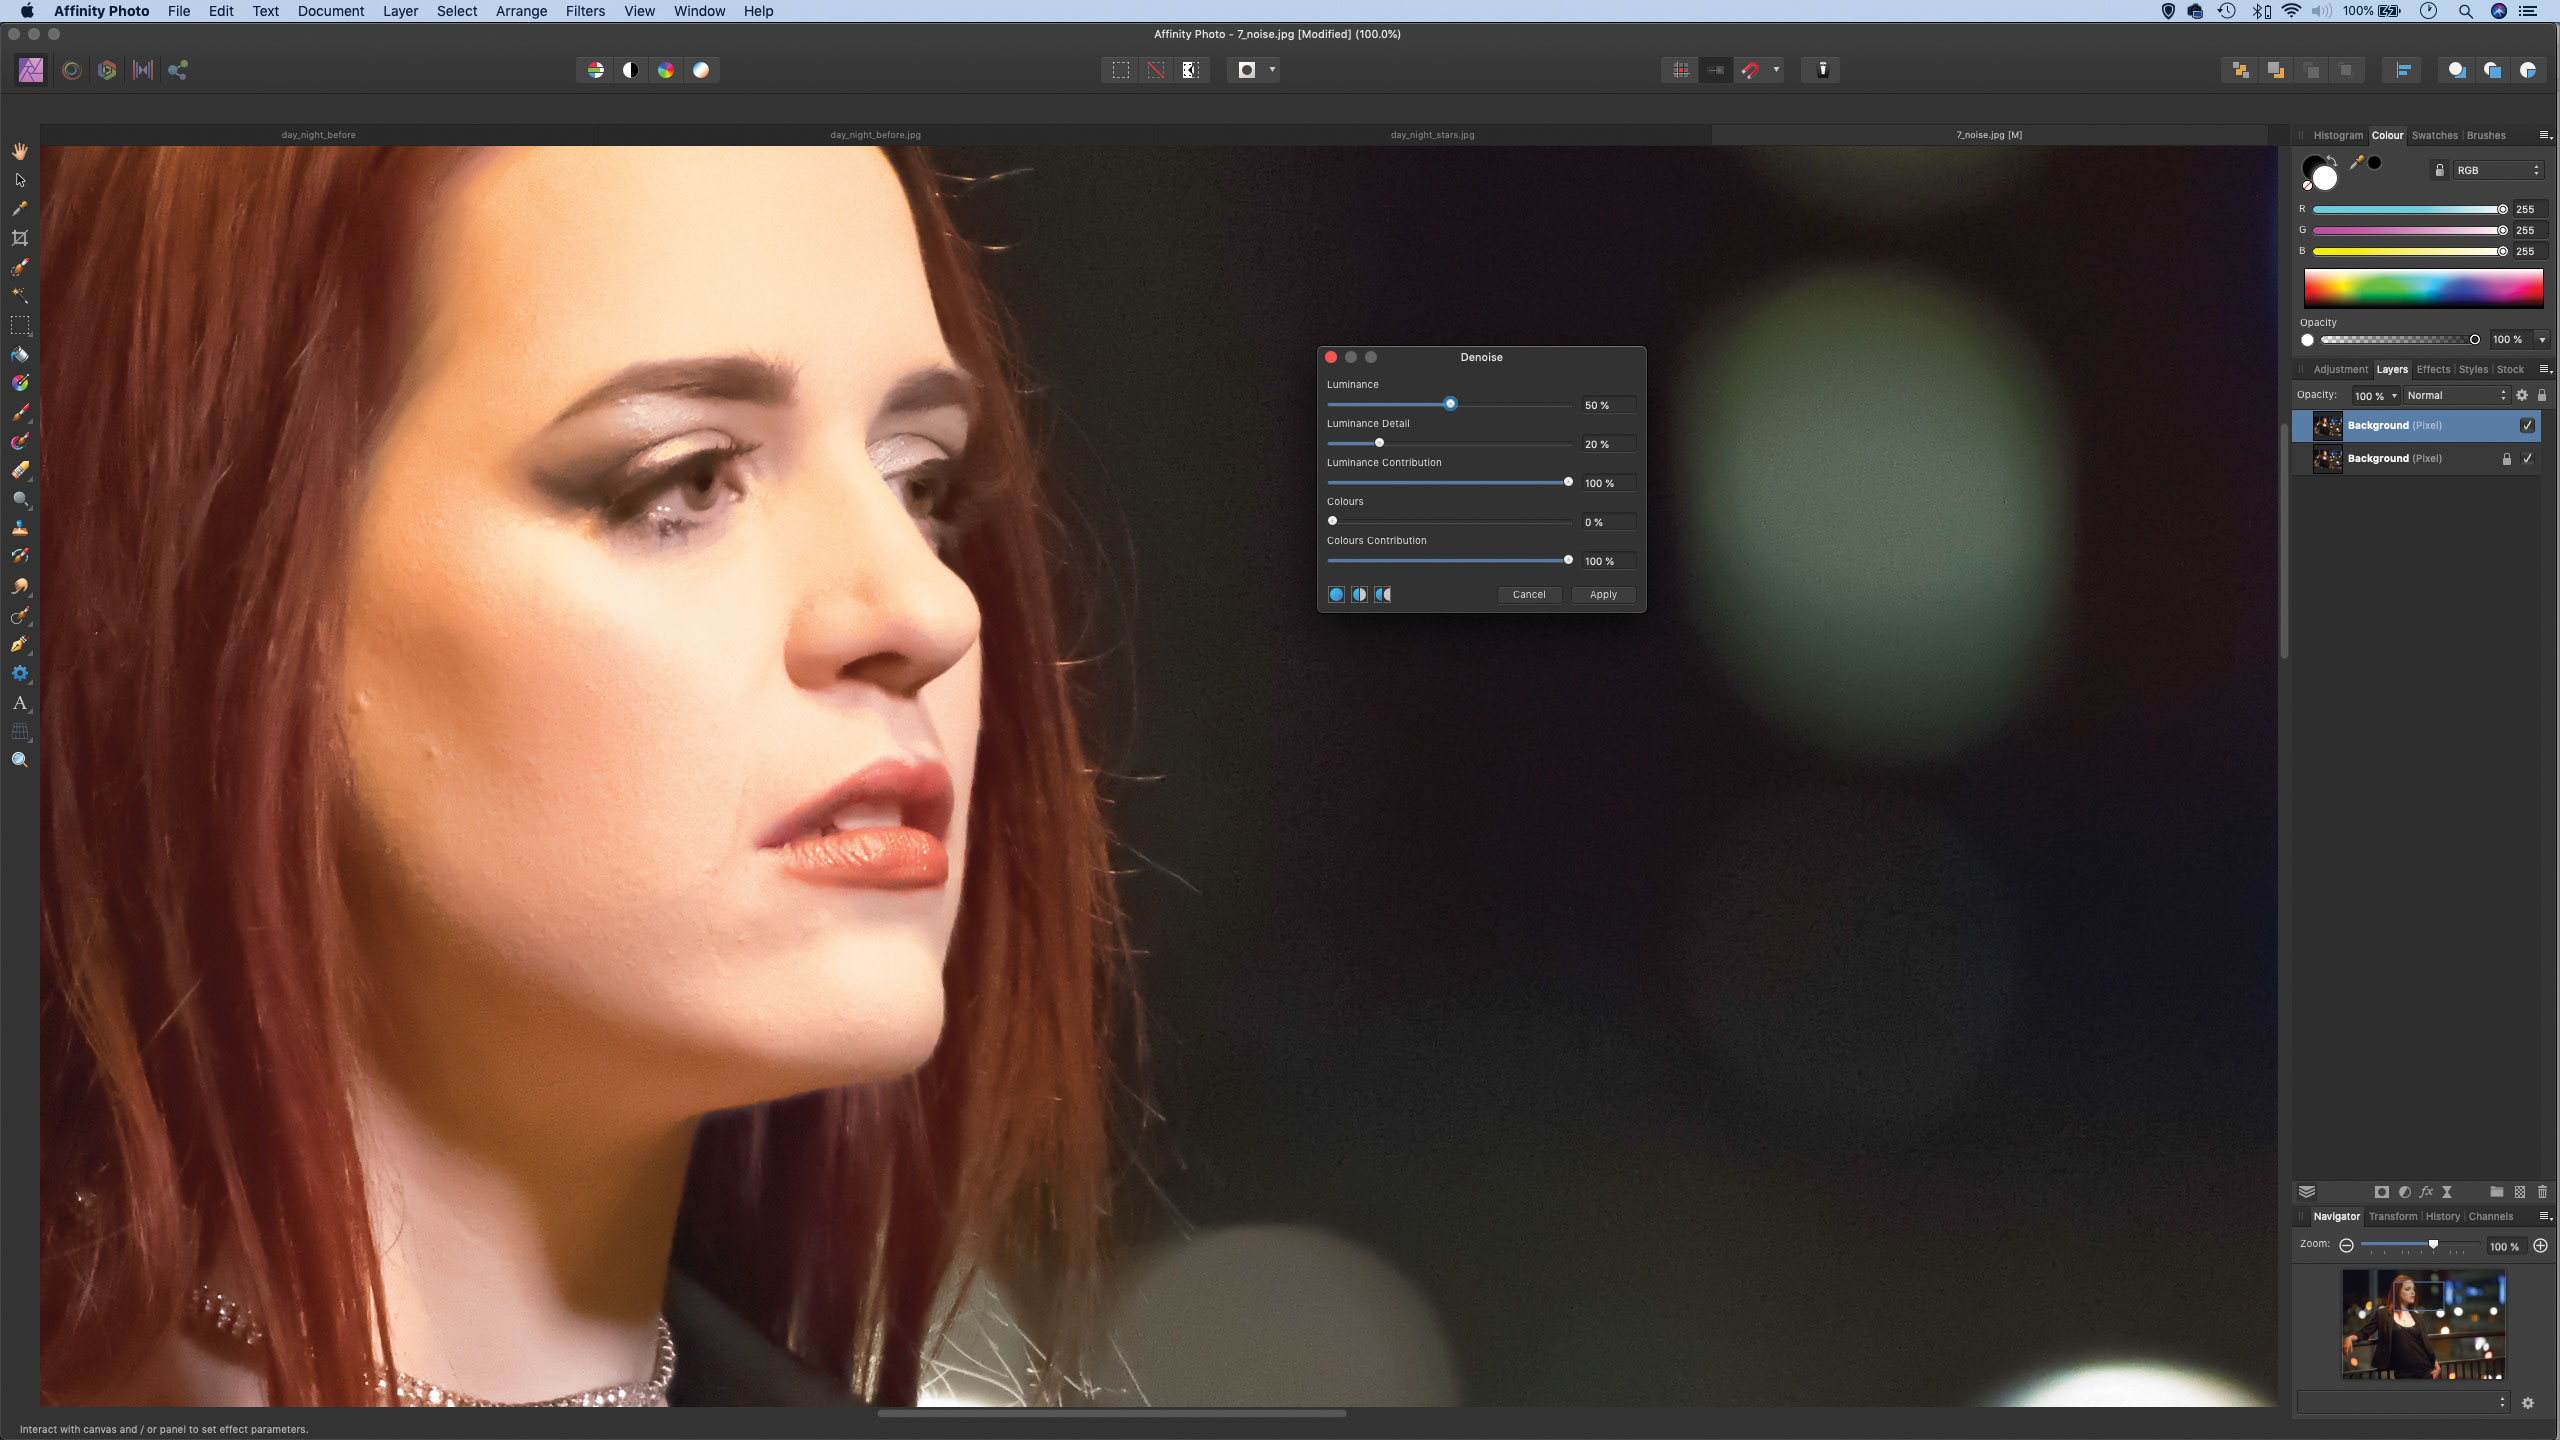
It’s best to judge noise reduction settings at an actual pixel view, so grab the Zoom tool, then right-click over the image and choose 100%. Initially our image here was very noisy as it was shot at ISO 22,800; we go to Filter > Noise > Denoise then begin adjusting the Luminance slider to fix the grainy noise.
Step 3: Fix the noise
Setting Luminance to around 50% here fixes the noise in the dark background, but at the cost of detail in the subject. Increasing the Luminance Detail slider can help to combat this, but it can also introduce artefacts into the soft areas. Instead we’ll mask out the noise reduction.
Step 4: Select the subject
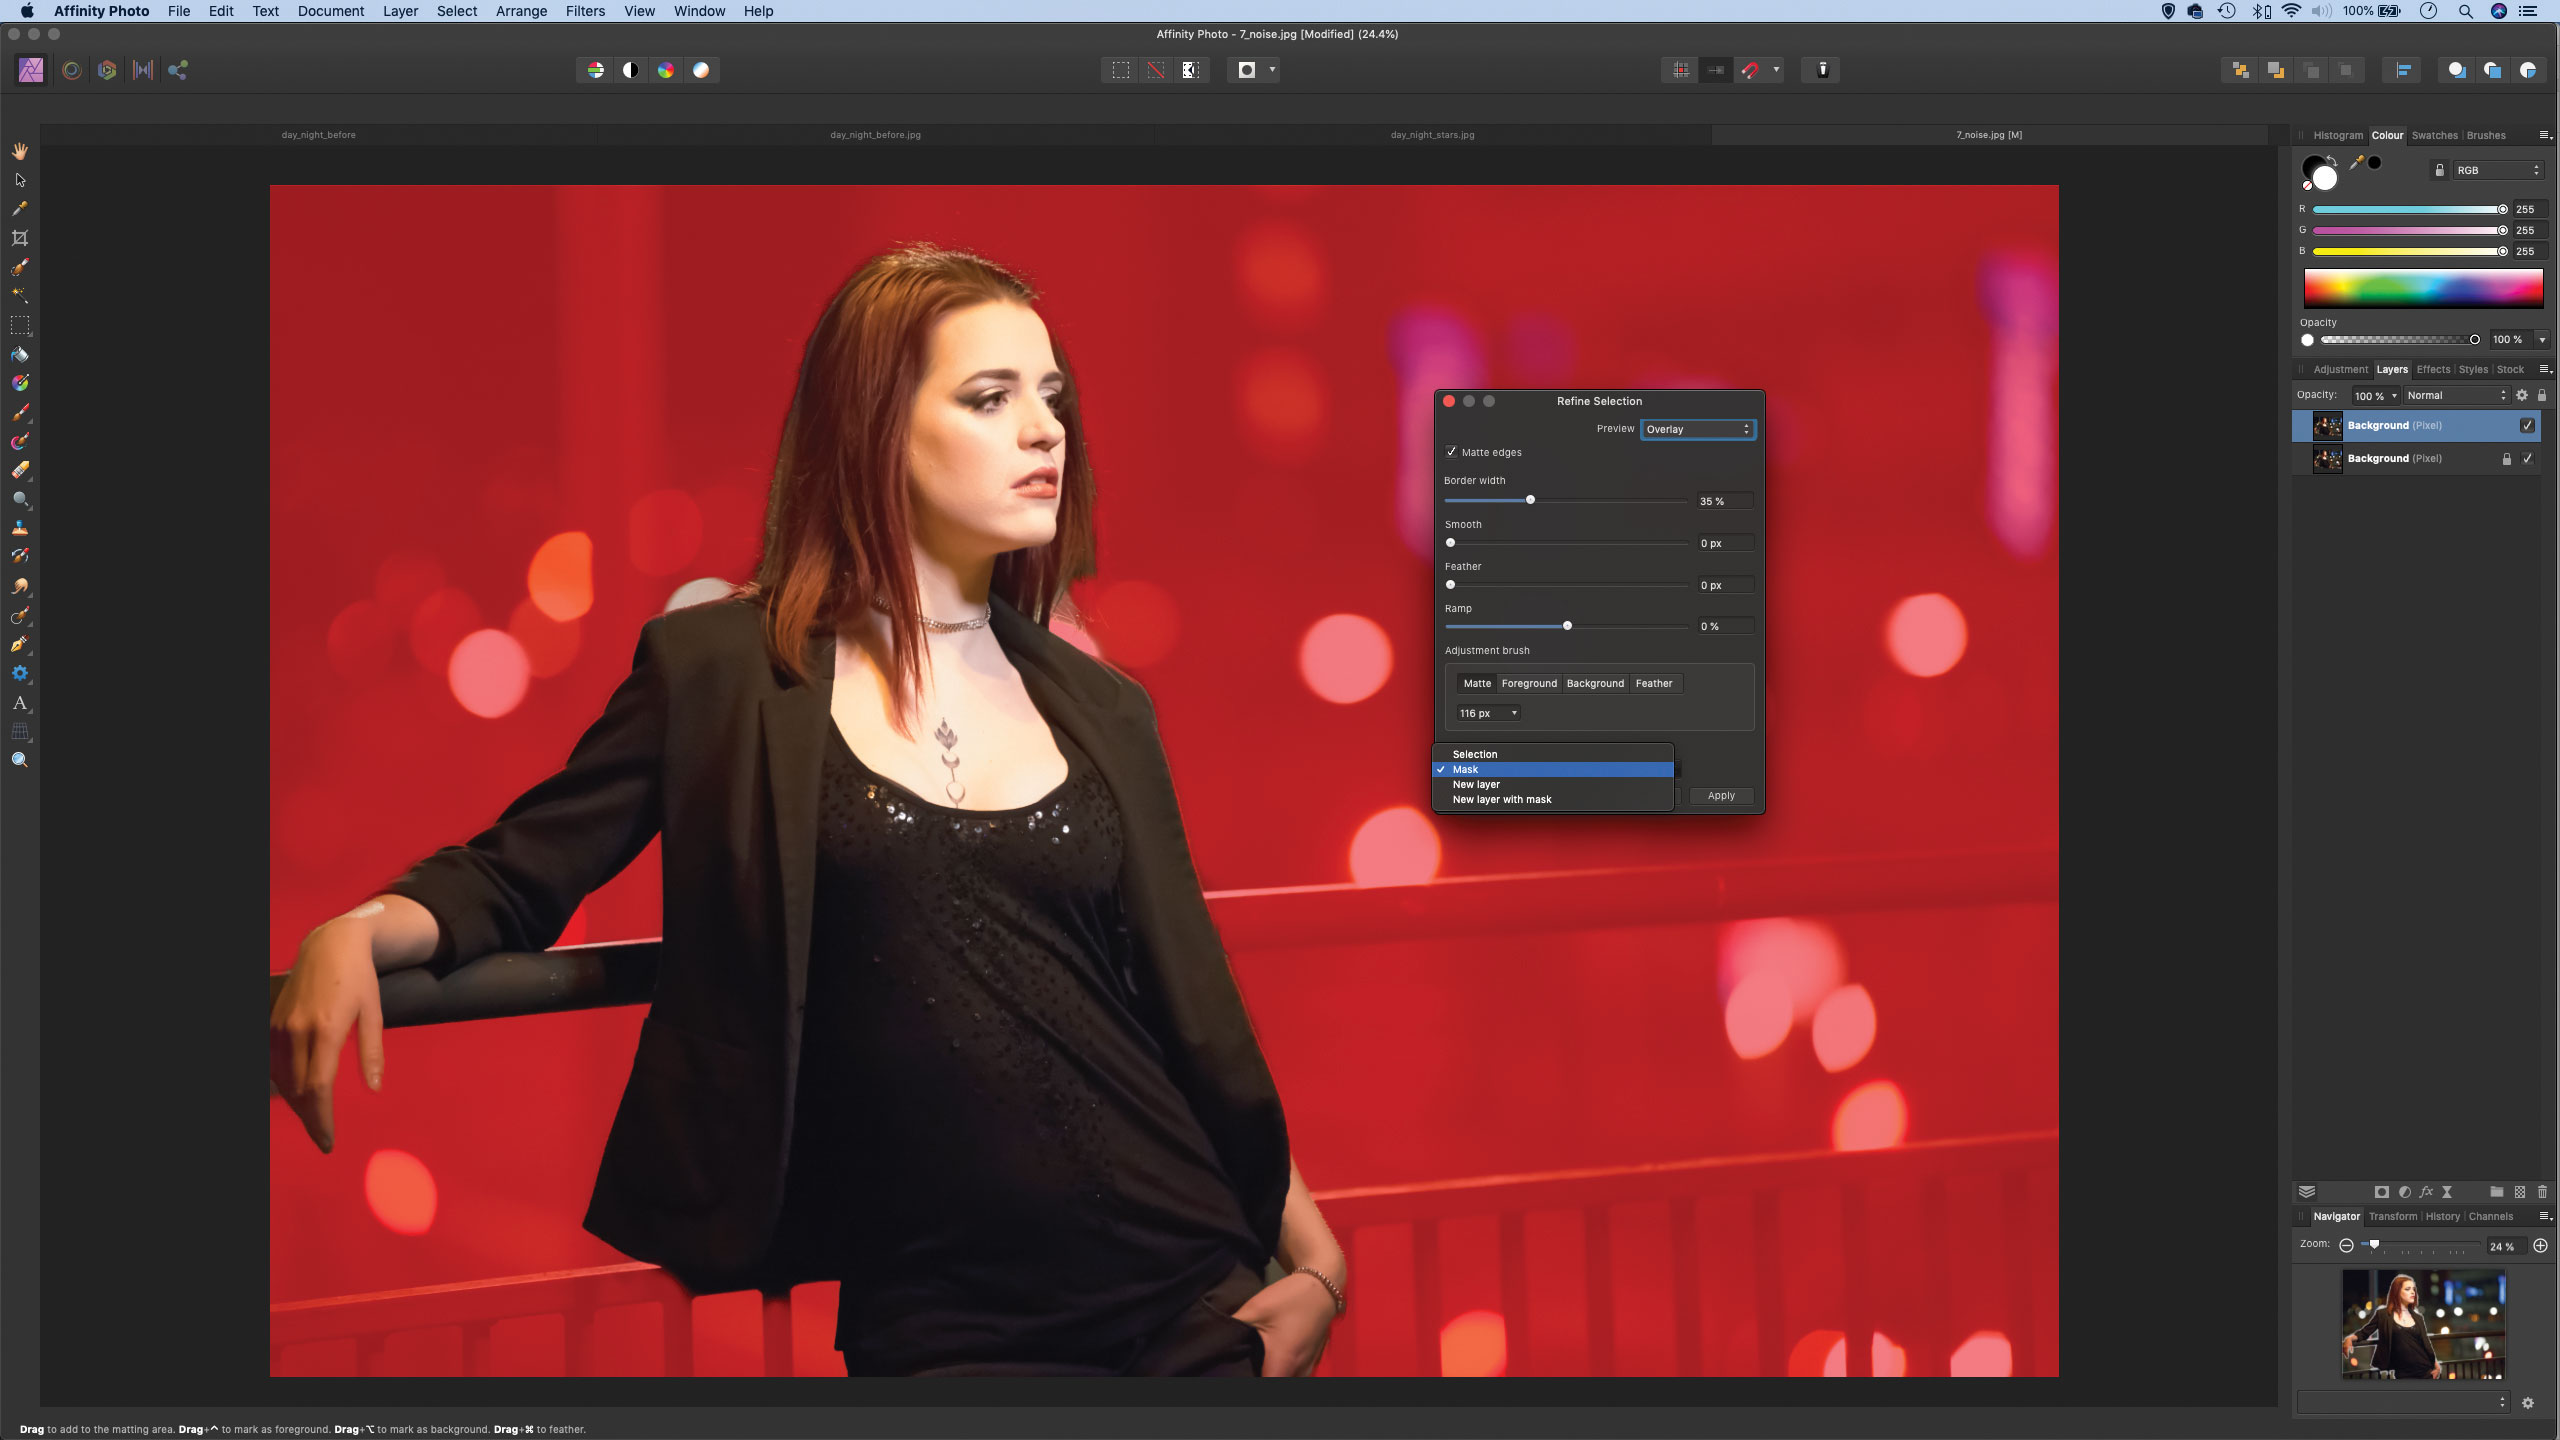
We set the Luminance to 50% and Luminance Detail to 20 then click Apply. Next, we zoom out and grab the Selection Brush tool, paint over our subject to select her, then click the Refine button and increase Border Width to roughly 35% to improve the selection edge. The we set Output: Mask and click Apply.
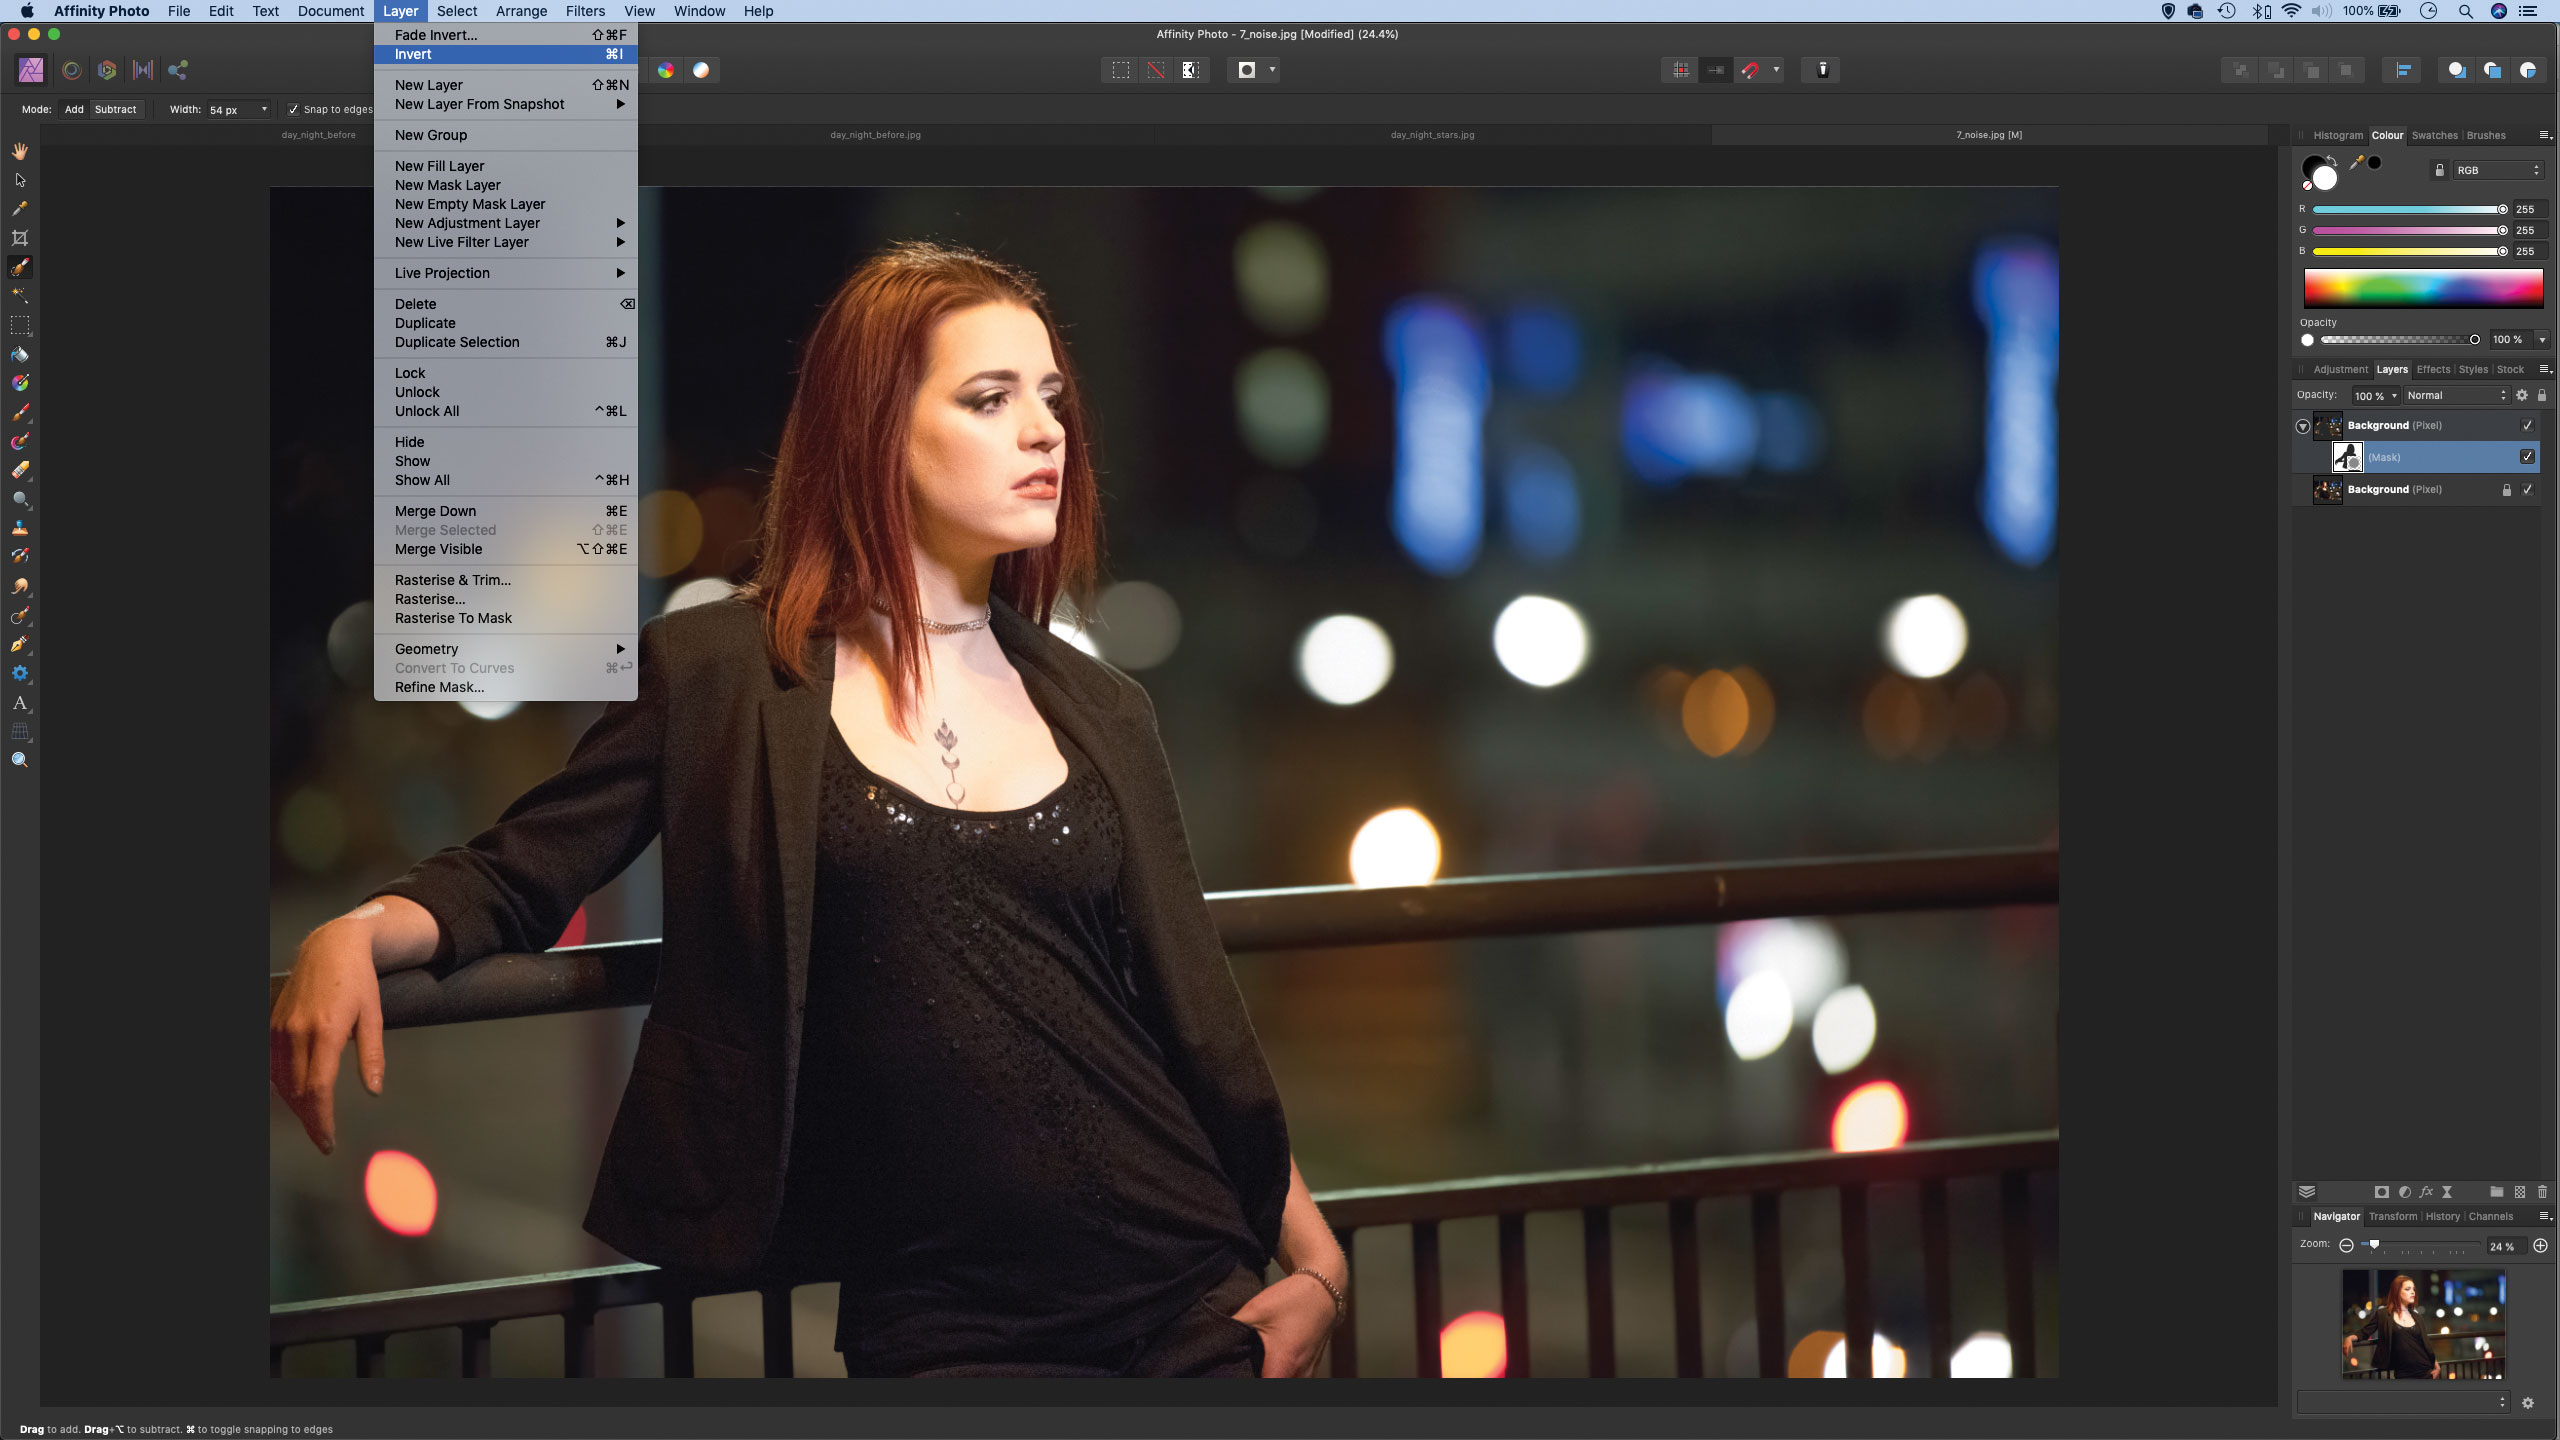
Step 5: Invert the mask
Now we go to the Layers panel, highlight the mask thumbnail on the top layer, then go to Layer>Invert, thereby hiding the effects of the noise reduction over the subject, so that it only appears over the blurry backdrop. Next, we highlight the ‘Background’ layer, then duplicate again with Cmd/Ctrl+J.
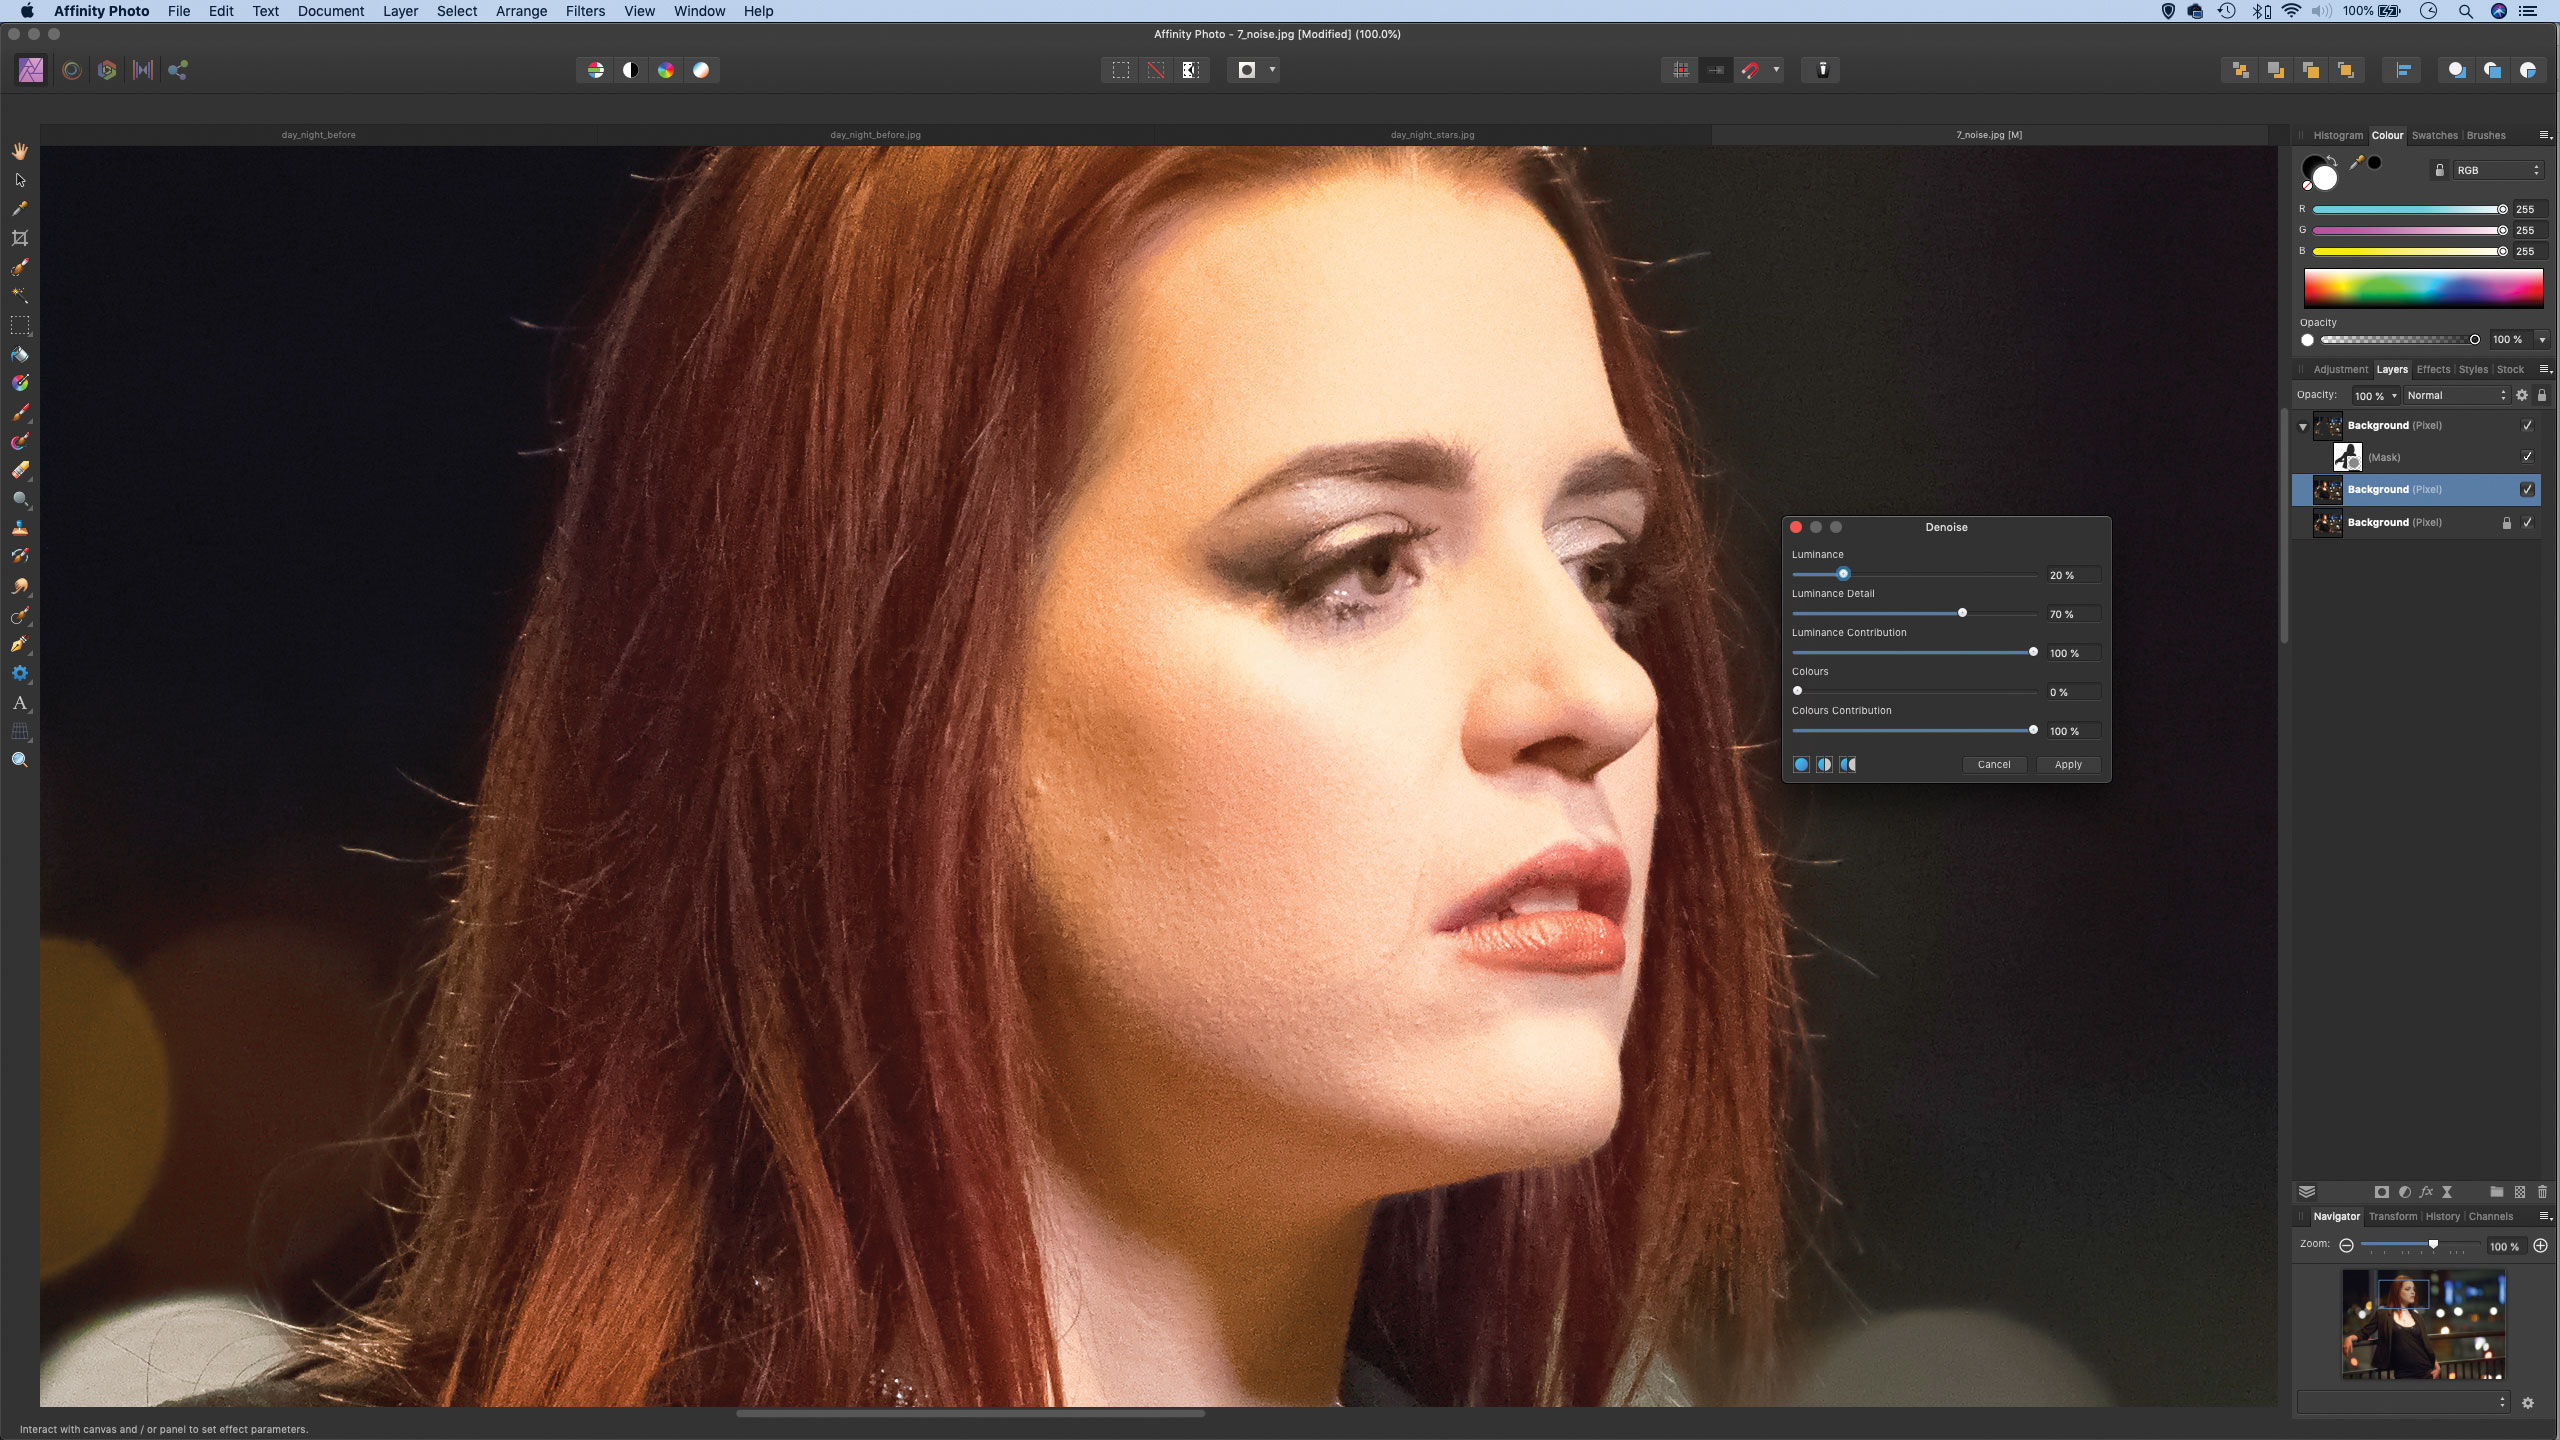
Step 6: Make a subtle fix
Finally, we highlight the middle layer, then go to Filter > Noise > Denoise and apply more subtle noise reduction – we used Luminance 20%, Luminance Detail 70%. Finally, if you like, you can paint in stronger noise reduction over the smooth areas of the subject – simply highlight the layer mask and paint white.
Quick tip
Denoise can be applied non-destructively as a Live Filter layer (go to Layer > New Live Filter) but it won’t act as strongly as if applying the noise correction directly to a pixel layer.
About N-Photo magazine
This tutorial originally appeared in N-Photo, the monthly newsstand magazine for Nikon photographers. Why not subscribe to a print edition, and have the magazine delivered direct to your door every month?
Alternatively, we have a number of different digital options available, including:
• Apple app (for iPad or iPhone)
• Zinio app (multi-platform app for desktop or smartphone)
• PocketMags (multi-platform app ideal for Android devices)
• Readly (all-you-can-eat digital magazine subscription service)
If you wanted a printed version of any of our most recent issues we have a selection of back issues to choose from in our online store.
Read more:
• Photography tips and tutorial videos
• The best photo editing tools and accessories
• The best desktop computers for photo editing
• The best photo-editing laptops right now
• The best photo editing software today
N-Photo: The Nikon Magazine is a monthly publication that's entirely dedicated to Nikon users. As a 100% independent magazine, you can be assured of unbiased opinion from a trustworthy team of devoted photography experts including editor Adam Waring and Deputy Editor Mike Harris.
Aimed at all users, from camera newcomers to working pros, every issue is packed with practical, Nikon-specific advice for taking better photos, in-depth reviews of Nikon-compatible gear, and inspiring projects and exciting video lessons for mastering camera, lens and Photoshop techniques.
Written by Nikon users for Nikon users, N-Photo is your one-stop shop for everything to do with cameras, lenses, tripods, bags, tips, tricks and techniques to get the most out of your photography.
