How to Focus Merge with Affinity Photo
Discover how to use Affinity Photo’s focus stacking command for detail-rich macro shots
The best camera deals, reviews, product advice, and unmissable photography news, direct to your inbox!
You are now subscribed
Your newsletter sign-up was successful
Watch video: Focus stacking in Affinity Photo
Start here
• Affinity Photo tutorials
The tutorials
1. Affinity Photo vs Photoshop
2. RAW editing with Affinity Photo
3. Focus merge with Affinity Photo
4. Replace a sky in Affinity Photo
5. Moody mono in Affinity Photo
6. Six Affinity Photo landscape tips
7. Color correction in Affinity Photo
8. Live Filters in Affinity Photo
9. Create a classic wet plate look
10. Remove objects in Affinity Photo
11. Paint an abstract portrait
12. Enhance skintones in Affinity Photo
13. Create HDR in Affinity Photo
14. Replace a sky in Affinity Photo
15. Affinity Photo double exposures
16. Affinity Photo Denoise tool
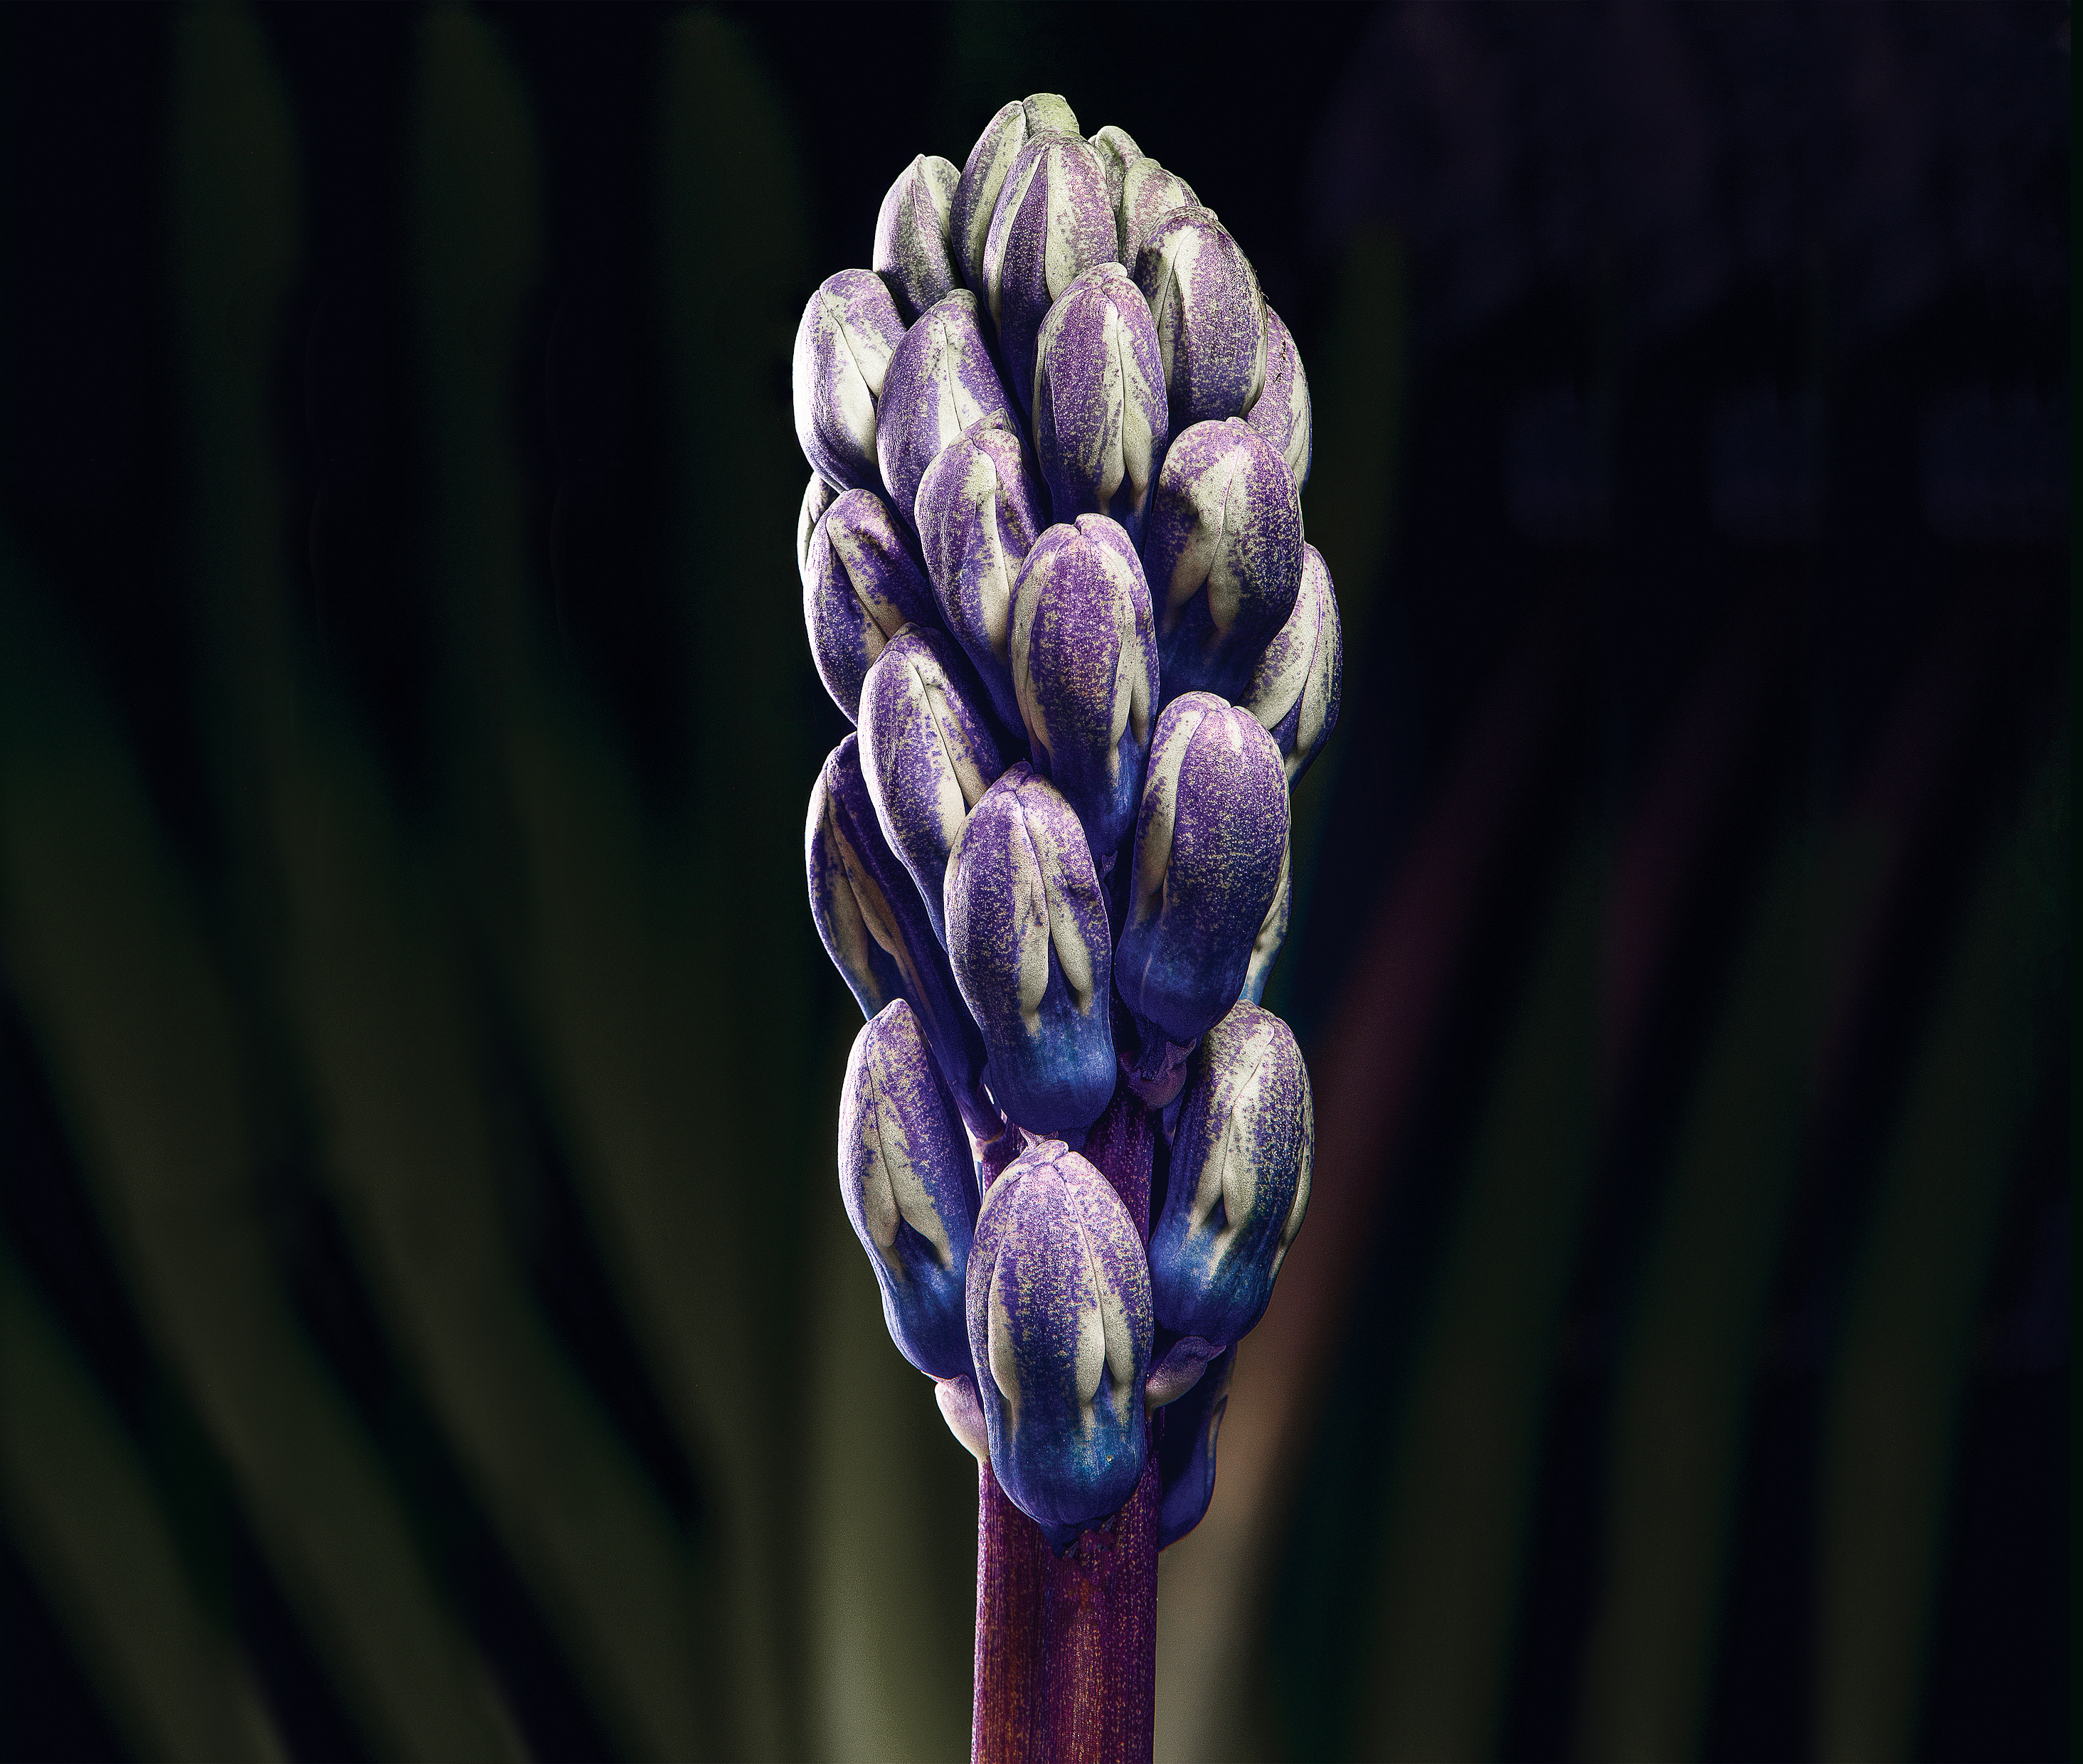
When shooting close-up macro subjects, the depth of field will be very shallow and the plane of sharpness may only stretch a few millimeters across the subject – even when using narrower apertures. So it can be a struggle to record a sharp close-up image from front to back.
Read more: Affinity Photo 1.8 review
If you need total sharpness, one of the best photography tips is to try focus stacking. This involves taking a series of shots, using a tripod-mounted camera, and adjusting the focus ring after capturing each frame so that a different part of the scene is in focus.
Once done, the sharp parts can be merged into one super-detailed macro photograph. Affinity Photo offers a powerful focus stacking tool called Focus Merge. Not only is it easy to use, it also produces excellent results most of the time. However, no focus-stacking software is perfect! So, depending on the intricacy of the image, you might see messy blurred areas once the merge is complete.
If this occurs, fixing the problem involves looking back through each image that makes up the composite and tweaking the blend so that a sharper area is targeted instead. In this project we’ll explain how it’s done…
1. Select your image set
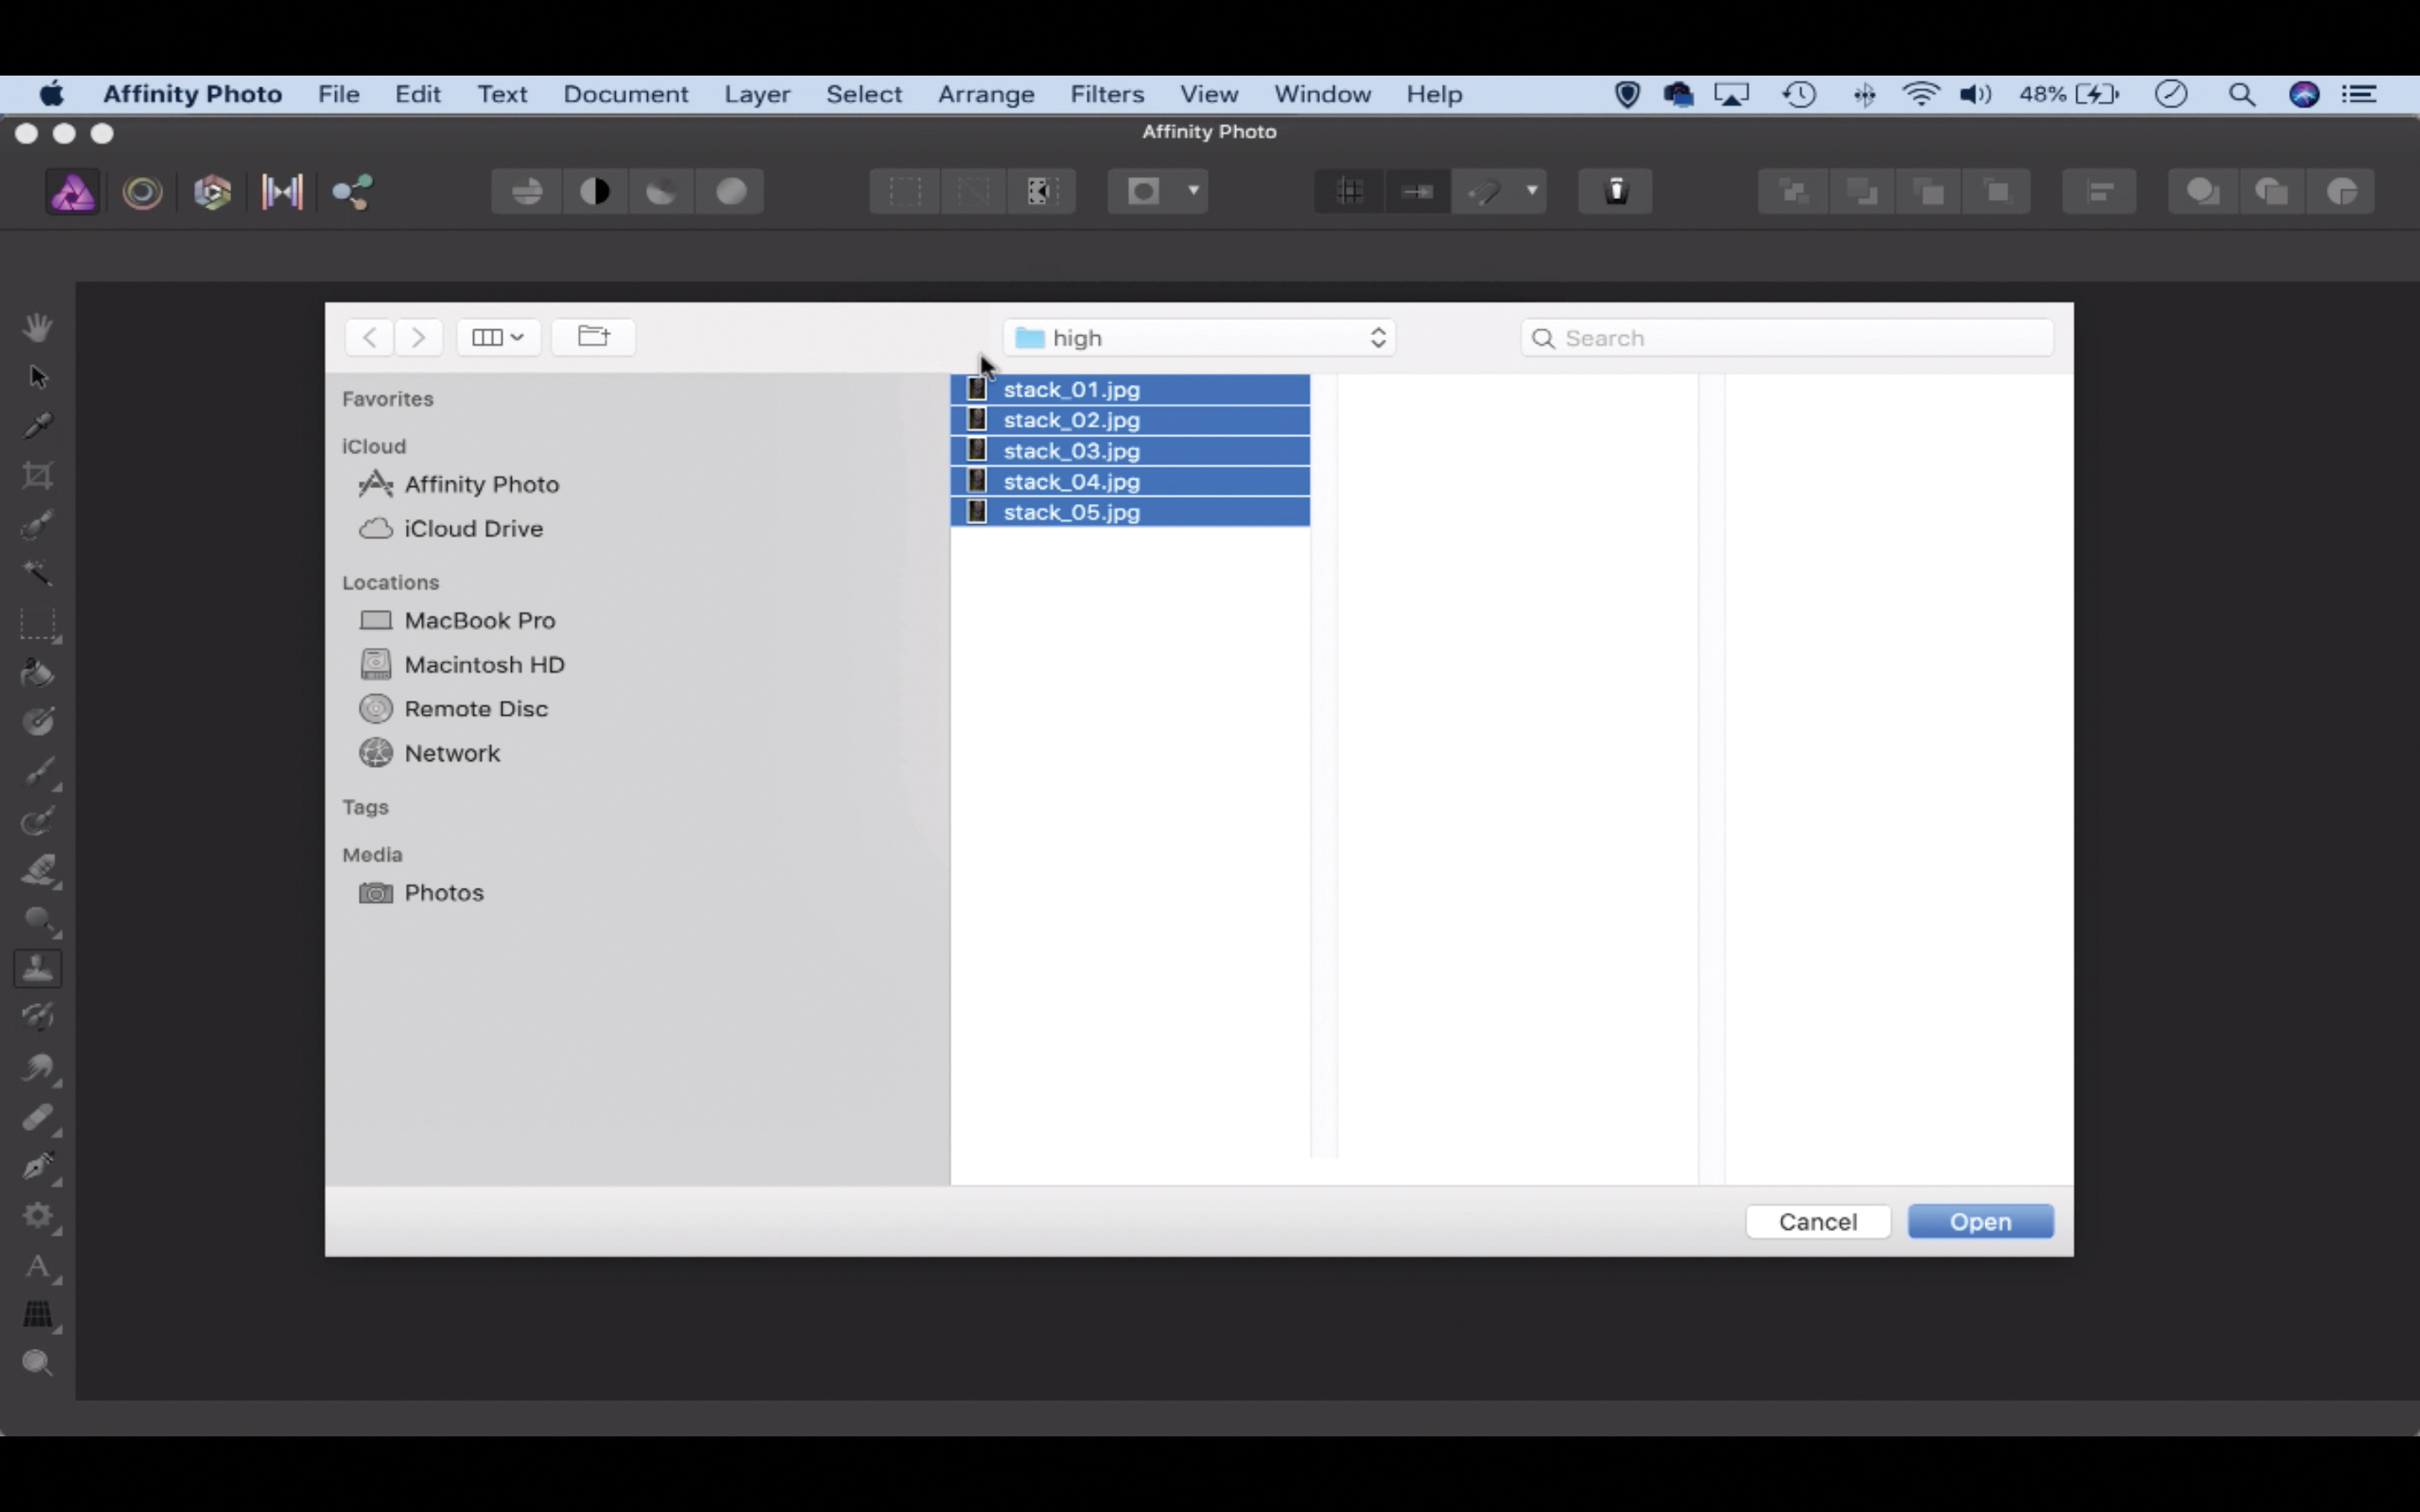
Initiating a focus merge in Affinity Photo is very easy. Simply open Affinity then go to File>New Focus Merge. Click Add in the dialog box and then navigate to your set of focus-stacked photos. Click-drag over the files to highlight them all, then hit Open to bring them into the New Merge.
The best camera deals, reviews, product advice, and unmissable photography news, direct to your inbox!
2. Start the merge
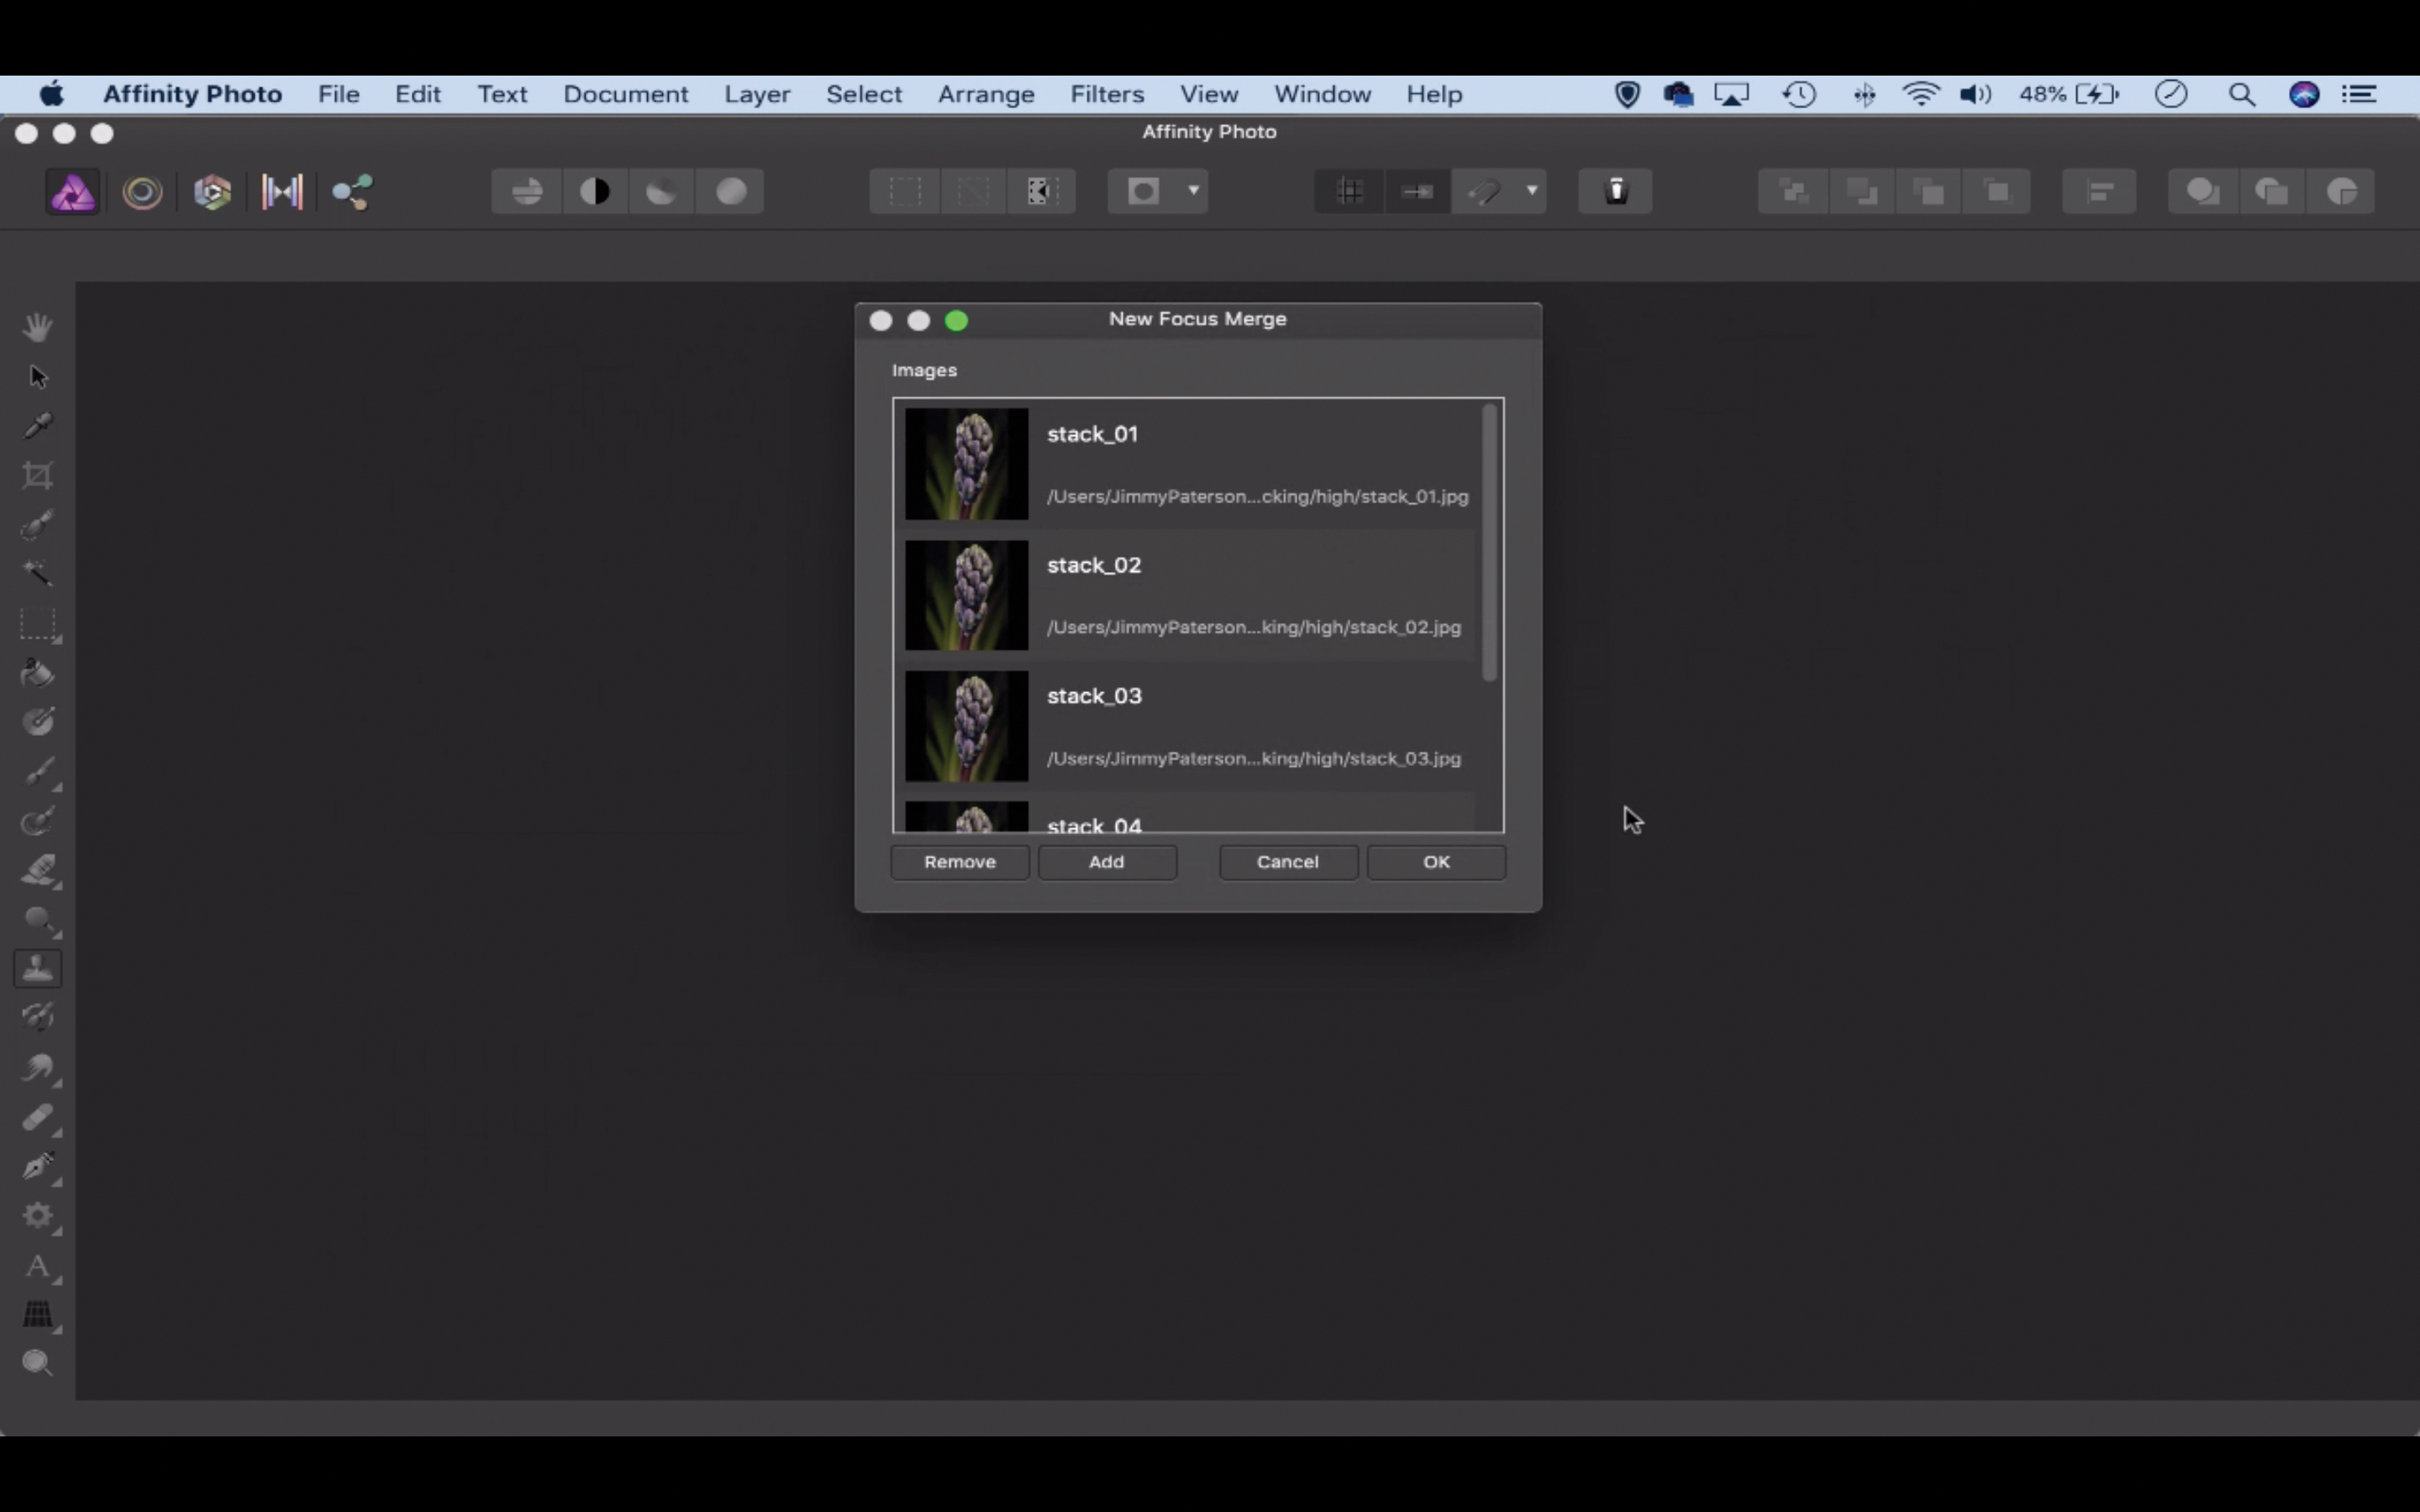
Once you’ve chosen your images, hit Merge – this may take a few moments. First the images are aligned to correct for changes in subject size between each focus shift. Next a depth map is created to seek out the sharp parts in each frame, Finally, the sharp parts are merged together into one image.
3. Check for issues
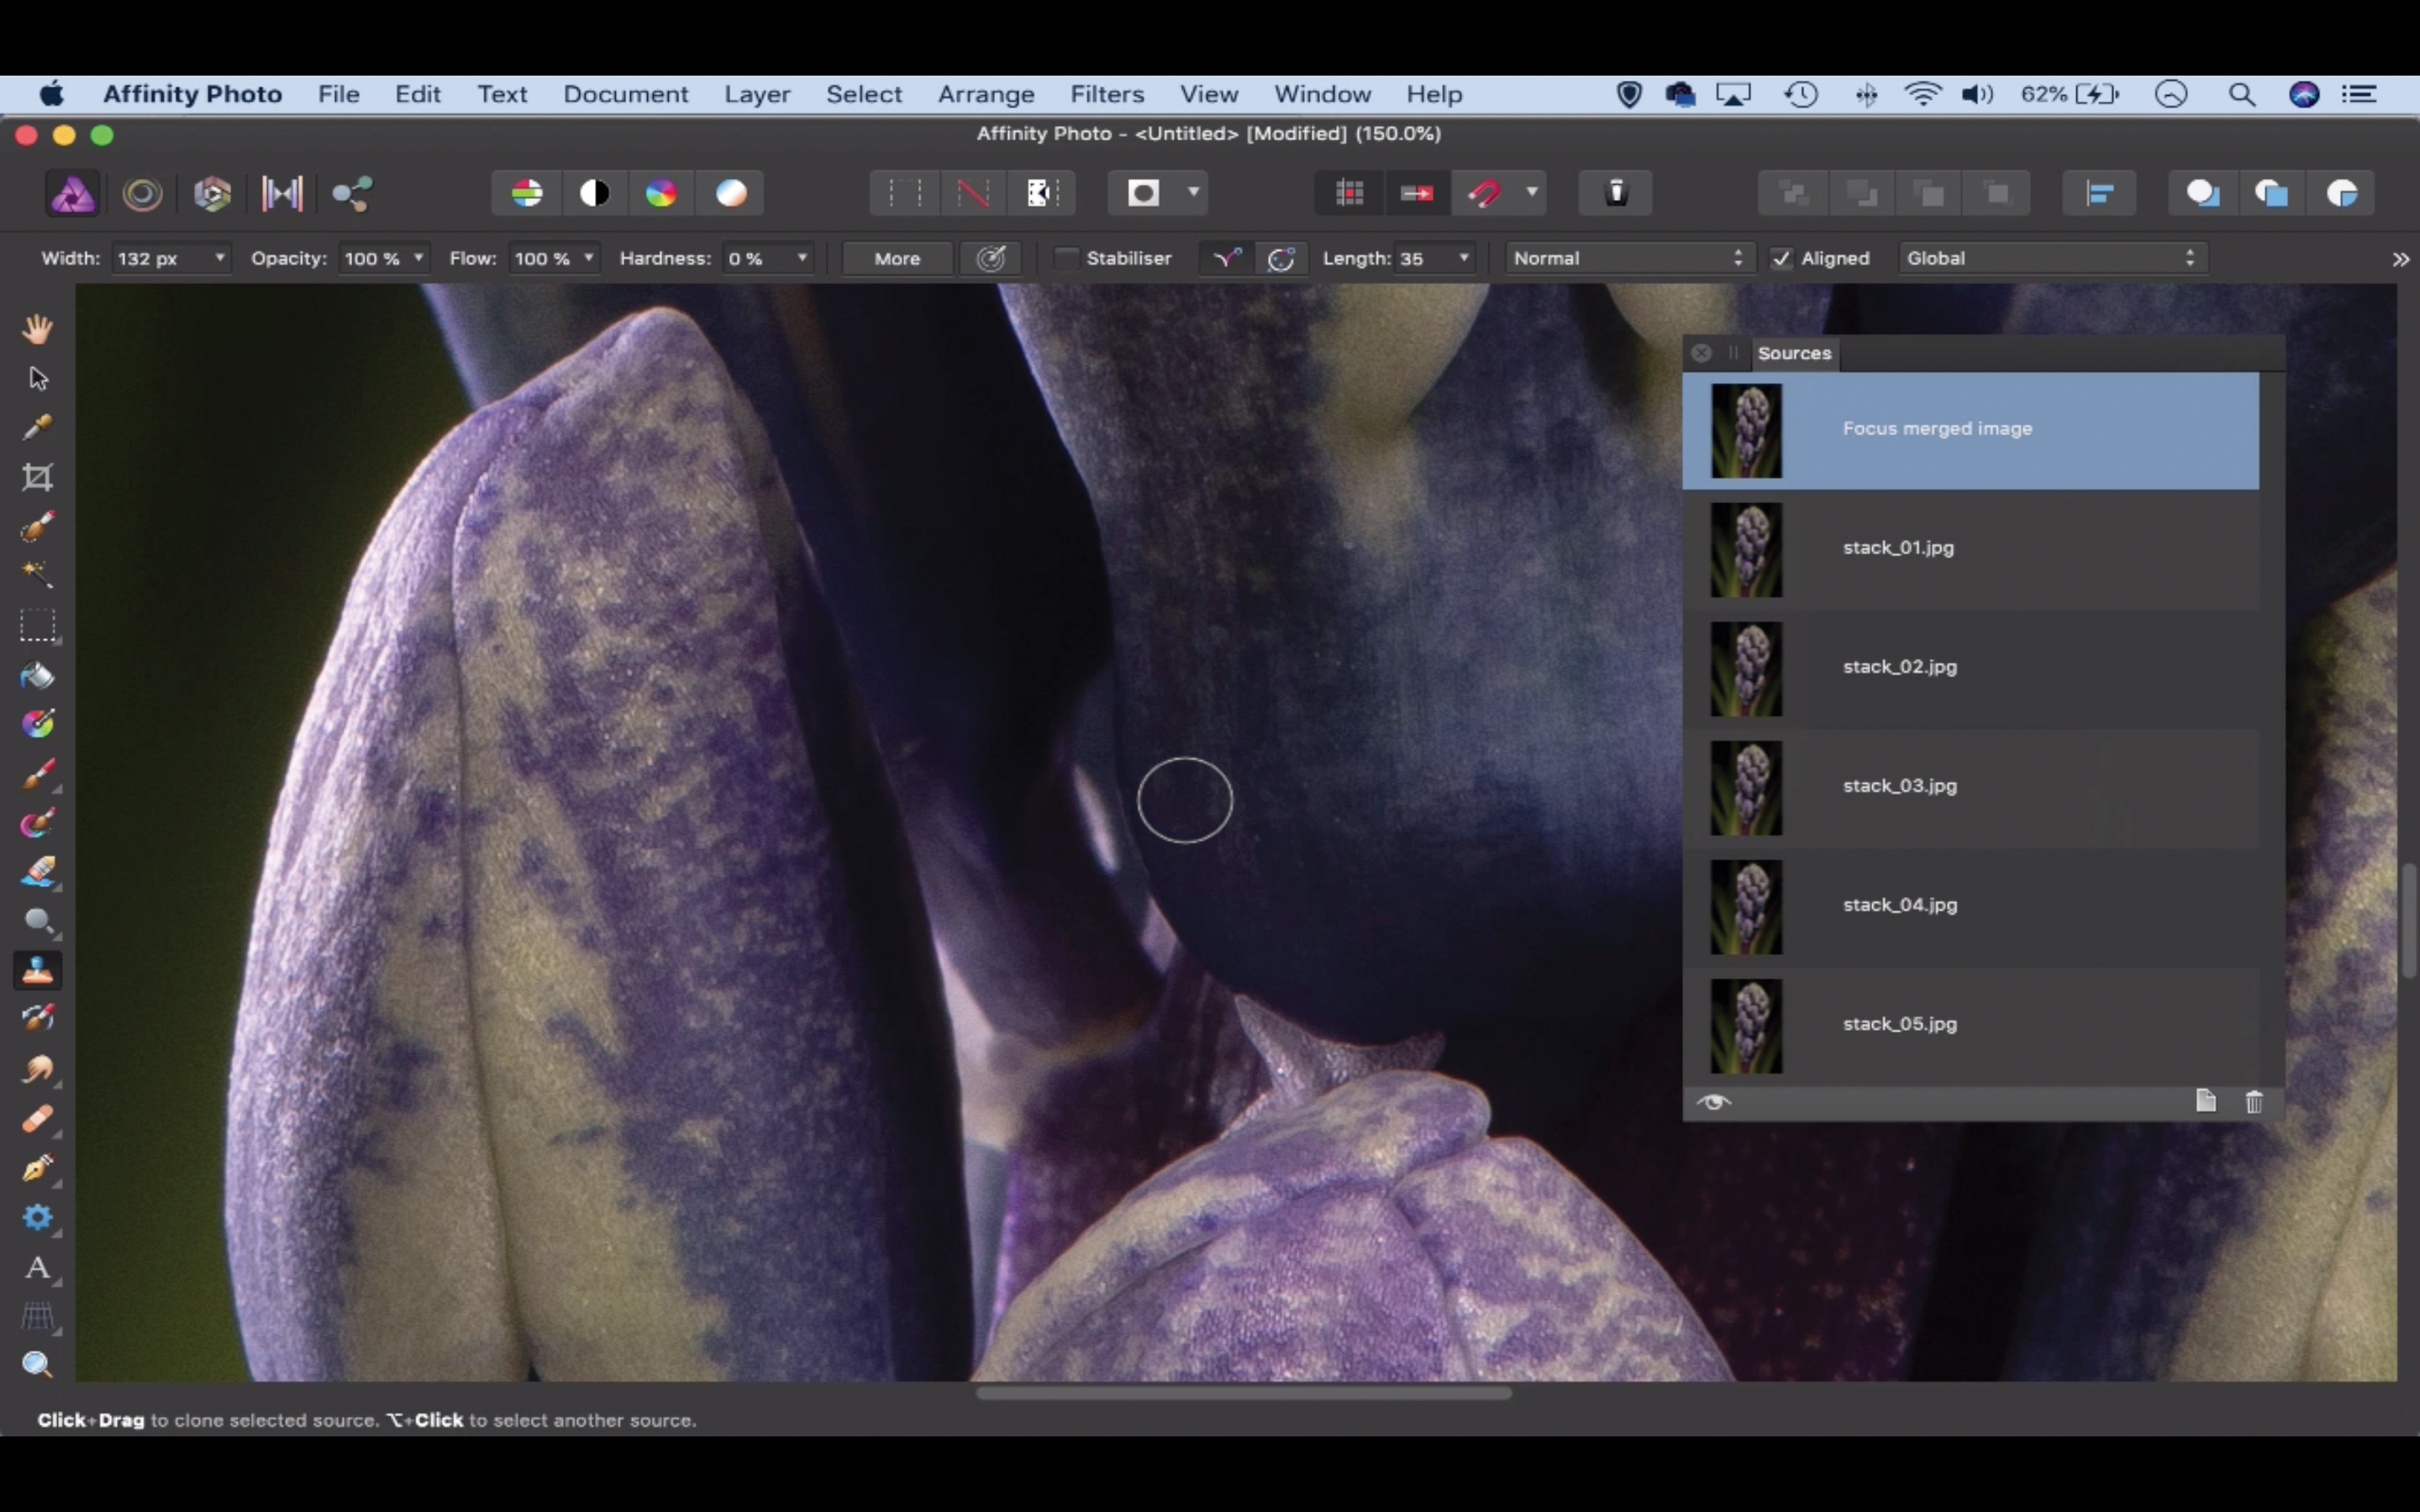
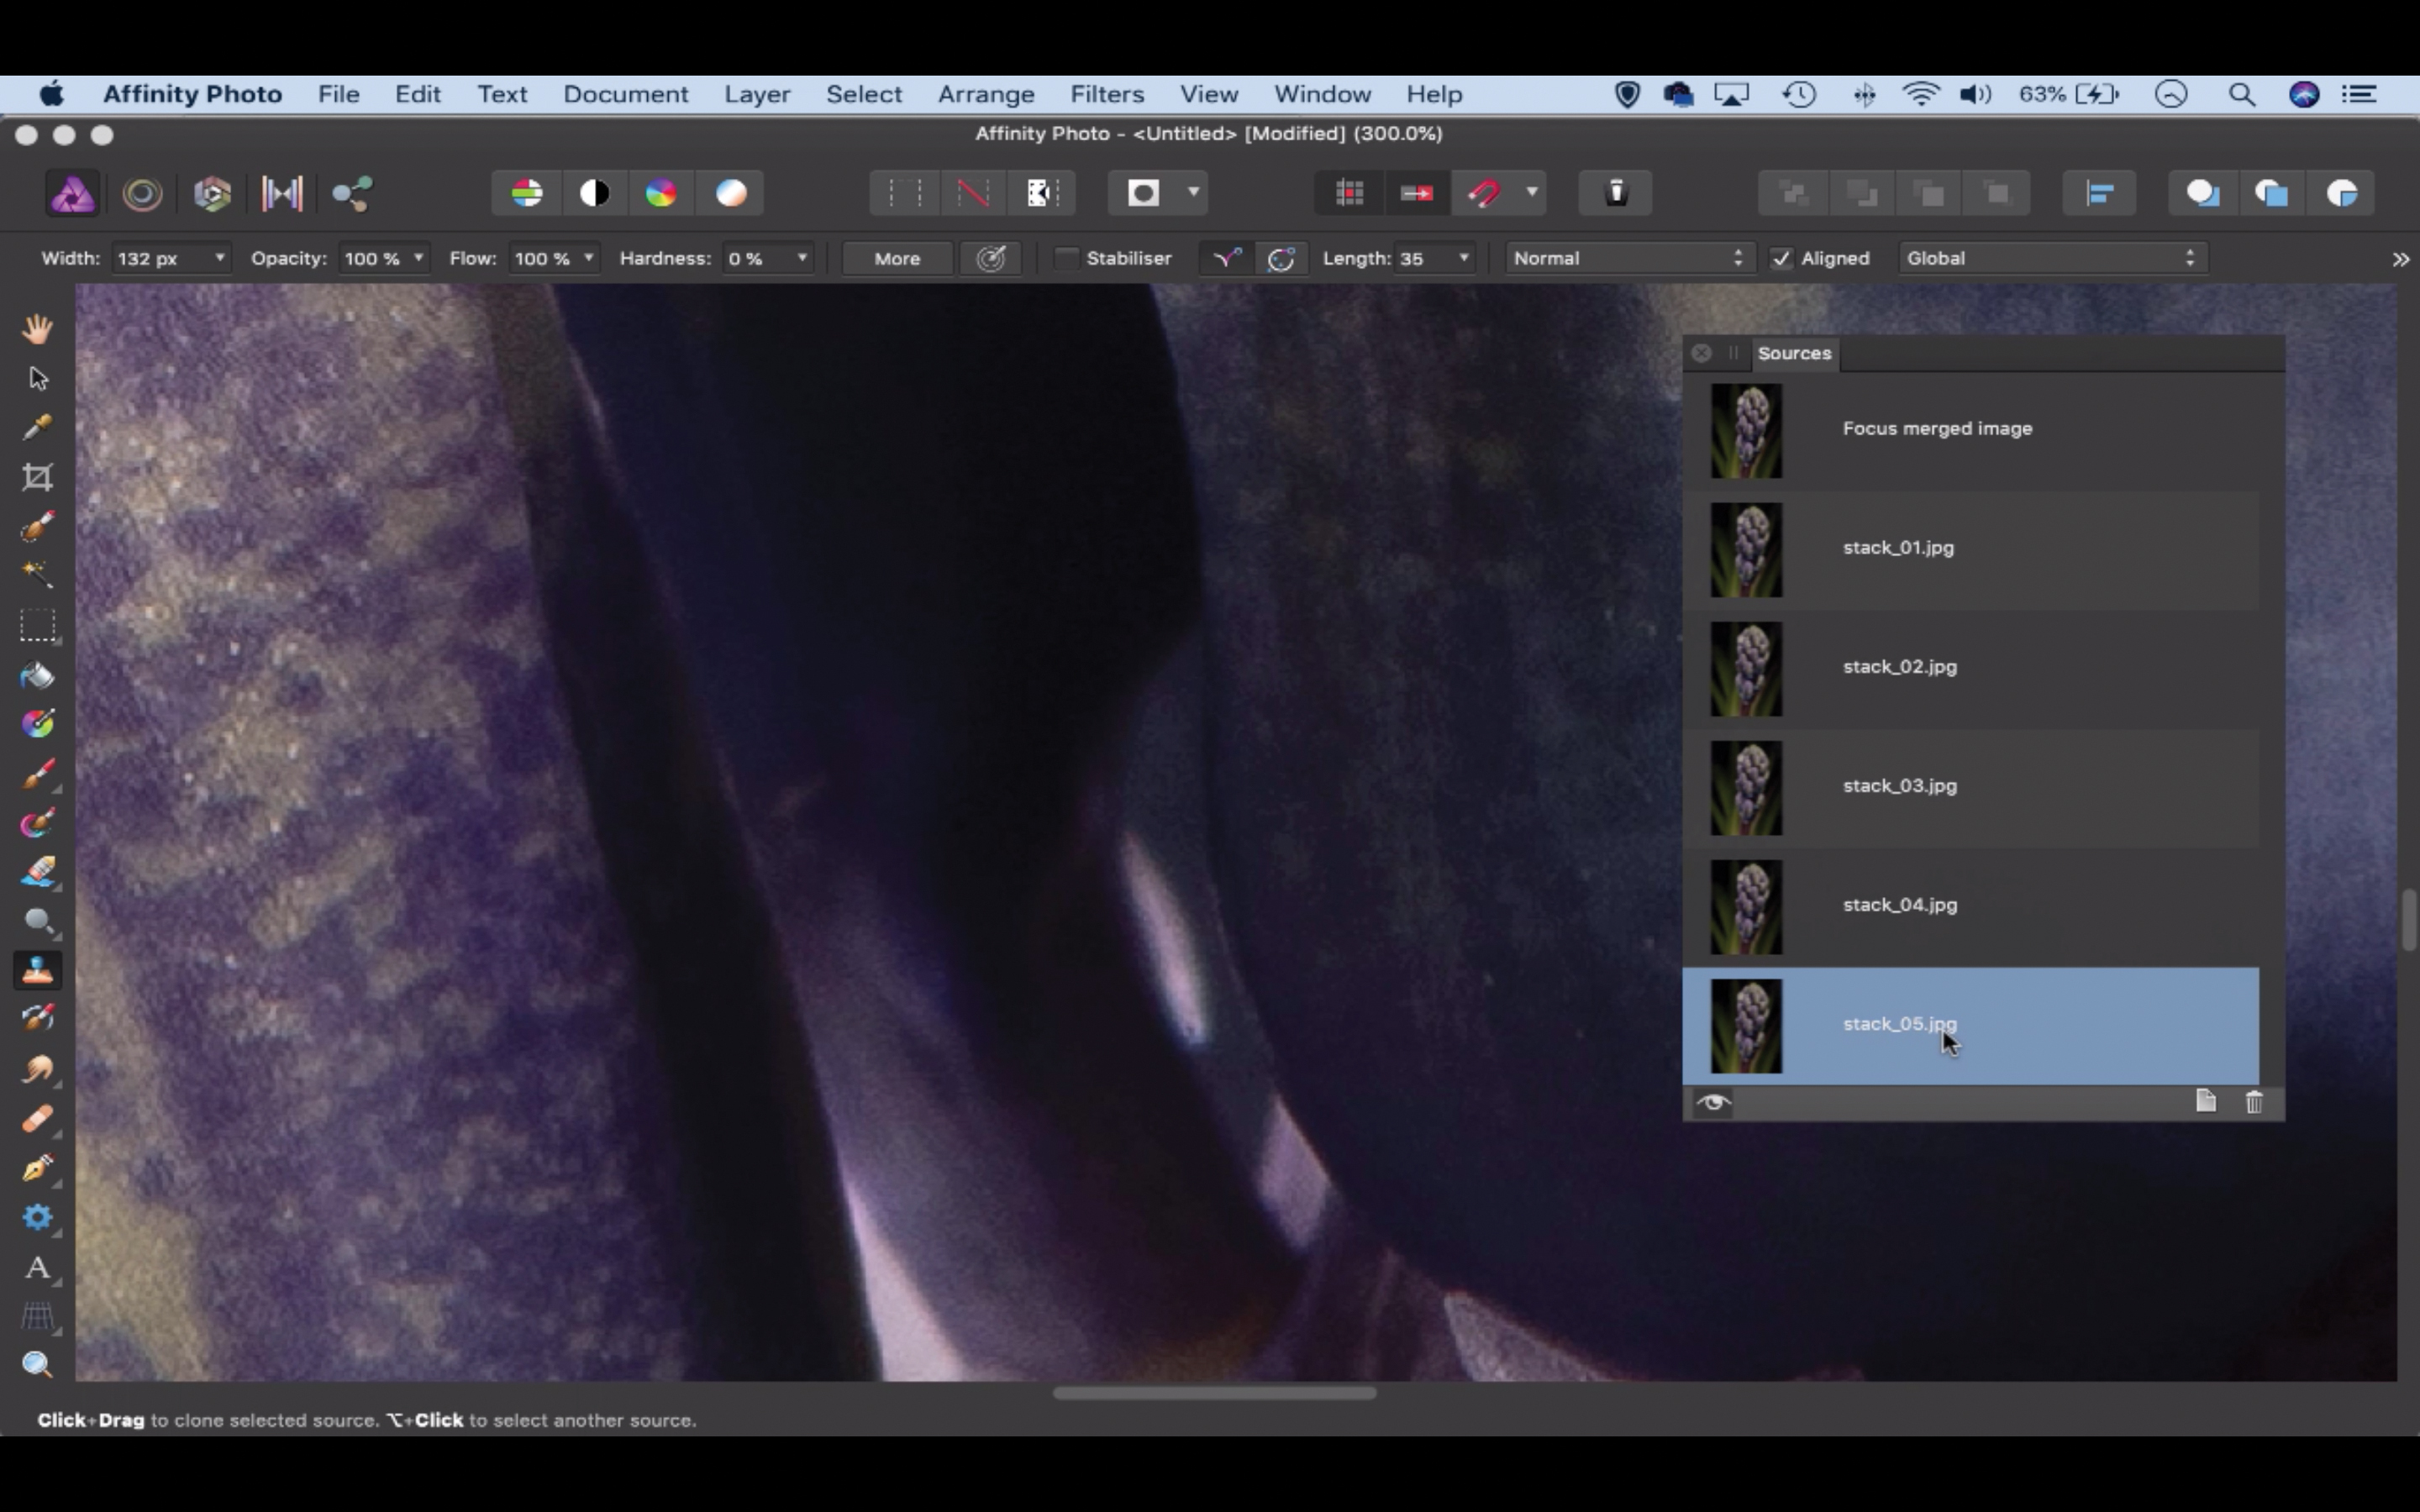
Once the merge is complete you’ll see the Sources panel appear. You can use this to manually fix any blurry areas if the merge has been unsuccessful. Zoom in close to check for problems. In this case some of the details in the plant aren’t as sharp as they could be.
4. Find sharper details
Click the Source Preview icon at the bottom left of the Sources panel to toggle it on. Now the view changes to allow you to click on each individual image that makes up the merge. Click through to determine if a sharper area exists than the one on the merged image. Here the bottom image offers a slightly sharper edge to the plant.
5. Clone the edges
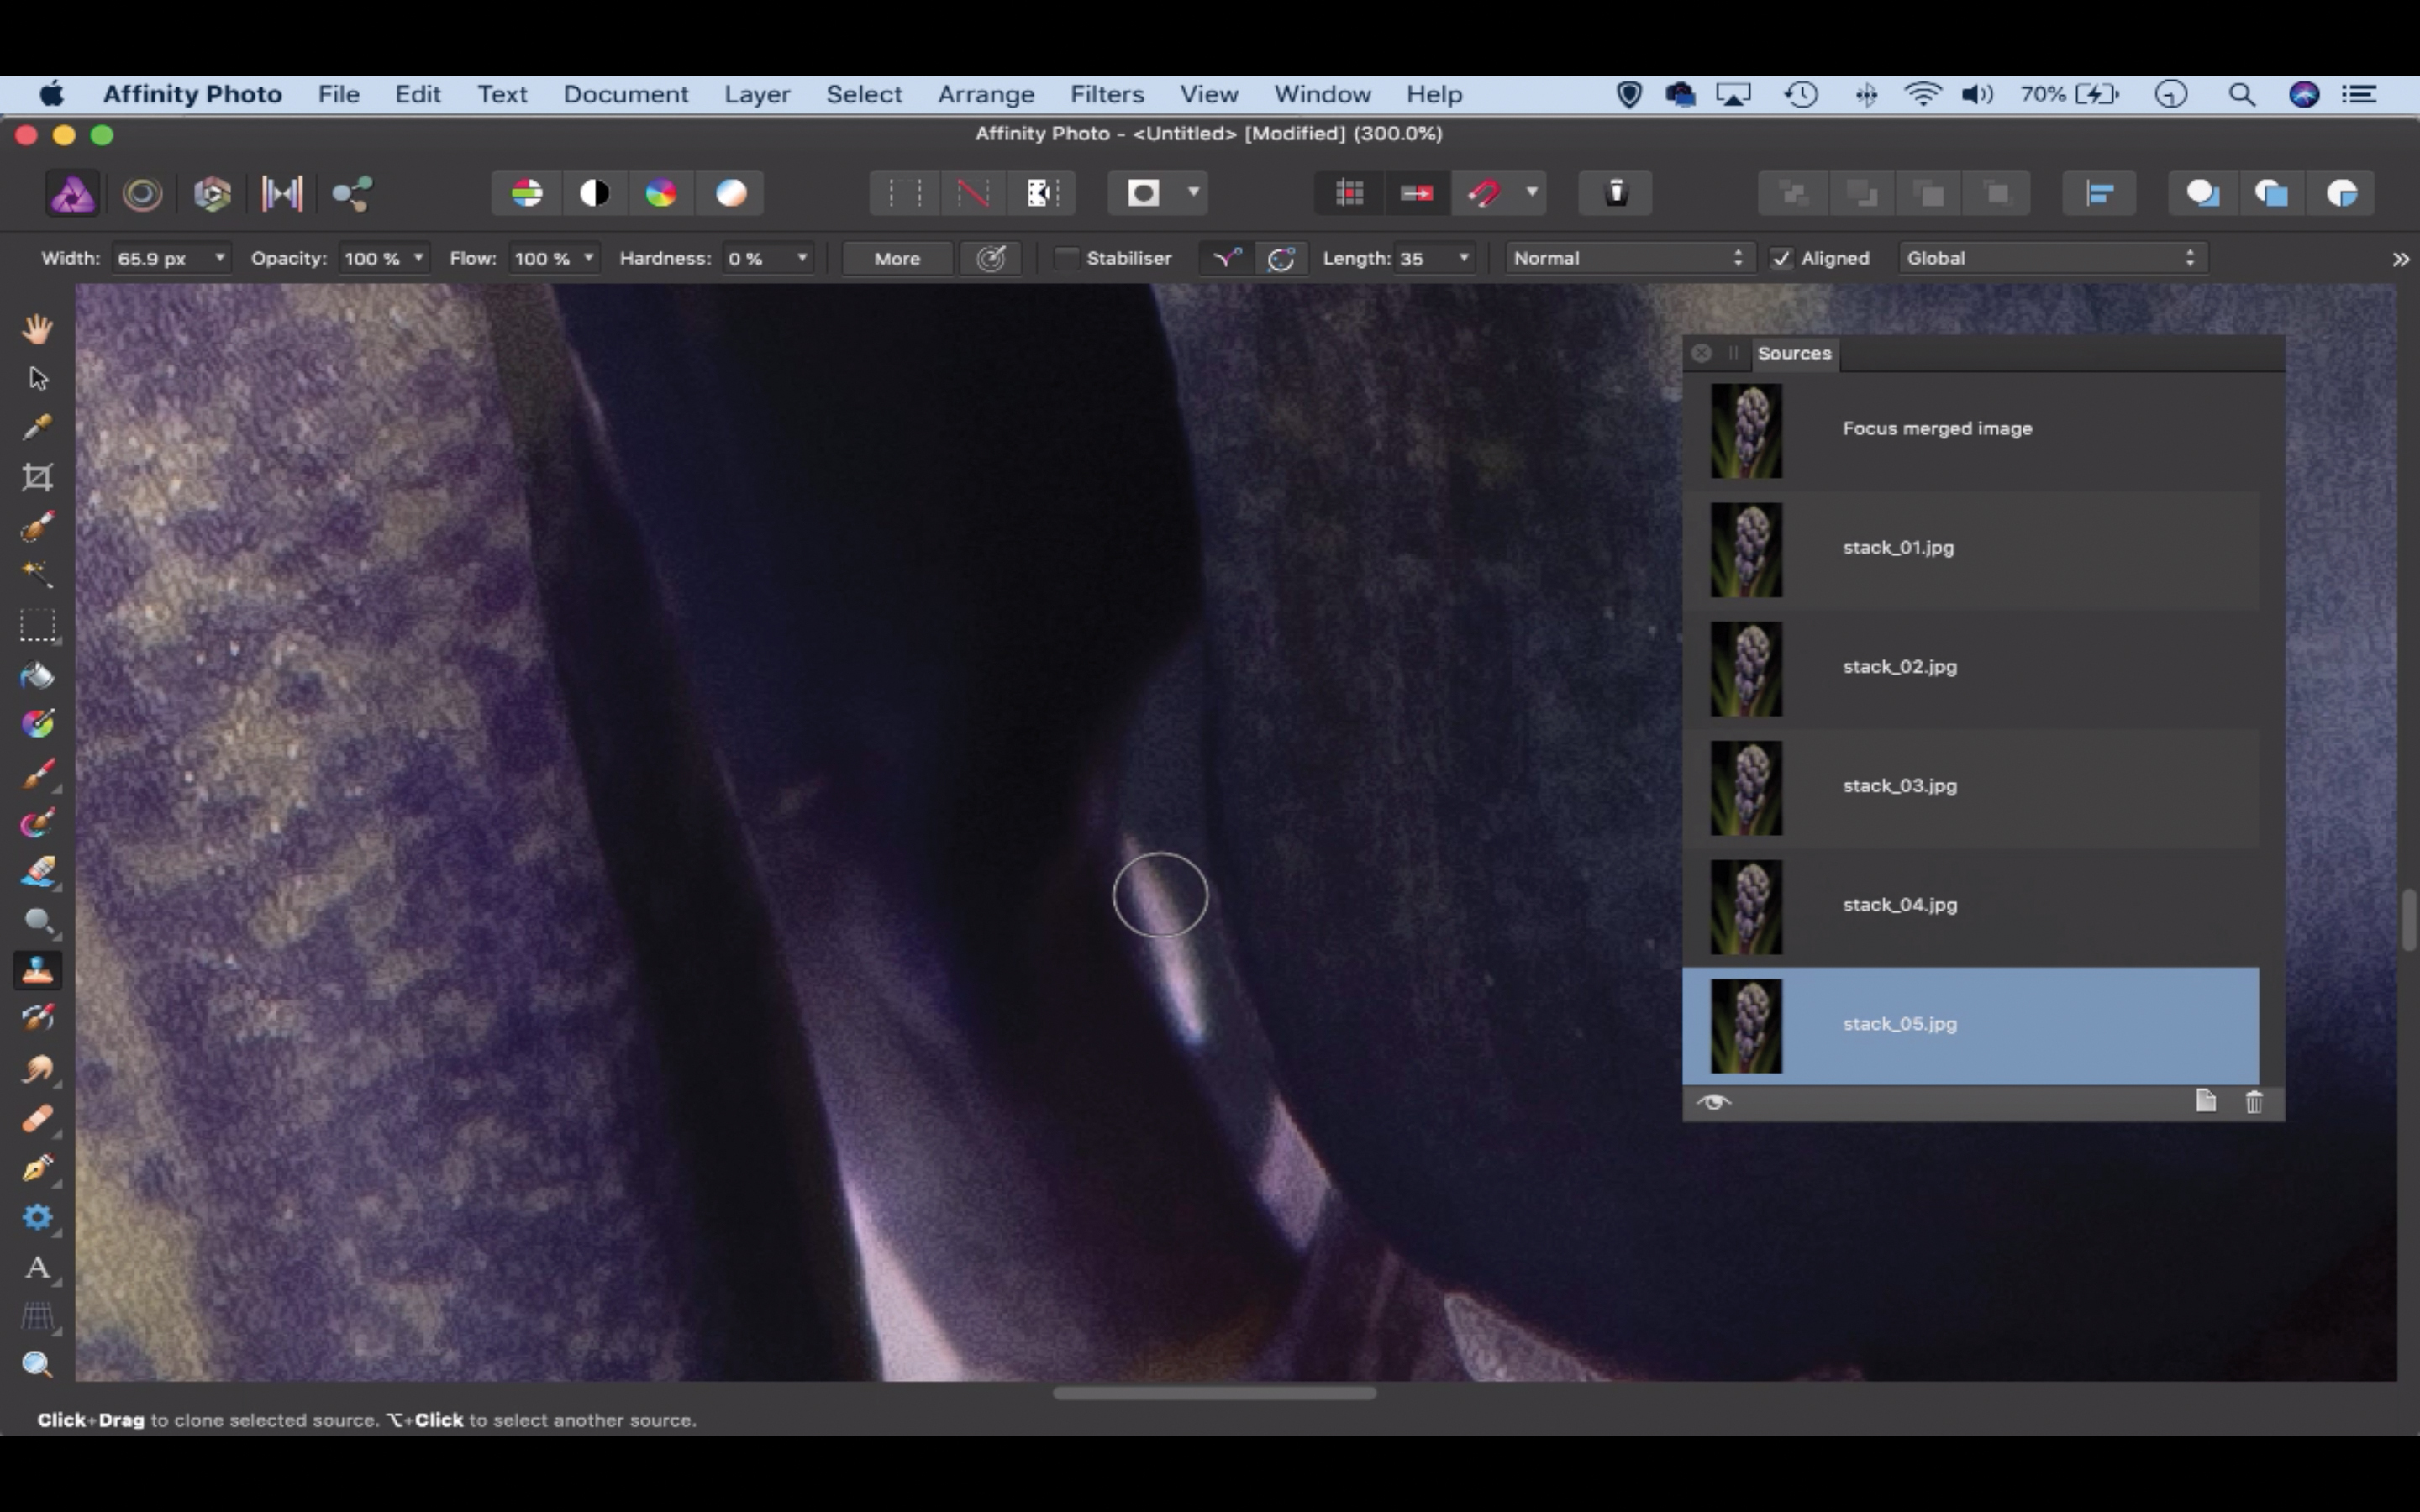
Highlight the photograph in the Sources panel that contains the sharper area, then click the Source Preview icon again to return to the merged view. Next, grab the Clone tool and set Opacity to 100, then paint over the blurry area to fix it by cloning from the other image in the Sources panel.
6. Sharpen the details
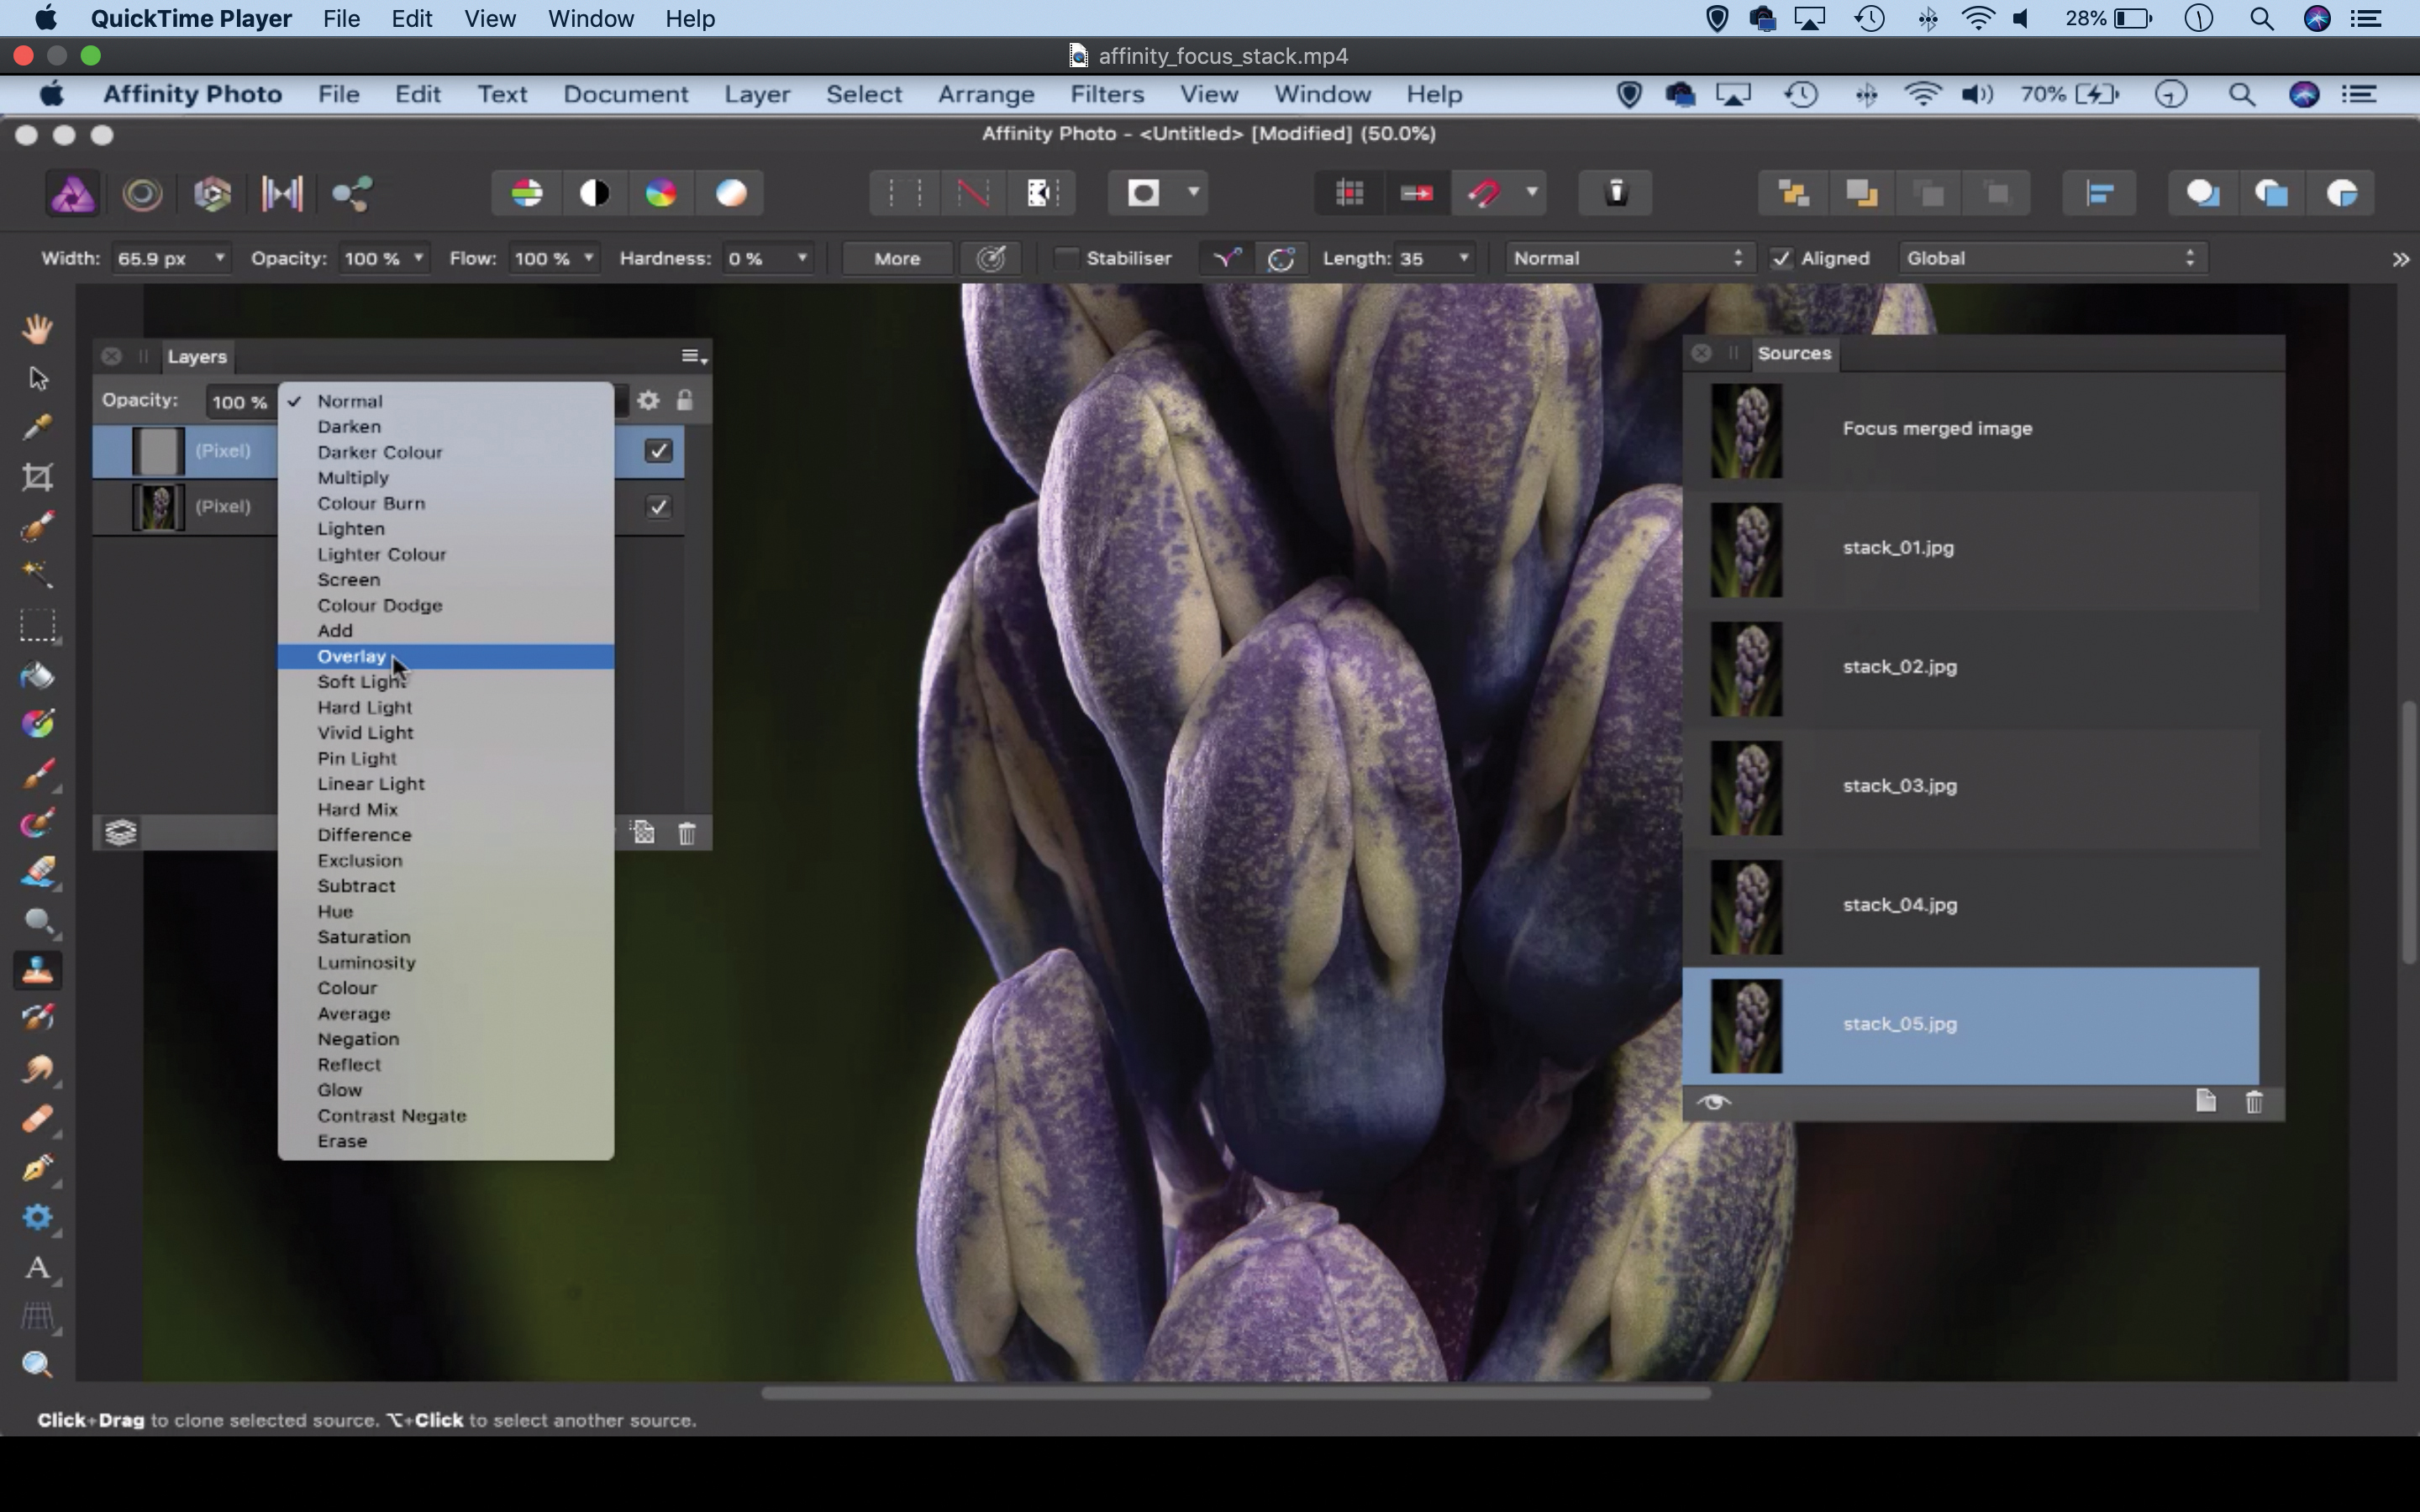
Go to the Layers panel (View>Studio>Layers), then hit Cmd/Ctrl+J to duplicate the bottom layer. Go to Filter>Sharpen>High Pass. Set the Radius to about 2.5px, then go to the Layers panel and set the blend mode to Overlay. Make any other changes to finish off the image.

Get Serif Affinity Photo for just £48.99/$49.99
Affinity Photo is a powerful image-editing program with professional-level features that rivals Adobe Photoshop yet costs just a fraction of the price – with no subscription required!

About N-Photo magazine
This tutorial originally appeared in N-Photo, the monthly newsstand magazine for Nikon photographers. Why not subscribe to a print edition, and have the magazine delivered direct to your door every month?
Alternatively, we have a number of different digital options available, including:
• Apple app (for iPad or iPhone)
• Zinio app (multi-platform app for desktop or smartphone)
• PocketMags (multi-platform app ideal for Android devices)
• Readly (all-you-can-eat digital magazine subscription service)
If you wanted a printed version of any of our most recent issues we have a selection of back issues to choose from in our online store.
Read more:
Photography tips and tutorial videos
The best photo editing software: image editors for novices through to pros
The best photo editing tools and accessories
The best MacBooks for photo editing in 2020
N-Photo: The Nikon Magazine is a monthly publication that's entirely dedicated to Nikon users. As a 100% independent magazine, you can be assured of unbiased opinion from a trustworthy team of devoted photography experts including editor Adam Waring and Deputy Editor Mike Harris.
Aimed at all users, from camera newcomers to working pros, every issue is packed with practical, Nikon-specific advice for taking better photos, in-depth reviews of Nikon-compatible gear, and inspiring projects and exciting video lessons for mastering camera, lens and Photoshop techniques.
Written by Nikon users for Nikon users, N-Photo is your one-stop shop for everything to do with cameras, lenses, tripods, bags, tips, tricks and techniques to get the most out of your photography.
