Change your clothes in Affinity Photo
Swap the colour of clothes and add patterns with selections and masks in Affinity Photo
The best camera deals, reviews, product advice, and unmissable photography news, direct to your inbox!
You are now subscribed
Your newsletter sign-up was successful
Start here
• Affinity Photo tutorials
The tutorials
1. Affinity Photo vs Photoshop
2. RAW editing with Affinity Photo
3. Focus merge with Affinity Photo
4. Replace a sky in Affinity Photo
5. Moody mono in Affinity Photo
6. Six Affinity Photo landscape tips
7. Color correction in Affinity Photo
8. Live Filters in Affinity Photo
9. Create a classic wet plate look
10. Remove objects in Affinity Photo
11. Paint an abstract portrait
12. Enhance skintones in Affinity Photo
13. Create HDR in Affinity Photo
14. Replace a sky in Affinity Photo
15. Affinity Photo double exposures
16. Affinity Photo Denoise tool
17. Affinity Photo retouching
18. Restore old family portraits
19. Change clothes in Affinity Photo
20. Create super-charged sunsets
Watch video: How to change outfits in Affinity Photo
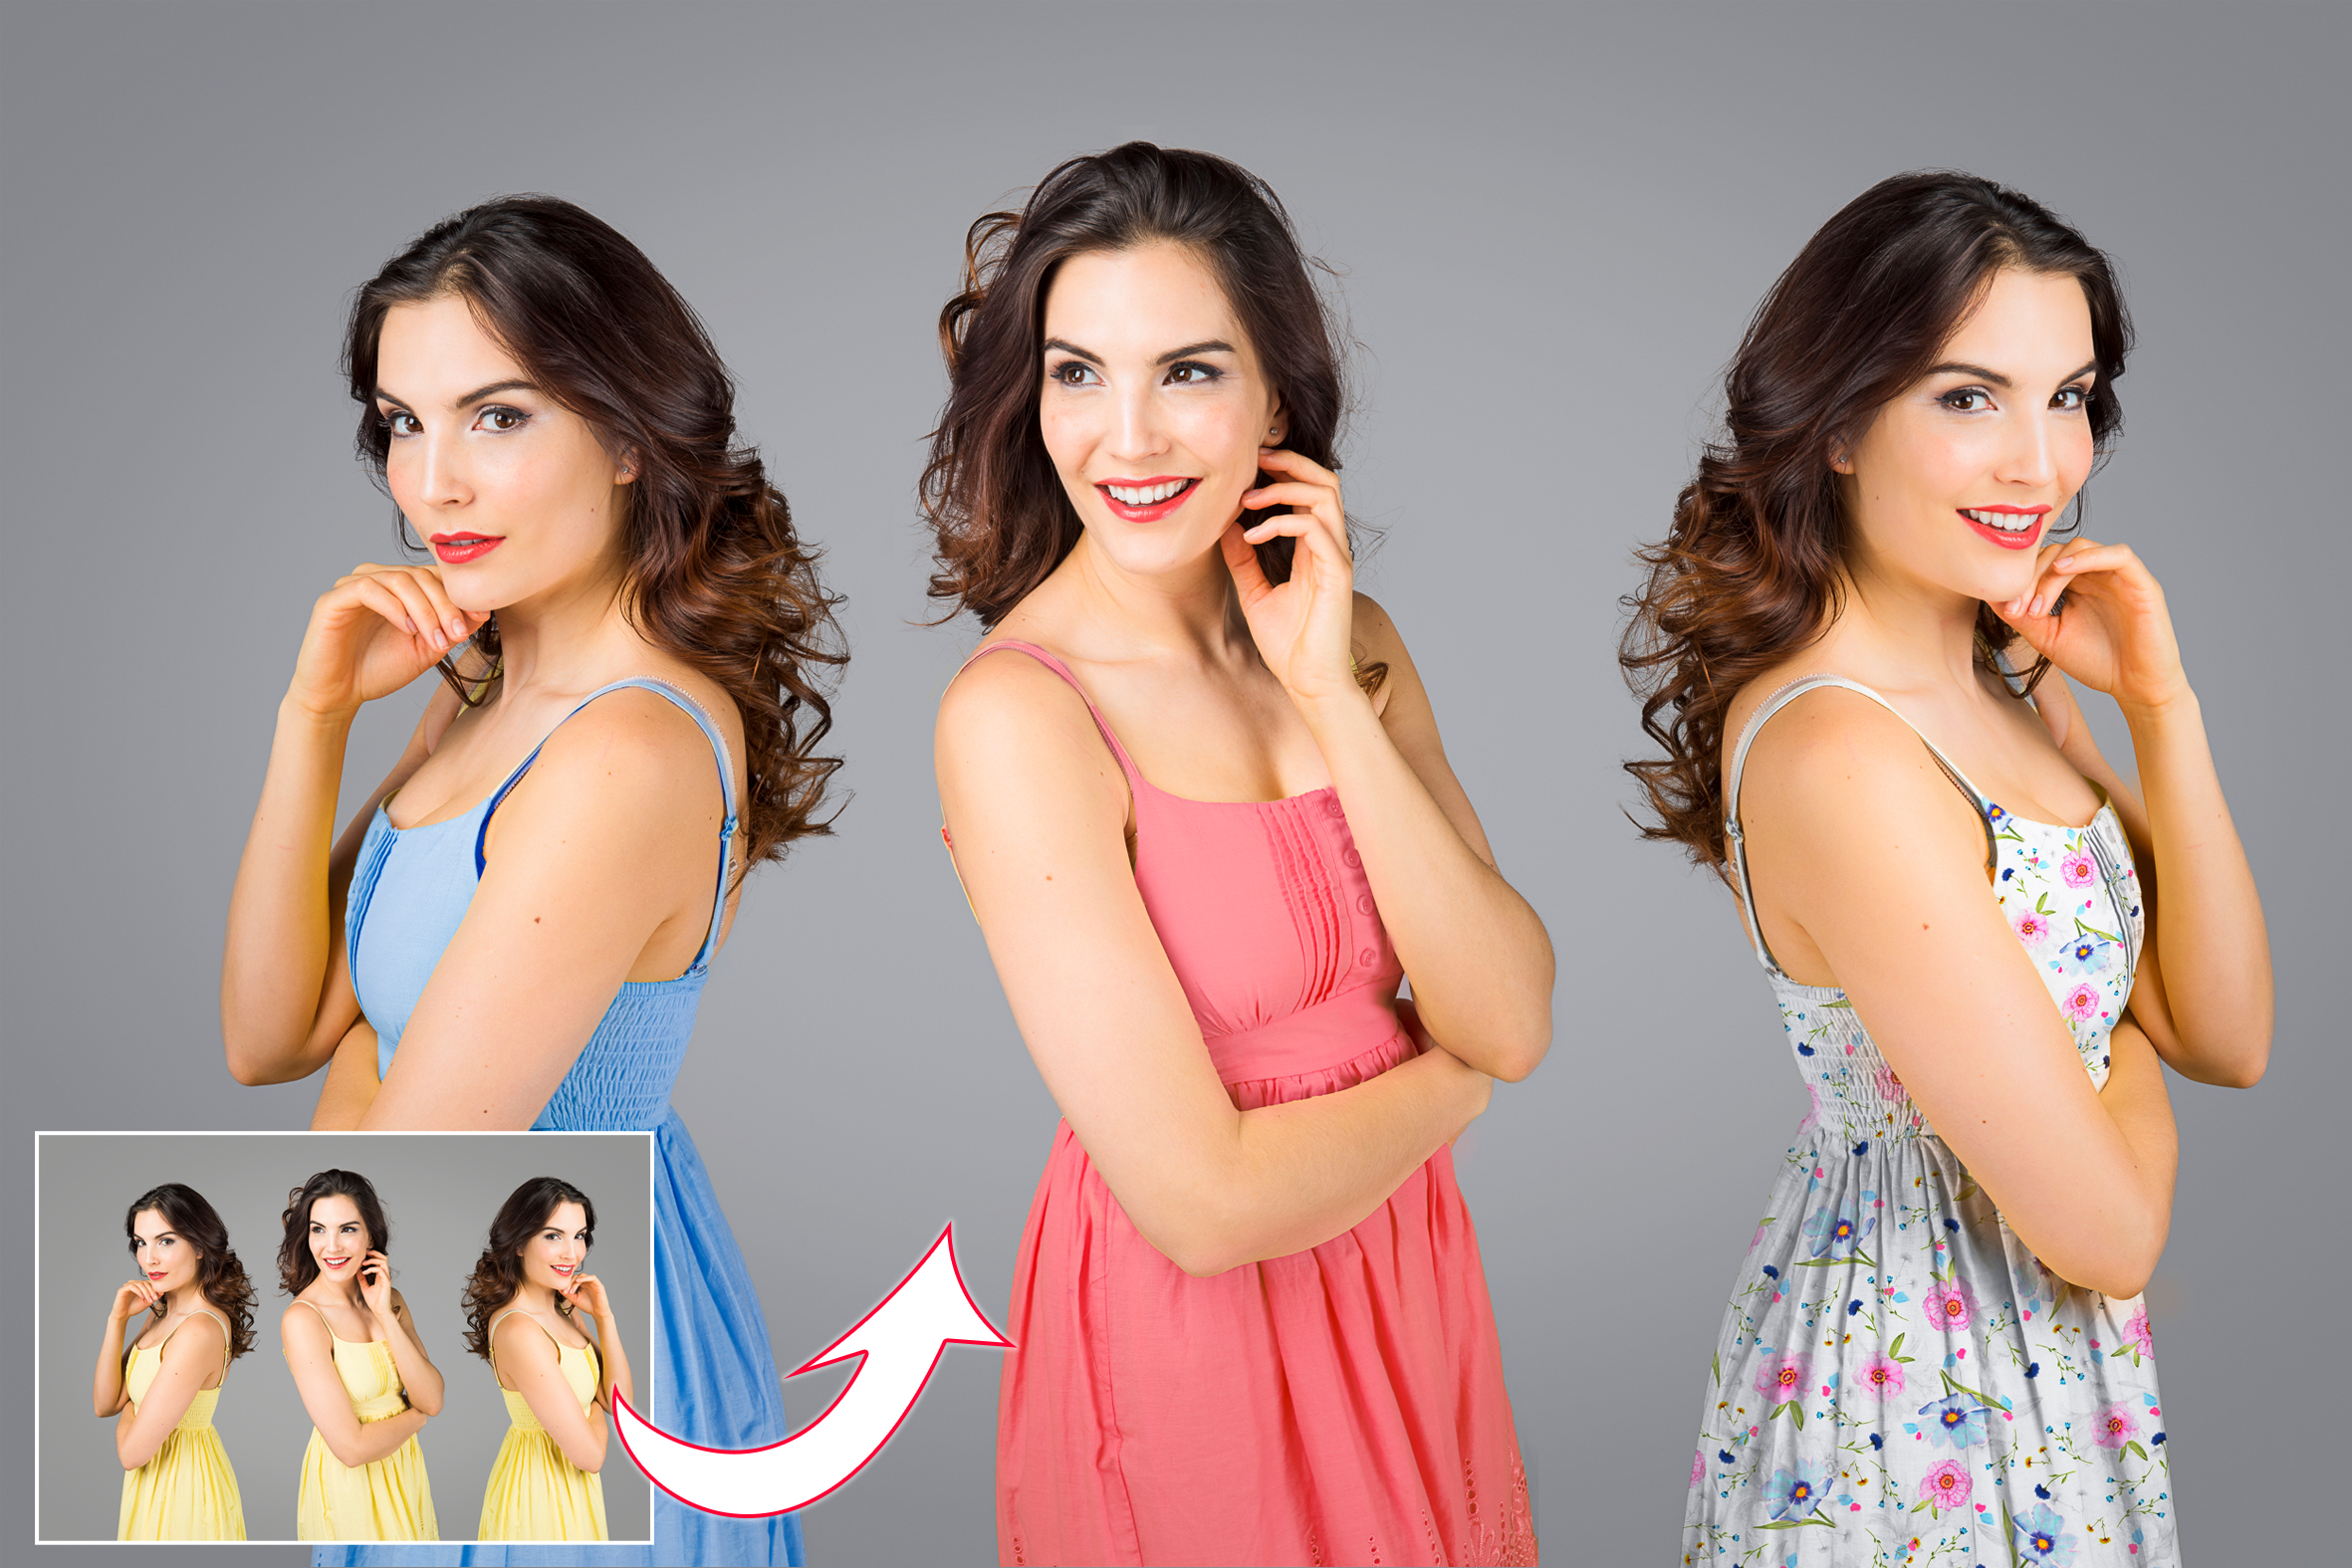
Whether you want to change someone’s clothes, or alter the colour of an object, the process is simple in Affinity. We just define the area to be altered, then use layers and masks to change it.
The first step is to isolate the area with a selection. Affinity offers several excellent selection tools that lock on to complex shapes and objects. In this project we’ll use the Selection Brush and Refine command, a combination that lets us make quick, precise selections easily.
Article continues belowAfter that, we can go on to add an adjustment layer. Our active selection is automatically converted into a layer mask, making it possible to alter the tones and colours in a specific part of the photo. There are several different adjustment layers that we can use to change colours. Here we’ll play with HSL, Curves and Selective Colour.
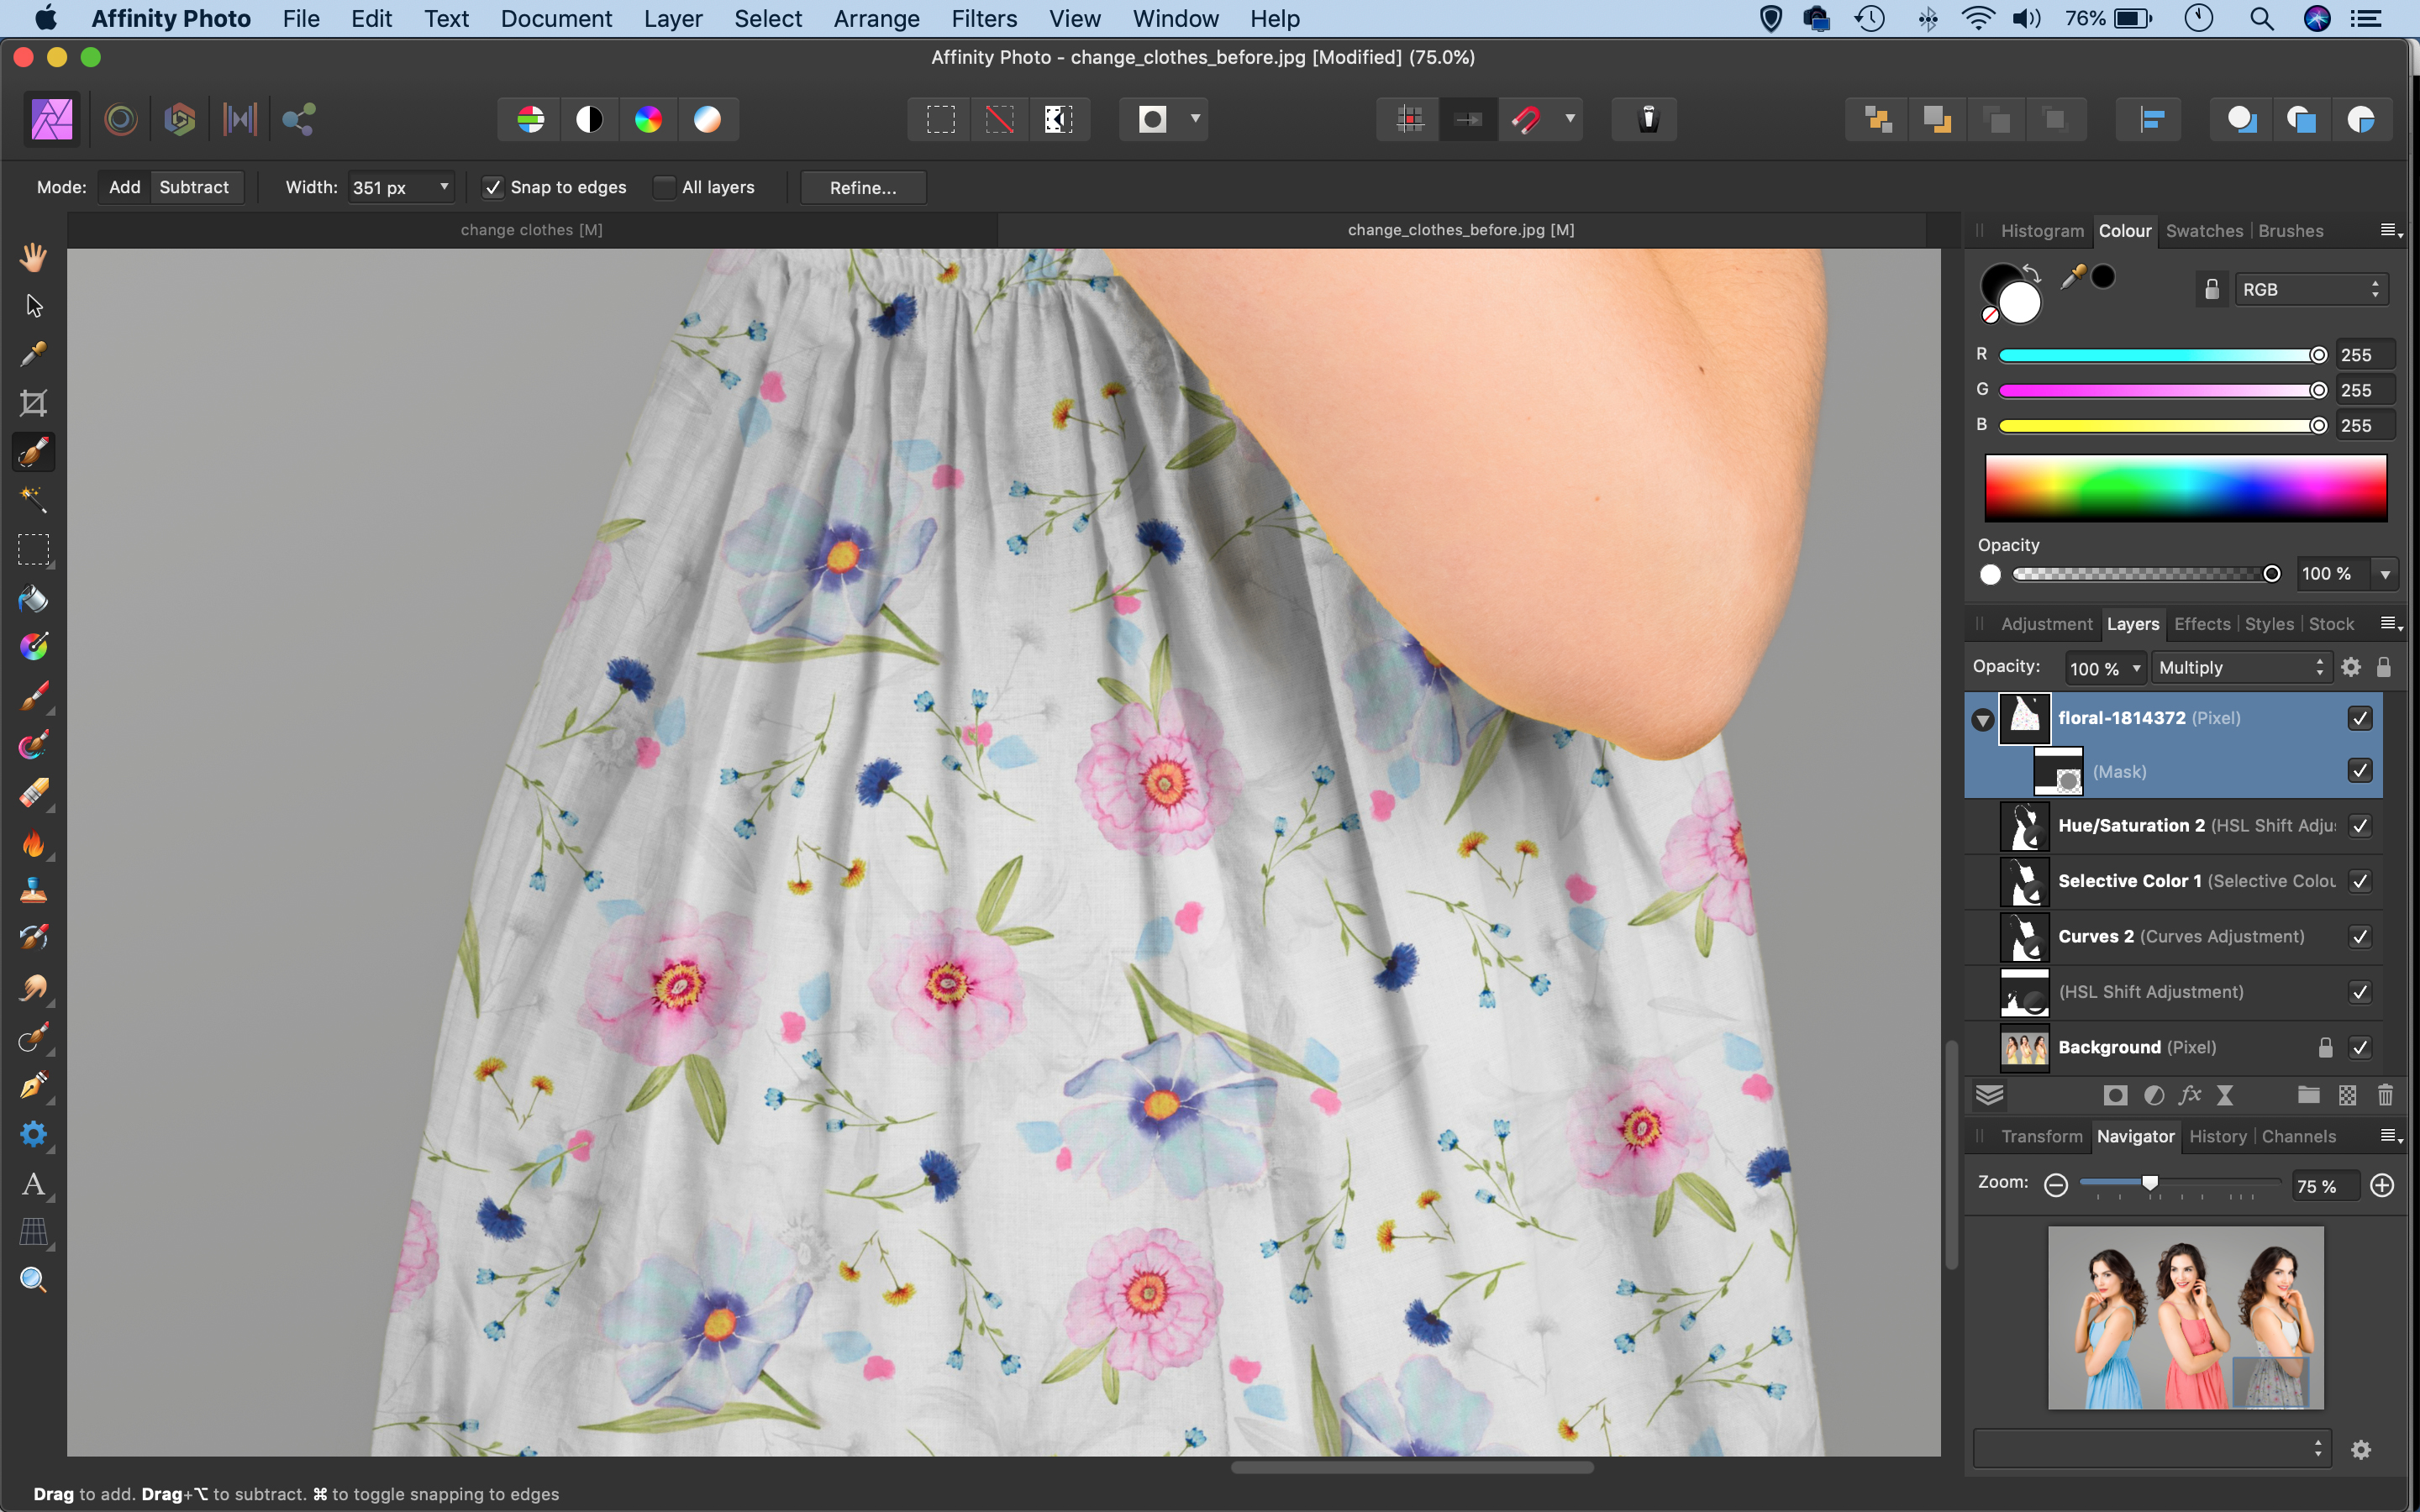
If, like the outfit on the right here, the aim is to add a different pattern or texture to the surface, then instead of adjusting the tones we need to copy and paste part of another photo or design. Once done, we can use a layer mask to confine it to the shape of the dress and then use layer blending modes to combine the two into a believable whole.
Here, the Multiply blend mode lets us blend our flower pattern with the shadowy folds in the dress. All of our effects remain independent of one another on separate layers, so if we like we can go back and change the colours or pattern at any time.
Read more:
The best camera deals, reviews, product advice, and unmissable photography news, direct to your inbox!
Step 1: Make a selection
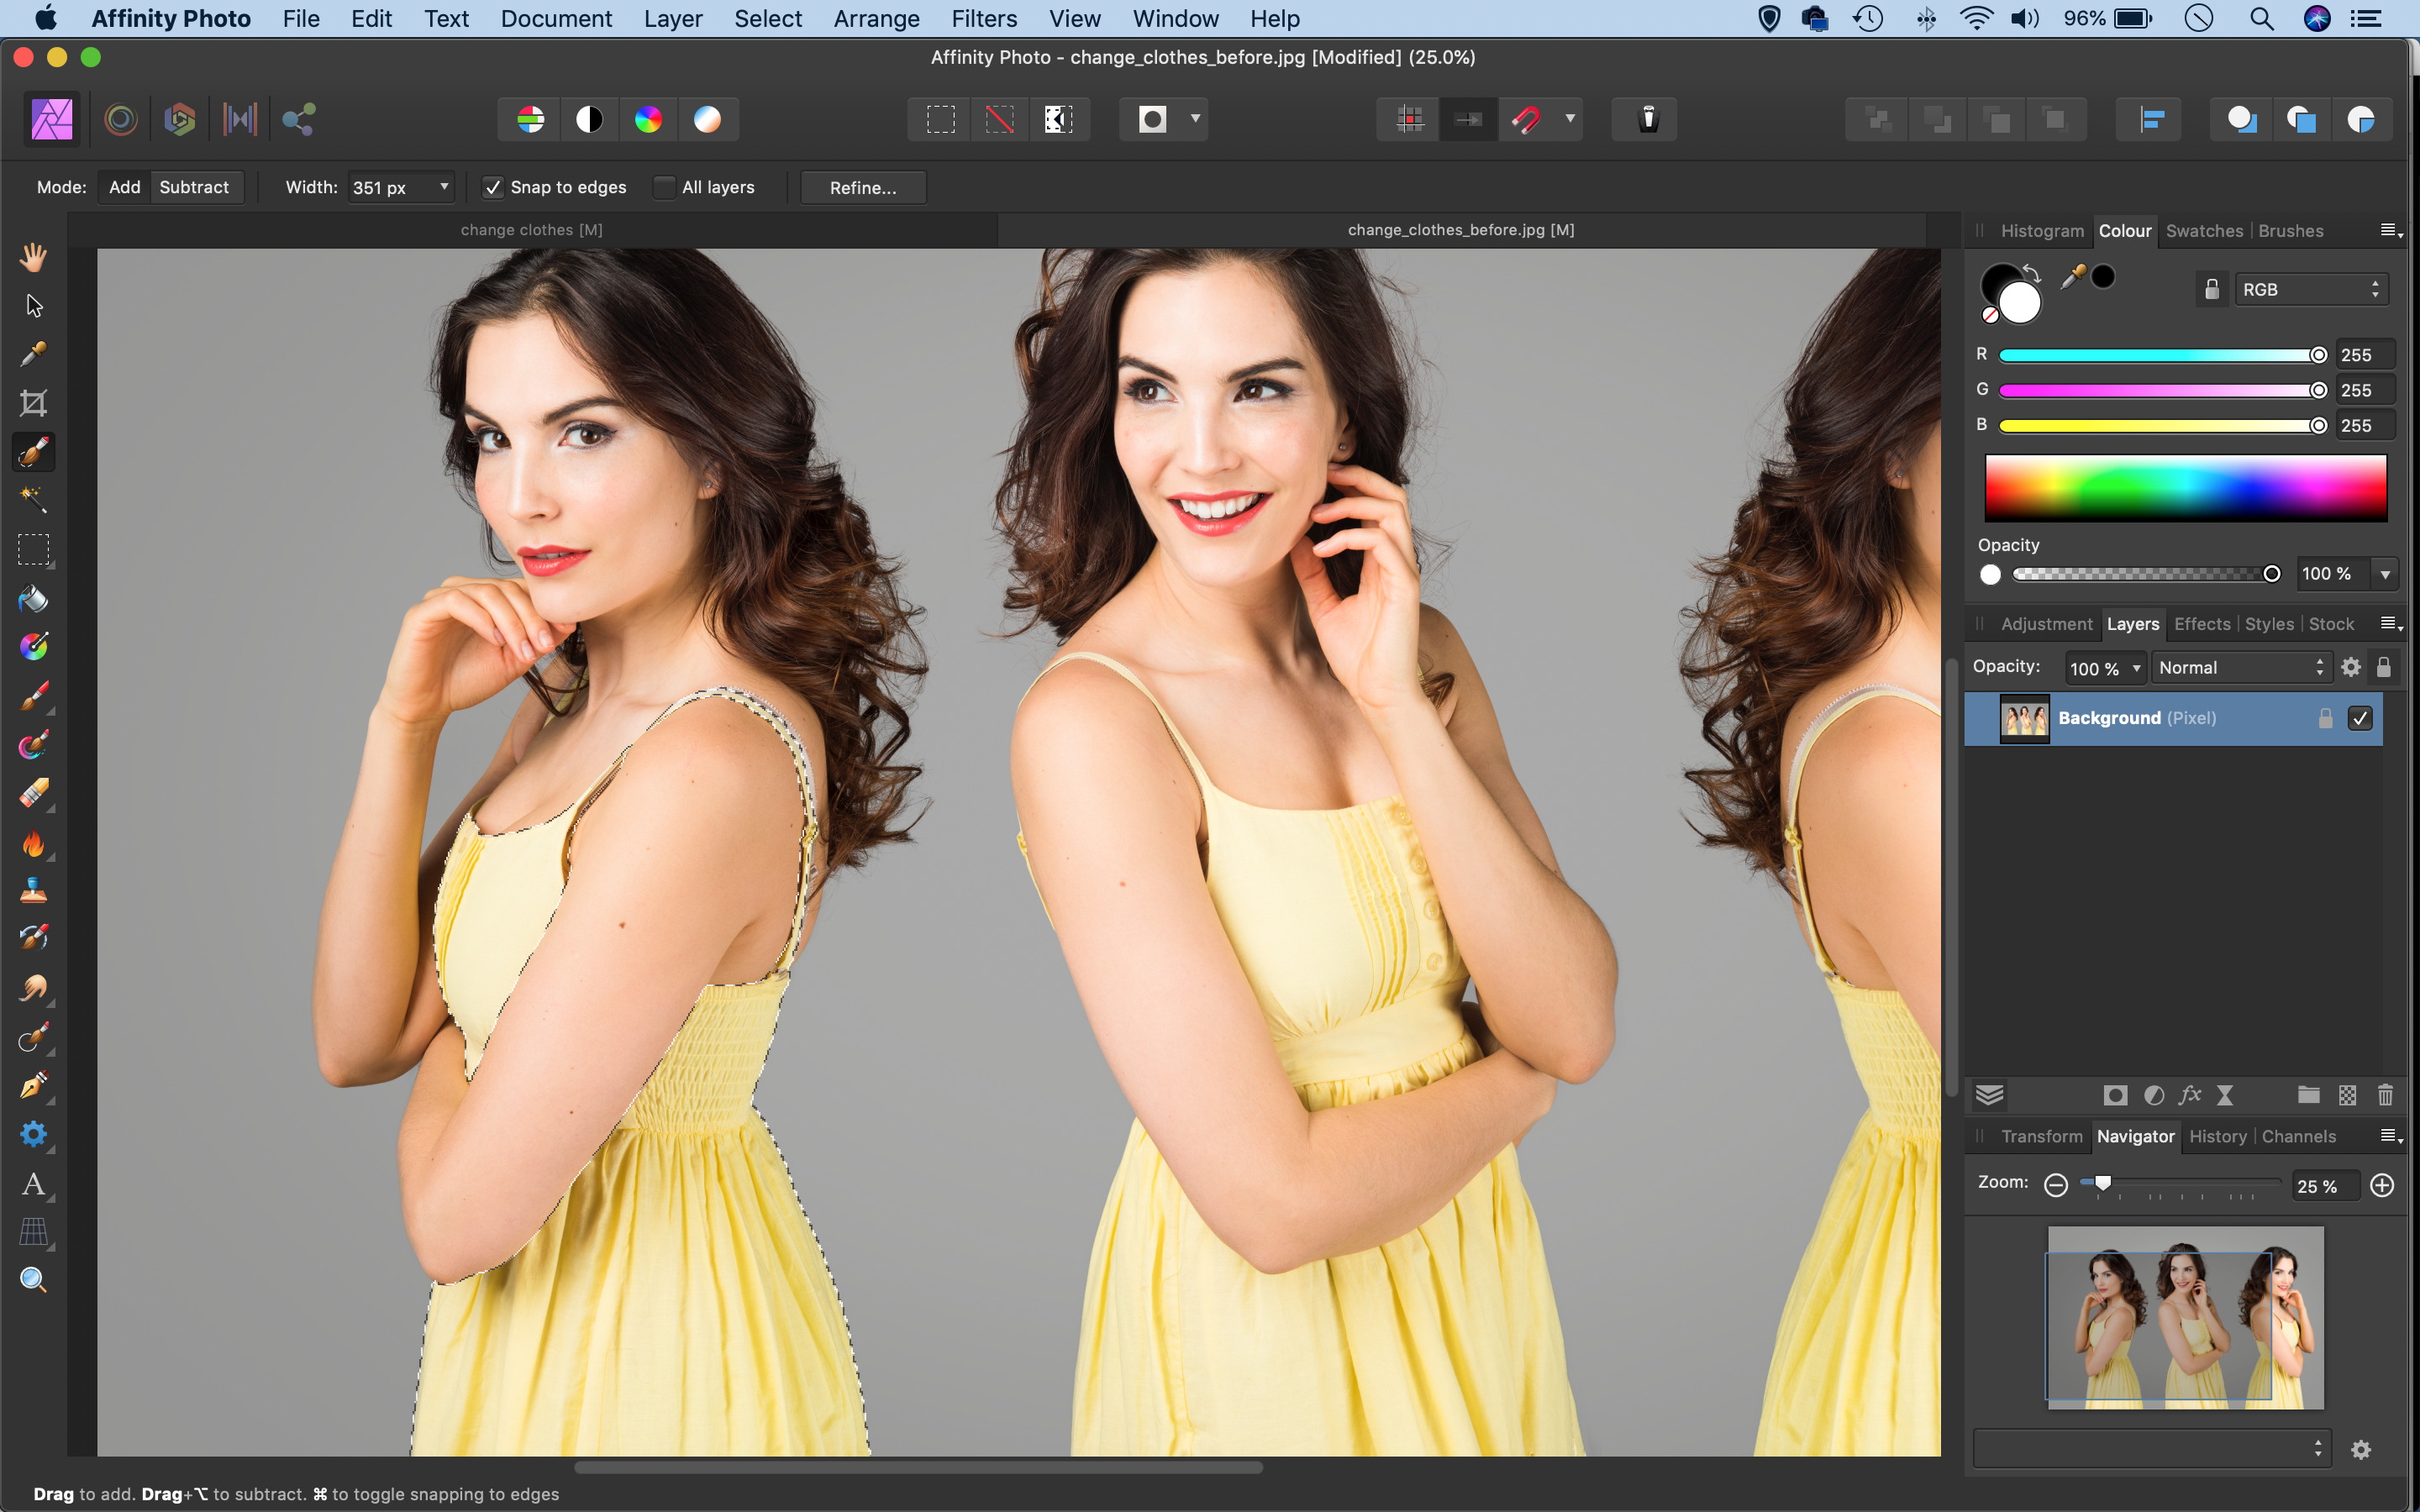
Grab the Selection Brush tool and make sure ‘Snap to Edges’ is checked in the tool options at the top. Paint over the clothes to select the area. If the tool selects the wrong areas, hold Alt and paint to subtract. Next, click the Refine button. Increase Border Width to about 5px and hit OK.
Step 2: Alter the hue
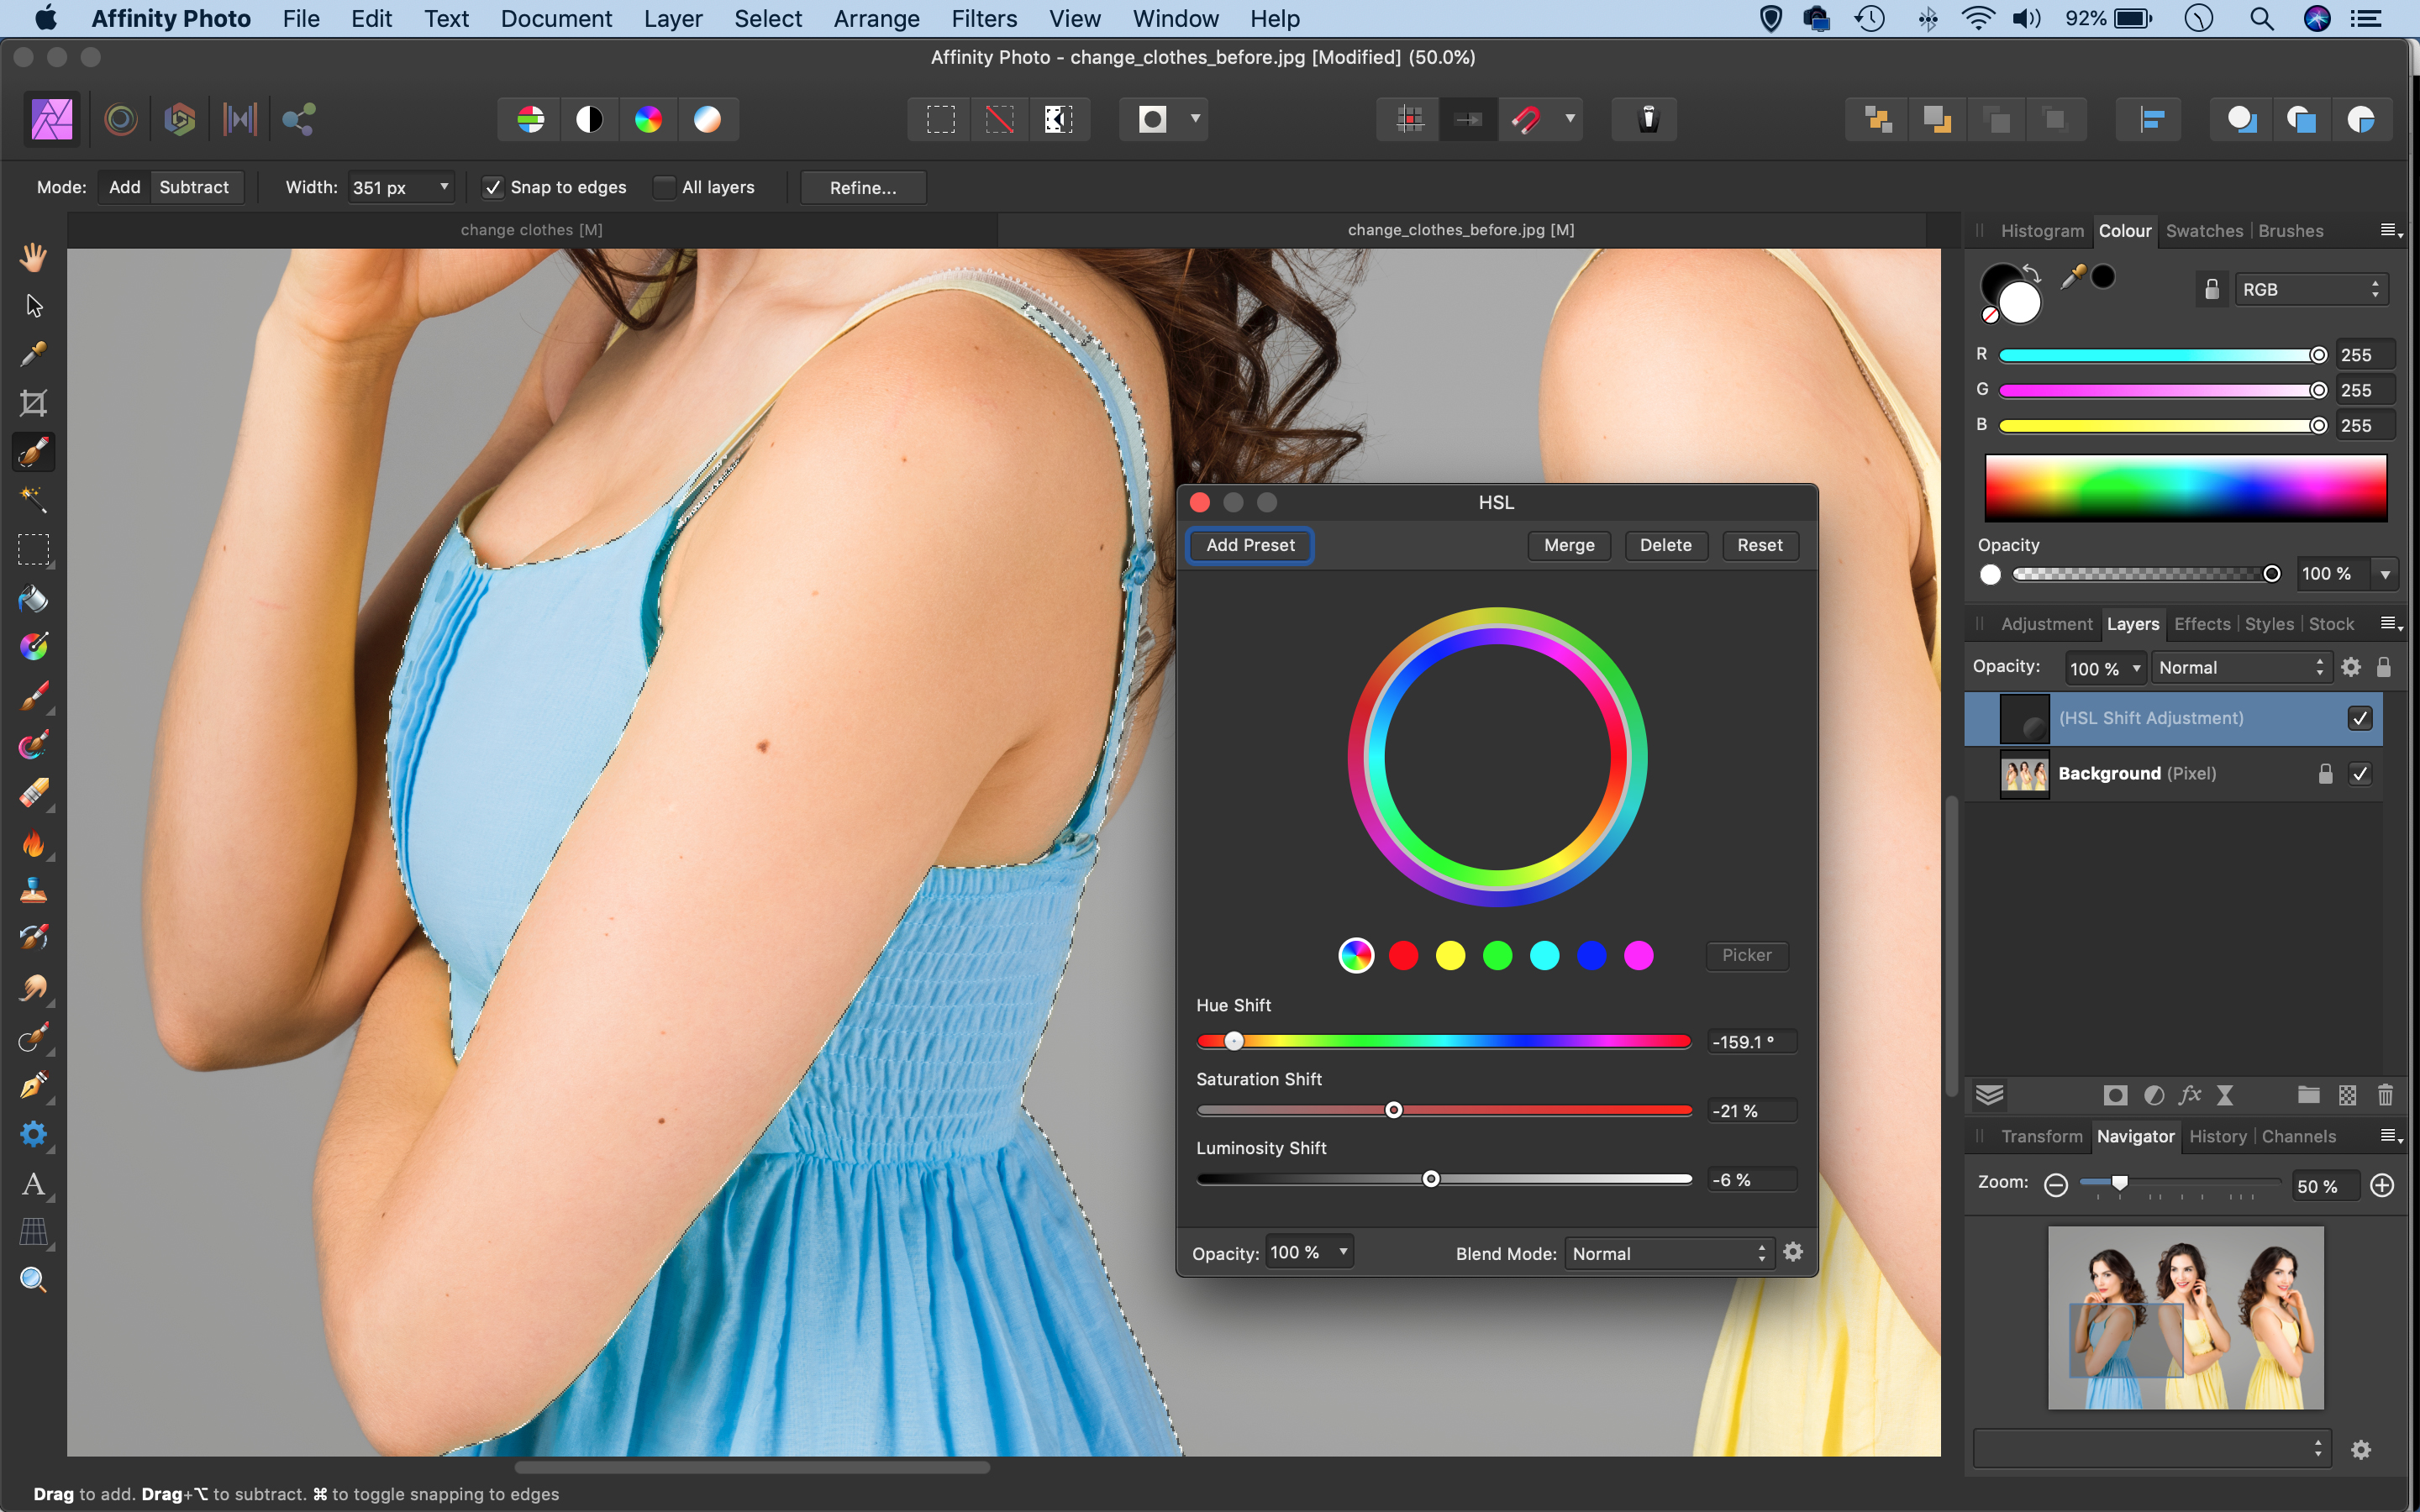
Once you’re happy with the selection click the Adjustments icon at the bottom of the Layers panel and choose HSL. Drag the Hue slider one way or the other to alter the colour of the clothes. Fine-tune the intensity of the colour with the Saturation slider, and tweak the brightness with Luminosity Shift.
Step 3: Check the edges
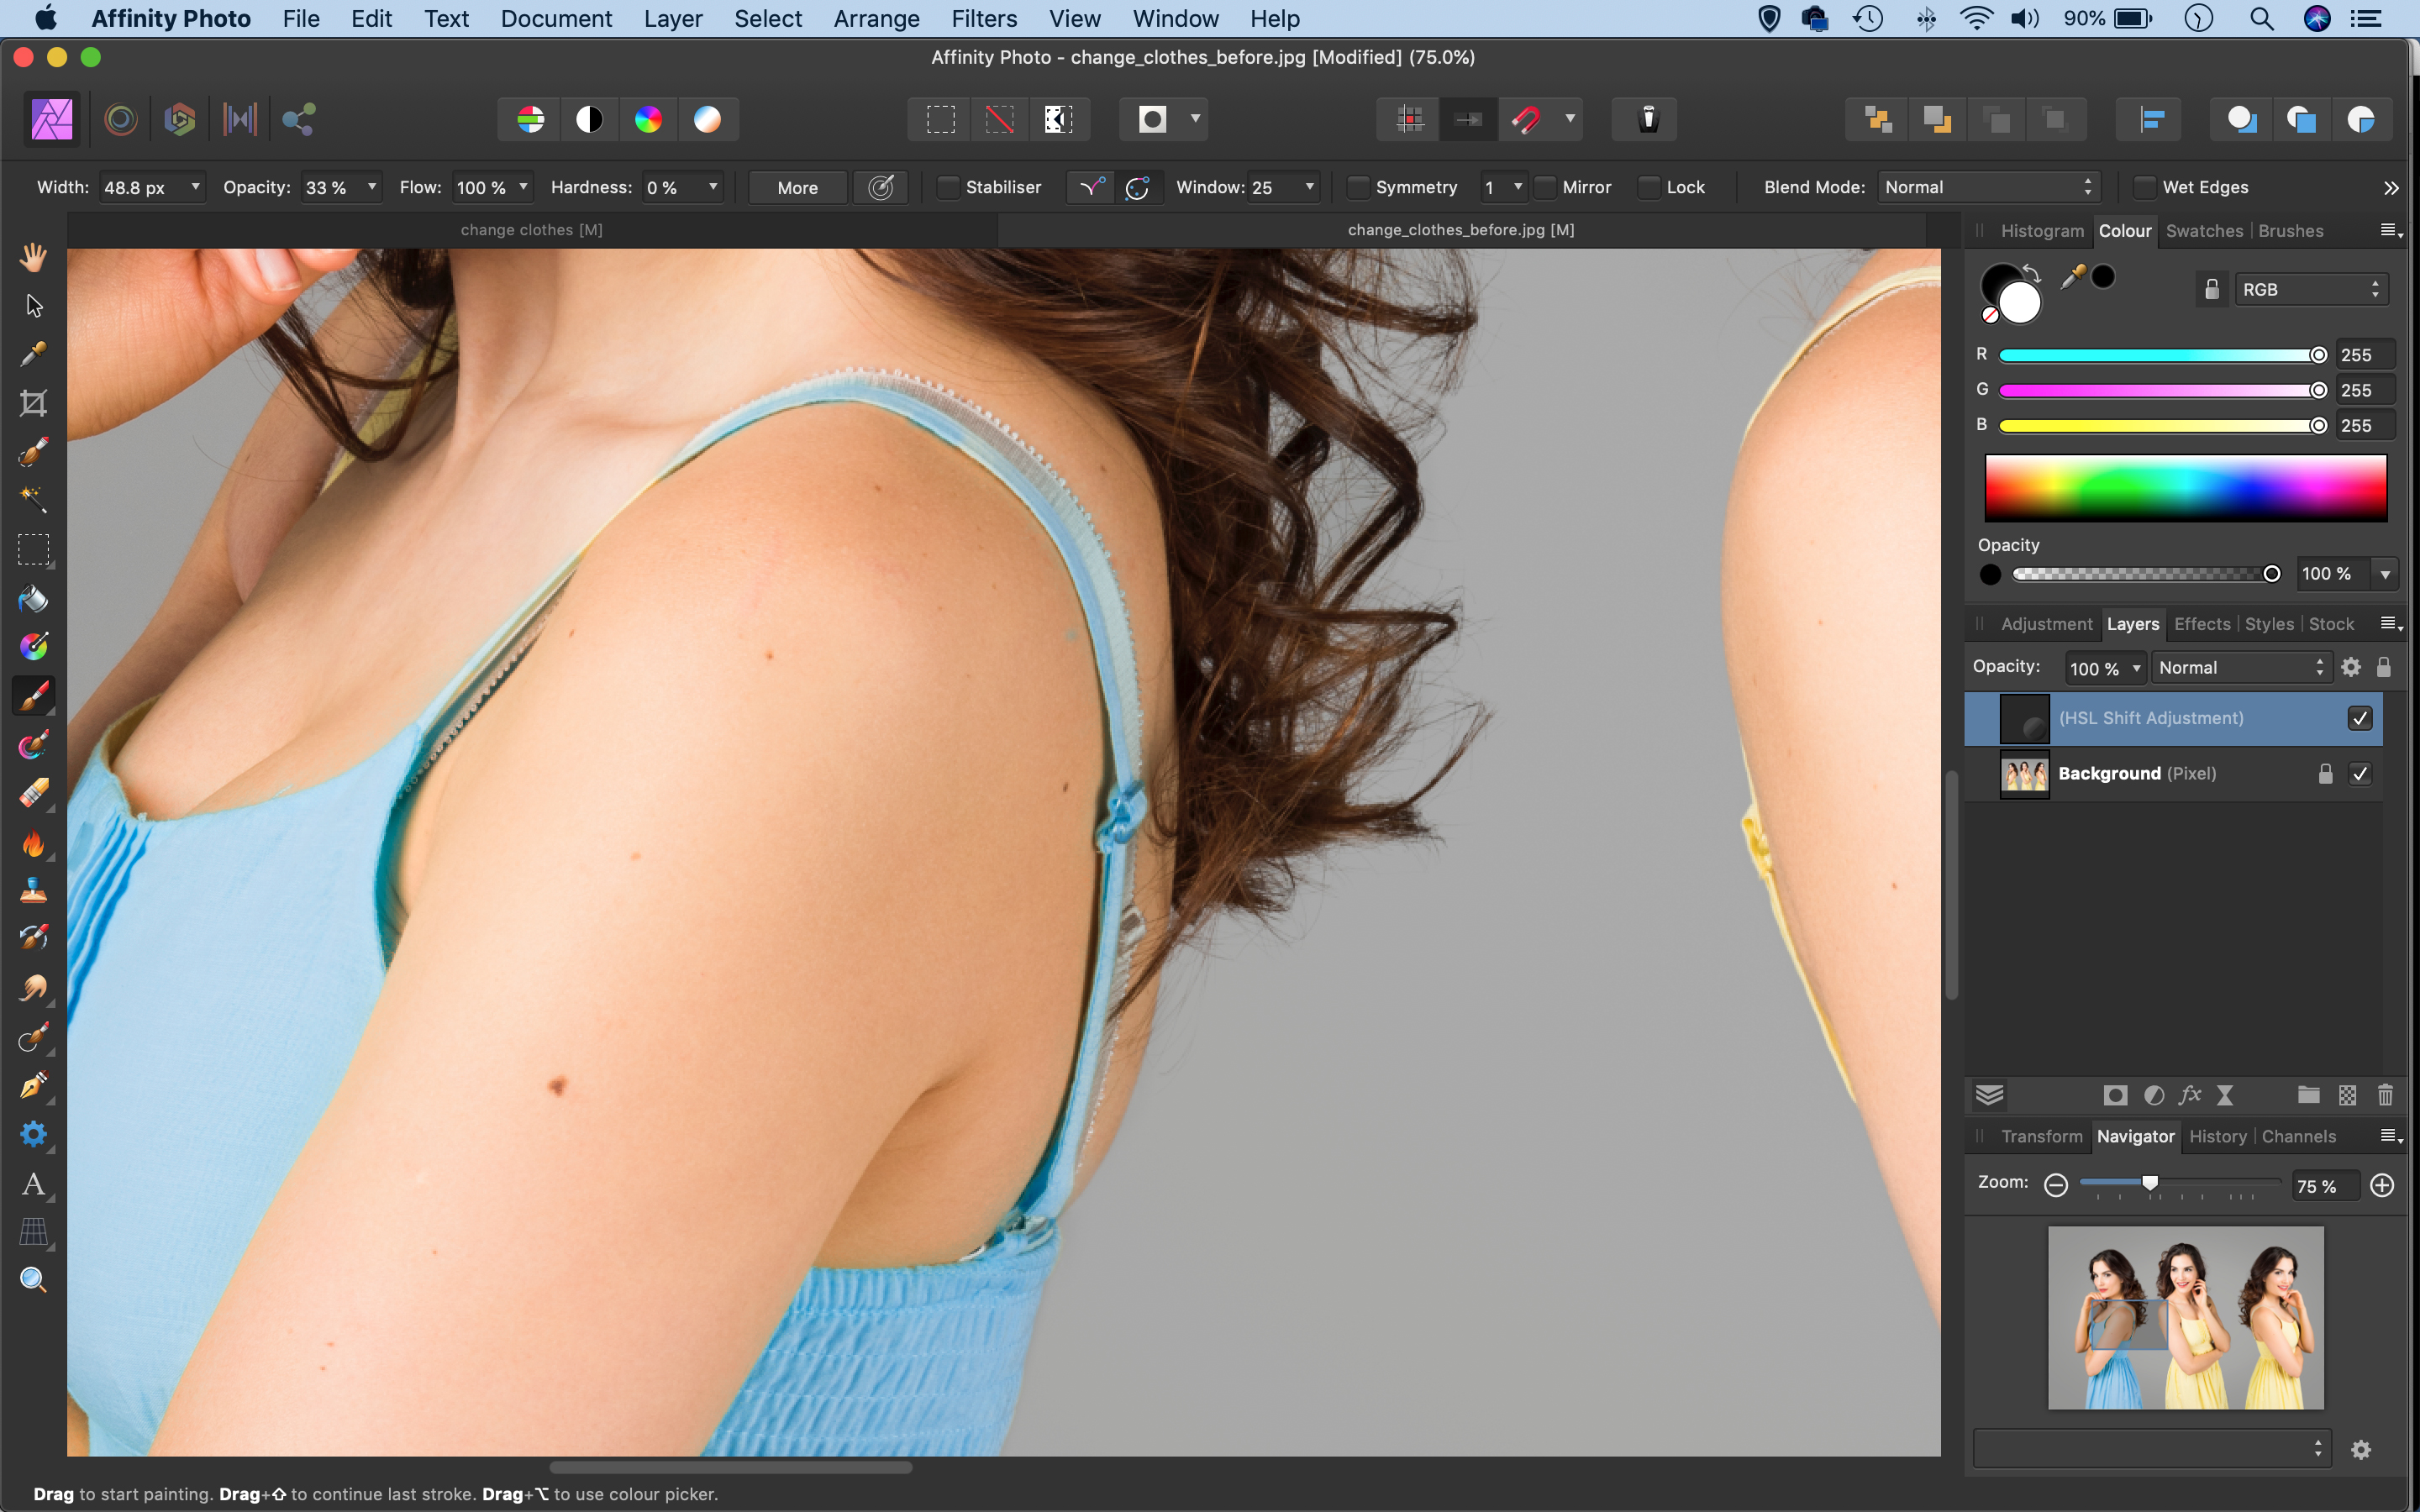
Zoom in to check the edges of the clothes. If you need to tweak the area covered by the colour change, highlight the layer and paint with black to hide areas or white to reveal them. You may also want to paint at a low opacity to tint the skin, as the colour of the clothes casts over the nearby skin tones.
Step 4: Use selective colour
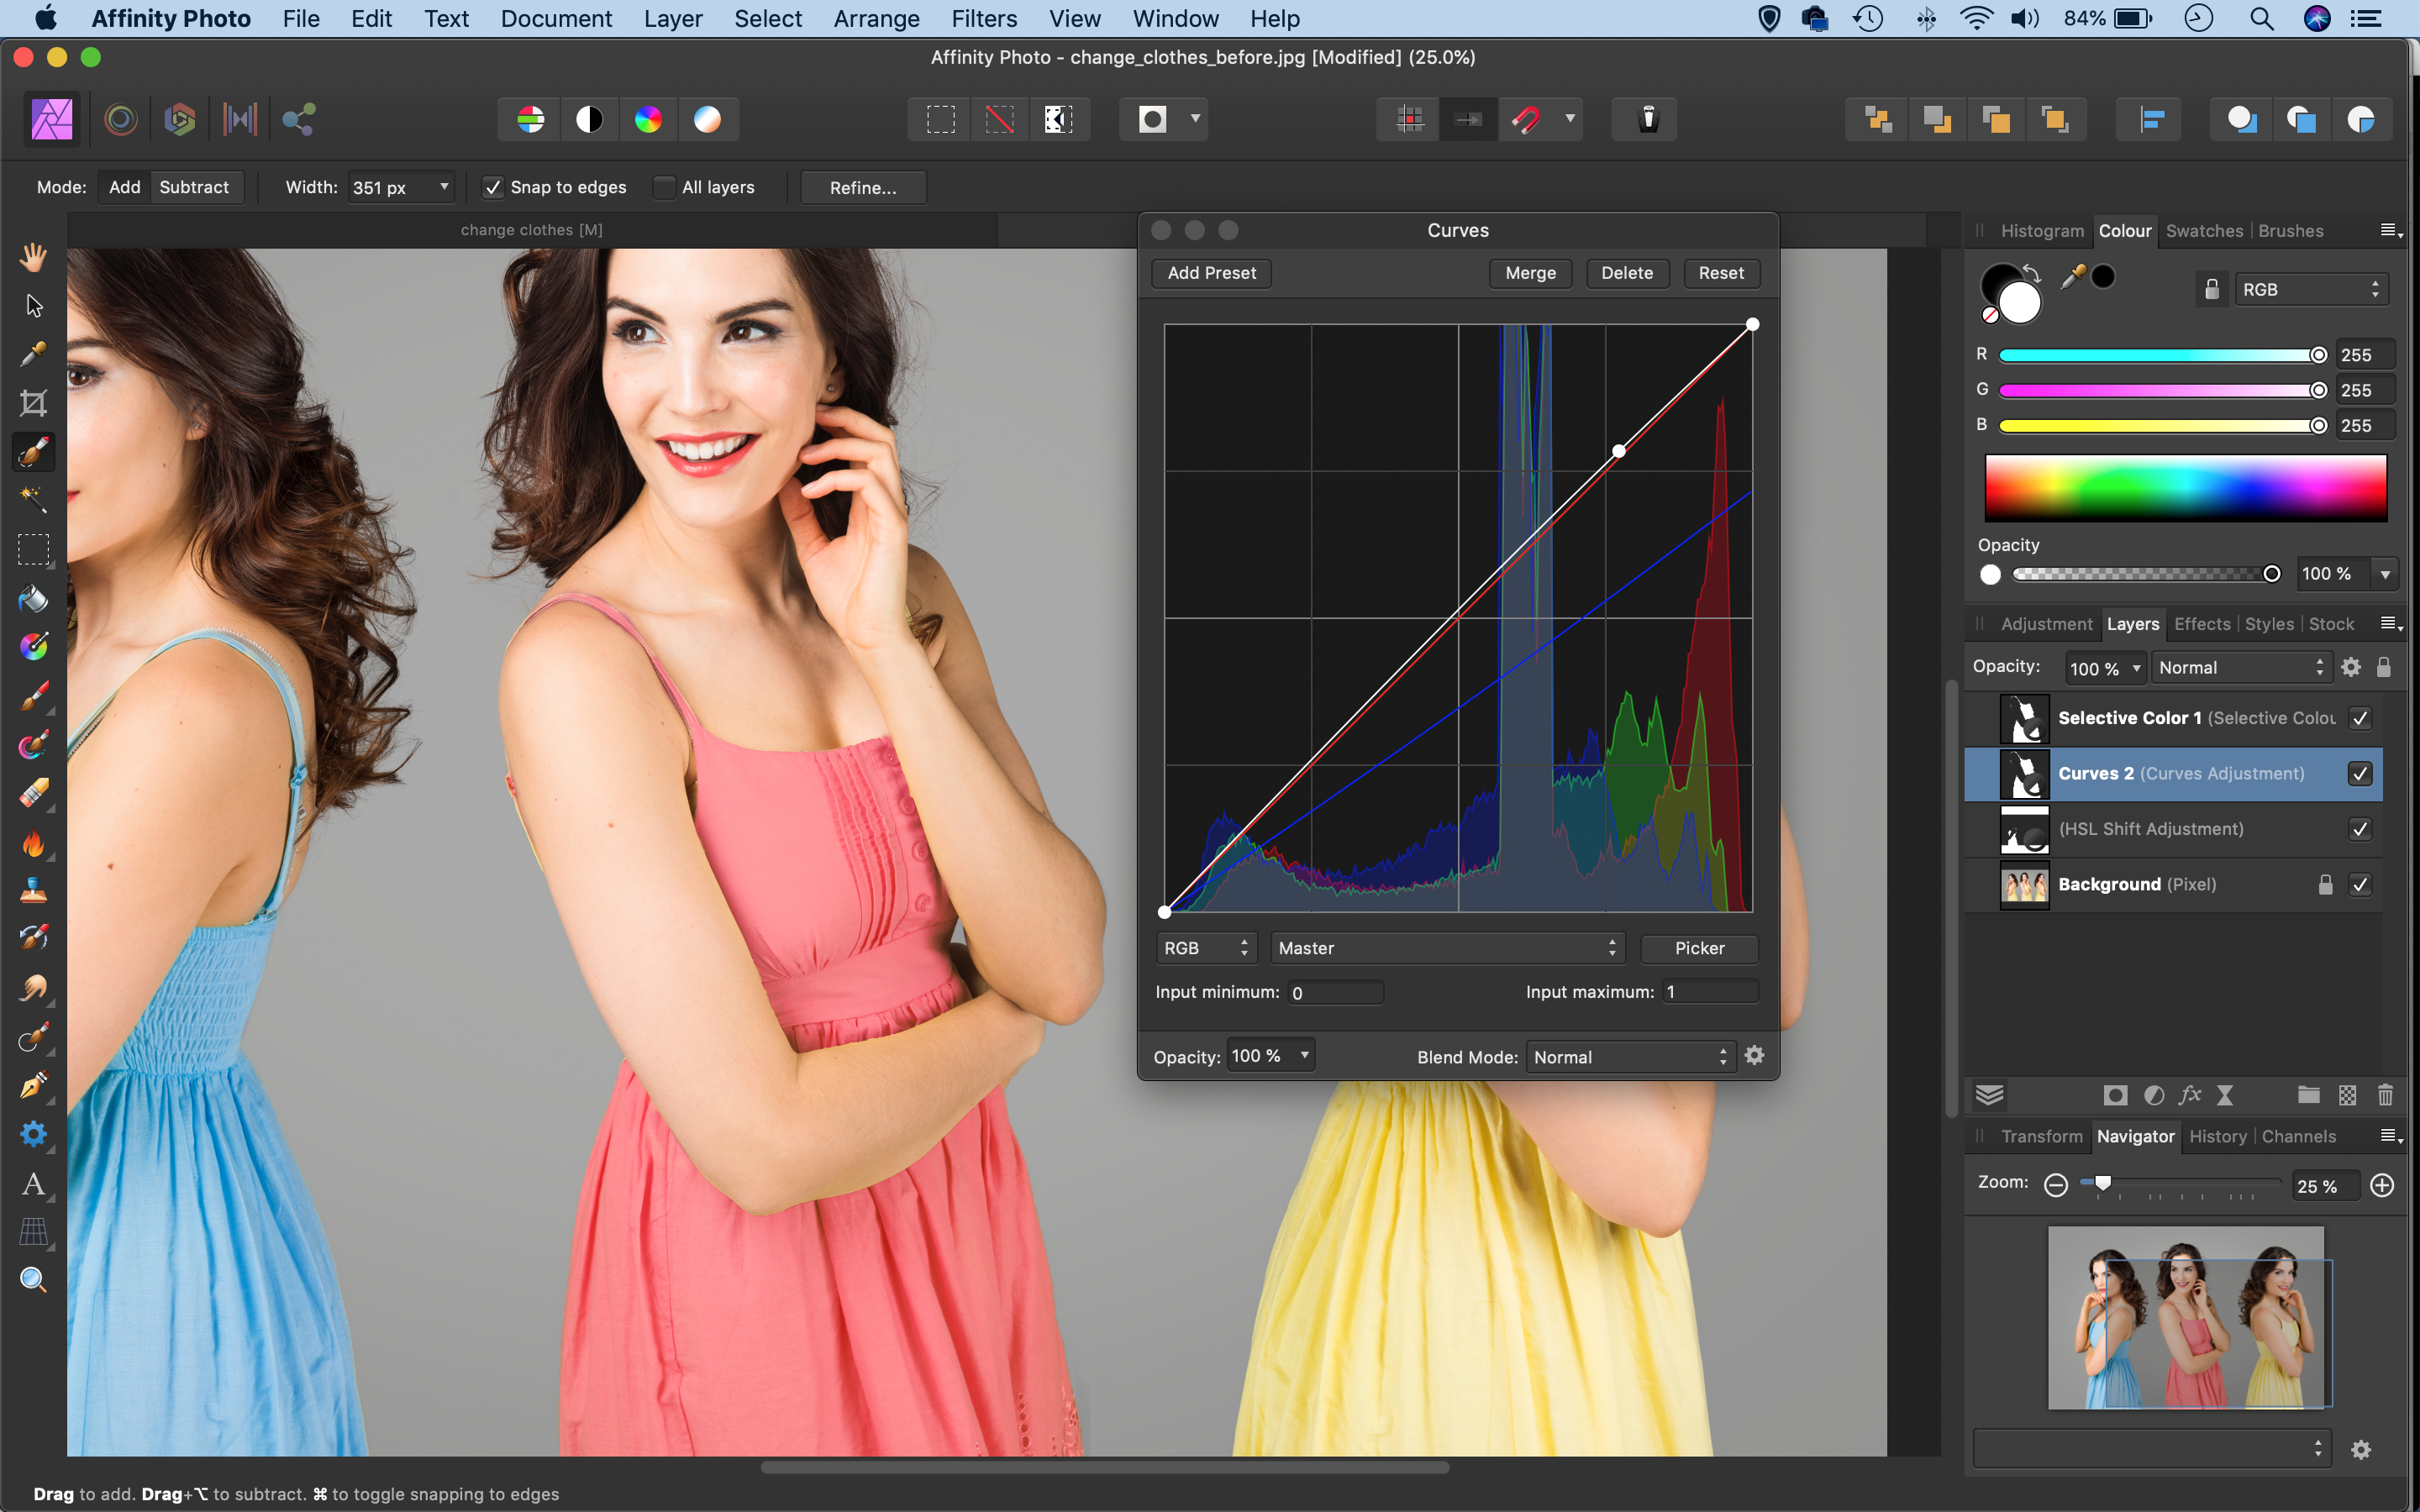
Select the second dress in the same way as before. Add a Selective Colour Adjustment, then click the dropdown at the top of the settings and tweak the Yellows and Reds to create an orange colour. Next, add a Curves layer. Drag it below the Selective Colour layer and drag down on the curve line to darken the colour.
Step 5: Paste in a pattern
Select the dress on the right, then add an HSL layer and drag Saturation down to 0. Open an image of a pattern, then copy and paste it into the portrait. Set the layer blend mode to Multiply. Hold Cmd/Ctrl and click the thumbnail of the HSL layer below. Highlight the pattern layer and click the layer mask icon to add a mask.
Step 6: Warp the pattern
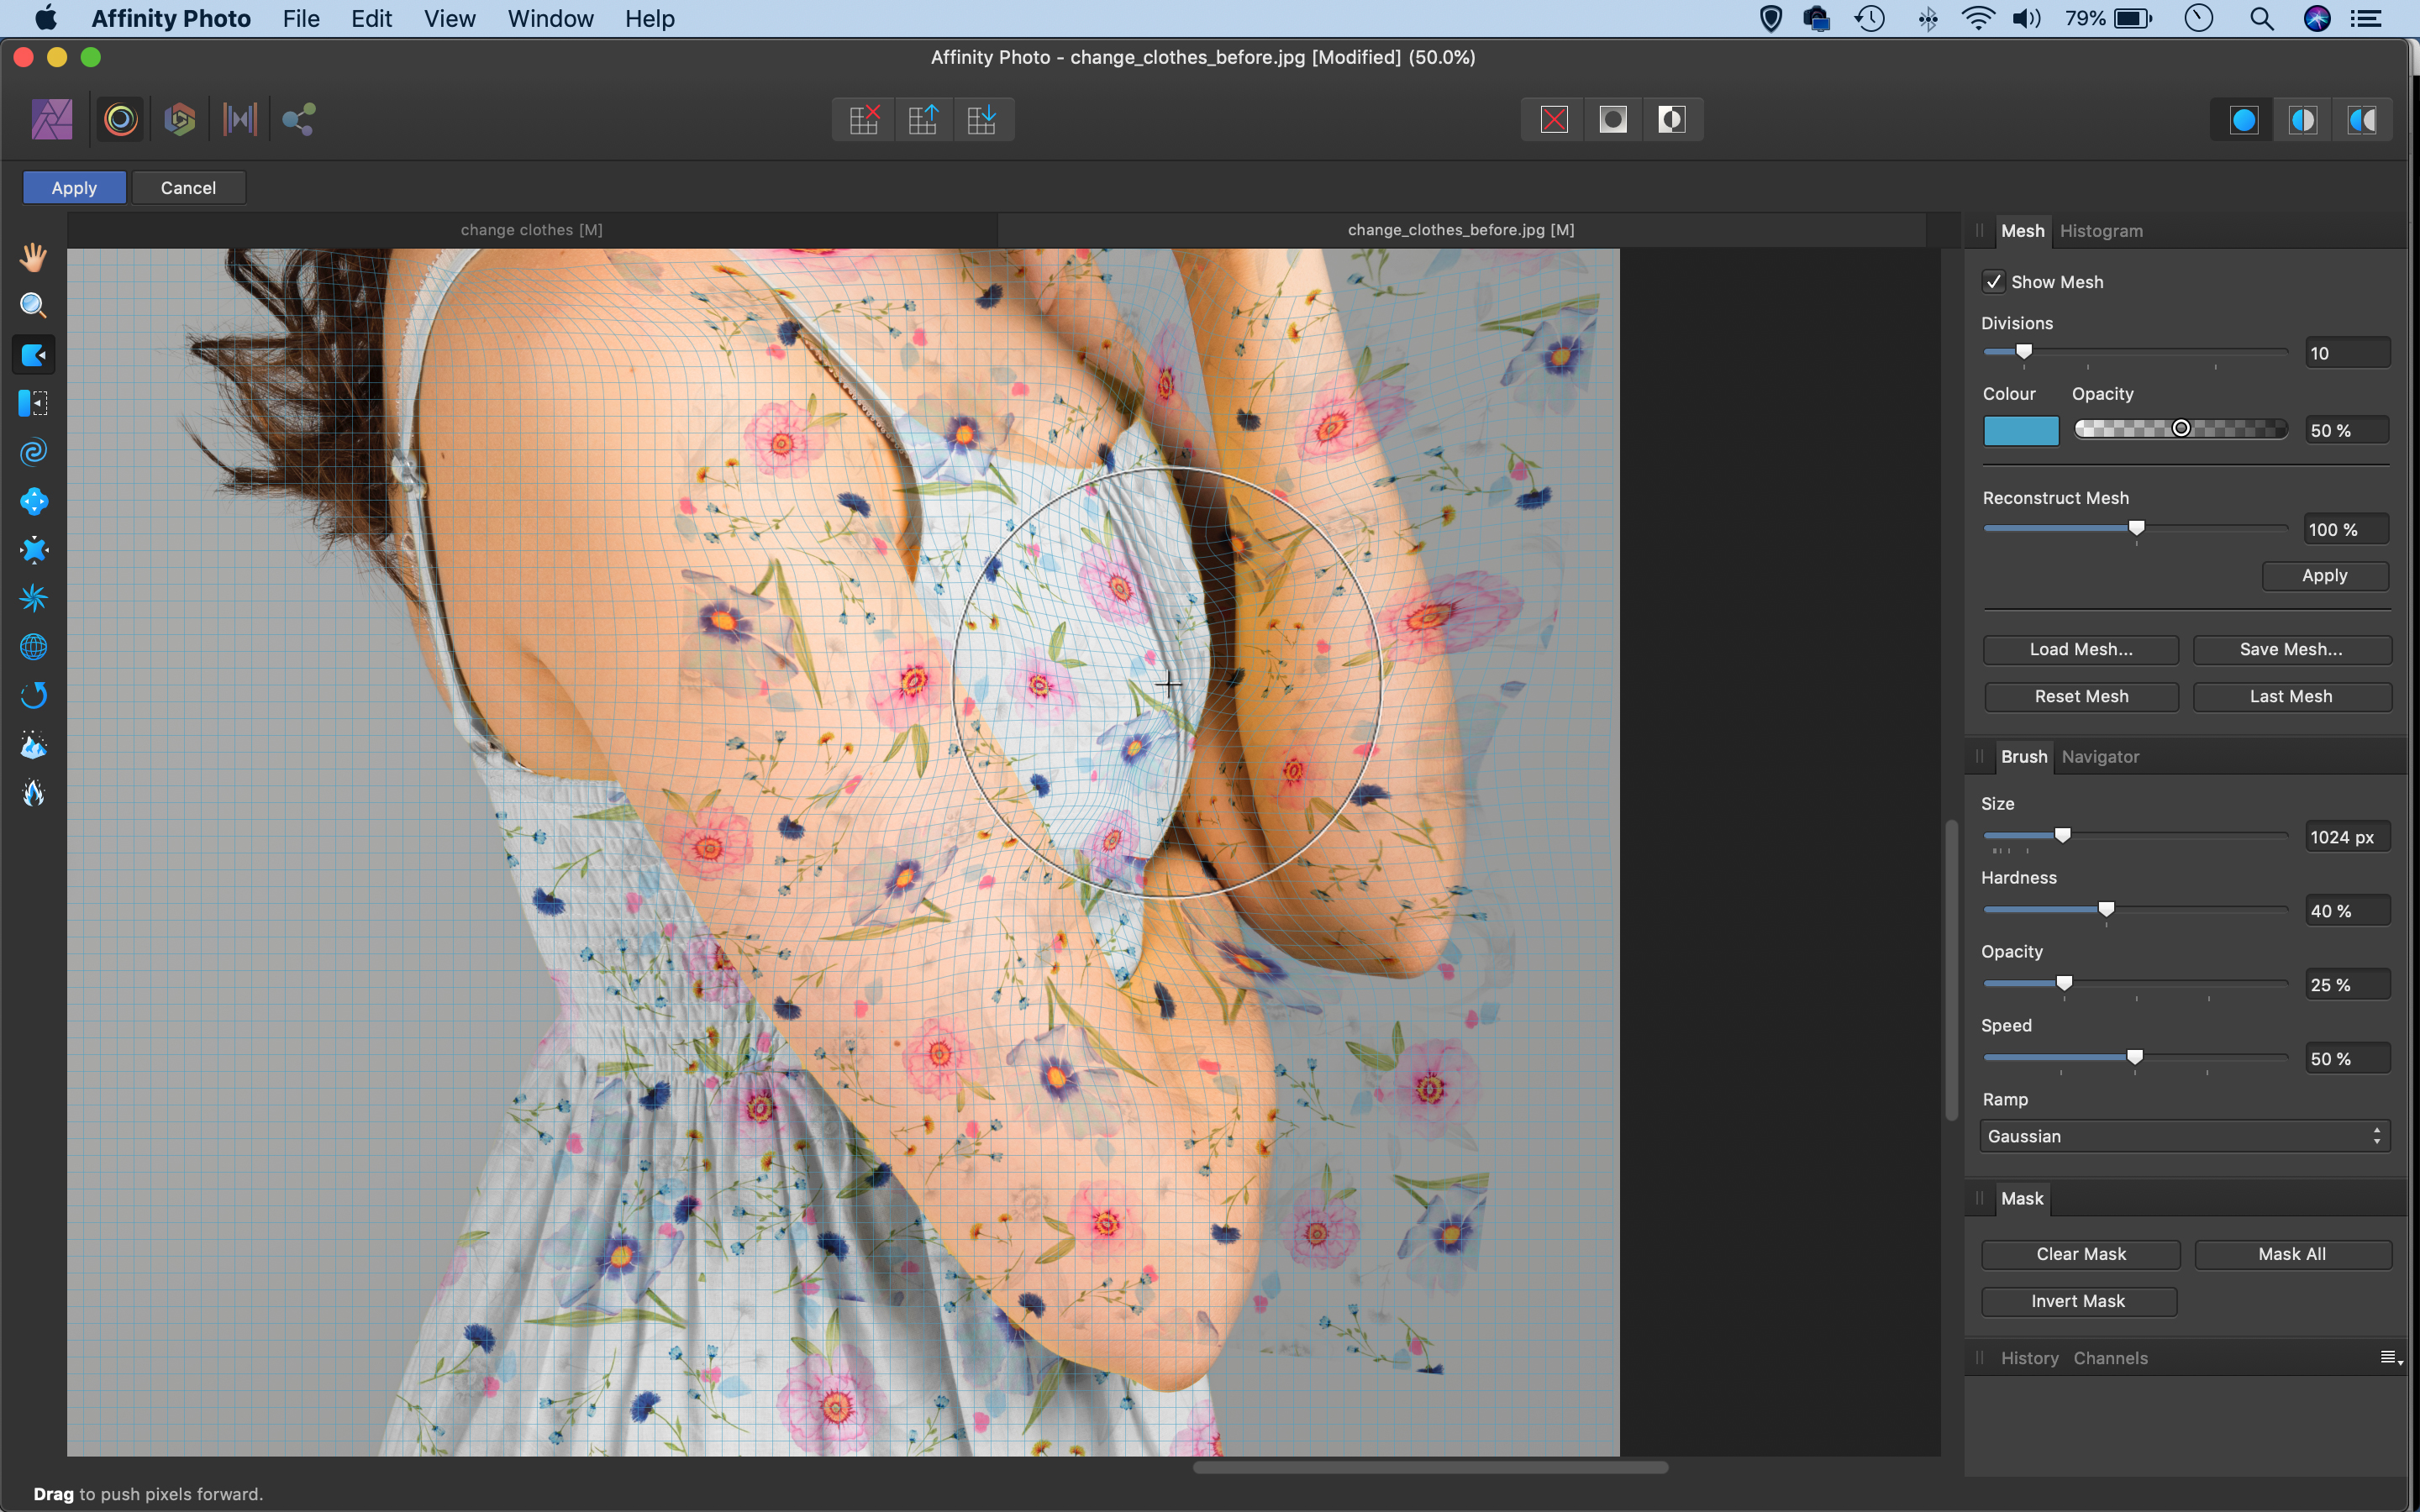
We may want to reshape the pattern so that it follows the surface of the dress. Duplicate the pattern layer with Cmd/Ctrl+J, then go to the Liquify Persona. Use the tools to warp the pattern to match the clothes underneath, then add a mask to confine it to the area.
Quick tip
The problem with selections made by tools like the Selection Brush is they’re hard edged. Objects are usually a bit soft, especially if edges include hair or other shapes like fur or grass. This is where the Refine command comes in. After making a selection we open Refine and increase the Border Width, then use the Foreground and Background brush to fine-tune what’s included.
About N-Photo magazine
This tutorial originally appeared in N-Photo, the monthly newsstand magazine for Nikon photographers. Why not subscribe to a print edition, and have the magazine delivered direct to your door every month?
Alternatively, we have a number of different digital options available, including:
• Apple app (for iPad or iPhone)
• Zinio app (multi-platform app for desktop or smartphone)
• PocketMags (multi-platform app ideal for Android devices)
• Readly (all-you-can-eat digital magazine subscription service)
If you wanted a printed version of any of our most recent issues we have a selection of back issues to choose from in our online store.
Read more:
• Photography tips and tutorial videos
• The best photo editing tools and accessories
• The best desktop computers for photo editing
• The best photo-editing laptops right now
• The best photo editing software today
N-Photo: The Nikon Magazine is a monthly publication that's entirely dedicated to Nikon users. As a 100% independent magazine, you can be assured of unbiased opinion from a trustworthy team of devoted photography experts including editor Adam Waring and Deputy Editor Mike Harris.
Aimed at all users, from camera newcomers to working pros, every issue is packed with practical, Nikon-specific advice for taking better photos, in-depth reviews of Nikon-compatible gear, and inspiring projects and exciting video lessons for mastering camera, lens and Photoshop techniques.
Written by Nikon users for Nikon users, N-Photo is your one-stop shop for everything to do with cameras, lenses, tripods, bags, tips, tricks and techniques to get the most out of your photography.
