Clean up skin the easy way in Affinity Photo: portrait enhancement made easy
Use Affinity Photo’s dedicated Frequency Separation command to improve skin and retouch faces
Start here
• Affinity Photo tutorials
The tutorials
1. Affinity Photo vs Photoshop
2. RAW editing with Affinity Photo
3. Focus merge with Affinity Photo
4. Replace a sky in Affinity Photo
5. Moody mono in Affinity Photo
6. Six Affinity Photo landscape tips
7. Color correction in Affinity Photo
8. Live Filters in Affinity Photo
9. Create a classic wet plate look
10. Remove objects in Affinity Photo
11. Paint an abstract portrait
12. Enhance skintones in Affinity Photo
13. Create HDR in Affinity Photo
14. Replace a sky in Affinity Photo
15. Affinity Photo double exposures
16. Affinity Photo Denoise tool
Watch video: How to retouch a portrait
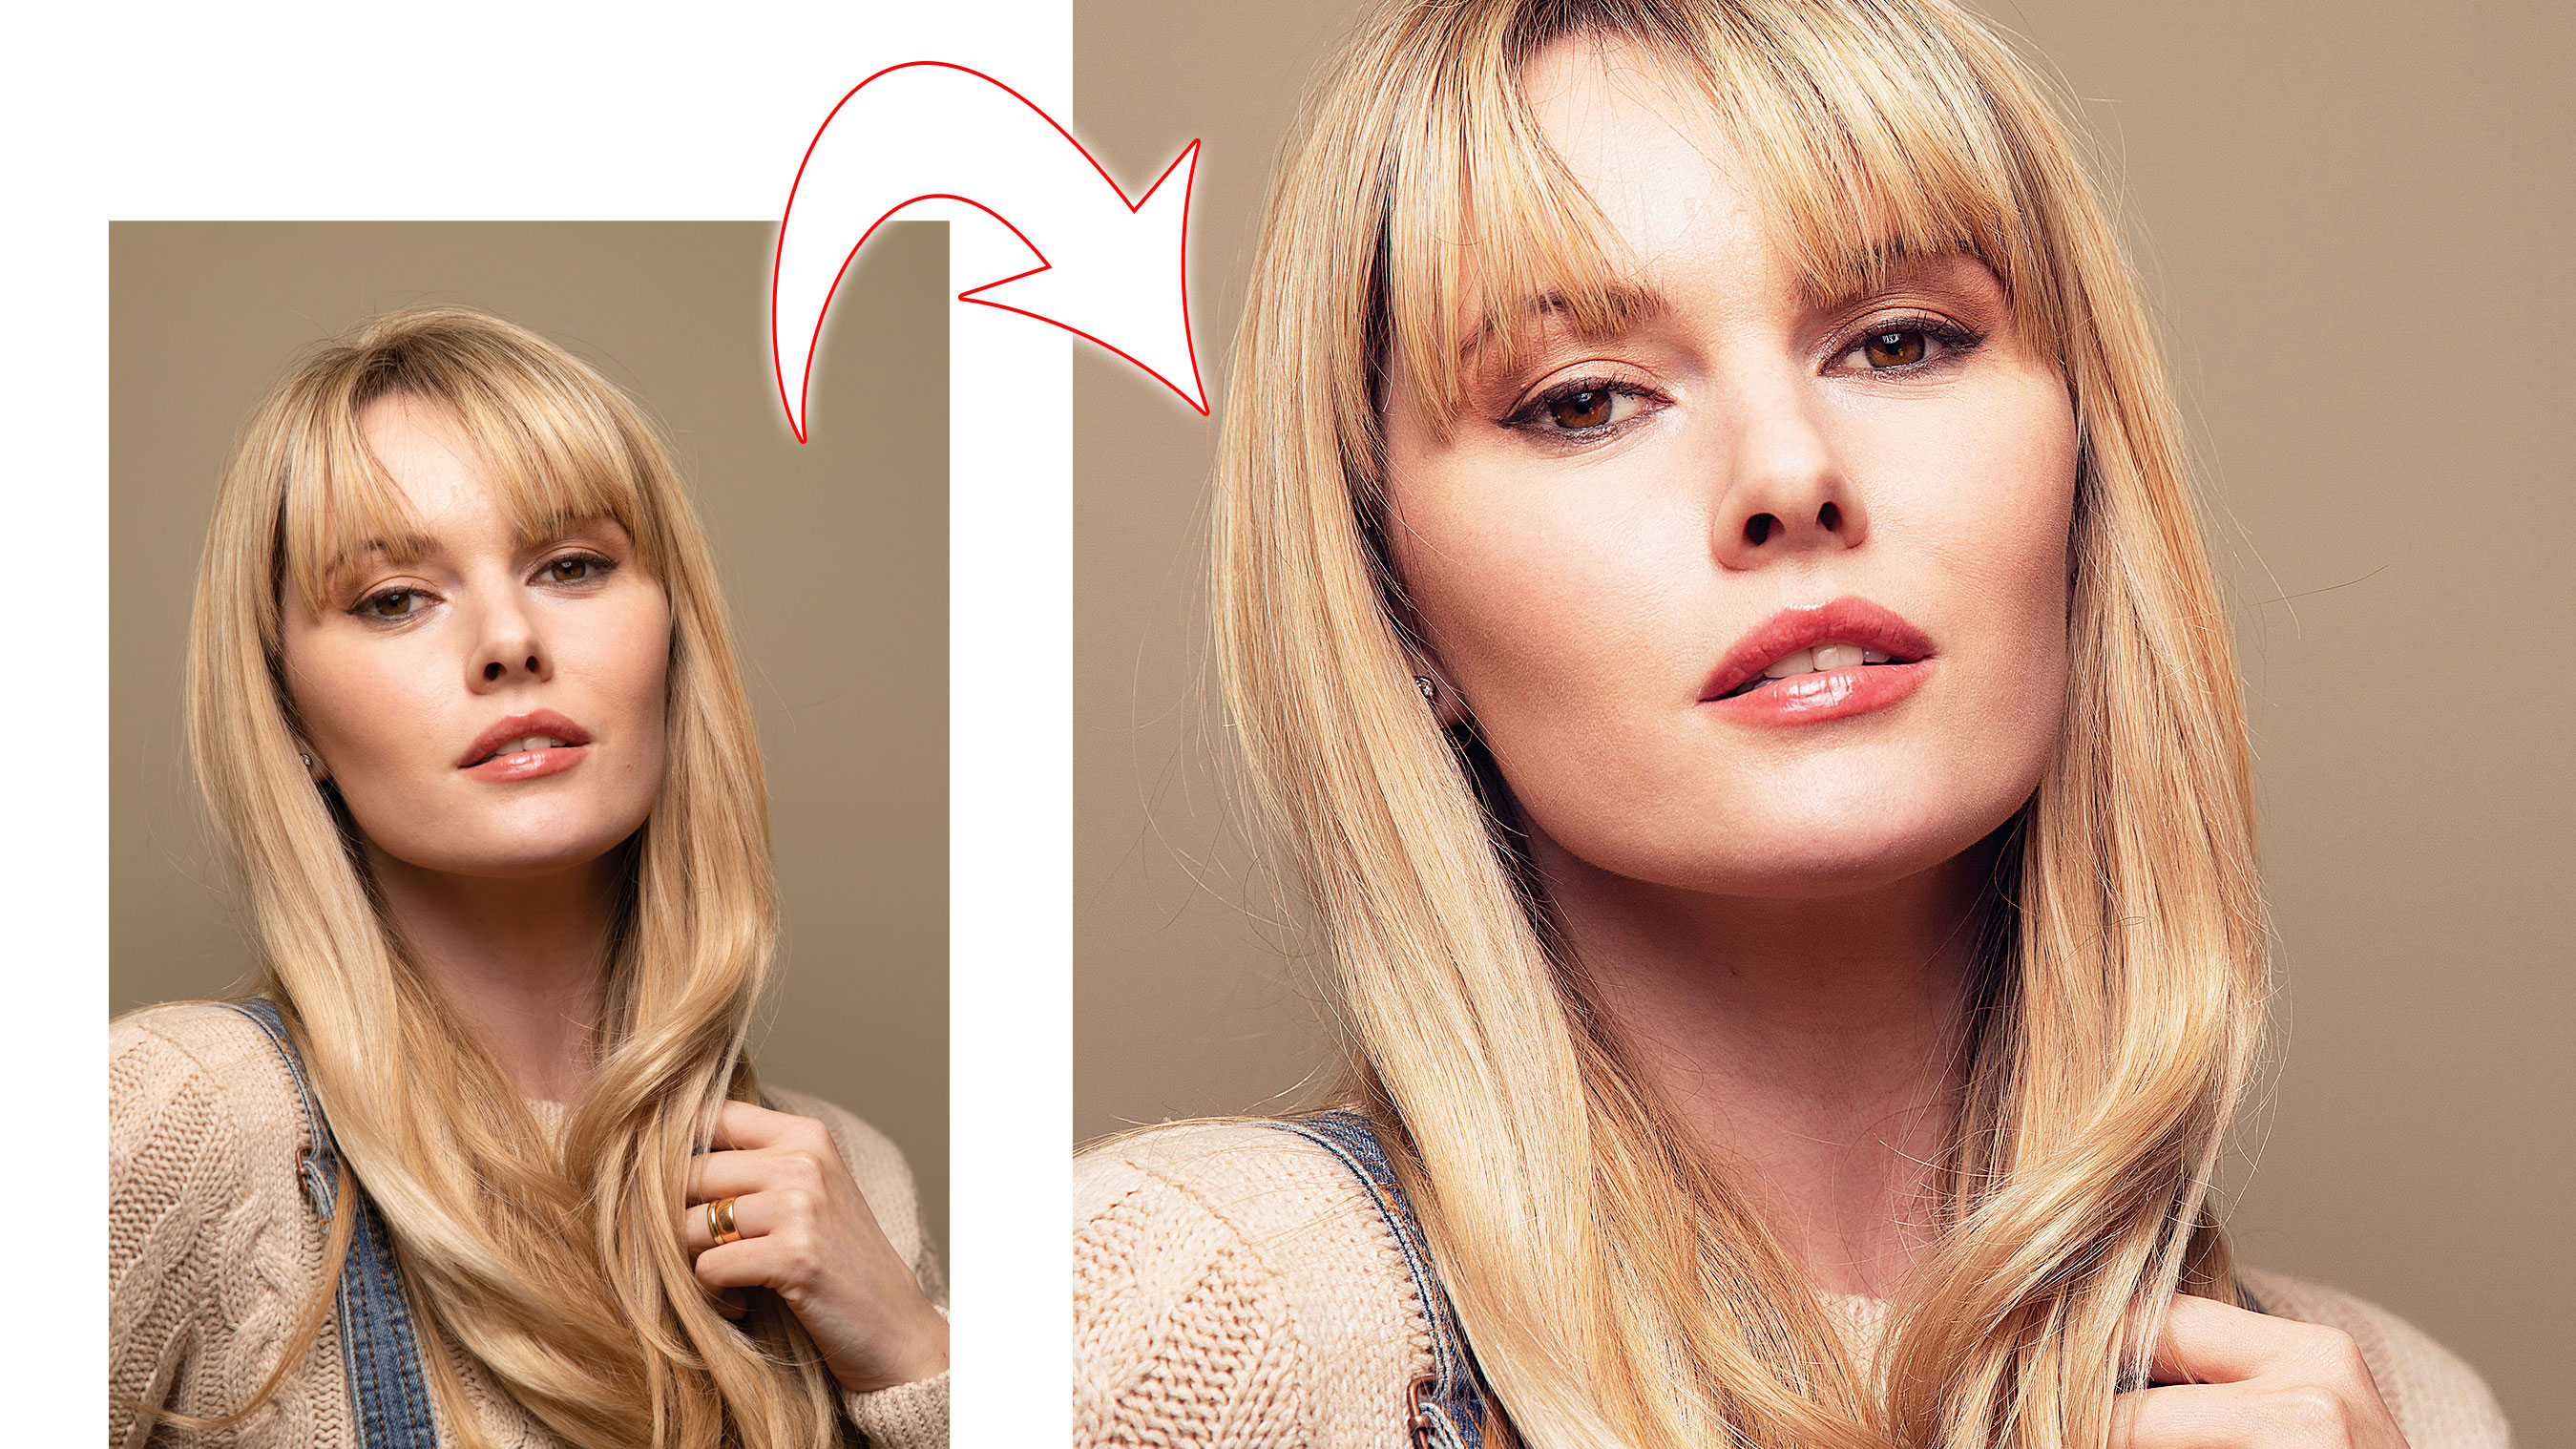
Affinity Photo offers a host of useful tools for portrait retouching. The healing and clone tools are ideal for removing marks and imperfections, while the tonal tools on offer make it easy to boost tones and add impact to the eyes of a subject.
Each of these adjustments can be made on separate layers, which gives you the option to tone things down afterwards if an enhancement looks overcooked or unnatural – a common pitfall with retouching.
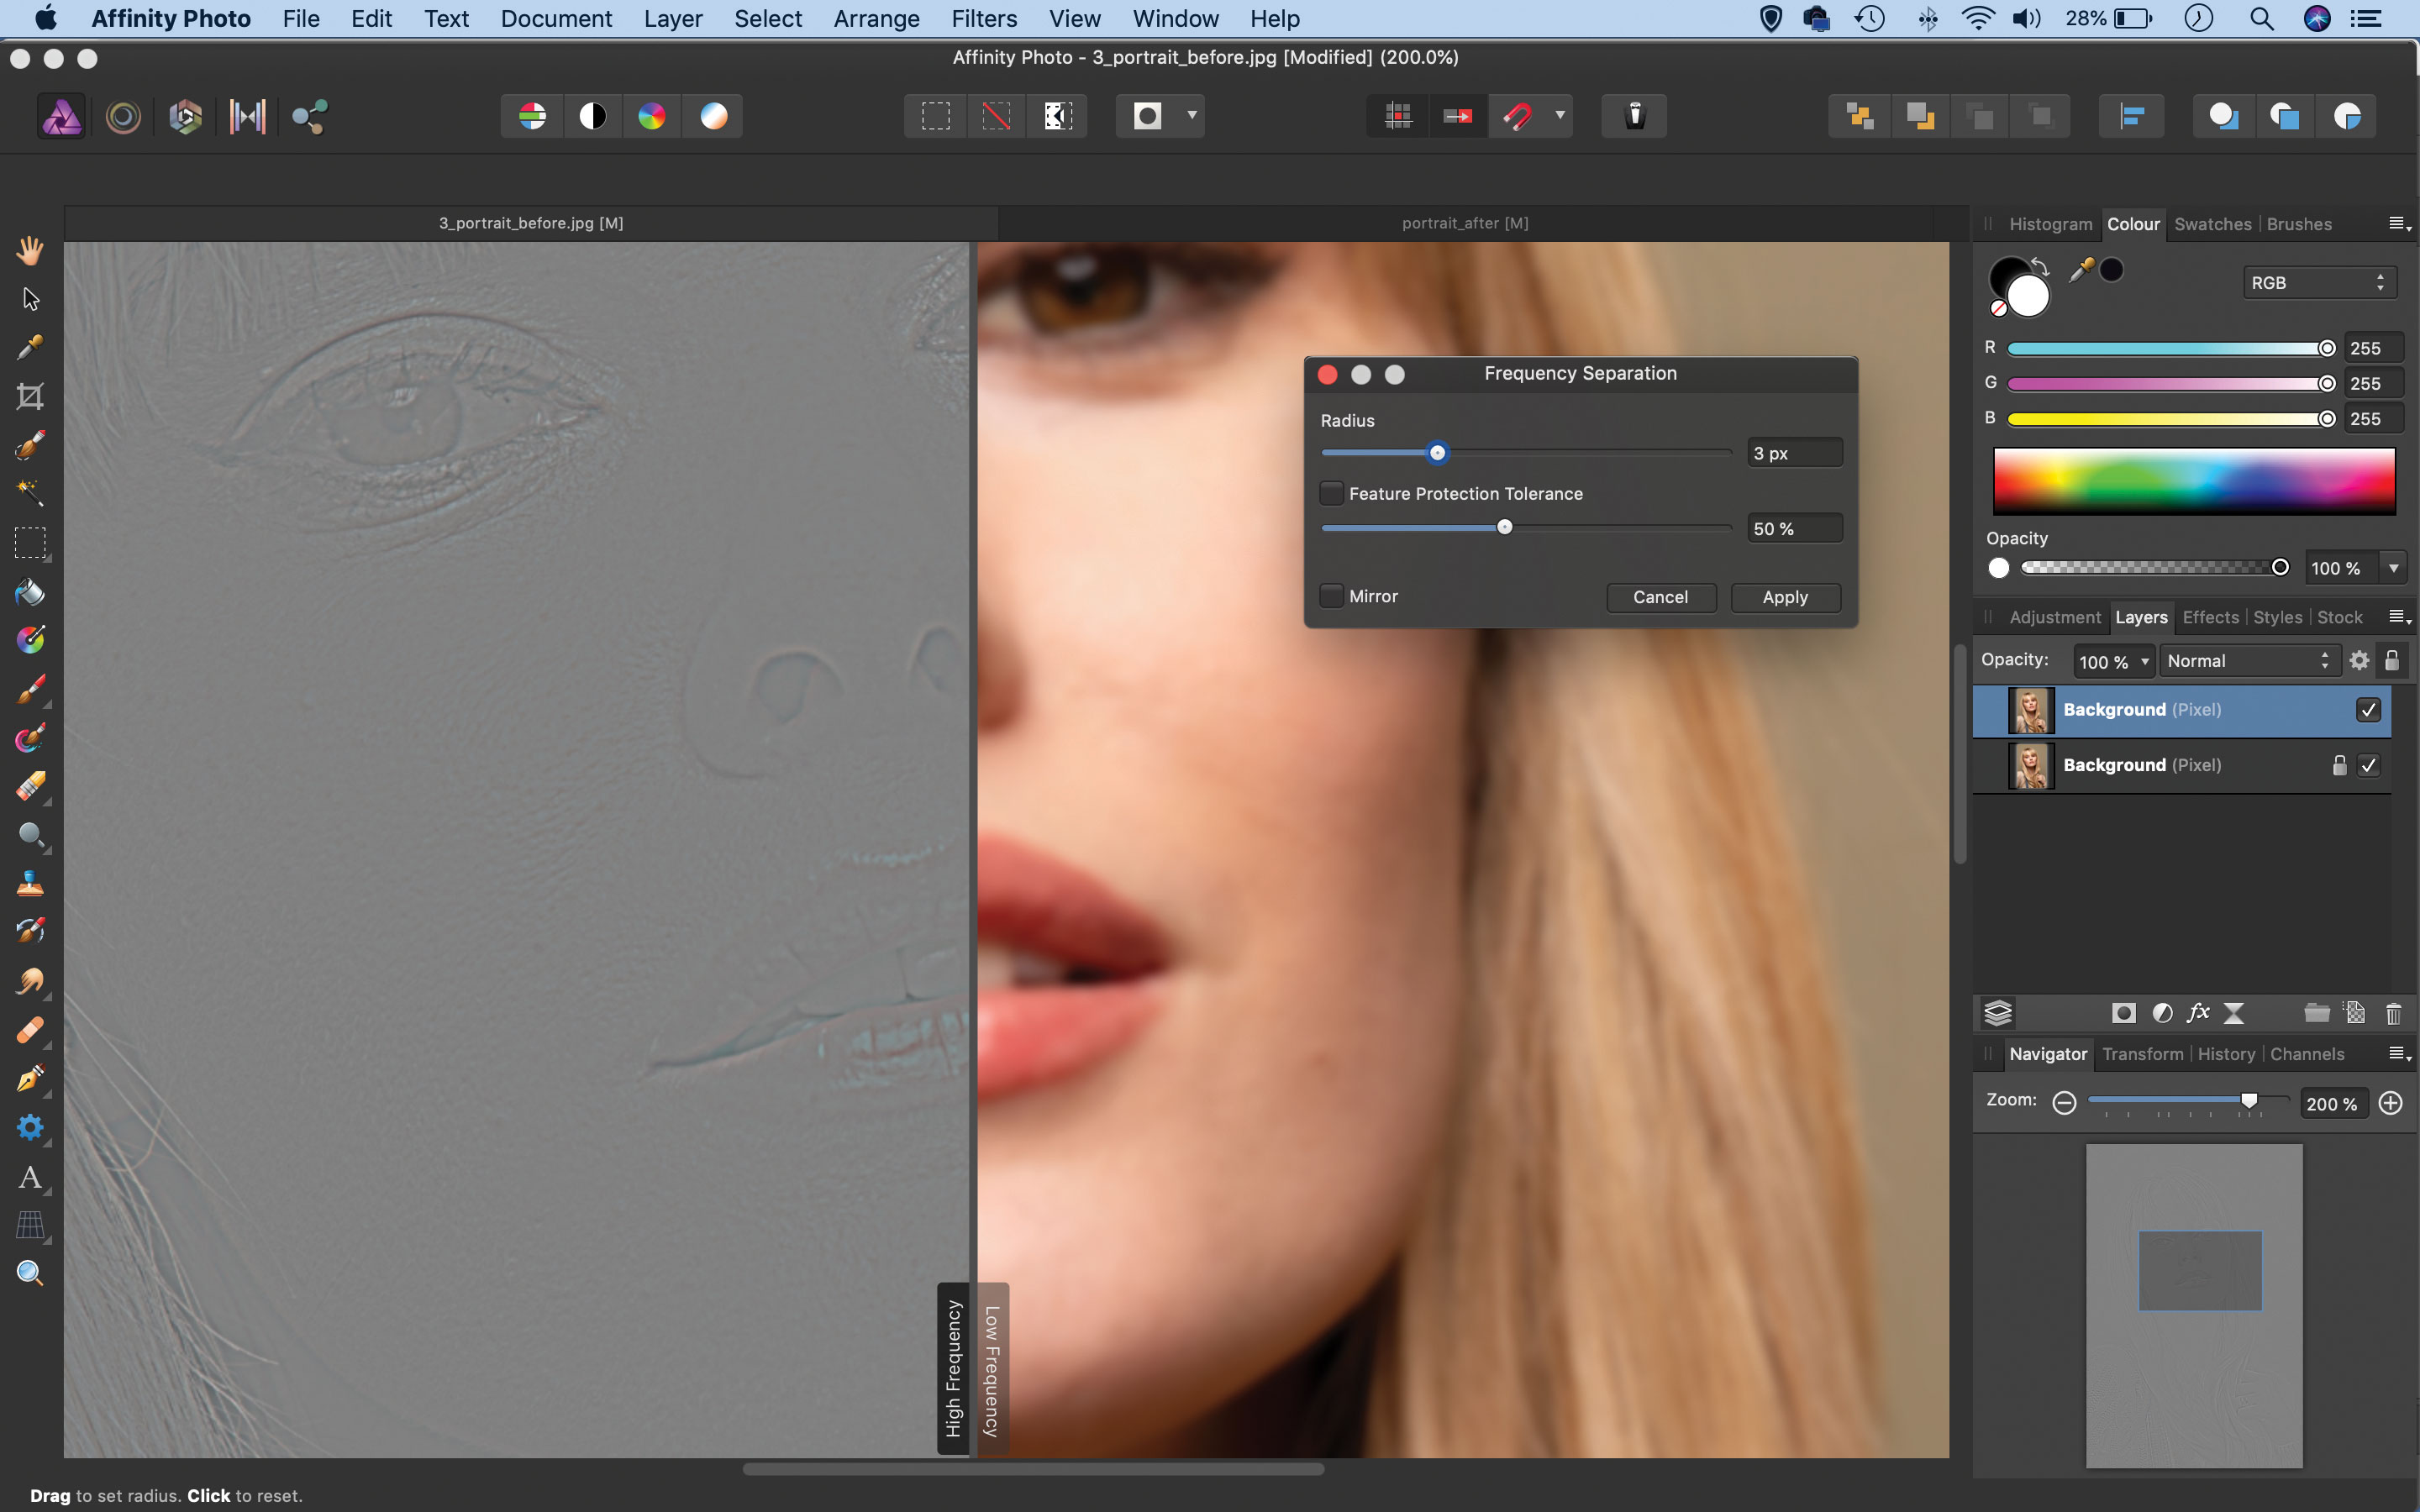
One of the best features is the dedicated Frequency Separation command, which effectively splits the image in two. The lower layer holds the low frequency detail, which includes tones and colours – in the context of a face, it’s basically the skin tones. By contrast, the upper layer has the high frequency detail, which includes all of the fine slightly more subtle textures, skin pores and little lines on the face.
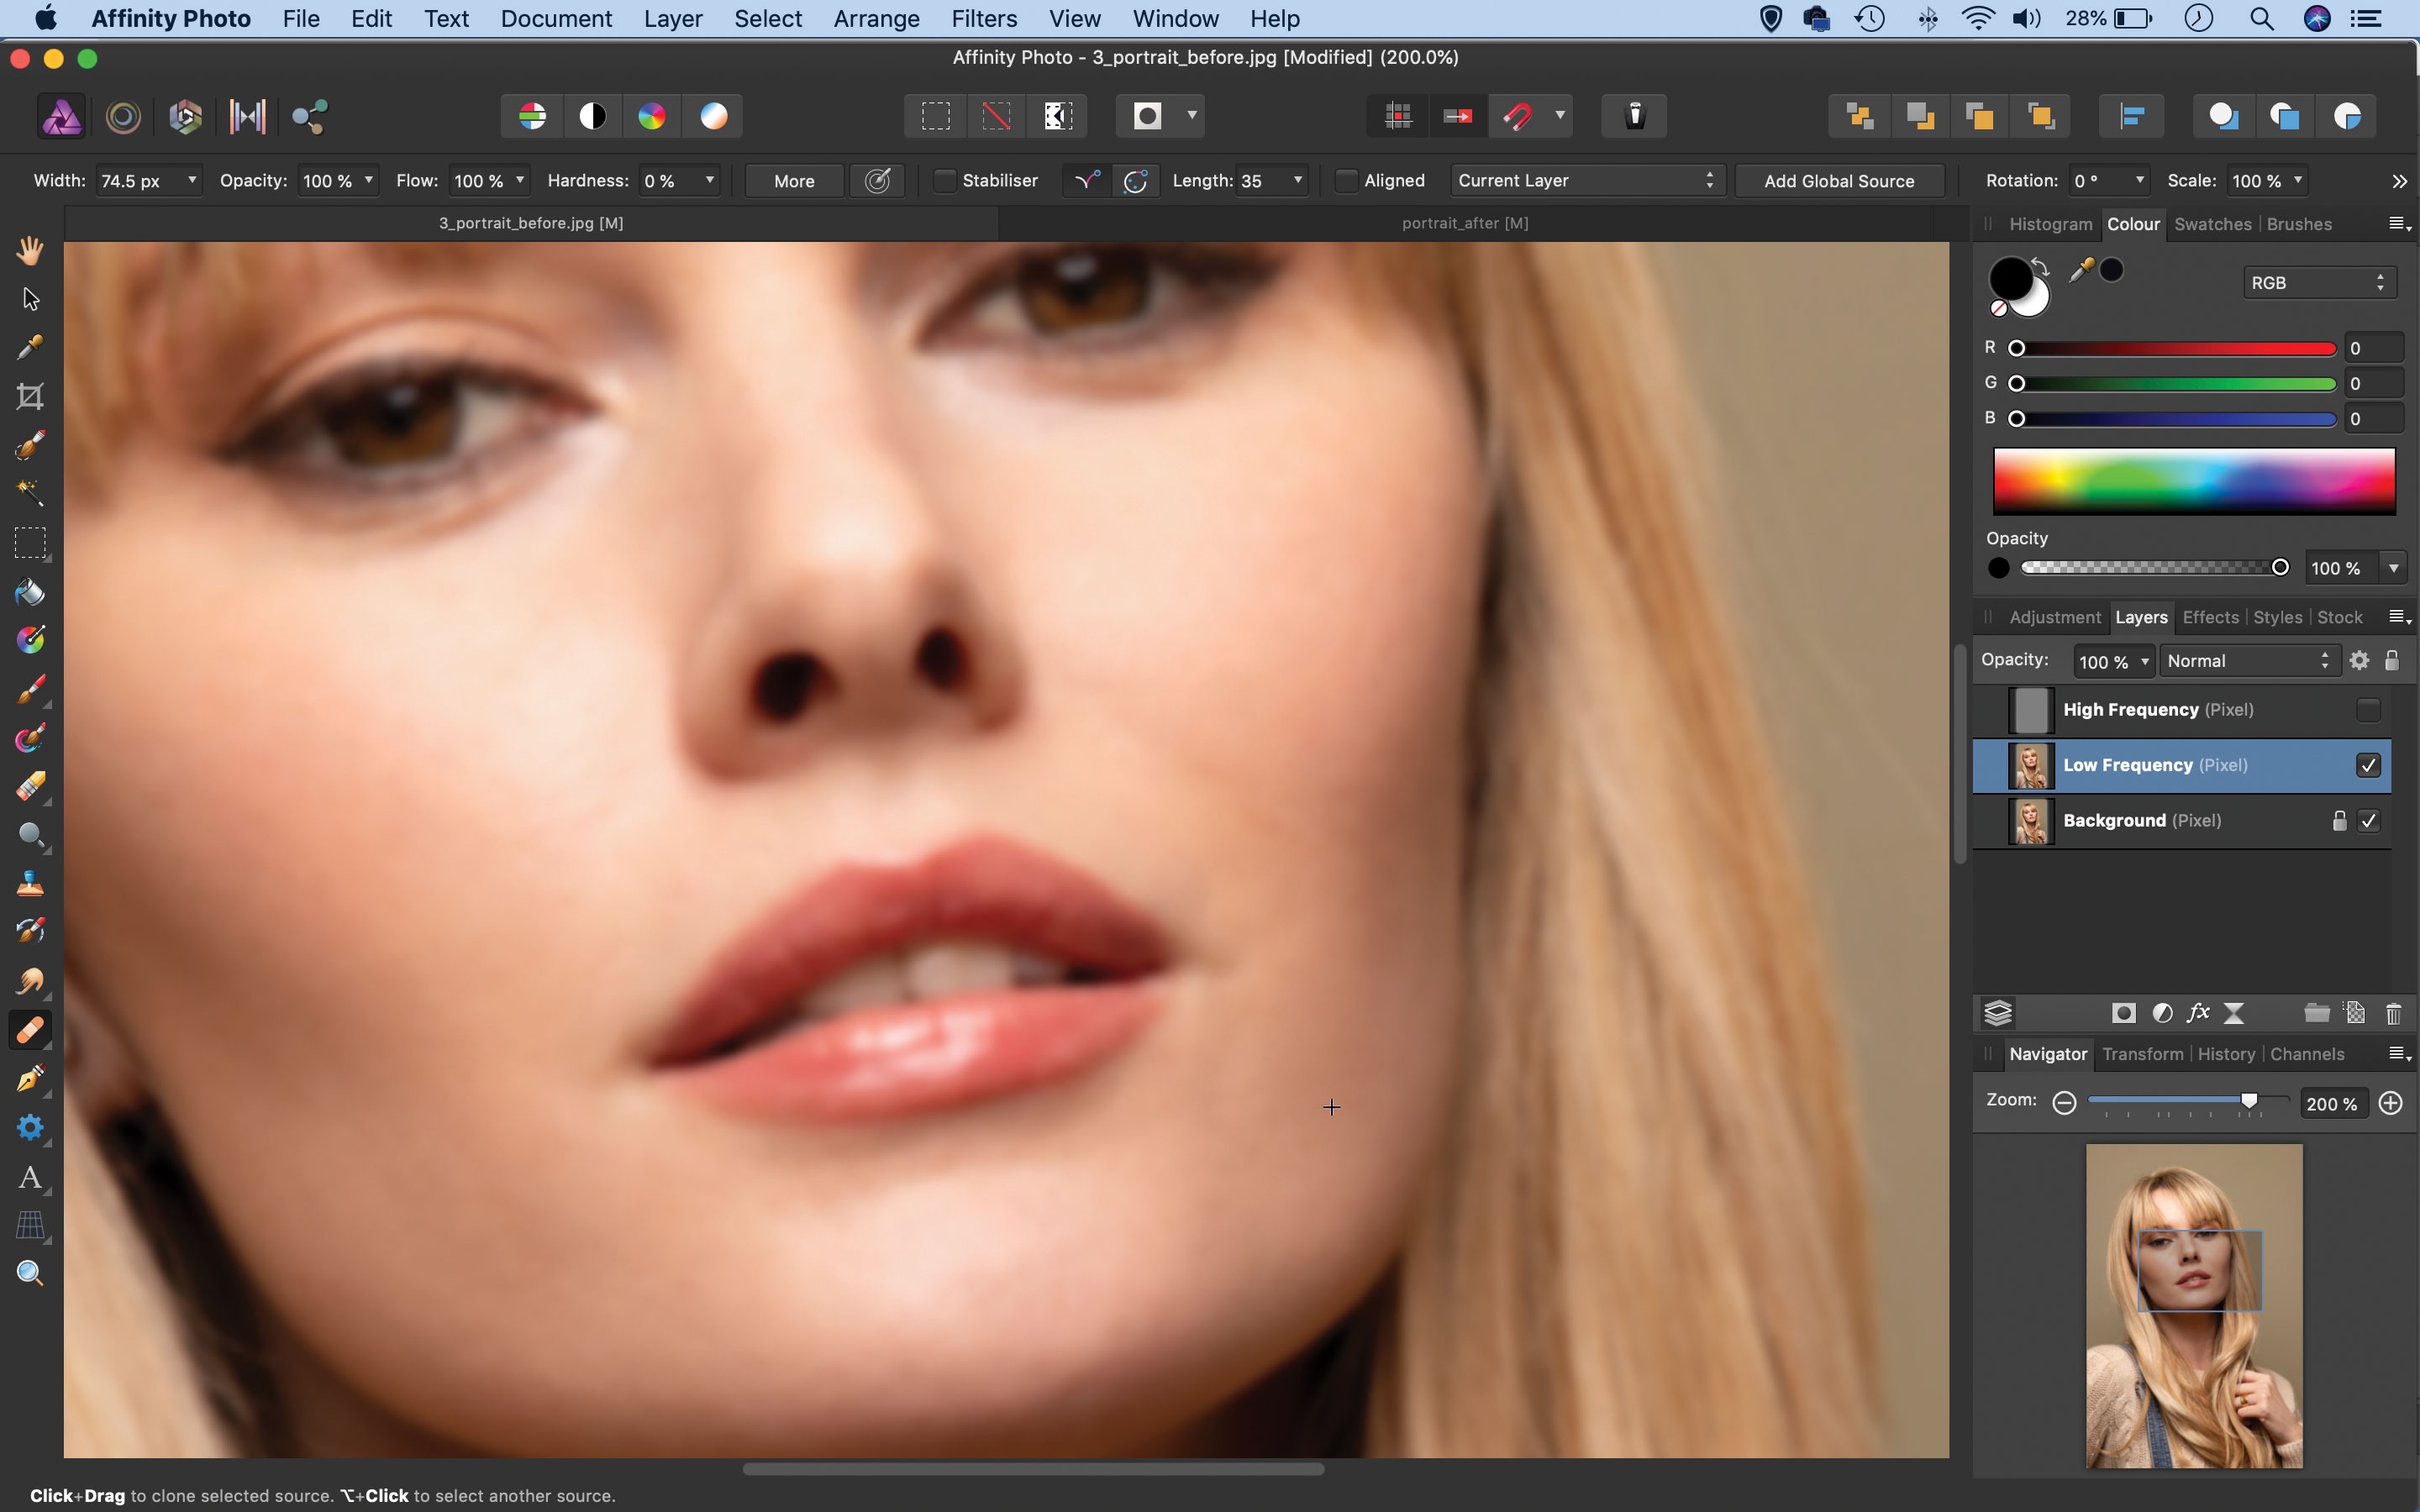
By splitting the image in two along these lines, we can retouch one independently of the other. So we can, for example, soften blotchy skin or bags under eyes by cloning on the low frequency layer without obliterating all of the fine textures and pores.
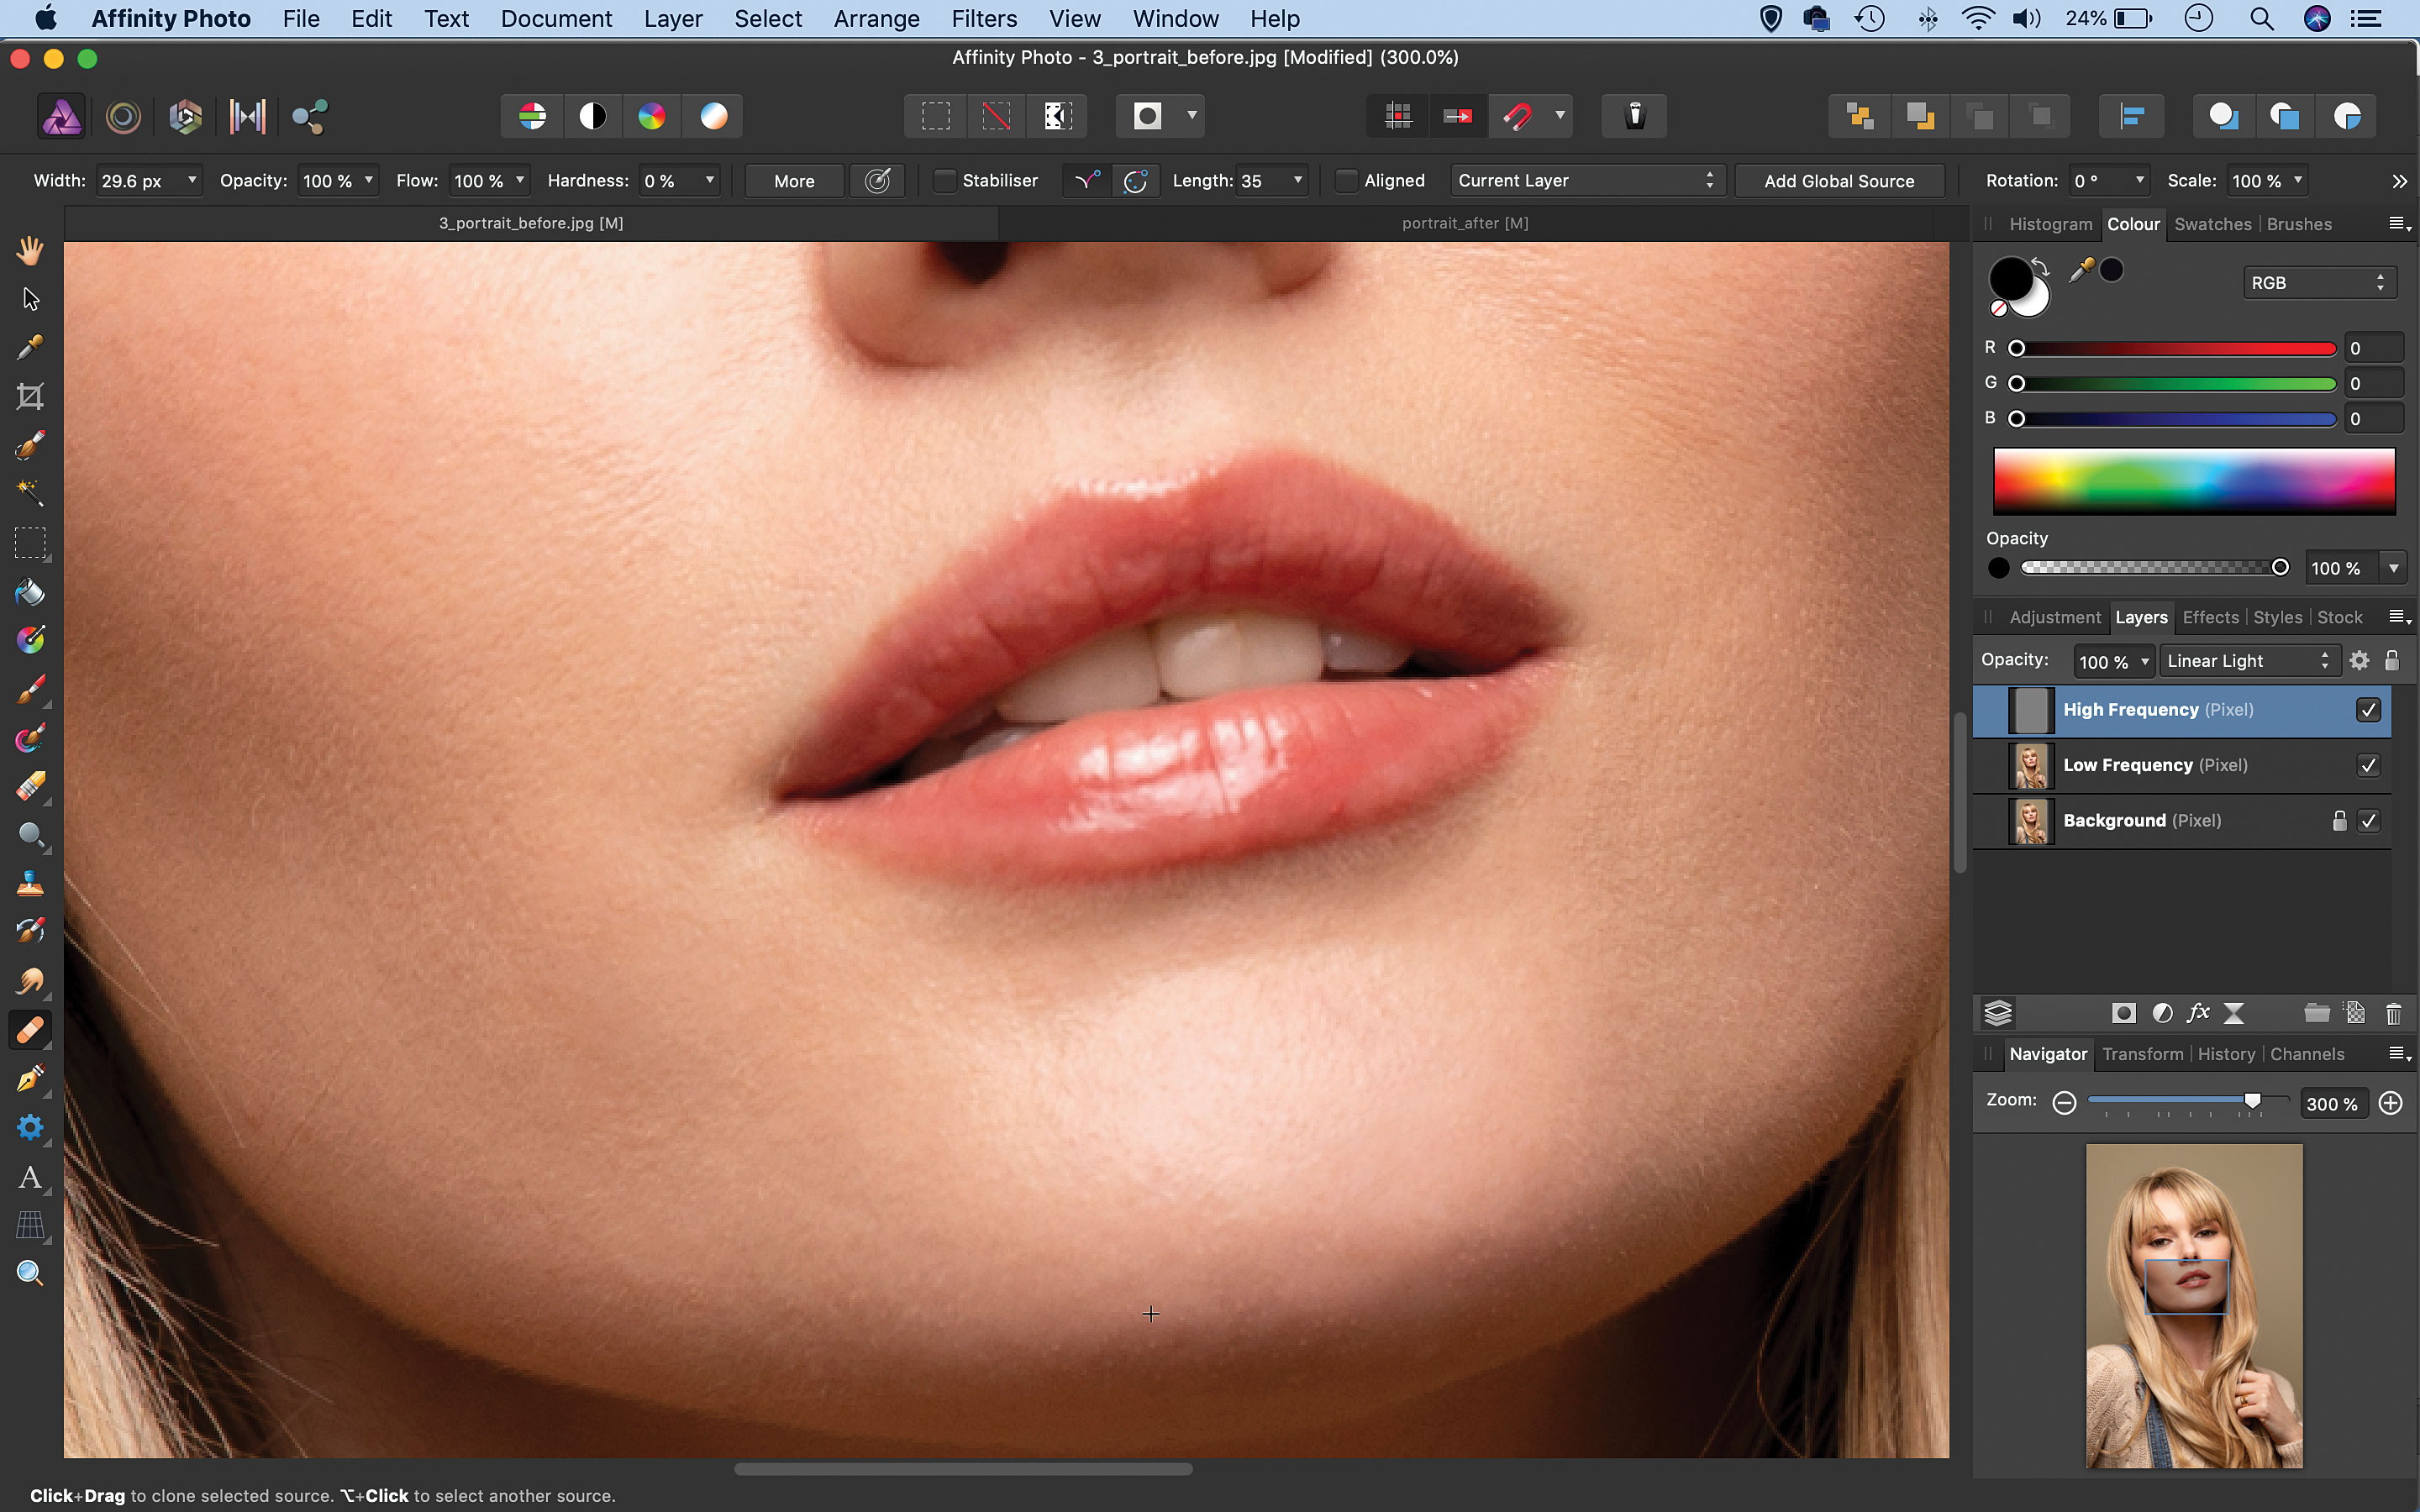
Similarly, we can remove pimples and marks on the high frequency layer without harming the colours underneath. In short, it means we can make our subjects look as if they’ve just had a two-hour mud mask facial treatment followed by a professional makeup job, while still looking natural.
When you first engage the Frequency Separation command you’ll be asked to set the radius for the effect. This determines the amount of blur applied to the low frequency layer. Setting the right amount is crucial. The exact figure will depend on the resolution of your image and the size of the subject in the frame, so it has to be judged by eye. We want a radius that only just blurs the texture of the skin. Pushed too far it can over-blur the transitions between tones and leave the face looking rather flat.
The best camera deals, reviews, product advice, and unmissable photography news, direct to your inbox!
In this Affinity Photo tutorial we’ll explain how to use Frequency Separation, then finish off our portrait with impactful tonal changes to get your subjects looking their best.
Read more:
Step 1: Frequency Separation
Start by opening up your portrait image in Affinity Photo and press Cmd/Ctrl+J to duplicate the background layer. Now go to Filters > Frequency Separation. In the dialog box, we choose a radius that only just blurs the textures in the face and leaves gentle transitions between the tones. Here it’s around 4px. Click Apply.
Step 2: Remove uneven tones
You’ll see two new layers in the Layers panel. Click the tick next to High Frequency to turn it off for now and target Low Frequency. Grab the Healing tool. Alt-click to sample a source near to a blotchy patch of skin, then paint to remove it. Continue working over the face.
Step 3: Soft colour transitions
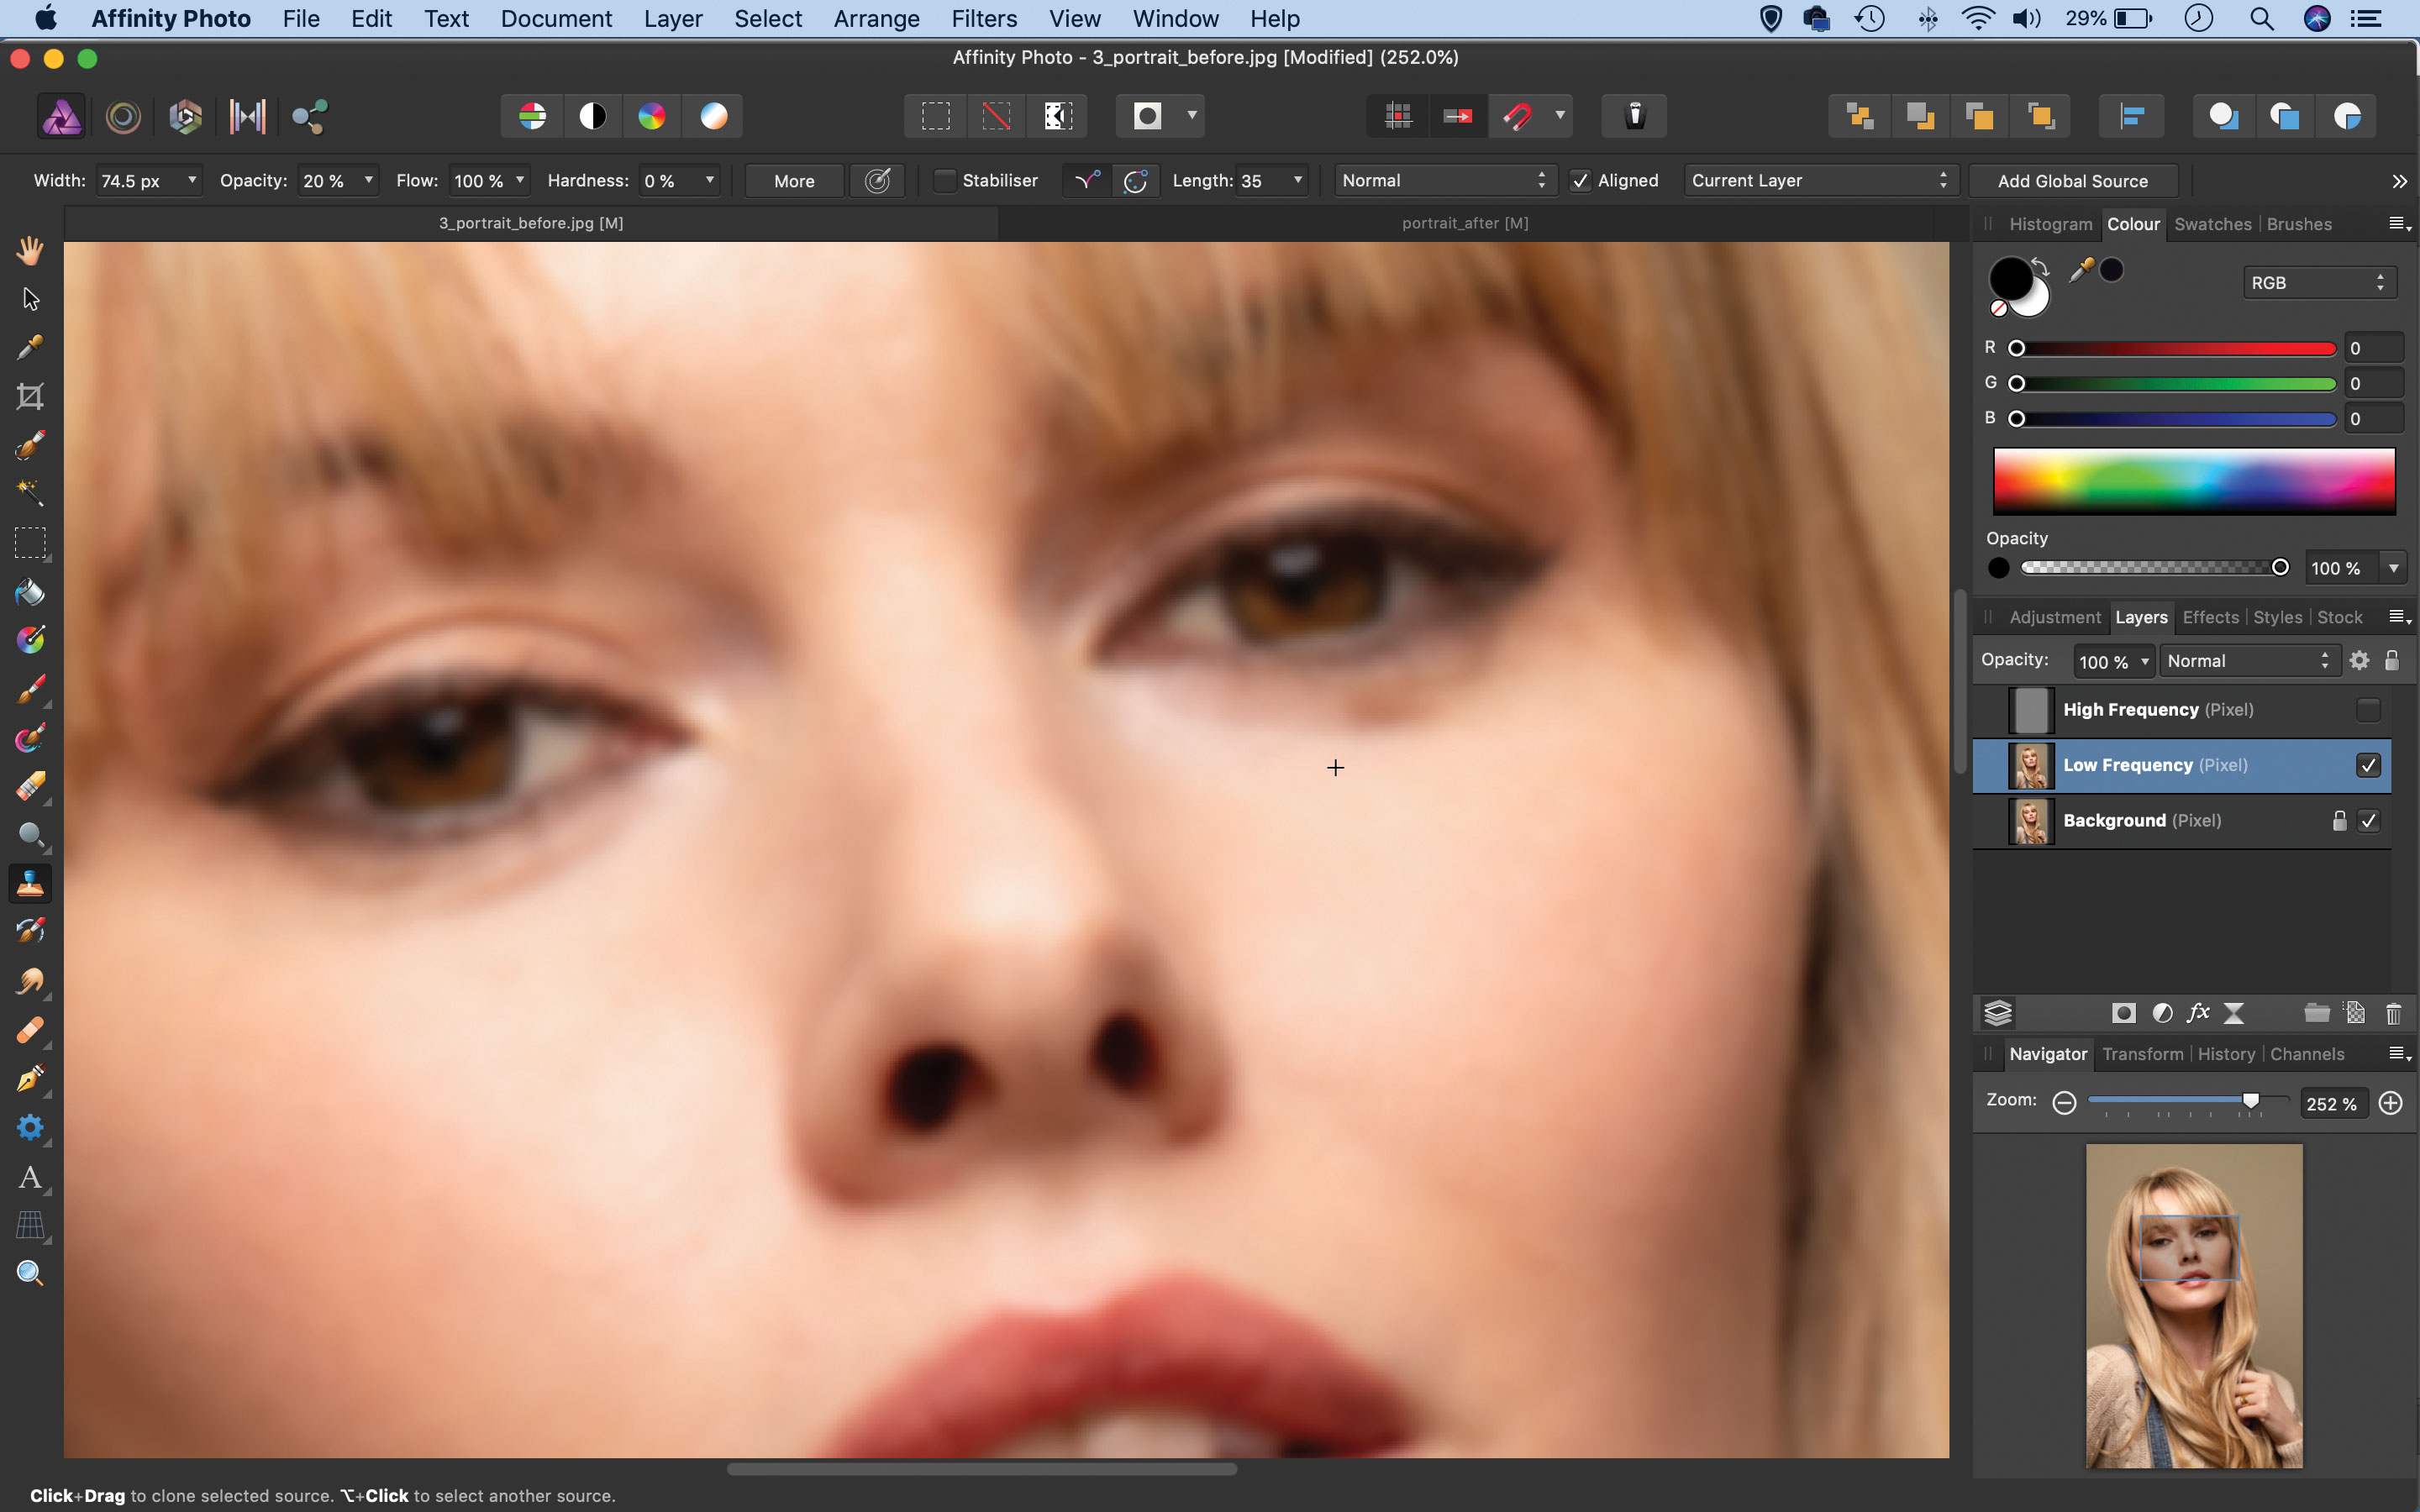
The Clone tool can also be useful for retouching the Low Frequency layer. Grab it from the toolbar then hit 2 for 20% opacity (it's a good starting point). Again, Alt-click to sample a clear part of the skin then paint to tone down the bags under the eyes and the rough patches near the corners of the mouth.
Step 4: Retouch marks
Now highlight and reveal the High Frequency layer then grab the Healing tool. Make sure it’s set to ‘Current Layer’ in the tool options then retouch little lines, pimples and small marks on the skin. You can also use the Clone tool to soften textures that might appear too harsh.
Step 5: Boost the eyes
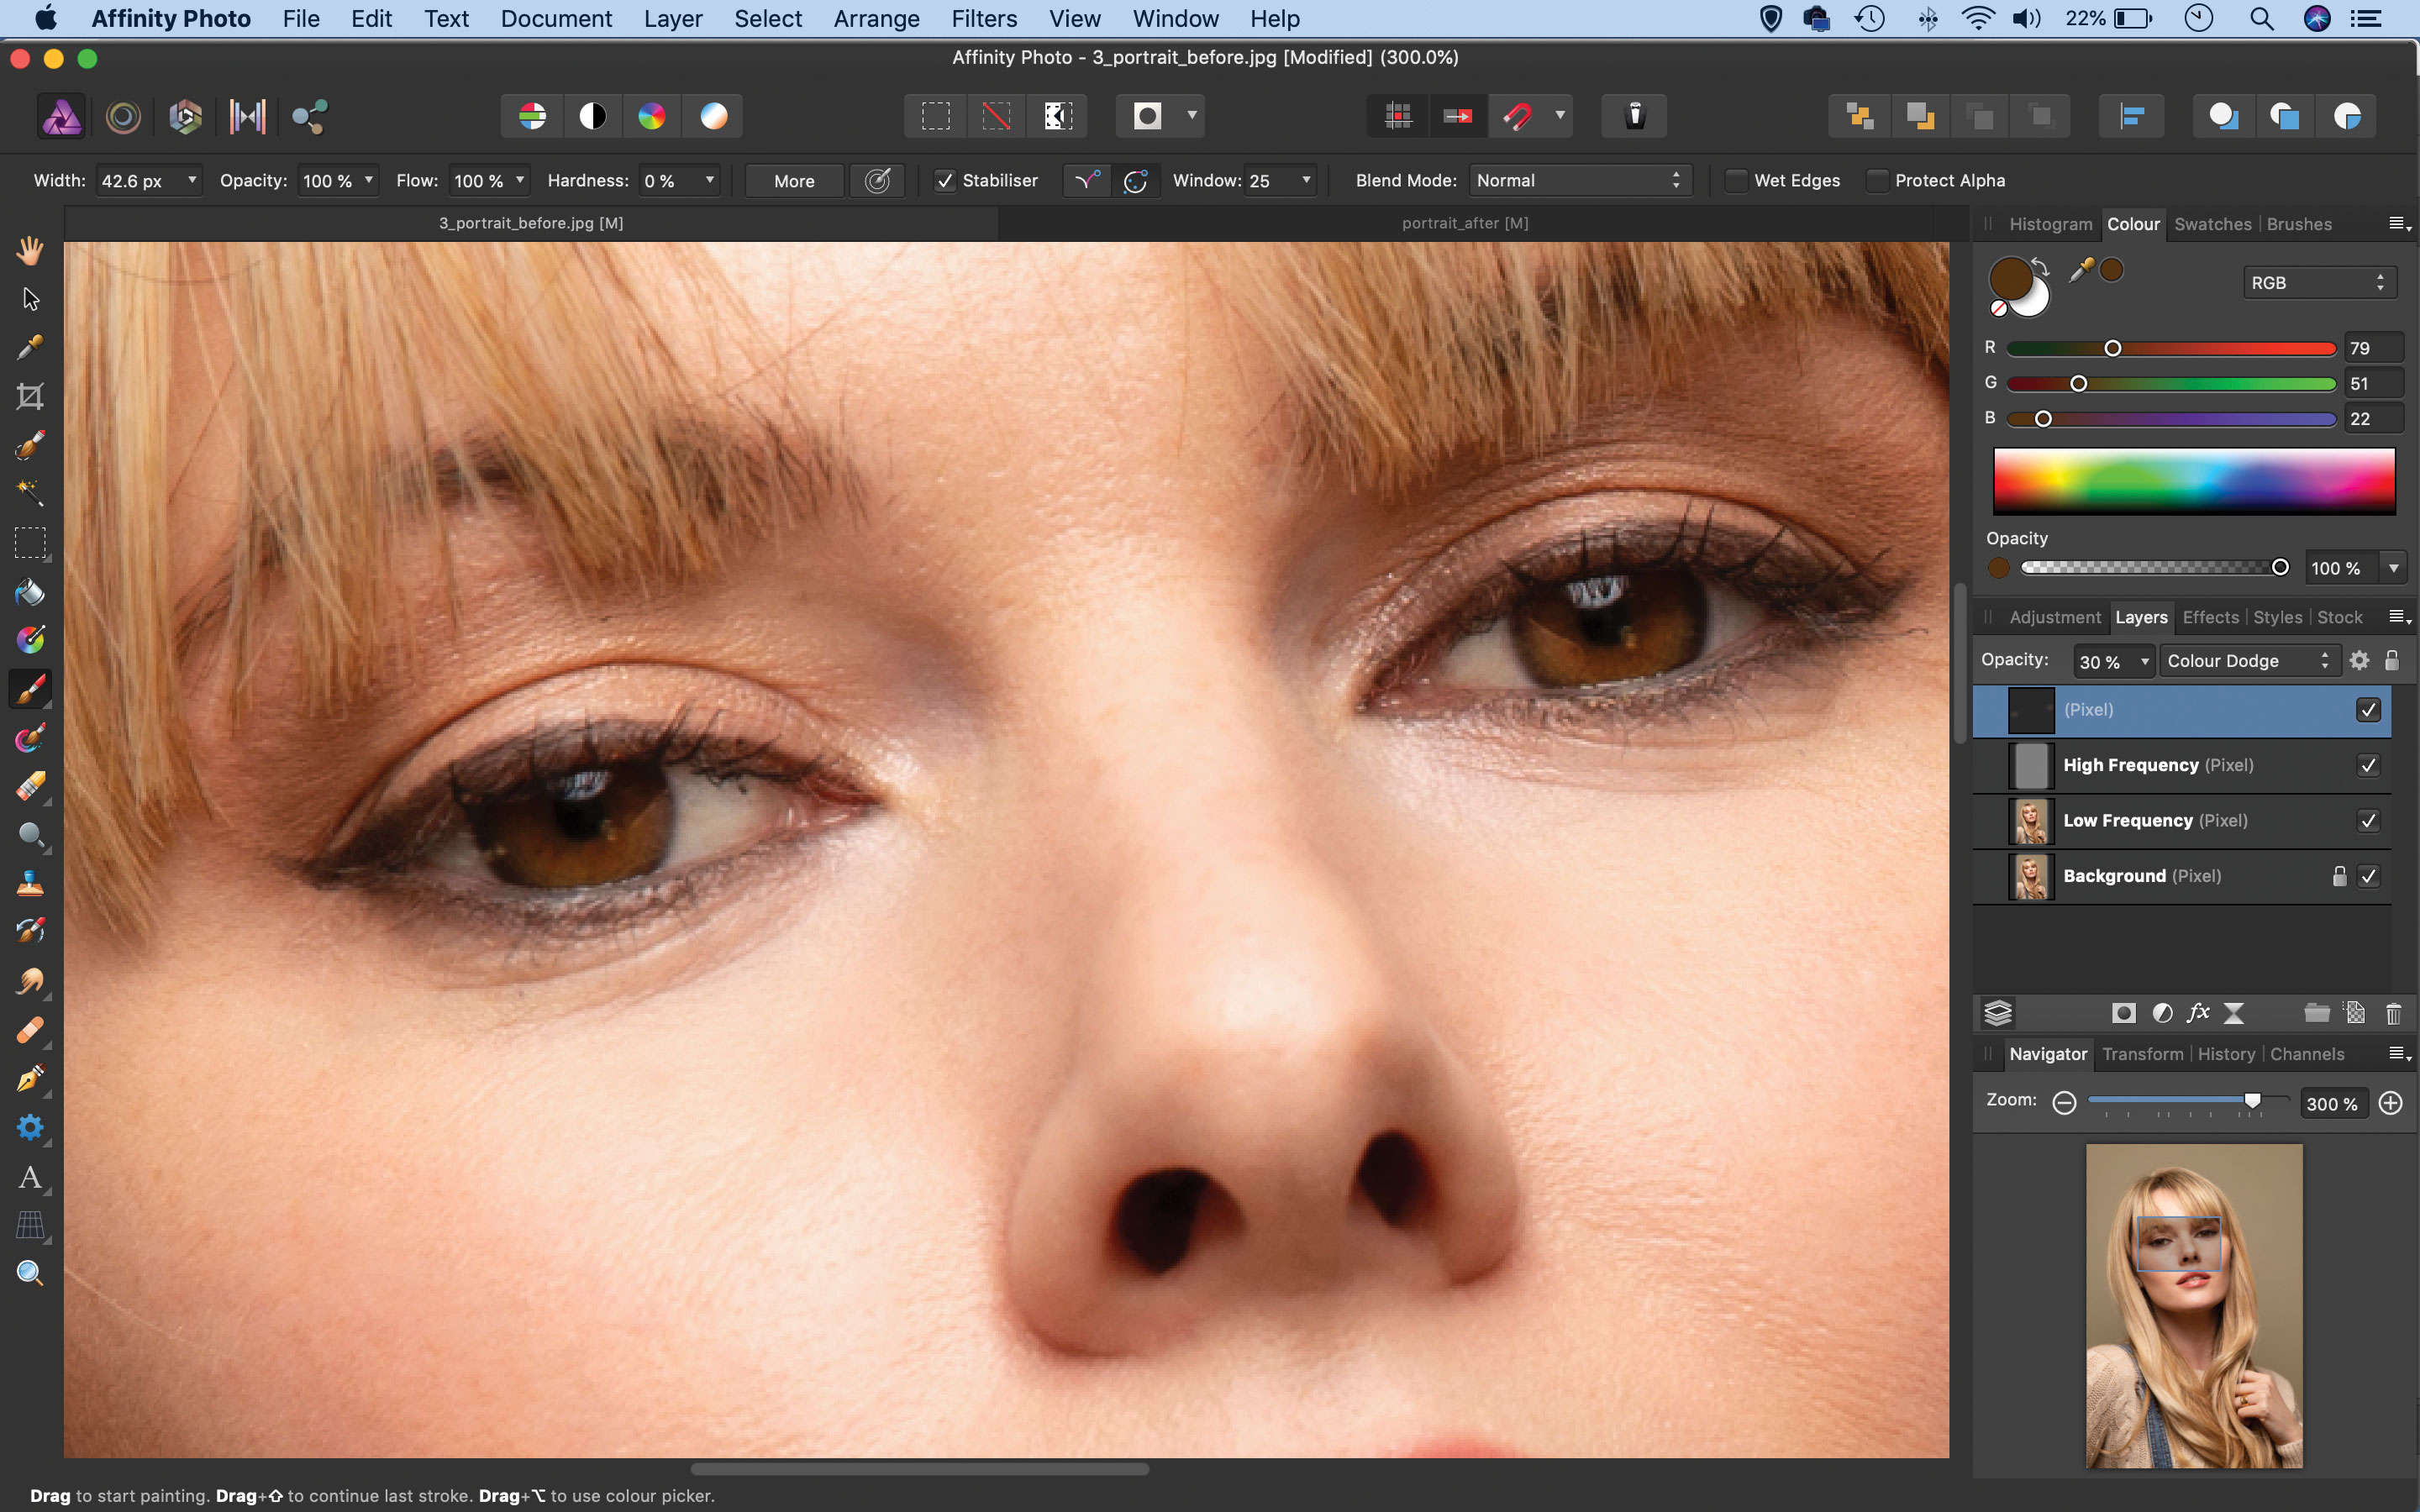
Make a new layer and set it to the Color Dodge blend mode. Grab the Brush tool then hold Alt and click to sample the colour in your subject's eyes. Paint over the iris to enhance the colours. If it’s too strong, lower the layer opacity to around 30%.
Step 6: Enhance the tones
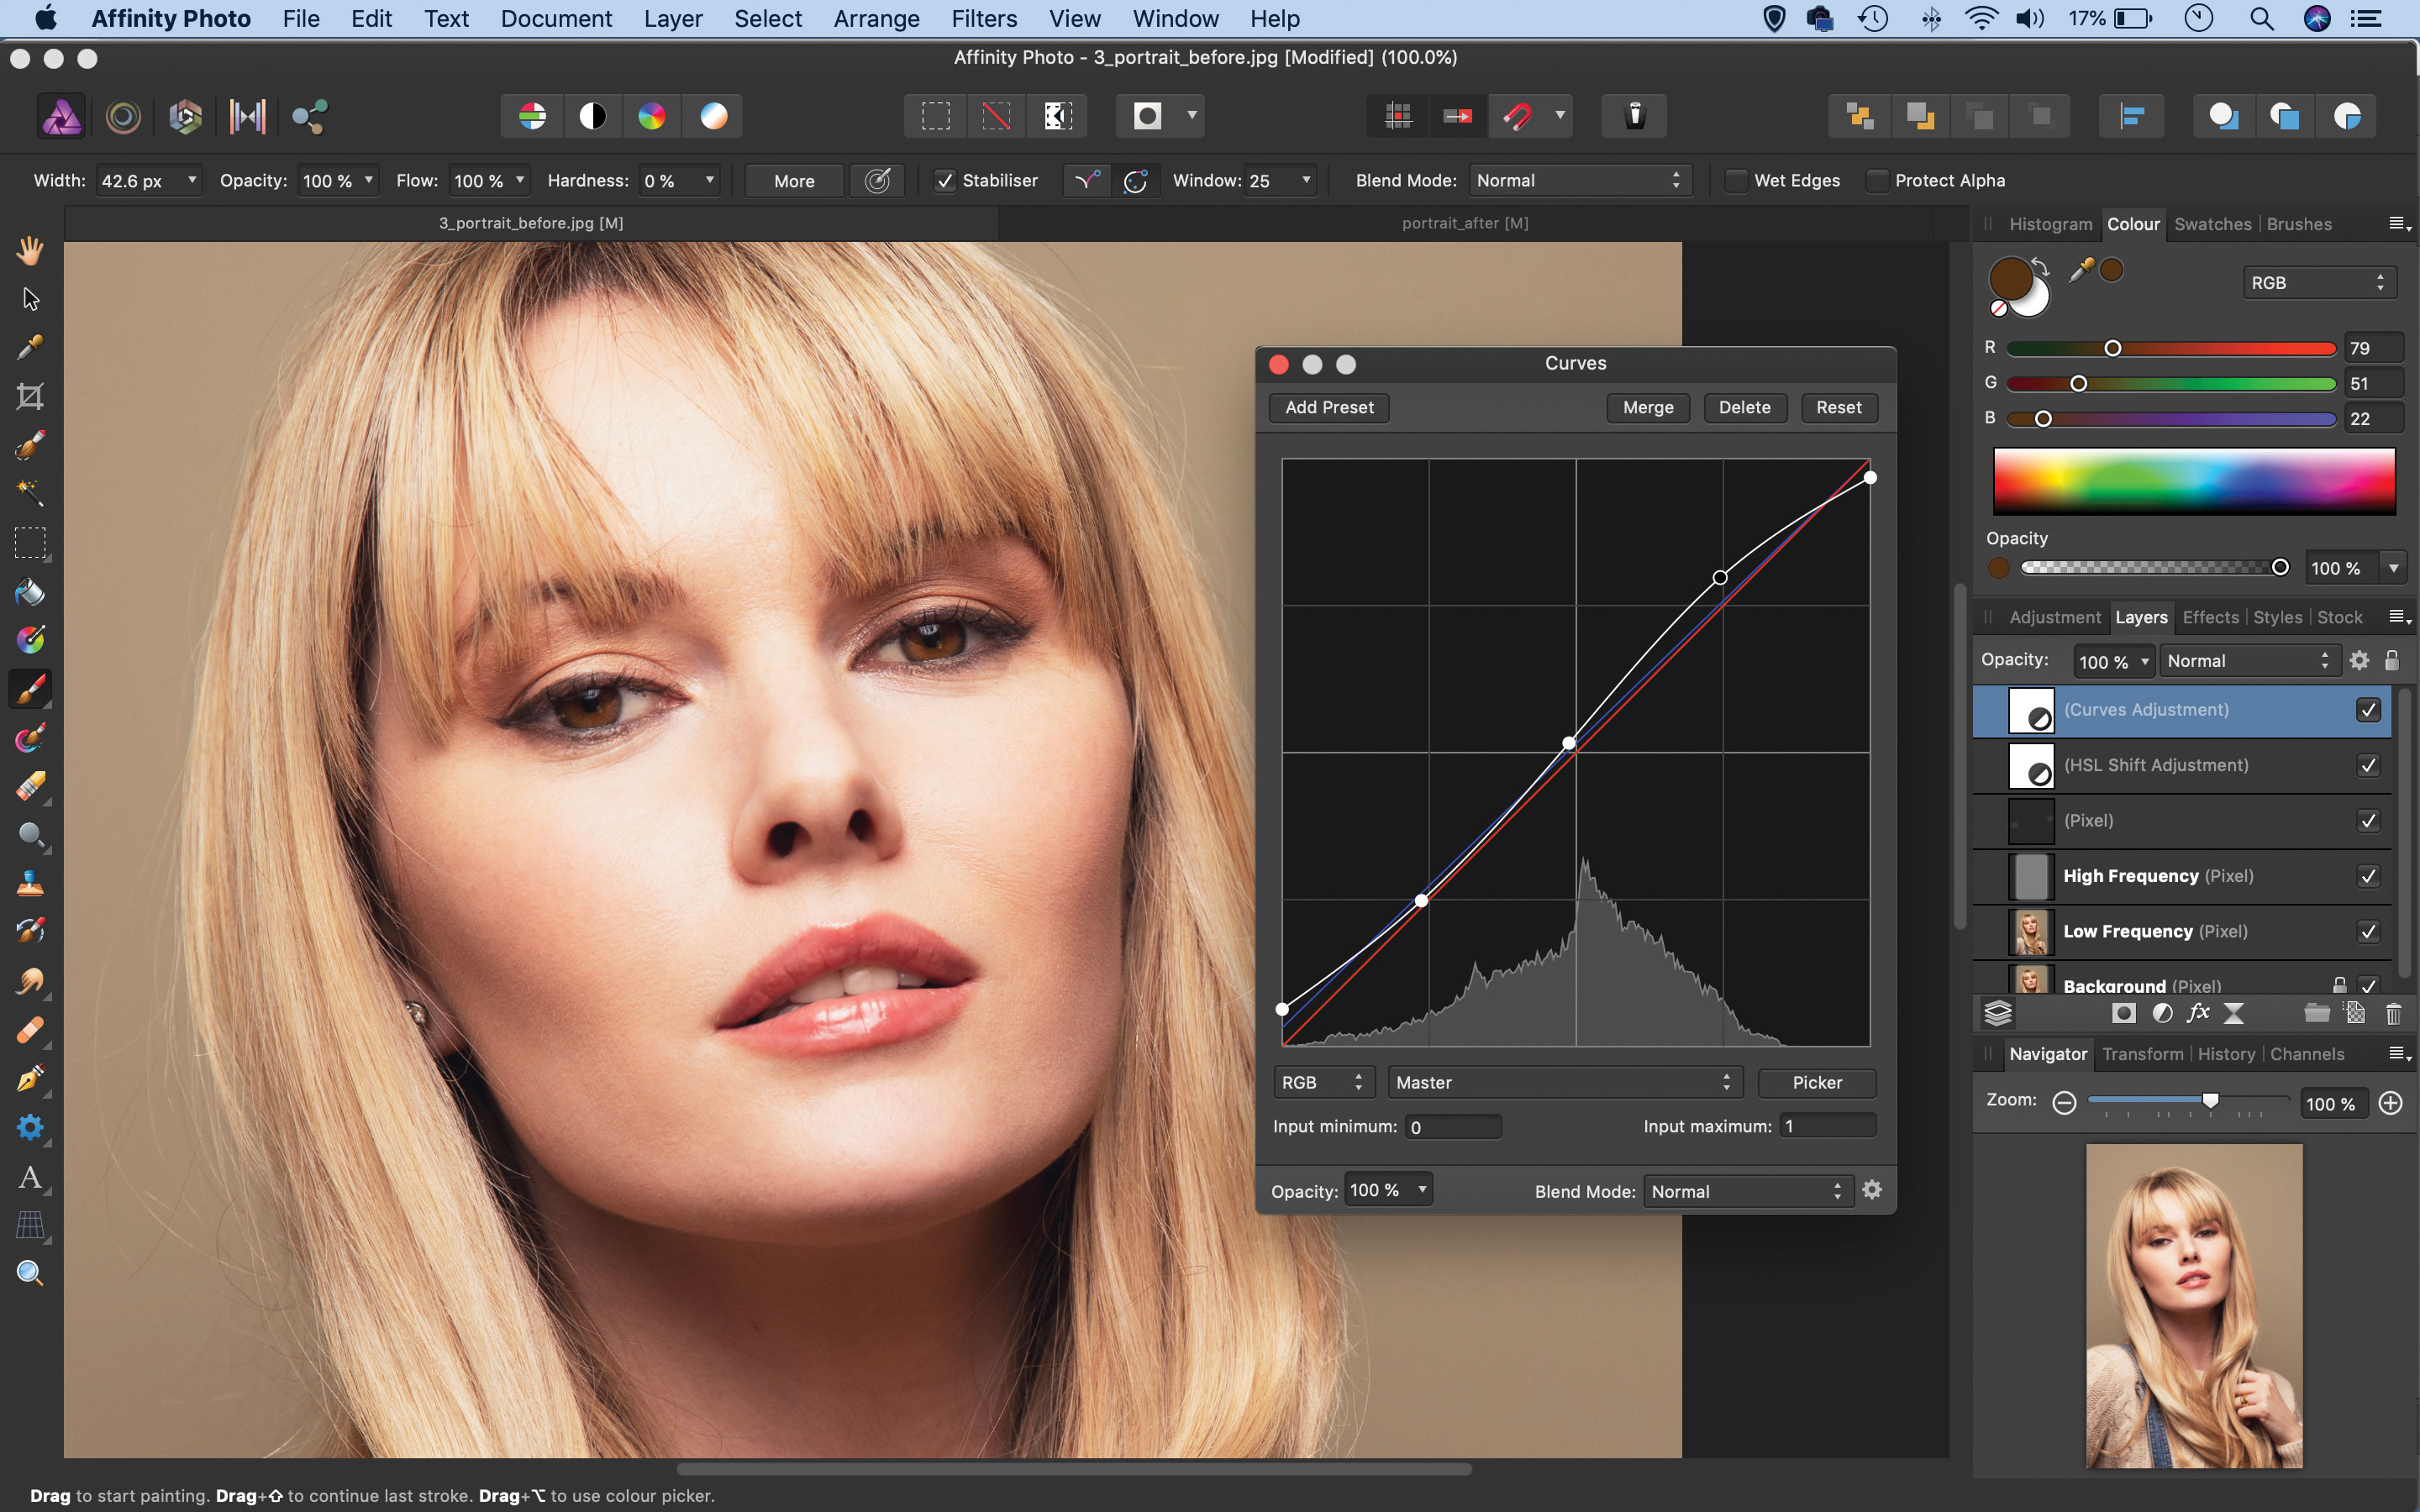
To finish off, click the adjustment layer icon in the Layers panel and choose HSL. Target the Reds and lift luminosity slightly, then repeat for Yellows. This gently lifts the skintones. Next add a Curves adjustment layer then plot an S-shaped curve to boost contrast. Target the Blues, and lift the bottom point upwards slightly as shown
Quick tip
When you first engage the Frequency Separation command you’ll be asked to set the radius for the effect. This determines the amount of blur applied to the low frequency layer. Setting the right amount is crucial. The exact figure will depend on the resolution of your image and the size of the subject in the frame, so it has to be judged by eye. We want a radius that only just blurs the texture of the skin. Pushed too far it can over-blur the transitions between tones and leave the face looking rather flat.
About N-Photo magazine
This tutorial originally appeared in N-Photo, the monthly newsstand magazine for Nikon photographers. Why not subscribe to a print edition, and have the magazine delivered direct to your door every month?
Alternatively, we have a number of different digital options available, including:
• Apple app (for iPad or iPhone)
• Zinio app (multi-platform app for desktop or smartphone)
• PocketMags (multi-platform app ideal for Android devices)
• Readly (all-you-can-eat digital magazine subscription service)
If you wanted a printed version of any of our most recent issues we have a selection of back issues to choose from in our online store.
Read more:
• Photography tips and tutorial videos
• The best photo editing tools and accessories
• The best desktop computers for photo editing
• The best photo-editing laptops right now
• The best photo editing software today
N-Photo: The Nikon Magazine is a monthly publication that's entirely dedicated to Nikon users. As a 100% independent magazine, you can be assured of unbiased opinion from a trustworthy team of devoted photography experts including editor Adam Waring and Deputy Editor Mike Harris.
Aimed at all users, from camera newcomers to working pros, every issue is packed with practical, Nikon-specific advice for taking better photos, in-depth reviews of Nikon-compatible gear, and inspiring projects and exciting video lessons for mastering camera, lens and Photoshop techniques.
Written by Nikon users for Nikon users, N-Photo is your one-stop shop for everything to do with cameras, lenses, tripods, bags, tips, tricks and techniques to get the most out of your photography.
