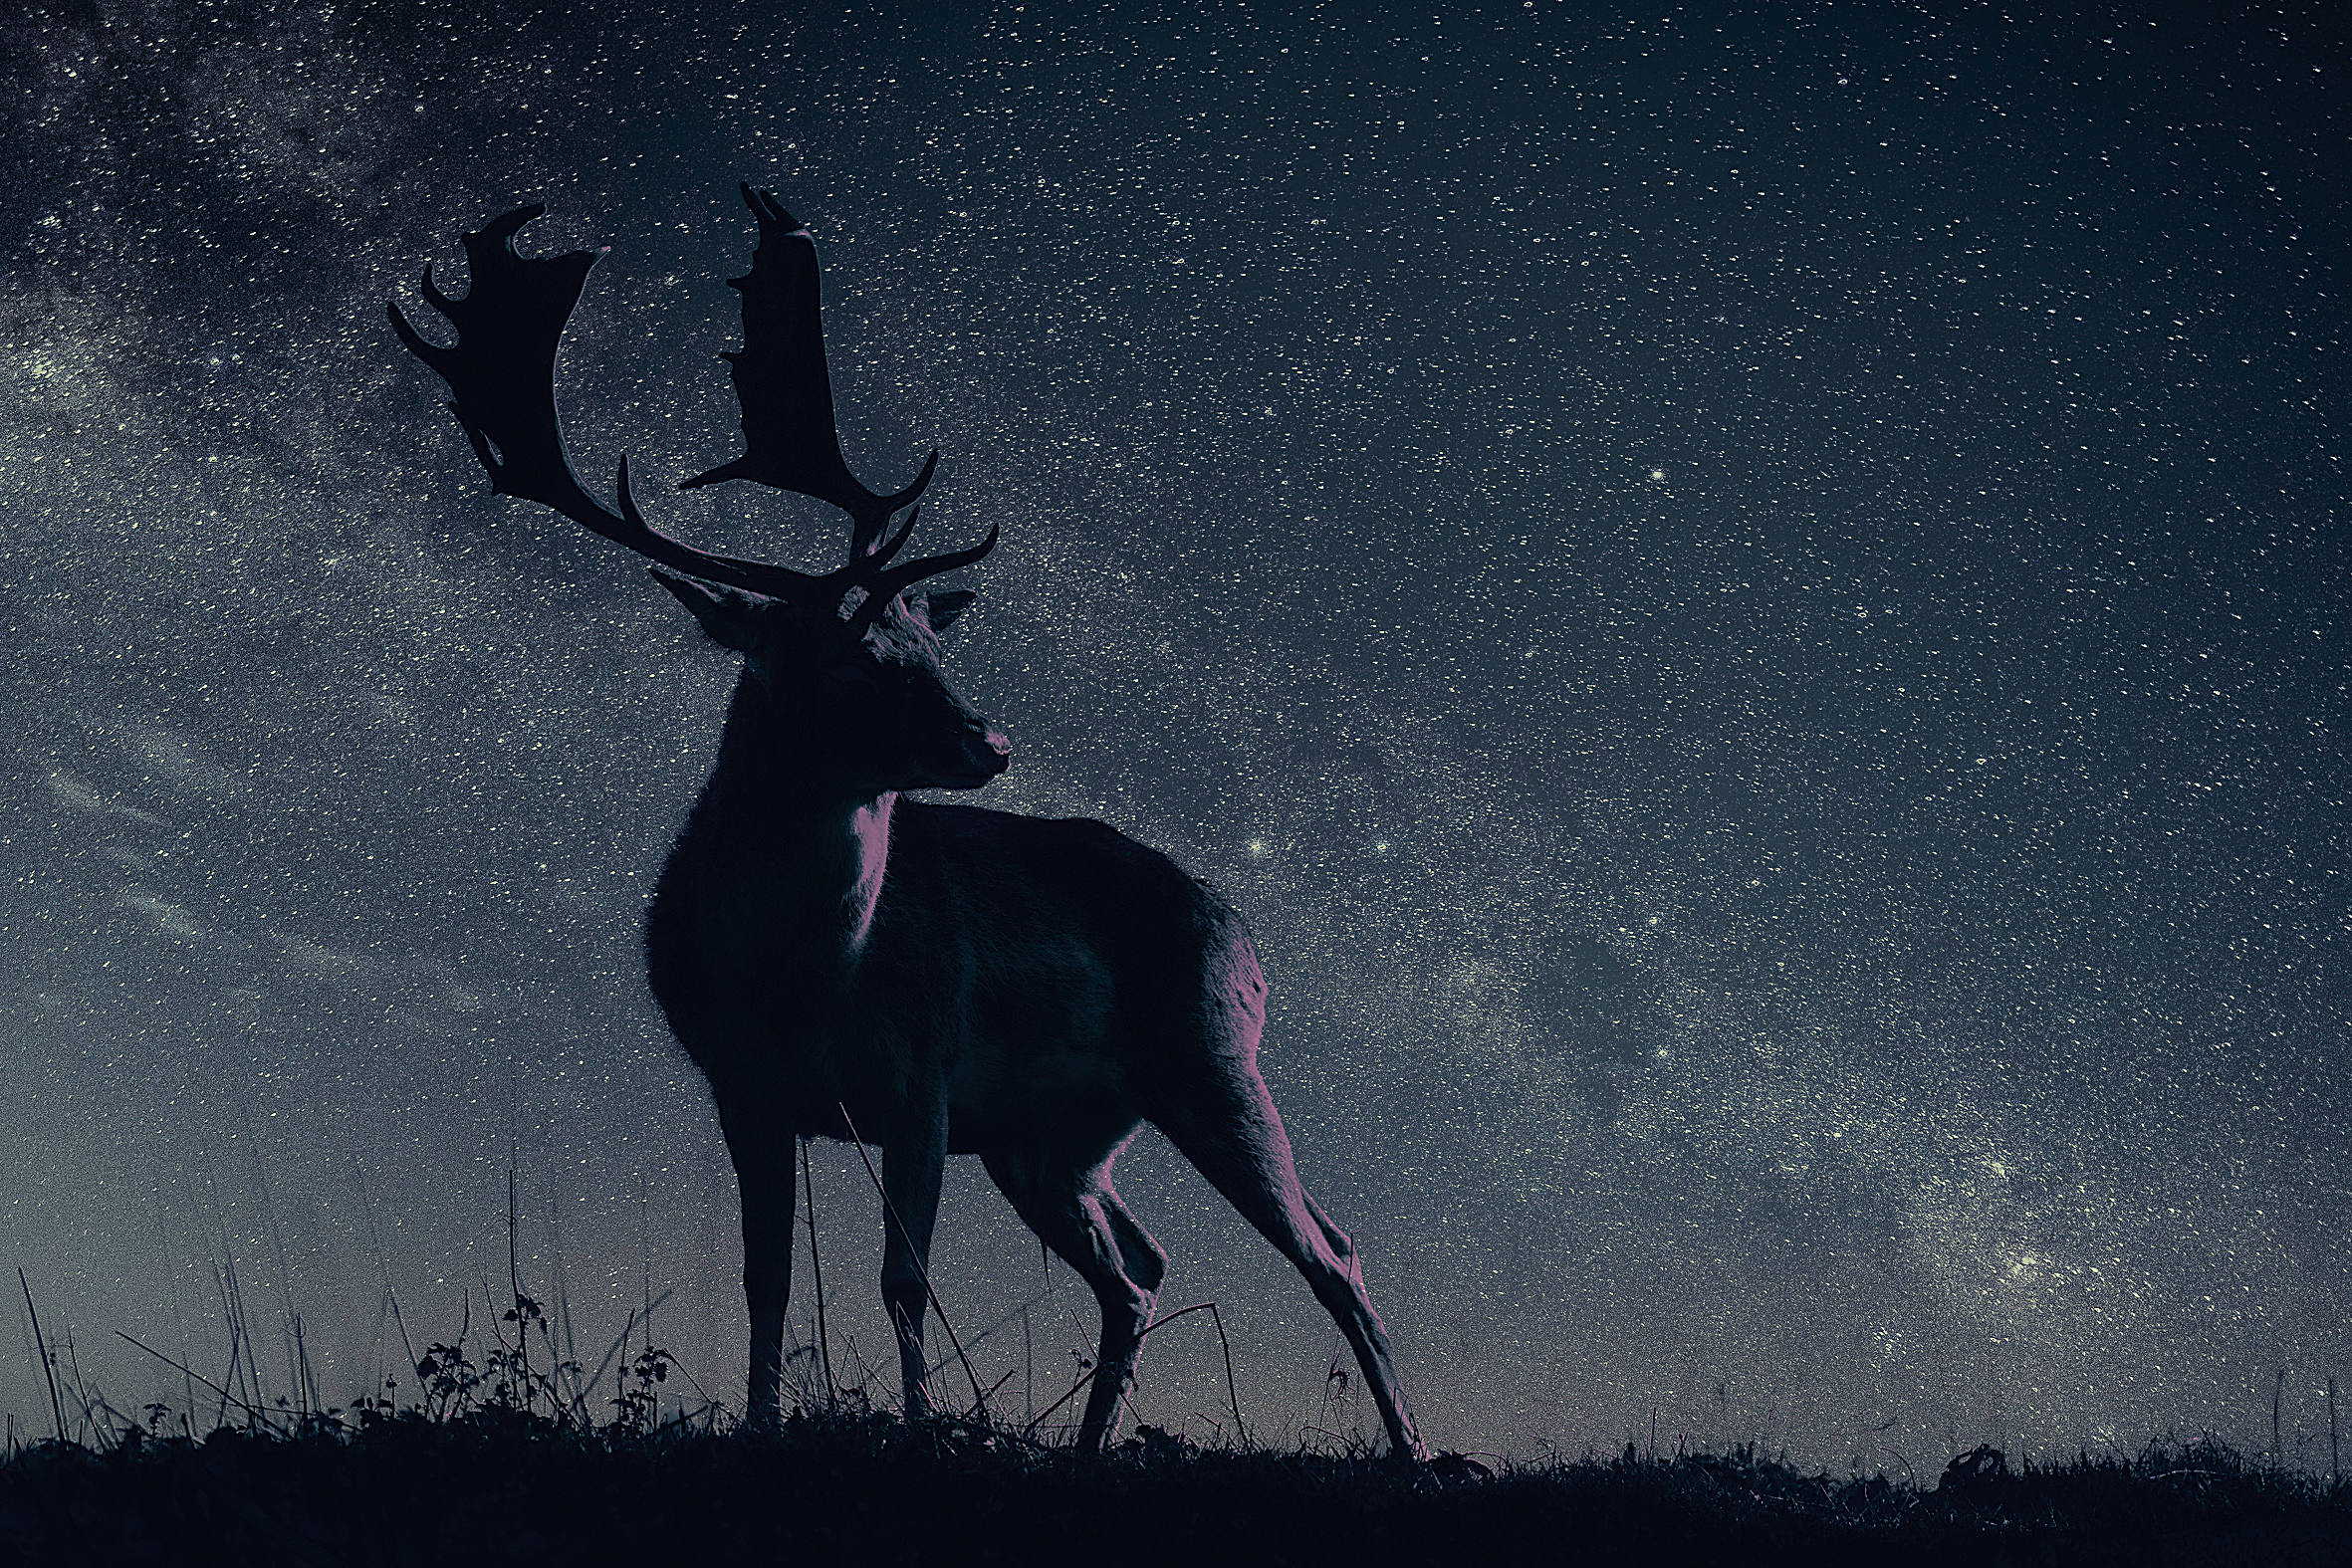
Sky replacement in Affinity Photo – transform day to night!
Use a combination of tonal tools and compositing skills to turn sunlight into moonlight
The best camera deals, reviews, product advice, and unmissable photography news, direct to your inbox!
You are now subscribed
Your newsletter sign-up was successful
Watch video: Sky replacement in Affinity Photo
Start here
• Affinity Photo tutorials
The tutorials
1. Affinity Photo vs Photoshop
2. RAW editing with Affinity Photo
3. Focus merge with Affinity Photo
4. Replace a sky in Affinity Photo
5. Moody mono in Affinity Photo
6. Six Affinity Photo landscape tips
7. Color correction in Affinity Photo
8. Live Filters in Affinity Photo
9. Create a classic wet plate look
10. Remove objects in Affinity Photo
11. Paint an abstract portrait
12. Enhance skintones in Affinity Photo
13. Create HDR in Affinity Photo
14. Replace a sky in Affinity Photo
15. Affinity Photo double exposures
16. Affinity Photo Denoise tool
Like Photoshop, one of the biggest benefits of using Affinity Photo is the layers feature. Layers enable you to combine a range of images and effects to completely transform the look of your photos. We can even change day to night. In this tutorial we’ll look at how this is done with a simple combination of layer skills.
Read more: Affinity Photo 1.8 review
We’ll begin by making a tonal adjustment to transform the bright blue sky into a moody nighttime backdrop, altering the colors to cool things down and darkening the midtones to plunge our subject into darkness. We’ll use the Gradient Map tool for this, which enables us to map a range of nighttime shades onto the tonal range of our image.
The Gradient Map adjustment in Affinity Photo enables you to remap colors onto different parts of the tonal range. Here it sees us add a dark blue tone into the shadows and midtones, thereby transforming the bright sunny day into a scene that looks as if it was actually shot on an atmospheric night. By default the gradient map enables you to add a blend of three colors, but you can double-click the line to add more if you choose (and hit Delete to remove colors, if you need to).
It helps here that the original photo is shot in hard sunlight as, with the colors altered, we can make the sunlight look almost like moonlight instead, which has a similarly hard-edged quality.
To finish things off, we’ll drop in an image of a starry sky, then fit it into the backdrop, thereby transforming the blue backdrop into a star-filled evening scene. This is done by first selecting the blue sky with the Flood Selection tool, then converting the selection to a layer mask in order to constrain the stars to the area of sky on the layer below.
The best camera deals, reviews, product advice, and unmissable photography news, direct to your inbox!
An ability to combine photos with layer masks like this is one of the cornerstones of image editing in Affinity. Master these skills and you can merge all kinds of photos and selective effects for endlessly creative results.
1. Add a Gradient Map
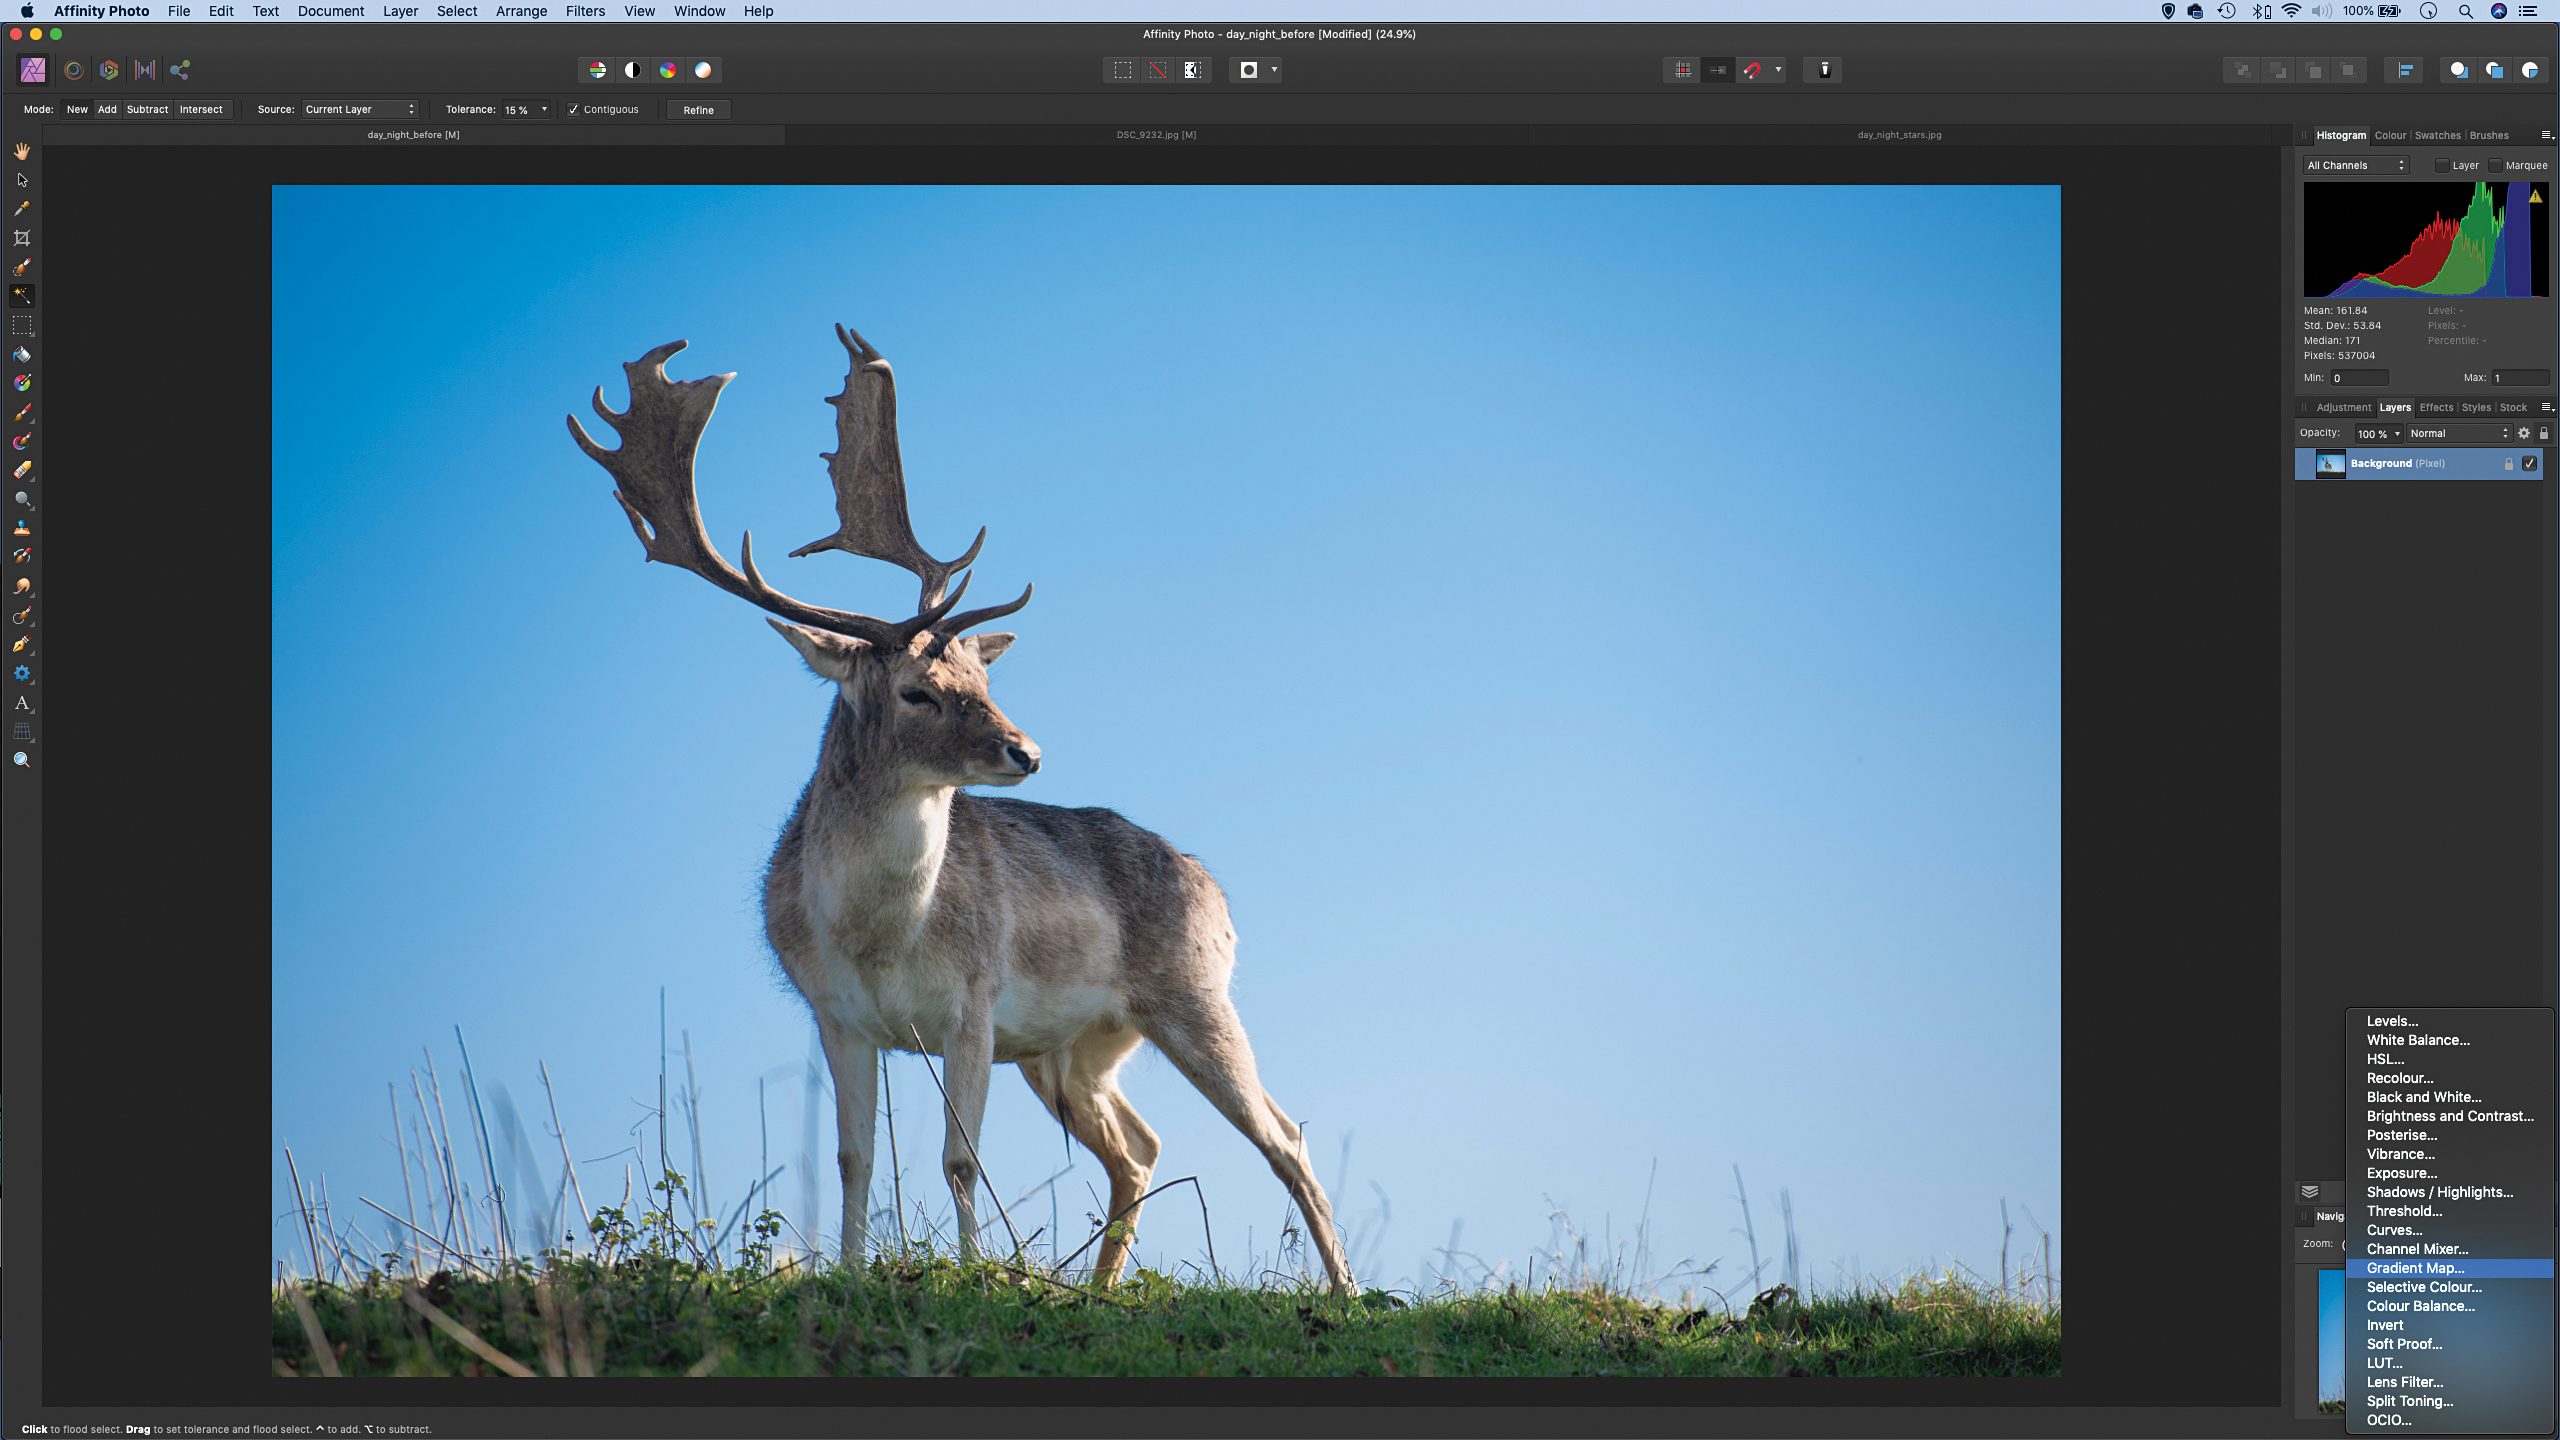
Open day_night_before into Affinity Photo. Make sure you’re in the Photo Persona (top-left purple icon) then go to the Layers panel (Go to View>Studio>Layers if it’s not on-screen). Click the Adjustment Layer icon at the bottom of the Layers panel and choose Gradient Map.
2. Darken the midtones
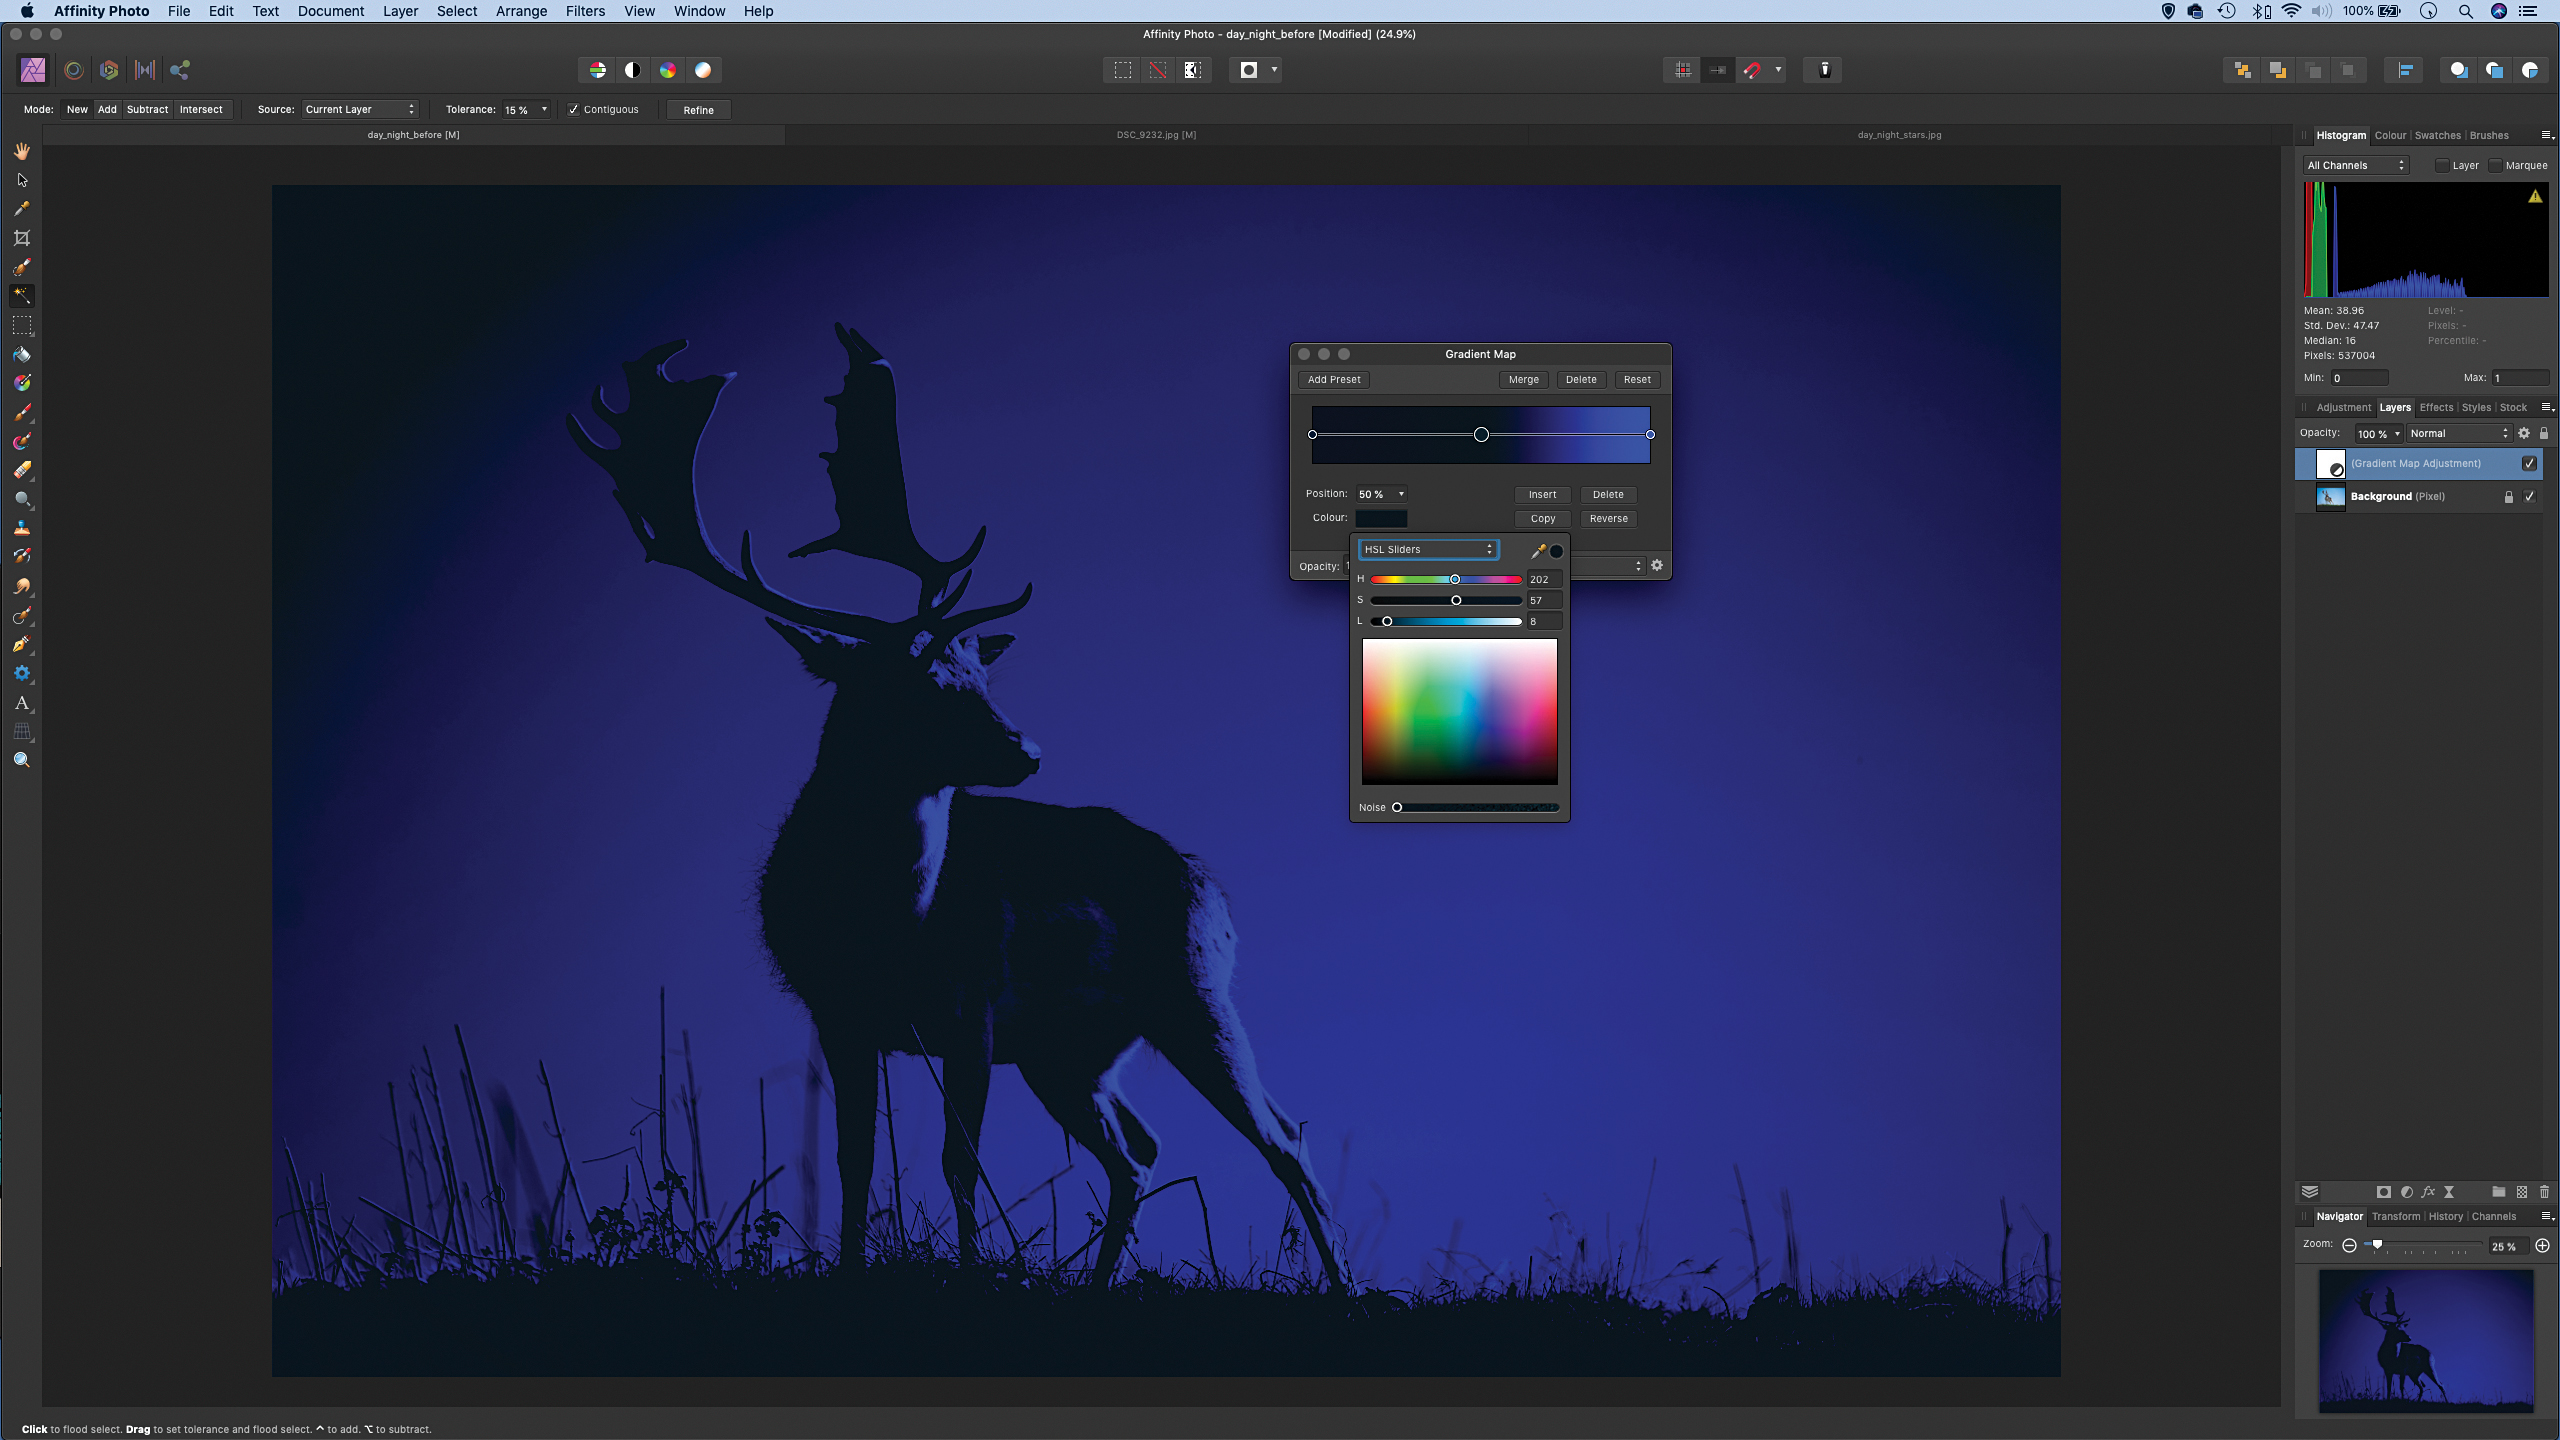
Click the circle on the left of the line. This enables us to change the colors of the shadows. Click the color box and choose a dark blue tone for the shadows – here we’ve used H 213, S 100, L 7. Next, click on the middle circle and use a slightly lighter blue for the midtones – we had H 202, S 57, L 8 here.
3. Alter the gradient
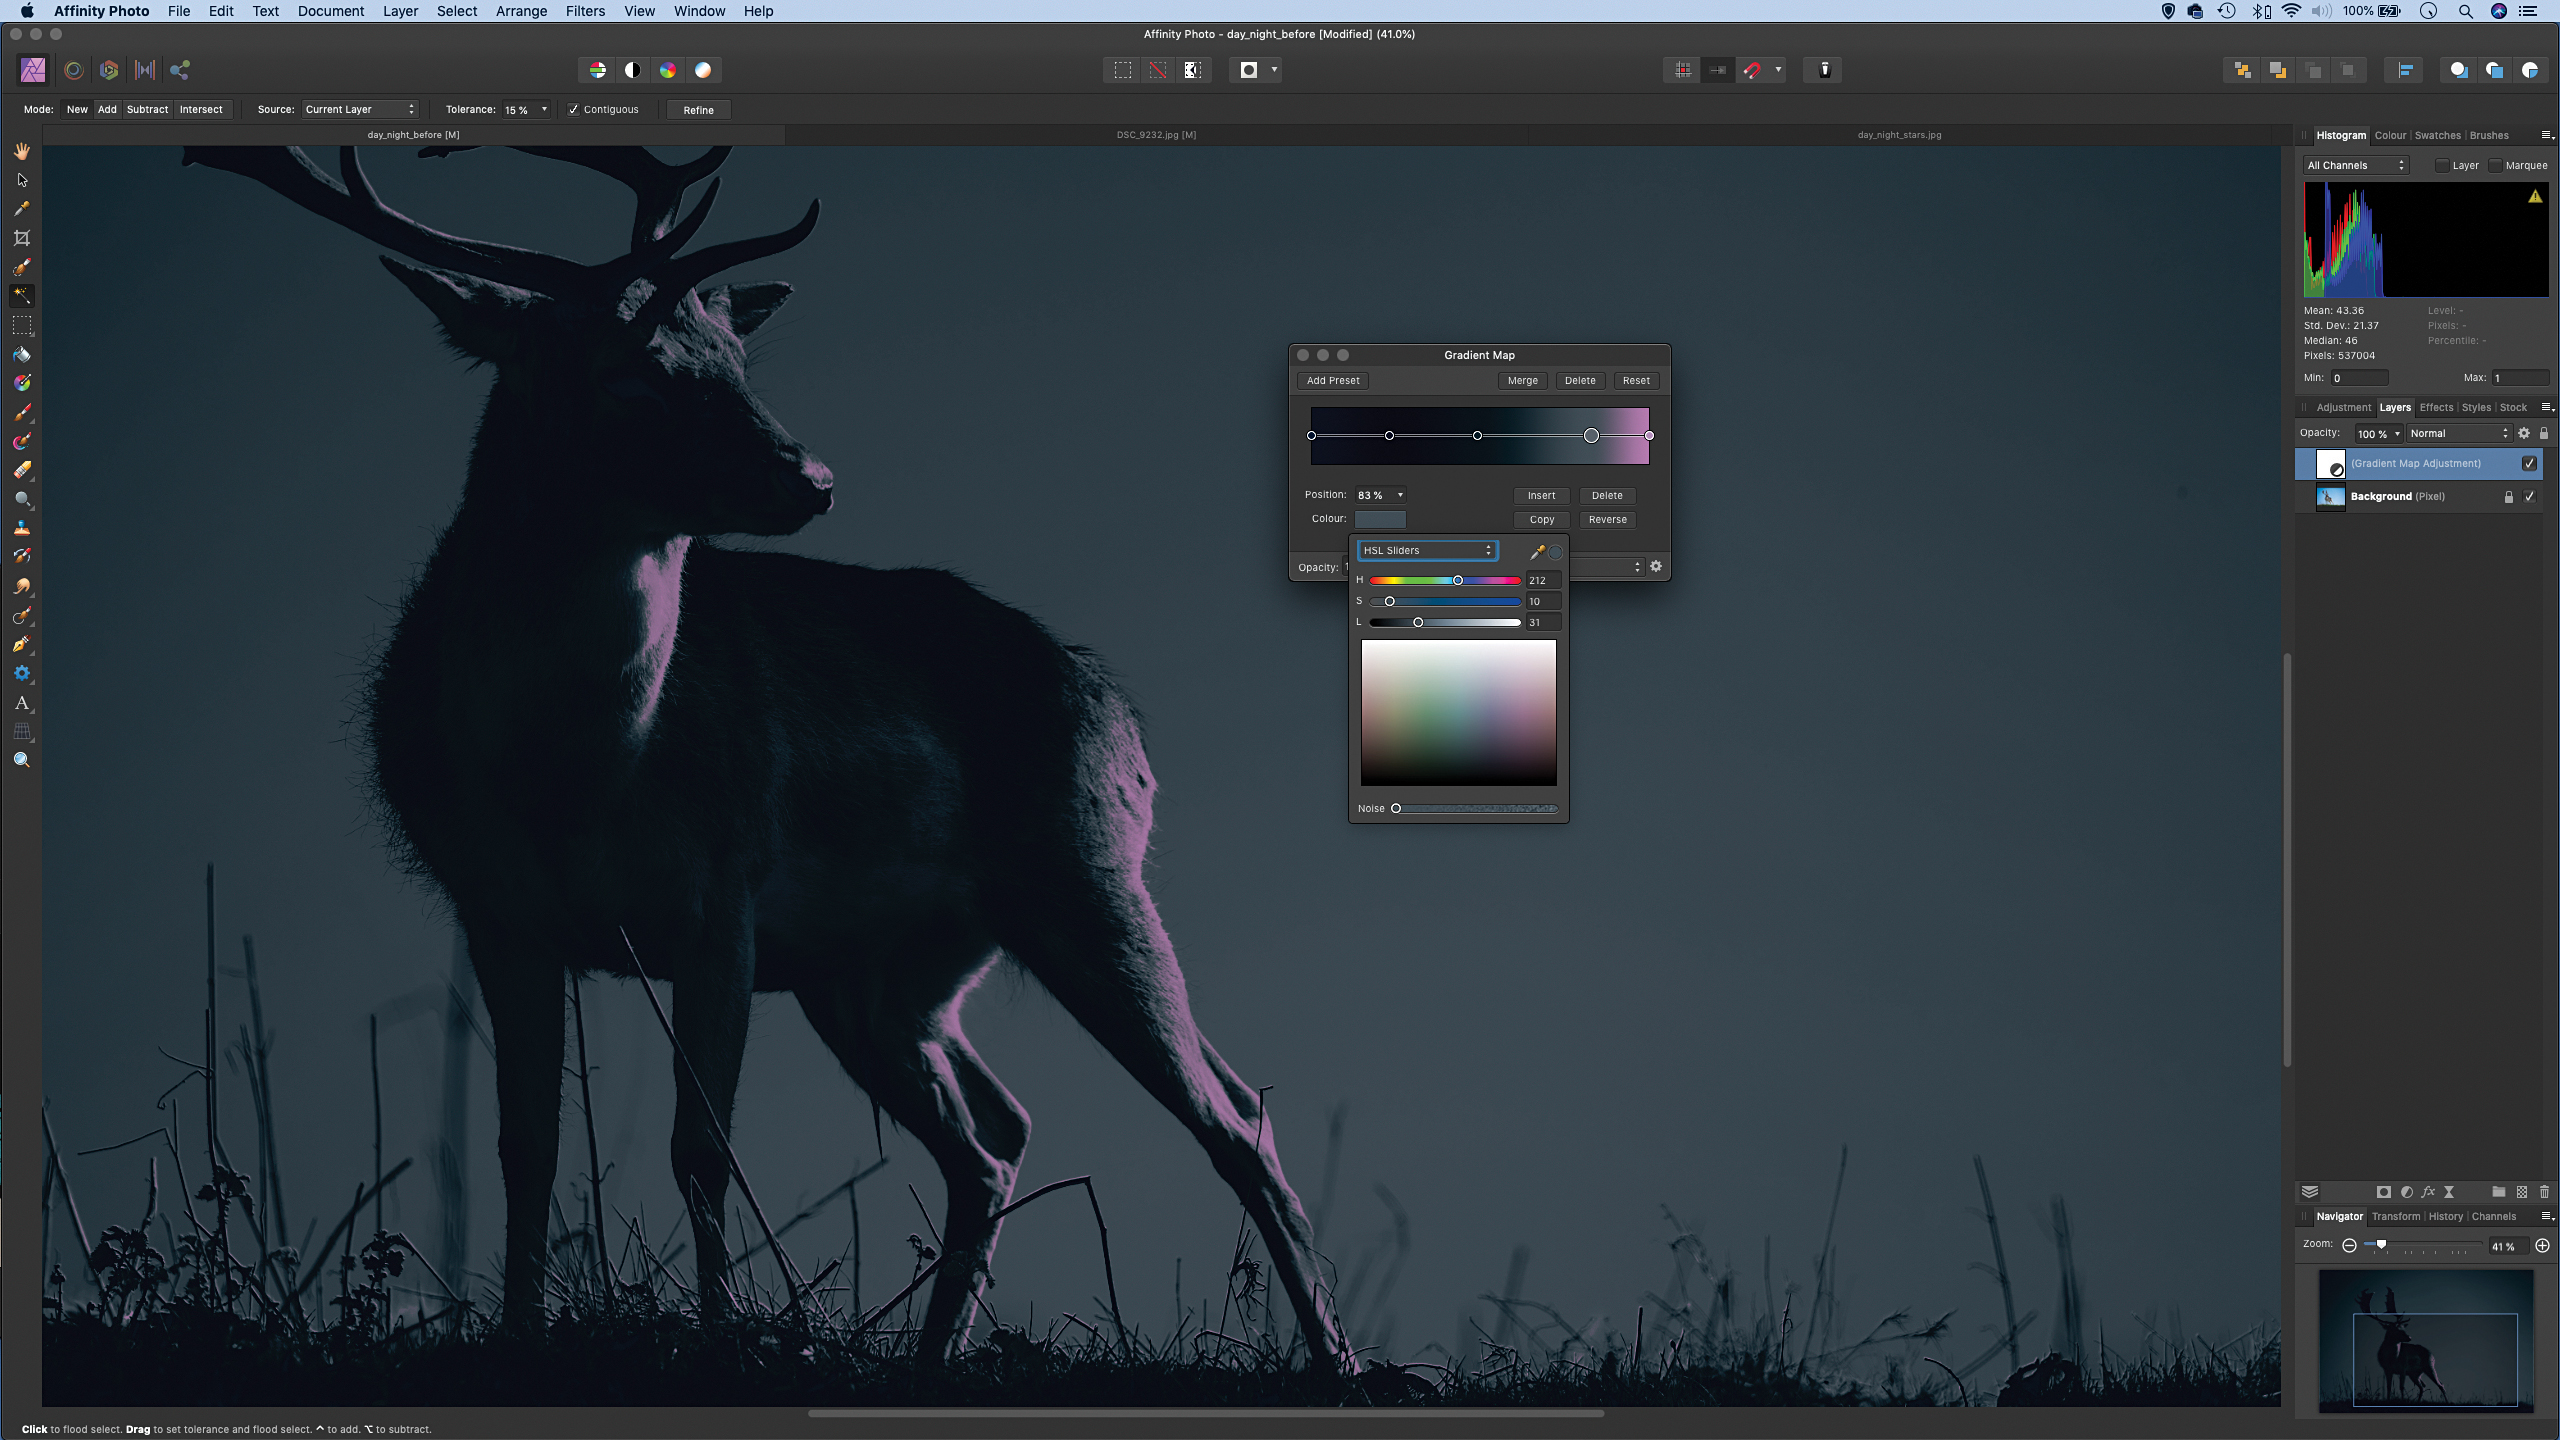
Add another color on the gradient map for the highlights – we used a light purple (H 292, S 23, L 57). You can also double-click on parts of the line to add further spots of color to the blend, just like we’ve done here with a few extra spots in the shadows and highlights of the image.
4. Select the sky
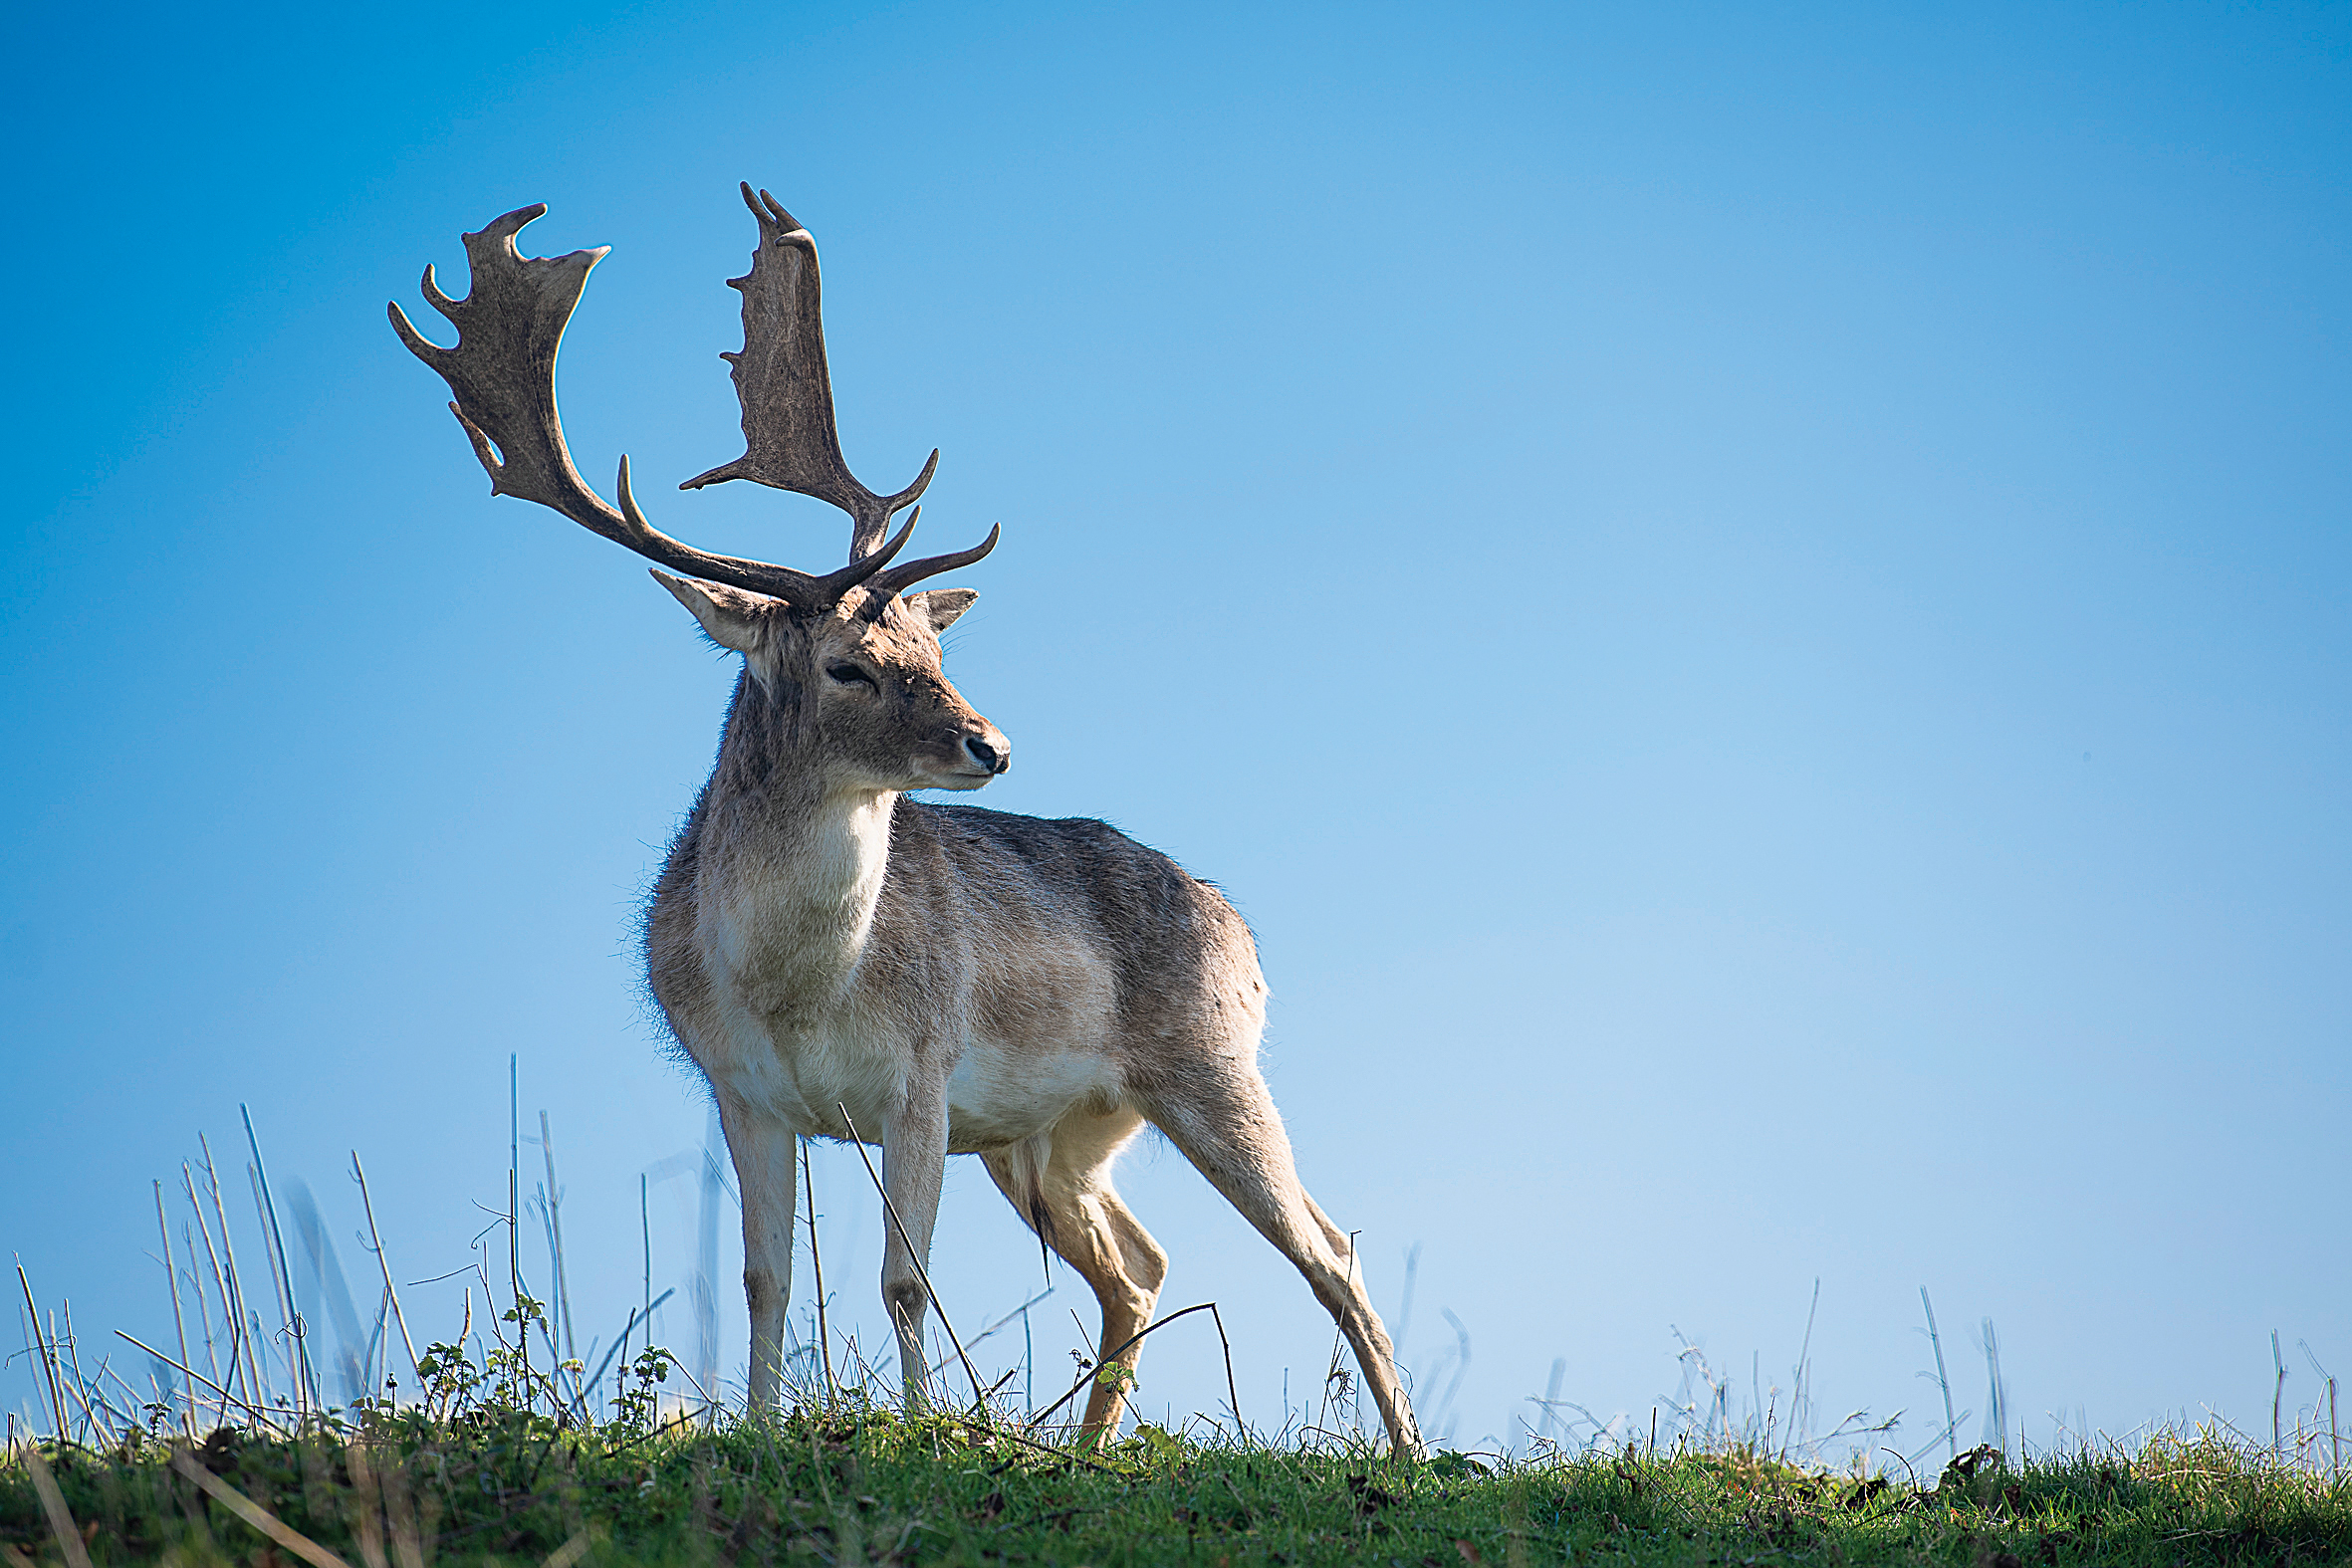
Open day_night_stars. Hit Cmd/Ctrl+C to copy then go to the other image and Cmd/Ctrl+V to paste. Click the ticks next to the top two layers to hide them and highlight the bottom layer. Grab the Flood Select tool and click over the sky. Hold Shift and continue clicking to select all parts of the blue sky.
5. Mask the stars
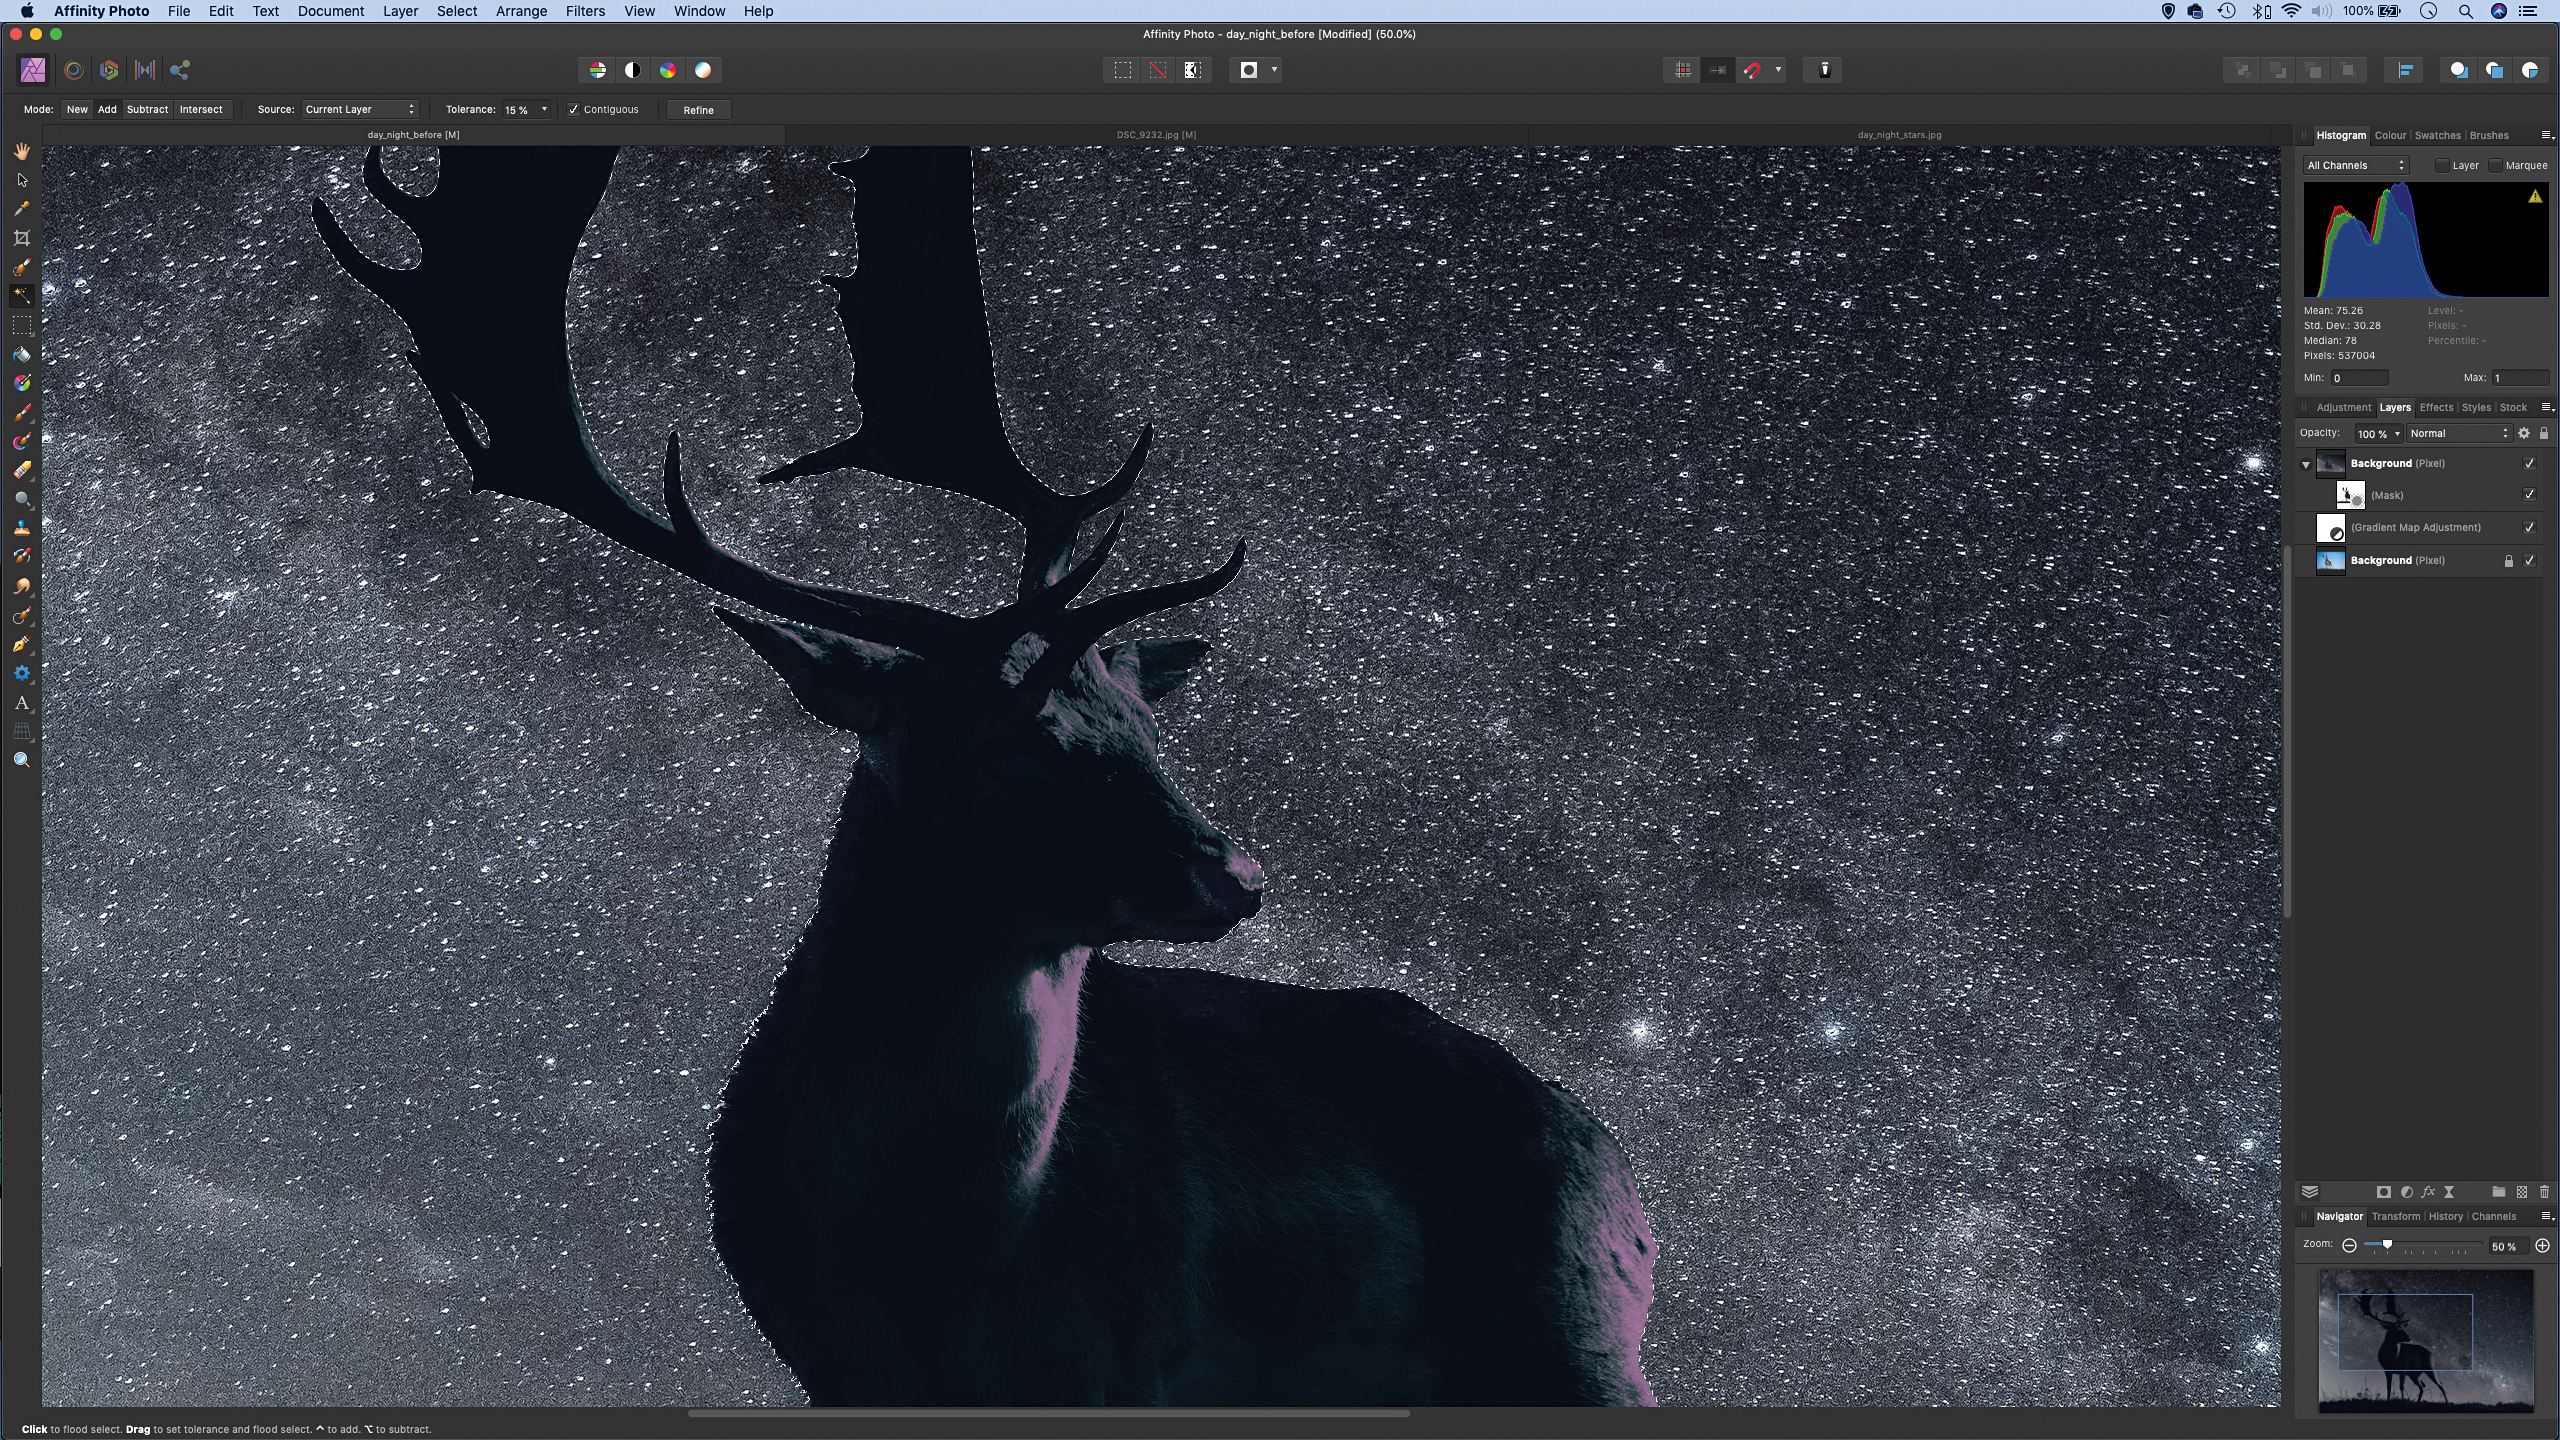
Click the Refine button at the top to improve the selection. Increase Border Width to 30% and hit OK. Next, reveal the other layers and highlight the top layer, then click the Layer Mask icon at the bottom of the Layers panel to change the selection to a layer mask. Hit Cmd/Ctrl+D to deselect.
6. Blend and tone
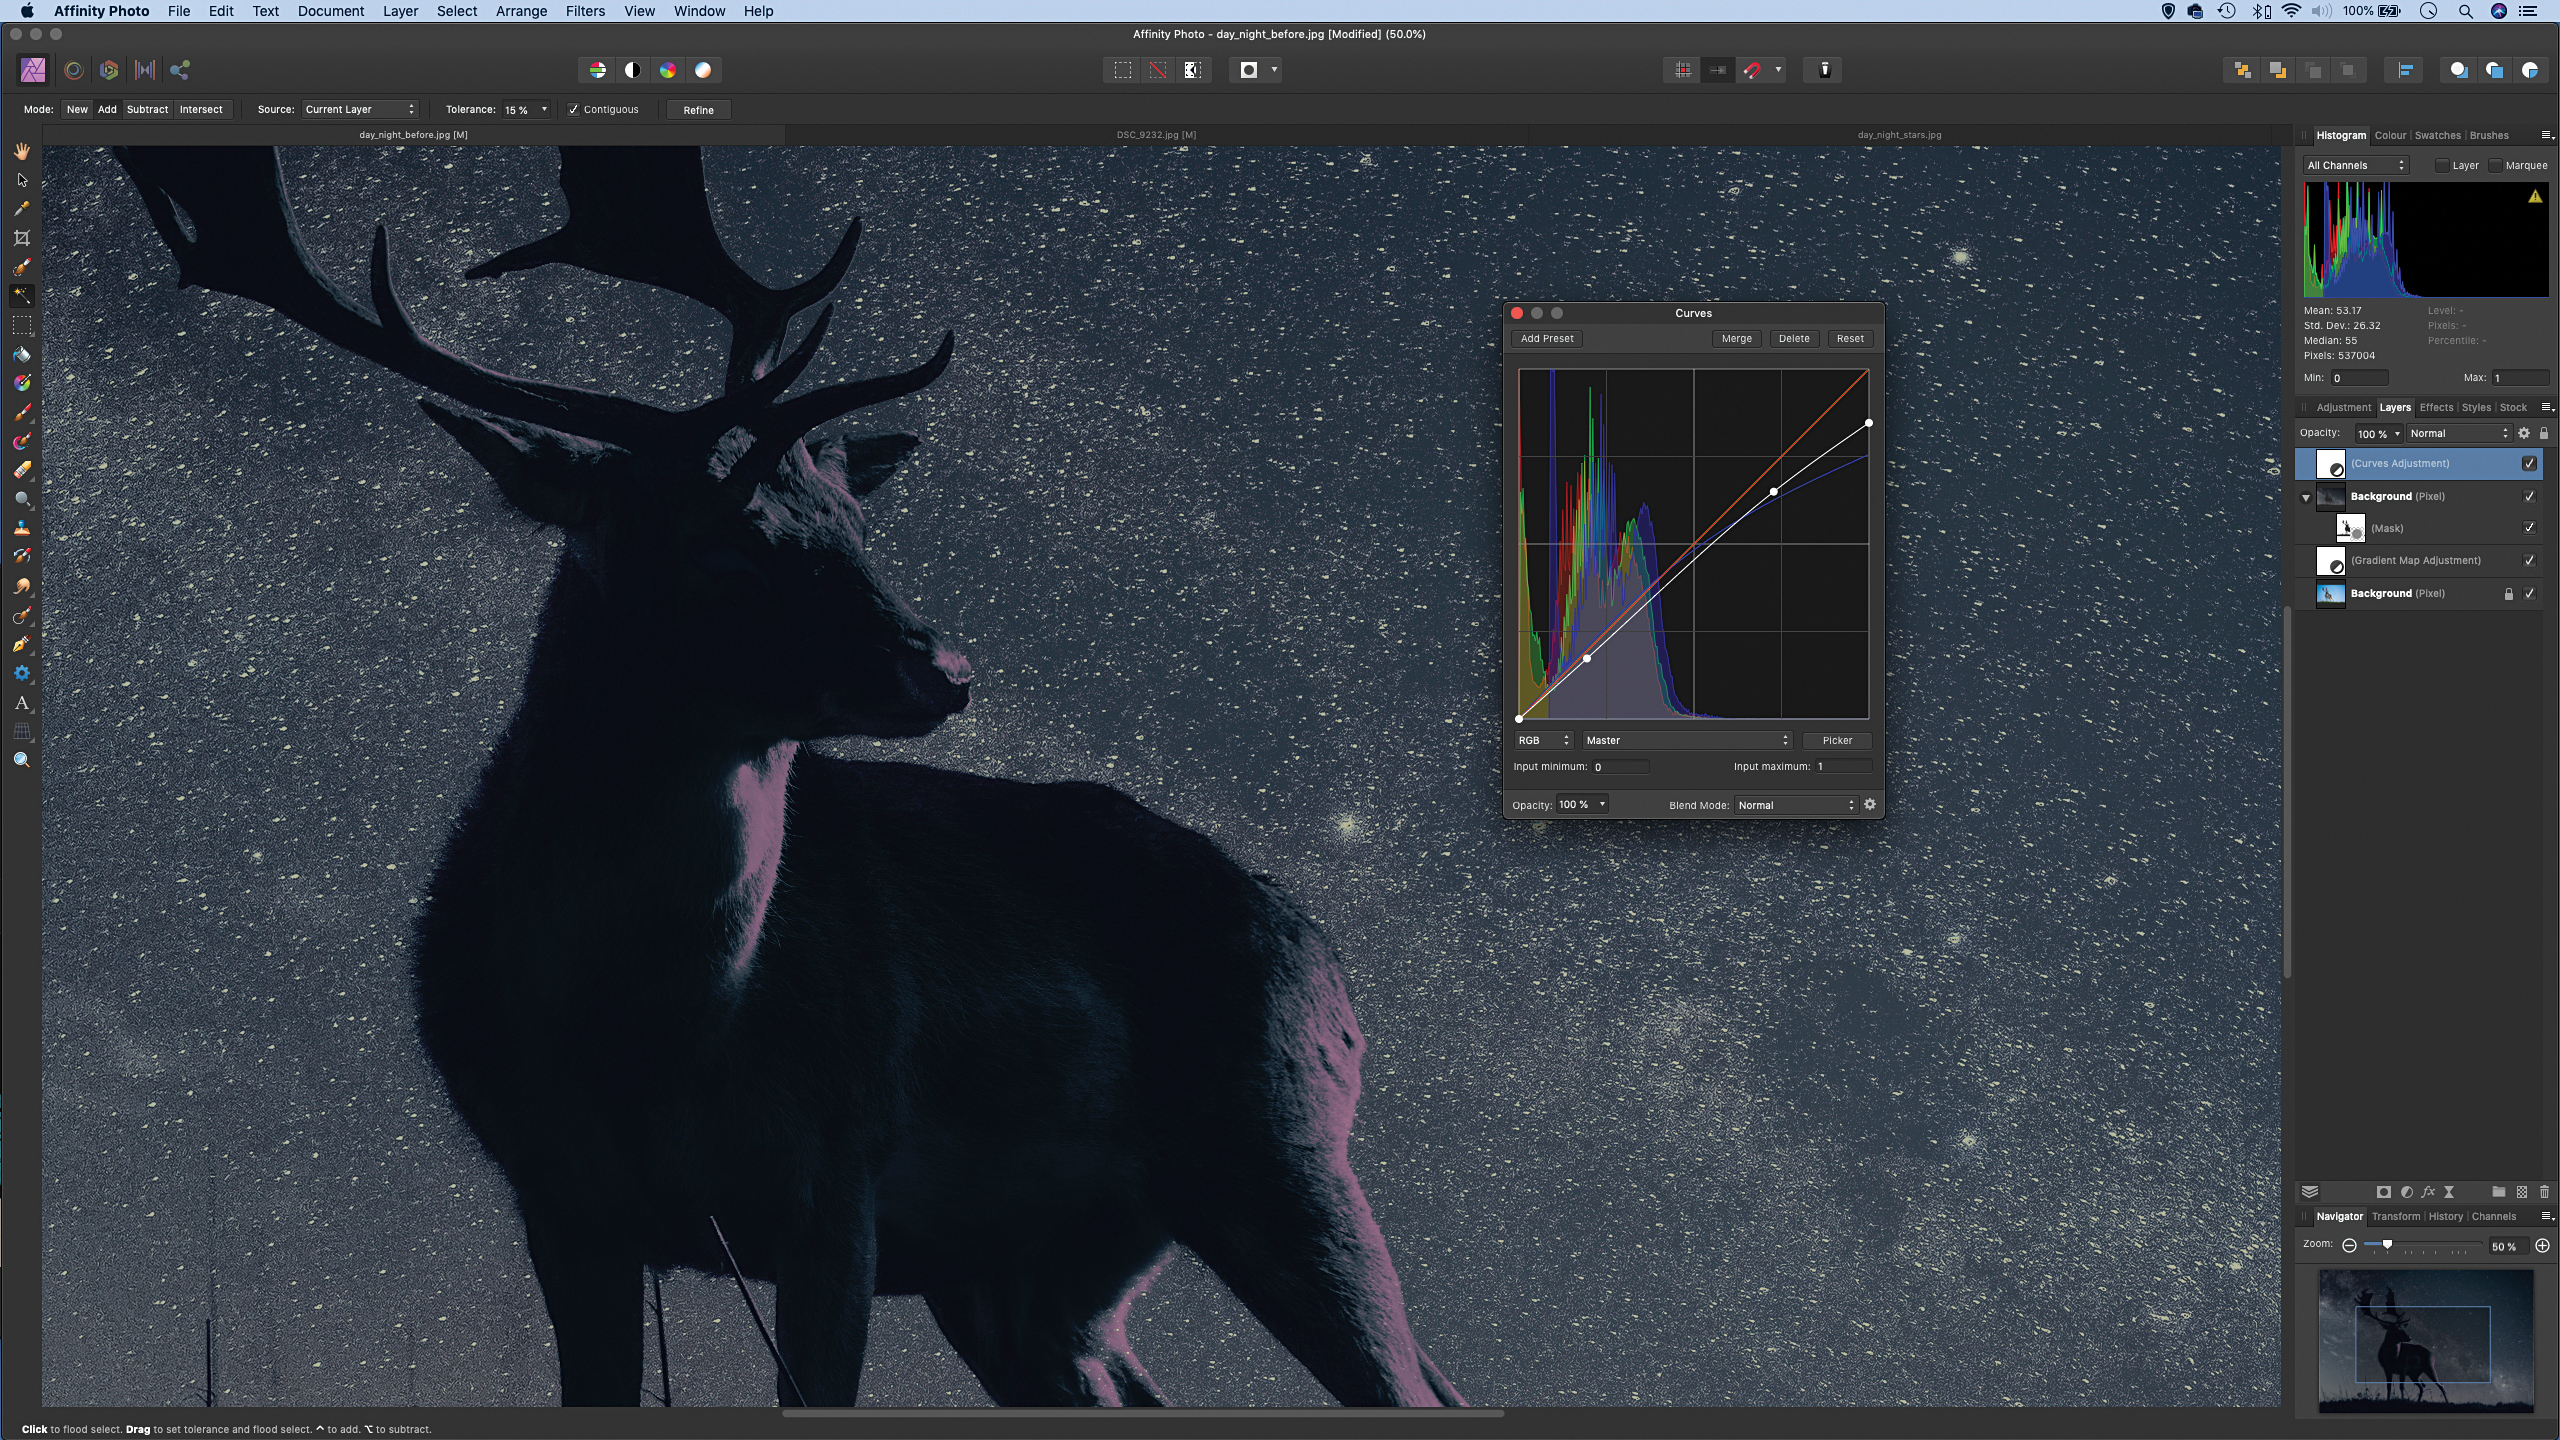
Go to the Layers panel and change the blend mode of the stars layer to Screen, then lower the layer opacity to around 75%. Finally, click the Adjustment Layer icon and choose Curves. Drag the top-right point on the line downwards to dull the highlights slightly, as shown.

Get Serif Affinity Photo for just £48.99/$49.99
Affinity Photo is a powerful image-editing program with professional-level features that rivals Adobe Photoshop yet costs just a fraction of the price – with no subscription required!

About N-Photo magazine
This tutorial originally appeared in N-Photo, the monthly newsstand magazine for Nikon photographers. Why not subscribe to a print edition, and have the magazine delivered direct to your door every month?
Alternatively, we have a number of different digital options available, including:
• Apple app (for iPad or iPhone)
• Zinio app (multi-platform app for desktop or smartphone)
• PocketMags (multi-platform app ideal for Android devices)
• Readly (all-you-can-eat digital magazine subscription service)
If you wanted a printed version of any of our most recent issues we have a selection of back issues to choose from in our online store.
Read more:
• The best photo editing tools and accessories
• The best tablets for photo editing
• The best monitors for photographers
• Best graphics tablets for photo editing
• The best photo-editing laptops
• The best desktop computers for photo editing
• The best ultrawide monitors for photo editing
The lead technique writer on Digital Camera Magazine, PhotoPlus: The Canon Magazine and N-Photo: The Nikon Magazine, James is a fantastic general practice photographer with an enviable array of skills across every genre of photography.
Whether it's flash photography techniques like stroboscopic portraits, astrophotography projects like photographing the Northern Lights, or turning sound into art by making paint dance on a set of speakers, James' tutorials and projects are as creative as they are enjoyable.
He's also a wizard at the dark arts of Photoshop, Lightroom and Affinity Photo, and is capable of some genuine black magic in the digital darkroom, making him one of the leading authorities on photo editing software and techniques.
