Get the wet plate look in Affinity Photo using image layers and textures
Transform images with Affinity Photo to create a the beautifully timeless look of a vintage photograph
Start here
• Affinity Photo tutorials
The tutorials
1. Affinity Photo vs Photoshop
2. RAW editing with Affinity Photo
3. Focus merge with Affinity Photo
4. Replace a sky in Affinity Photo
5. Moody mono in Affinity Photo
6. Six Affinity Photo landscape tips
7. Color correction in Affinity Photo
8. Live Filters in Affinity Photo
9. Create a classic wet plate look
10. Remove objects in Affinity Photo
11. Paint an abstract portrait
12. Enhance skintones in Affinity Photo
13. Create HDR in Affinity Photo
14. Replace a sky in Affinity Photo
15. Affinity Photo double exposures
16. Affinity Photo Denoise tool
Watch video: give images a retro look
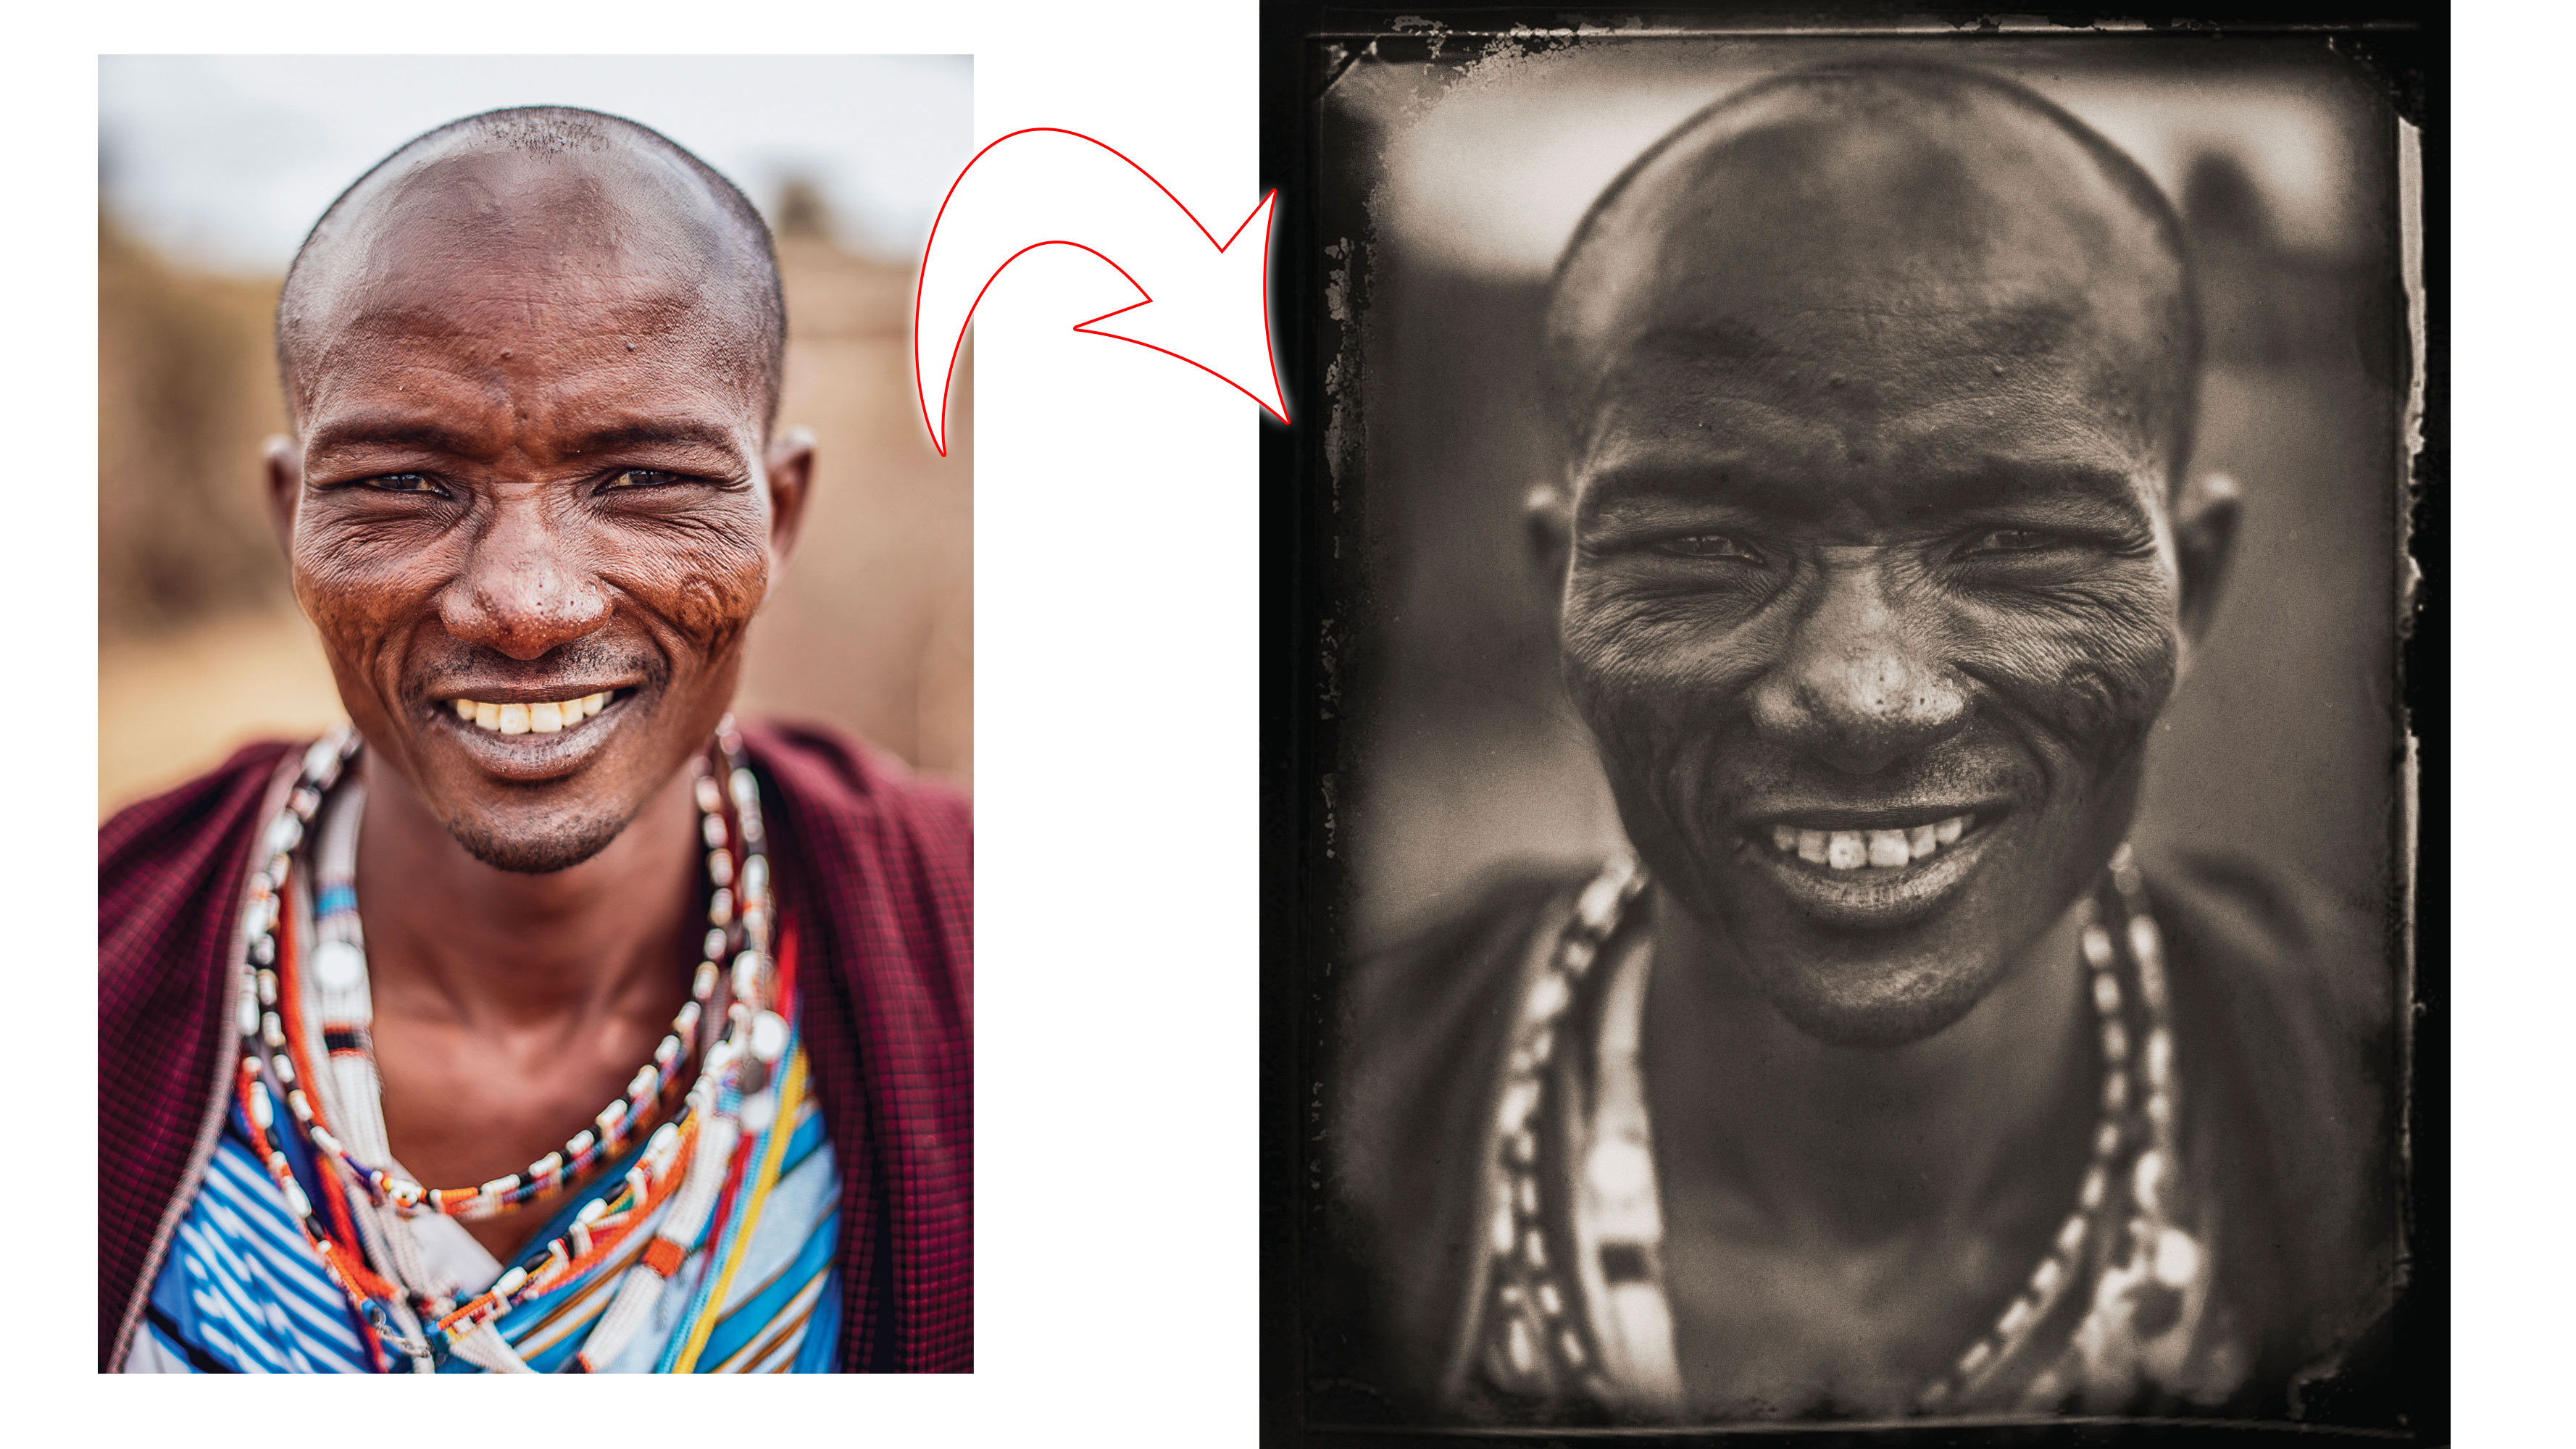
Adding vintage effects to digital photos is hugely popular at the moment. But if you want to take things beyond generic, one-click Instagram treatments, then you need the right tools for the job. Affinity Photo offers an array of powerful image blending features that allow us to add a custom-made border, then apply textures and toning effects to finish things off. In this tutorial we’ll explain how it’s done and we’ll create a vintage wet plate effect using a combination of pictures.
Key to this technique is the ability that Affinity Photo gives us to combine images and effects on different layers. We can begin by dropping in a messy vintage border and then adding a couple of different textures. We’ll blend these with our portrait using layer blending modes, which allows us to combine pixels in a variety of ways.
We can also make use of another powerful non-destructive layer feature – adjustment layers. These work by affecting all the layers below, which means we can edit them, change the opacity or experiment with blending modes. It’s features like this that give us control over the effect and allow us to fine-tune things so that the different tonal settings and blended elements work together with our chosen portrait.
Read more:
Step 1: Copy in the portrait
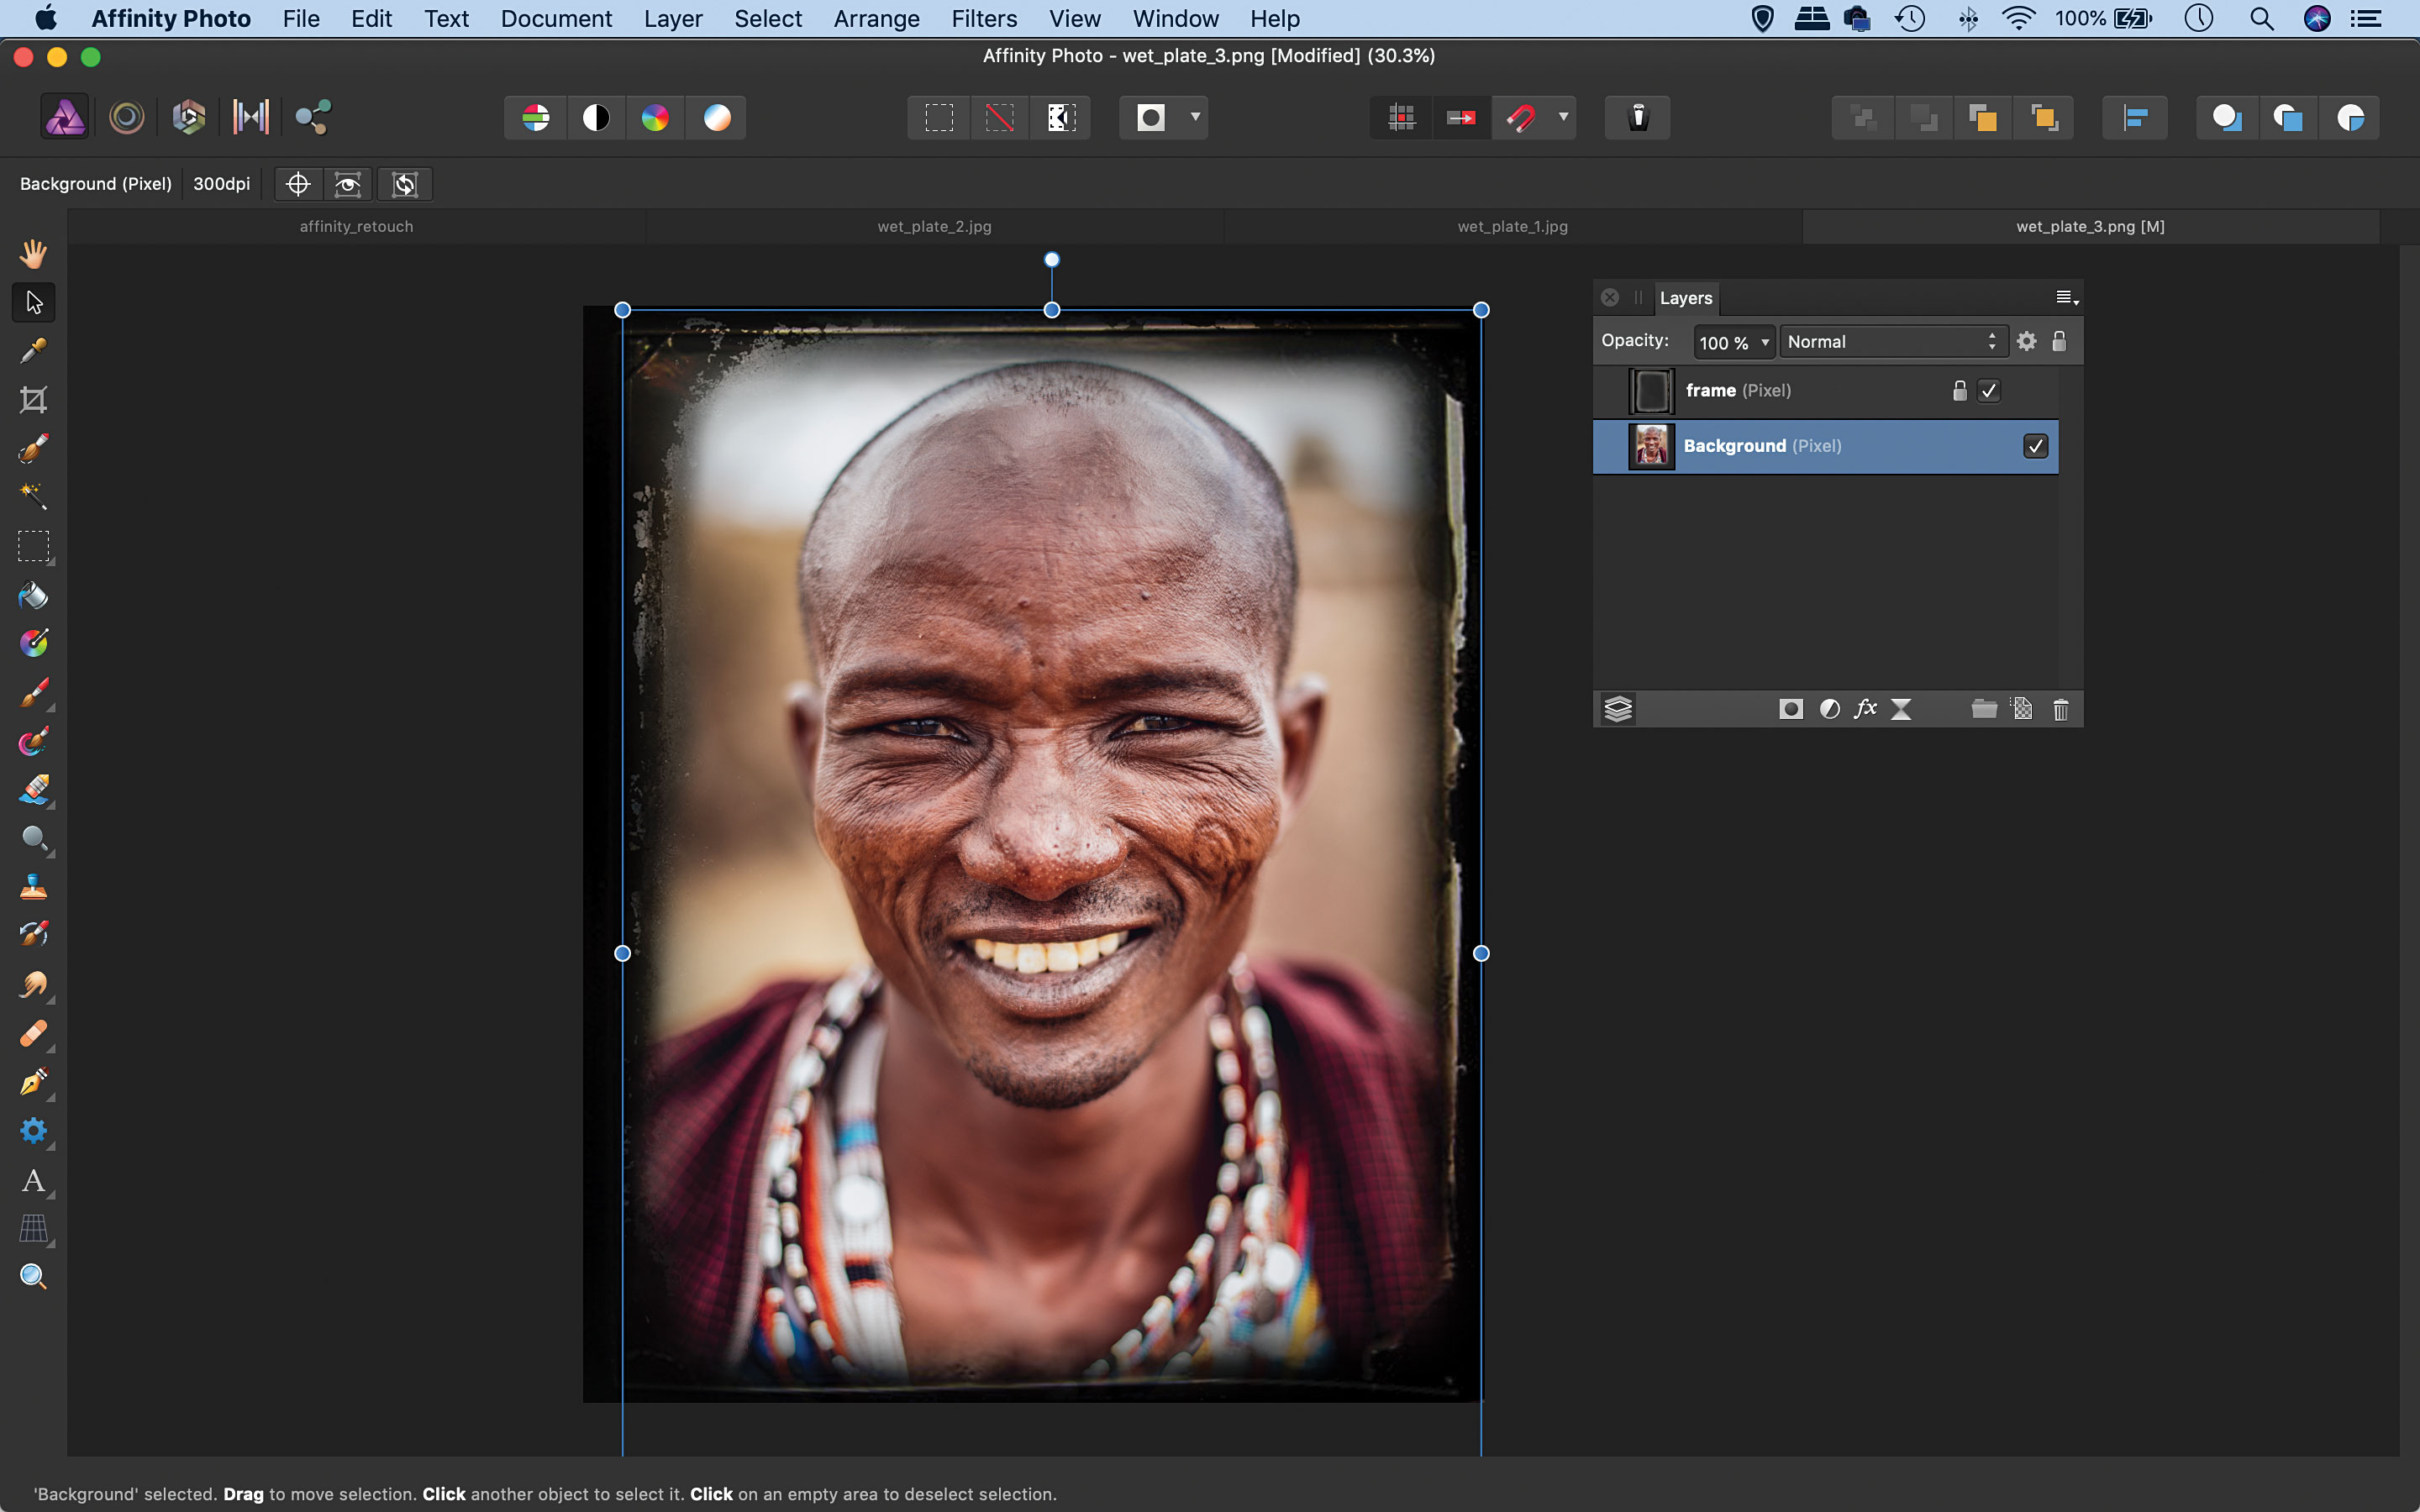
We've opened two images into Affinity Photo. The first is our portrait image and we hit Cmd/Ctrl+C to copy, then go to the frame image and hit Cmd/Ctrl+V to paste. Next, we go to the Layers panel and rename the layers as ‘face’ and ‘frame’ just for easier identification later on, then drag the ‘face’ layer to the bottom.
The best camera deals, reviews, product advice, and unmissable photography news, direct to your inbox!
Step 2: Convert to mono
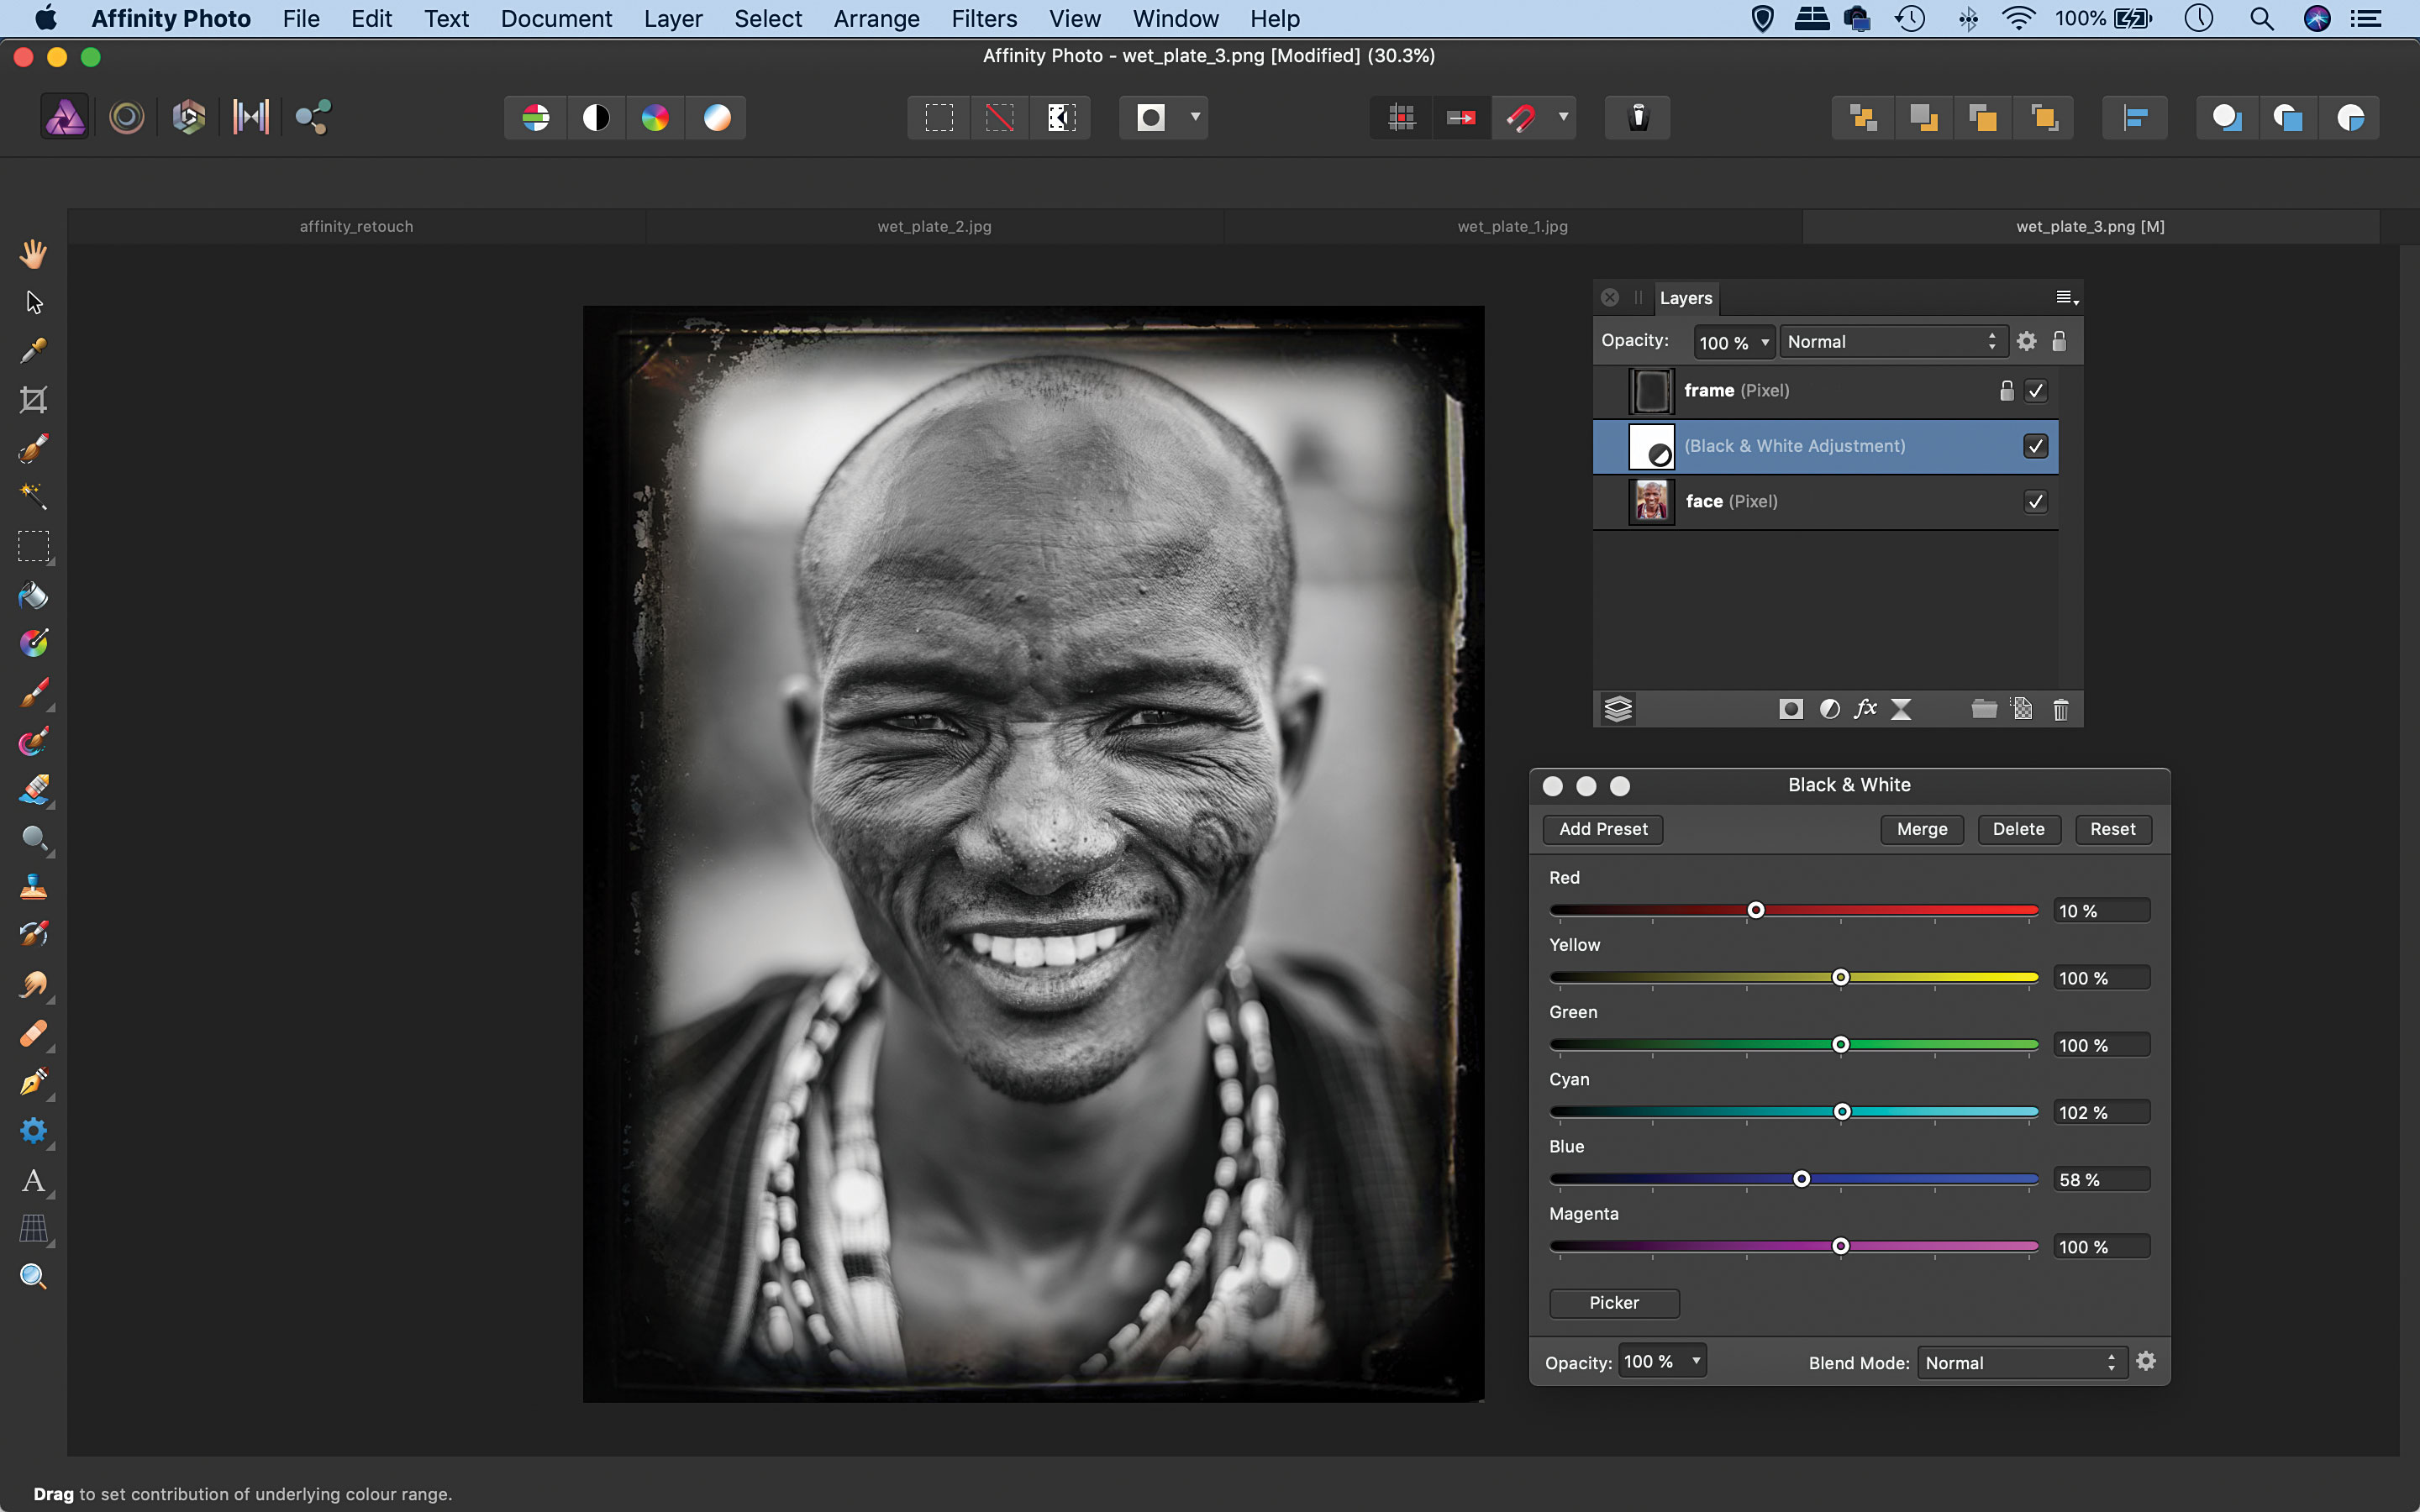
Now we highlight the bottom layer then click the circular Create Adjustment Layer icon at the bottom of the Layers panel and choose Black and White. We click ‘Picker’ in the settings then drag left or right over parts of the image to control the luminosity, dragging left over the skin to darken the reds.
Step 3: Add a wet texture
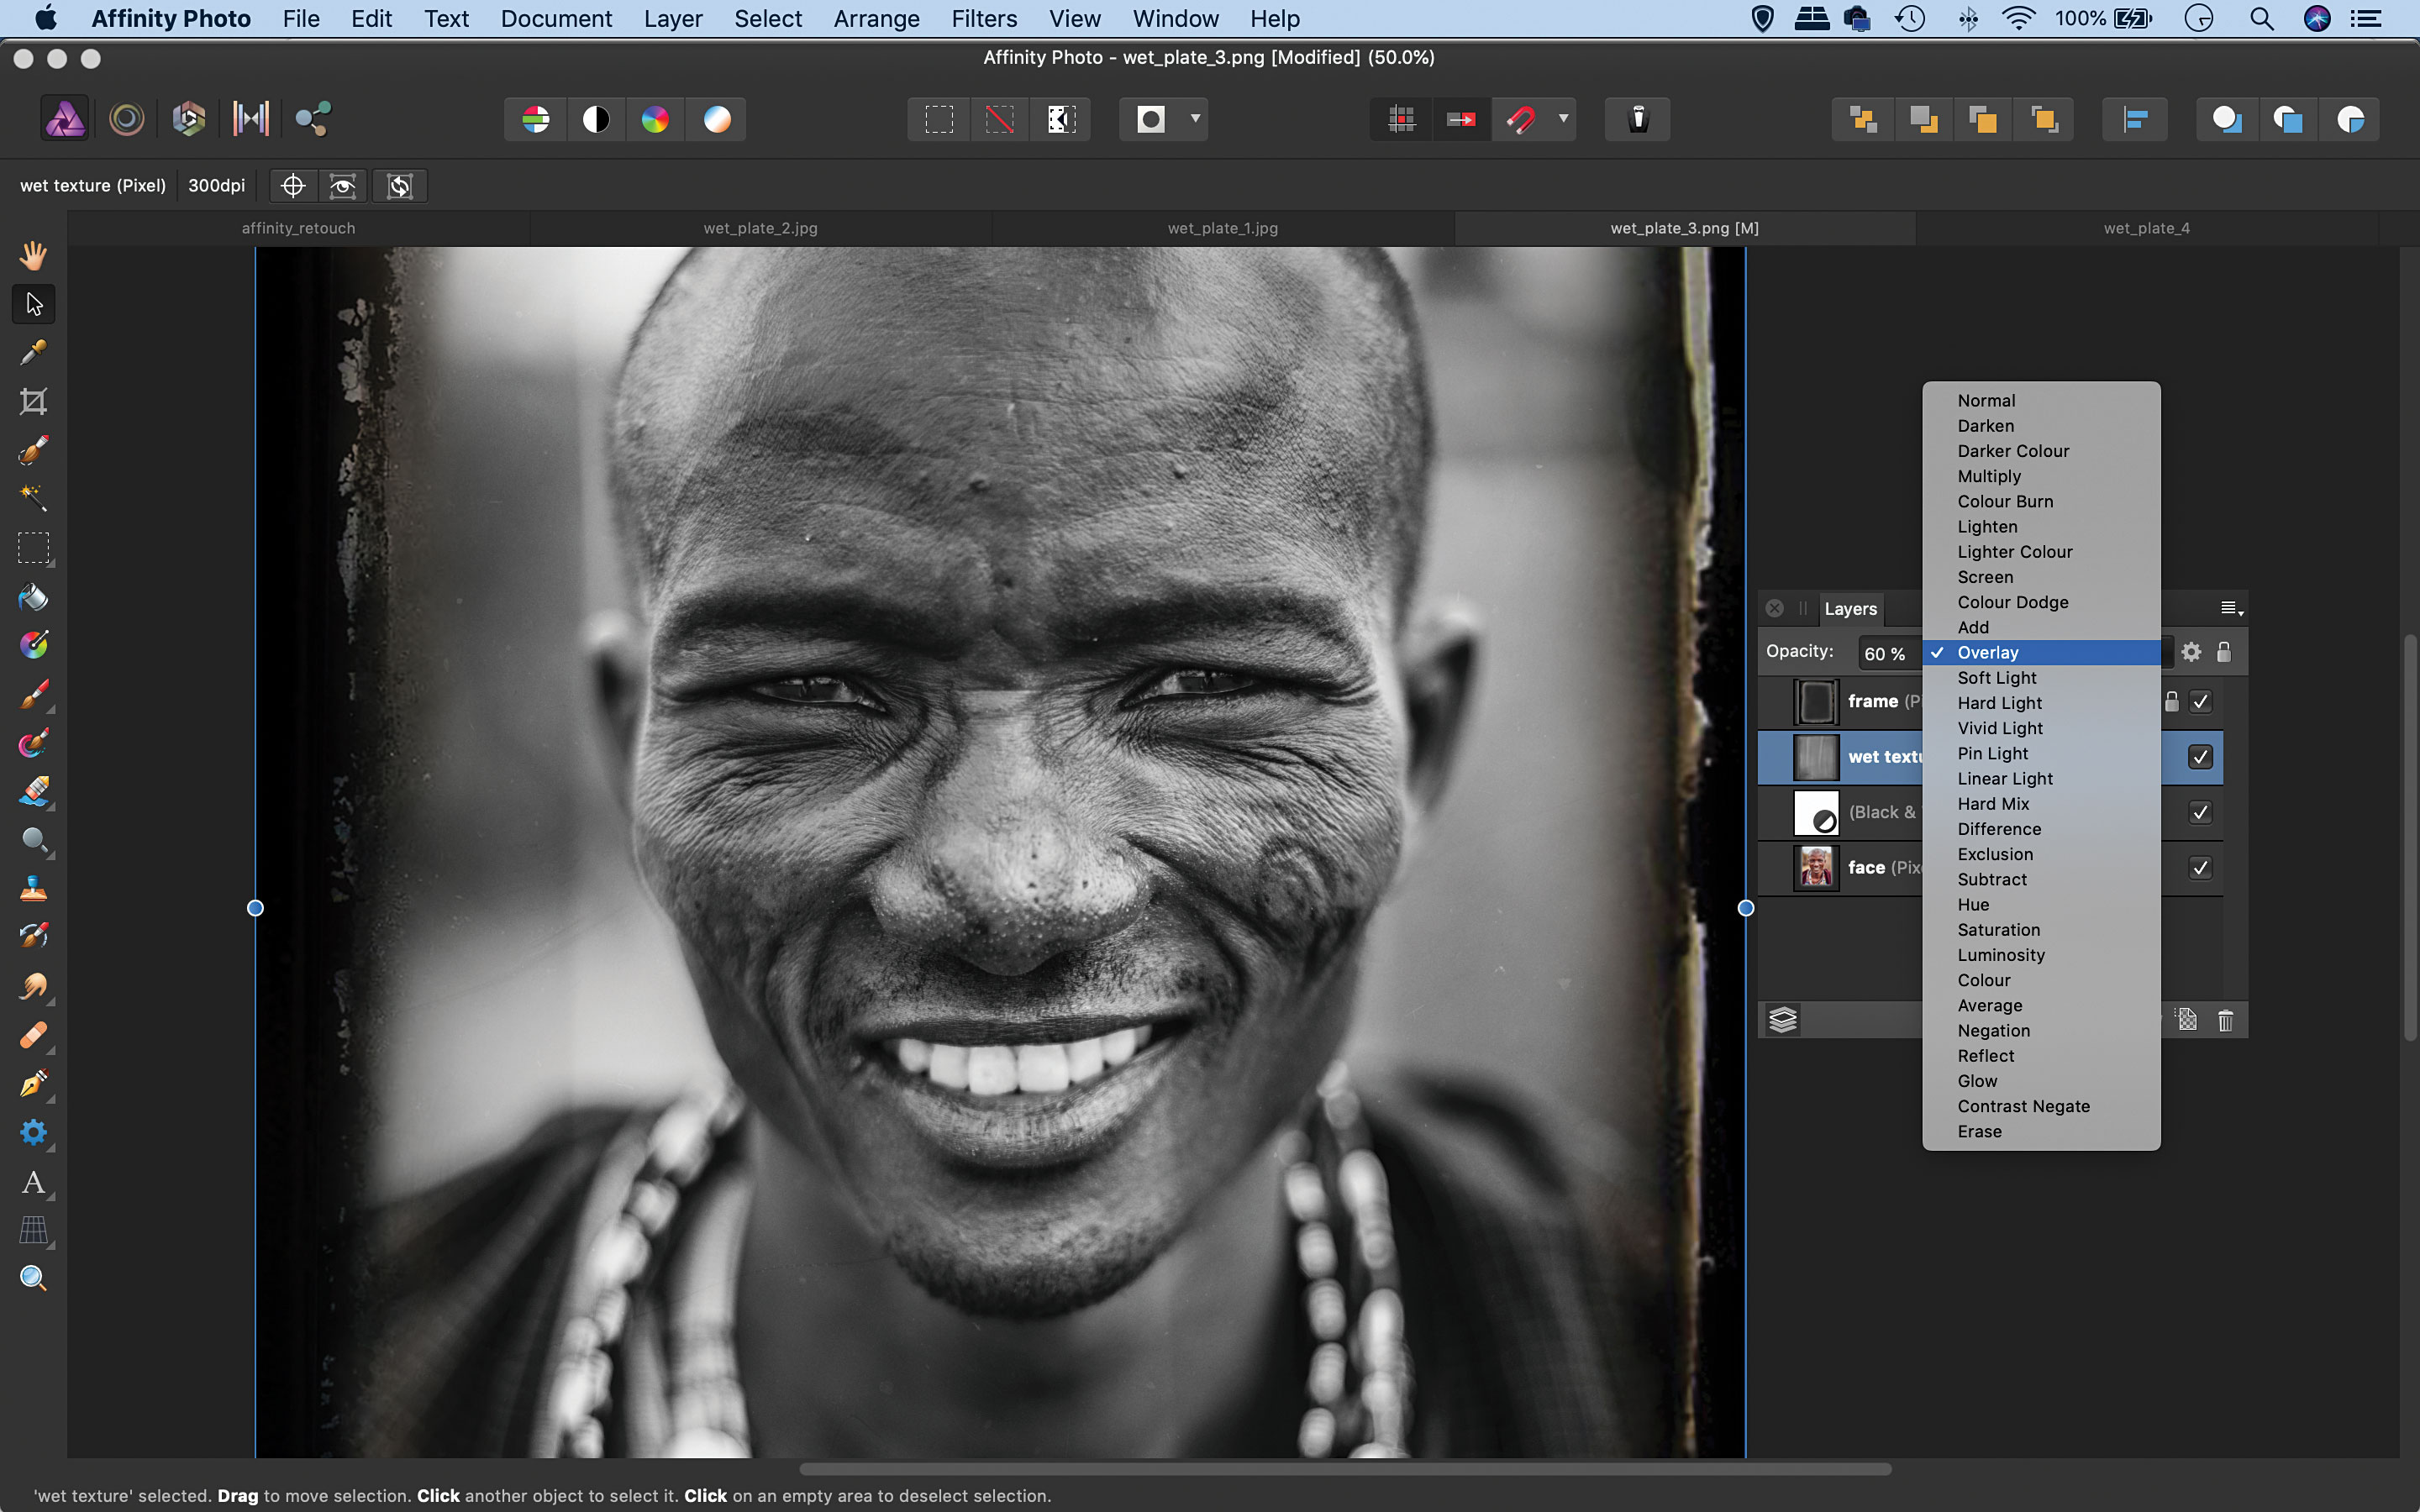
Now we copy and paste a 'texture' image as another layer, then go to the Layers panel, click the blending mode drop-down menu at the top and choose Overlay. The effect is quite strong, so we lower the layer opacity to 60%. You can click the tick to toggle the layer off and on to assess the correct opacity for your image.
Step 4: Blur the portrait
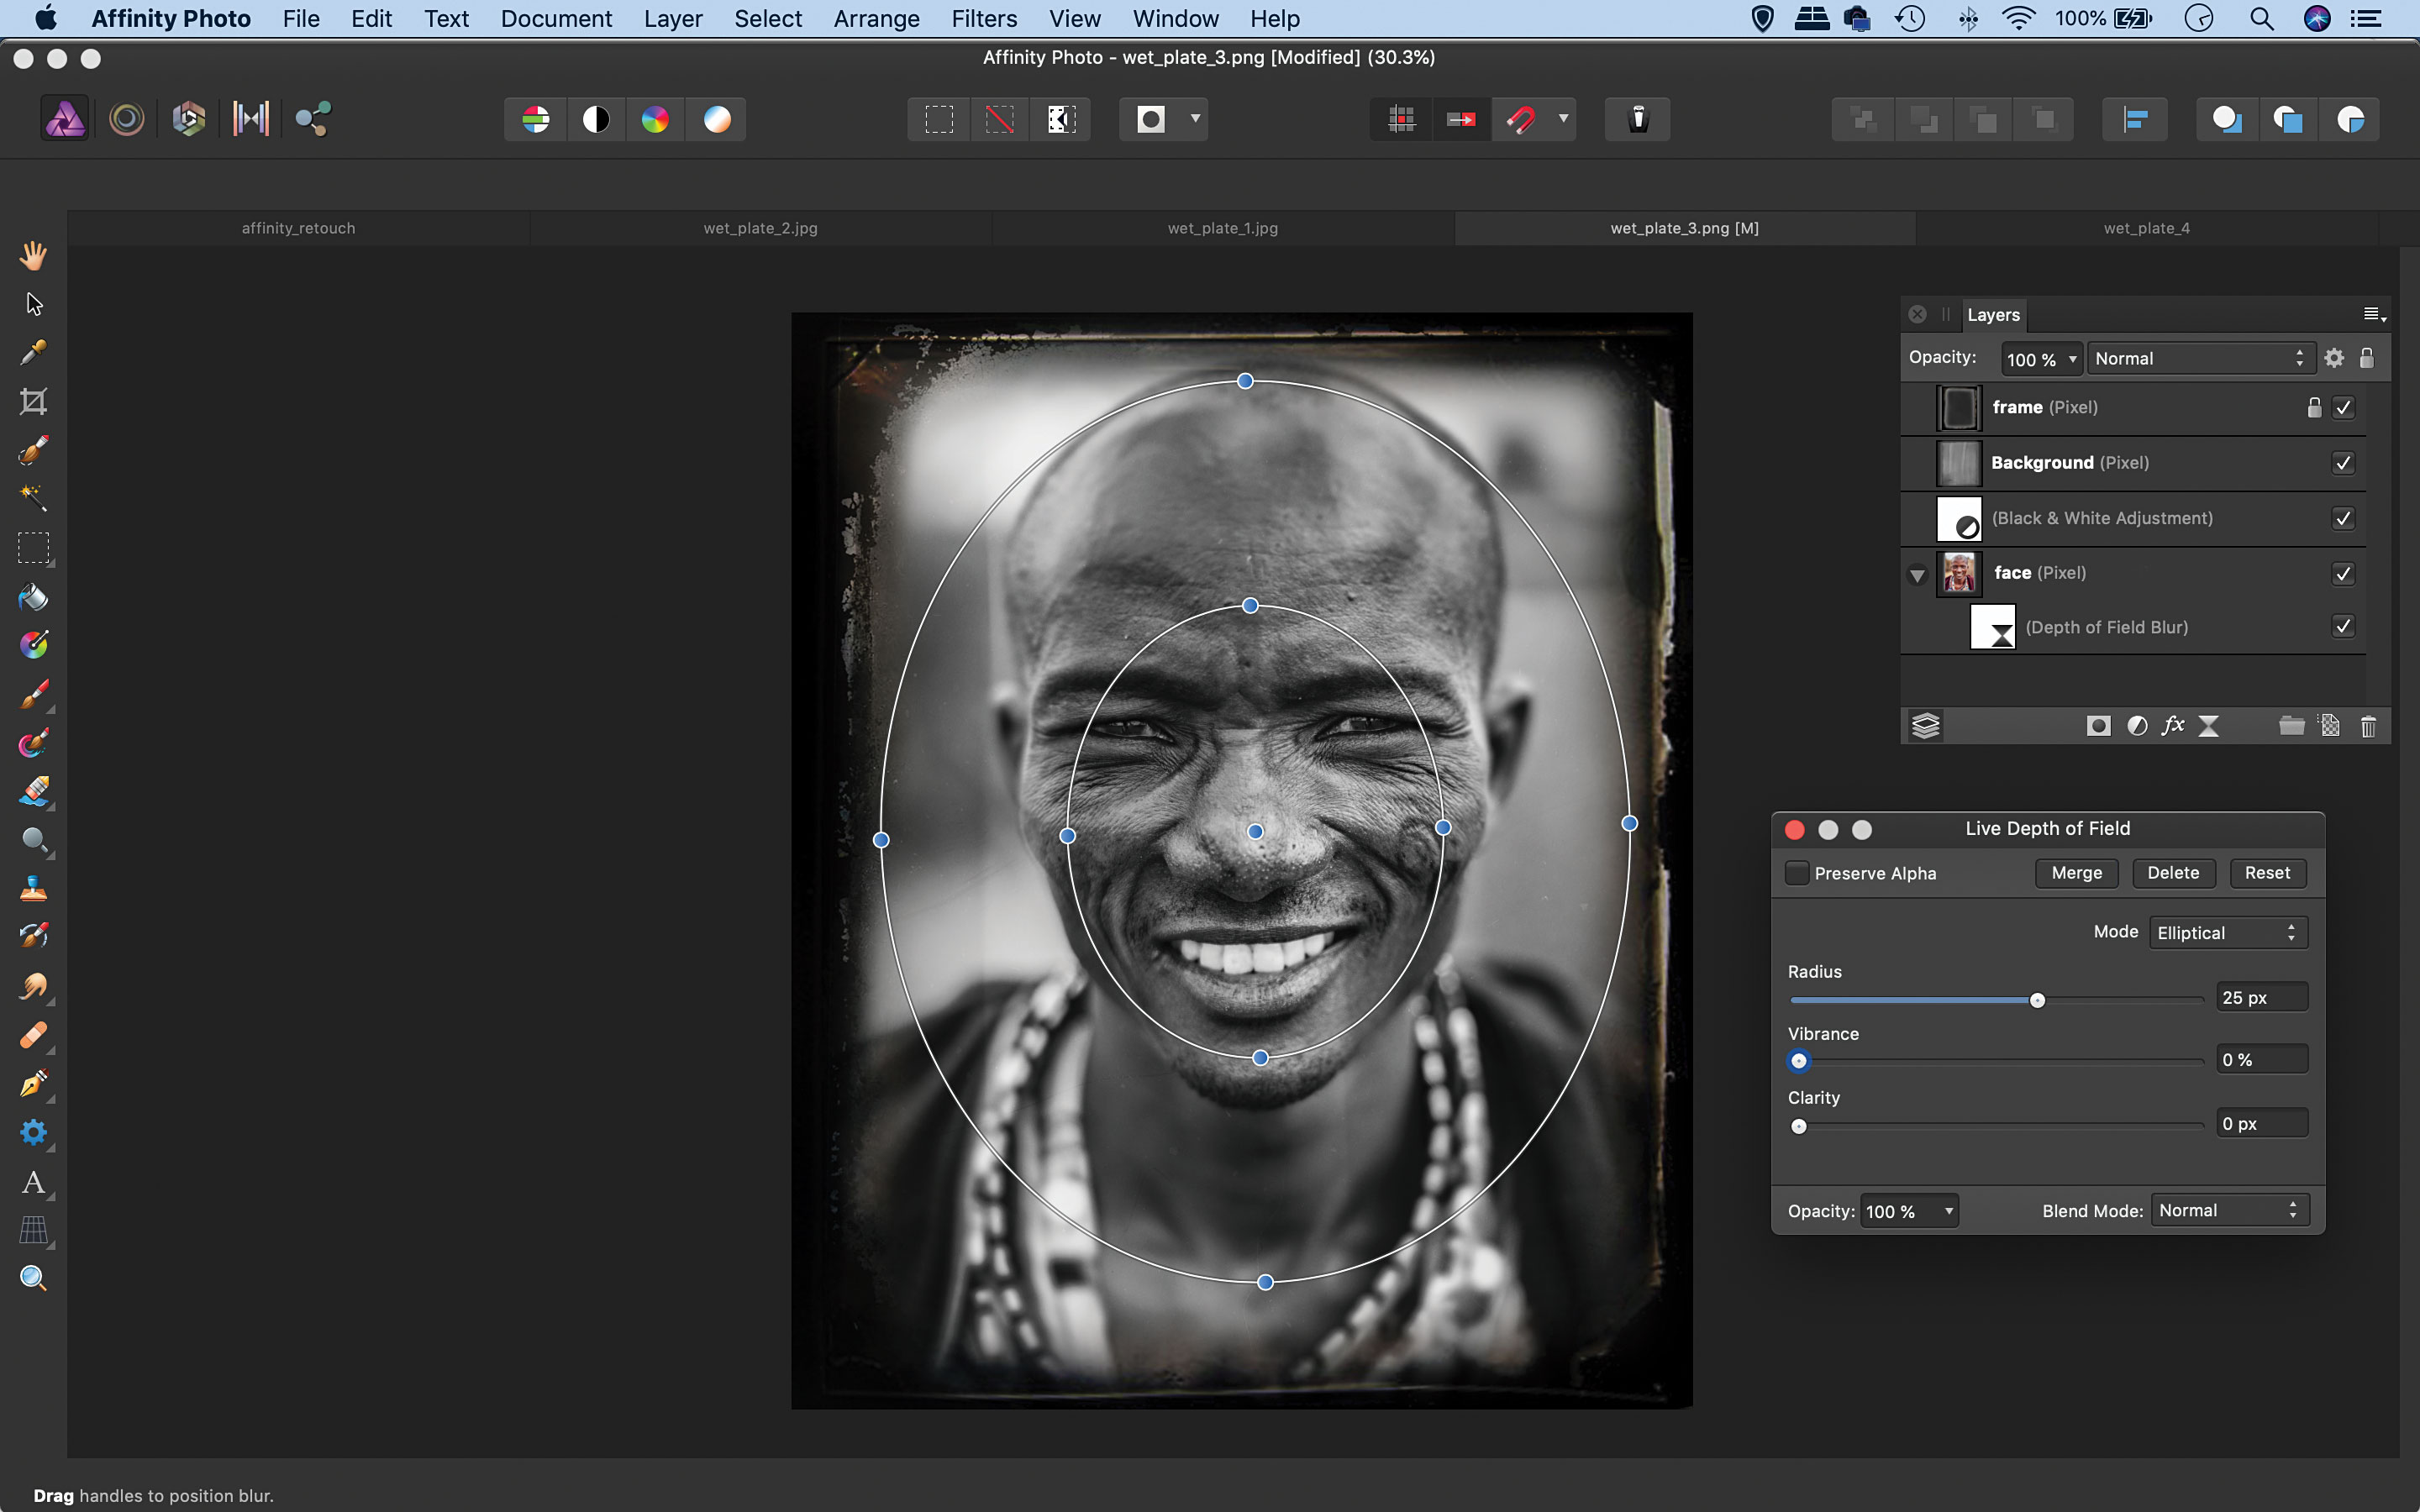
To create a vintage-looking edge blur effect, we highlight the bottom layer then go to Layer > New Live Filter Layer > Depth of Field Filter. In the settings we choose Elliptical Blur then increase the Radius to about 25px. We can move the center point over the face and adjust the size of the circles to blur the edges of the portrait.
Step 5: Add vintage toning
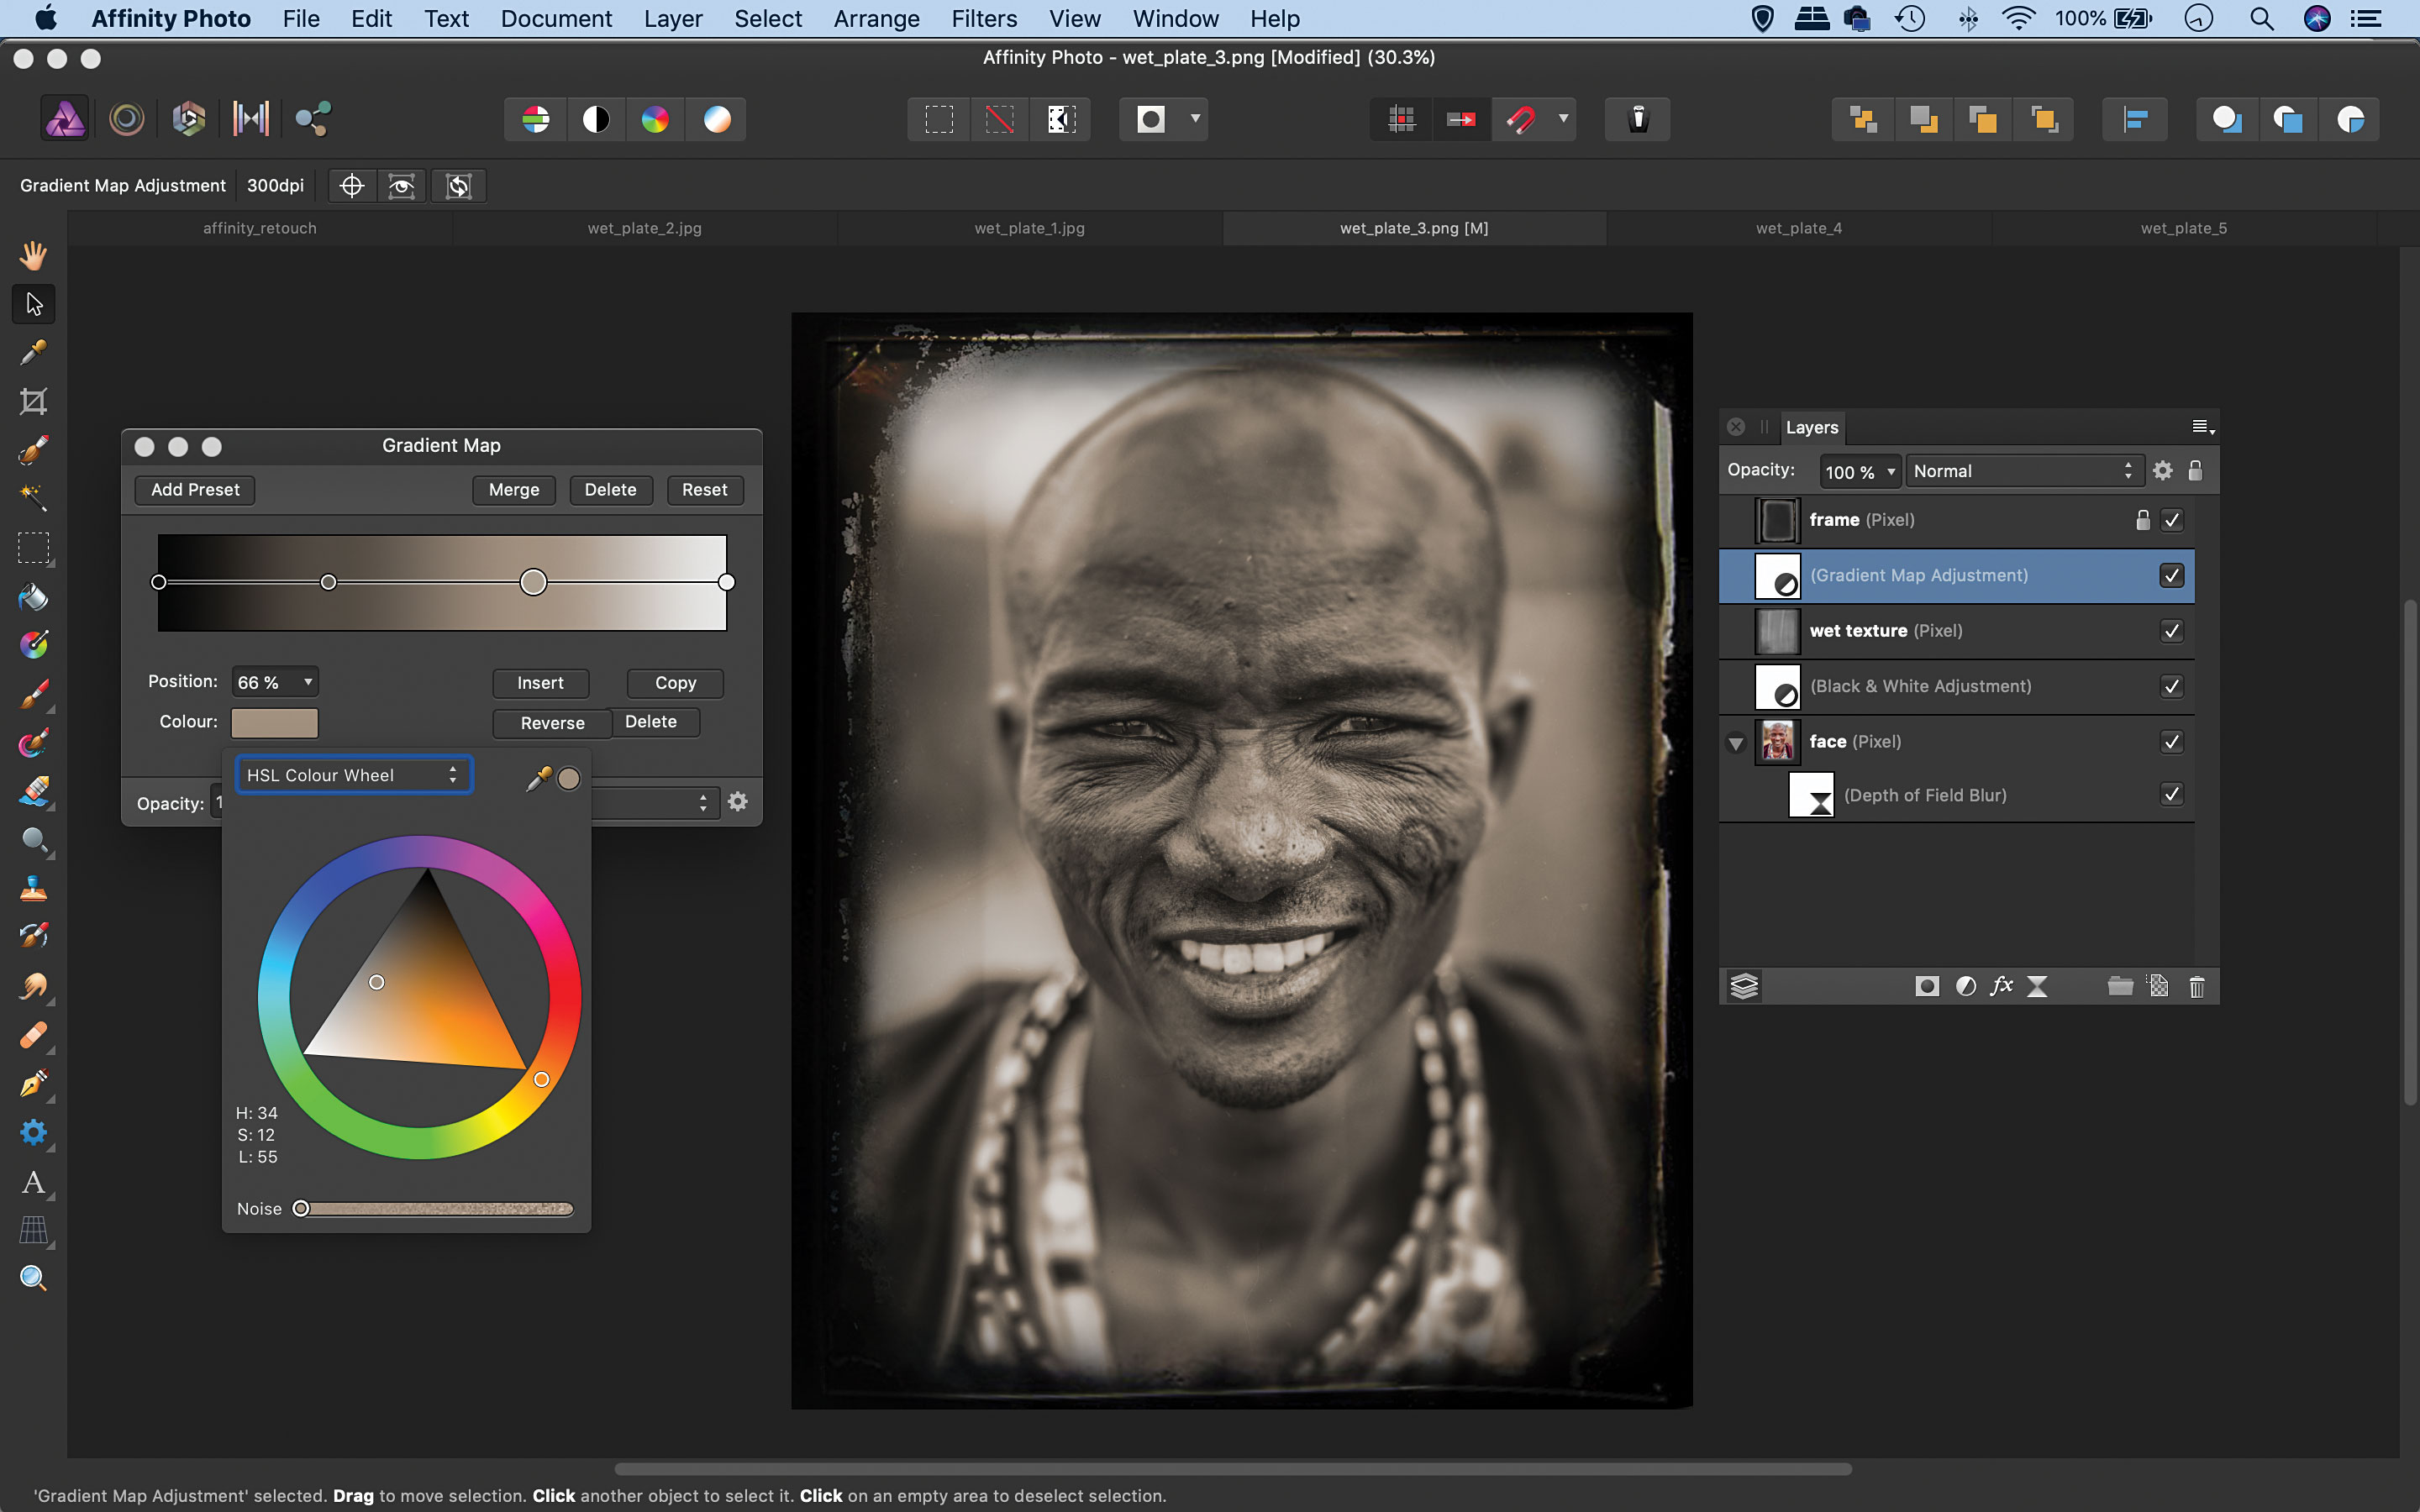
For our toning effect we add a Gradient Map adjustment layer, then click on the points to add colors, and double-click the line to add more points. You can drag these left or right to change the tonal range. We used four points as shown (1:H0S0L6 ,2:H34S8 L29, 3: H34 S12 L55 , 4: H0 S0 L100).
Step 6: Make it grainy
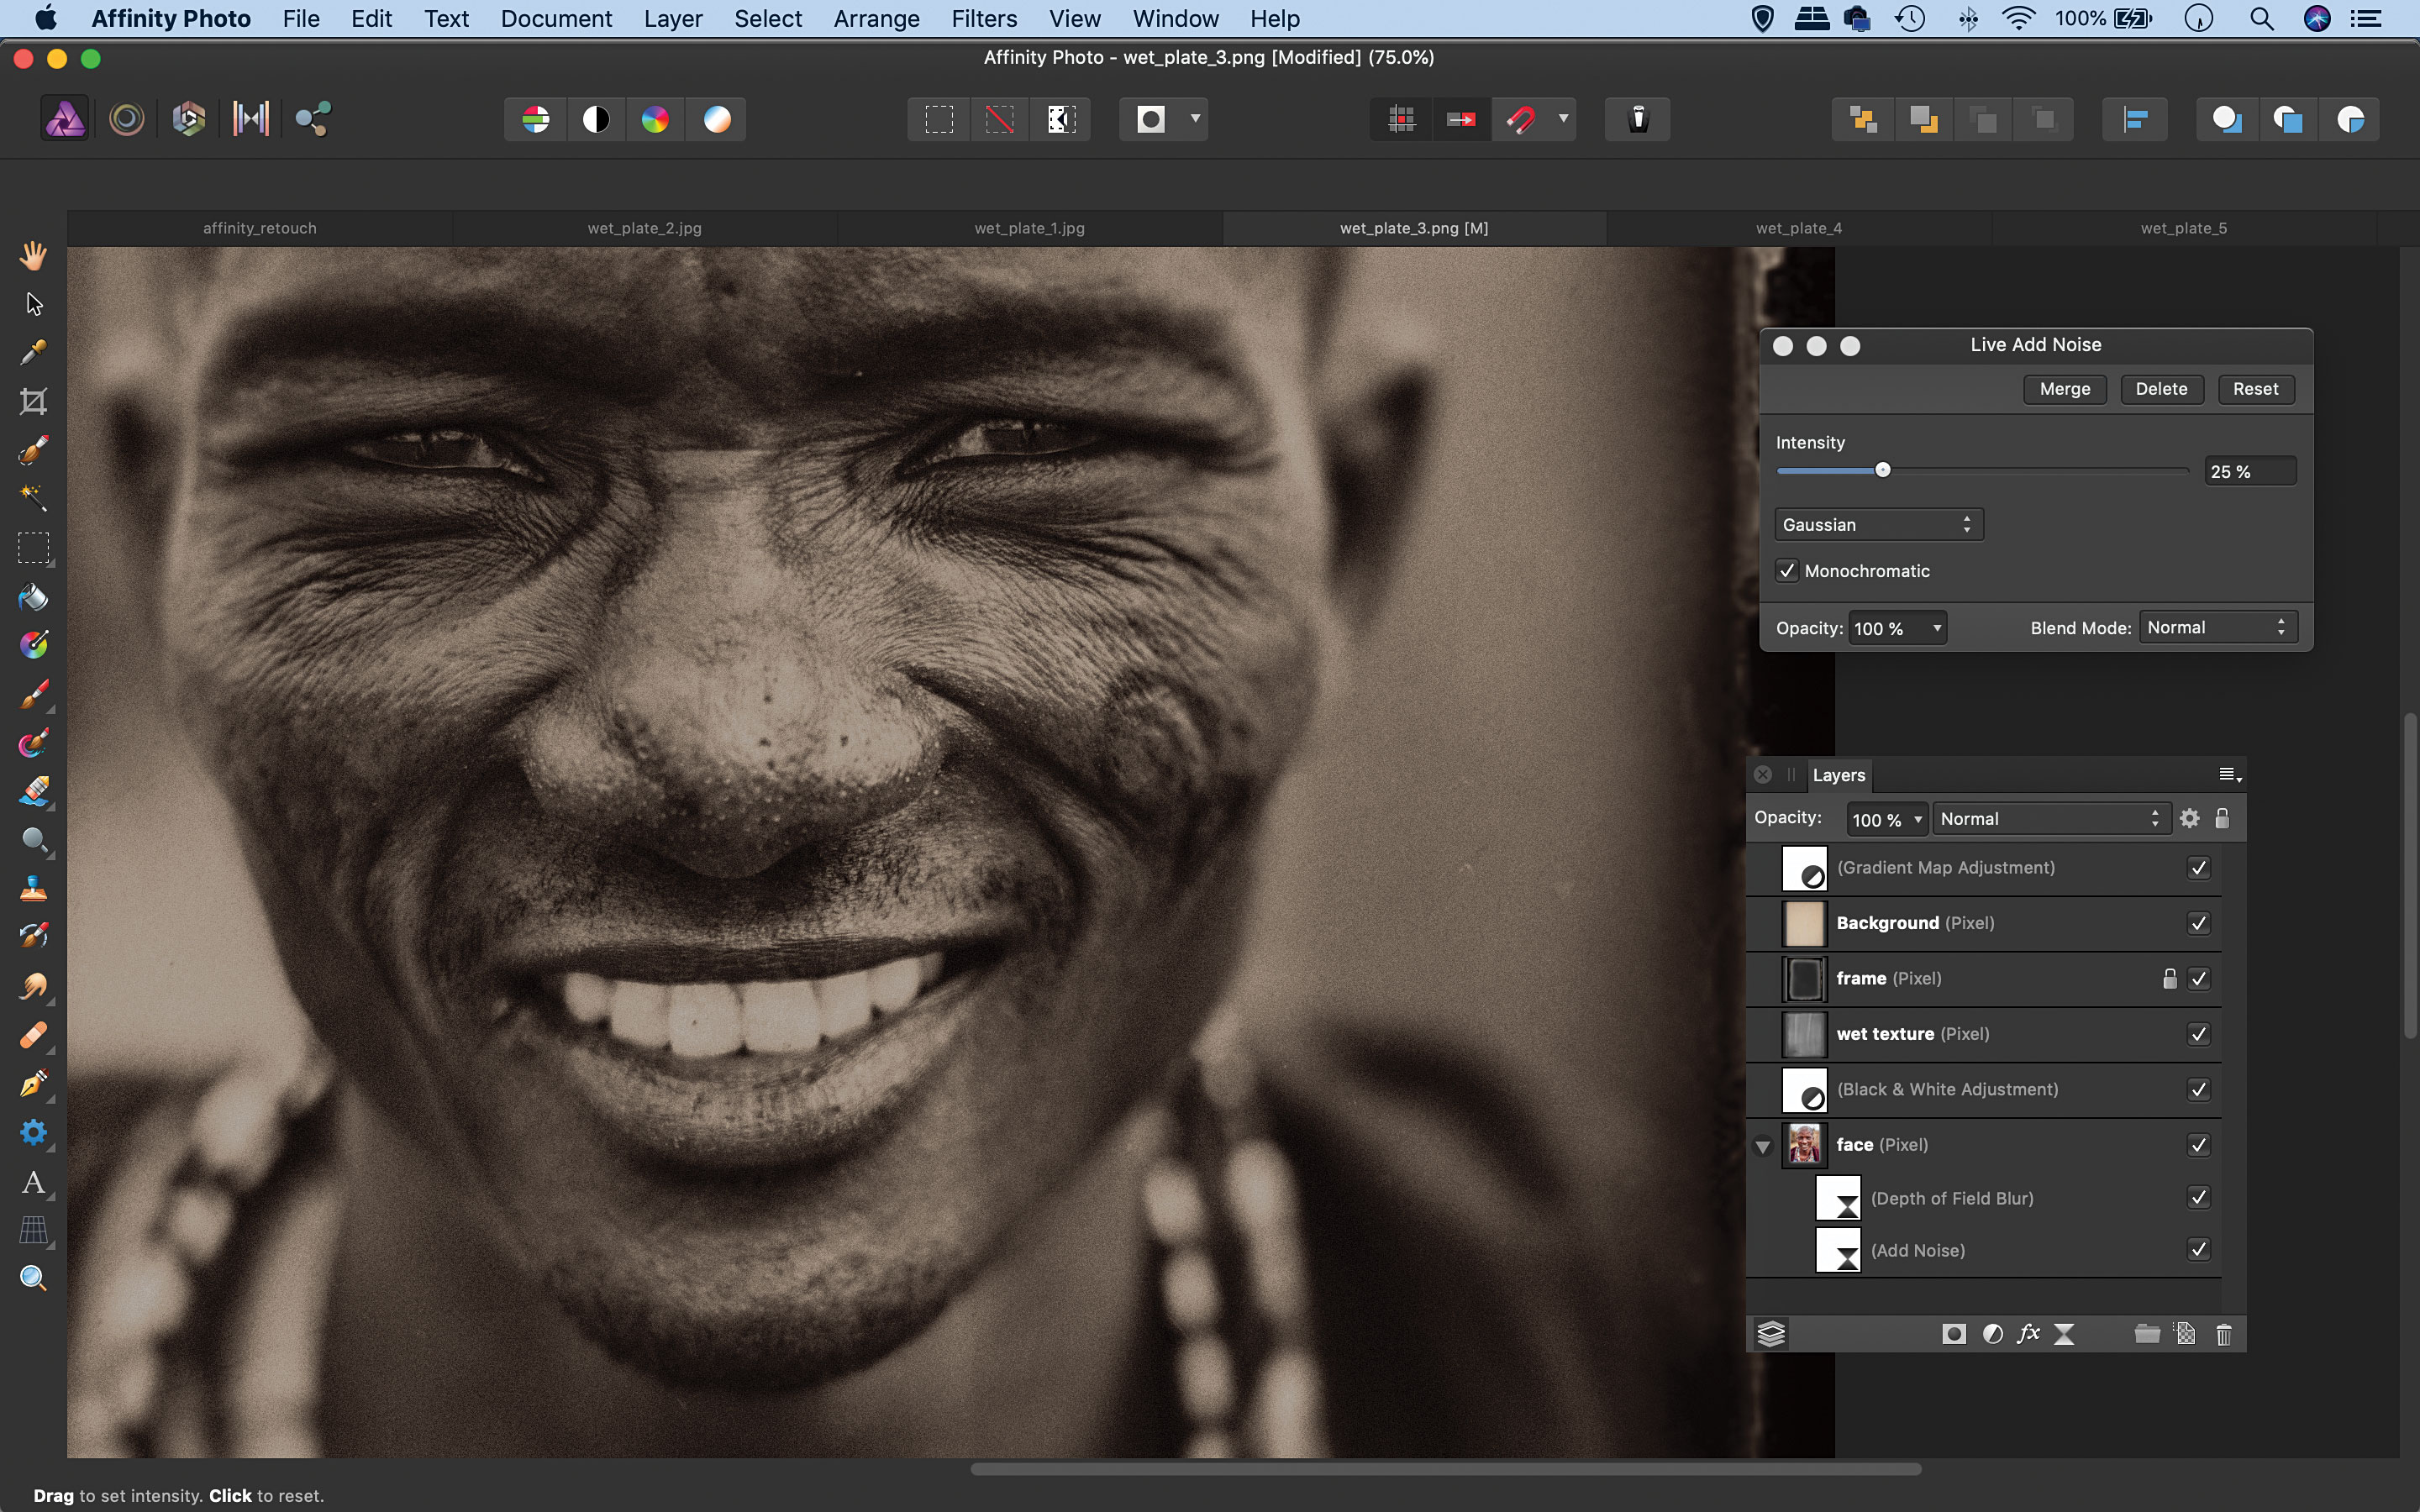
To create the grain effect, we copied and pasted in a fourth 'grain' image, then went to the blending mode drop-down again and chose Multiply – then lowered the layer opacity to about 65%.Finally, we highlighted the bottom layer then used Layer > New Live Filter Layer > Add Noise, increasing the noise to about 25%.
Gradient Map adjustments
The Gradient Map adjustment layer is one of Affinity Photo’s most useful toning tools. It lets us choose colours for different points on the gradient (there are three to begin with but you can double-click to add more), these are then ‘mapped’ on to the tonal range of the image. This means we can give shots a vintage look, like sepia, selenium or cyanotype, and choose exactly which shades of colour to use for the shadows, midtones and highlights. After adding colour points we can drag them left or right to change the balance of colours, which is useful for fine-tuning the effect.
Quick tip
If your image lacks punch try adding a Curves adjustment layer and plot an S-shaped curve line to boost contrast.
About N-Photo magazine
This tutorial originally appeared in N-Photo, the monthly newsstand magazine for Nikon photographers. Why not subscribe to a print edition, and have the magazine delivered direct to your door every month?
Alternatively, we have a number of different digital options available, including:
• Apple app (for iPad or iPhone)
• Zinio app (multi-platform app for desktop or smartphone)
• PocketMags (multi-platform app ideal for Android devices)
• Readly (all-you-can-eat digital magazine subscription service)
If you wanted a printed version of any of our most recent issues we have a selection of back issues to choose from in our online store.
Read more:
• Photography tips and tutorial videos
• The best photo editing tools and accessories
• The best desktop computers for photo editing
• The best photo-editing laptops right now
• The best photo editing software today
N-Photo: The Nikon Magazine is a monthly publication that's entirely dedicated to Nikon users. As a 100% independent magazine, you can be assured of unbiased opinion from a trustworthy team of devoted photography experts including editor Adam Waring and Deputy Editor Mike Harris.
Aimed at all users, from camera newcomers to working pros, every issue is packed with practical, Nikon-specific advice for taking better photos, in-depth reviews of Nikon-compatible gear, and inspiring projects and exciting video lessons for mastering camera, lens and Photoshop techniques.
Written by Nikon users for Nikon users, N-Photo is your one-stop shop for everything to do with cameras, lenses, tripods, bags, tips, tricks and techniques to get the most out of your photography.
