Master Live Filters in Affinity Photo and create re-editable non-destructive effects!
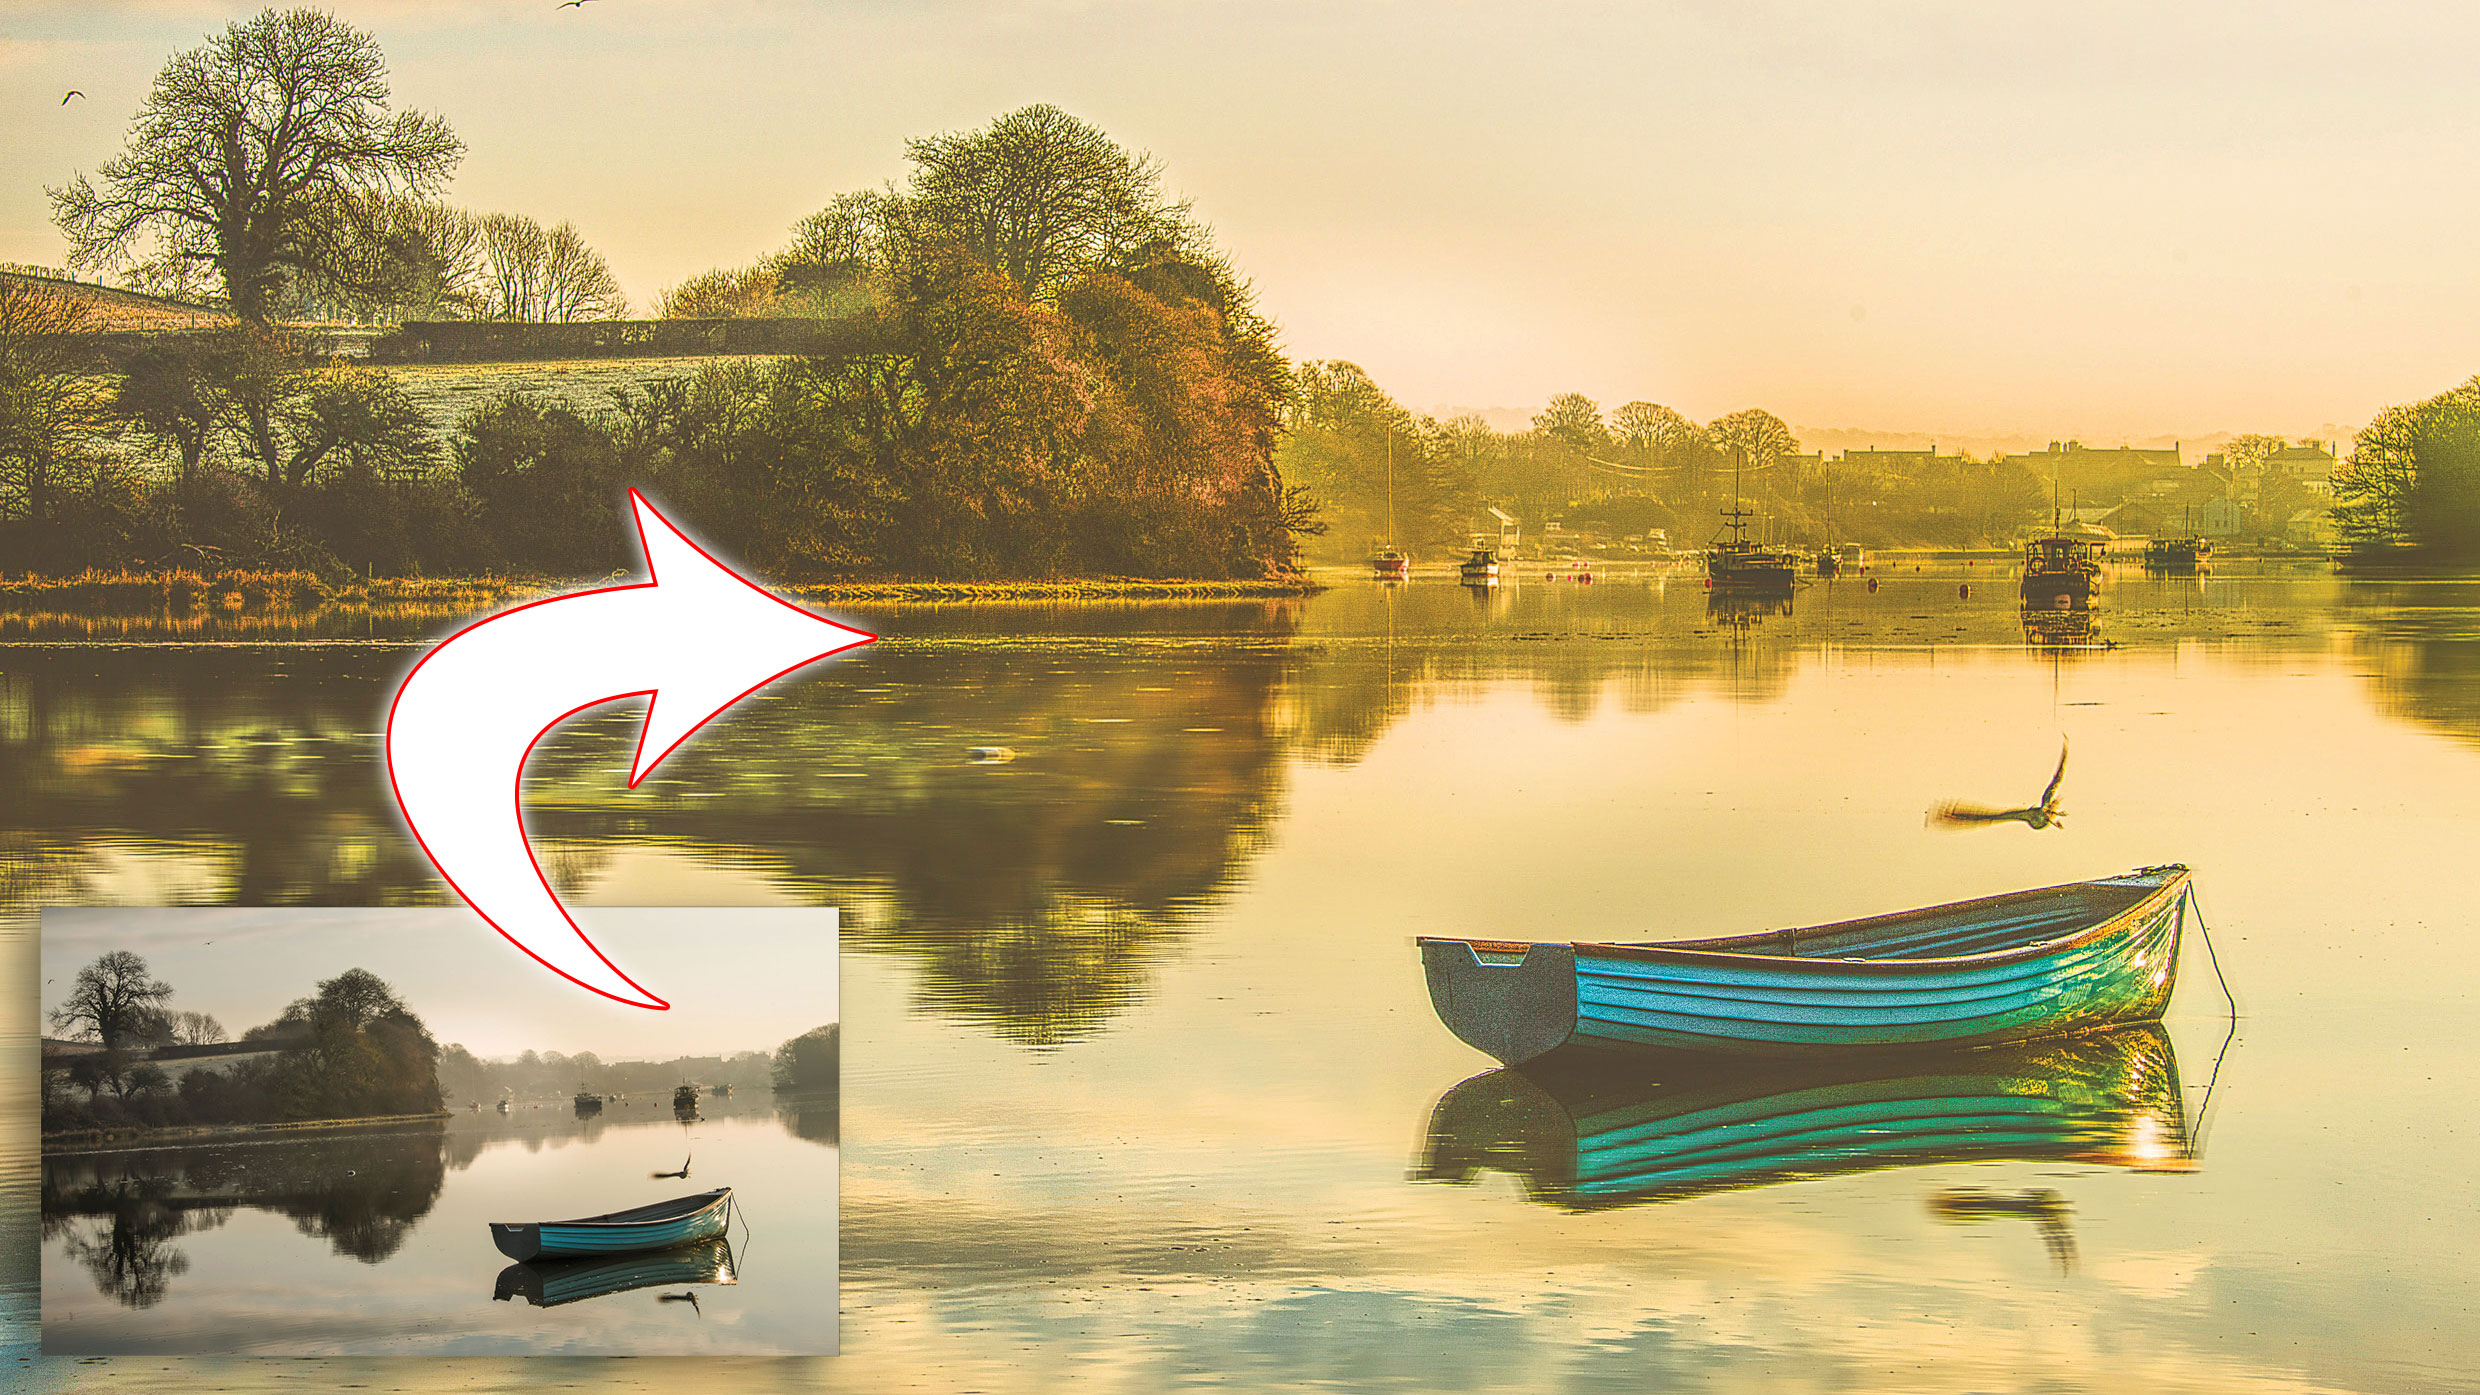
Enhance a dull-looking landscape with the ‘live filter’ feature in Serif’s powerful, low-cost image editor
Watch the video: Live filters
Start here
• Affinity Photo tutorials
The tutorials
1. Affinity Photo vs Photoshop
2. RAW editing with Affinity Photo
3. Focus merge with Affinity Photo
4. Replace a sky in Affinity Photo
5. Moody mono in Affinity Photo
6. Six Affinity Photo landscape tips
7. Color correction in Affinity Photo
8. Live Filters in Affinity Photo
9. Create a classic wet plate look
10. Remove objects in Affinity Photo
11. Paint an abstract portrait
12. Enhance skintones in Affinity Photo
13. Create HDR in Affinity Photo
14. Replace a sky in Affinity Photo
15. Affinity Photo double exposures
16. Affinity Photo Denoise tool
Love them or hate them, photo-editing filters are one way to give photographs a specific look, or simply apply a fun effect. There are two types of filter – those that let you add effects, like turning your photo into a sketch, and those that have more practical uses, such as sharpening and blur.
While Affinity Photo’s list of filters can’t compare with the number on offer in Photoshop, there are thankfully more of the latter than the former. Here we’ll look at a few of the best. Amongst the list of filters on show you’ll find powerful sharpening tools; a range of blur tools for crafting all manner of depth-of-field effects; and a haze-removal tool that manages to out-perform the similar feature in Photoshop.
When it comes to applying filters in Affinity Photo you have two options – you can either add the effect directly to a pixel layer, or you can instead use the clever live filter feature. Rather than altering the pixels on a layer, this instead places the filter effect on a separate layer. It not only means the filter remains editable, but also affords you all the benefits of working with layers. So you can mask the effect to make it selective, alter the opacity to tone it down, or change the blending mode, if you decide to.
In this way, live filter layers are kind of similar to adjustment layers. Just like adjustment layers, we can build up an effect by using a combination of filter layers, and even switch the order around if we need to.
Live filters affect all the layers below them in the stack, so take note of their position in the Layers panel to control how they affect the rest of the image
Read more:
The best camera deals, reviews, product advice, and unmissable photography news, direct to your inbox!
Step 1: Haze removal
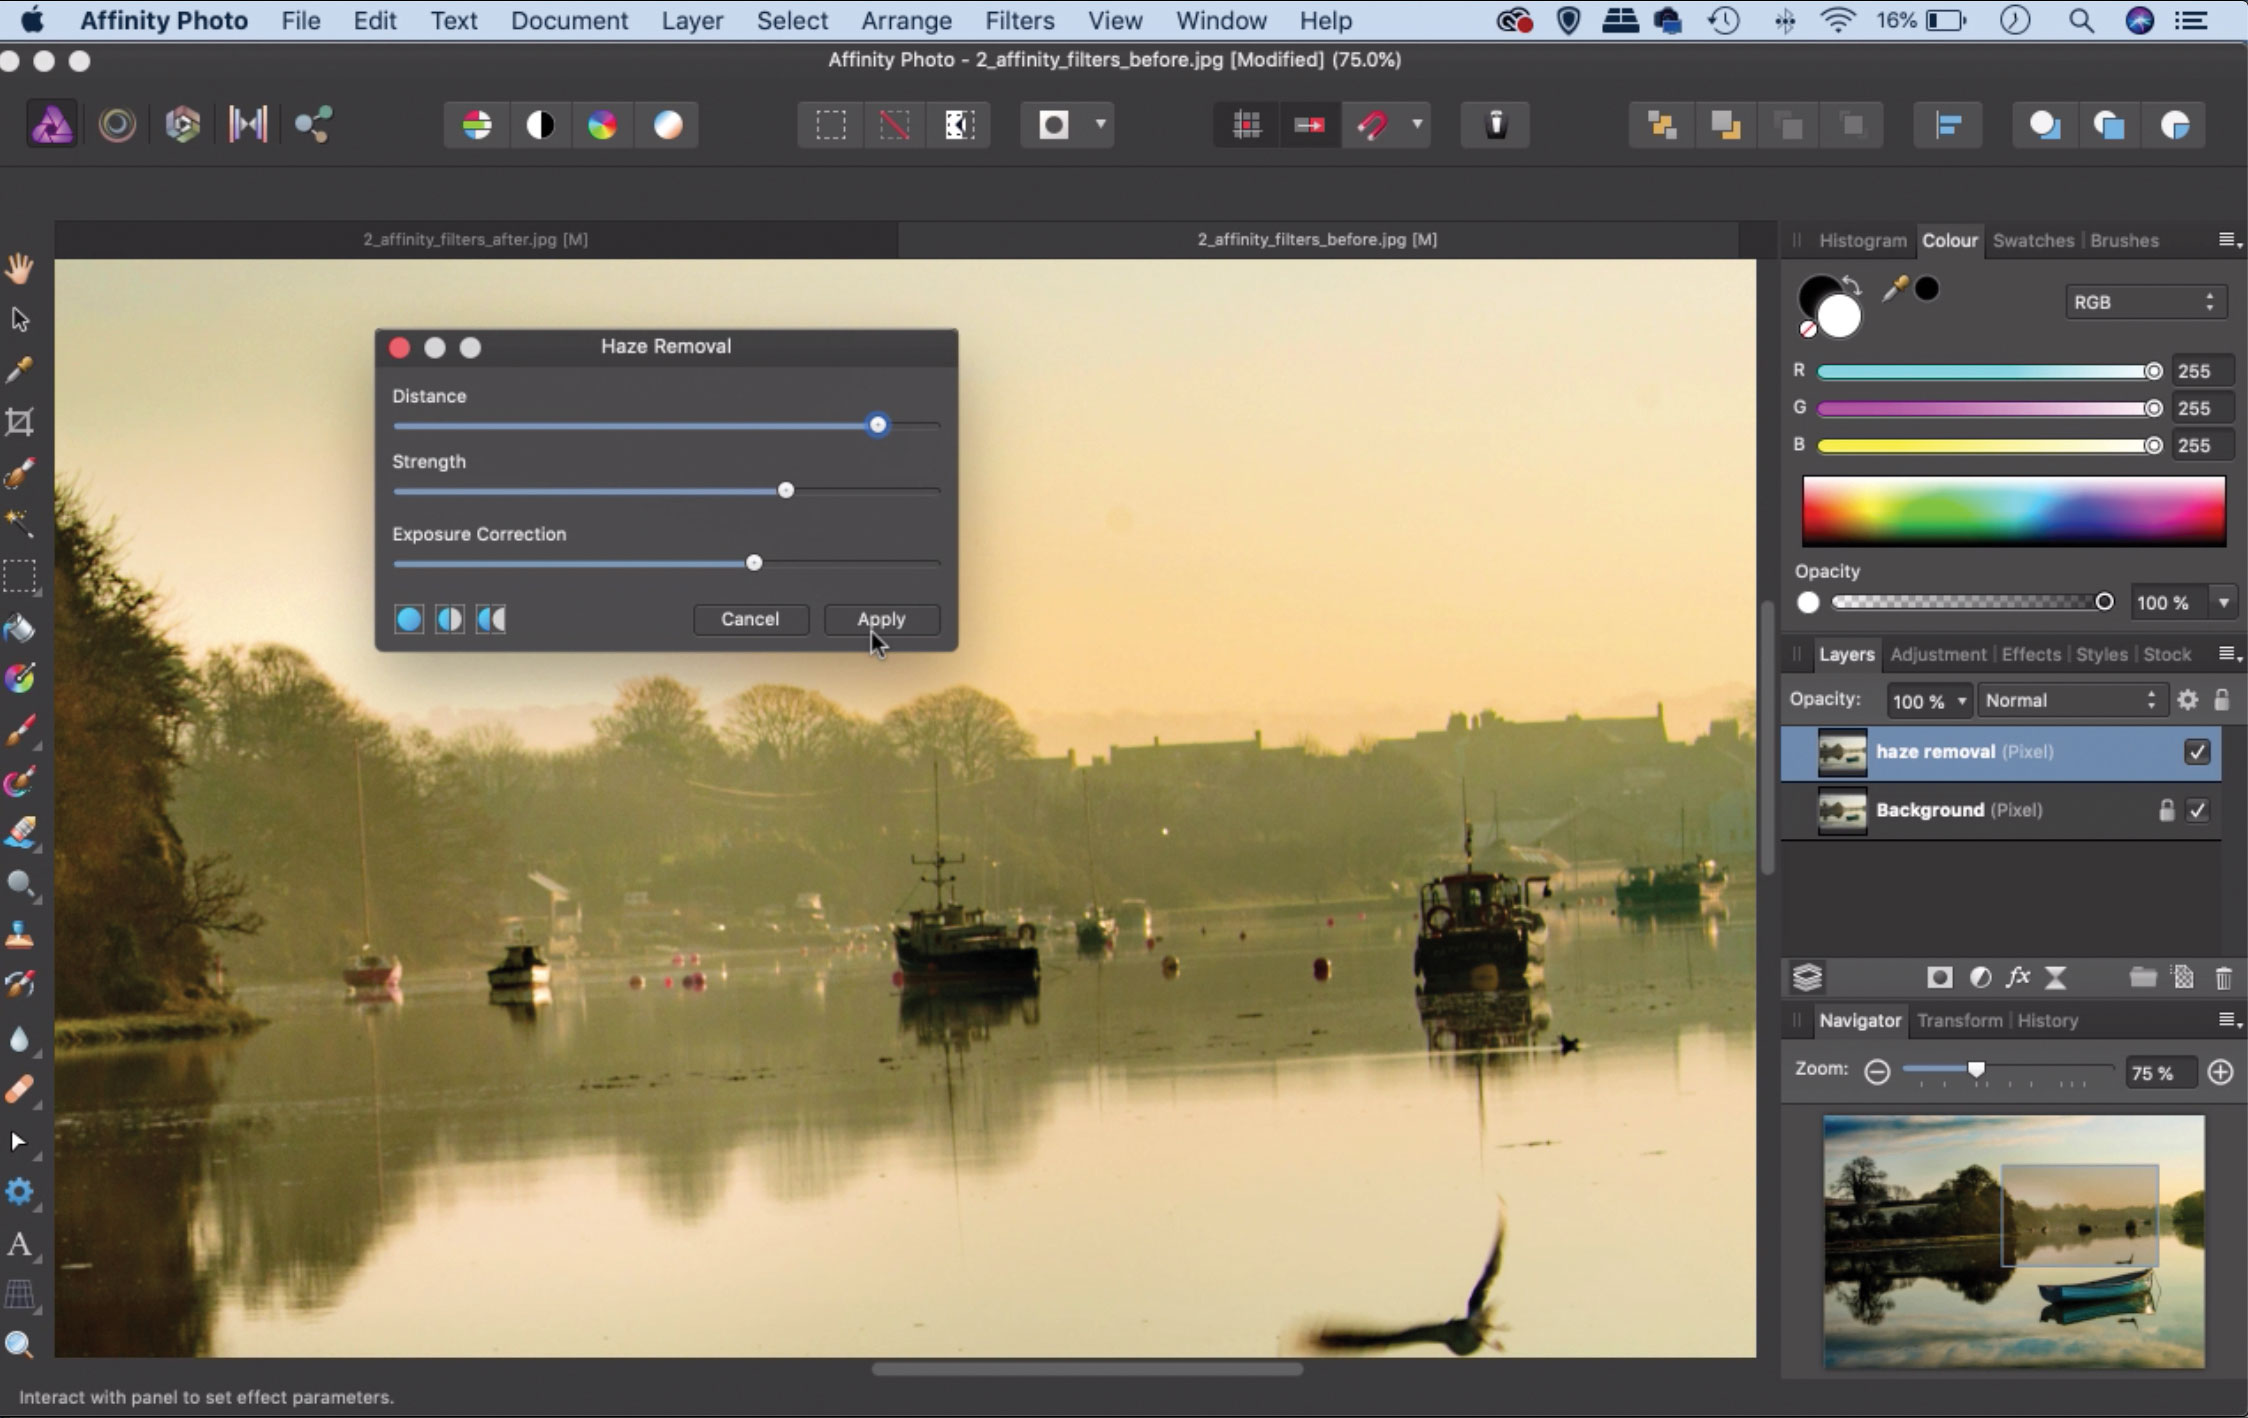
We can use the Haze Removal filter to enhance misty details in this picture. We highlight and duplicate the bottom layer (Cmd/ Ctrl+J) then go to Filter > Haze Removal. You can experiment with the sliders to cut through the haze. It can leave the image looking too dark, so try increasing the Exposure slider.
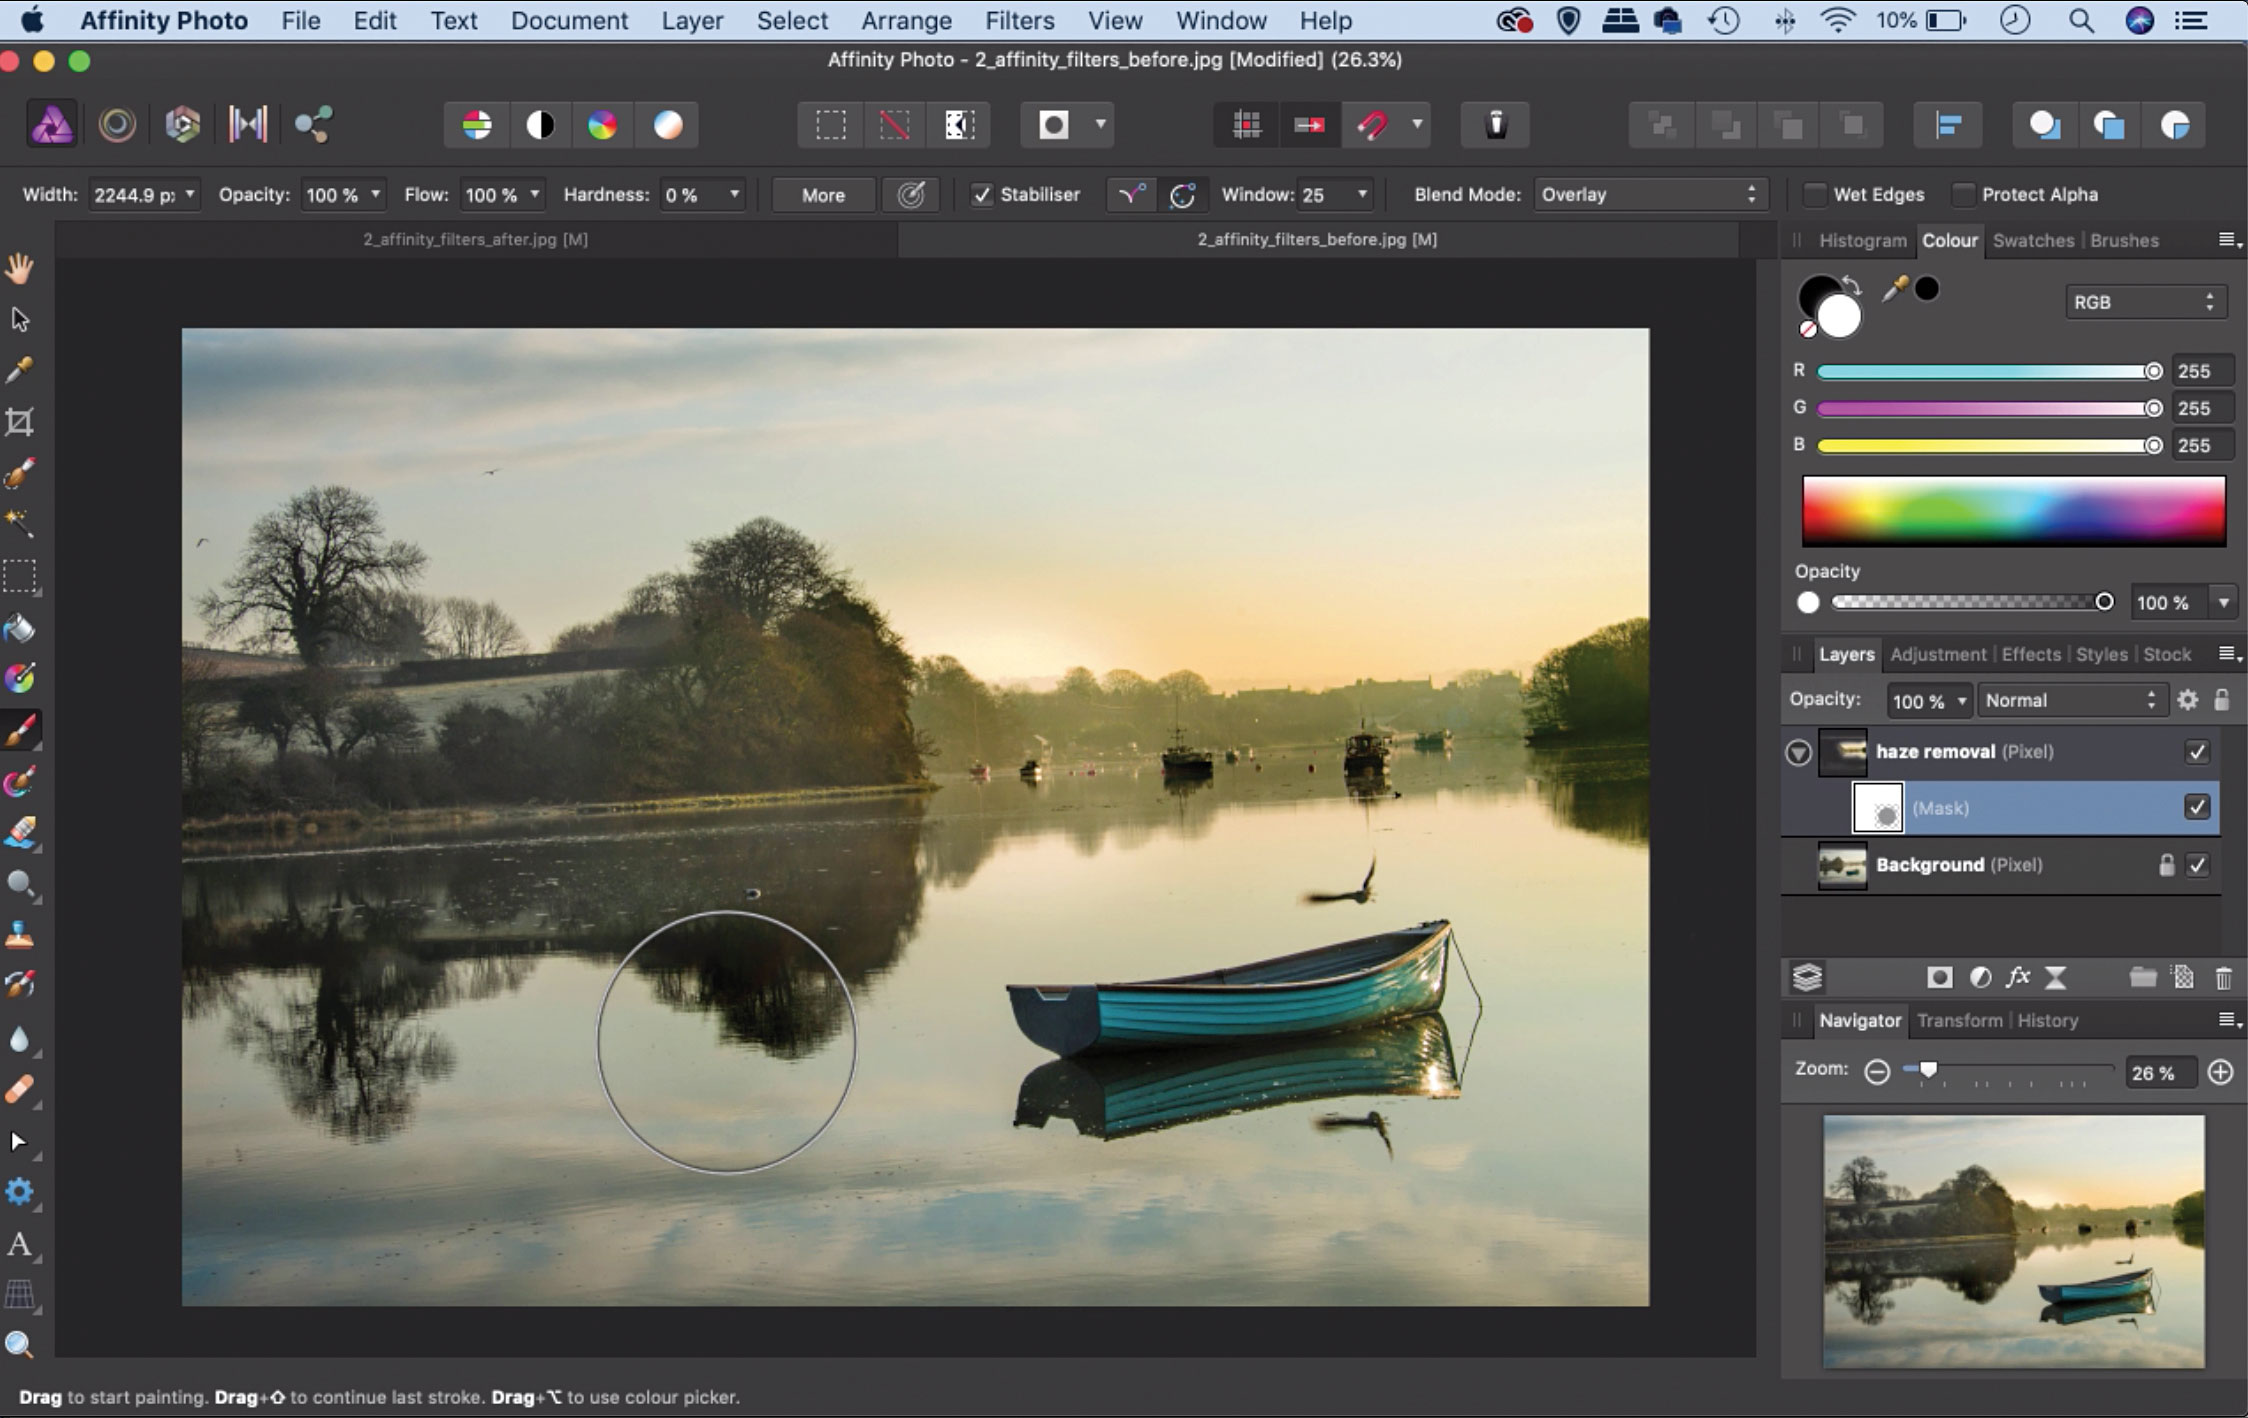
Step 2: Add a mask
Step 3: Fix the horizon
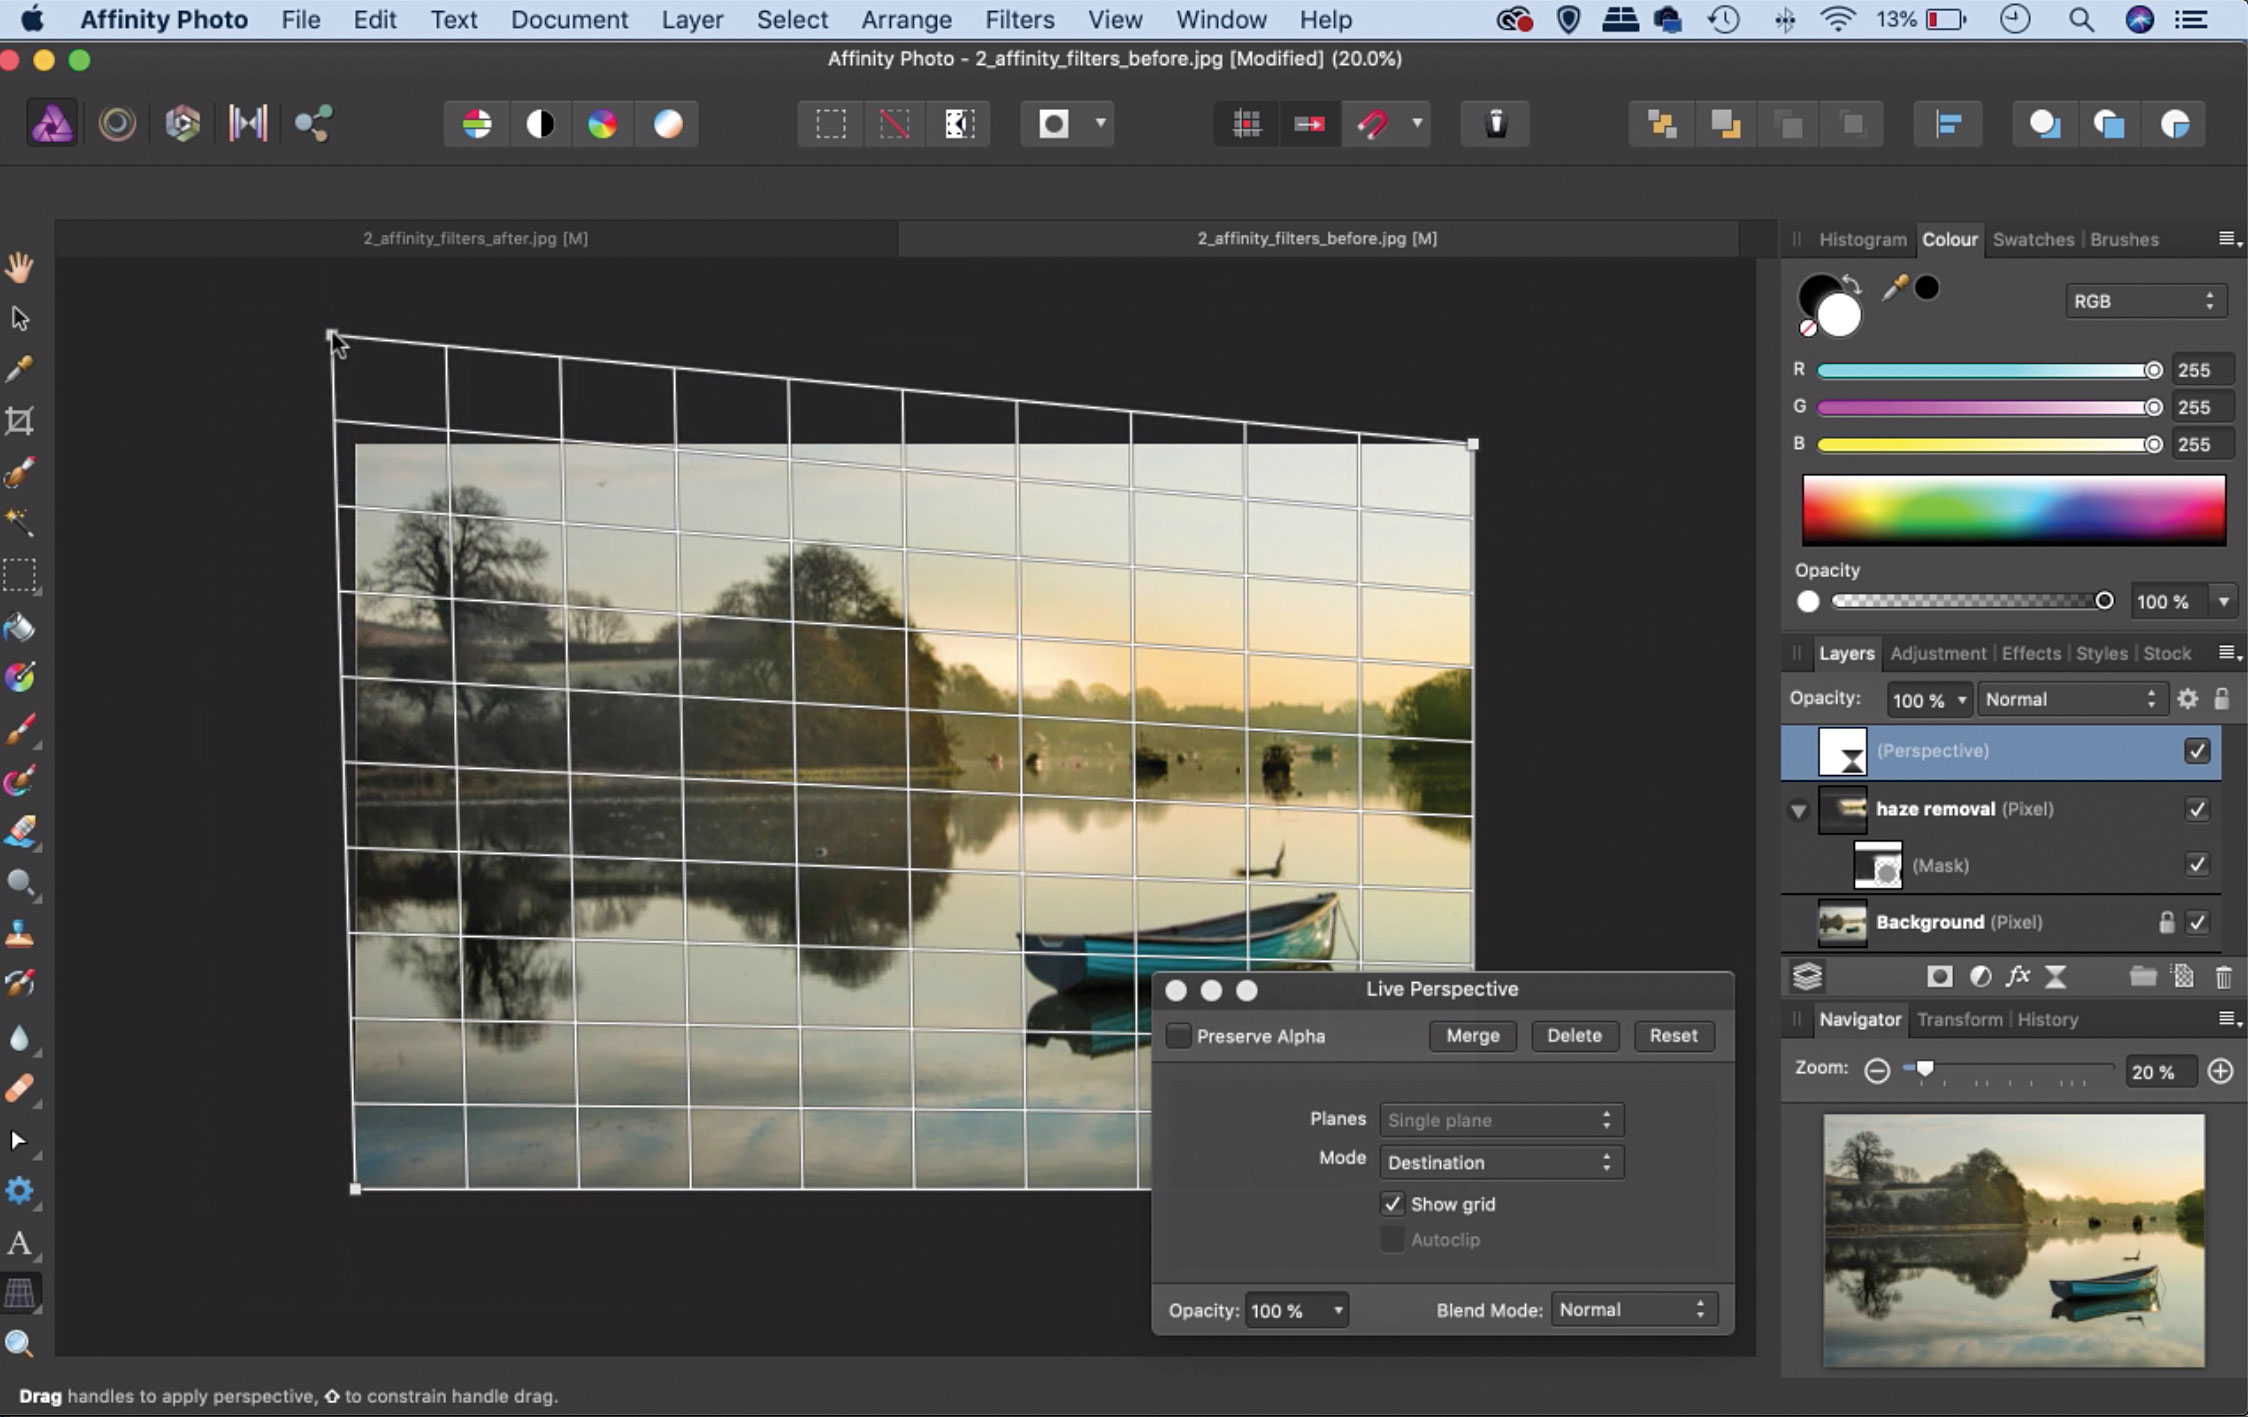
For this, we go to Layer > New Live Filter Layer > Perspective Filter. We need to make sure the newly created Perspective layer is at the top of the layer stack so that it affects all the layers below. Now we drag the top-left corner of the grid upwards. This lets us fix the horizon without having to crop in to the image.
Step 4: Blur the water
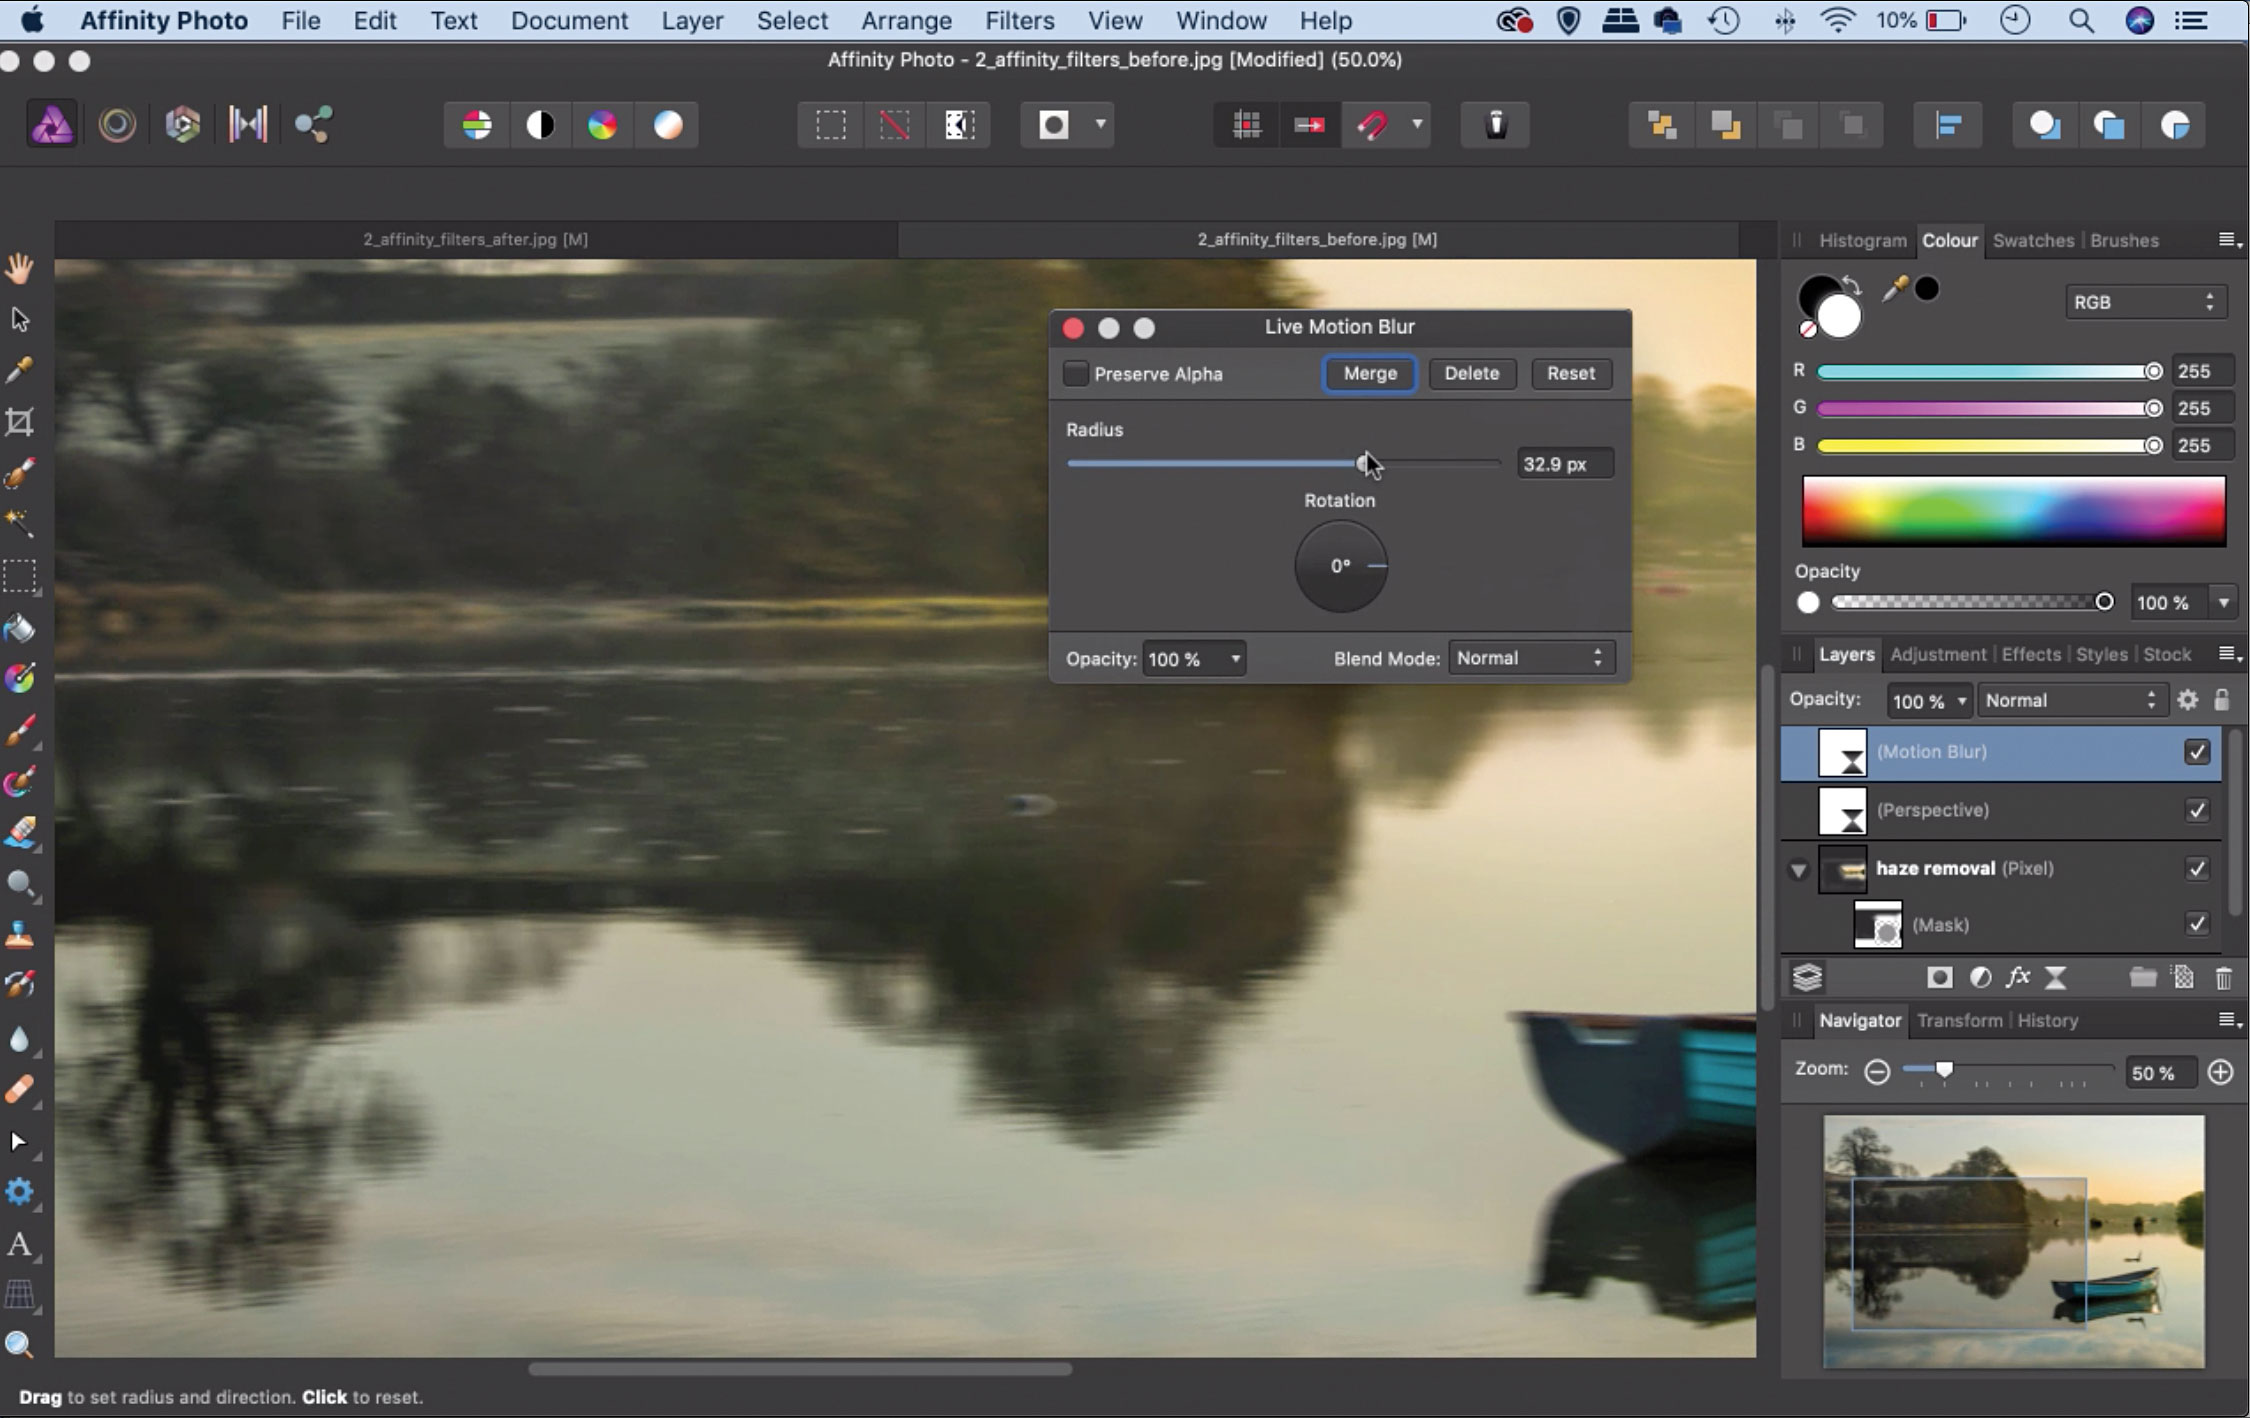
Affinity Photo has an array of blur filters, including Motion Blur, so we use the Layer > New Live Filter Layer > Motion Blur command. We leave the angle at 0 and increase the Radius to make a horizontal blur. Then we add a layer mask and paint with black to hide parts of this layer, so it just affects the water.
Step 5: High Pass sharpening
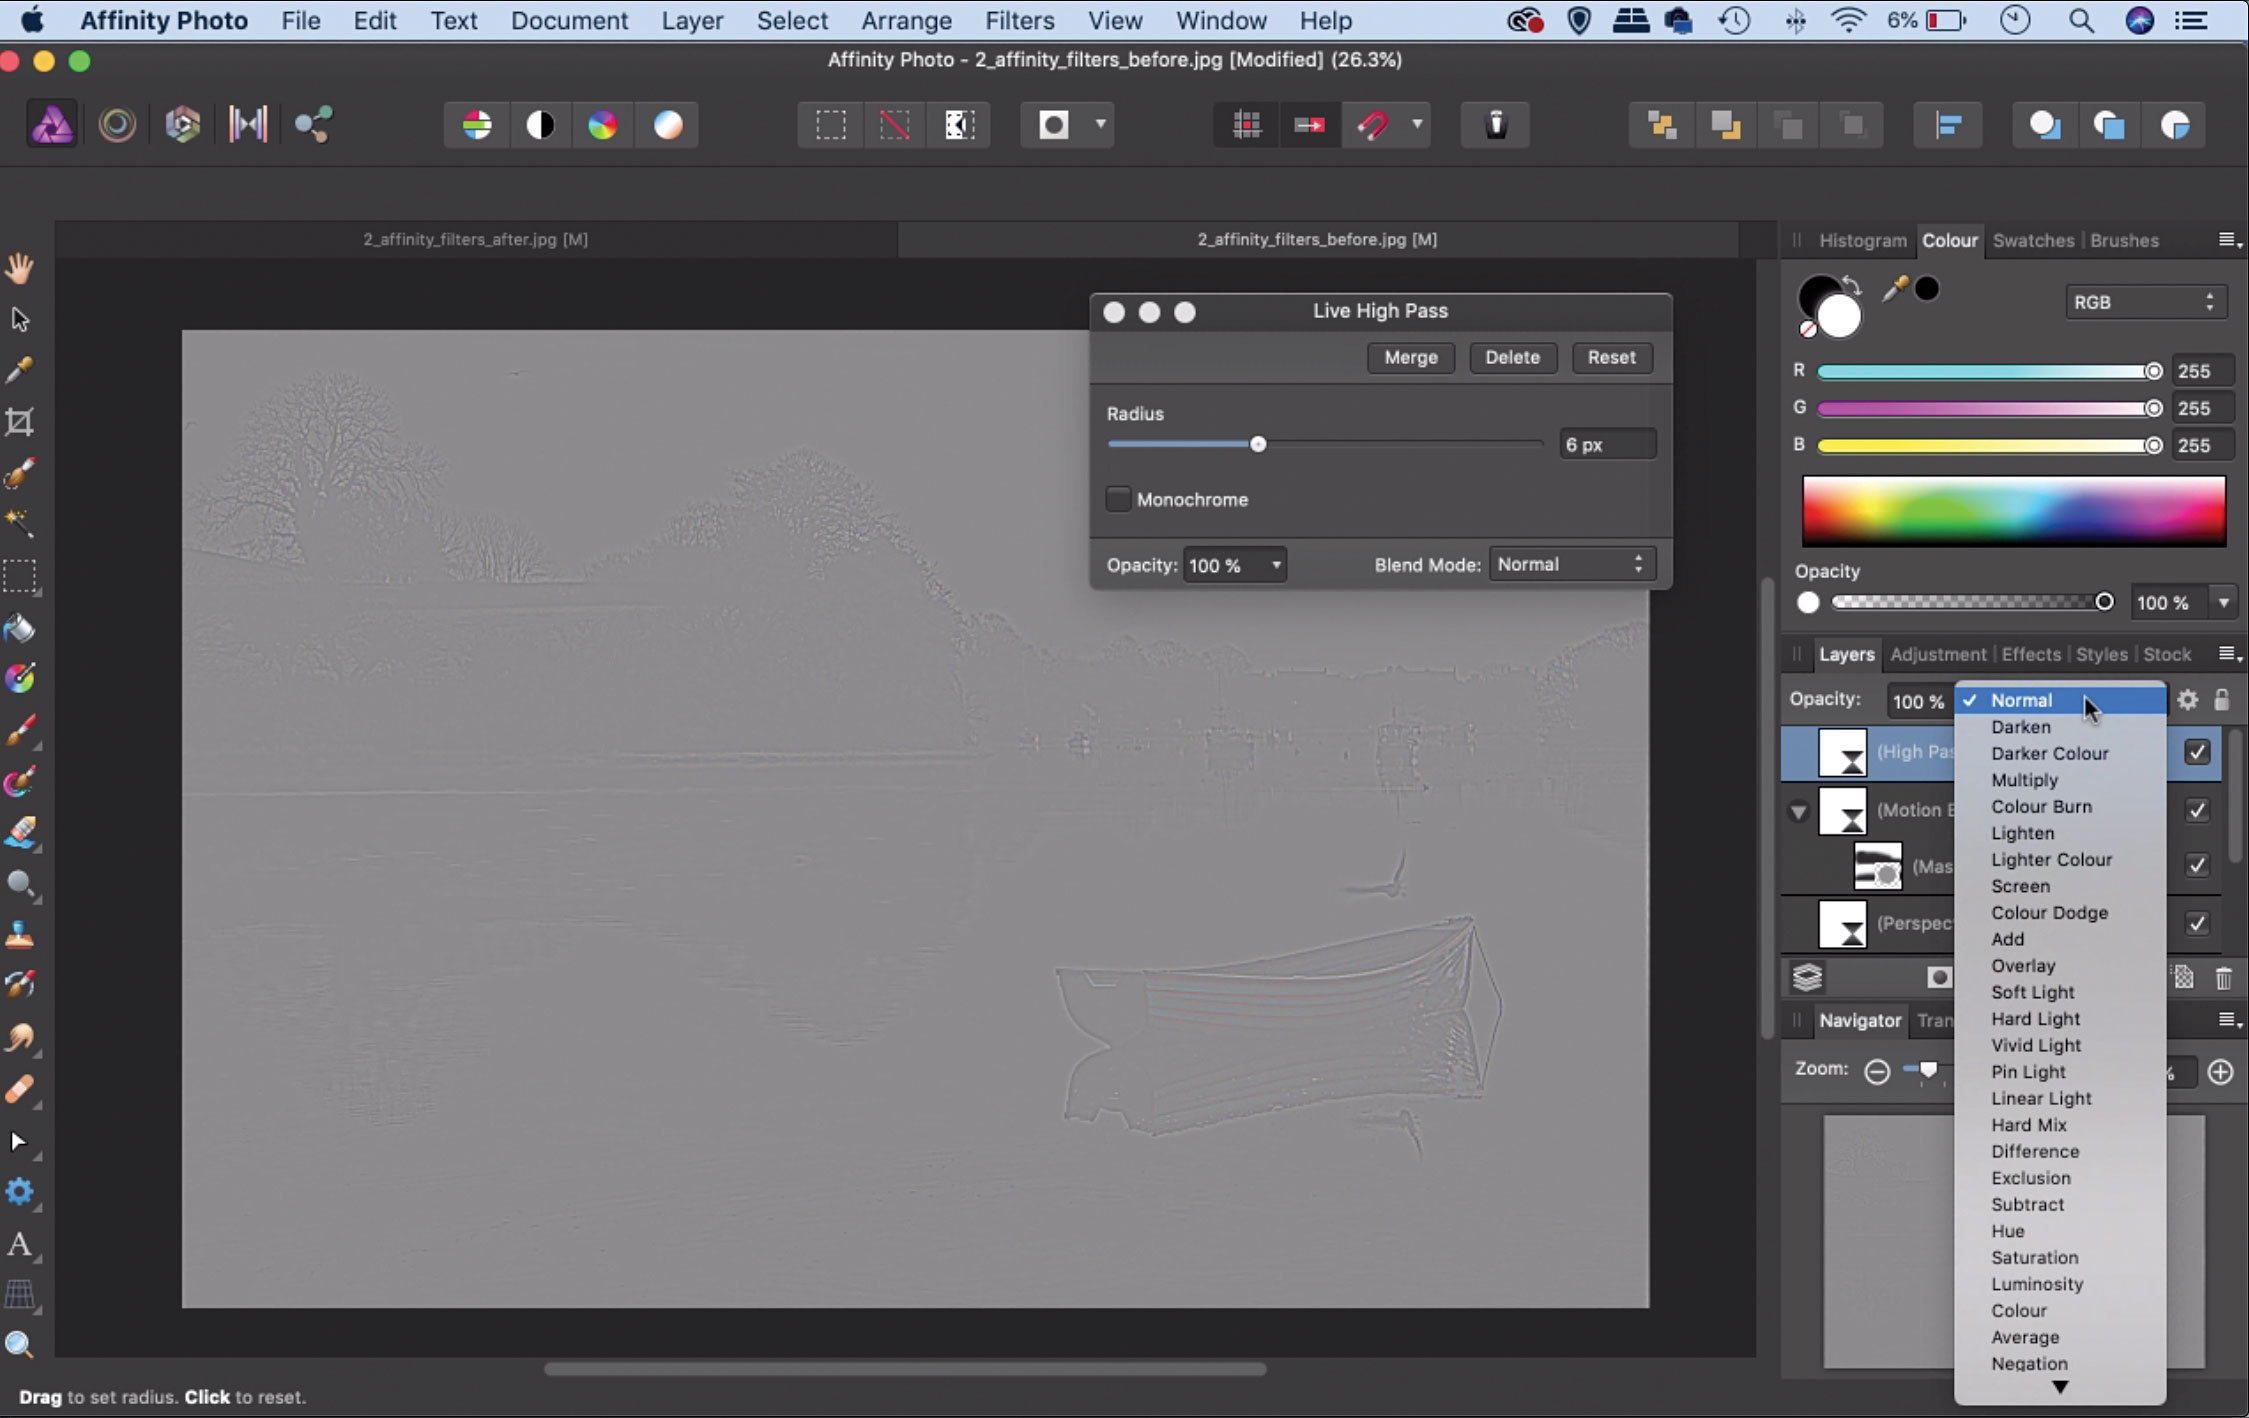
This Live Filter produces a wonderful sharpening effect. We go to Layer > New Live Filter > High Pass. Next, we go to the Layers panel and change the blending mode from Normal to Overlay, then increase the High Pass amount to apply the right strength of sharpening for the photo.
Step 6: Tone mapping presets
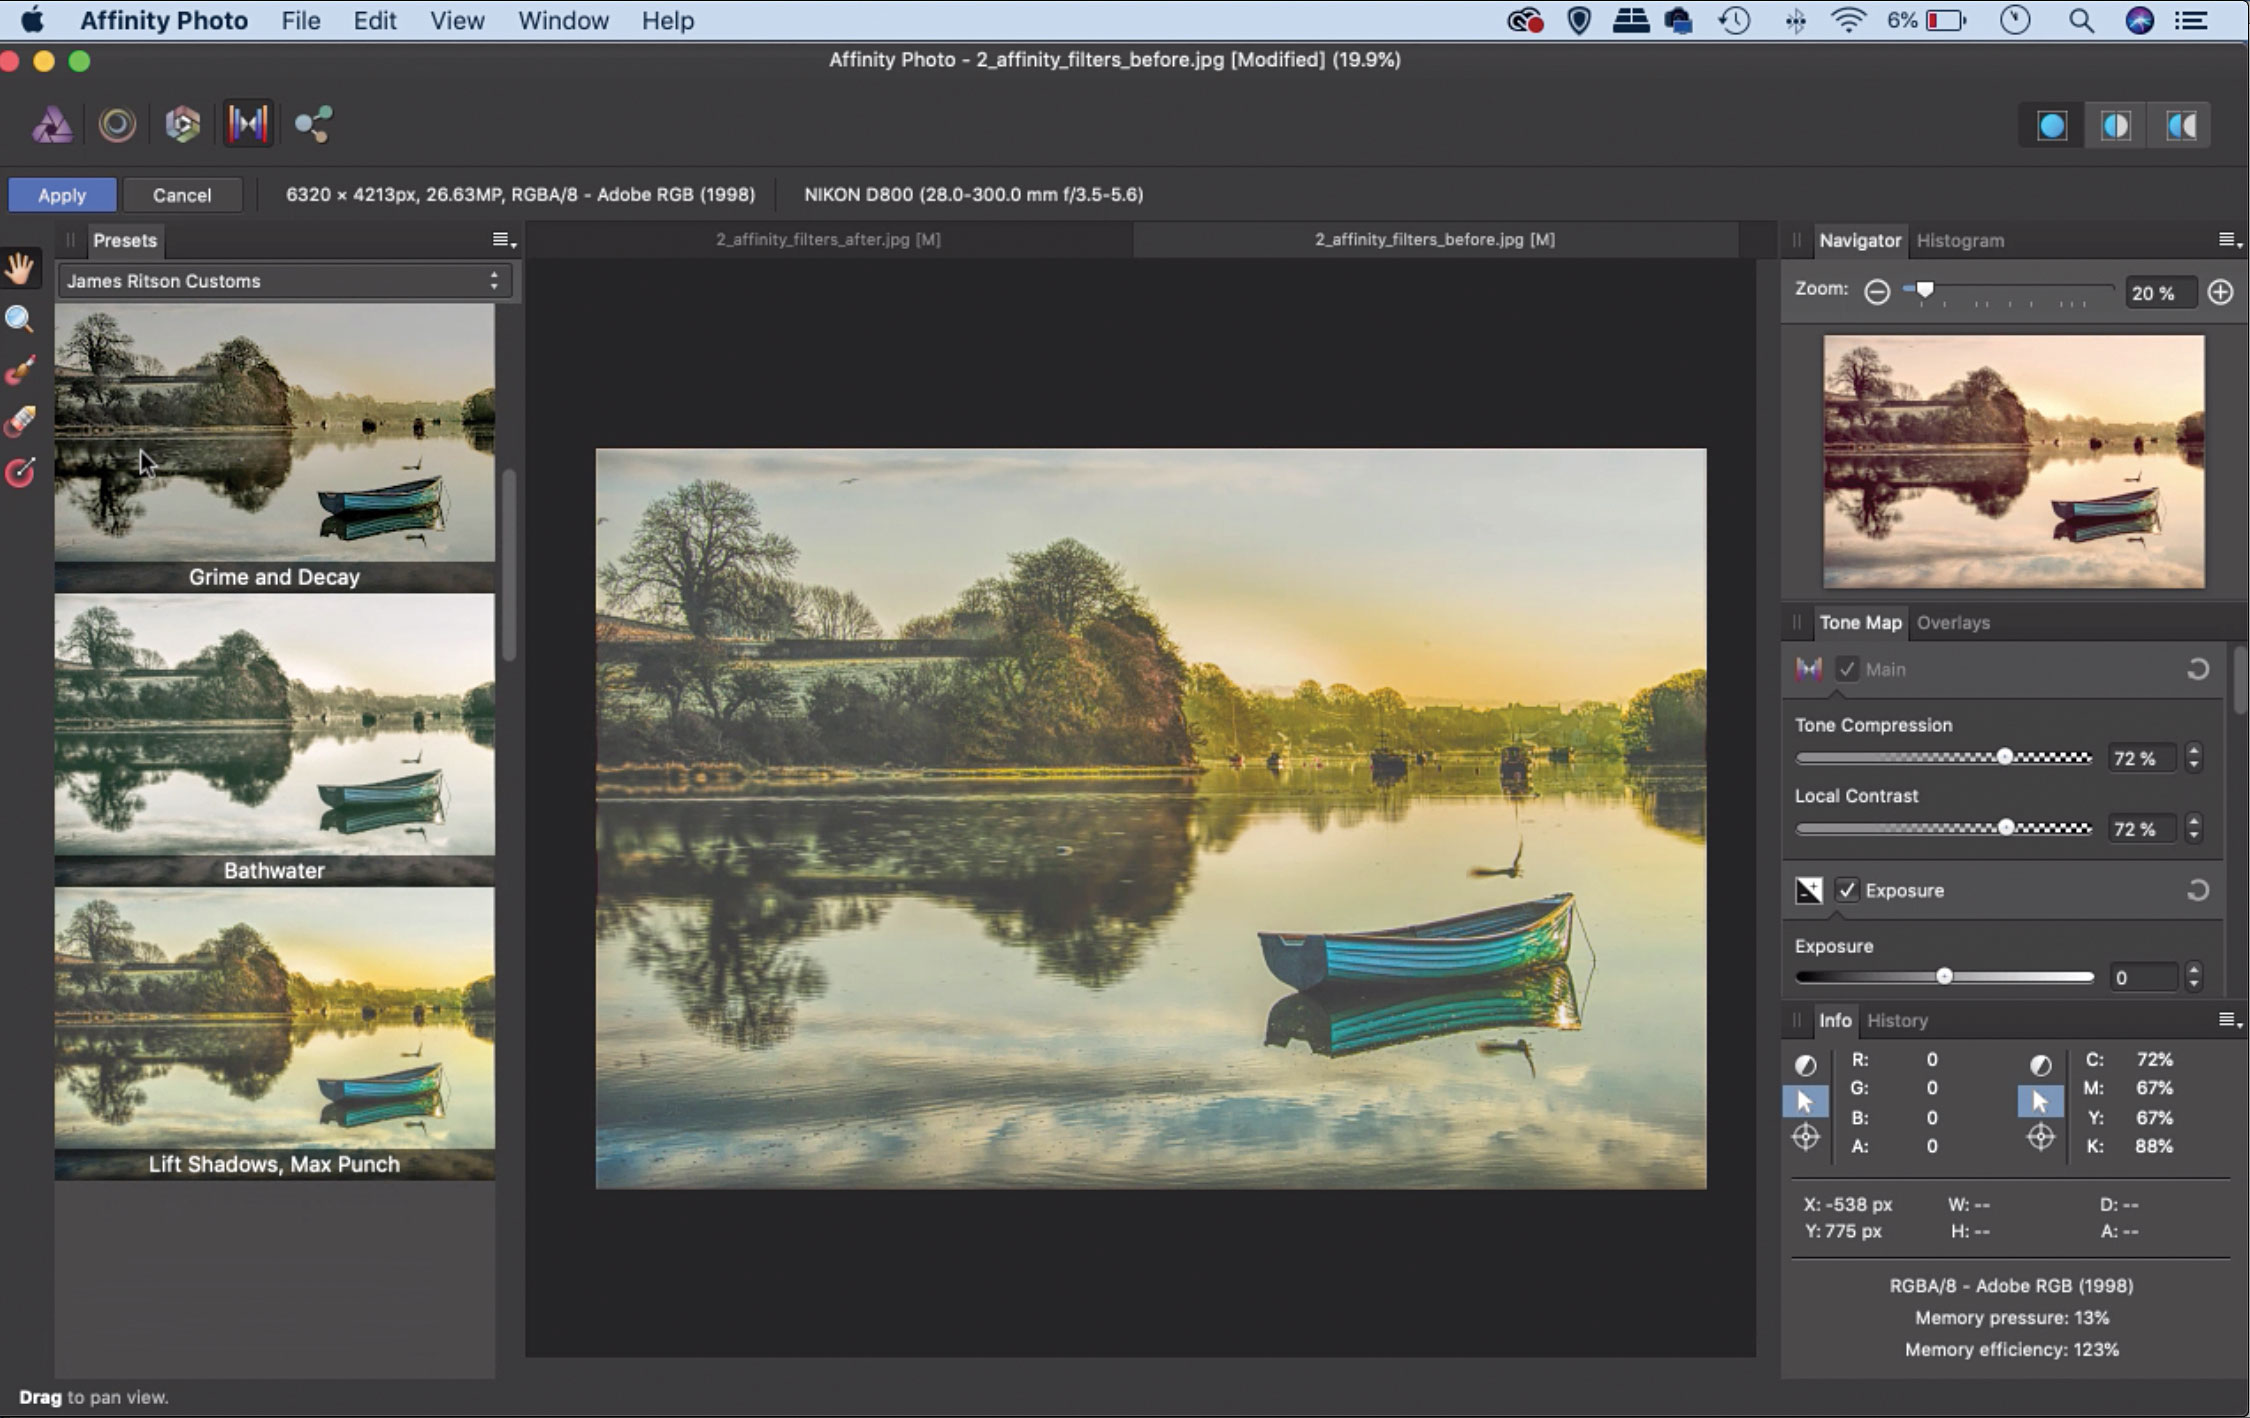
For this final step we hit Cmd/Ctrl+Shift+Alt+E to merge a copy of all layers into one. We now click ‘Tone Mapping’ at the top left, then fiddle with the presets on the left. We used the ‘Urban Bright’ setting under ‘James Ritson Customs’. Hit ‘Apply’ and adjust the layer opacity if you want to lower the effect.
The Mirror filter
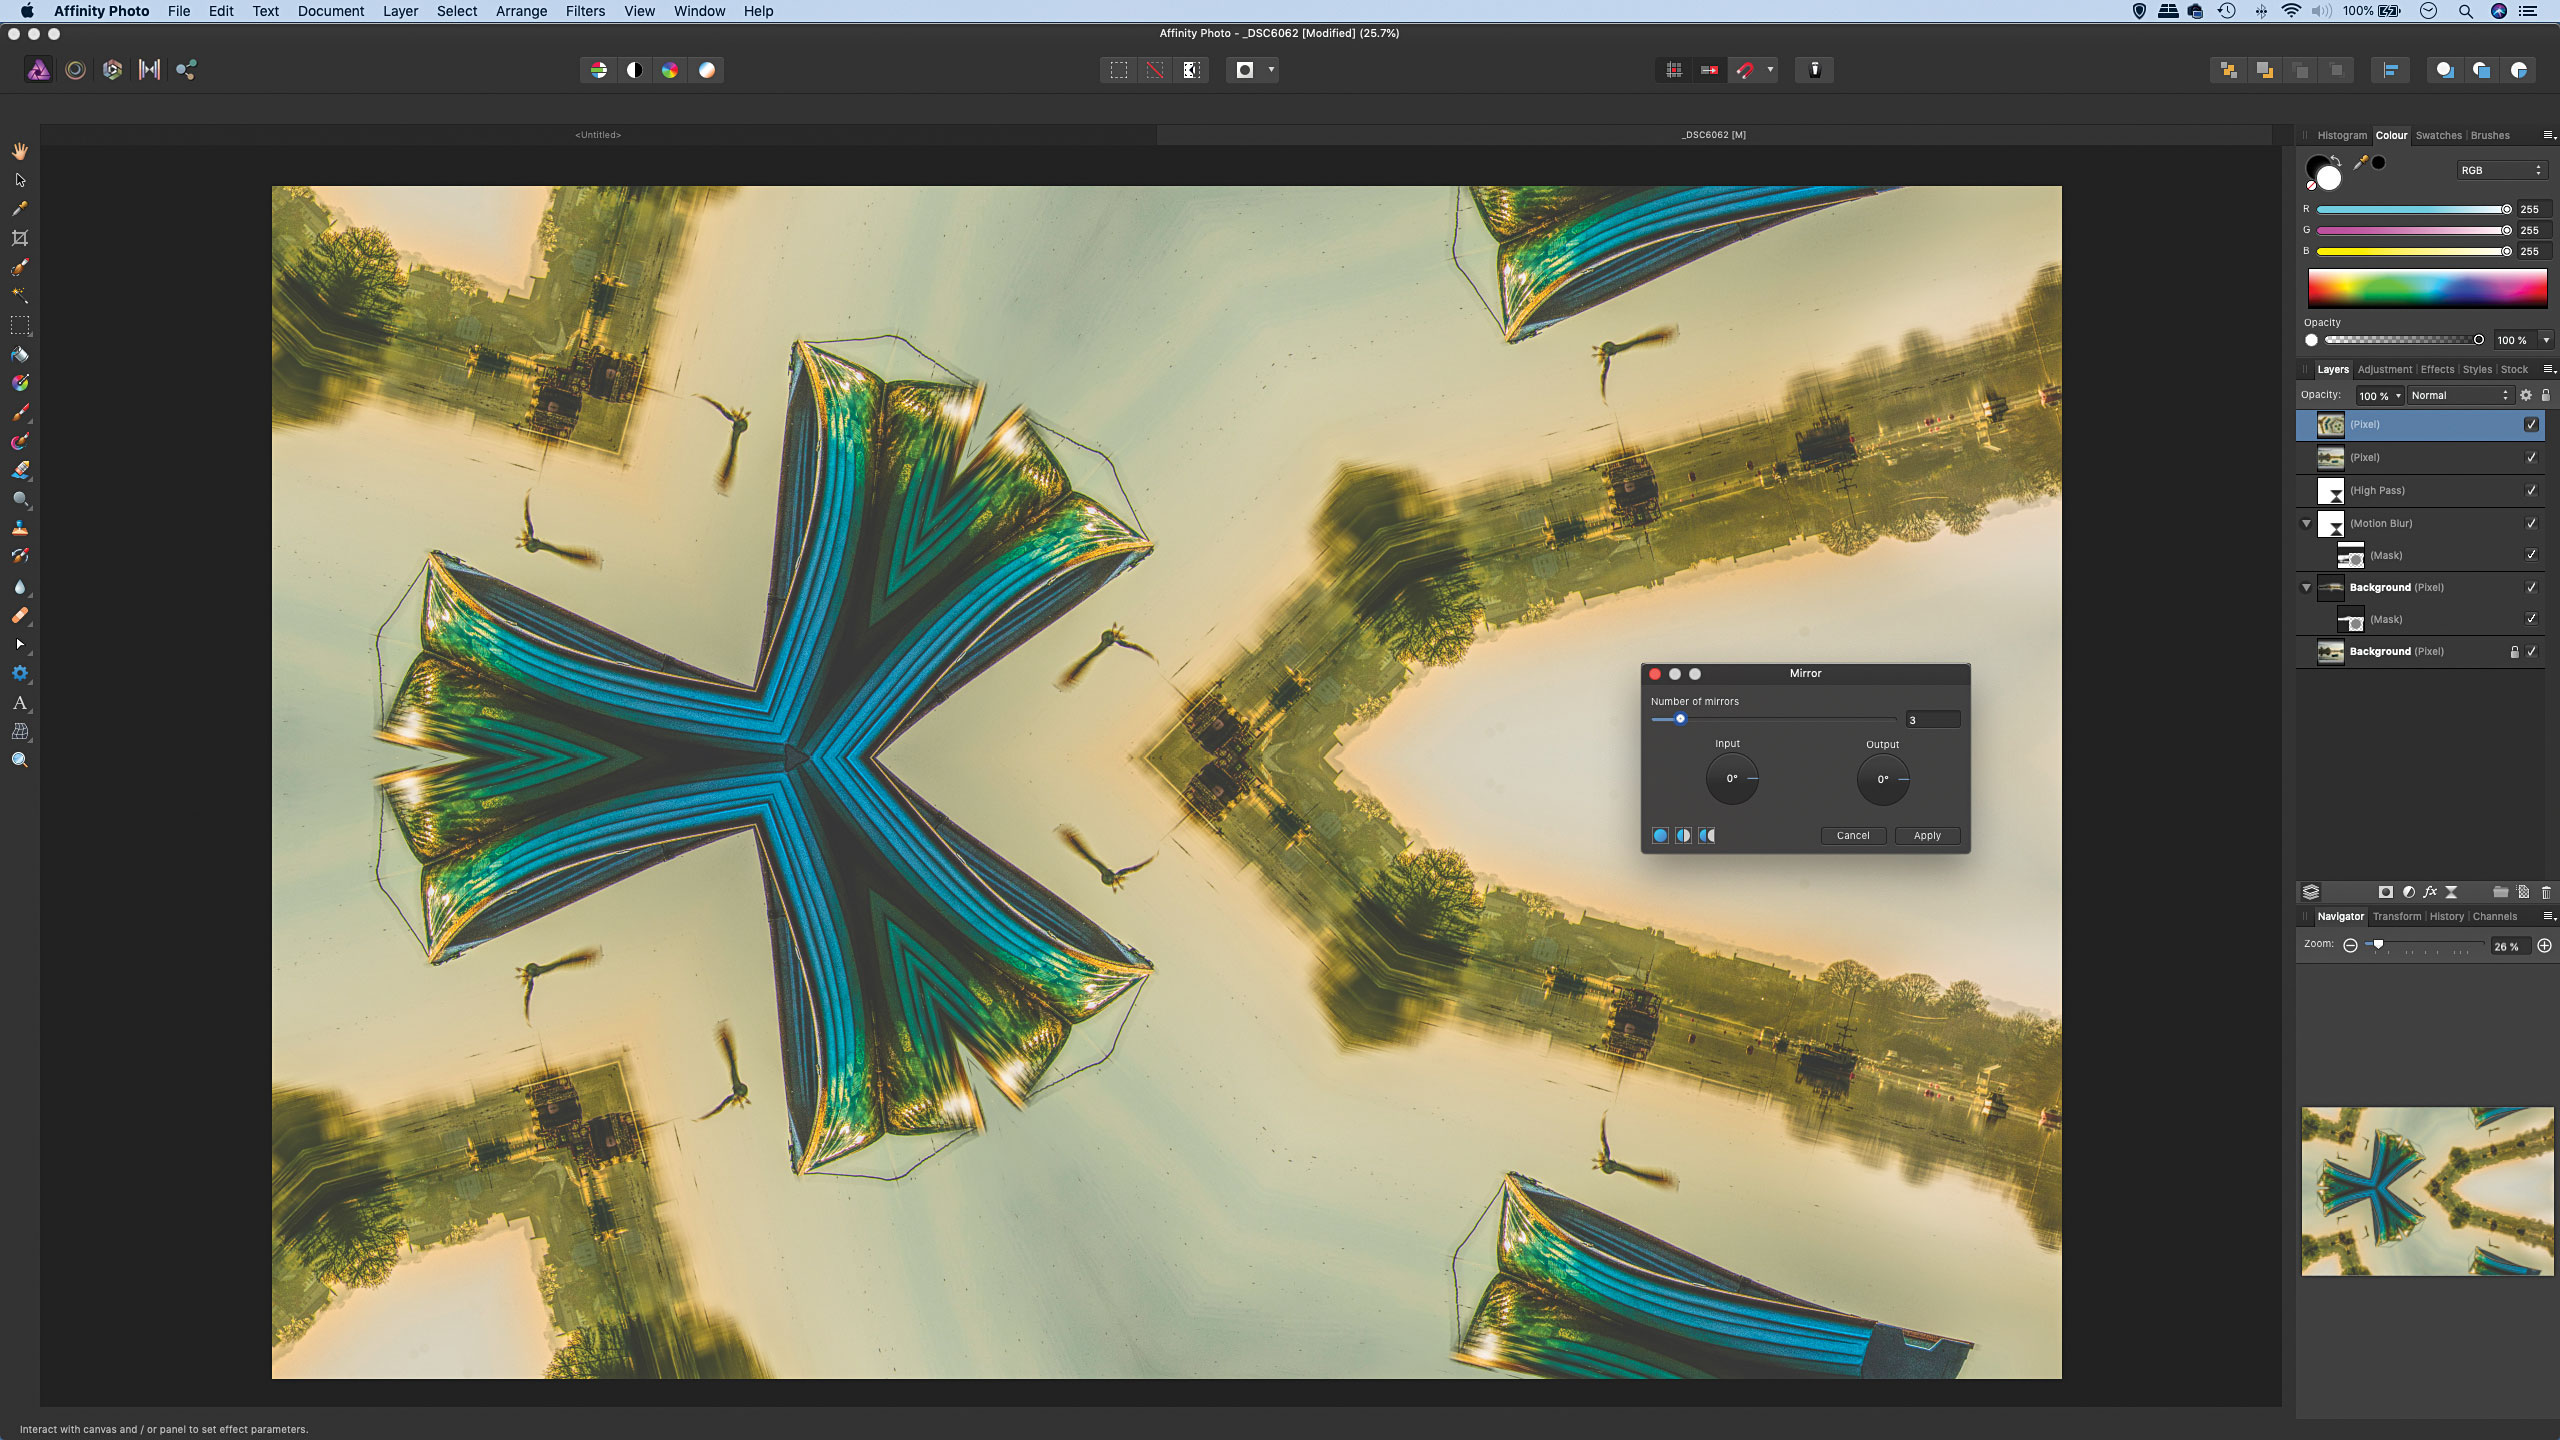
Found under Filter > Distort > Mirror, the Mirror filter is great fun. It lets you divide the image into symmetrical segments, dictated by the number of mirrors you set. As well as experimenting with the Input and Output controls, you can also drag within the image to change the centre point of the effect, leading to all kinds of weird and wonderful patterns. Sometimes it can help to apply the filter more than once to further refine the crazy effect.
Quick tip
Live filters affect all the layers below them in the stack, so take note of their position in the Layers panel to control how they affect the rest of the image.
About N-Photo magazine
This tutorial originally appeared in N-Photo, the monthly newsstand magazine for Nikon photographers. Why not subscribe to a print edition, and have the magazine delivered direct to your door every month?
Alternatively, we have a number of different digital options available, including:
• Apple app (for iPad or iPhone)
• Zinio app (multi-platform app for desktop or smartphone)
• Google Play (for Android devices)
• Readly (all-you-can-eat digital magazine subscription service)
If you wanted a printed version of any of our most recent issues we have a selection of back issues to choose from in our online store.
Read more:
• Photography tips and tutorial videos
• The best photo editing tools and accessories
• The best desktop computers for photo editing
• The best photo-editing laptops right now
• The best photo editing software today
N-Photo: The Nikon Magazine is a monthly publication that's entirely dedicated to Nikon users. As a 100% independent magazine, you can be assured of unbiased opinion from a trustworthy team of devoted photography experts including editor Adam Waring and Deputy Editor Mike Harris.
Aimed at all users, from camera newcomers to working pros, every issue is packed with practical, Nikon-specific advice for taking better photos, in-depth reviews of Nikon-compatible gear, and inspiring projects and exciting video lessons for mastering camera, lens and Photoshop techniques.
Written by Nikon users for Nikon users, N-Photo is your one-stop shop for everything to do with cameras, lenses, tripods, bags, tips, tricks and techniques to get the most out of your photography.
