My landscape photography tips are designed to help you capture your best outdoor pictures ever. Landscape photography is arguably the number one reason why most photographers pick up a camera in the first place. Who doesn’t love the idea of trekking into the hills and spending some quality time with Mother Nature? It’s also one of the most accessible forms of photography because you don’t need the best camera for landscapes or the best lenses for landscapes to capture beautiful vistas on your travels (even if it helps).
Almost any camera and any wide, standard, or telephoto lens combination are capable of capturing great landscape photographs. And with potential subjects all around you, you don’t have to go to far-flung places to find stunning landscape subjects. But in many ways, the sheer volume of choice can make landscape photography a little overwhelming for newcomers. So, that’s why I’ve compiled this list of beginner-friendly landscape photography tips, so that when you head out on your next trek into the wilderness, you can do so with more conviction. Grab your kitbag and hiking pole, and let's get started!

I was previously Technique Editor (later Dep Ed) on N-Photo: The Nikon Magazine, where I produced more landscape tutorials and went on more landscape shoots than I can count. From trudging through Eryri National Park, during a blizzard, to picking my way along a rain-covered Hadrian’s Wall, I’ve trudged across much of the United Kingdom with my camera in hand. So, if you’re new to landscape photography or want to brush up on your skills, here are my essential landscape photography tips.
What is landscape photography?
Landscape photography is about capturing the natural environment around us. It helps condense the biodiversity and indeed vastness of the world into digestible snapshots, providing an aspirational window into places we may not have immediate access to. As for what constitutes a landscape photograph, there’s no simple answer.
Article continues belowSome suggest that cityscapes are a subgenre of landscape photography, and while you do get urban landscapes, these can almost always be described as cityscapes, architecture, or urbex. As such, I believe a landscape is best thought of as an outdoor scene – not a close-up – predominantly composed of natural elements. This allows for the inclusion of some architecture, such as bridges, windmills, and cottages, but by and large, natural elements should dominate the scene.
Landscape photography tips: Gear

What I love about landscape photography is that you can capture stunning images with nothing more than the best camera for beginners and a kit lens. But shoot enough landscape photos and you’ll begin to yearn for more kit. The first piece of kit I recommend picking up is a tripod. And while you can pick up an unbranded tripod for next to nothing, I do recommend buying a solid tripod from a reputable brand. There’s nothing more frustrating than a flimsy tripod.
Next up, I’d recommend picking up a set of neutral density filters: a 3-stop, 6-stop, and 10-stop is a good starting point. These will allow you to capture long exposures, and later, when you’re comfortable using filters, you can always invest in a polarizing filter and an ND grad to round off your collection. Once you’ve got a set of ND filters, you can then upgrade your kit lens and invest in some quality glass. Fast lenses are nice to have, but they can be expensive. Unless you're going to be shooting low-light landscapes, narrower apertures will do the job and be more cost-effective.
Standard, wide-angle, and telephoto lenses are all very useful indeed for landscape photography. A good starting point would be a 24-70mm or 14-24mm if you’re using a full-frame camera. If you’re using a crop-sensor camera, then an 8-16mm or 16-50mm will work just as well (providing an equivalent 12-24mm and 24-75mm). And finally, make sure you protect your kit as you'll be out in all winds and weather. That means investing in a good camera backpack and a rain cover. Oh, and pack a first-aid kit, too. If you're out hiking, it's a safety essential!
Landscape photography tips

Want to get straight to the point? Check out my quick tips for landscape photography (below) and take a look at the landscape photography cheat sheet (above), which you can enlarge by clicking on the image. These tips are great for referring to when you’re out on a landscape shoot and don’t have time to scroll through my comprehensive guide.
- ISO: Shoot at your camera’s base ISO to reduce noise and increase image quality
- Aperture: Select an aperture between f/8 and f/11 to provide an adequately large depth of field without noticeable diffraction
- White balance: Choose a white balance preset that best suits the conditions you’re shooting in, such as daylight or cloudy, or set your color temperature manually
- Reciprocal rule: Use the reciprocal rule to mitigate camera shake if you’re hand-holding the camera
- Tripod: Use a tripod to precisely frame your image and use slower shutter speeds without introducing camera shake
- Rule of thirds: Divide your frame into a three-by-three grid and place your subject on one of the four intersection points
- Golden hour: Shoot just after sunset or just before sunrise to capture soft, golden light
- ND filters: ND filters allow you to capture long exposures, while ND grads allow you to darken overly bright skies and balance your exposure
- Polarizing filter: Cut reflections or add contrast to blue skies by using a polarizer
- Shoot RAW: Capture as much image data as possible by shooting RAW so you have as much pliability in post-production as possible and have free rein to alter your white balance
- Use a rain cover: Make sure you protect your camera with a rain cover, when needed, even if your camera is weather sealed
How to plan a landscape shoot

The difference between a good landscape photographer and a great landscape photographer will almost always come down to planning. If you’ve ever wondered how the best in the business just happen to come across the most gorgeous sunsets and locations time and again, it’s because they know how to plan the perfect landscape shoot.
Planning encompasses everything from where you’re going, when you’re going to get there, what you’re going to pack, what weather you expect to encounter, and how you’re going to keep safe – an extremely important and often overlooked aspect of heading out into the wilds. Nowadays, photographers can take advantage of planning apps, such as The Photographer’s Ephemeris and PhotoPills, which provide a plethora of information on elements such as sun position, maps, and key timings such as golden hour and blue hour.
Landscape photography tips: Exposure
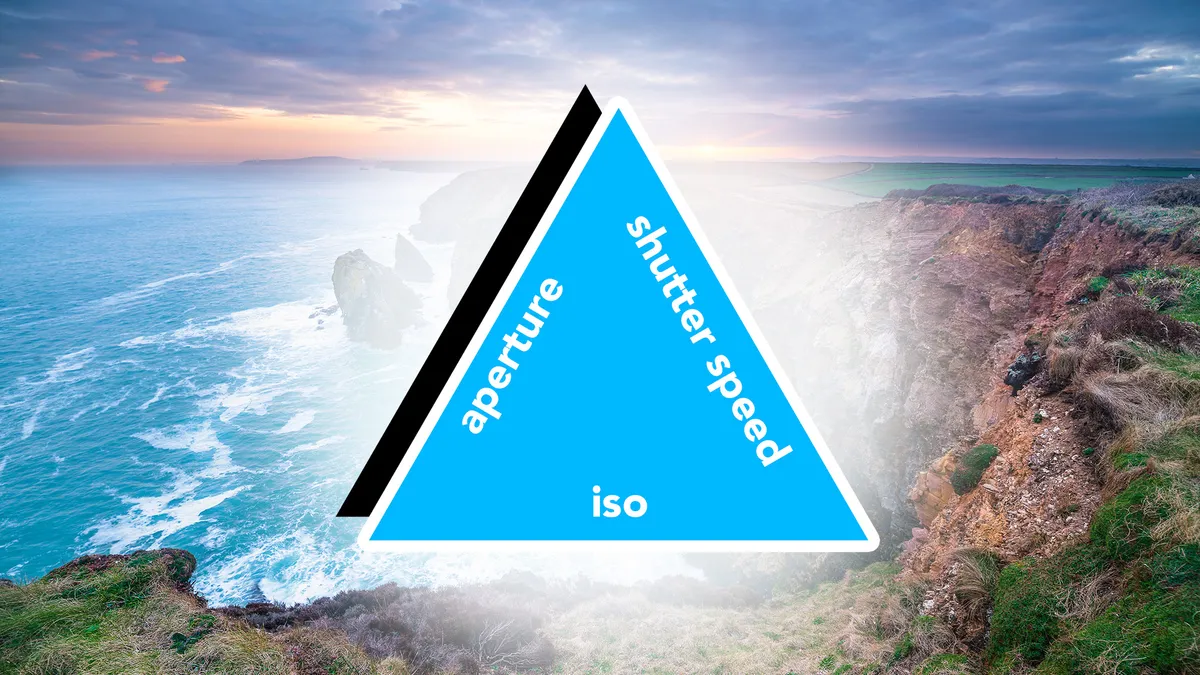
If you’re not familiar with the exposure triangle, you may find this tip a little difficult to get your head around, so make sure you familiarize yourself with it first. Landscape photographers favor low ISOs so they can retain as much detail as possible and middling to narrow apertures to capture a large depth of field without unwanted diffraction.
As such, I’d recommend using your camera’s base ISO (usually ISO64 or ISO100) – if you’re shooting on a tripod – and setting your aperture from f/8 to f/11. The only reason you’ll need to worry about your shutter speed is if you’re trying to freeze motion blur, such as swaying branches in windy weather. If that’s the case, increase your ISO accordingly.
Landscape photography tips: Wide-angle lenses

Wide-angle lenses are synonymous with landscape photography, and for good reason, but the temptation is often to go too wide. Wide lenses exhibit barrel distortion, which can diminish even large objects positioned near the centre of the frame. Unless you are very close to your subject, you can end up with a disproportionate amount of sky and foreground, while the subject only occupies a very small portion of the frame. If that sky or foreground is particularly interesting, an ultra-wide-angle lens may still be the way to go, but if it’s not, you might want to reach for a 24mm lens (35mm equivalent) or tighter. Just make sure you choose the right focal length for the scene in front of you.
Landscape photography tips: Telephoto lenses

You might not associate the best telephoto lenses with landscape photography, but they’re a kitbag essential for most outdoor photographers. A long lens allows you to essentially ‘crop’ into the scene without losing any pixels. This is extremely useful if you want to isolate a faraway subject. As mentioned in the previous landscape photography tip, wide lenses exhibit barrel distortion.
If your wider lenses are diminishing the impact of your intended subject and you cannot find a composition that works, try using a telephoto lens to crop into the scene. This will allow the subject to dominate more of the frame and potentially provide a composition you’re happy with. Learn how to shoot landscapes with a telephoto lens, and you can pick out and isolate natural patterns within the landscape. This might be a patchwork of fields or a perfectly aligned row of trees, for example.
Landscape photography tips: Tripods

The best tripods allow you to keep your camera steady so you can use longer focal lengths without experiencing camera shake. They also provide you with the freedom to spend as much time as you like perfecting your compositions. I always use live view when composing landscapes on a tripod. This means I can see the scene on my camera’s rear LCD, adjusting the tripod head so that I can set up the perfect composition.
Using live view also allows you to take advantage of the rule of thirds grid, which helps you to line up this often-used compositional rule. But although a tripod might seem like a relatively simple piece of kit, I often see other photographers using them in a less-than-ideal manner. With that in mind, know these 11 tripod mistakes you could be making.
Landscape photography tips: Rule of thirds
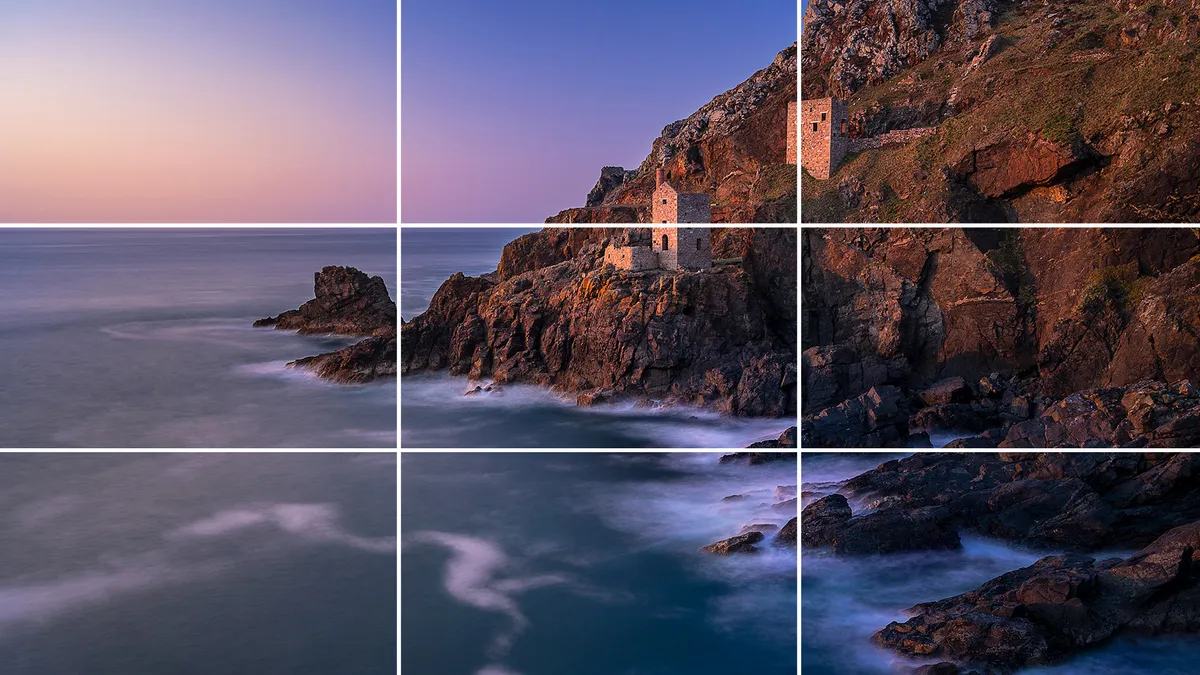
The rule of thirds is a landscape photography staple. You simply position the horizon line on either of the two horizontal lines and position your subject roughly over one of the four points where the two horizontal lines and two vertical lines intersect. Another great compositional technique for beginner landscape photographers is foreground interest. This is where you use an object in the foreground to provide additional interest and lead the viewer’s eye towards the subject. Think of a rocky outcrop in the foreground and a mountain behind. You can also use elements within your scene such as paths, hedgerows, and treelines as leading lines that point towards your subject.
Landscape photography tips: Golden hour

Unless the sun is softened by cloud cover or filtered through the canopy of a forest, landscape photographers tend to avoid taking photographs in the middle of the day. This is when the sun is high in the sky, casting high-contrast light across the land, which forms hard shadows. If you want to know the best time to go out and shoot landscape photos, it's much better to shoot early in the morning or later in the evening when the sun is lower in the sky and the lighting is softer.
I think the golden hours are the best time to shoot – the hour that follows sunrise and precedes sunset. Providing it’s not too cloudy, you’ll find the landscape bathed in beautiful, soft, golden light, producing equally soft shadows. This also means you’re up for sunrise and sunset, as well as blue hour, which are also great times to capture landscapes. Just make sure you make the most of your limited time with the best lighting by learning how to capture luscious landscape lighting.
Landscape photography tips: ND filters

Neutral density (ND) filters are light-blocking lens attachments that allow you to shoot at longer shutter speeds. This is useful if you want to capture long exposures, introducing motion blur to moving objects such as waterfalls, lapping waves, or a spinning windmill. There are different strengths of ND filter, but the most popular block out three, six, and 10 stops of light.
You can use various apps to calculate what shutter speed to use to achieve the correct exposure (or this handy photography cheat sheet), but the best mirrorless cameras have made ND filters incredibly simple to use, since you can often eyeball the exposure via live view or the electronic viewfinder. Make sure you learn how to use ND filters properly before heading out with them to photograph a moody sunset or any other gorgeous vista.
Landscape photography tips: Polarizing filters

You cannot replicate the glare-reducing effects of a polarizing filter in post-production, making this little accessory a landscape photography staple. Polarizing filters are used to block polarized light, which creates glare, thus cutting reflections in windows, bodies of water, and on damp surfaces, while increasing contrast and boosting saturation. When learning how to use a polarizing filter, know that they operate best when positioned at a 90-degree angle to the sun, as such, wide focal lengths can produce a patchy aesthetic as the field of view extends well beyond this 90-degree angle. Be mindful that polarizing filters will block around two stops of light, so you’ll want to avoid them if you’re working handheld in low-lighting conditions.
Landscape photography tips: Focus

Landscape photographers often aim to capture as much of the scene in focus as possible. A neat trick when using wider lenses is to simply focus a third of the way into the scene to approximate the hyperfocal distance. An alternative is double-distance focusing, whereby you locate the closest object that you want in focus, this might be a rock in the foreground, for example. You then approximate the distance between your camera and the rock and focus roughly double that distance into the frame.
If you’re using a telephoto lens, then the depth of field will be inherently shallower, and you’ll likely want to focus in and around your intended subject to make sure it’s sharp. I always zoom into live view to check that my image is sharp, where intended, so I don’t get any nasty surprises when I blow the images up to 100% on my monitor at home.
Landscape photography tips: Shoot RAW

I always recommend shooting RAW, no matter what you’re shooting, but it’s particularly important when capturing landscapes. This is because you’re often working with high-contrast scenes thanks to the bright sky and dark ground. Unless it’s an overcast day or you’re using an ND grad, you’ll struggle to balance your exposure in a single shot. That’s why many landscape photographers will underexpose their images slightly so they retain more detail in the highlights. They will then lift the shadows in post-production to bring back detail. By shooting RAW, you’ll preserve more image data, allowing you to lift the shadows while retaining more detail. Another trick to retain as much image data as possible is to shoot an exposure bracket – up next!
Landscape photography tips: Shoot a bracket

One of the challenges that landscape photographers face, especially when shooting towards the sun, is exposing for the bright sky and darker ground. With sensors boasting bigger dynamic ranges than ever, this problem has diminished slightly. But there are still times when the contrast is just too much. In those moments, you have two choices: use an ND grad to darken the sky or capture a bracketed exposure. The latter is ideal if you don’t have an ND grad handy or don’t have time to set up your filter system.
If you don't know how to shoot and edit a HDR landscape, it involves capturing multiple images with identical framing, but different exposures. For example, a three-shot bracket would include an image where you expose for the ground, an image where you expose for the sky, and an exposure somewhere between the two. The best photo editing software can then be used to blend the images together so the entire frame is properly exposed.
Landscape photography tips: Bad weather
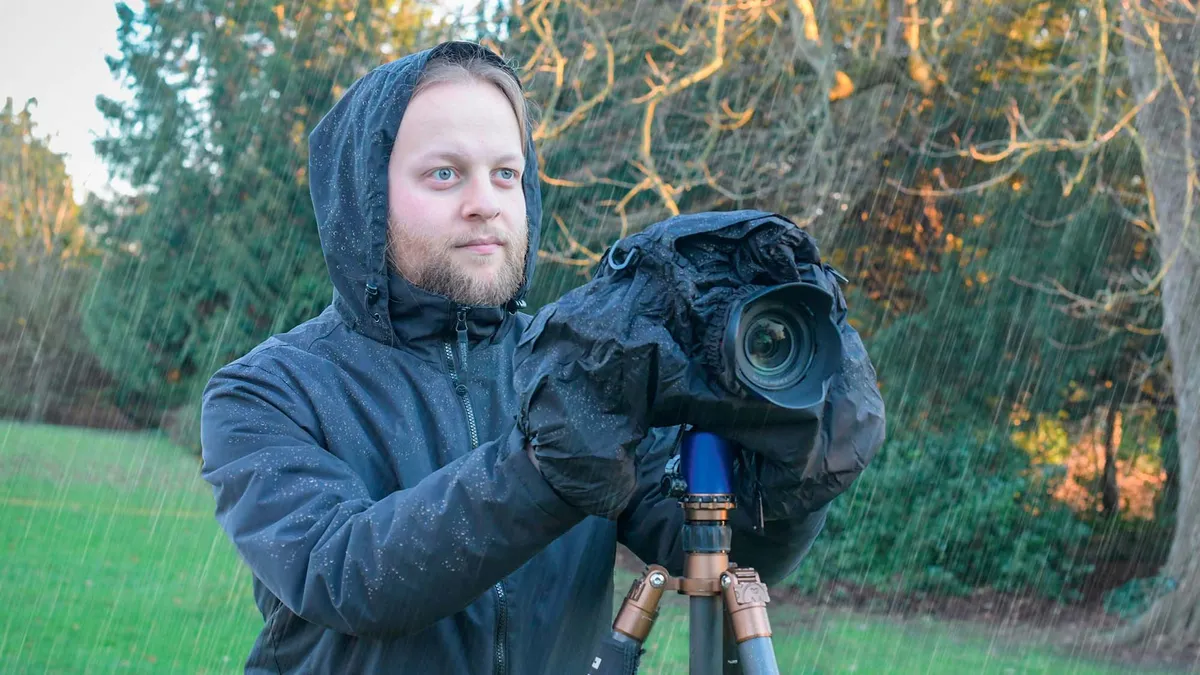
Make sure you’re prepared for bad weather. Mountainous regions are especially notorious for changing conditions, and the last thing you want is to get caught in the middle of a storm with no rain cover for your camera or kit bag. Oh, and a waterproof jacket is essential, too! And while weather-sealed cameras are generally very robust, they’re not waterproof, you still need to protect your camera in the rain. I tend to use a rain cover at the first sign of rain to make sure my camera’s protected.
And don’t use bad weather as an excuse not to head out with your camera. I live in the UK, and if I stayed indoors at every sign of rain, I’d never leave! In fact, less-than-ideal weather can work in your favor. You’ll often find that landscapes look more vibrant after rainfall, and it can often lead to more dramatic or moody skies, as well as the appearance of rainbows.
How to practice landscape photography
As with any new skill, you’ll want to rack up as many hours as possible early on so you can start to develop as a landscape photographer. Initially, you can head out to your nearest rural space or big park so you can practice the fundamentals. Once you begin to gain confidence, start researching great landscape locations you can visit with your camera. Make sure you choose locations that are close to home and easy to get to at first.
The main thing is that you’re getting out there and practicing. As soon as you’re happy to, start throwing in a few excursions that are further afield. If I’m going on holiday or travelling for work, I’ll often check out if there’s a location I can visit nearby. Working this way helps to reduce my time on the road. Another great tip is to find a friend who also enjoys capturing landscapes. Heading out with another photographer is always much more fun, you’ll encourage each other to photograph more often, and it’s much safer, too. Not only can you share driving duties, but should somebody slip and get hurt out on a hike (it happens) your photography partner can get help.
You might also like...
If all that wasn’t enough to satiate your outdoor appetite, here are 7 common landscape photography mistakes (and how to avoid them). And if you’re looking for a great-value camera, the Nikon Z7 is a high-resolution, full-frame landscape photography powerhouse that’s going for $1,000. Plus, a sheep photobombed my landscape photo and made it even better!
You must confirm your public display name before commenting
Please logout and then login again, you will then be prompted to enter your display name.