
You’ll want to avoid these common landscape photography mistakes if you’re to realize your full potential as a landscape photographer. Thankfully, they’re not particularly difficult to overcome, and I’ll show you exactly what landscape photography tips you can employ to combat them.
After all, landscapes are one of the most popular and inspiring subjects to photograph, and there are many different ways you can capture them. From wide fields of view that squeeze in sprawling vistas to tightly framed scenes that hone in on a slice of the landscape, to moody scenes captured in monochrome and movement blurred via a long exposure, you can let your creativity run wild.
Unfortunately, with so much choice, there’s plenty of room for error. And while I doubt you’re making all of the pitfalls below, even seasoned landscape photographers may appreciate being reminded of one or two. So, take a look through the nine common landscape photography mistakes in this article, and I’ll show you how to overcome them.
1. Inaccurate white balance

One of the most common mistakes photographers make when shooting landscapes is not properly setting their white balance. White balance alters the color temperature of an image so that colors are rendered accurately, so-called because white objects are typically used as a point of reference. If your camera’s white balance is not set correctly, the color temperature may appear overly warm or cool. For more accurate colors, you can either use your camera's automatic white balance setting or set it manually using a gray card or a neutral object.
The importance of white balance is a huge reason why many photographers insist on shooting RAW. This is because RAW files allow you to alter the color temperature of your images in post-production, non-destructively. So, if you forget to set your white balance or auto white balance proves to be inaccurate, you can alter it after the fact and not be penalized. If you shoot JPEG, you can alter color temperature slightly, but not nearly as dramatically as a RAW file. If your white balance is way off when shooting JPEG, the image could end up being unusable.
2. Going too wide

Wide-angle lenses are a landscape photography staple, but that’s not to say they’re always the best lenses for landscapes. A common mistake is to shoot too wide. You see, wide-angle lenses make distant objects appear further away due to perspective distortion. As such, you can end up diminishing the impact of distant subjects such as mountains or lone trees if your field of view is too wide.
If your subject looks prominently positioned in person but diminutive when you look through the viewfinder, increase your focal length. Using a tighter wide-angle or standard lens will often do the trick, but in some instances, you may need to turn to a telephoto lens. Longer lenses are a great way to crop into a scene and pick out areas of interest that are simply too far away to have any impact on the composition when using a wider focal length.
3. Not thinking about your composition
One of the biggest landscape photography pitfalls is not paying attention to the composition of your image. It’s very easy to point the camera at a beautiful scene and think that’s enough, but there’s actual science behind good composition. Composition means the arrangement of elements in an image, and it plays a crucial role in the overall impact and effectiveness of the images we create.
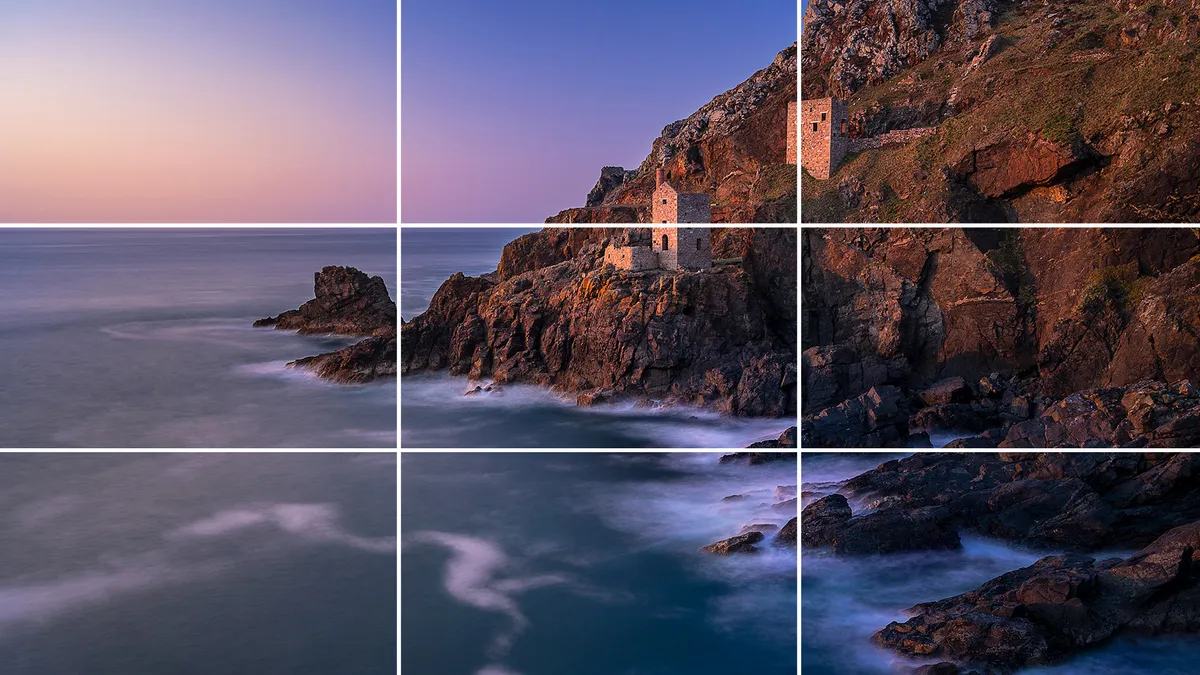
Some common mistakes in landscape composition include centering the subject, placing the horizon line in the middle of the frame, and including too many distracting elements in the scene. To compose your images more effectively, try using the rule of thirds, leading lines, and capturing a frame within a frame to draw the viewer's attention to the subject of the image.
That said, there’s no hard-and-fast rule when it comes to composition – the rules are made to be broken. Just make sure you know them like the back of your hand, first.
4. Wonky horizons

Technically, this is a compositional problem, but it’s so common and trips up even the most experienced photographers, it’s worth giving it its own space. Some people seem to have a natural ability for holding a camera level, while others struggle like they’re standing on a trampoline in high heels!
Getting the horizon level when you’re shooting from an unusual angle is especially tricky, and if you don’t get it right you’ll have to rotate and crop the image in post. While that's not a difficult task, it will mean cropping, which could ruin your composition, so it’s best to avoid too much straightening in post if you can.
Thankfully, plenty of solutions exist. If you’re using a tripod, the head might come with a handy bubble level built in, and if it doesn’t, you can buy bubble levels that slot into your camera’s hotshoe. Alternatively, many cameras now have a digital level built-in that can be displayed in the viewfinder or on the rear LCD screen.
5. Over or underexposure

One of the biggest problems landscape photographers encounter is not properly exposing the scene. Correct exposure requires light and shadow to be perfectly balanced, and can make a big difference in the overall quality of the image. If an image is underexposed, it will appear too dark and may lack detail. If it’s overexposed, it will appear too bright and may have blown-out highlights.
To ensure proper exposure, take a test shot and see how it looks. If you’re using a mirrorless camera with an EVF, this will provide you with a live preview of your scene so you can see the exposure in real-time. Your camera’s histogram will also provide you with an exposure graph that can guide you. If the curve touches the left or right edges of the histogram, then the shadows and/or highlights have been clipped, respectively.
Clipping can’t and shouldn’t always be avoided, but you generally don’t want extensive clipping, so watch out for histograms that are largely bunched up to the left or right side. There’s no such thing as a perfect histogram, as it will change from scene to scene, but generally, you’re looking for curves to largely occupy the mid portion of the histogram, with as little clipping as possible.
Finally, shooting RAW retains as much image data as possible, which gives you more flexibility in post-production to refine your exposure. I like to get my exposure as close to perfect in-camera, but a little tweaking is almost always needed in post.
6. Not balancing the exposure properly

Sometimes you can’t achieve the correct exposure because you’re unable to balance the brighter sky with the darker ground. As you probably already know, it’s easier to bring back detail in the shadows than it is in the highlights when editing an image in post-production. This means that a lot of photographers will expose for the highlights (the sky) and attempt to lift the shadows in post-production to balance the exposure.
The high-dynamic range of modern sensors has made this increasingly possible, but very bright skies can still make it difficult to prevent the highlights or shadows from clipping. To avoid this happening, you can either use a graduated ND filter or exposure bracketing. The former is a filter that’s typically half tinted and half clear. This means you position the tinted half of the filter over the bright sky to darken it in-camera without affecting the darker ground, thus making it easier to achieve a balanced exposure.
The latter is when you capture multiple identically framed images (typically three or five) at different exposures, before blending those exposures together in post-production to balance the exposure of the whole image.
7. Not noticing the time of day

Not paying attention to the time of day is an easy thing to do when you’re caught up exploring the natural wonders around you. But this can have a significant impact on the lighting and overall mood of your landscape images. Shooting during the golden hours (just after sunrise and just before sunset) can result in beautiful, warm, golden light that can add depth and dimension to an image.
On the other hand, shooting during the middle of the day can result in harsh, direct light that can create stark, ugly shadows and flat-looking images. To make the most of the light, try to plan your landscape shoots around the golden hours. This is made extremely easy by using an app like PhotoPills or The Photographer’s Ephemeris, which will tell you exactly when the golden hours will occur at a given location on a given date and at a given time.
8. Not waiting for the right light

Light is the most important aspect of landscape photography. You can have a stunning subject, all the technical photography knowledge in the world, and the most compelling composition possible, but if the lighting conditions aren’t working, you’re wasting your time. That’s why showing up during the right time of day is only half the battle.
Light is ever changing. If you capture your photo as soon as the light gets good and then immediately move on, you might end up missing out on the best that’s yet to come. Gorgeous lighting conditions might only last for seconds or appear out of nowhere; that’s why experienced landscape photographers will stay at their location until they’re absolutely certain the best lighting conditions have passed.
All it takes is a break in the clouds, and everything can change. As the sun moves across the sky, you’ll also notice the light falling on different parts of the landscape. If you’re shooting a lighthouse, for instance, you might wait for the light to hit the lighthouse, further highlighting it as your subject. Don’t just take one photo, either. Keep shooting as the light changes so you can select the best lighting in post-production.
9. Image blurred

Landscapes often require narrower apertures to capture a suitably large depth of field, while low ISOs are typically used to preserve as much image quality as possible. However, if you’re not shooting in bright conditions, this will require you to slow down your shutter speed in order to let enough light into the camera. This adds to the risk of camera shake, which is image blur caused by unintentional camera movements.
Image stabilisation is one way of getting around this, but if your camera or lens doesn’t have it, or it’s already on and your images are still soft, the best workaround is going to be using a tripod. The best tripod is an essential piece of equipment for landscape photographers anyway, since it’ll allow you to be much more precise with your composition.
But beware, camera shake can even affect images when a tripod is being used. This is because, at very slow shutter speeds, camera shake can be introduced by physically pressing the shutter button. That’s why I either set an exposure delay mode or use a remote shutter release, so I can fire the shutter without touching the camera.
You might also like...
Want to learn more about landscapes? Here's how I take amazing shots of the great outdoors. If you want to upgrade your landscape gear, here are the best cameras for landscape photography and the best neutral density filters.
