Digital Camera World Verdict
Since Photomator’s acquisition by Apple, it slots nicely into the Apple ecosystem, enabling you to edit pictures on the go via Photomator iPadOS, sync via iCloud, and continue editing on the macOS version of Photomator. It also syncs to your iCloud Photo Library, so all your iPhone-snapped images (and any Albums that you created in Photos) are easily accessible in Photomator. Photomator offers photo editors a place to go when Apple Photos can’t do a particular job, such as enabling you to select and adjust a subject’s colors and tones without altering a shot’s background, for example. However, although you can use layers to make adjustments and selections, Photomator won’t let you composite images on separate layers. You’ll need to subscribe to its more expensive sister app, Pixelmator Pro, to do that.
Reasons to buy
- +
Syncs between macOS, iOS, and iPadOS
- +
Adjustment layers
- +
AI crop, color, and tone tools
- +
AI subject selection
- +
Creative LUTs and filters
- +
Comprehensive Raw support
Reasons to avoid
- -
Can’t composite image layers
- -
Apple platforms only
Why you can trust Digital Camera World Our expert reviewers spend hours testing and comparing products and services so you can choose the best for you. Find out how we test.
Traditionally, professional Mac-based photographers would probably not be using Apple Photos as their main image-editing app. Apple Photos is great for organizing images, syncing them between devices via iCloud, and sharing them with friends and family. However, the photo-fixing tools in Apple Photos are relatively basic. For example, you can’t make mask-based selections in Apple Photos, which limits its use as a serious photo fixer. Mac-based photographers (such as myself) would need to rely on third-party apps such as Adobe Lightroom or Photoshop, among the best photo-editing software, to perform more complex or creative edits.
With the acquisition of third-party apps Pixelmator Pro and Photomator in 2025, Apple dramatically boosted its in-house photo-fixing powers. Photomator is the little sister app to Pixelmator Pro. Think of Pixelmator Pro as an Adobe Photoshop alternative, providing the ability to composite images in layers and use vector-based text to create designs for posters and flyers, for example.
The streamlined Photomator app enables users to fix common problems with color, tone, and composition without getting bogged down by Pixelmator Pro’s suite of graphic design tools. Think of Photomator as a more focused digital darkroom app that offers professional photo editors much more control over editing camera Raw files than they’d get with Apple Photos, such as the ability to make non-destructive mask-based adjustments.
Photomator: Requirements
Processor |
Fully optimized for Apple Silicon (M1 chips and newer) |
Operating System |
macOS Ventura 13 or later. Photomator for iPhone or iPad requires iOS 17 or iPadOS 17 or later |
RAM |
8 GB |
Disk Space |
825 MB |
Photomator: Price
Photomator is available for a yearly subscription of $34.99 / £29.99 / AU$49.99, which works out to around $2.90 / £2.50 / AU$4.15 per month, which is a far better deal than the monthly subscription cost of $7.99 / £7.99 / AU$12.99. So, for around half the price of a cup of coffee per month, you get access to a collection of more powerful image-editing tools than you’ll find in the free Apple Photos app. This is far cheaper than paying $12.99 / £12.99 per month for Photomator’s sister app Pixelmator Pro, although this is part of a bundle with high-end pro apps such as Final Cut Pro in the Apple Creator Studio – Apple’s answer to the Adobe Creative Cloud.
There is also a lifetime license if you wish to purchase the software outright, at $119.99 / £119.99 / AU$199.99, which pays for itself if you're confident you'll still be using the software in four years.

So, if you’re primarily using Apple Photos to organize, edit, and share your iPhone-snapped images, then Photomator is well worth considering thanks to its more powerful toolset. Photomator also slots perfectly into the Apple ecosystem as it enables you to access and edit images stored in your iCloud library.
You can also run Photomator on your Mac, iPhone, and iPad, and edits made on one platform are synced on the others. If you’re not sure about Photomator, you can take it for a free seven-day trial run, but make sure that you cancel the subscription via your Apple account before the end of the trial period, or the annual subscription will kick in.
Photomator: Interface & Usability
When you launch Photomator, the first thing that you see is the browser, which is similar in layout and design to the browser in Apple Photos. Here you can explore assets by flicking through Albums that you’ve already created in Apple Photos, or you can create new Albums in Photomator, and they’ll appear in Apple Photos after syncing via iCloud. So, Photomator is firmly and effectively embedded in the Apple ecosystem.
A key interface difference between Photos and Photomator is the color scheme. Unlike the white background in Apple Photos, Photomator’s interface is a neutral black and gray, which echoes the look of pro photo-fixing apps such as Adobe Lightroom. The black-and-gray interface also brings Photomator in line with the look of other Apple apps such as Final Cut Pro and Pixelmator Pro. The Photomator browser also enables you to manage your assets with more control than you can with the Apple Photos browser. For example, in Photomator, you can assign star ratings to shots and then filter for specific ratings.

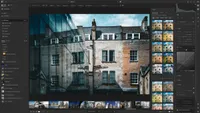
But Photomator’s key strengths lie not in the browser but in the edit windows. Double-click on a photo and it appears in a clean black-and-gray workspace. At the top, in the menu bar, is a series of icons that access a range of image-editing workspaces and tools. These icons are ML (which unleashes a range of machine learning adjustments to color and tone in a click), Repair tool (providing a more advanced way to remove unwanted elements than you get in the Photos app), Clone tool (for manually sampling and relocating pixels), Crop tool (more on that in the Performance section), and the main workspace – Color Adjustments. It’s in Color Adjustments that you find most of the action in Photomator thanks to a host of photo-fixing and AI-powered digital darkroom tools. We’ll delve into this workspace in the Performance section of this review.
Also in the toolbar is an HDR (High Dynamic Range) button. This enables you to see a wider range of colors and tones if your device’s display supports that feature, but you can toggle it off, which is especially useful if you’re editing for print. There’s also an ellipsis (...) icon that provides access to other tools, such as an ML-powered Super Resolution tool. This will prove useful if you want to enlarge typically low-res files produced by generative AI.
Oh, Photomator also looks and behaves in a similar way on the iPadOS version of the app, though that does lack some of the macOS version’s tools, such as the Black & White and Color Monochrome panels. This isn’t a major issue, as both the Mac and iPadOS versions are included in the subscription, so you could start editing on the iPad and then finish off with the extra tools on your Mac’s version of Photomator.

Photomator: Performance
If you’ve used any image-editing app before, you’ll take to Photomator like a duck to water, thanks to a collection of typical tools such as a Basic panel with sliders that adjust Exposure, Shadows, Highlights, etc. A good place to start is by clicking on the ML button, as this causes AI to analyze a shot to tweak colors and tones. You’ll then notice that sliders in the Color Adjustments panel have been repositioned. Tools are grouped into panels that can be toggled open (or collapsed), making it easy to focus on specific photo-fixing tasks. Some tools, such as Selective Color and Curves, look and behave the way the equivalent tools do in the Photos app, so there’s no steep learning curve to climb.
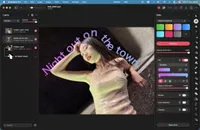
However, you soon begin to see Photomator’s superiority over Apple Photos when it comes to making selective adjustments. At the top of Photomator’s Color Adjustments panel is a Layers panel. By default, you’ll see the image layer. Click on the "+" icon to access commands such as Select Subject. This uses AI (ML) to create a mask that enables you to adjust properties such as color, tone, clarity, etc., for a person without changing the background. You can use the Select Background command to create a new mask on a separate layer and apply selective adjustments to the background.

This makes it easy to produce creative edits such as a spot-color effect, where a person in full color stands against a black-and-white background, for example. You can also use masks to adjust the Clarity of background brickwork while preserving the smooth skin tones of a model, for example. See the video below to see layer-based editing in action.
You can also use Photomator to apply edits (such as tweaking tone curves) as adjustment layers – just like you can in Adobe Photoshop. This makes it easy to fine-tune the look of your edited photo, as you can tweak an adjustment layer’s properties with ease or toggle it on and off to see what it brings to the image-editing party! I found that Photomator’s AI-powered mask-creating tools worked really well, though you can fine-tune them using brush-based tools if necessary. But if you need to combine images as composited layers, then you’ll need Pixelmator Pro, not Photomator.

As well as photo fixing, Photomator enables you to indulge in some creative processing, courtesy of one-click color and tone tweaking filters. Filters are presented in a filmstrip of thumbnails along the bottom of the workspace, with each thumbnail previewing the look that the filter will apply to your currently open photo. Filters are grouped into themes such as B&W (Black & White – obviously) and CN (Cinematic – less obviously!). The handy thing about filters is that they instantly alter a host of properties in various sections of the Color Adjustments panel, so they teach you more about how these adjustment tools work. A nice touch is the ability to manually tweak a host of image adjustment tools to get a look that you like, and then save these adjustments as a custom one-click filter.
Another quick way to produce a wide range of mood-changing creative looks is to experiment with the options in the LUT (Look-Up Table) section of the Color Adjustments panel. Here there are some excellent Grayscale Conversion filters that mimic the different looks that you get when placing different colored filters over the lens when shooting with black-and-white film, such as using a red filter to darken blue skies in black-and-white prints. Unlike Filters, LUTs don’t change the position of sliders in the Color Adjustments panel. You can also export custom filters that you’ve created as LUTs (in .cube format), which some photographers will find useful.

Talking of file formats, Photomator offers comprehensive support to photographers who prefer to shoot and edit in their camera brand’s own Raw format, including, of course, Apple ProRAW .dng (Digital Negative) files from iPhones such as the iPhone 17 Pro and 17 Pro Max. Photomator currently supports over 750 Raw formats, and as it is an annual subscription-based app, support for new Raw formats should be added over the year.

Photomator: Verdict
If you’re a long-term Apple Photos user who wants to "up" your photo-editing skills without climbing a steep learning curve or spending a lot of cash, then Photomator is well worth considering, especially thanks to its effective AI-powered selection tools and layered, non-destructive, mask-based editing powers. The Repair tool is marginally better at removing unwanted objects than Apple Photos’ Clean Up tool, though both fall short of Adobe’s much more powerful and effective Generative Fill and Remove tools. I particularly enjoyed the ability to start editing a shot on the iPadOS version of Photomator and then continue editing it via my macOS version of the app, courtesy of syncing via iCloud. Photomator is an effective and affordable addition to the Mac photo-fixing ecosystem.
Features ★★★★☆ |
Photomator supports over 750 camera Raw formats. AI-powered layer-based mask creation enables you to target and tweak the colors and tones of a subject or background selectively, though you can’t composite images on layers. |
Design ★★★★☆ |
Photomator has a similar look to the Apple Photos app that you’re familiar with, so it’s easy to get to grips with. AI-powered adjustment and selection tools offer a springboard to making more complex edits (such as layer mask creation). |
Performance ★★★★☆ |
Filters and LUTs offer quick and effective ways to create a wide range of looks in a few clicks. AI-powered tools such as Auto Straighten and Auto Crop also work well and speed up your workflow. The Repair tool is better than in Photos, but not a patch on Adobe’s Generative Fill and Remove tools. |
Value ★★★★★ |
For much less than the price of one cup of coffee per month, Photomator offers a more powerful and affordable complementary app to Apple Photos. |
Alternatives