How to use Canon Digital Photo Professional – Canon DPP part 2
Boost your tonal range using the free RAW image editing software, Canon Digital Photo Professional 4
Watch video: How to master the Tone Adjustment tool in Canon DPP4
Canon Digital Photo Professional 4 is free RAW editing software that's available to every Canon EOS camera user – and is designed to help you import, organize, edit and share your photographs. This series of Canon Digital Photo Professional tutorials will help you get the best from this photo editor.
Part 1: Canon Digital Photo Professional tutorials
Part 2: Boost your tonal range
Part 3: Controlling tonal range
Part 4: Rescuing highlights
Part 5: Correcting color casts
Part 6: Selective color adjustments
Part 7: Creative color effects
Part 8: Black & white with DPP
Part 9: Fixing image distortion
Part 10: Sharpen images and smooth noise
While the Adobe Creative Cloud suite offers all the advanced post processing minutiae you could ask for, DPP 4 offers you a powerful yet easy to use way to edit your RAWs. In Part 2 of our Canon DPP series, we'll go over how to adjust curves to tweak shadows, midtones and highlights of your RAW images using the Tone Adjustment tool.
Shooting in a high-contrast location, it can be a challenge to capture detail throughout the scene’s tonal range. If you expose for the brightest highlights, the shadows are plunged into underexposed darkness, hiding interesting detail. By opening the aperture (or slowing down the shutter speed), you can reveal more shadow detail, but you run the risk of blowing out (or clipping) the highlights.
To shoot our high-contrast street scene, we set our metering mode to Evaluative, so that our camera would measure the light in both the brighter and darker parts of the scene, then attempt to capture detail throughout the frame.
Our shadows in the unprocessed version of the image are still too dark and the highlights lack detail, but as we’re shooting in Raw format, we can be relatively confident that Canon’s DPP4 can help restore missing detail in both the clipped shadows and highlights, creating a more evenly exposed image.
DPP4’s Basic palette can brighten up an underexposed image and selectively lighten shadows and darken highlights, but these sliders only work up to a point. If the contrast is too strong, you need to delve into the Tone Adjustment tool palette and selectively target and tweak specific shadow, midtone and highlight details with more power and accuracy. Tone curves enable you to create a more evenly balanced exposure when other tone-tweaking tools fail.
The best camera deals, reviews, product advice, and unmissable photography news, direct to your inbox!
01 Make basic adjustments
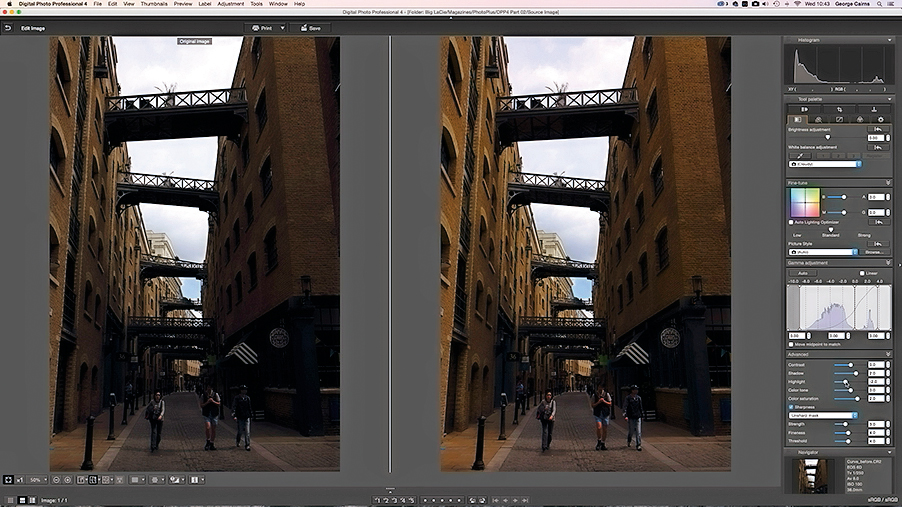
Open one of your underexposed .CR2 RAW images in Canon DPP4 and click the Edit Image button. In the Basic palette, set Shadow to 2 and then drop Highlight down to -2. Brightened shadows can look desaturated, so boost Color Saturation to 2.
02 Place control points
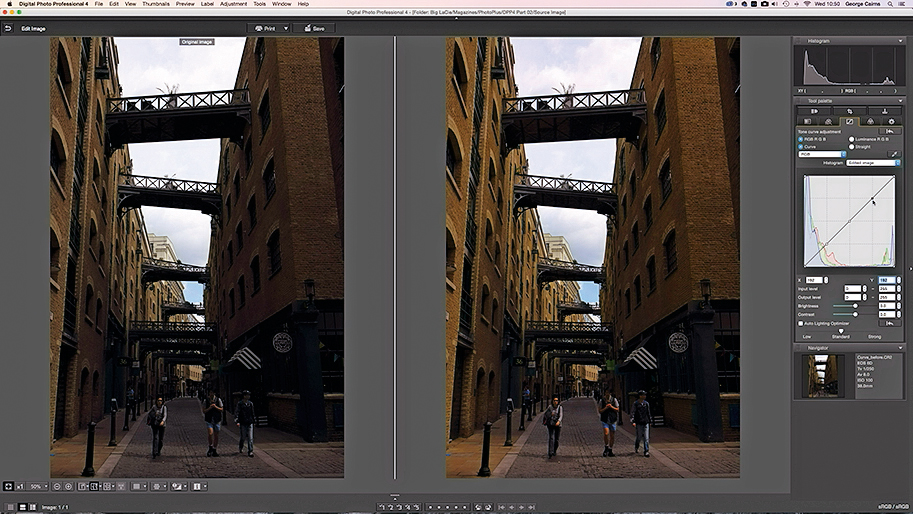
Click the Tone Adjustment palette. Click to place a midtone control point at the centre of the curve (with an X and Y value of 128). Place a shadow control point (X, Y value of 64). Place a highlight control point (X, Y value of 192).
03 Selective adjustments
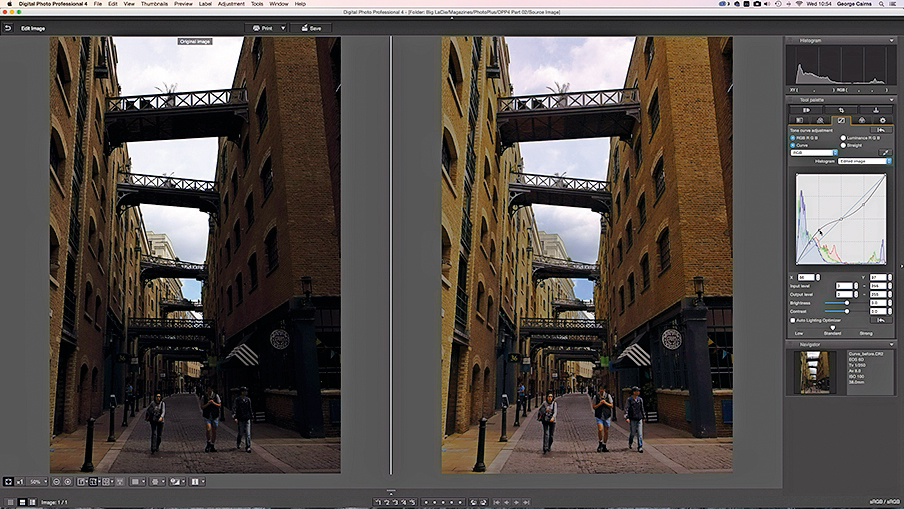
Drag the highlight control point down to darken the sky and reveal more detail. Push the shadow control point up to lighten underexposed shadows. The untouched middle point stops the shadow slider altering the highlights.
Canon Digital Professional workspace
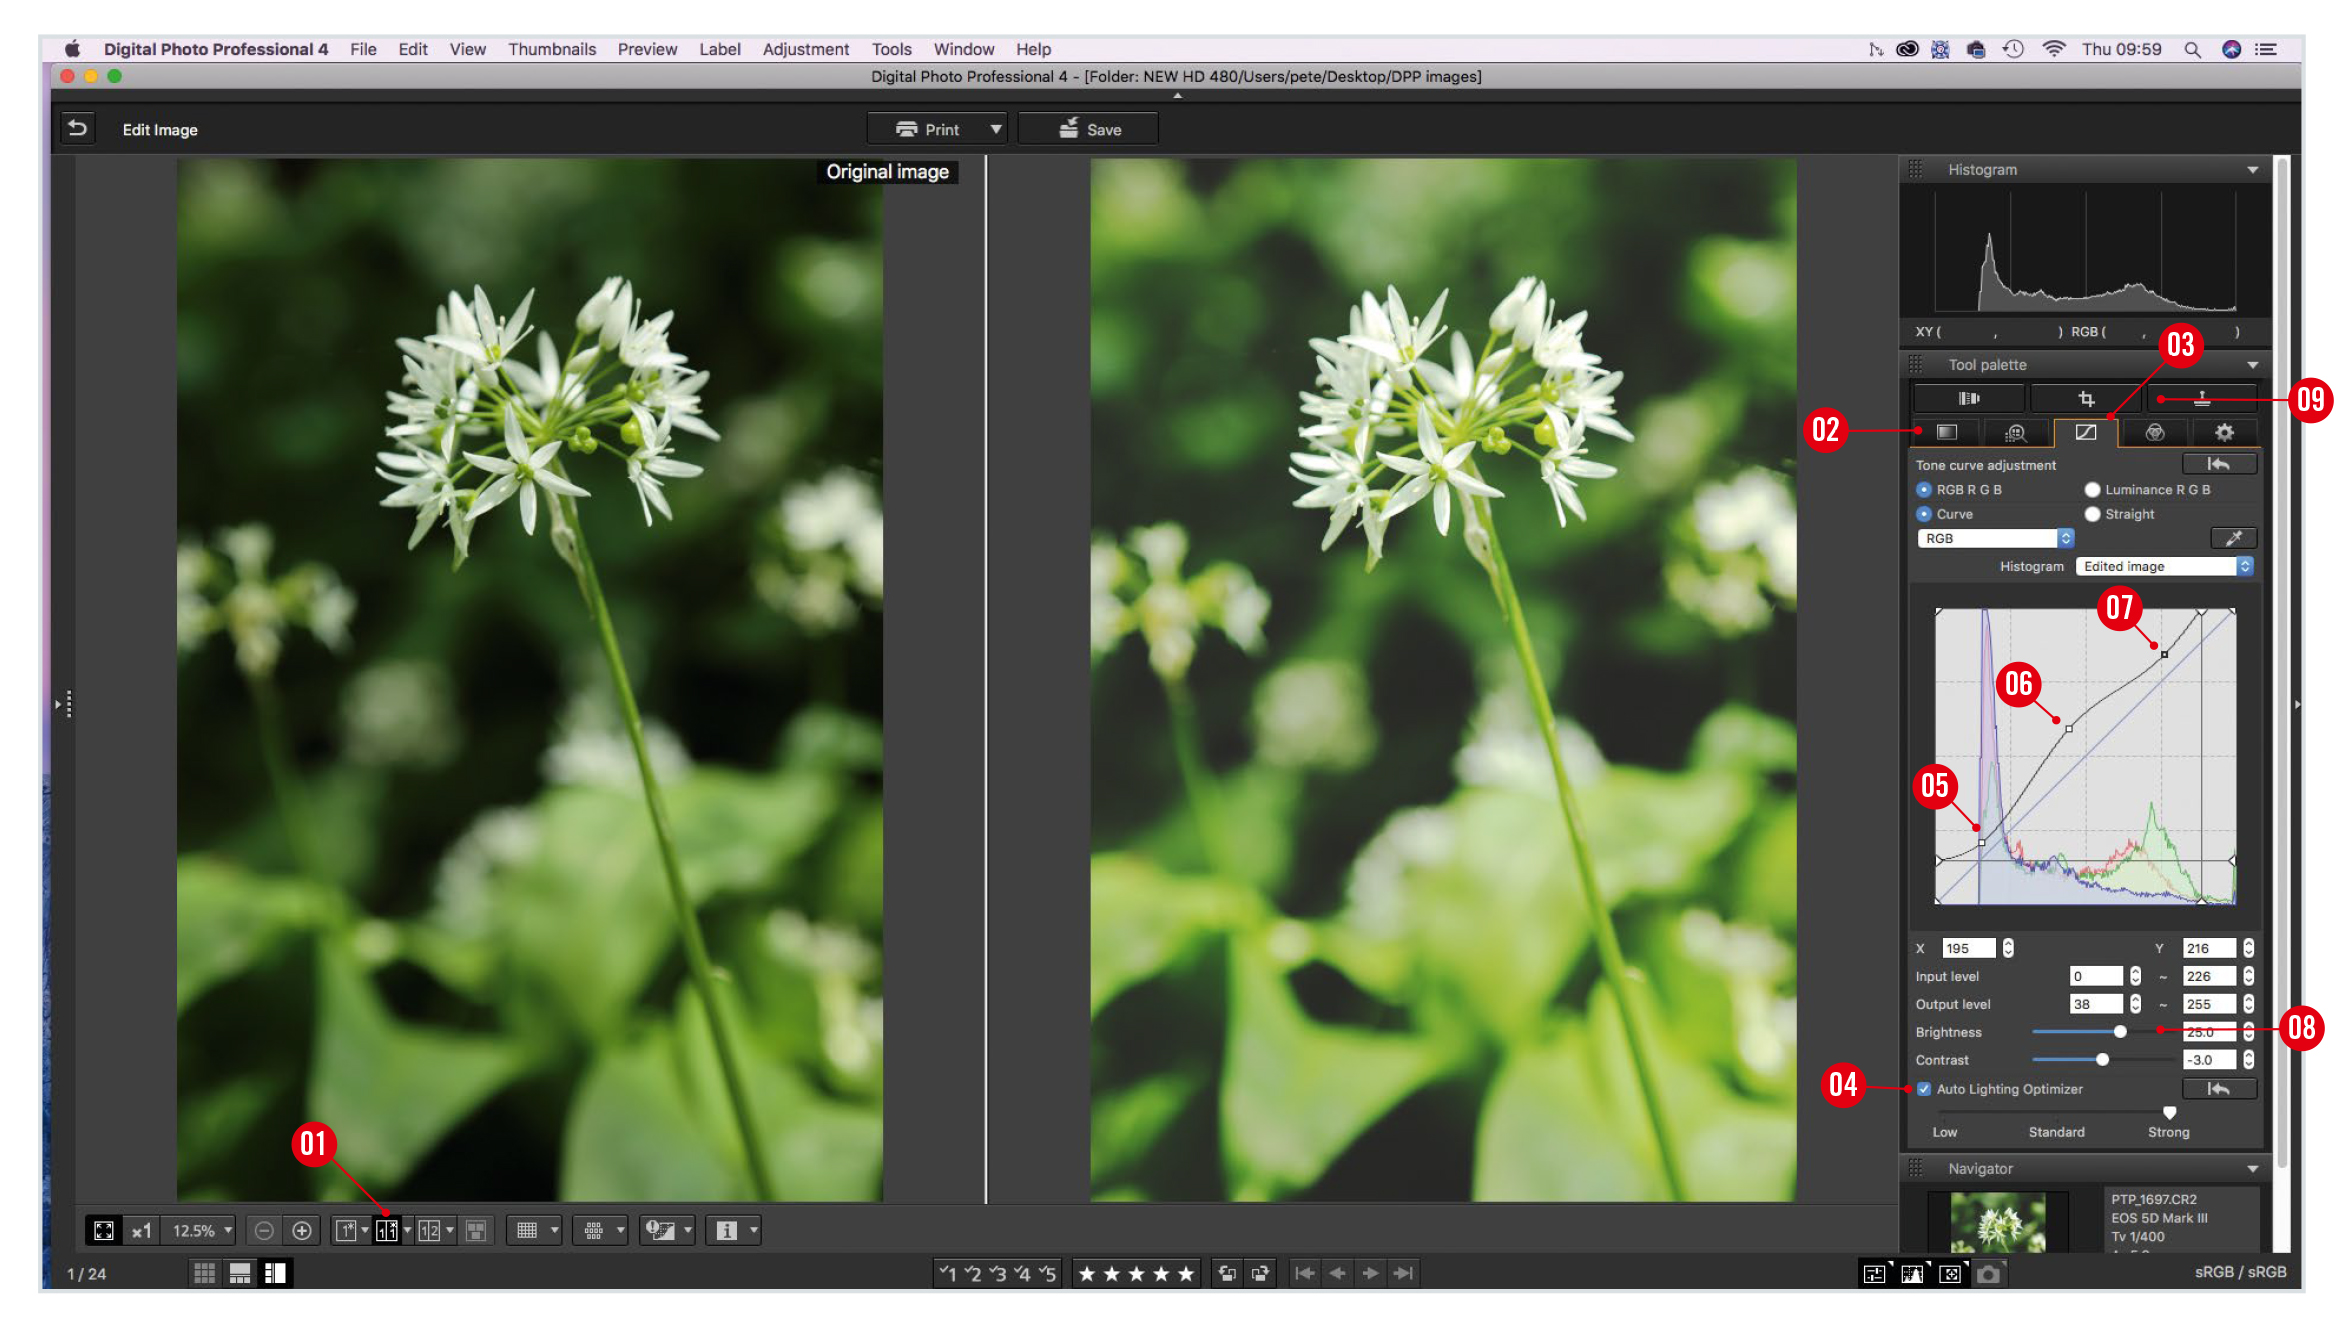
1. Preview
It helps to see a before and after version of an image to compare edits with the tones captured in-camera. Click the ‘1/1’ icon at the bottom.
2. Basic palette
Toggle open the Advanced tools. By dragging the Shadows slider right, we can selectively lighten shadow detail. By dragging the Highlights slider left, we can selectively restore some detail to the blown-out sky.
3. Tone Curve palette
Click here to access the more powerful and selective tone tweaking tools, so you can improve on what you started in the Basic palette.
4. Auto Lighting Optimizer
This tool can lighten underexposed shadows in a click. Reveal detail by dragging the slider towards Strong.
5. Lighten the shadows
This point on the curve has been dragged upwards. As it overlaps the shadow section at the left of the histogram, shadows and midtones have been lightened, revealing detail in the darker parts of the image.
6. Mid-point
By placing a control point in the middle of the diagonal line, you can separate the adjacent curve control points, enabling you to independently adjust shadows on the left and highlights on the right of the curve.
7. Darken the highlights
By pulling the highlight control point downwards, you can create a curve that remaps the image’s highlights to a darker value. This restores detail in the initially overexposed sky.
8. Brightness
The darkest shadows have a tonal level of 0, which is completely black. The Brightness slider gives the darkest shadows a higher output level, resulting in them looking lighter. Don’t push this too far or the shadows will look washed out.
10. Go straight
This button changes curves between control points into straight lines, for a subtle change in the tonal tweaks produced by the curve. Click back on Curve to restore the original results.
Get the latest Canon DPP software
Canon's DPP 4.12.60 is the latest version (released 9 July 2020) and available for most current Canon EOS DSLR owners – eg EOS 2000D, 800D, 90D, 7D Mk II, 6D Mk II, 5D Mk IV and 1D X Mk III. As well as Canon EOS R-system mirrorless cameras eg EOS R, RP, R5 and R6.
You can download this version of Canon's Digital Photo Professional software from Camon's site here get Canon's DPP software but you’ll need your EOS camera's serial number. Check the website to see if your Canon EOS camera is compatible with the latest DPP.
PhotoPlus: The Canon Magazine is the world's only monthly newsstand title that's 100% devoted to Canon, so you can be sure the magazine is completely relevant to your system.
Read more:
Best photo editing software: image editors for novices through to pros
Best photo-editing laptops: top laptops for photographers
Best online photography courses – from beginner guides to masterclasses
The former editor of PhotoPlus: The Canon Magazine, Peter has 18 years of experience as both a journalist and professional photographer. He is a hands-on photographer with a passion and expertise for sharing his practical shooting skills. Equally adept at turning his hand to portraits, landscapes, sports and wildlife, he has a fantastic knowledge of camera technique and principles.
He is the author of several published photography books including Portrait Photographer's Style Guide, and The Complete Guide to Organising and Styling Professional Photo Shoots with fellow portrait pro Brett Harkness.
Peter remains a devout Canon user and can often be found reeling off shots with his Canon EOS DSLR and EOS R mirrorless gear. He runs Peter Travers Photography, and contributes to Digital Camera magazine.
