How to use Canon Digital Photo Professional – Canon DPP part 7
Get creative with the color of RAW images using free editing software – Canon Digital Photo Professional 4
Watch video: Get creative with the color of your RAW images using Canon Digital Photo Professional 4
Canon Digital Photo Professional 4 is free RAW editing software that's available to every Canon EOS camera user – and is designed to help you import, organize, edit and share your photographs. This series of Canon Digital Photo Professional tutorials will help you get the best from this photo editor.
Part 1: Canon Digital Photo Professional tutorials
Part 2: Boost your tonal range
Part 3: Controlling tonal range
Part 4: Rescuing highlights
Part 5: Correcting color casts
Part 6: Selective color adjustments
Part 7: Creative color effects
Part 8: Black & white with DPP
Part 9: Fixing image distortion
Part 10: Sharpen images and smooth noise
In this tutorial, learn to use the Adjust Image Colors palette to shift the hue and luminance of particular colours. This creative approach to selective color adjustment creates false colors that mimic the results produced using analogue darkroom techniques such as cross processing. Cross processing involved developing print film using chemicals that were designed for use with slide film, or visa versa.
The results were hit-and-miss, but when it worked the creative shifts in hue could produce eye-catching images. Cross-processed blues often took on a greeny hue, for example. Shadows might feature a hint of magenta.
The cross-processed look is still popular as it helps give digital images a retro filmic look. It’s often mimicked in TV drama shows and commercials, especially in relation to adding surreal cyan hues to skies for example.
Unlike the unpredictable approach of the traditional darkroom technique, the Adjust Image Colors palette gives you the ability to replicate almost any cross-process chemical combination that you might desire – but without the smell or mess! And, thanks to the Digital Photo Professional 4’s Recipe commands, you can save and store a specific cross-processed look and apply it other images in a couple of clicks, as we’ll demonstrate in our step-by-step guide and video lesson.
01 FIX TONAL PROBLEMS
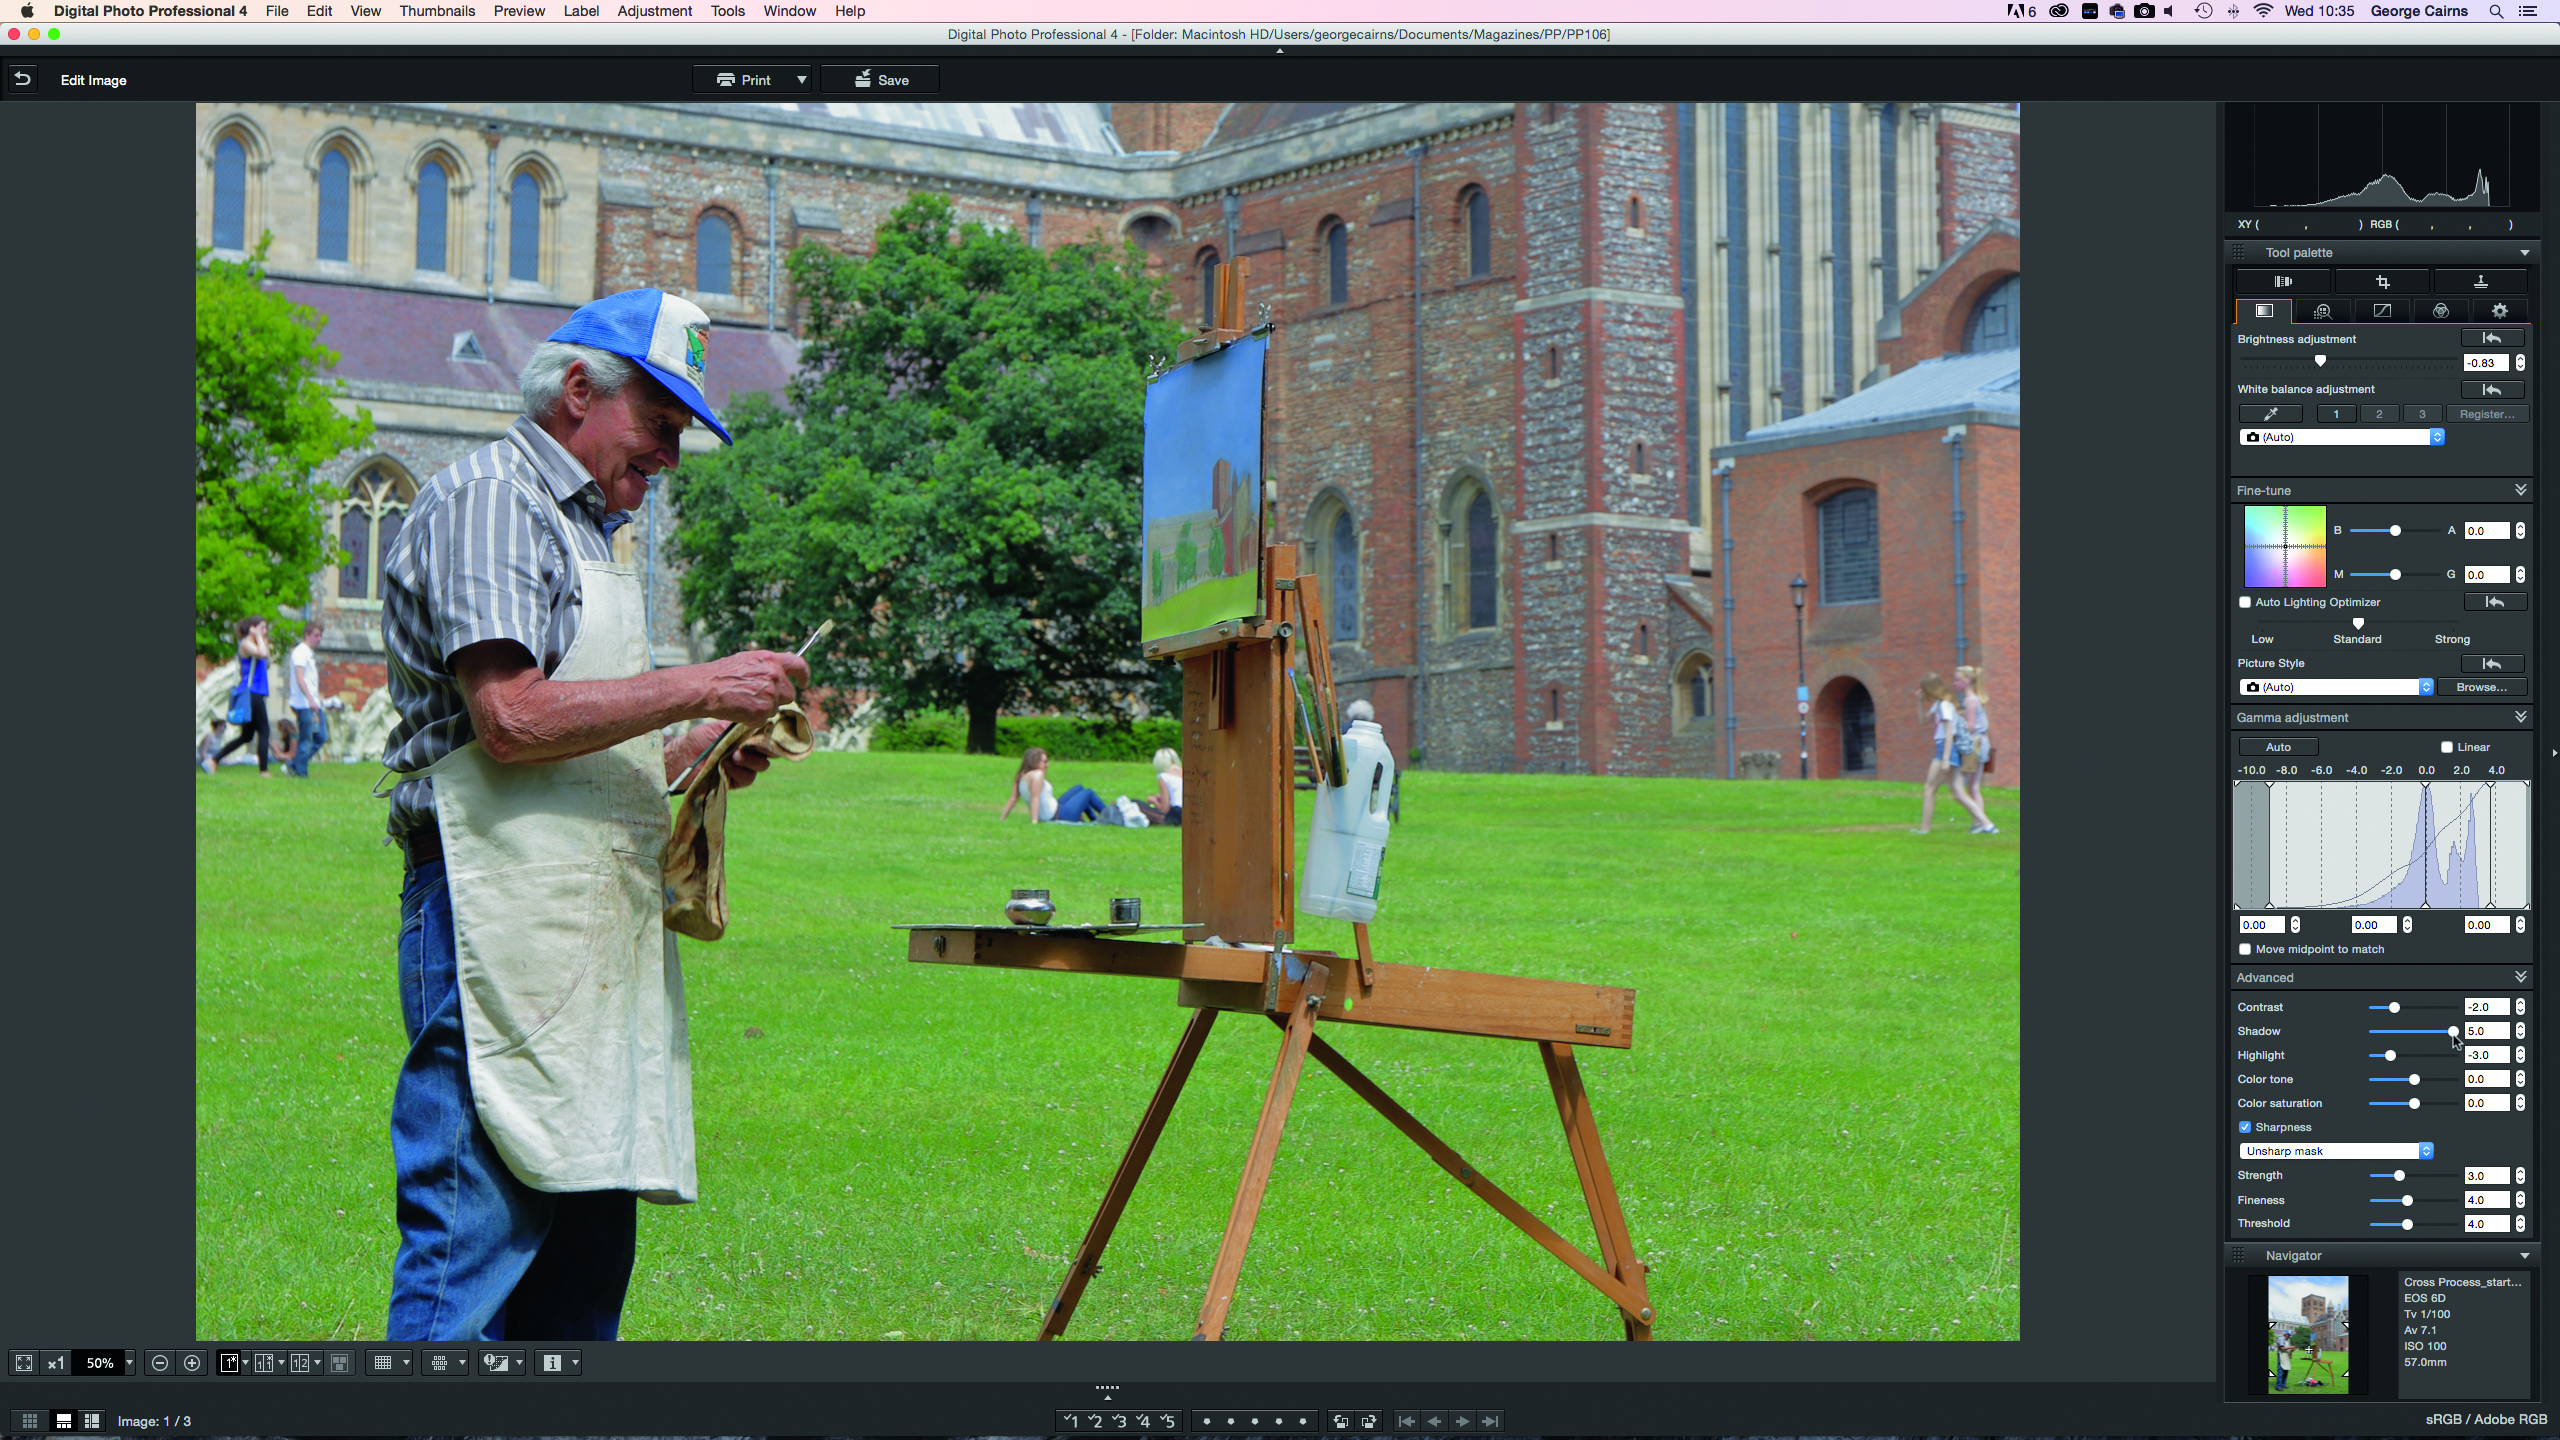
Browse in Canon DPP4 to your RAW .CR2 image. Click Edit Image. In the Basic panel set Brightness -0.83, Contrast -2, Lighten Shadow 5, Highlight -3. This can reveal missing shadows and highlight detail caused by incorrect camera settings.
The best camera deals, reviews, product advice, and unmissable photography news, direct to your inbox!
02 CROSS PROCESS COLOURS
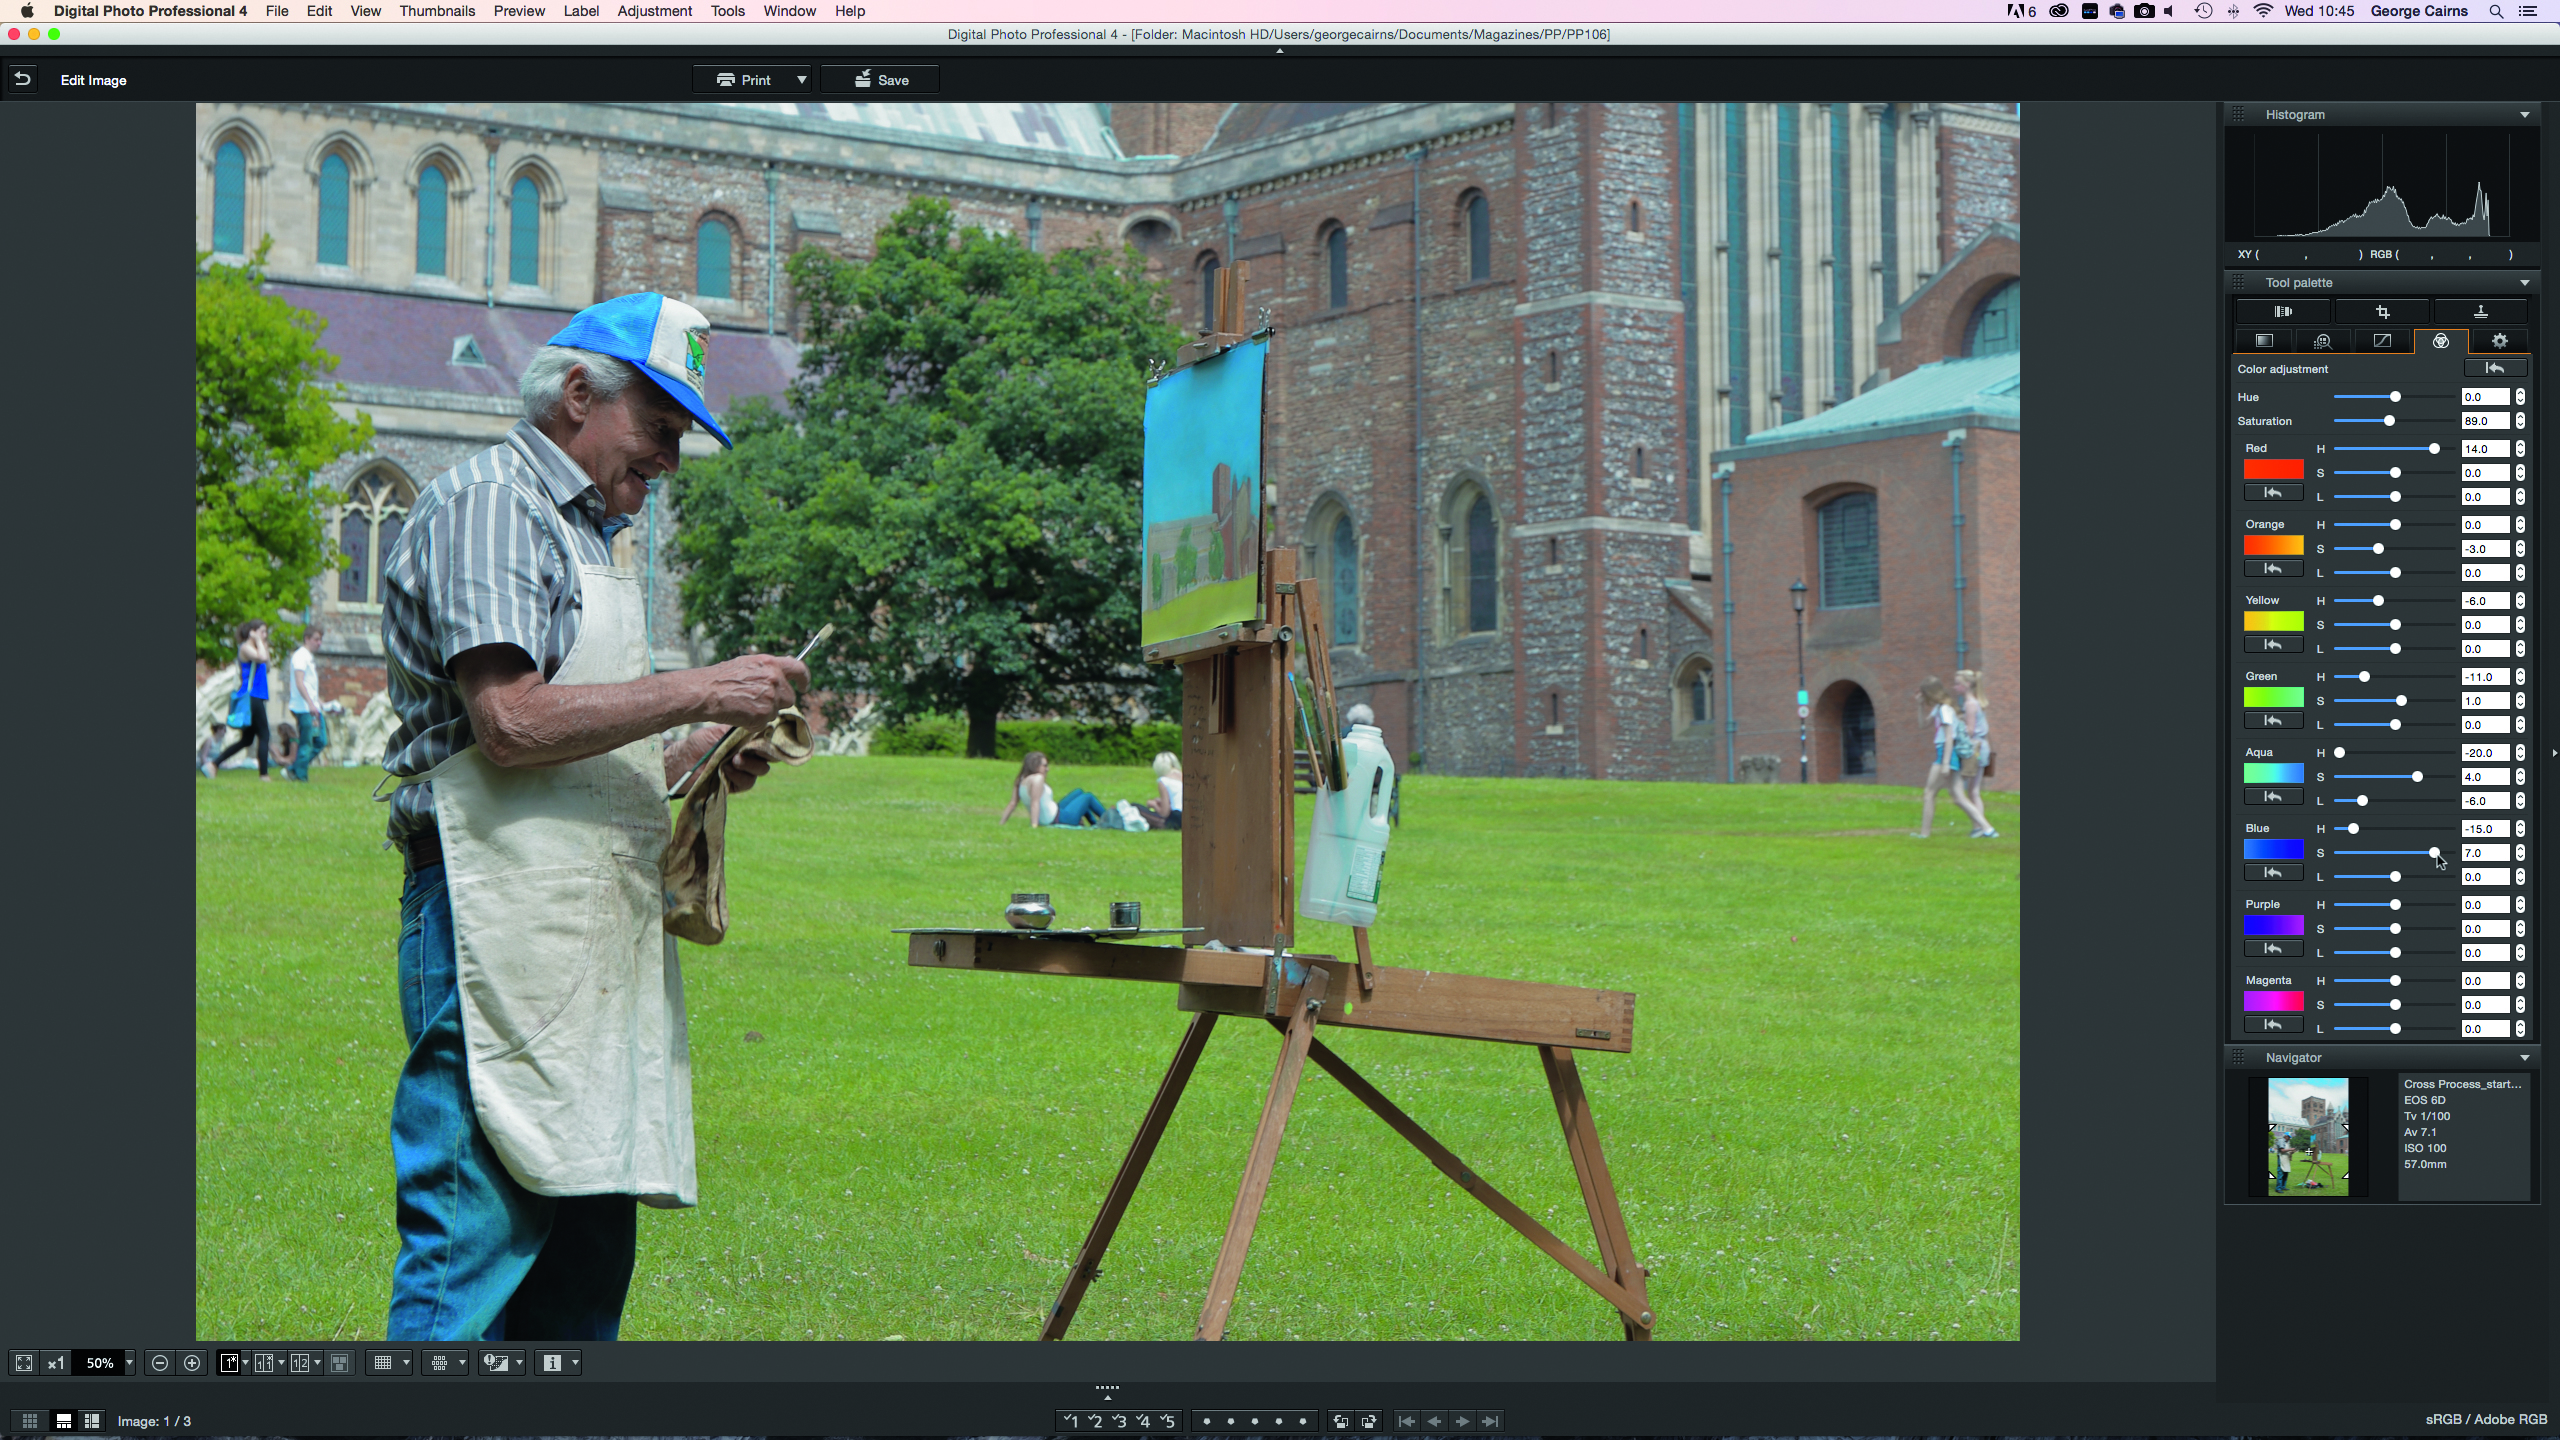
Click on the Adjust Image Colors palette. Set Red Hue 14, Orange Saturation -3, Yellow Hue -6, Green Hue -11, Green Saturation 1. For the Aqua, set H to 20,
S to 4 and L to -6. Drop the global saturation to 89 for less garish colours.
03 SAVE A RECIPE
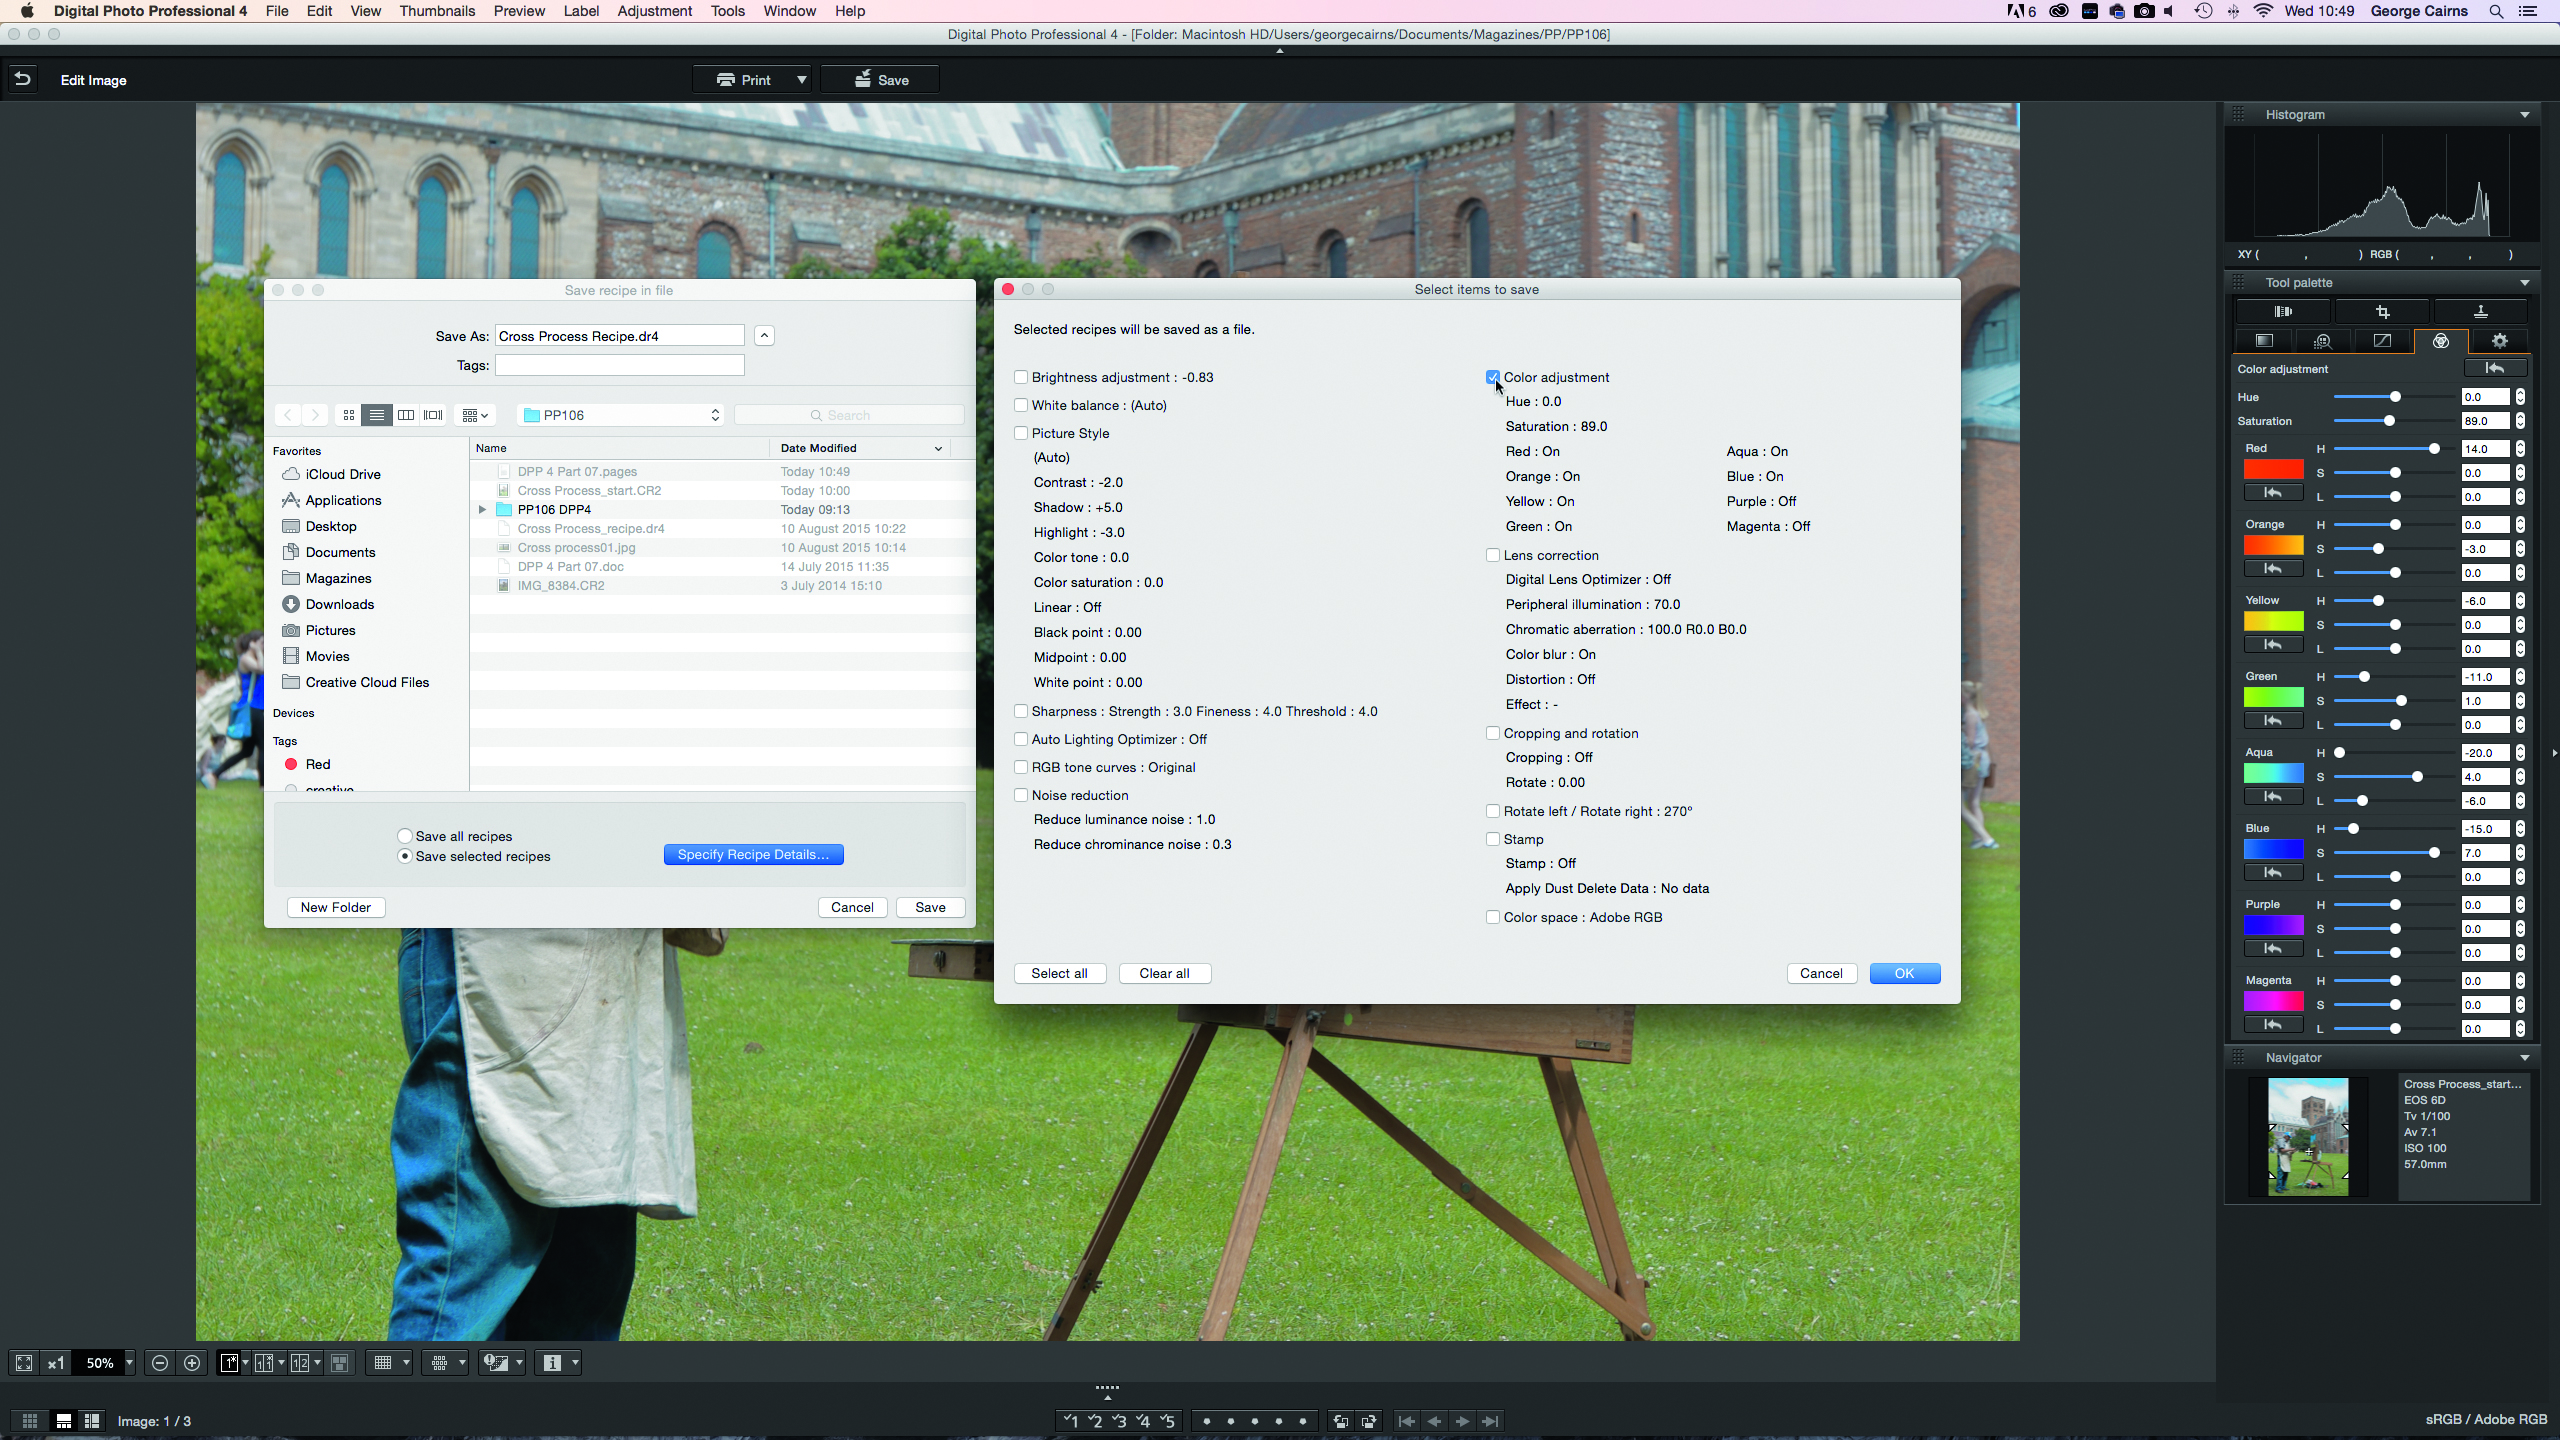
Choose Edit>Save Recipe In File. Tick Specify Recipe Details, then Clear All, then the Color Adjustment box, then OK, then Save. Choose Edit>Read And Paste Recipe From File to apply the cross-process colour effect to other photos.
Canon Digital Professional workspace
1. BEFORE/AFTER
To see how your processing is shaping up, keep an eye on both the original and the edited versions. To do so, click the Before/After comparison layout icon. If you’re working with a portrait-oriented shot, click the adjacent triangular fly-out icon and tick the Arrange Horizontally button. For landscape-oriented shots tick the Arrange Vertically button.
2. CREATE CYAN SKIES
The sky consists of a range of colours, so you need to adjust the Hue of both of the Blue and Aqua channels to tint the sky. Here an Aqua Hue value of -20 and a Blue Hue of -15 is enough to create the trademark cyan sky look. It also cross processes the painter’s jeans, for a vintage analogue film vibe.
3. SATURATION
By boosting the Aqua and Blue channels’ Saturation values to 4 and 7 respectively, you can make the sky stand out more in the processed version of the Raw file.
4. LUMINANCE
By dropping the value of the Aqua channel’s Luminance slider to -6 you can darken the sky, which helps make the clouds pop out in contrast.
5. WARMER COLOURS
Grass and vegetation tends to feature an abundance of yellow, so by shifting the Yellow channel’s Hue to -6 we can add a warmer tint to the grass. This wash of sepia (with its vintage photo connotations) helps the processed picture evoke a nostalgic feeling.
6. REVERT
Experiment with your HSL (Hue, Saturation, Luminance) settings to explore different cross-processed looks. You can click the Revert icon by each colour channel to restore the photo’s originally captured colours, or click this icon to revert all the adjusted colours to their default look.
7. GLOBAL ADJUSTMENTS
This pair of sliders adjusts the Hue and Saturation of all of the shot’s colours at the same time. We’ve dropped the global Saturation to give the shot’s colours a ‘faded over time’ look that complements the vintage effect produced by the cross-processed colours.
8. FINE-TUNE
You can tweak the adjustments produced by a channel’s sliders by tapping these up and down arrows. The results are very subtle and slow to apply, so you’ll probably never use this particular feature. You can also type numerical values into the adjacent boxes as an alternative to dragging the sliders.
Get the latest Canon DPP software
Canon's DPP 4.12.60 is the latest version (released 9 July 2020) and available for most current Canon EOS DSLR owners – eg EOS 2000D, 800D, 90D, 7D Mk II, 6D Mk II, 5D Mk IV and 1D X Mk III. As well as Canon EOS R-system mirrorless cameras eg EOS R, RP, R5 and R6.
You can download this version of Canon's Digital Photo Professional software from Camon's site here Get Canon's DPP software but you’ll need your EOS camera's serial number. Check the website to see if your Canon EOS camera is compatible with the latest DPP.
PhotoPlus: The Canon Magazine is the world's only monthly newsstand title that's 100% devoted to Canon, so you can be sure the magazine is completely relevant to your system.
Read more:
Best photo editing software: image editors for novices through to pros
Best photo-editing laptops: top laptops for photographers
Best online photography courses – from beginner guides to masterclasses
The former editor of PhotoPlus: The Canon Magazine, Peter has 18 years of experience as both a journalist and professional photographer. He is a hands-on photographer with a passion and expertise for sharing his practical shooting skills. Equally adept at turning his hand to portraits, landscapes, sports and wildlife, he has a fantastic knowledge of camera technique and principles.
He is the author of several published photography books including Portrait Photographer's Style Guide, and The Complete Guide to Organising and Styling Professional Photo Shoots with fellow portrait pro Brett Harkness.
Peter remains a devout Canon user and can often be found reeling off shots with his Canon EOS DSLR and EOS R mirrorless gear. He runs Peter Travers Photography, and contributes to Digital Camera magazine.
