How to use Canon Digital Photo Professional – Canon DPP part 8
Learn to create better black-and-white images using free editing software – Canon Digital Photo Professional 4
Watch video: How to create better black-and-white images using Canon Digital Photo Professional 4
Canon Digital Photo Professional 4 is free RAW editing software that's available to every Canon EOS camera user – and is designed to help you import, organize, edit and share your photographs. This series of Canon Digital Photo Professional tutorials will help you get the best from this photo editor.
Part 1: Canon Digital Photo Professional tutorials
Part 2: Boost your tonal range
Part 3: Controlling tonal range
Part 4: Rescuing highlights
Part 5: Correcting color casts
Part 6: Selective color adjustments
Part 7: Creative color effects
Part 8: Black & white with DPP
Part 9: Fixing image distortion
Part 10: Sharpen images and smooth noise
In this tutorial, we help you create effective monochrome images by using colours to form contrasting greyscale tones. There are a few reasons why you might want to remove colour from an image. By removing the distraction of colour from a photograph you can use contrasting greyscale tones to draw attention to various shapes, textures and patterns in the scene – and a black-and-white conversion might save a disappointing shot, for example if the sky is overcast and the colours are dull and drab. A monochrome image can also evoke different moods, especially if you use a wash of colour to tone it.
Simply desaturating a shot doesn’t guarantee a successful black-and-white conversion, however. Key elements in an image, such as a portrait subject’s clothing and their background, or a sky and the landscape below, may take on the same greyscale tones, causing them to lack impact and definition. The secret to a successful monochrome conversion is manipulating the colours in the original image to create a greater variety of greyscale tones. This process mimics the photographic technique of placing colour filters over the lens when shooting with black-and-white film – a red filter, for example, will darken blue skies in the black-and-white image, causing lighter white clouds to stand out more in contrast.
If you shoot using your Canon’s Raw format then you can use DPP 4’s Monochrome picture style to experiment with black-and-white looks. Our vegetables image isn’t a subject that you’d traditionally convert to black and white, but its variety of colours enable us to illustrate the versatility of the Monochrome picture style and its filter effects.
01 Convert to mono
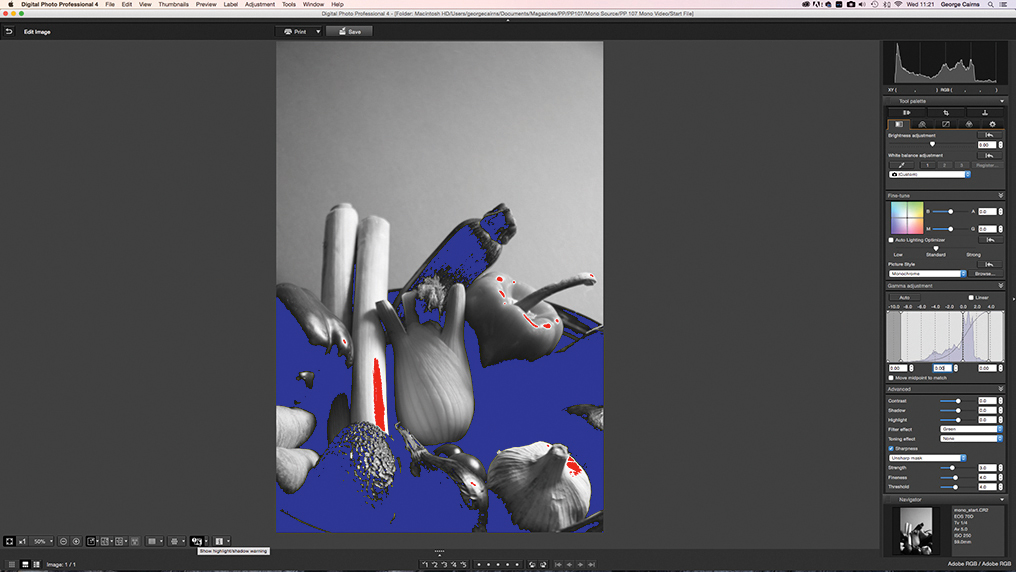
Open your RAW file and click Edit Image. Set Picture Style to Monochrome, and Filter Effect to Green. Click the Show Highlight/Shadow icon – clipped (underexposed) shadows will appear in blue, and clipped highlights as red.
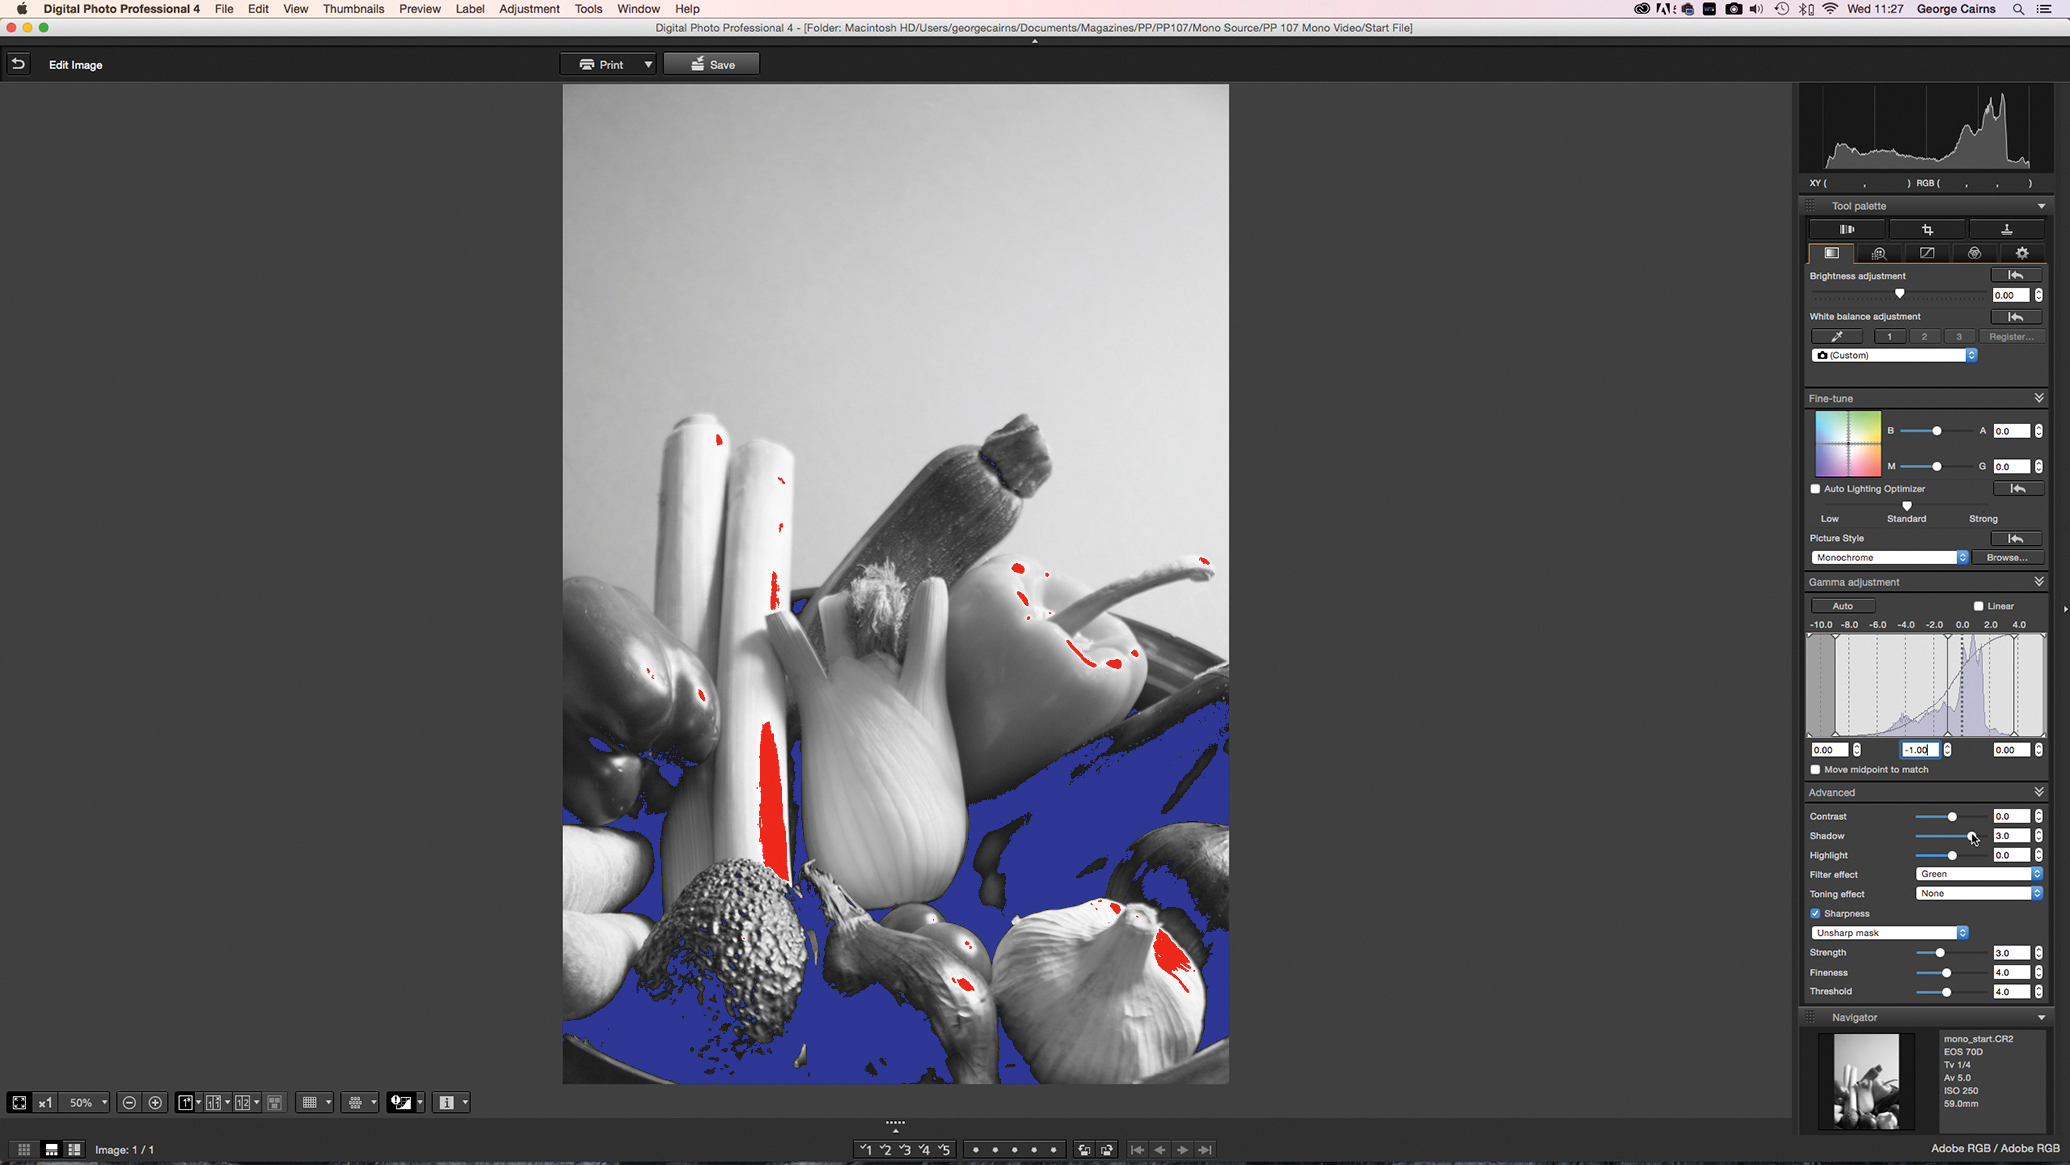
02 Reduce shadow clipping
Drag the Gamma Midtone slider left to lighten midtones and reduce shadow clipping. Set the Shadow slider to 3 to lighten the shadows. The blue patches will be reduced (but we want to keep a few black areas to create contrast).
The best camera deals, reviews, product advice, and unmissable photography news, direct to your inbox!
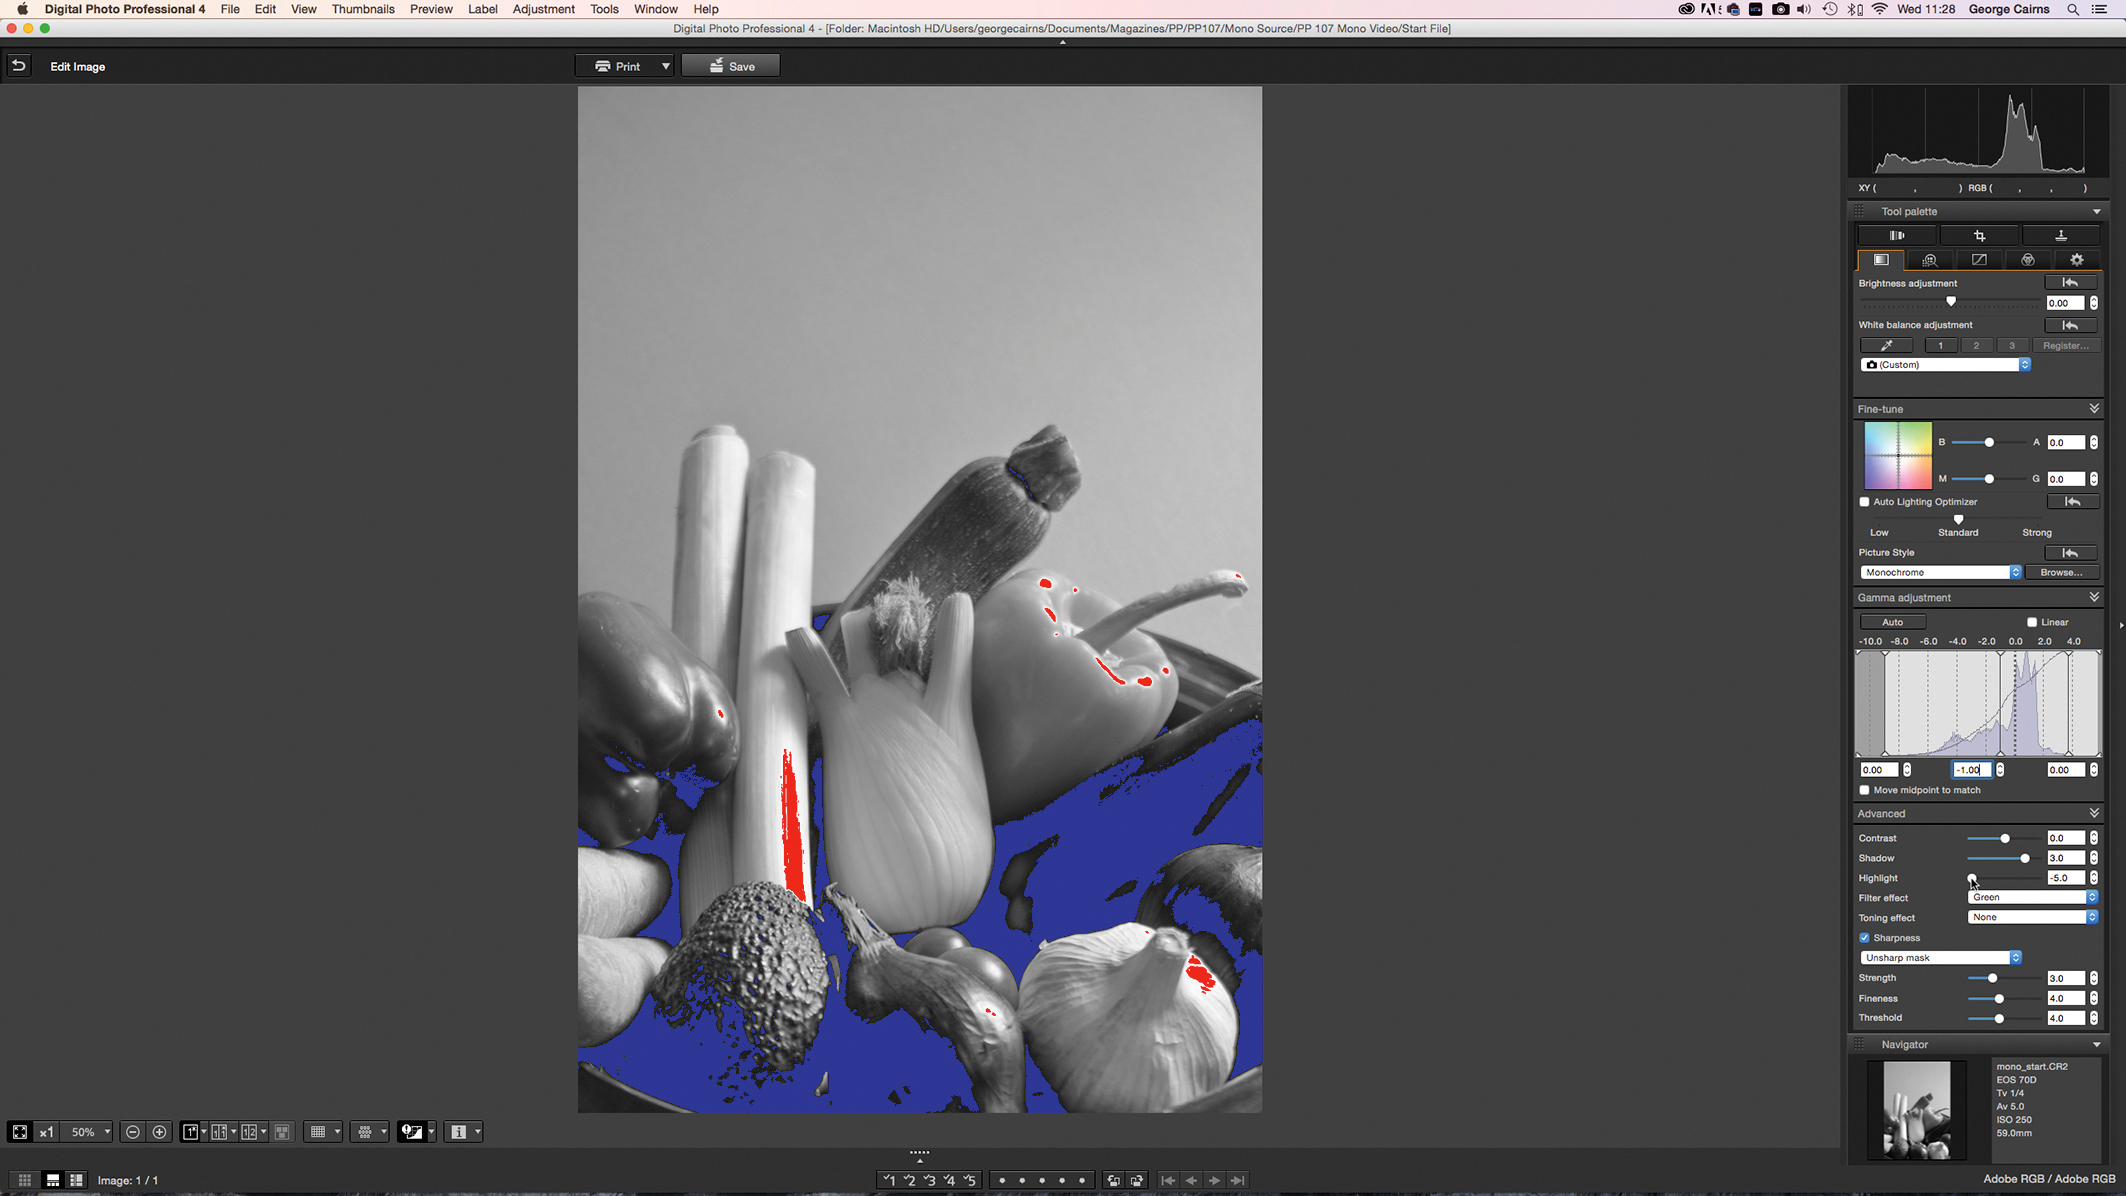
03 Reduce highlight clipping
Set the Highlight slider to -5.0 – this reduces the spread of the red patches and reveals more highlight detail. It’s okay if there are a few clipped highlights, as there’s no crucial detail in those areas and, again, it creates contrast.
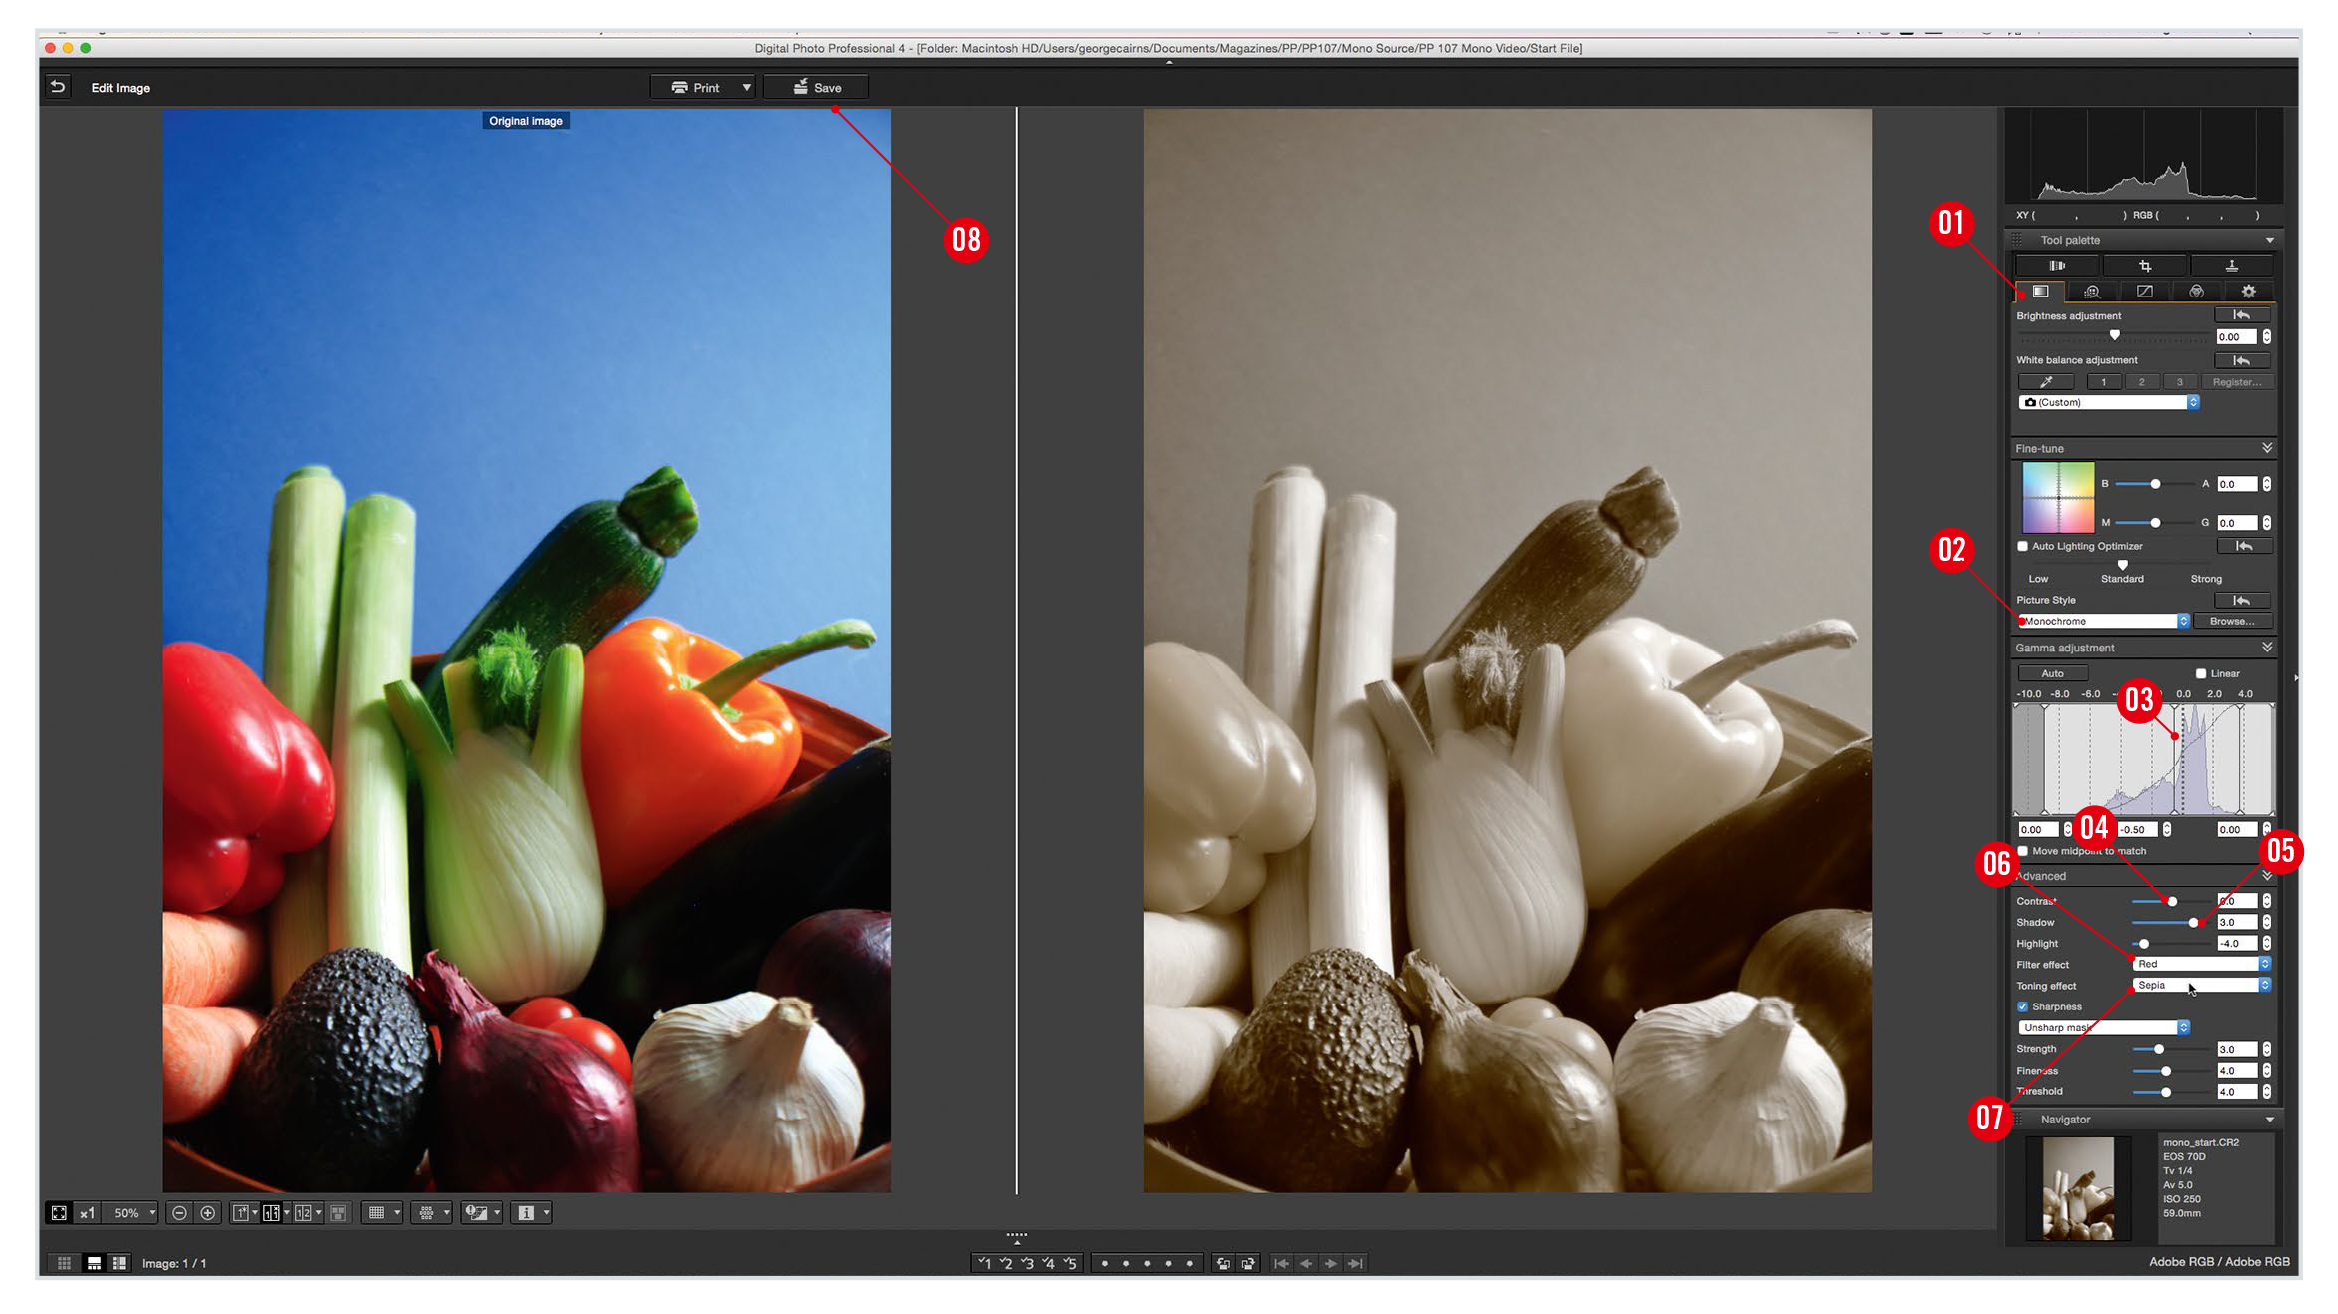
Canon Digital Professional workspace
1. BASIC PALETTE
All the tools you need for a striking mono conversion are accessible in the Basic image-editing palette.
2. PICTURE STYLE
Click this drop-down menu to access the Monochrome picture style. This instantly desaturates the image, but it’s unlikely that this will give you the best black-and-white conversion.
3. GAMMA
Drag this bar left to lighten a shot’s midtones. This tool uses a tone curve to remap the original midtone input levels and give them a brighter output level. The vertical dashed line indicates the original gamma settings of the shot’s midtones. Dragging the bar right will darken the midtones.
4. CONTRAST
An effective mono conversion should have some black shadows and white highlights, or you’ll end up with just a drab wash of mid-greys. Drag this slider right to create darker shadows and whiter highlights – check out our step-by-step walkthrough for more.
5. SHADOW & HIGHLIGHT
The Shadow slider enables you to selectively lighten shadows and midtones in your mono image to recover detail, and the Highlight slider pulls back highlight detail.
6. FILTER EFFECT
This menu is the key to effective monochrome conversions. Each filter setting lightens or darkens the greyscale tones corresponding to particular colours in the original image. By experimenting with various effects you can make specific objects stand out – for example, the Red filter darkens the blue backdrop and lightens the red and yellow peppers, making them stand out in contrast with darker tones in the shot.
7. TONING
This drop-down menu enables you to add a subtle wash of colour to your monochrome conversion. A hint of sepia gives a warm retro print look to our subject, while a wash of blue can make a landscape look more bleak and moody overall feel to the shot.
8. SAVE
After applying a particular filter, click Save to export the image as a JPEG. You can then try different filters and build up a collection of different mono versions of the same image.
JARGON BUSTER!
PICTURE STYLES: Picture styles are in-camera settings that will change the way an image is processed to adjust its colours and tones. You can also adjust picture styles in DPP.
GAMMA: The term gamma refers to the levels of brightness that your computer monitor uses to display a photo’s pixels.
Get the latest Canon DPP software
Canon's DPP 4.12.60 is the latest version (released 9 July 2020) and available for most current Canon EOS DSLR owners – eg EOS 2000D, 800D, 90D, 7D Mk II, 6D Mk II, 5D Mk IV and 1D X Mk III. As well as Canon EOS R-system mirrorless cameras eg EOS R, RP, R5 and R6.
You can download this version of Canon's Digital Photo Professional software from Camon's site here Get Canon's DPP software but you’ll need your EOS camera's serial number. Check the website to see if your Canon EOS camera is compatible with the latest DPP.
PhotoPlus: The Canon Magazine is the world's only monthly newsstand title that's 100% devoted to Canon, so you can be sure the magazine is completely relevant to your system.
Read more:
Best photo editing software: image editors for novices through to pros
Best photo-editing laptops: top laptops for photographers
Best online photography courses – from beginner guides to masterclasses
The former editor of PhotoPlus: The Canon Magazine, Peter has 18 years of experience as both a journalist and professional photographer. He is a hands-on photographer with a passion and expertise for sharing his practical shooting skills. Equally adept at turning his hand to portraits, landscapes, sports and wildlife, he has a fantastic knowledge of camera technique and principles.
He is the author of several published photography books including Portrait Photographer's Style Guide, and The Complete Guide to Organising and Styling Professional Photo Shoots with fellow portrait pro Brett Harkness.
Peter remains a devout Canon user and can often be found reeling off shots with his Canon EOS DSLR and EOS R mirrorless gear. He runs Peter Travers Photography, and contributes to Digital Camera magazine.
