Watch video: How to restore blown-out highlights your RAW images using Canon Digital Photo Professional 4
Canon Digital Photo Professional 4 is free RAW editing software that's available to every Canon EOS camera user – and is designed to help you import, organize, edit and share your photographs. This series of Canon Digital Photo Professional tutorials will help you get the best from this photo editor.
Part 1: Canon Digital Photo Professional tutorials
Part 2: Boost your tonal range
Part 3: Controlling tonal range
Part 4: Rescuing highlights
Part 5: Correcting color casts
Part 6: Selective color adjustments
Part 7: Creative color effects
Part 8: Black & white with DPP
Part 9: Fixing image distortion
Part 10: Sharpen images and smooth noise
When we view a high-contrast landscape the pupils in our eyes rapidly adjust to reveal detail in bright or dark areas as we look around the scene. However, when we capture the scene as a digital image we create a frozen frame of time.
If the camera’s pupil – the iris aka aperture – is set to expose for shadows, then the highlights will be overexposed and lack detail. Alternatively, it may capture detail in the highlights, plunging the shadows into darkness. Either way, the resulting photograph lacks the wider range of tonal detail that we perceive with the our own naked eye.
Canon's Digital Photo Professional 4 has plenty of tools to help you target and adjust overexposed highlights, as we’ll demonstrate in DPP 4.
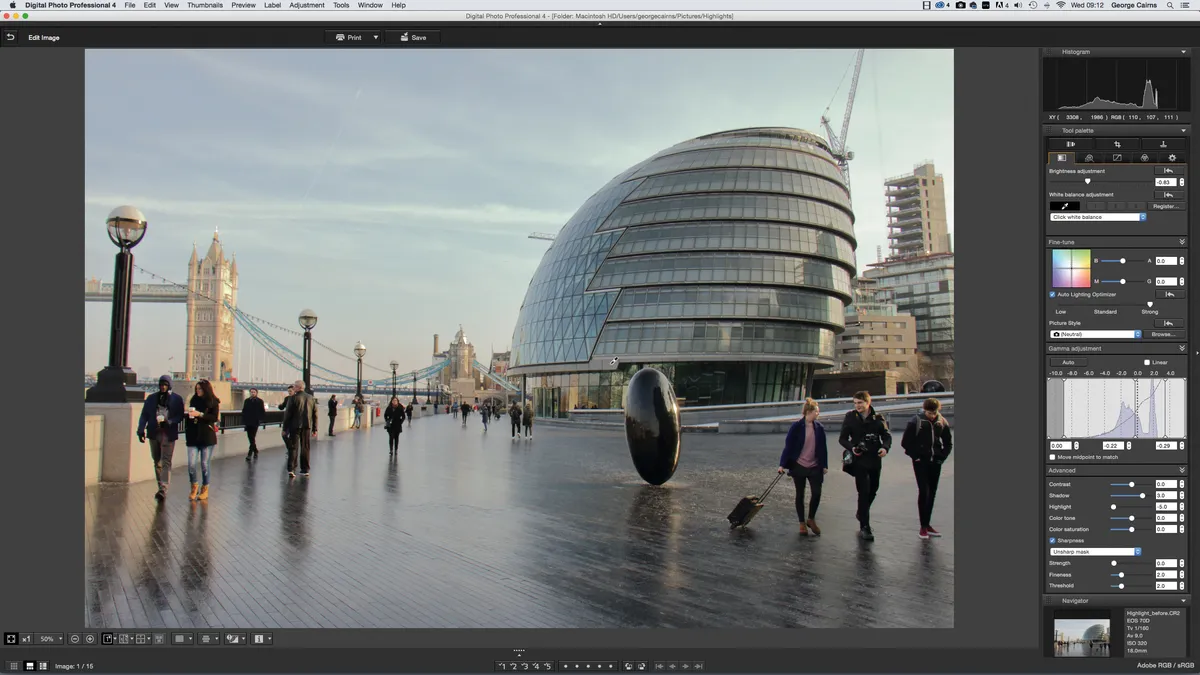
01 RESTORE HIGHLIGHTS

Drag the Brightness slider to -0.83 to restore some highlight detail to our image. This will underexpose the shadows, so push the Shadow slider to 3. Drag the Highlights slider to -5 for even more highlight detail.
02 REMOVE COLOR CAST
Our shot looks too cool. Go to the White Balance Adjustment panel. Click the Eyedropper icon. Click on part of the image that should be a neutral grey; the eyedropper will remove its cold blue tint, warming up the rest of the shot.
03 TWEAK THE TINT

To boost the colour-corrected shot’s warmer colours, drag Color Saturation up to 2.0. To tease out more of the warm sunlight go to Fine-Tune and drag the M slider left to add a hint of magenta and enhance the light hitting the buildings.
Canon Digital Professional workspace

1. EDIT IMAGE
Click the Edit Image button to access extra image-editing tools, such as the Histogram window, so that you can analyse the photo’s exposure problems with more precision.
2. HISTOGRAM
The histogram in our annotation displays a more balanced range of highlights, midtones and shadows for the edited version of the image than in the histogram of the unedited image (below). Here, we can see that the brightest pixels at the right of the graph are peaking far higher than the midtones in the middle and shadows on the left, indicating that the highlights are very overexposed.
3. LEVELS
Your photo’s tones are measured in a range of levels that run between 0 for pure black and 255 for pure white. If you place the cursor over part of the photo you’ll see the precise level of the sampled area. Here we placed the cursor over an overexposed white highlight in the image, which gave us a maximum level of 255 for the Red, Green and Blue channels.
4. CLIPPING RANGE
The Highlight/Shadow Warning enables you to see the brightest highlights as patches of red. You can then adjust the tone-tweaking sliders to reduce the presence of these clipped patches and restore missing tonal detail. You can adjust the threshold to display a wider range of highlights with a red clipping warning. Pixels with a level between 192 and 255 can be designated as overexposed. In our example we chose a clipping threshold of 240.
5. BRIGHTNESS
Reduce the amount of overexposed highlights by dragging this slider left.
6. MIDTONE LEVELS
Drag this vertical bar to the left to remap the midtone’s input levels to a lighter output level, reducing the amount of clipped shadows.
7. HIGHLIGHT LEVELS
This bar controls the strength of the highlights. Drag it right to reduce highlight brightness. Here we’ve dragged it slightly left to make sure that our processed picture still has some bright highlights.
8. HIGHLIGHT SLIDER
This slider selectively targets and adjusts the brightest highlights without altering shadows or midtones. Dragging it left claws back lots of missing highlight detail.
Get the latest Canon DPP software
Canon's DPP 4.12.60 is the latest version (released 9 July 2020) and available for most current Canon EOS DSLR owners – eg EOS 2000D, 800D, 90D, 7D Mk II, 6D Mk II, 5D Mk IV and 1D X Mk III. As well as Canon EOS R-system mirrorless cameras eg EOS R, RP, R5 and R6.
You can download this version of Canon's Digital Photo Professional software from Camon's site here Get Canon's DPP software but you’ll need your EOS camera's serial number. Check the website to see if your Canon EOS camera is compatible with the latest DPP.

Read more:
Best photo editing software: image editors for novices through to pros
Best photo-editing laptops top laptops for photographers
Best online photography courses – from beginner guides to masterclasses

