
Watch video: How to take control of the tones of your RAW images using Canon Digital Photo Professional 4
Canon Digital Photo Professional 4 is free RAW editing software that's available to every Canon EOS camera user – and is designed to help you import, organize, edit and share your photographs. This series of Canon Digital Photo Professional tutorials will help you get the best from this photo editor.
Part 1: Canon Digital Photo Professional tutorials
Part 2: Boost your tonal range
Part 3: Controlling tonal range
Part 4: Rescuing highlights
Part 5: Correcting color casts
Part 6: Selective color adjustments
Part 7: Creative color effects
Part 8: Black & white with DPP
Part 9: Fixing image distortion
Part 10: Sharpen images and smooth noise
Capturing detail in a location’s shadows, midtones and highlights can be a challenge for your Canon camera. When set to an auto exposure mode, your EOS may use Evaluative metering mode to analyse the intensity of shadows and the highlights in different parts of the frame. It will then adjust its aperture, shutter speed and ISO settings to capture an exposure based on an average of the scene’s spread of tones.
This compromising approach can still lead to photographs that suffer from
a lack of detail in the shadows, highlights, or both. You may want to use the Partial or Spot metering mode to record the highlight intensity in a specific part of the frame. This will enable you to bias the camera settings towards capturing more highlight detail, though the shadows will look relatively dark as a result.
By shooting in the Raw image format you can give yourself the edge, as there will be more tonal information hidden in the unprocessed Raw file than you’ll be able to see with the naked eye. You can then tease out missing shadow detail in Digital Photo Professional 4’s virtual darkroom.
We’ll show you how to use a histogram to analyse the spread of tones in your photo. You’ll learn how to use a histogram to selectively lighten underexposed shadows and midtones without blowing out highlight detail. We’ll also demonstrate how DPP 4’s clipping warning tools help you see precisely which pixels are underexposed, so you can target your selective tonal adjustments more effectively…
01 Turn on clipping warning

In DPP4, click the Edit Image button. Set the Comparison Layout to Arrange Horizontally. Click the Show Highlight/Shadow Warning icon. Underexposed shadows will appear in blue. Blown-out highlights will appear as patches of red.
02 Lighten the shadows

Drag Brightness Adjustment to 0.17. Drag the histogram’s midpoint slider
to -1.20 and the Advanced section’s Shadow slider to 5 to lighten shadows. The blue patches will diminish, revealing shadow detail. Push Highlight to -5.
03 Adjust the threshold

Click the fly-out arrow next to the Show Highlights/Shadow Warning. To reduce the range of the clipping warning, drop the value to 22. Click Close and you’ll have a lower shadow clipping threshold, so fewer midtones will appear in blue.
Canon Digital Professional workspace
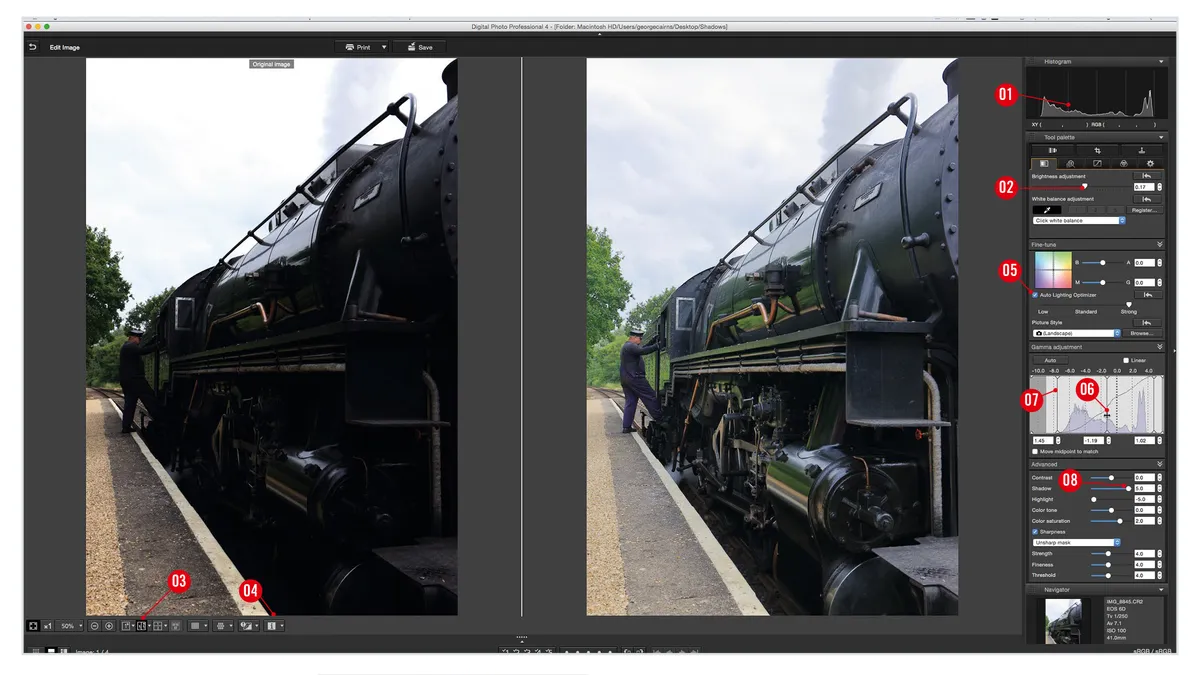
1. Histogram
This undulating graph represents the shadows, midtones and highlights in your photo. The width indicates the spread of shadows on the left, midtones in the middle and highlights towards the right, while the height of the graph represents the strength of particular tones.
2. Boost the Brightness
Drag the Brightness slider right to begin to lighten underexposed shadows, though be careful not to clip correctly exposed highlights.
3. Before/after comparison
This icon displays a before and after version of your image, to help you discern the effect of your post-production adjustments. Click on the adjacent fly-out icon to change the layout and stack your photo comparisons horizontally, vertically or even split them down the middle.
4. Show Shadow/highlights warning
Click here to turn on a clipping warning. Underexposed shadows will appear as patches of blue. Blown-out (clipped) highlights will appear in red. Don’t try and remove all clipped areas or you’ll have no contrast.
5. Auto Lighting Optimizer
This tool attempts to automatically correct an underexposed image to lighten the shadows and create more contrast. You can then fine-tune the results using the Low, Standard or Strong settings. This tool produces quite subtle results, but it’s a good place to start when trying to reveal more detail in a scene’s underexposed shadows.
6. Midtone slider
By dragging this vertical slider to the left you can remap a photo’s underexposed midtones to a lighter tonal level and reveal more detail in underexposed regions.
7. Shadow levels
This slider controls the strength of the shot’s shadow levels. For darker shadows, drag it right until it touches the histogram graph. If the shadows are too underexposed you can lighten them by dragging this slider left.
8. Selective shadow adjustment
This advanced slider selectively lightens underexposed shadows by making behind-the-scenes adjustments to the shot’s tone curve; here, the histogram above the curve has been pushed up where it overlaps the shadows and midtones to lighten tones in those areas.
Get the latest Canon DPP software
Canon's DPP 4.12.60 is the latest version (released 9 July 2020) and available for most current Canon EOS DSLR owners – eg EOS 2000D, 800D, 90D, 7D Mk II, 6D Mk II, 5D Mk IV and 1D X Mk III. As well as Canon EOS R-system mirrorless cameras eg EOS R, RP, R5 and R6.
You can download this version of Canon's Digital Photo Professional software from Camon's site here Get Canon's DPP software but you’ll need your EOS camera's serial number. Check the website to see if your Canon EOS camera is compatible with the latest DPP.

Read more:
Best photo editing software: image editors for novices through to pros
Best photo-editing laptops: top laptops for photographers
Best online photography courses – from beginner guides to masterclasses

