How to use Canon Digital Photo Professional – Canon DPP part 10
Learn to sharpen images and smooth noise using free editing software – Canon Digital Photo Professional 4
Watch video: How to sharpen delicate details while smoothing unwanted picture noise of your RAW images using Canon Digital Photo Professional 4
Canon Digital Photo Professional 4 is free RAW editing software that's available to every Canon EOS camera user – and is designed to help you import, organize, edit and share your photographs. This series of Canon Digital Photo Professional tutorials will help you get the best from this photo editor.
Part 1: Canon Digital Photo Professional tutorials
Part 2: Boost your tonal range
Part 3: Controlling tonal range
Part 4: Rescuing highlights
Part 5: Correcting color casts
Part 6: Selective color adjustments
Part 7: Creative color effects
Part 8: Black & white with DPP
Part 9: Fixing image distortion
Your Canon EOS camera’s autofocus function will do its best to capture a sharp-looking shot, but despite its best efforts it may produce an image that is not quite sharp. An image that looks nice and crisp on your Canon’s display may turn out to be a little soft, especially when viewed at 100% on your PC’s larger monitor or printed out.
This result could be down to an in-camera setting. For example, a wide aperture will create an image with a shallow depth of field, causing background or foreground details to look soft. Your camera may also gently blur the shot using a low-pass (or anti-aliasing filter). It does this to avoid making moiré patterns – artefacts that appear in areas with a complex texture.
Fortunately Canon’s free Digital Photo Professional 4 software is designed to let you indulge in some post-production sharpening, courtesy of its Adjust Image Detail panel. Thanks to its sliders, you can counteract some of the gentle blurring caused by the low-pass filter and reveal more delicate details, such as a pet’s fine fur.
Most photos will benefit from a little sharpening, especially if you want to produce a print with more punch. (But blur caused by subject movement or shooting handheld with a slow shutter speed can’t be so easily fixed.)
However, sharpening a shot can exaggerate unsightly artefacts such as ISO-induced luminance noise, so we’ll show you how to best strike the fine balance between sharpening important details while smoothing out nasty noise.
The best camera deals, reviews, product advice, and unmissable photography news, direct to your inbox!
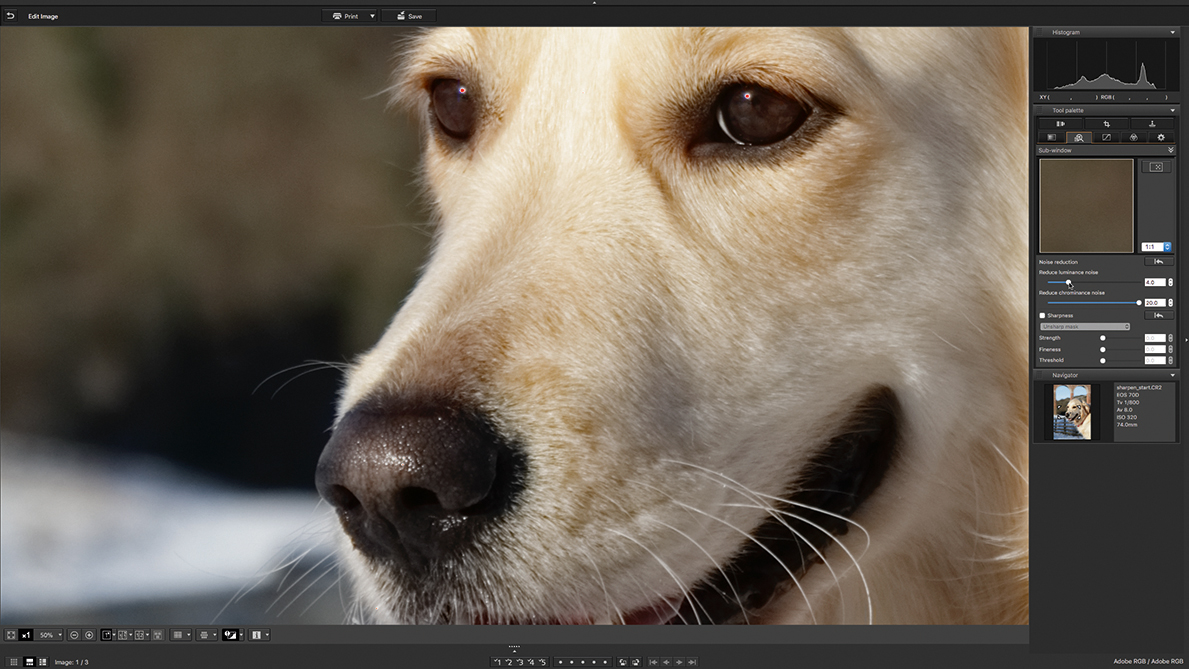
01 MAKE LESS NOISE
Open your Raw .CR2 image. Magnify to 100%. Click on the Adjust Image Detail pane. Drag Reduce Chrominance Noise to 20 to remove the colour blotches. Drag Reduce Luminance Noise to 4 to smooth noise without softening detail.
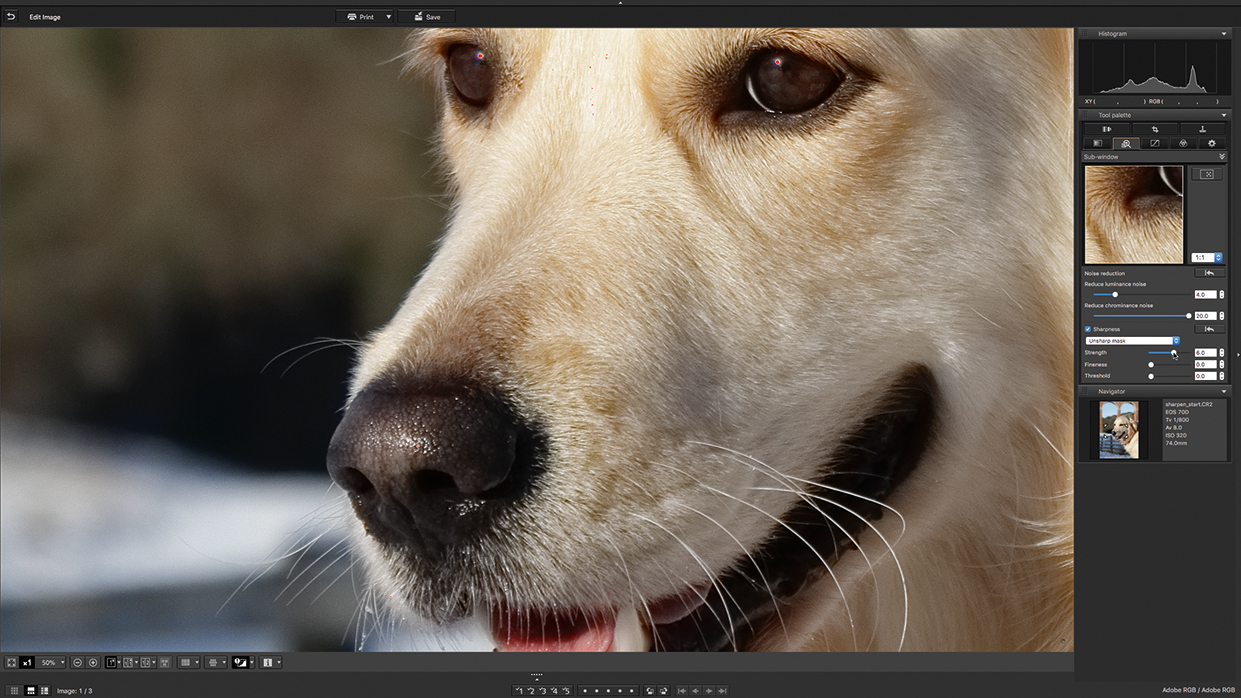
02 SHARPEN DETAILS
Tick the Sharpness box and choose Unsharp Mask. Drag Strength to 6; the increase in contrast around edges makes the fur stand out more, but it also exaggerates some of the luminance noise in the background bokeh.
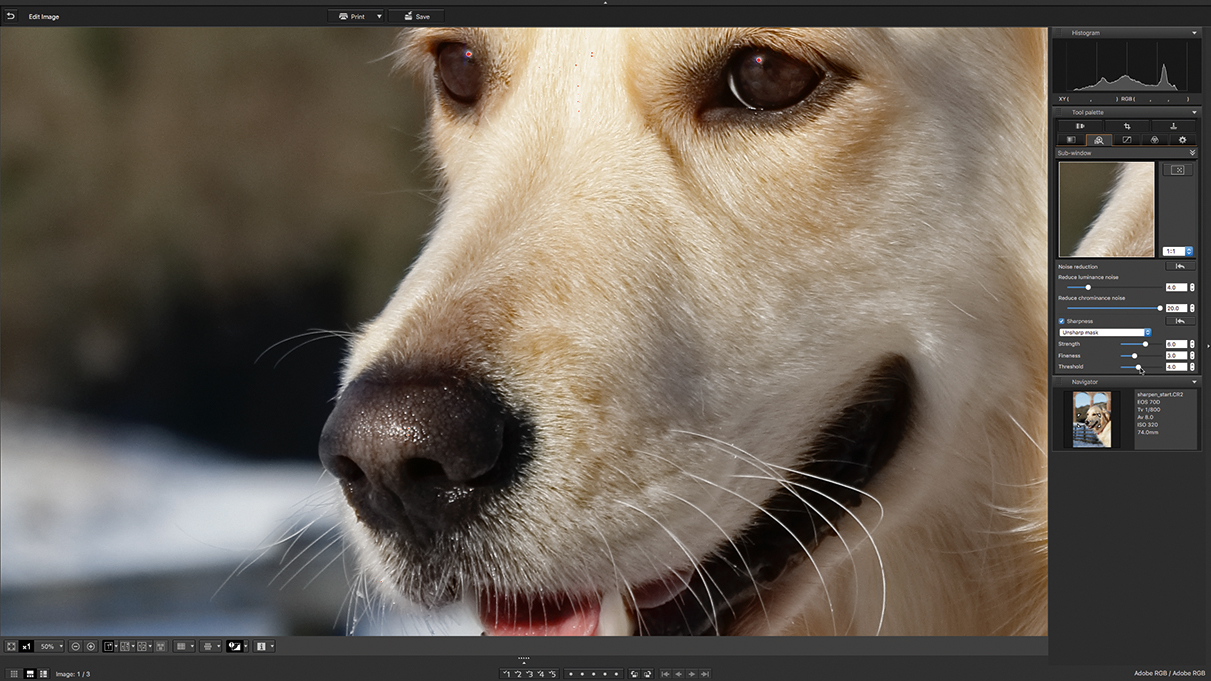
03 FINE-TUNE RESULTS
Drag Fineness to 3 to increase contrast change’s spread, giving delicate details more impact, but don’t go too high or you’ll add haloes. A Threshold of 4 helps strike a balance between sharpening the fur while minimizing bokeh noise.
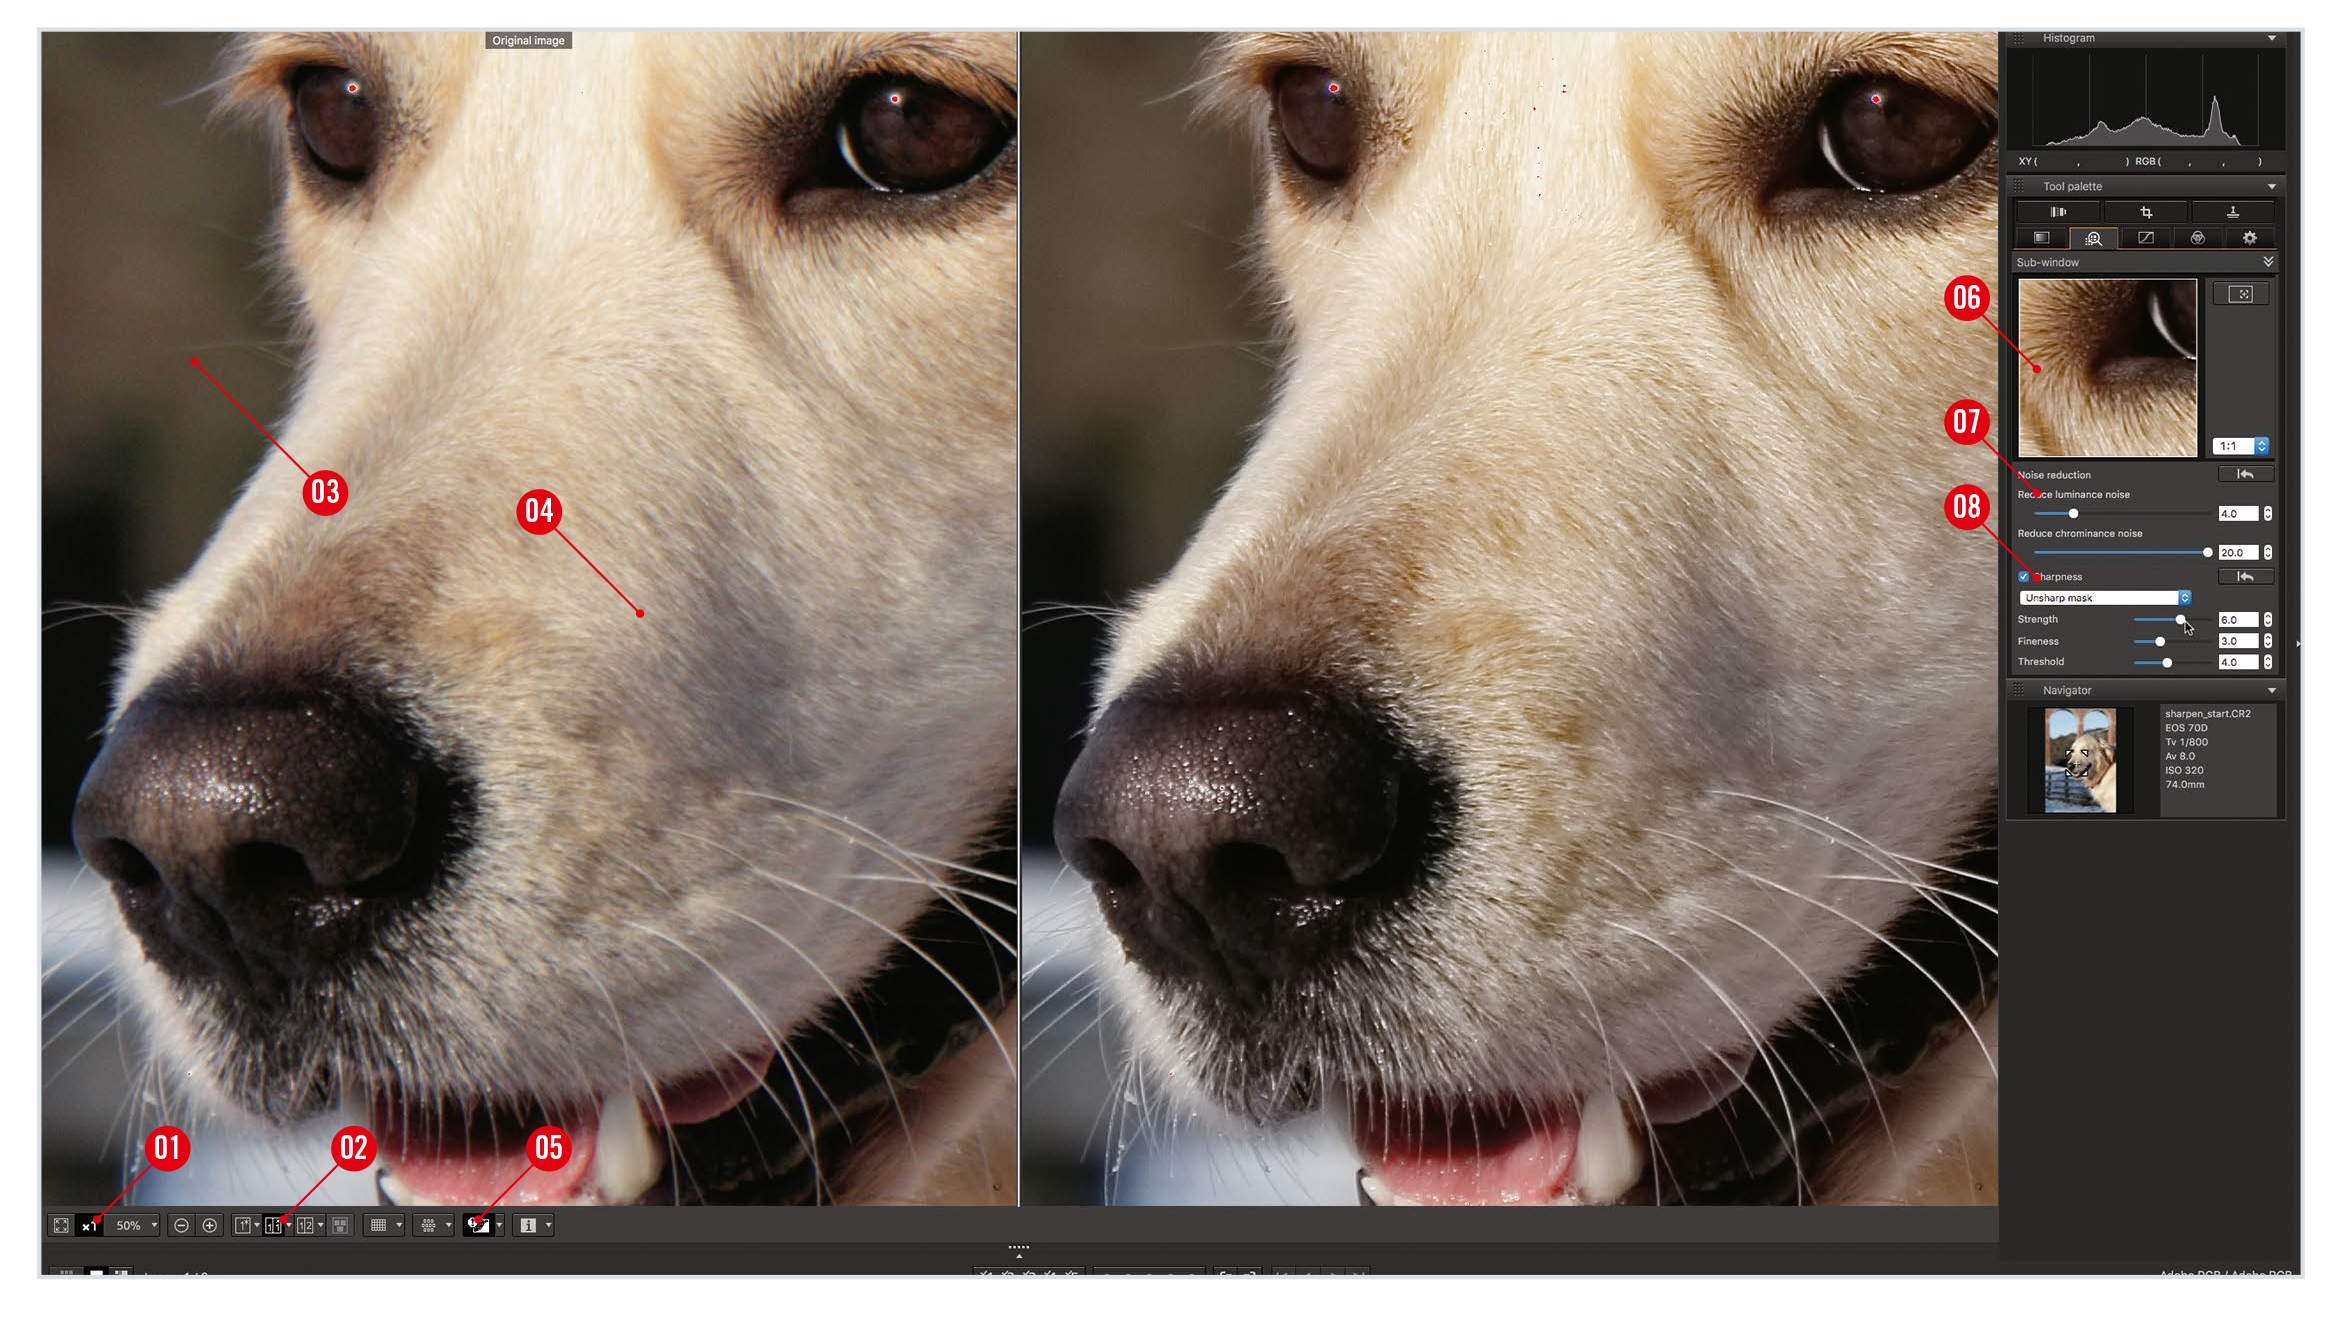
Canon Digital Professional workspace
1. GIVE IT 100%
To see how sharp your shot really is (and spot noise more effectively), you need to see the image’s actual pixels. Click here for an instant 100% view.
2. COMPARE VERSIONS
Click here to change the way the before and after images are displayed. Due to our photo’s portrait orientation we’ve chosen the Arrange Horizontally option so that we can see how noisy and soft the start image is compared with the processed version.
3. NOISE
Noise is especially noticeable in smooth, featureless areas, such as this background bokeh, as we can see in this part of the photo. You’ll notice more noise in images captured using higher ISO speeds.
4. SOFT DETAILS
Delicate details, such as strands of fur, are slightly soft and lack impact. In the sharpened version these textures stand out more.
5. SHADOW/HIGHLIGHT WARNING
Post-production sharpening works by increasing contrast around edges in the image. This makes edge details stand out more, but can cause highlights to become overexposed. By turning on the Show Shadow/Highlight warning you can reveal clipped highlights as patches of red.
6. SUB-WINDOW
If you want to view the whole photo in the main window, then you can use a sub-window to display a magnified preview of part of the shot. Click the crosshair icon and move the cursor over the section of image that you want to preview. When you adjust a slider you’ll see changes appear in the sub-window. Make sure that you chose 1:1 magnification to view the preview at 100%.
7. NOISE REDUCTION
These sliders smooth out unwanted luminance and chrominance noise (as we demonstrate in our walkthrough and video lesson).
8. SHARPNESS
This drop-down menu enables you to choose either the Sharpness or Unsharp Mask tools. The single Sharpness slider simply increases the contrast around edge of details, but this basic tool can exaggerate picture noise and add artefacts such as haloes. Unsharp Mask’s additional sliders help you strike a better balance between sharpening important detail while keeping noise at bay.
JARGON BUSTER!
NOISE: Chrominance noise is especially ugly, manifesting itself as green and purple blotches. Luminance noise shows as greyscale specks.
HALOES: Halos are light or dark lines that cling to the edge of sharpened details. They are caused by the extreme contrast change that over-sharpening can produce.
Get the latest Canon DPP software
Canon's DPP 4.12.60 is the latest version (released 9 July 2020) and available for most current Canon EOS DSLR owners – eg EOS 2000D, 800D, 90D, 7D Mk II, 6D Mk II, 5D Mk IV and 1D X Mk III. As well as Canon EOS R-system mirrorless cameras eg EOS R, RP, R5 and R6.
You can download this version of Canon's Digital Photo Professional software from Camon's site here Get Canon's DPP software but you’ll need your EOS camera's serial number. Check the website to see if your Canon EOS camera is compatible with the latest DPP.
PhotoPlus: The Canon Magazine is the world's only monthly newsstand title that's 100% devoted to Canon, so you can be sure the magazine is completely relevant to your system.
Read more:
Best photo editing software: image editors for novices through to pros
Best photo-editing laptops: top laptops for photographers
Best online photography courses – from beginner guides to masterclasses
The former editor of PhotoPlus: The Canon Magazine, Peter has 18 years of experience as both a journalist and professional photographer. He is a hands-on photographer with a passion and expertise for sharing his practical shooting skills. Equally adept at turning his hand to portraits, landscapes, sports and wildlife, he has a fantastic knowledge of camera technique and principles.
He is the author of several published photography books including Portrait Photographer's Style Guide, and The Complete Guide to Organising and Styling Professional Photo Shoots with fellow portrait pro Brett Harkness.
Peter remains a devout Canon user and can often be found reeling off shots with his Canon EOS DSLR and EOS R mirrorless gear. He runs Peter Travers Photography, and contributes to Digital Camera magazine.
