Lightroom series part 28: How to process a moonlit landscape in Lightroom
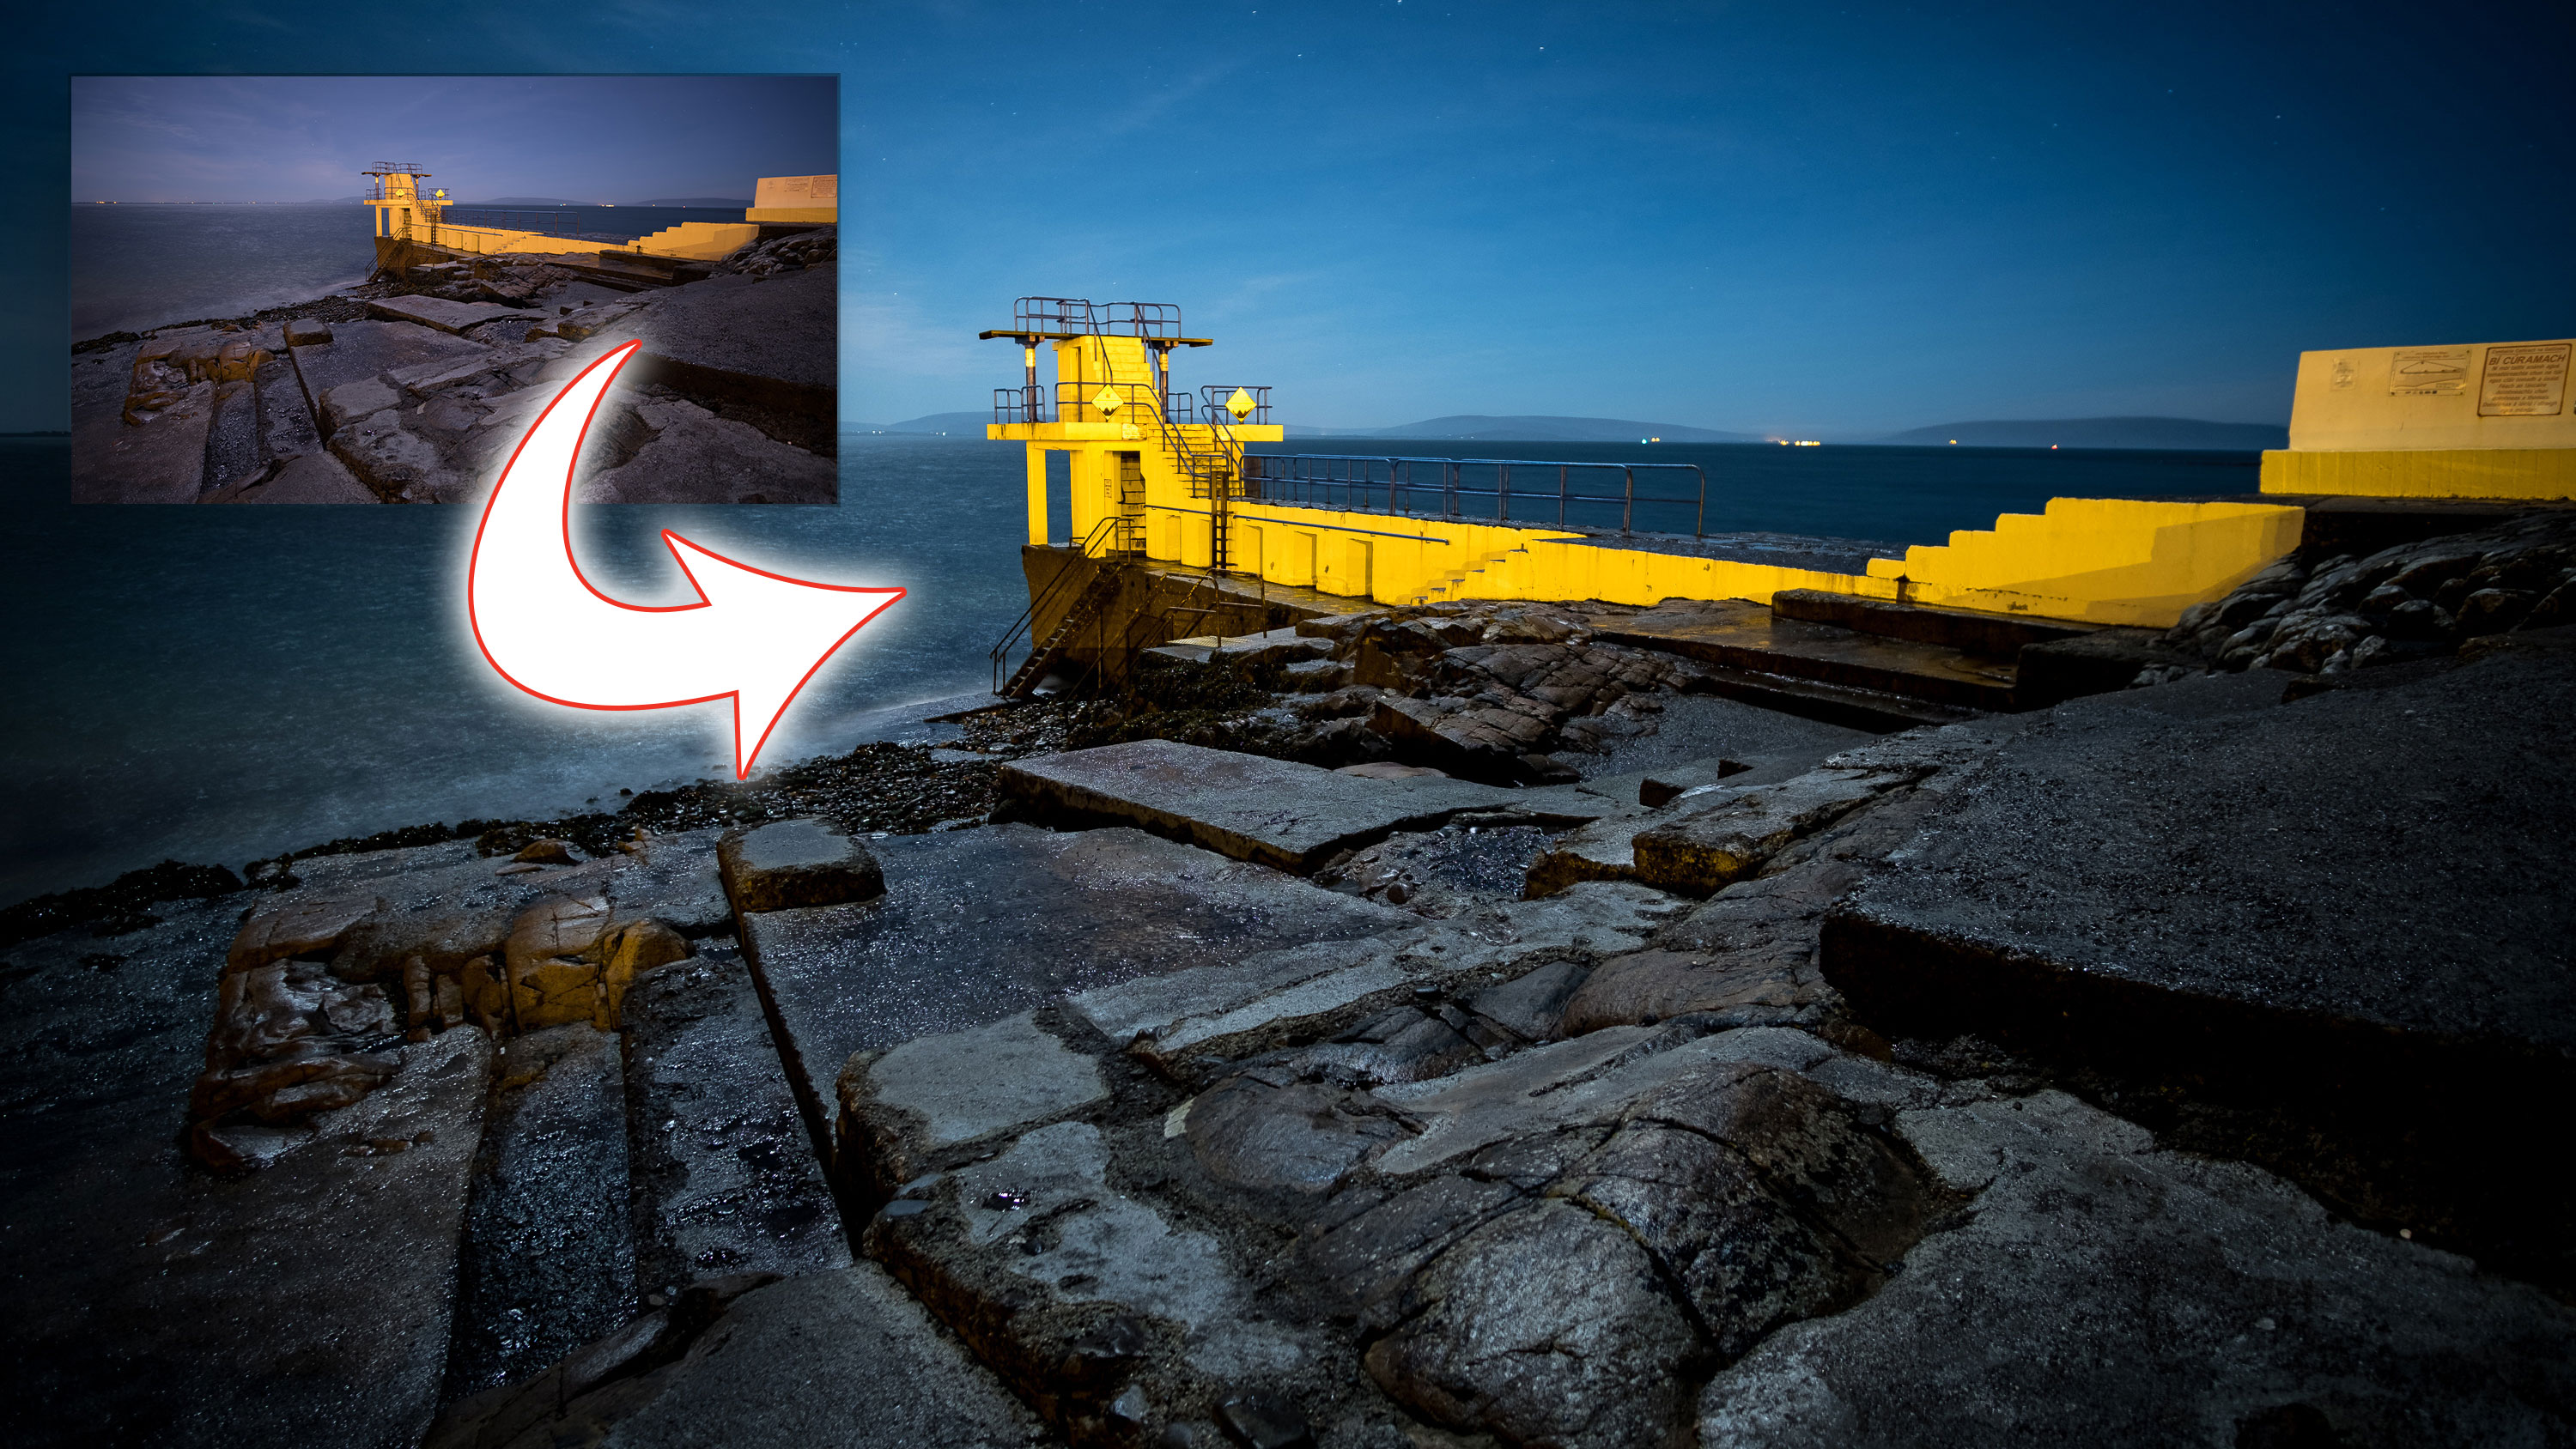
Discover the techniques that help you make a night-time sky sparkle after a nocturnal shooting session
The best camera deals, reviews, product advice, and unmissable photography news, direct to your inbox!
You are now subscribed
Your newsletter sign-up was successful
We've all shot our share of landscapes during golden hour, or even during the day, but how many of us have shot landscapes at night?
Welcome to the 28th instalment of our Lightroom series, first published in Digital Camera magazine (see below for subscription offers).
If you are already a Lightroom user, you could discover some new tricks and processes you haven't tried yet. If you don't use Lightroom, then scroll down to the bottom where you'll discover how to get it and which Adobe Photography Plan is best.
Article continues belowThe challenge of shooting in the dark is a refreshing change to shooting during the day. All the rules go out the window. There’s no shooting at f/16. It’s hard to find focus in the dark – and on top of that, how do you even compose your shot?
There’s a trick, of course, and that’s to wait for the full moon. For a few days before or after the full moon, the land at night is lit beautifully. Often it can even look like daylight with a hint of stars. But you still have to process the files to get the most out of them...
• See more Lightroom tutorials
1. White balance
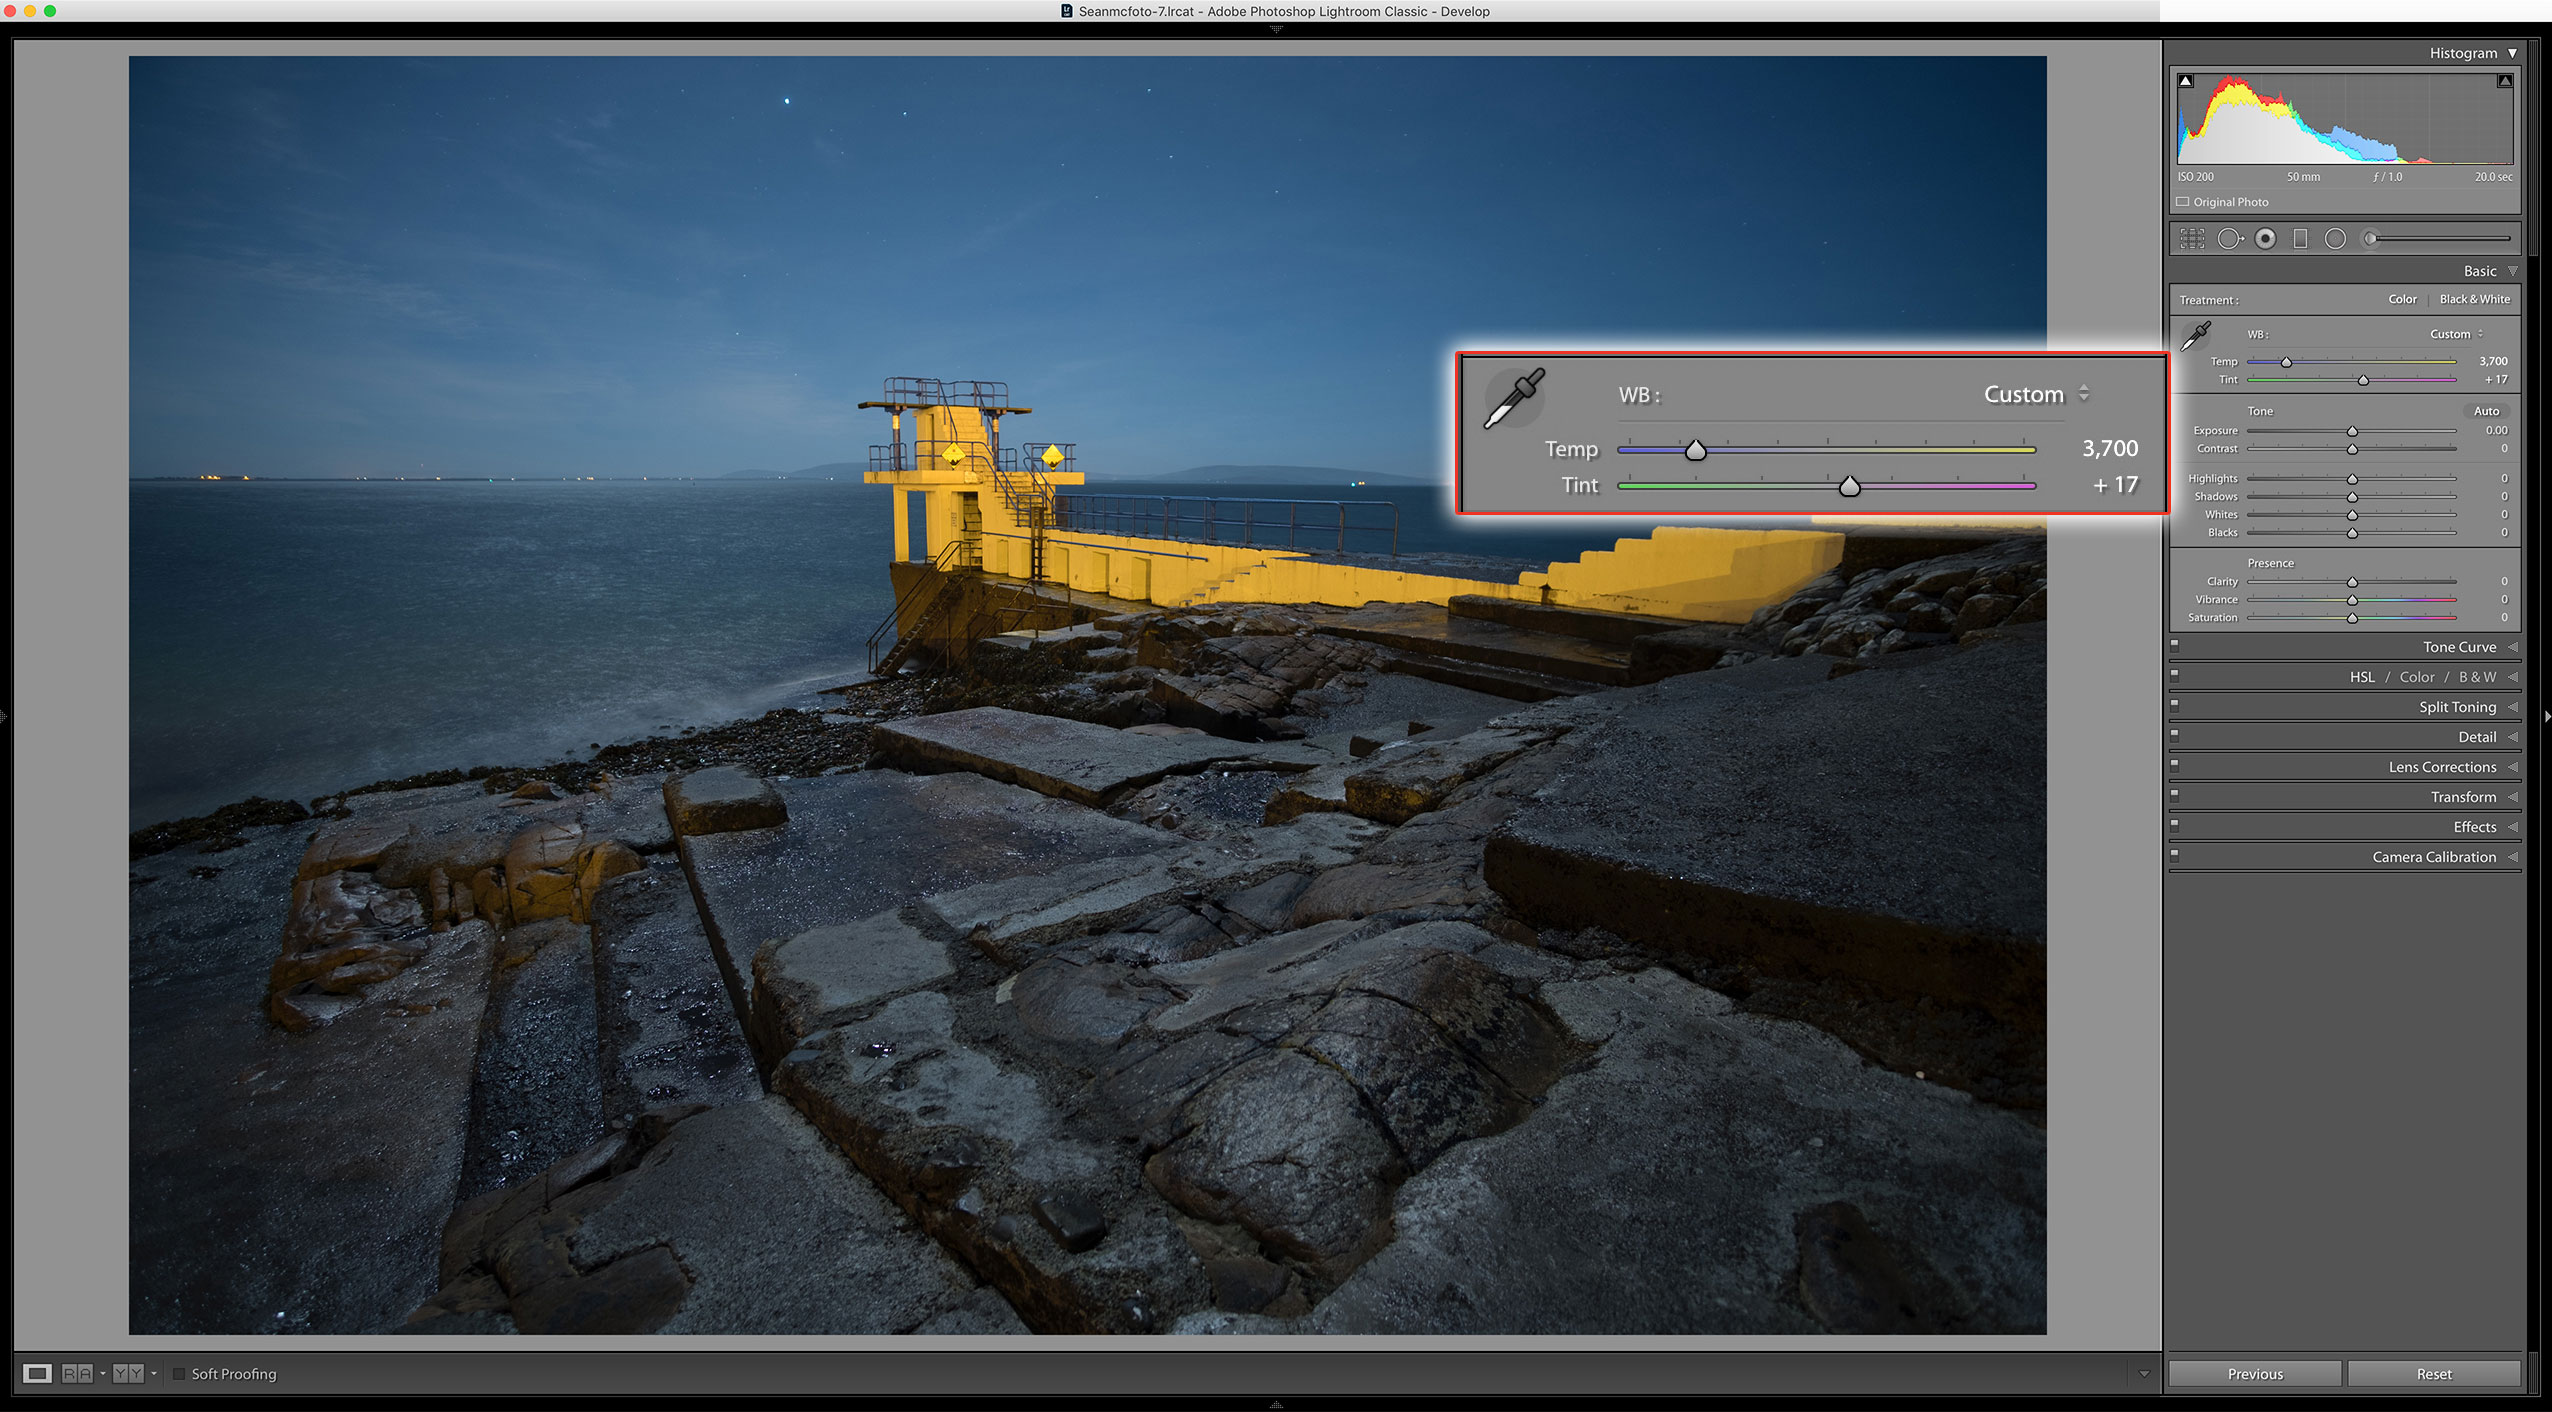
The first step is to set the white balance. Our start file has a lot of magenta in it, so it needs a healthy dose of correction from 51 to 17. To keep the night-time feel, the shot needs an injection of blue too; a Temperature setting of 3,700K works.
The best camera deals, reviews, product advice, and unmissable photography news, direct to your inbox!
2. Adjust the Blacks
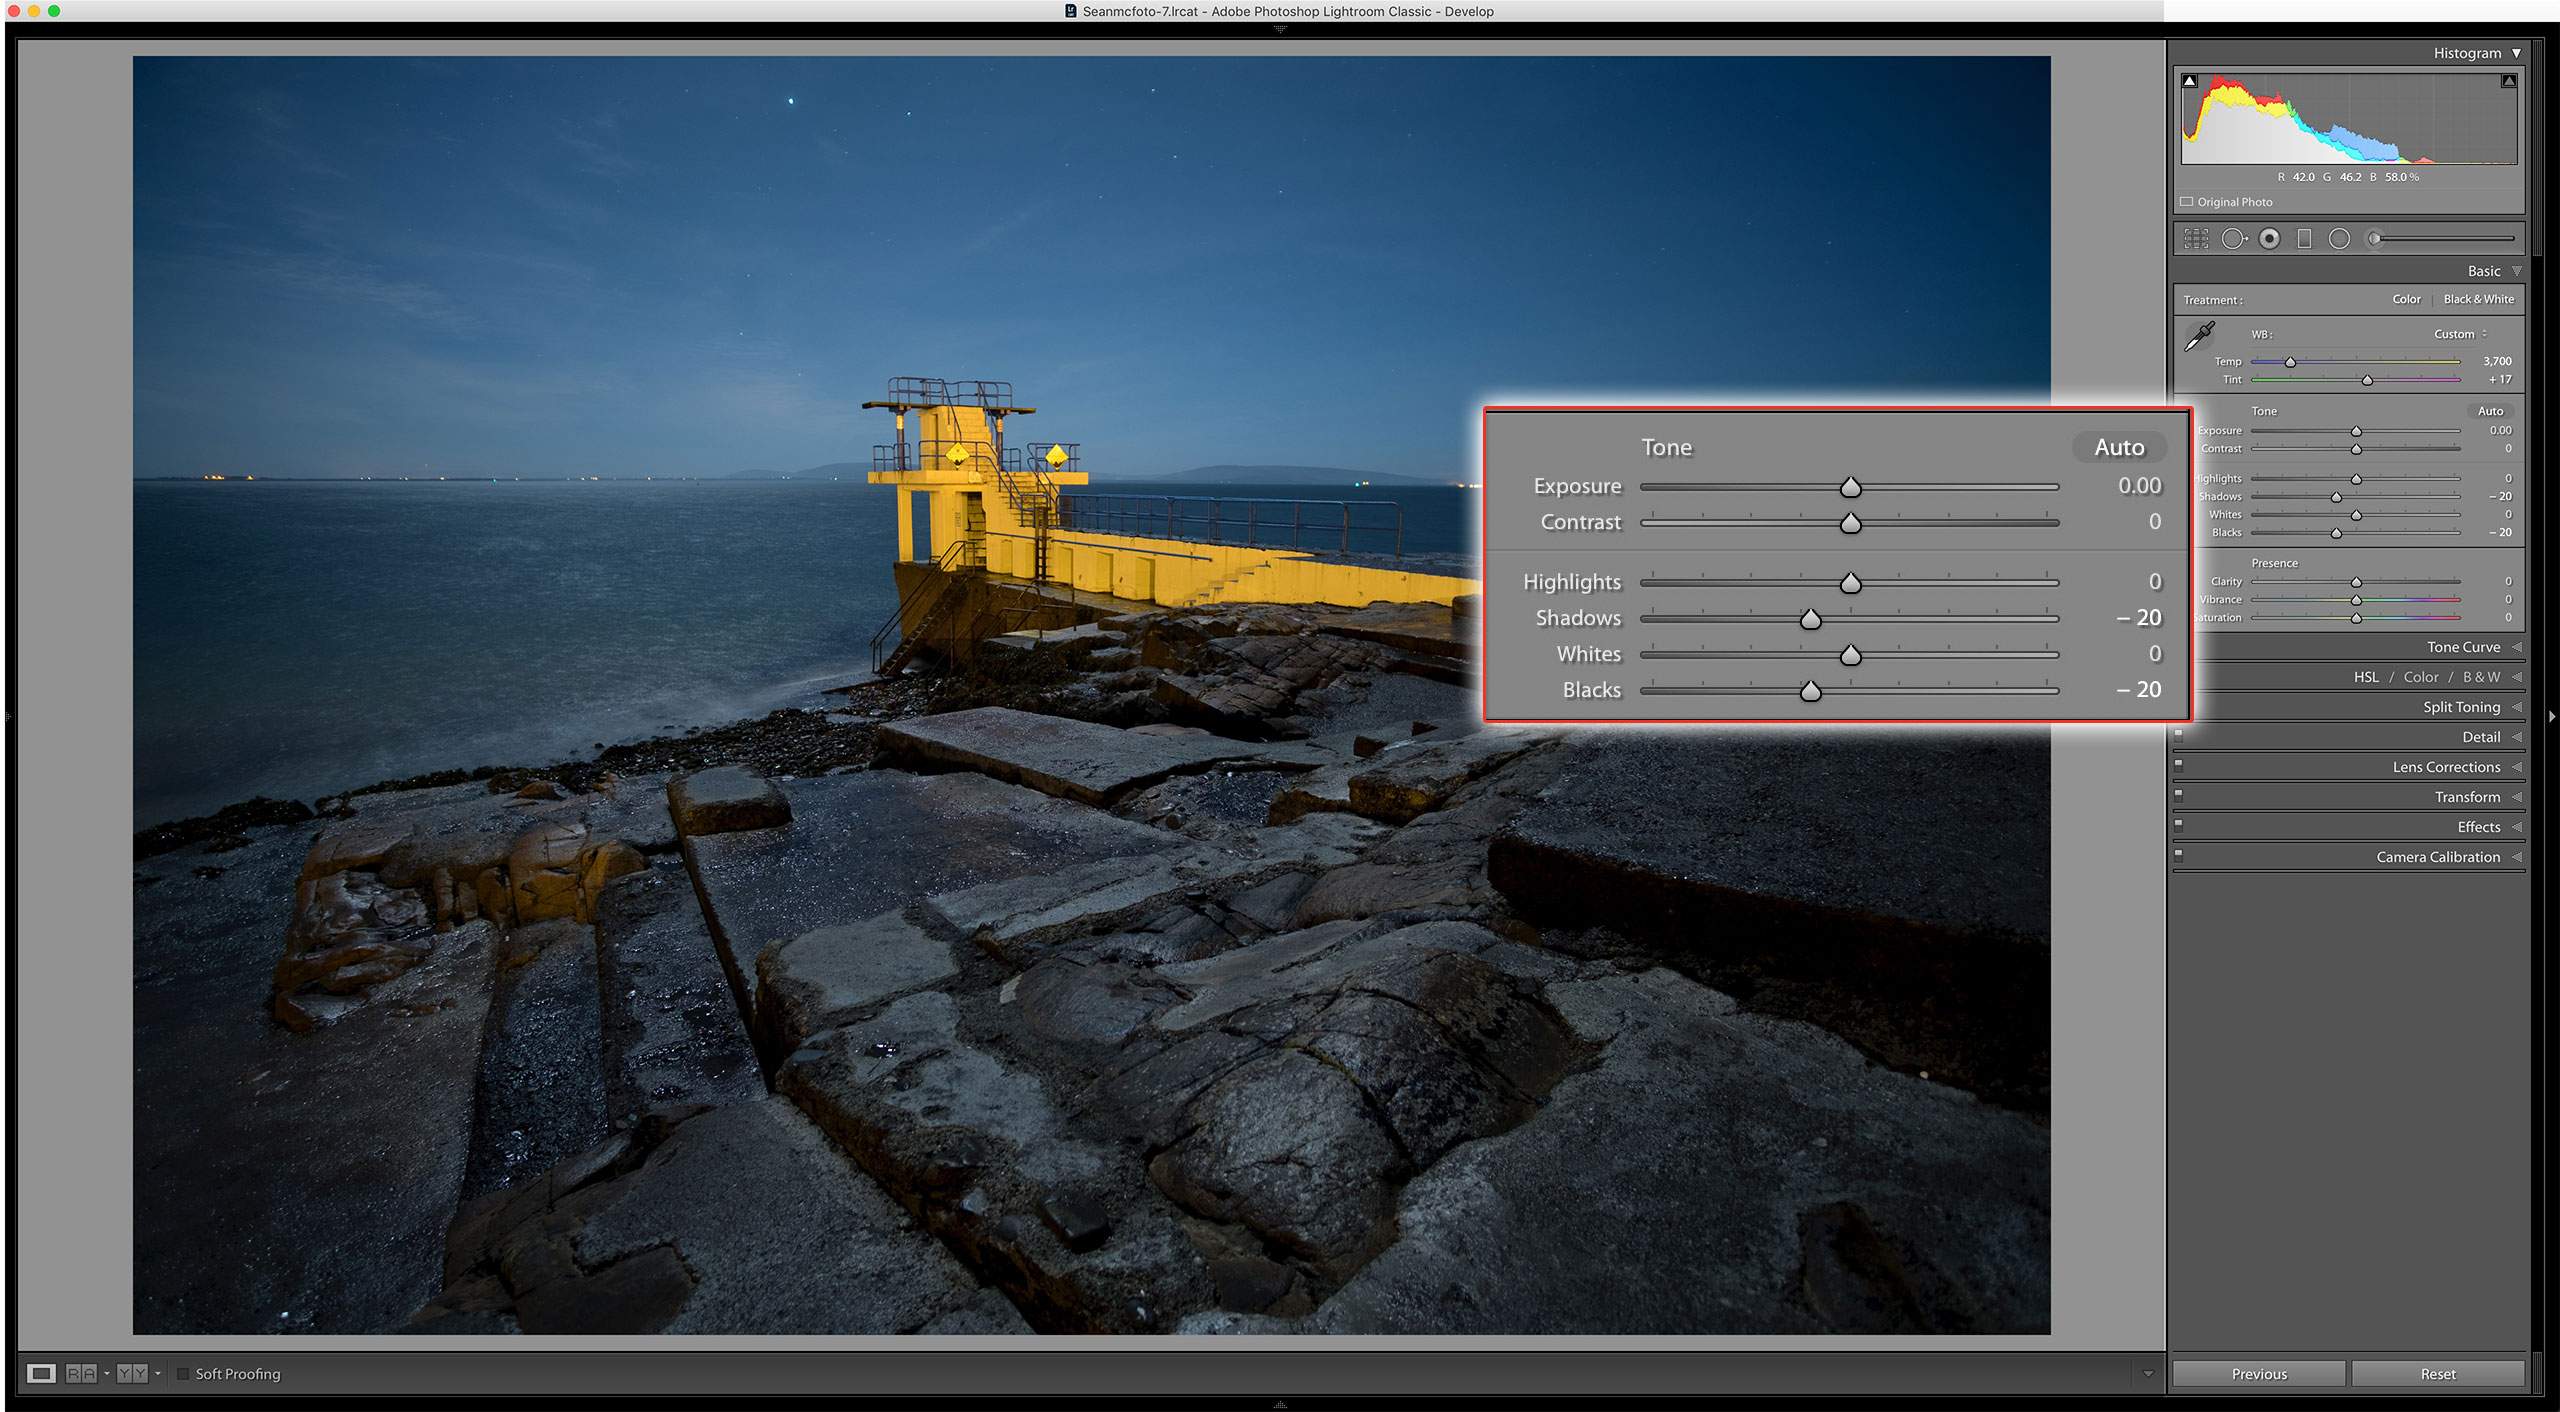
The image needs to remain a little dark, otherwise it just looks like it was shot during the day. Setting both Blacks and Shadows to -20 helps maintain an edge of darkness in the main parts of the photo.
3. Boost the stars
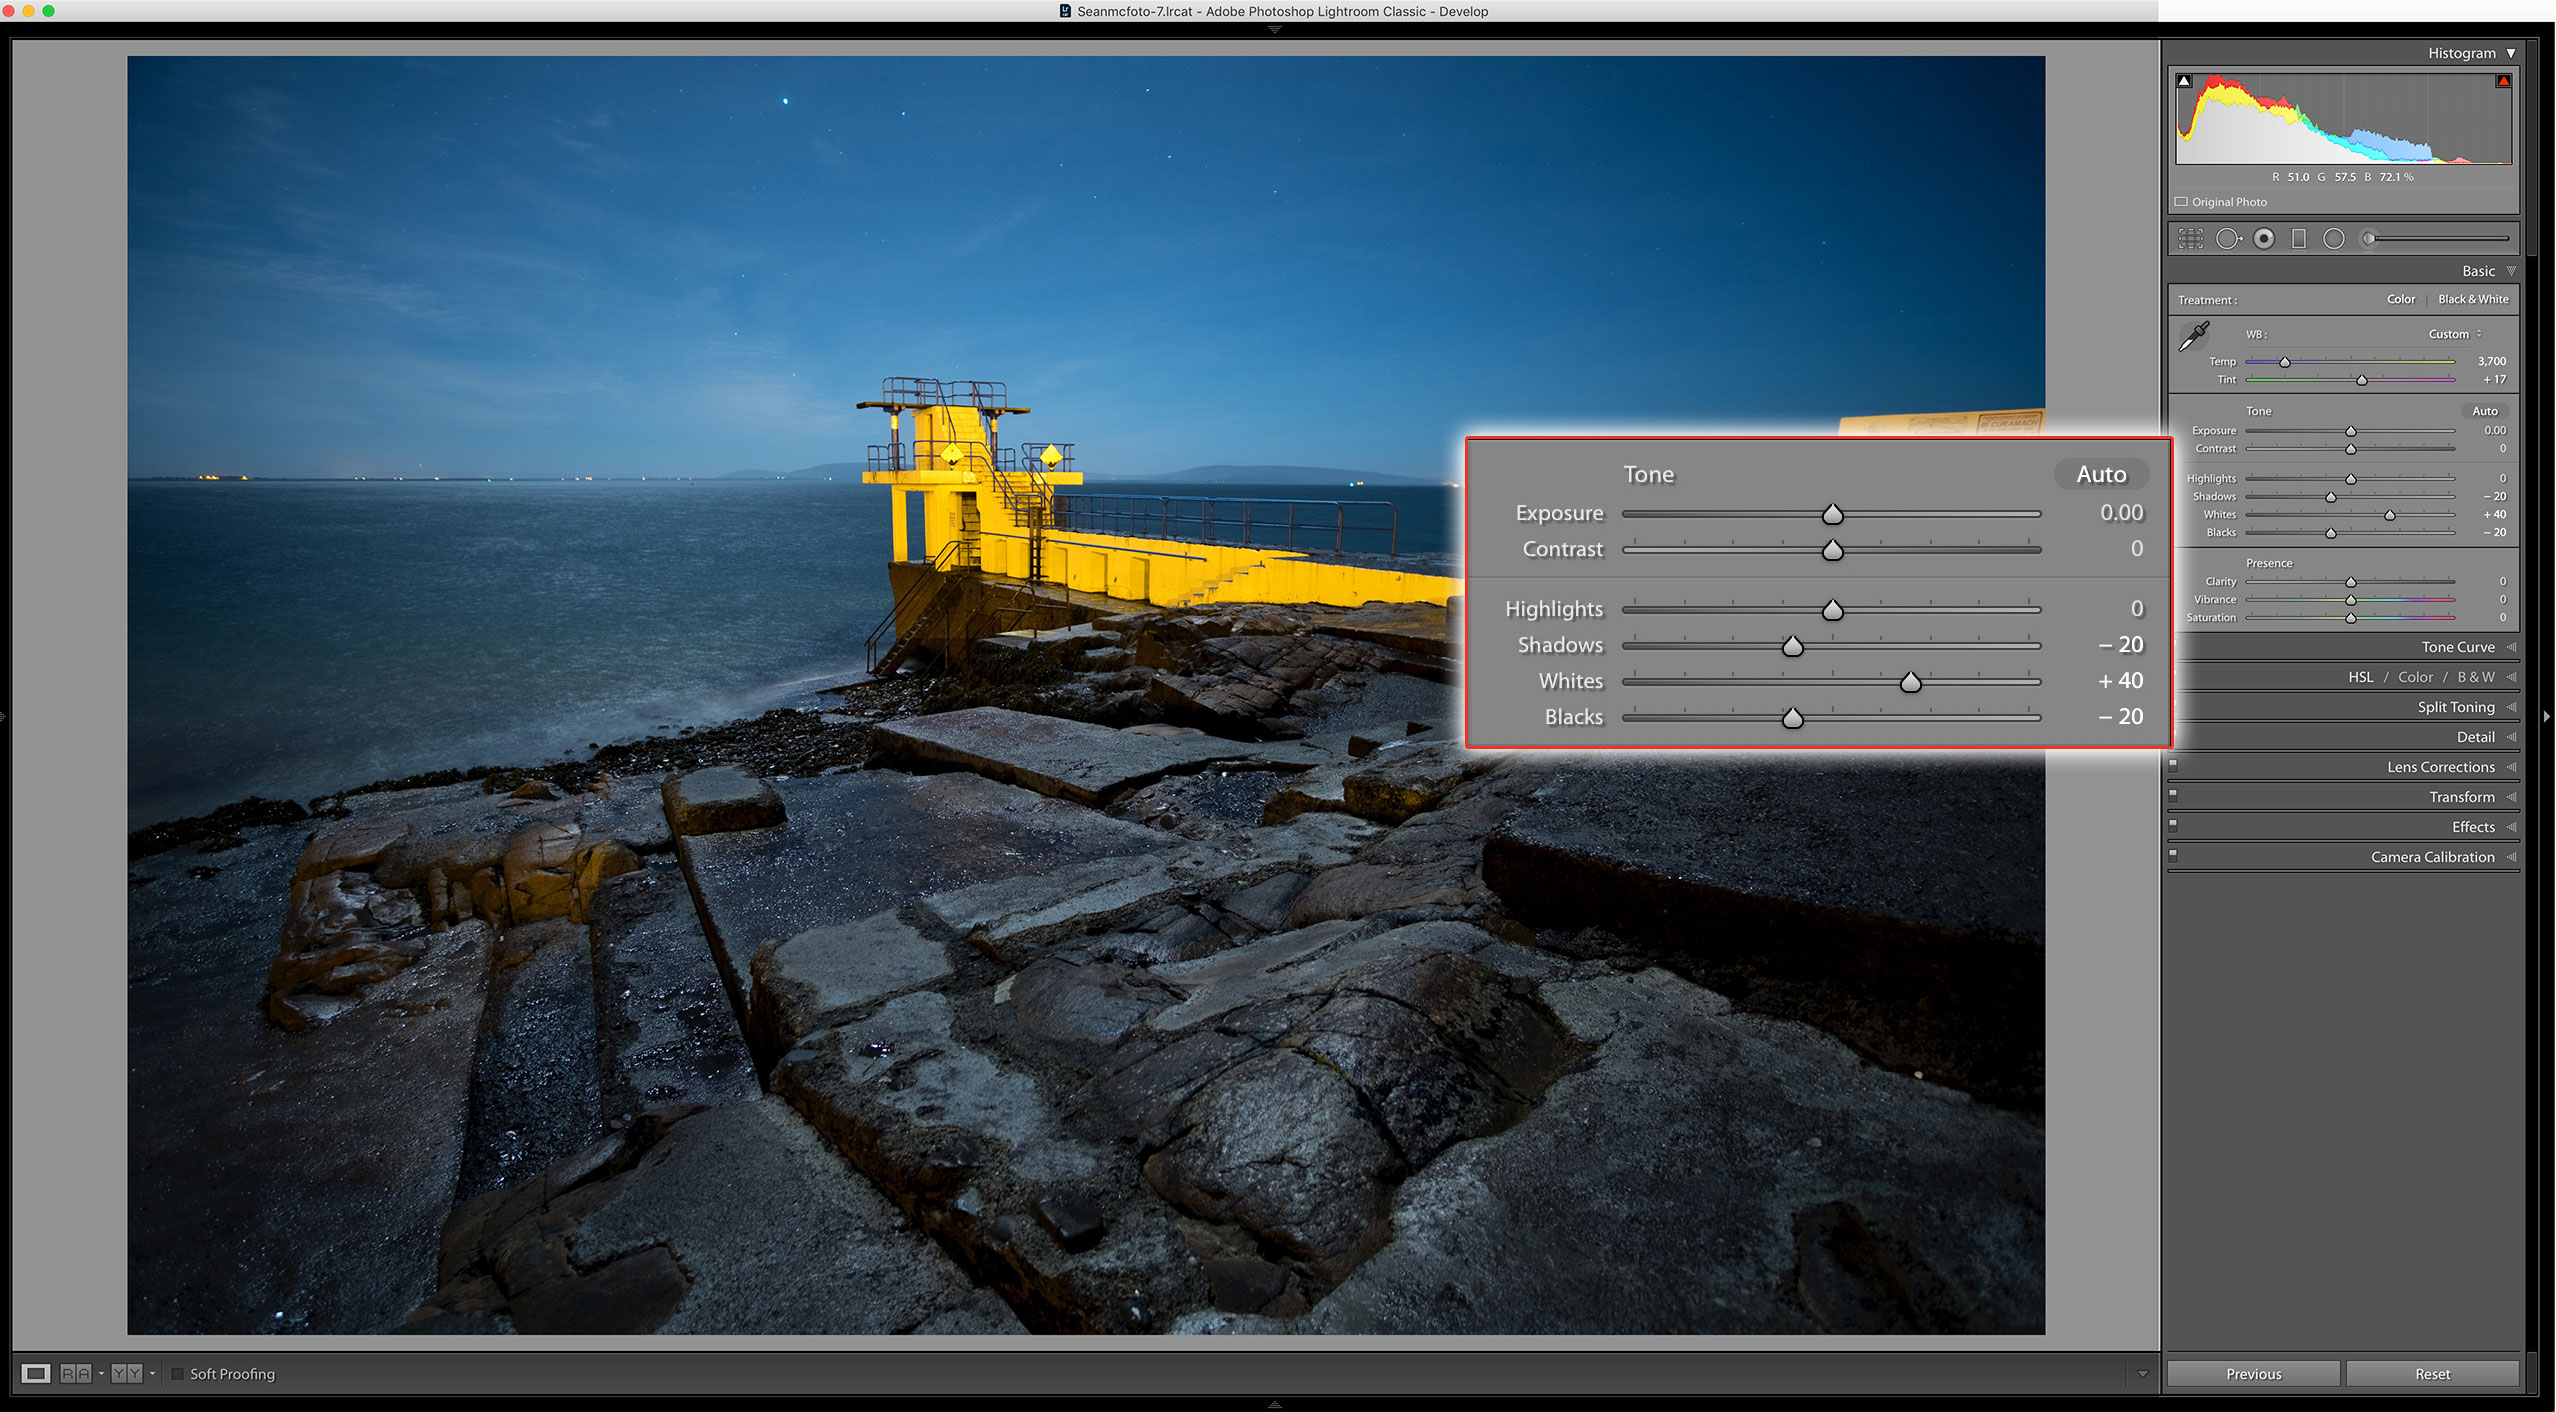
We’ve helped the dark, and now we’ll help the light: our stars. I boost the Whites to improve the lighter parts of the photo, leaving the darker parts alone. Around 40 looks great.
4. Assist the focus
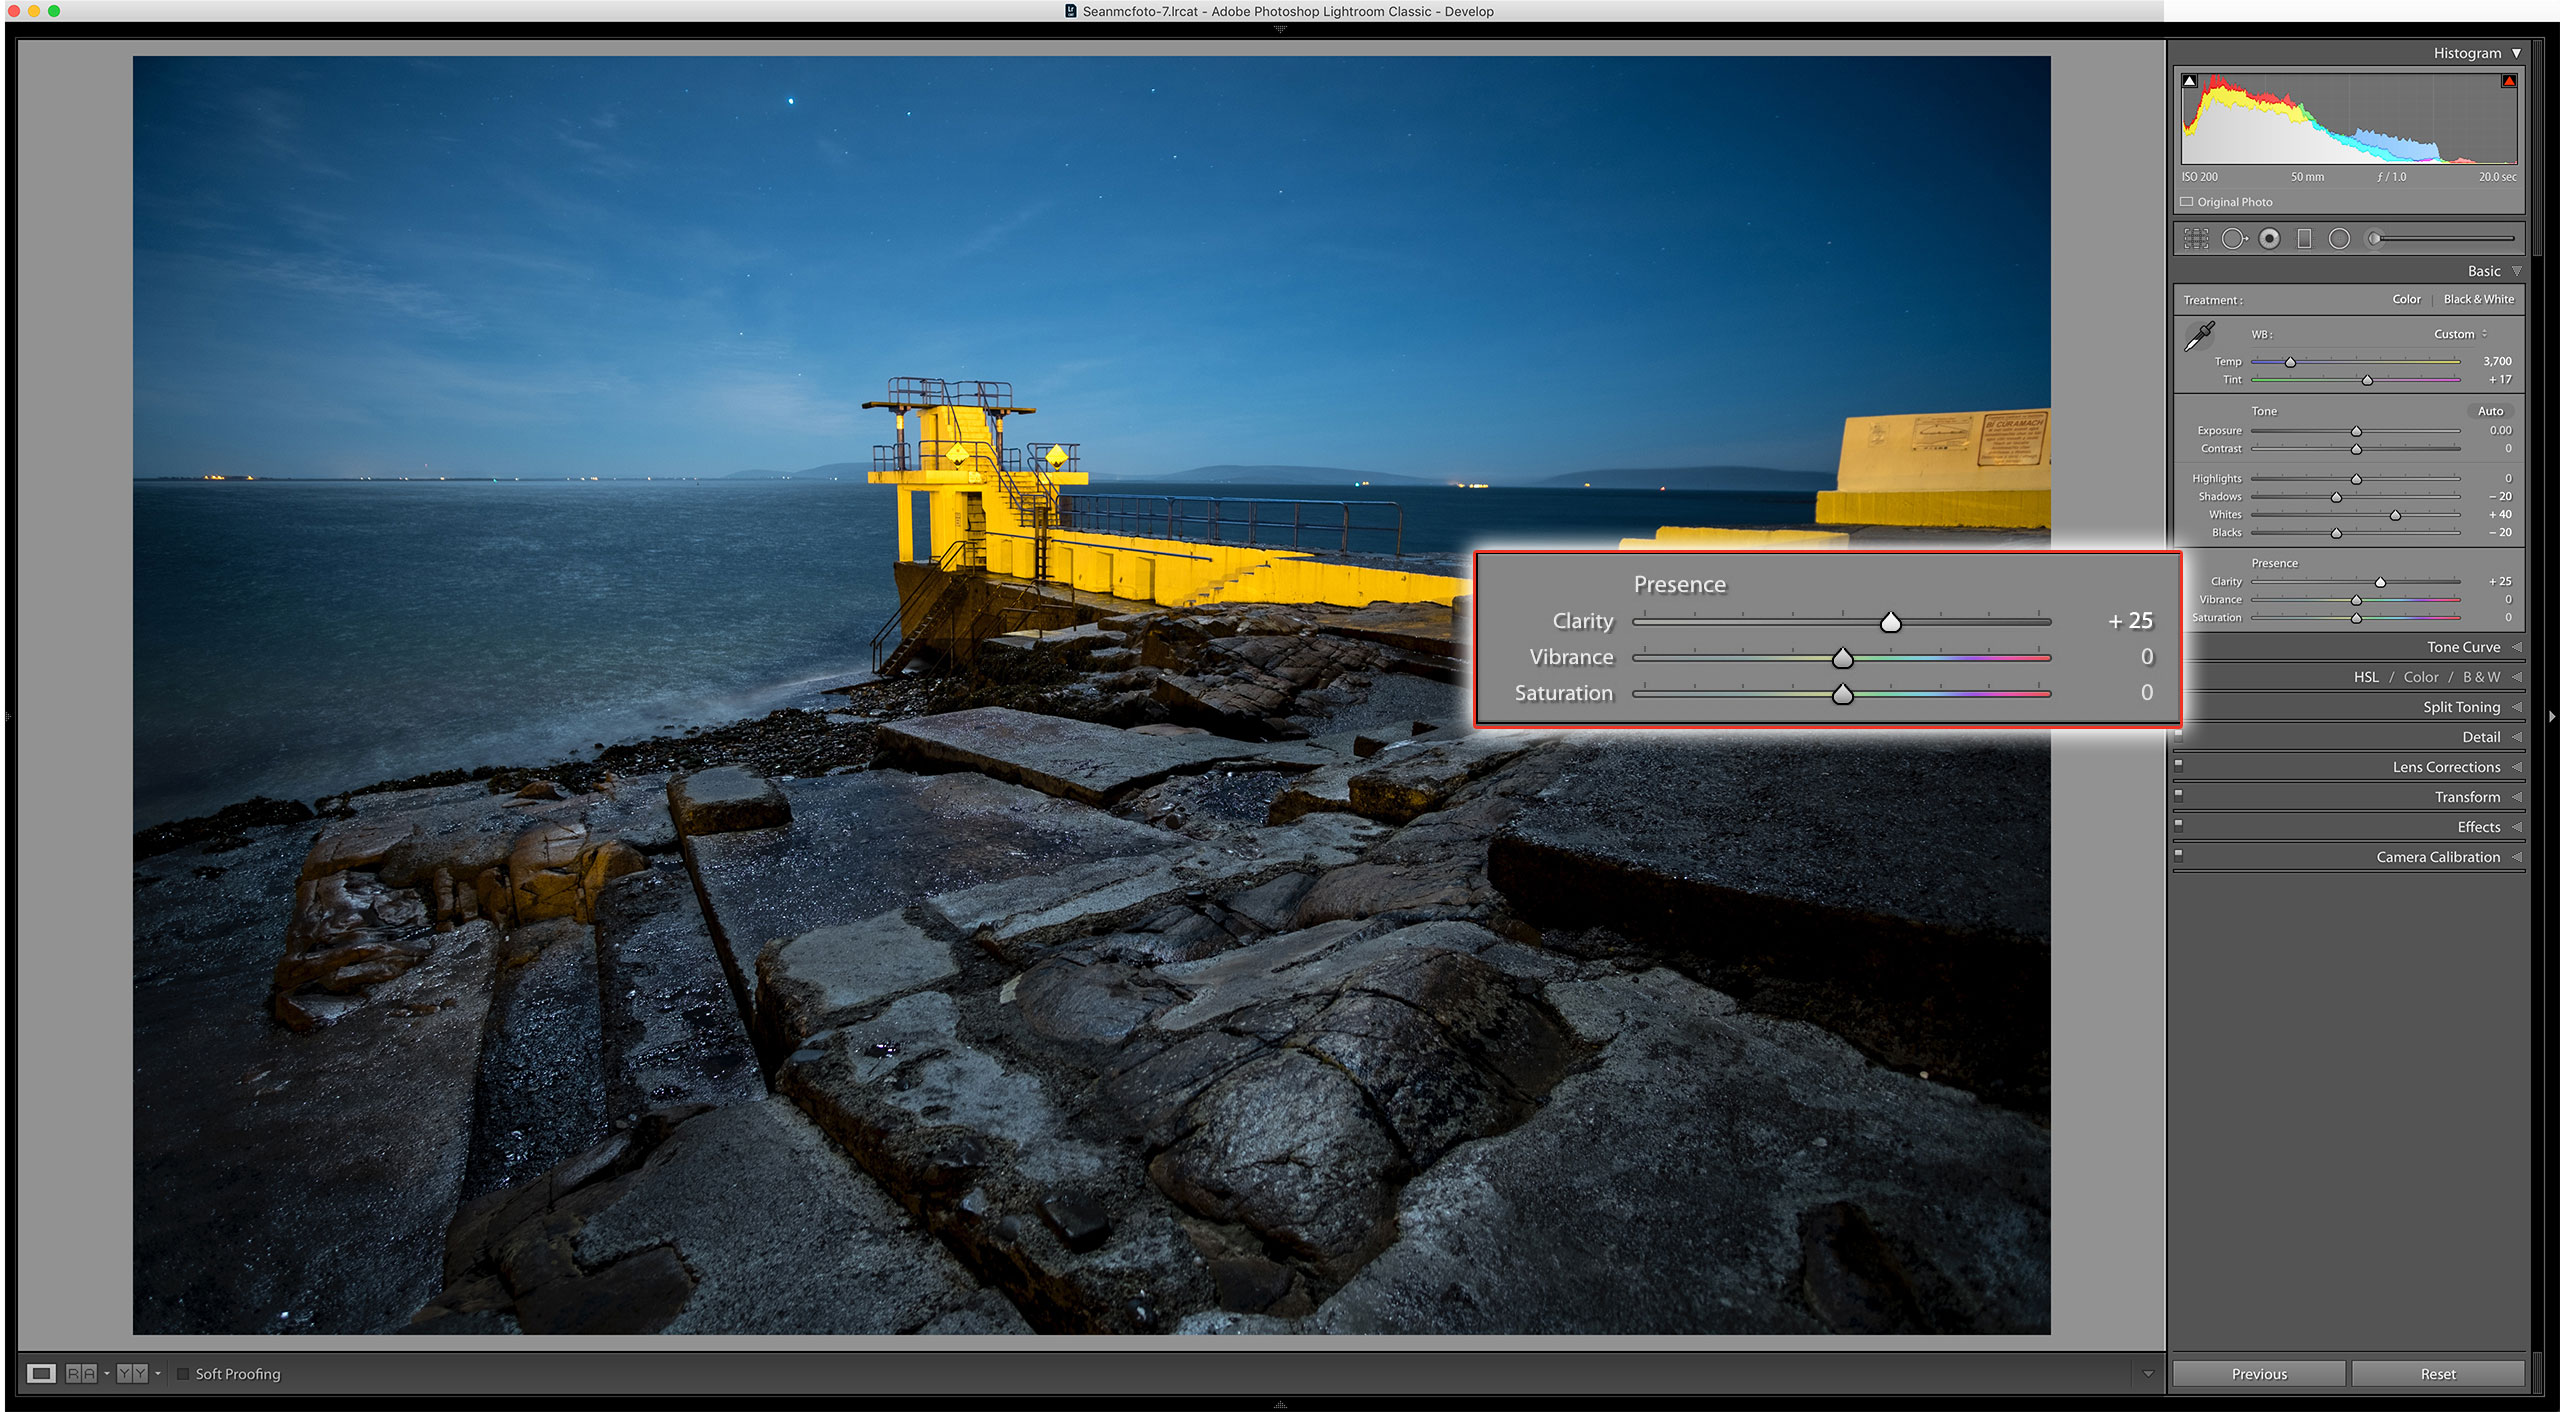
As night-time shots are often done with wide-aperture prime lenses, the depth of field is quite shallow, so let’s make what is in focus even better. First, boost Clarity to taste. 25 is great on this photo.
5. Sharpening
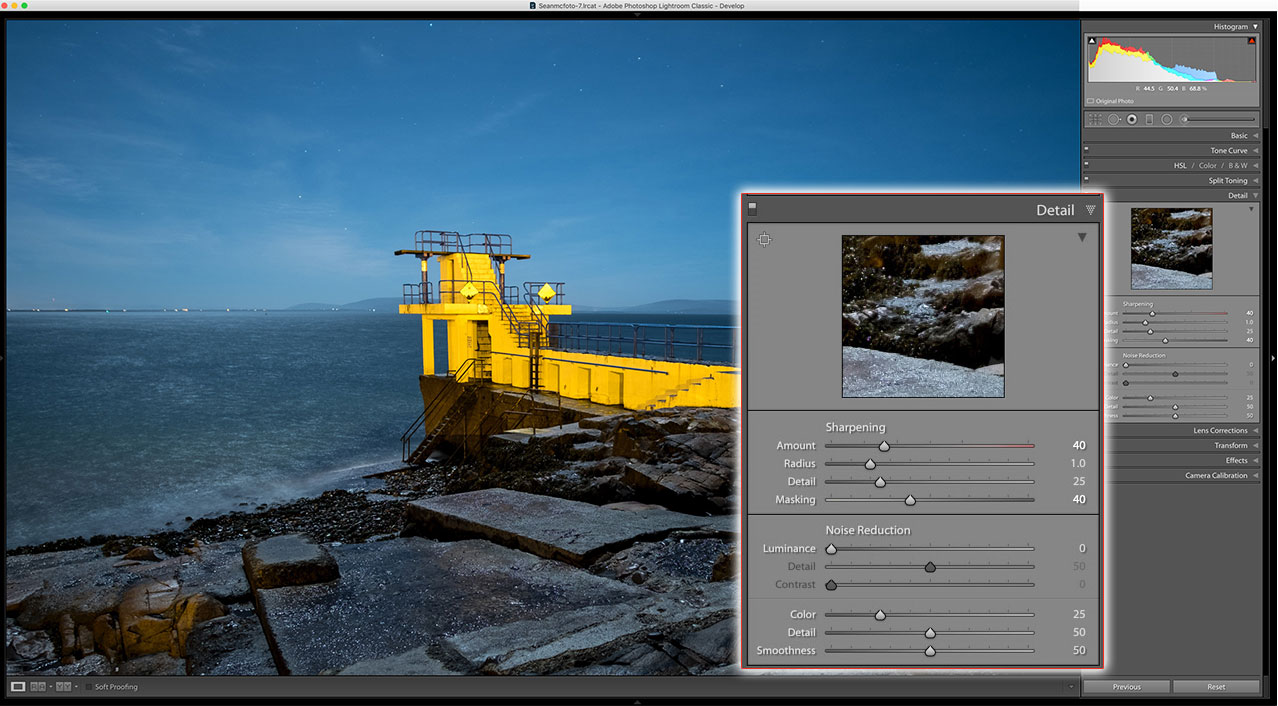
For this I go to the Detail panel and increase Amount to 40. I only want the sharpening to affect the edges, so I set Masking to 40 as well. One benefit of moonlit shots on a tripod is that you can use a low ISO, so unless you need it, leave Noise Reduction alone.
6. Finishing touches
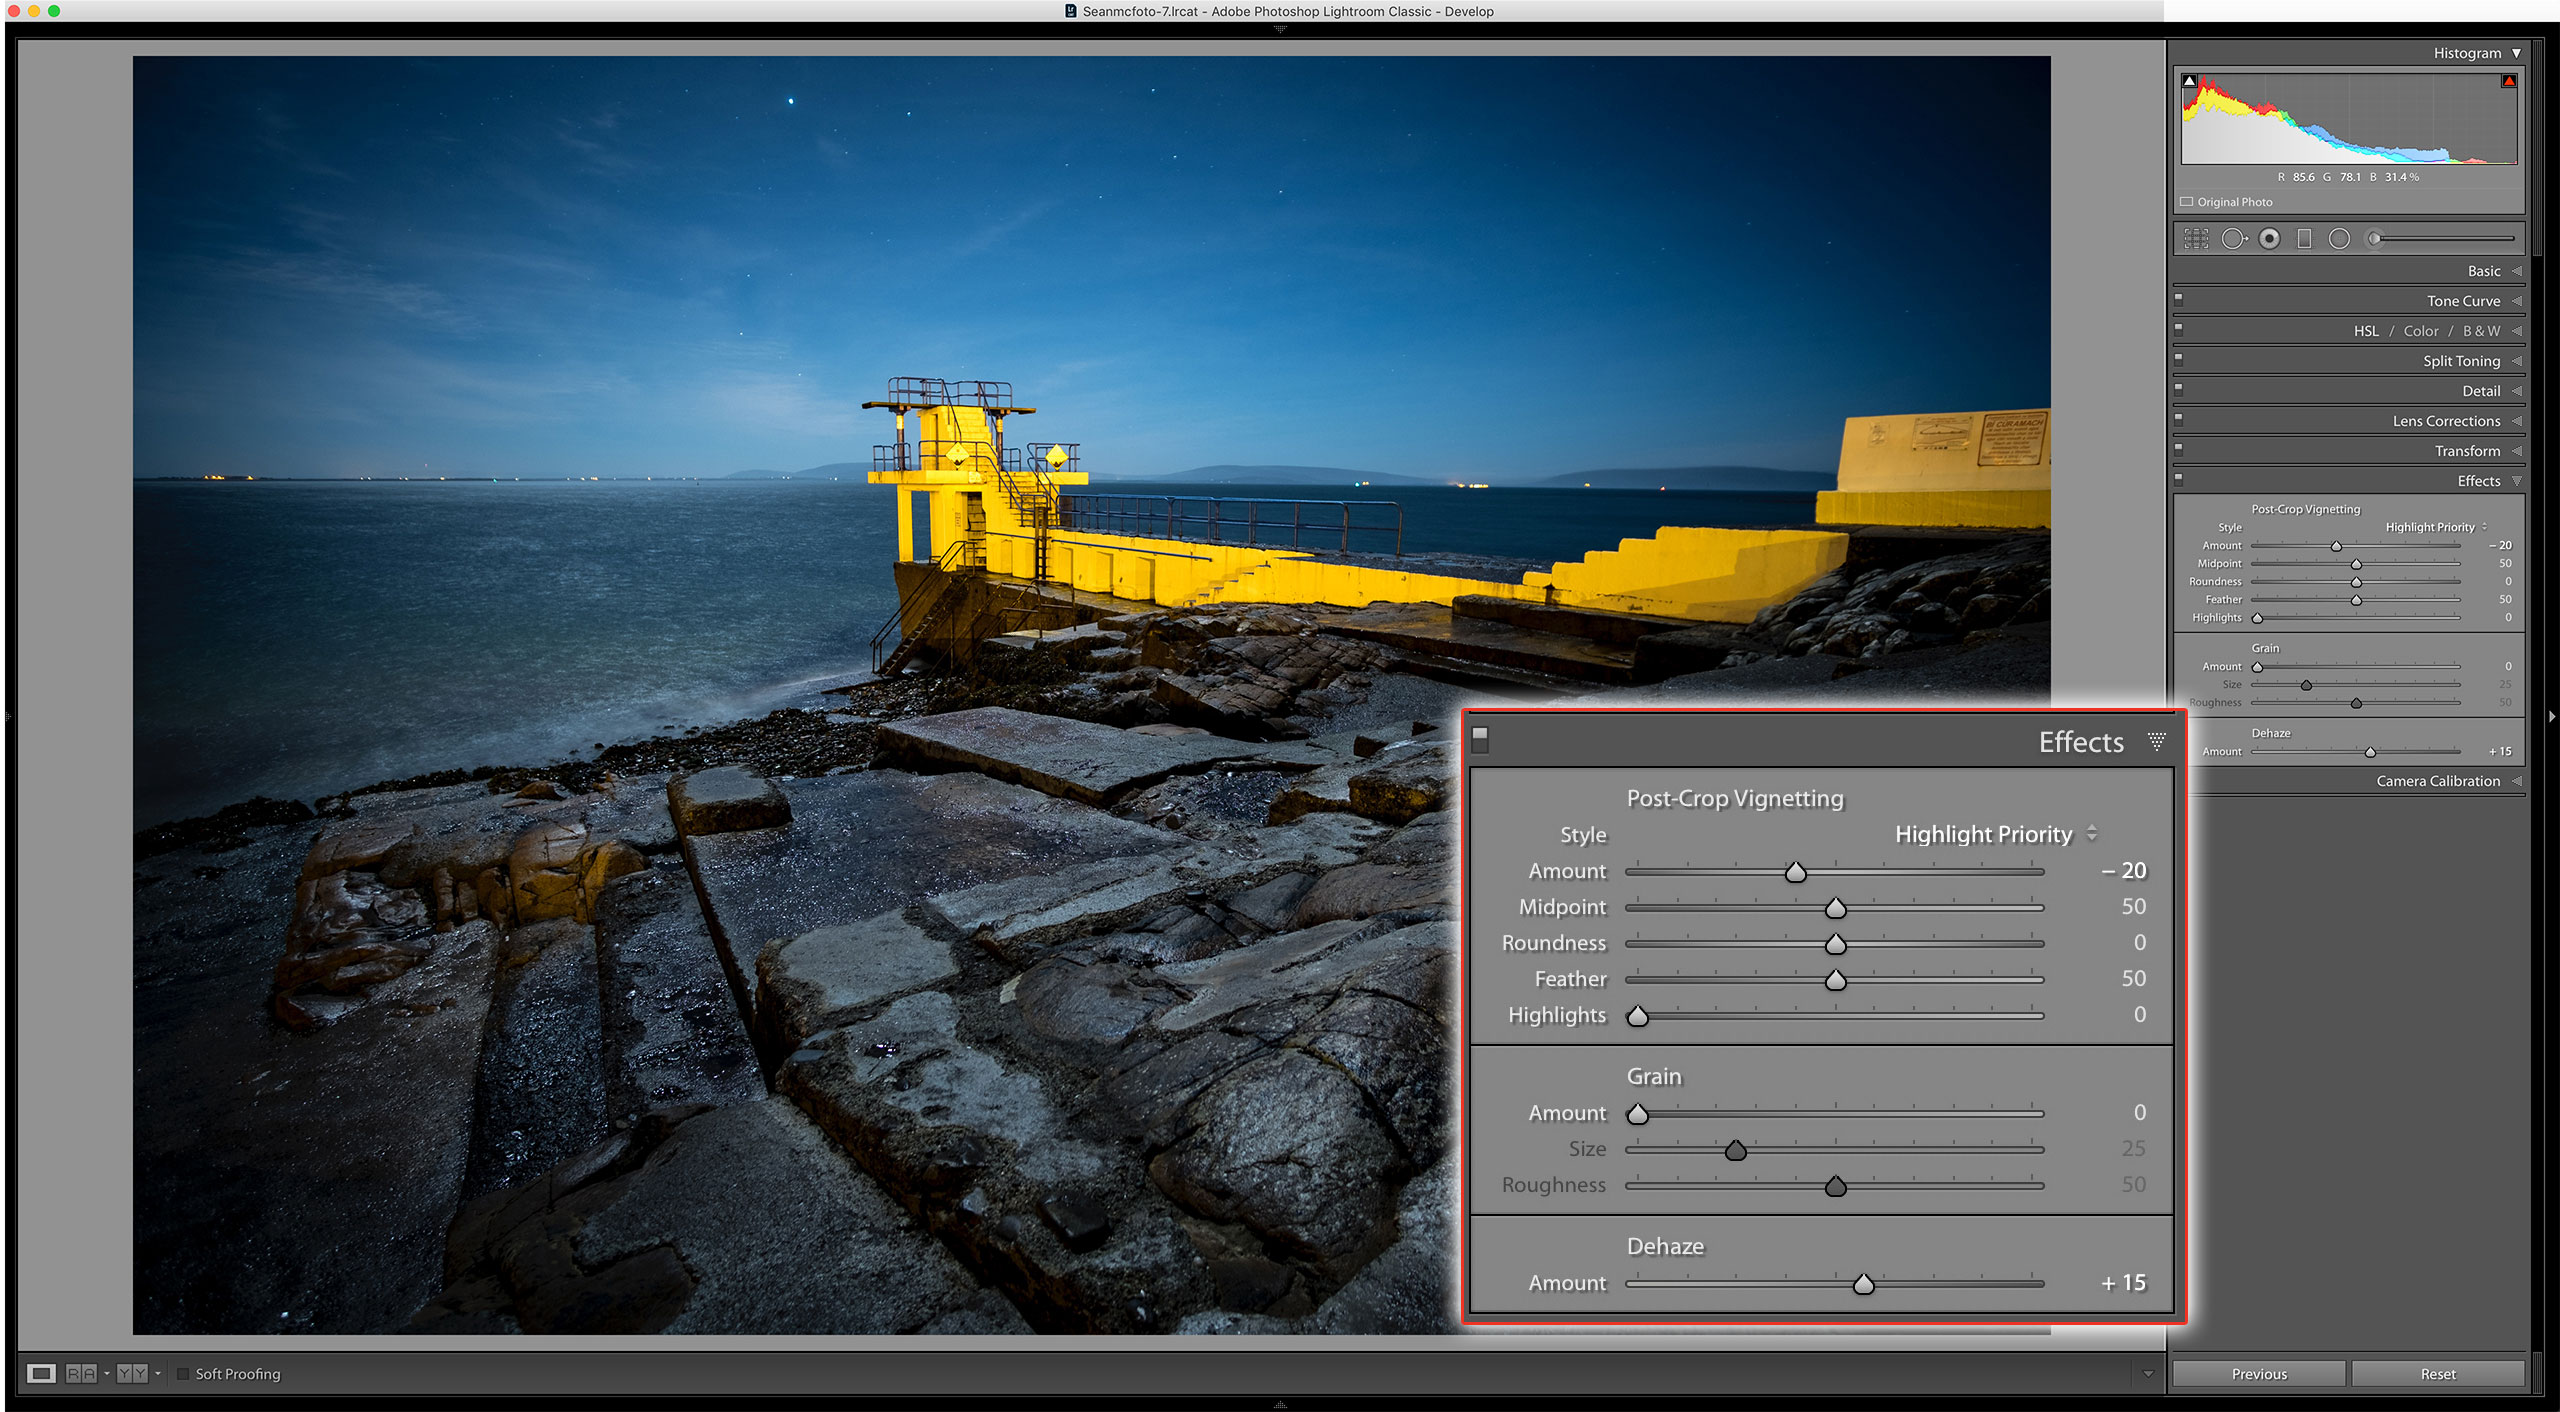
For this I go to Effects, and set the Vignette Amount to -20. This helps focus the attention by darkening the edges. Some Dehaze (about 15) can also boost the night-time feel. Because Dehaze darkens the shot, an increased Exposure setting of 0.20 will bring this back a little. (Dehaze has moved to the Basic panel in later versions of Lightroom.)
Expert tip: Editing by hand
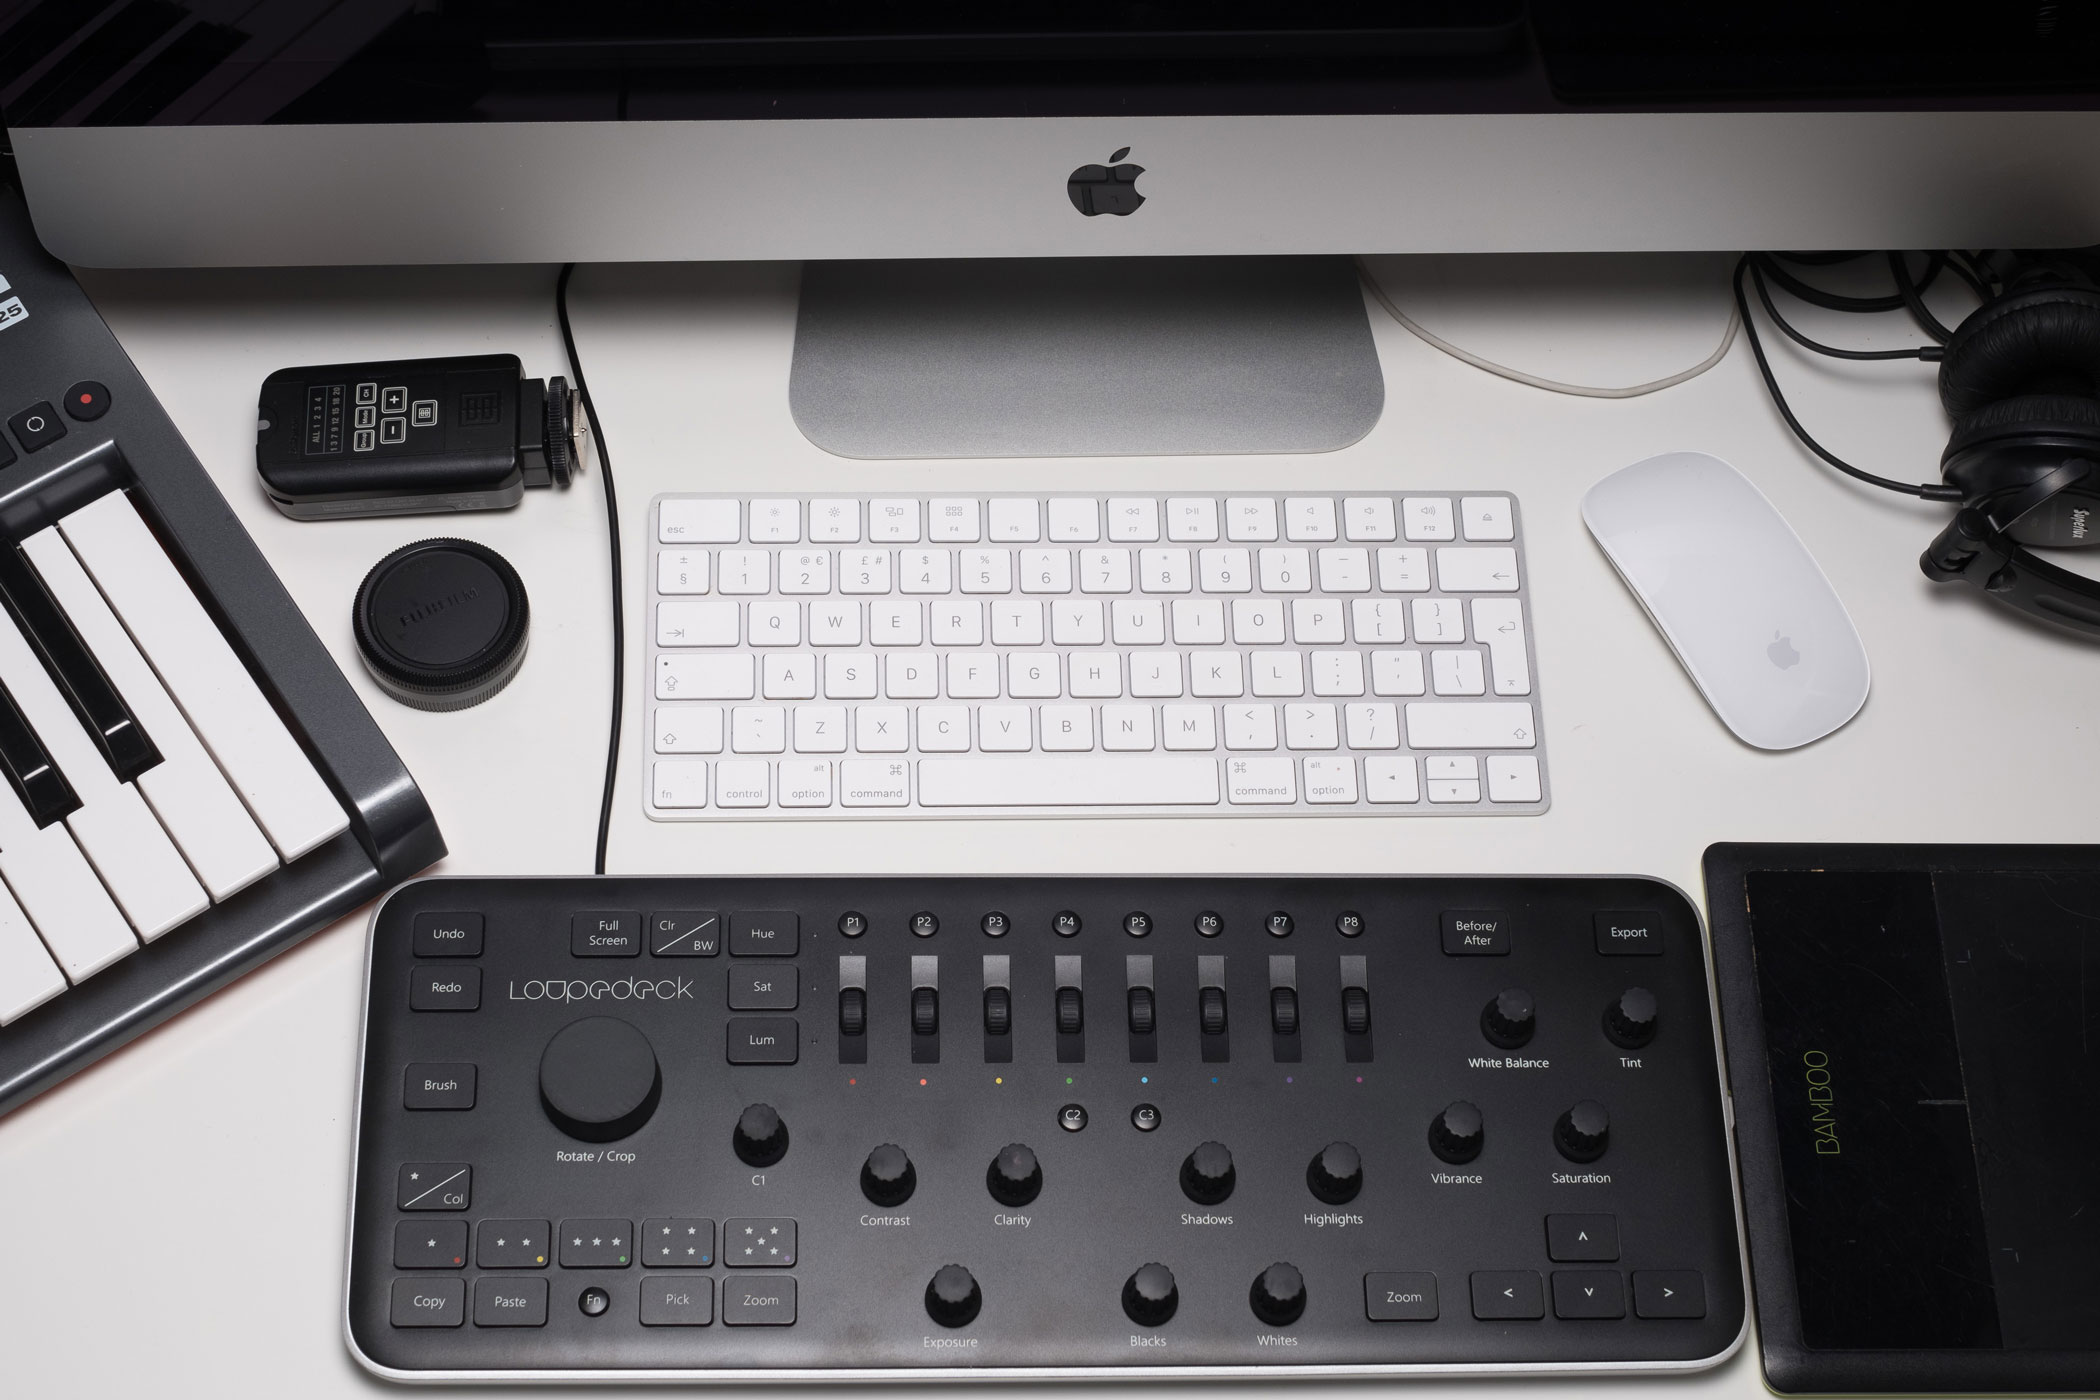
Because editing photos relies on changing sliders, it’s easy to fall into the trap of making the ‘numbers’ look good. Hardware can help, and there are a number of suitable devices on the market. One I’ve been using is the Loupedeck. This dedicated controller for Lightroom really helps cut time in processing. There are alternatives of course. Pfixer and LrControl allow users to connect Midi-compatible devices to Lightroom and control it from them. Handy for musicians! Palette from palettegear offers a modular system that is fully customisable and builds together like a Lego controller using magnets.
About Digital Camera magazine
This tutorial originally appeared in Digital Camera Magazine, the monthly newsstand magazine for all photographers. Why not subscribe to a print edition, and have the magazine delivered direct to your door every month?
Alternatively, we have a number of different digital options available, including:
• Apple app (for iPad or iPhone)
• Zinio app (multi-platform app for desktop or smartphone)
• PocketMags (multi-platform app ideal for Android devices)
• Readly (all-you-can-eat digital magazine subscription service)
If you wanted a printed version of any of our most recent issues we have a selection of back issues to choose from in our online store.
How to get Adobe Lightroom
Adobe Lightroom is available in two versions: the regular Adobe Lightroom Classic CC designed for desktop users, which is what we cover in this series, and a new cloud-based Adobe Lightroom CC, which stores your files online and offers a similar but reduced set of features. For regular desktop users we recommend Adobe Lightroom Classic CC.
Adobe offers three subscription based Photography Plans which you can click on below. We recommend either the regular Photography Plan, or the Photography Plan (1TB) which costs more but comes with 1TB online storage in case you decide to go with Lightroom CC.
For this set of tutorials and for anyone who likes to work on a single main computer, we recommend the regular Creative Cloud Photography Plan. This is the cheapest way to get started AND it comes with Photoshop CC too.
Read more:
• This is the best photo-editing software today
• These are the best laptops for photographers right now
• We help you choose the best desktop computers for photo editing
Sean McCormack is a commercial, and editorial photographer, book author, and regular contributor to Digital Camera magazine based in Galway, Ireland. He has extensive experience with Lightroom, dating back to its original beta version, and has tried out just about every plugin and preset available. His latest book is Essential Development 3: 25 Tips for Lightroom Classic’s Develop Module.
