Add mood lighting to landscapes at home using this Photoshop CC trick
Use Photoshop CC's adjustment layers, blending modes and filters to dramatically alter the look and feel of a landscape
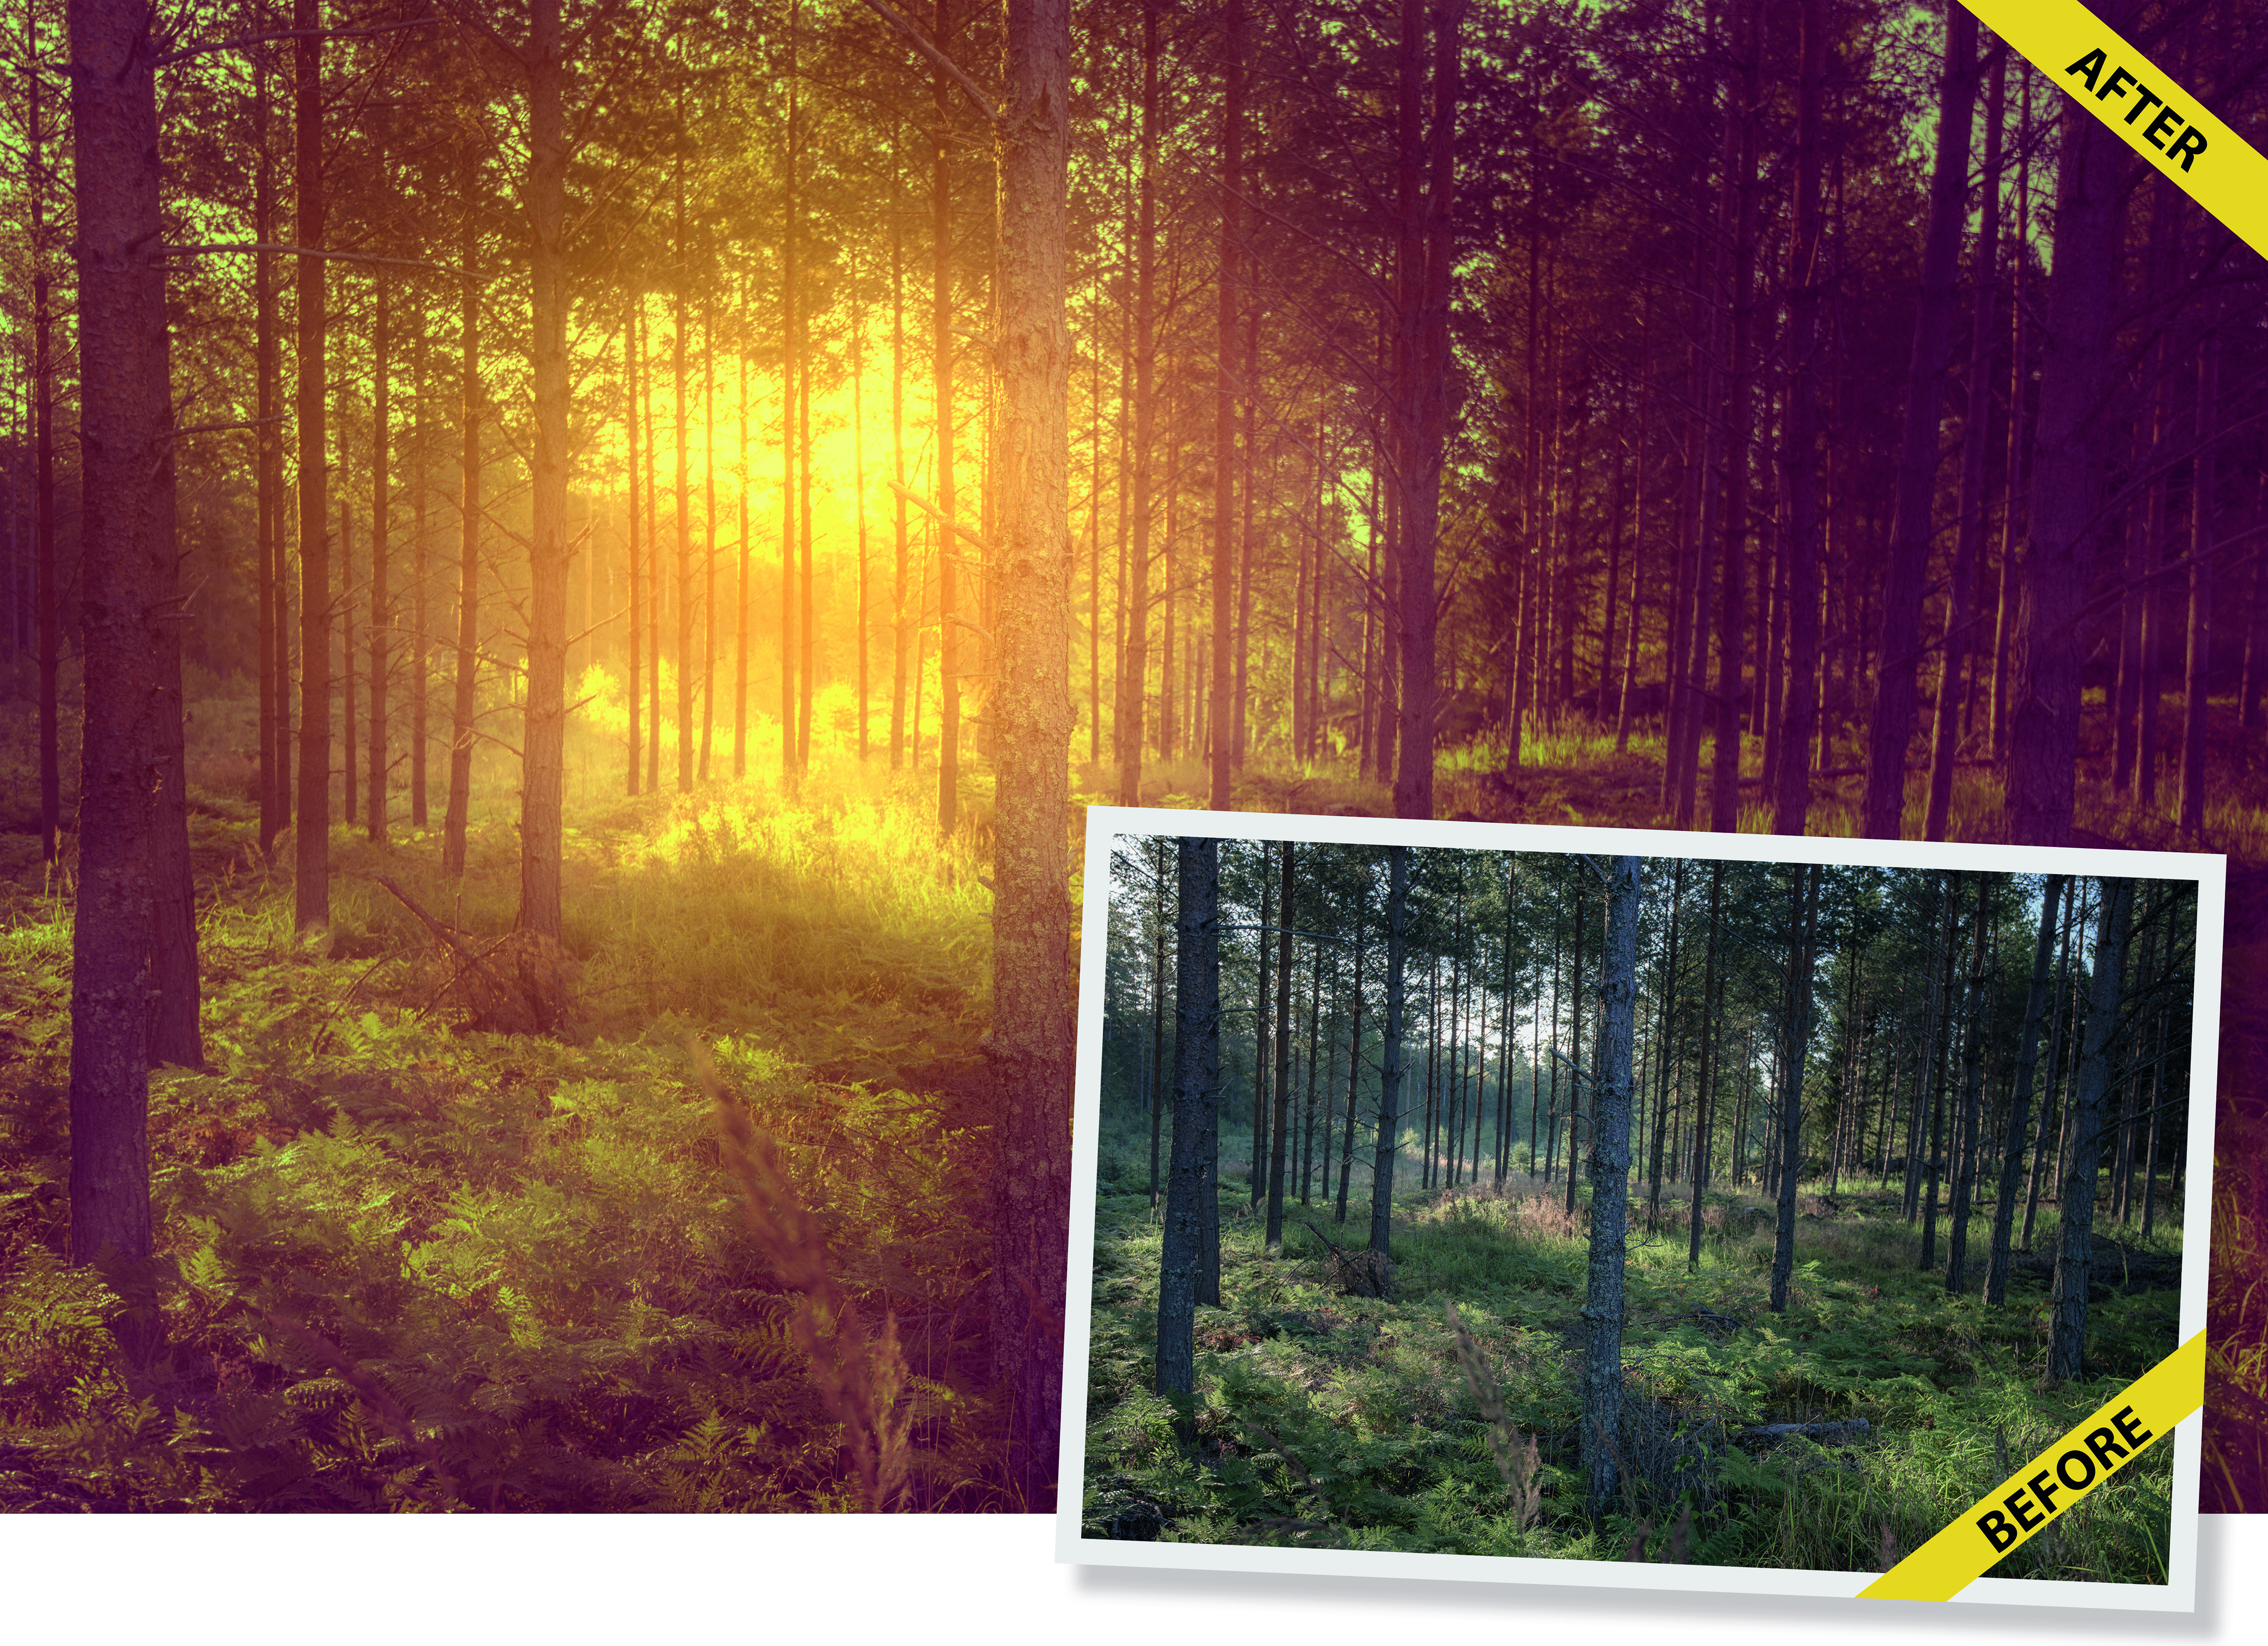
It’s not always easy to arrive at a location at the right time – often the light isn’t right, or the angle of the sun too high, or the colors too dull. While there’s no substitute for nailing the shot in-camera, if you want to change the mood after the fact there are a few tools in Photoshop that can help.
Tips and tutorials
• How to download Photoshop
• 100 Photoshop tips!
• 15 top Photoshop fixes
• More Photoshop tutorials
• Photoshop Elements tutorials
Free Photoshop stuff
• 55 free Photoshop brushes
• 63 free Photoshop templates
• 52 free Photoshop plug ins
• 63 free Photoshop actions
• Free textures for Photoshop
• Free frames and borders
In this tutorial we’ll explain how to totally alter the atmosphere in our woodland scene here with a combination of brush skills, layer blending modes and adjustment layers. With these simple tools, you can change the colors to give the scene a dreamy atmosphere, add in spots of flare, and even suggest mist floating through the forest.
We’ve suggested specific colors and settings for you to try out, but bear in mind that these are tailored to our image here, so if you want to use similar techniques on your own scenes then it’s worth experimenting with different shades until you hit upon the right look.
Article continues below• Landscape photography tips and techniques
Along the way you’ll learn key Photoshop skills that will serve you well in all kinds of editing tasks. We’ll utilize the power of adjustment layers to build up non-destructive tonal changes.
Don't have Photoshop? You can get a 7-day Adobe Creative Cloud trial to try Photoshop and other Adobe software for free.
• Download Photoshop
• Download Lightroom
• Download Premiere Pro
We’ll also control the effect with layer masks, so that the tonal changes can be applied selectively to different areas with ease. What’s more, we’ll explain a nifty trick with the Radial Blur filter for making atmospheric streaks of light that filter through the forest...
STEP BY STEP: Alter the atmosphere
The best camera deals, reviews, product advice, and unmissable photography news, direct to your inbox!
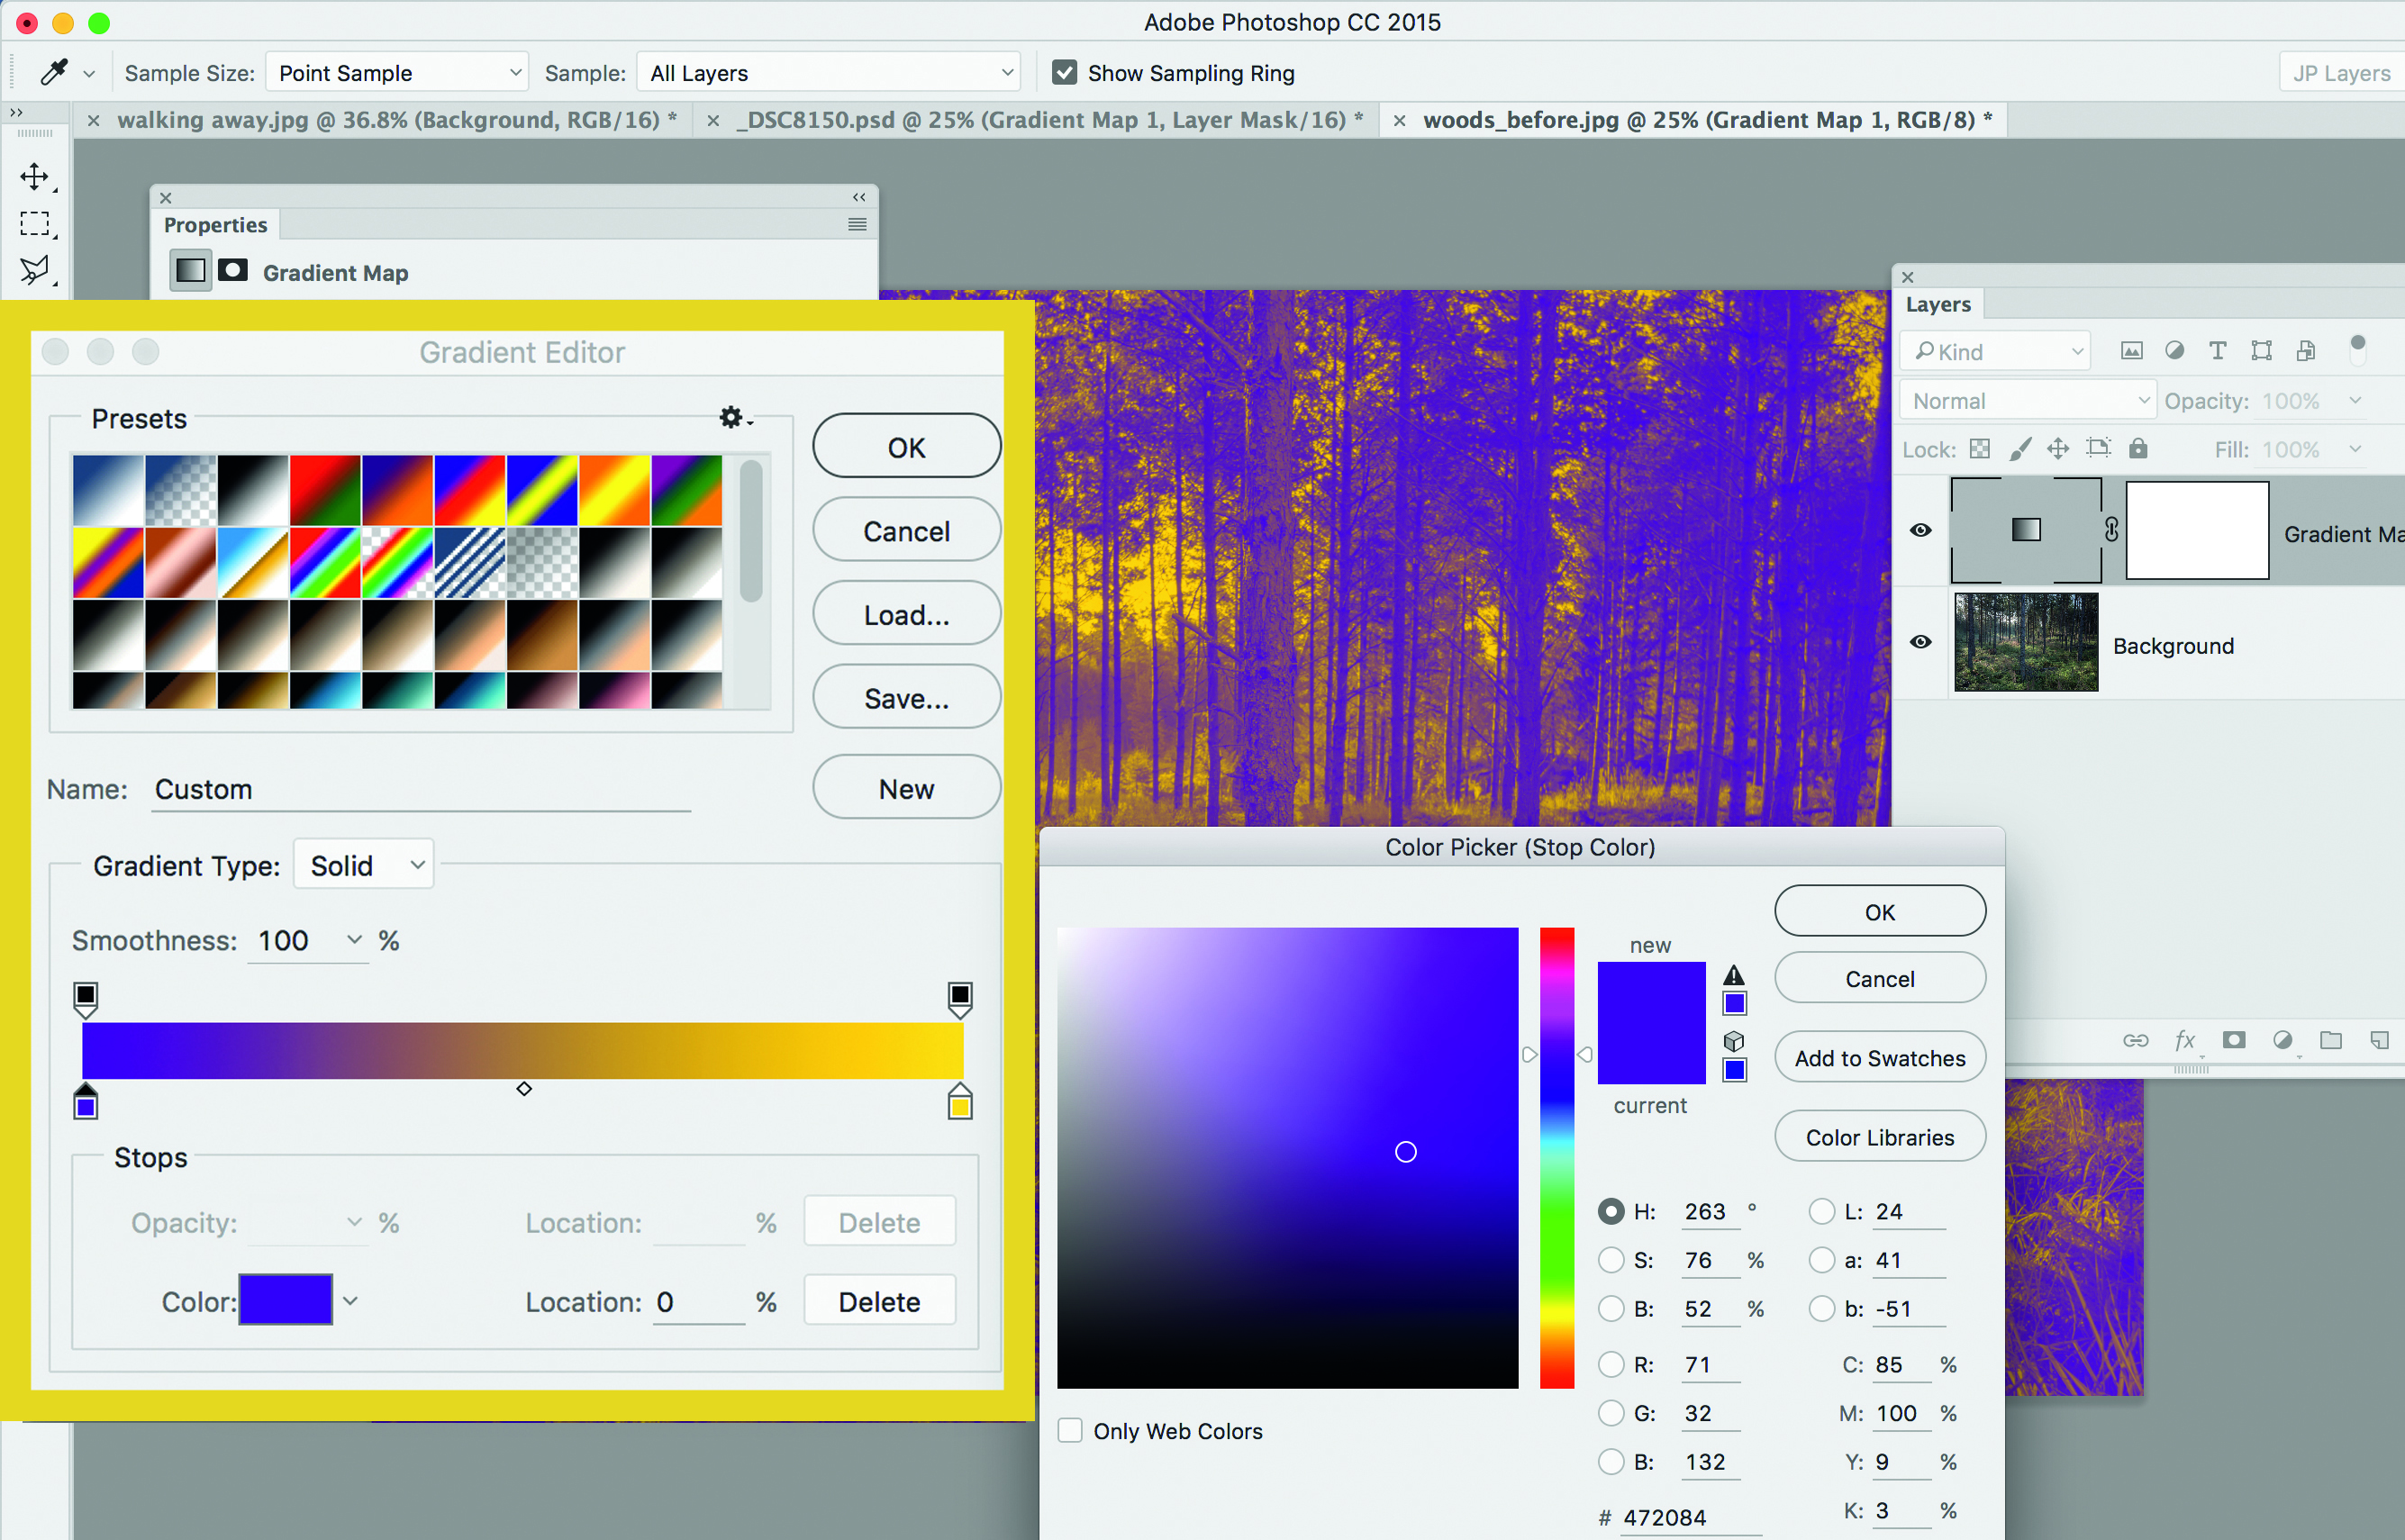
1 Customise a gradient
Go to the Layers panel, click Create Adjustment Layer and choose Gradient Map. Click the gradient strip, then double-click the ‘colour stop’ icon at the bottom left. Choose a purple (#472084) and click OK. Now open the colour stop icon opposite and choose a yellow (#FFD200).
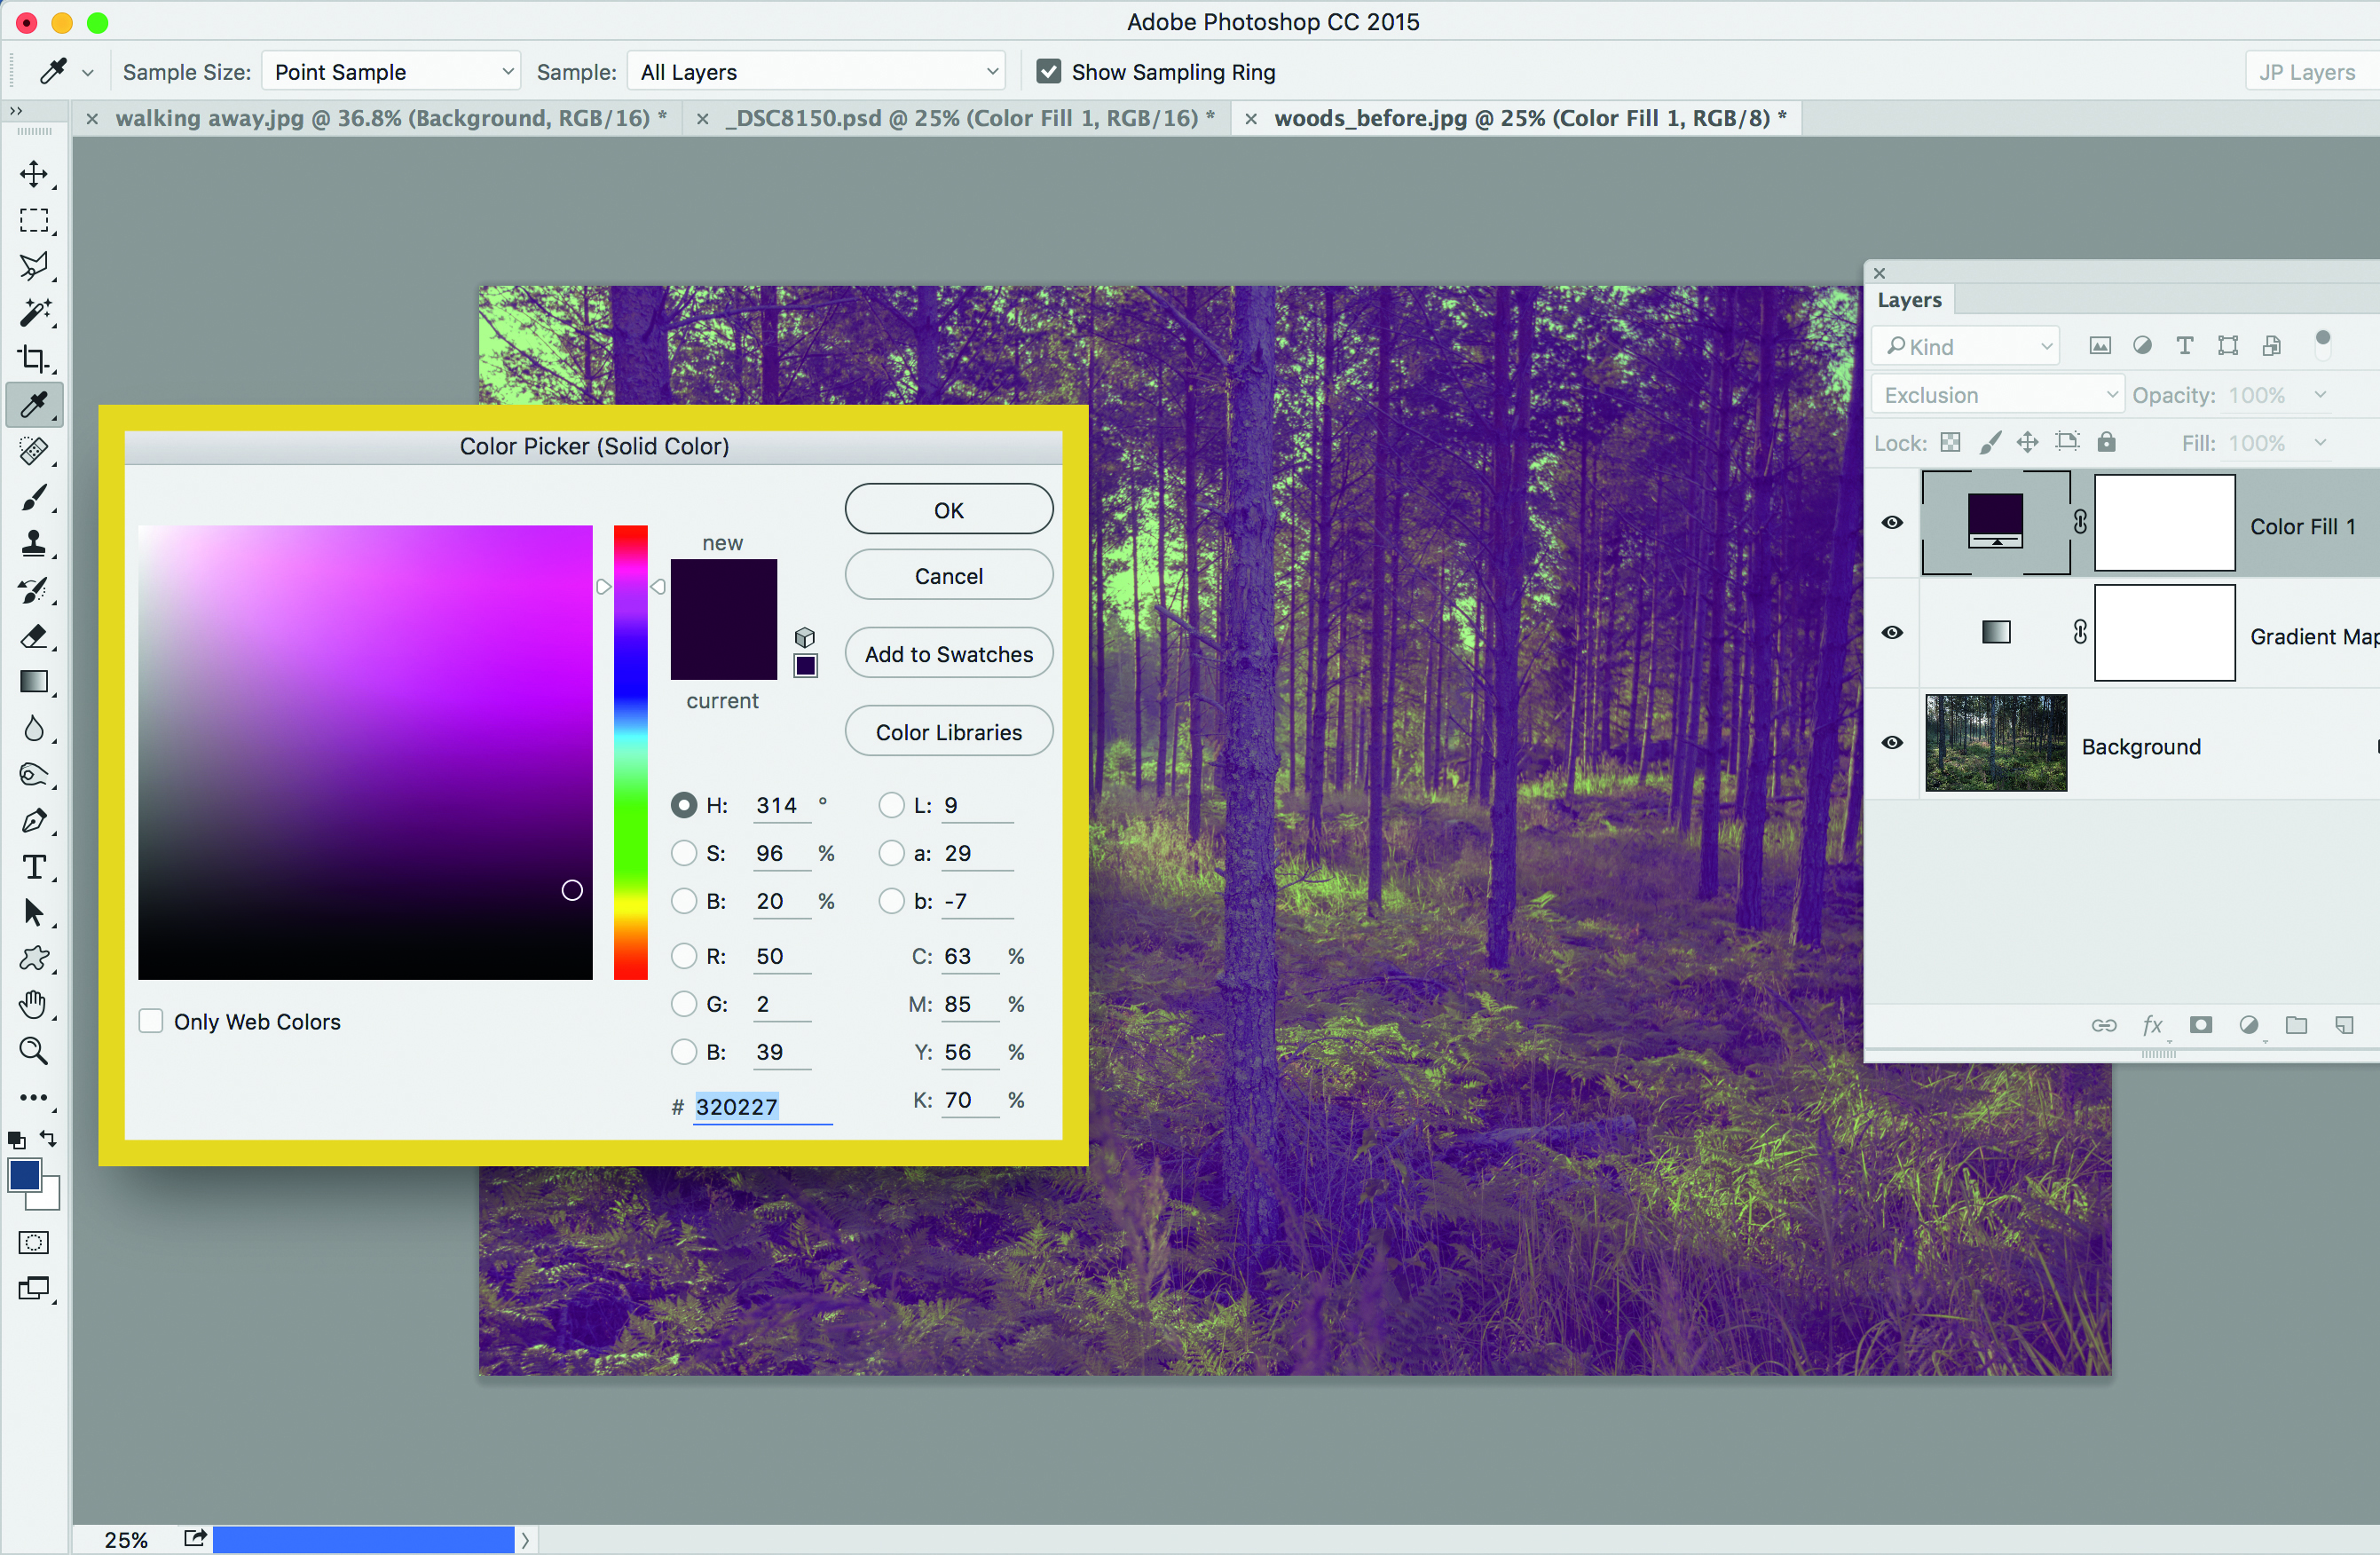
2 Adjust the colors
Reduce the opacity of the layer to 25%. Click Create Adjustment Layer and choose Solid Color. Select a purple tone (#320227) and click OK. Set the layer’s Blending Mode to Exclusion. Add a Color Balance Adjustment Layer with extra red and yellow in the midtones and highlights.
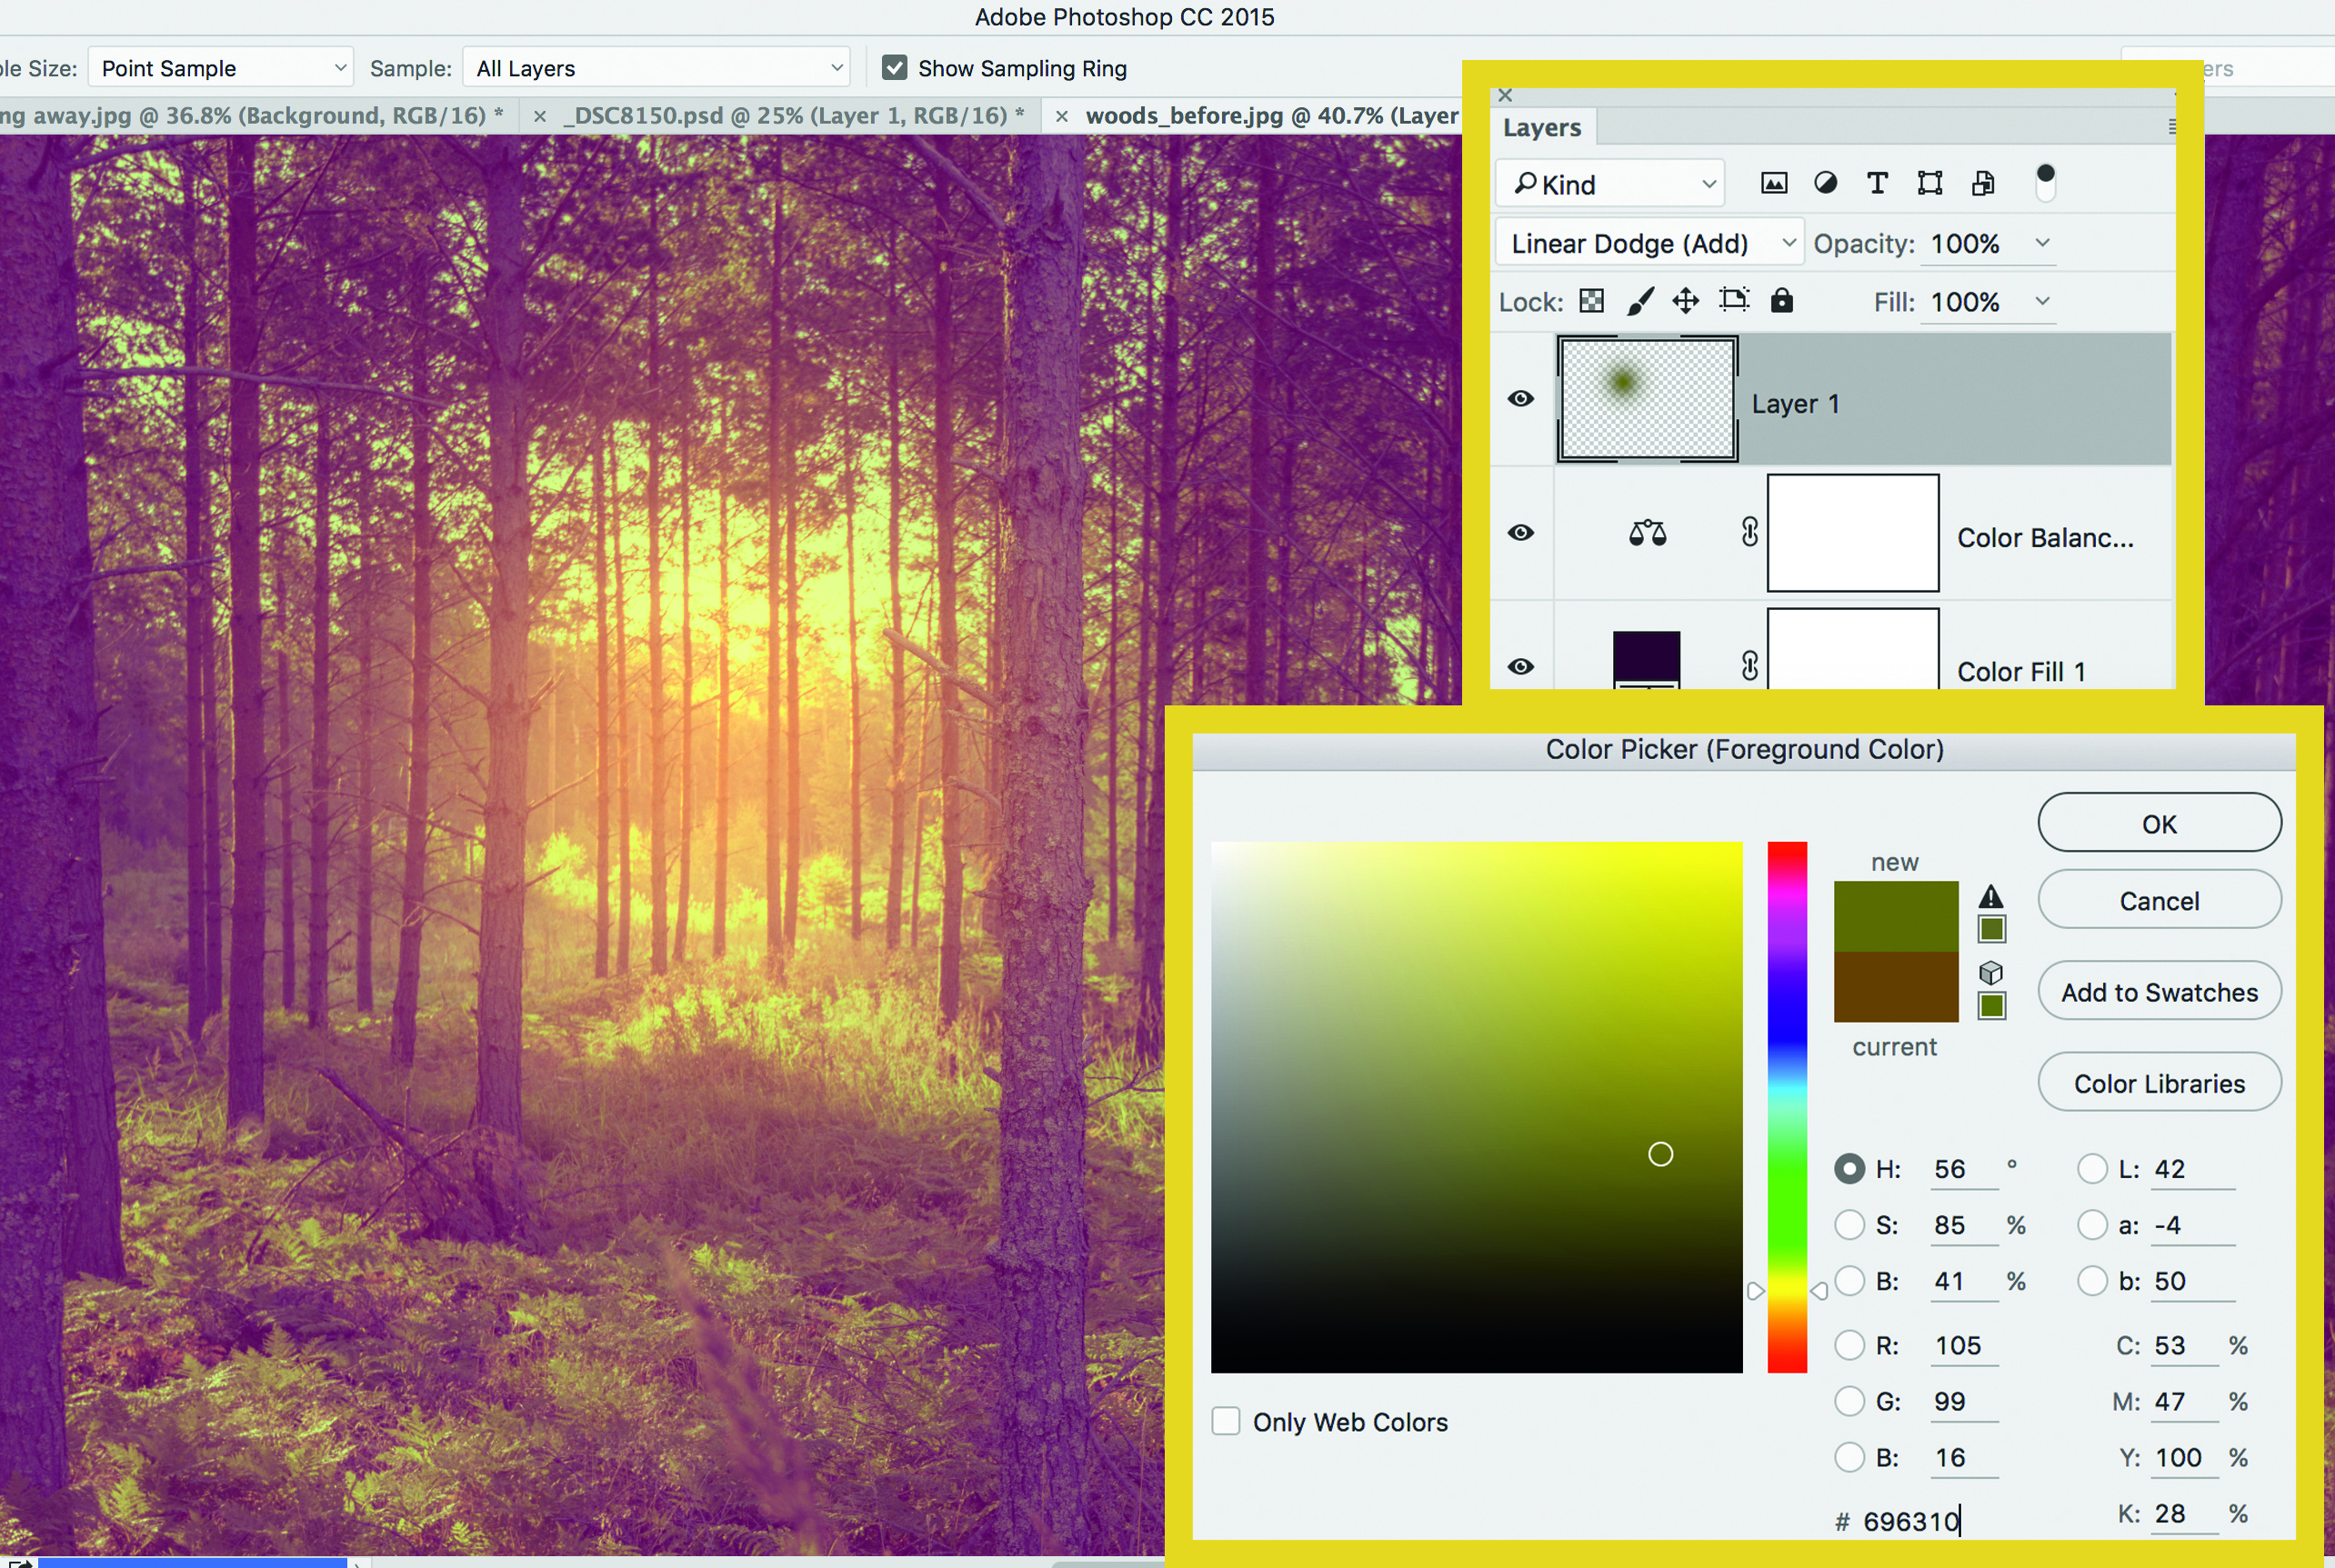
3 Paint a flare
Click Create New Layer and set the Blending Mode to Linear Dodge (Add). Next, grab the Brush tool, right-click, and set Hardness to 0. Set the foreground colour to a greenish tone (#696310 here) then, using a fairly large brush size, click once to add the flare.
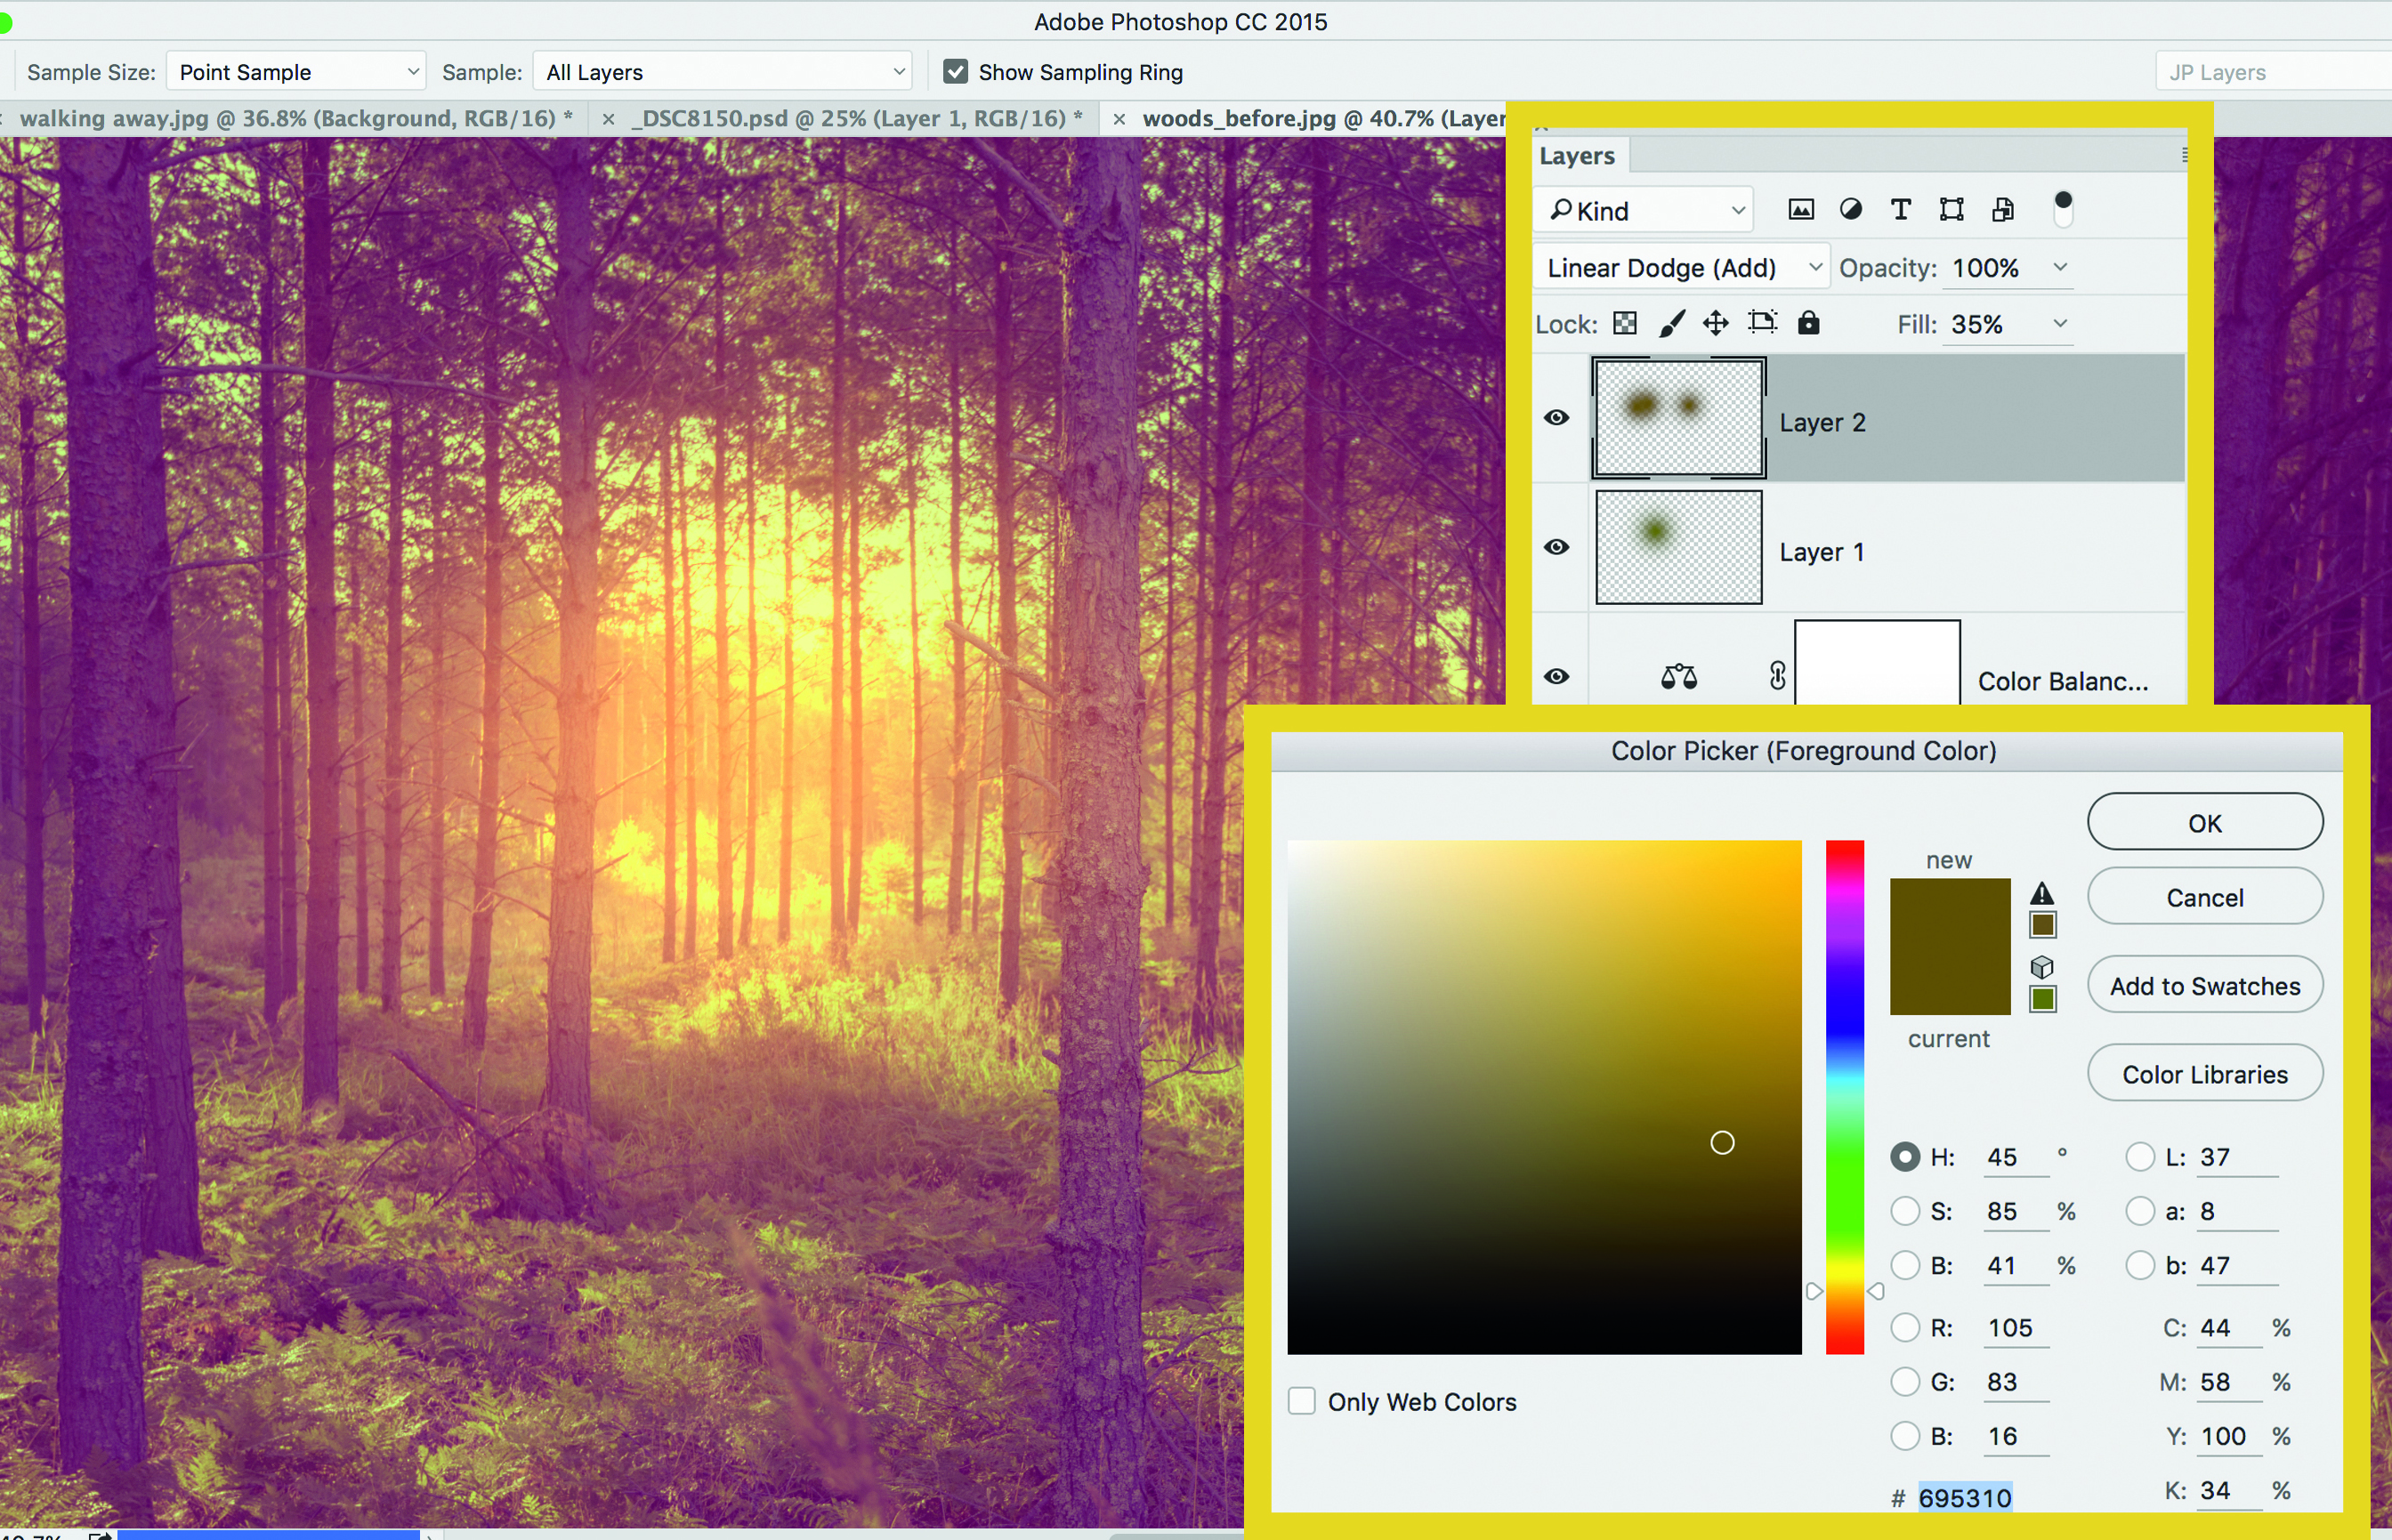
4 Darken the edges
Add a new layer, set Blending Mode to Linear Dodge (Add), choose a brown (#695310), paint a couple of spots to add to the flare effect. Click Create Adjustment Layer, choose Curves and drag down to darken. Paint over the flare with the Brush tool to hide the darkening effect.
5 Add a burst
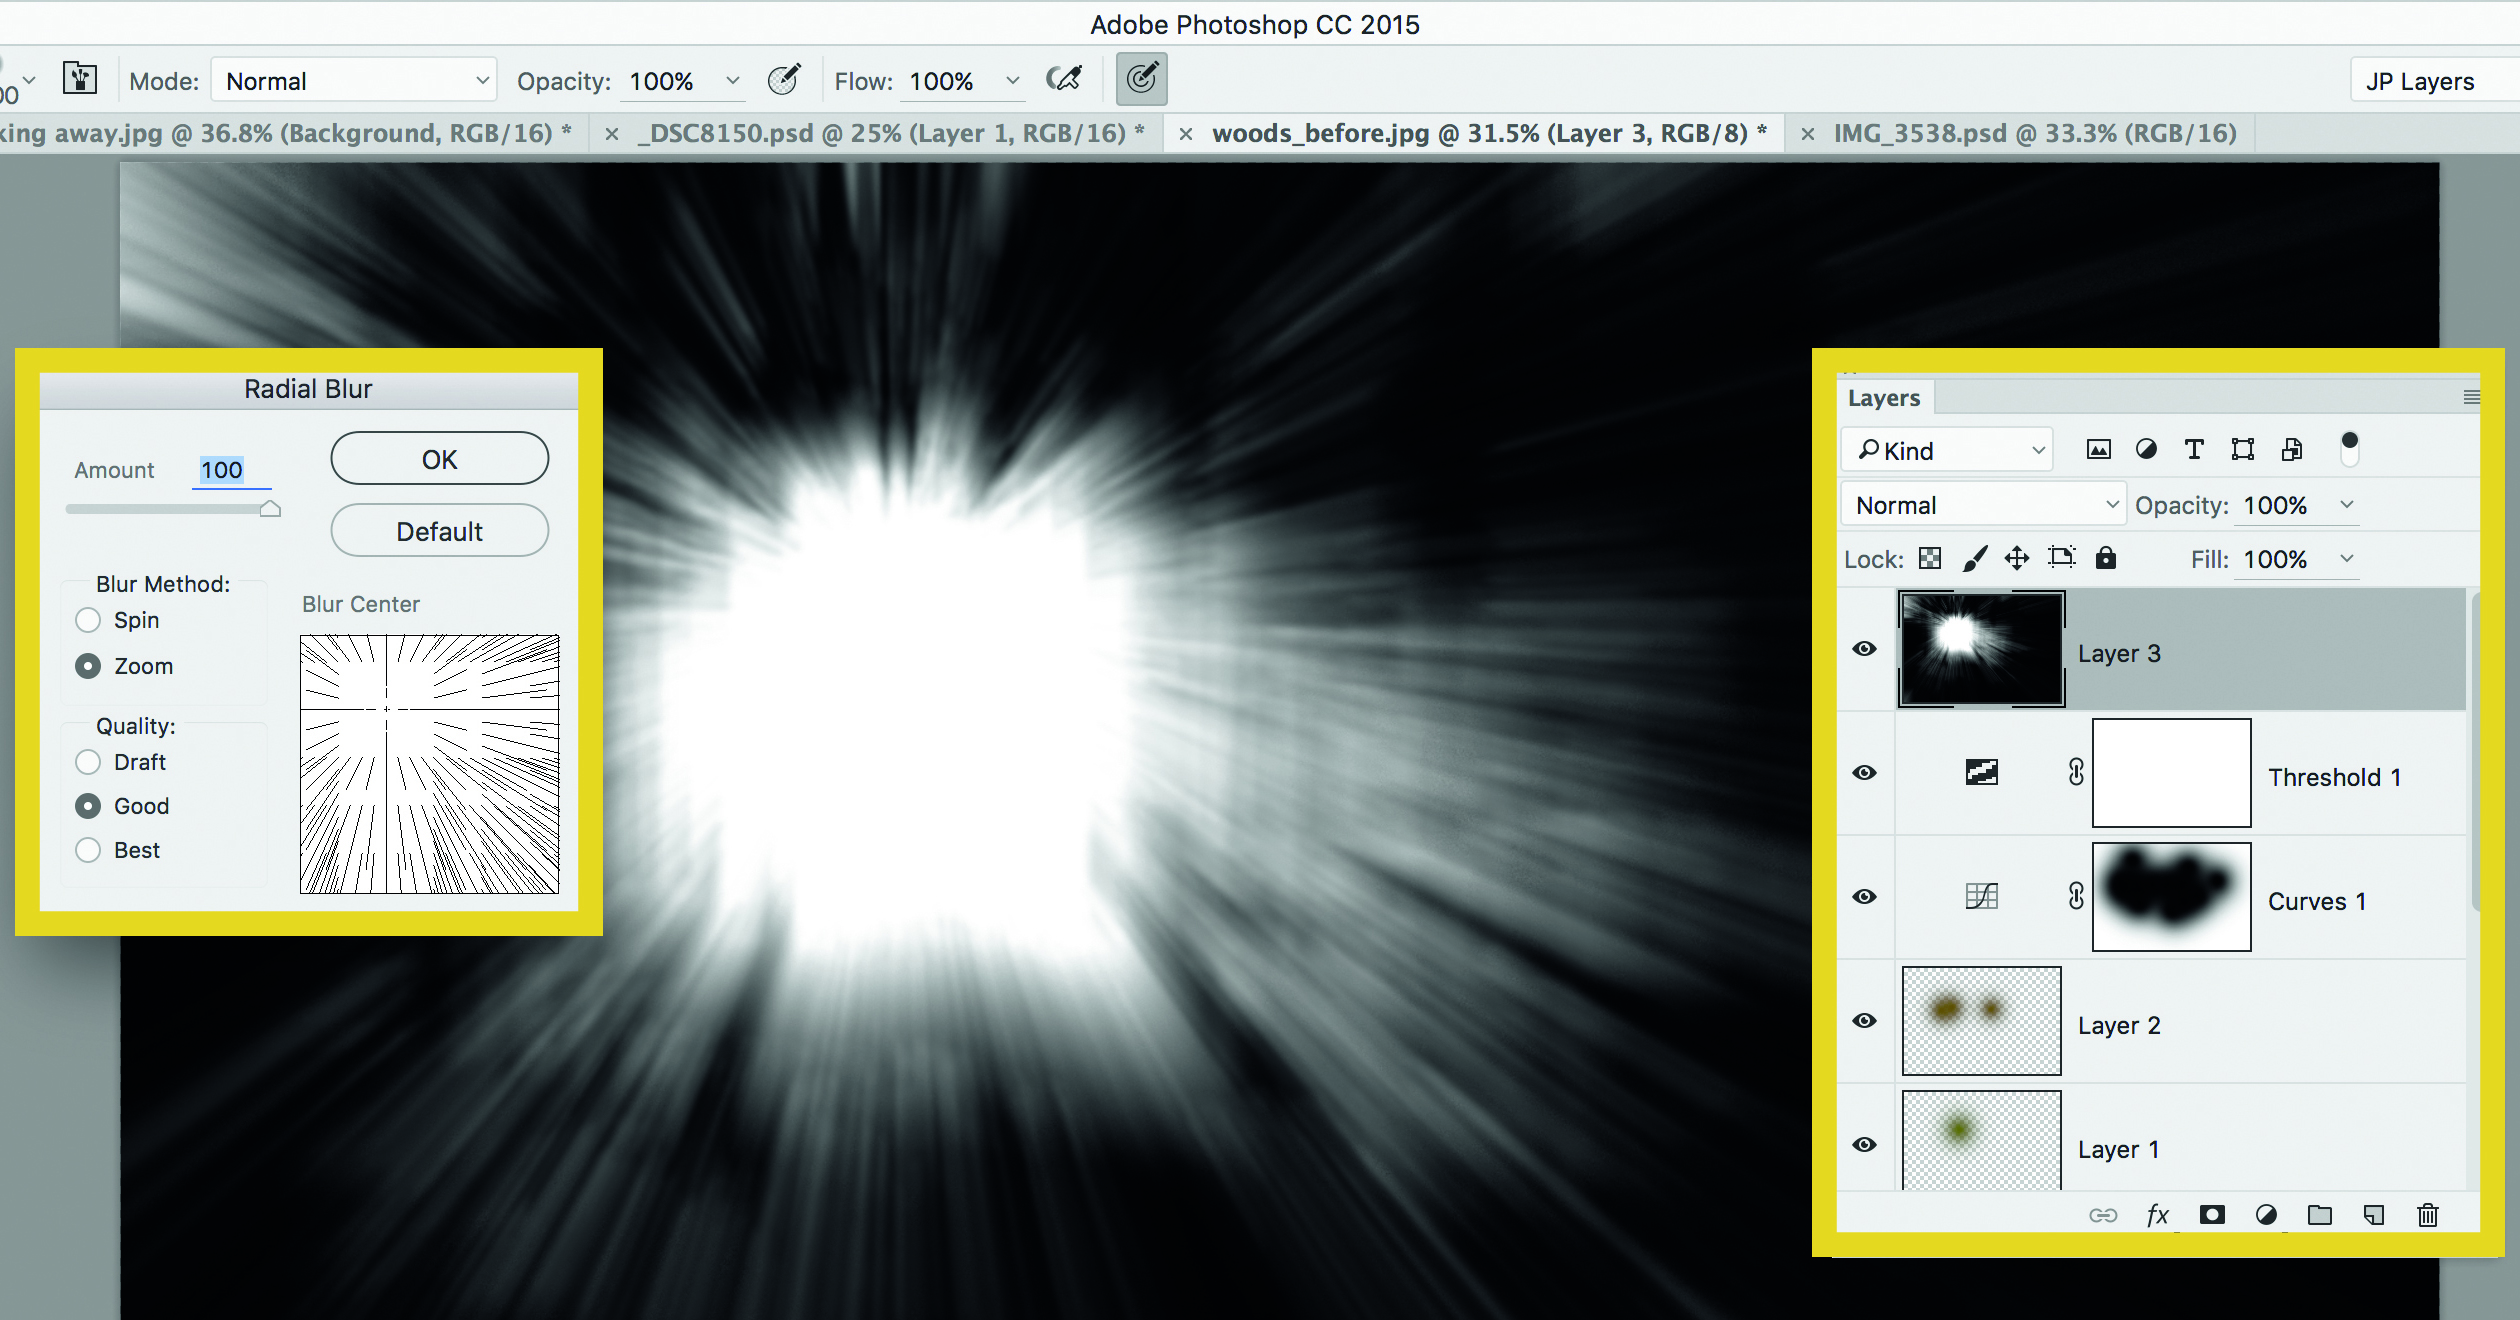
Add a Threshold adjustment layer set to 120, merge all layers (Ctrl/Cmd+Shift+Alt+E), delete the Threshold layer and highlight the new layer. Go Filter>Blur>Gaussian Blur, Amount 10. Go Filter>Blur>Radial Blur, Amount 100, Method: Zoom, position the blur on the flare.
6 Blend the effect
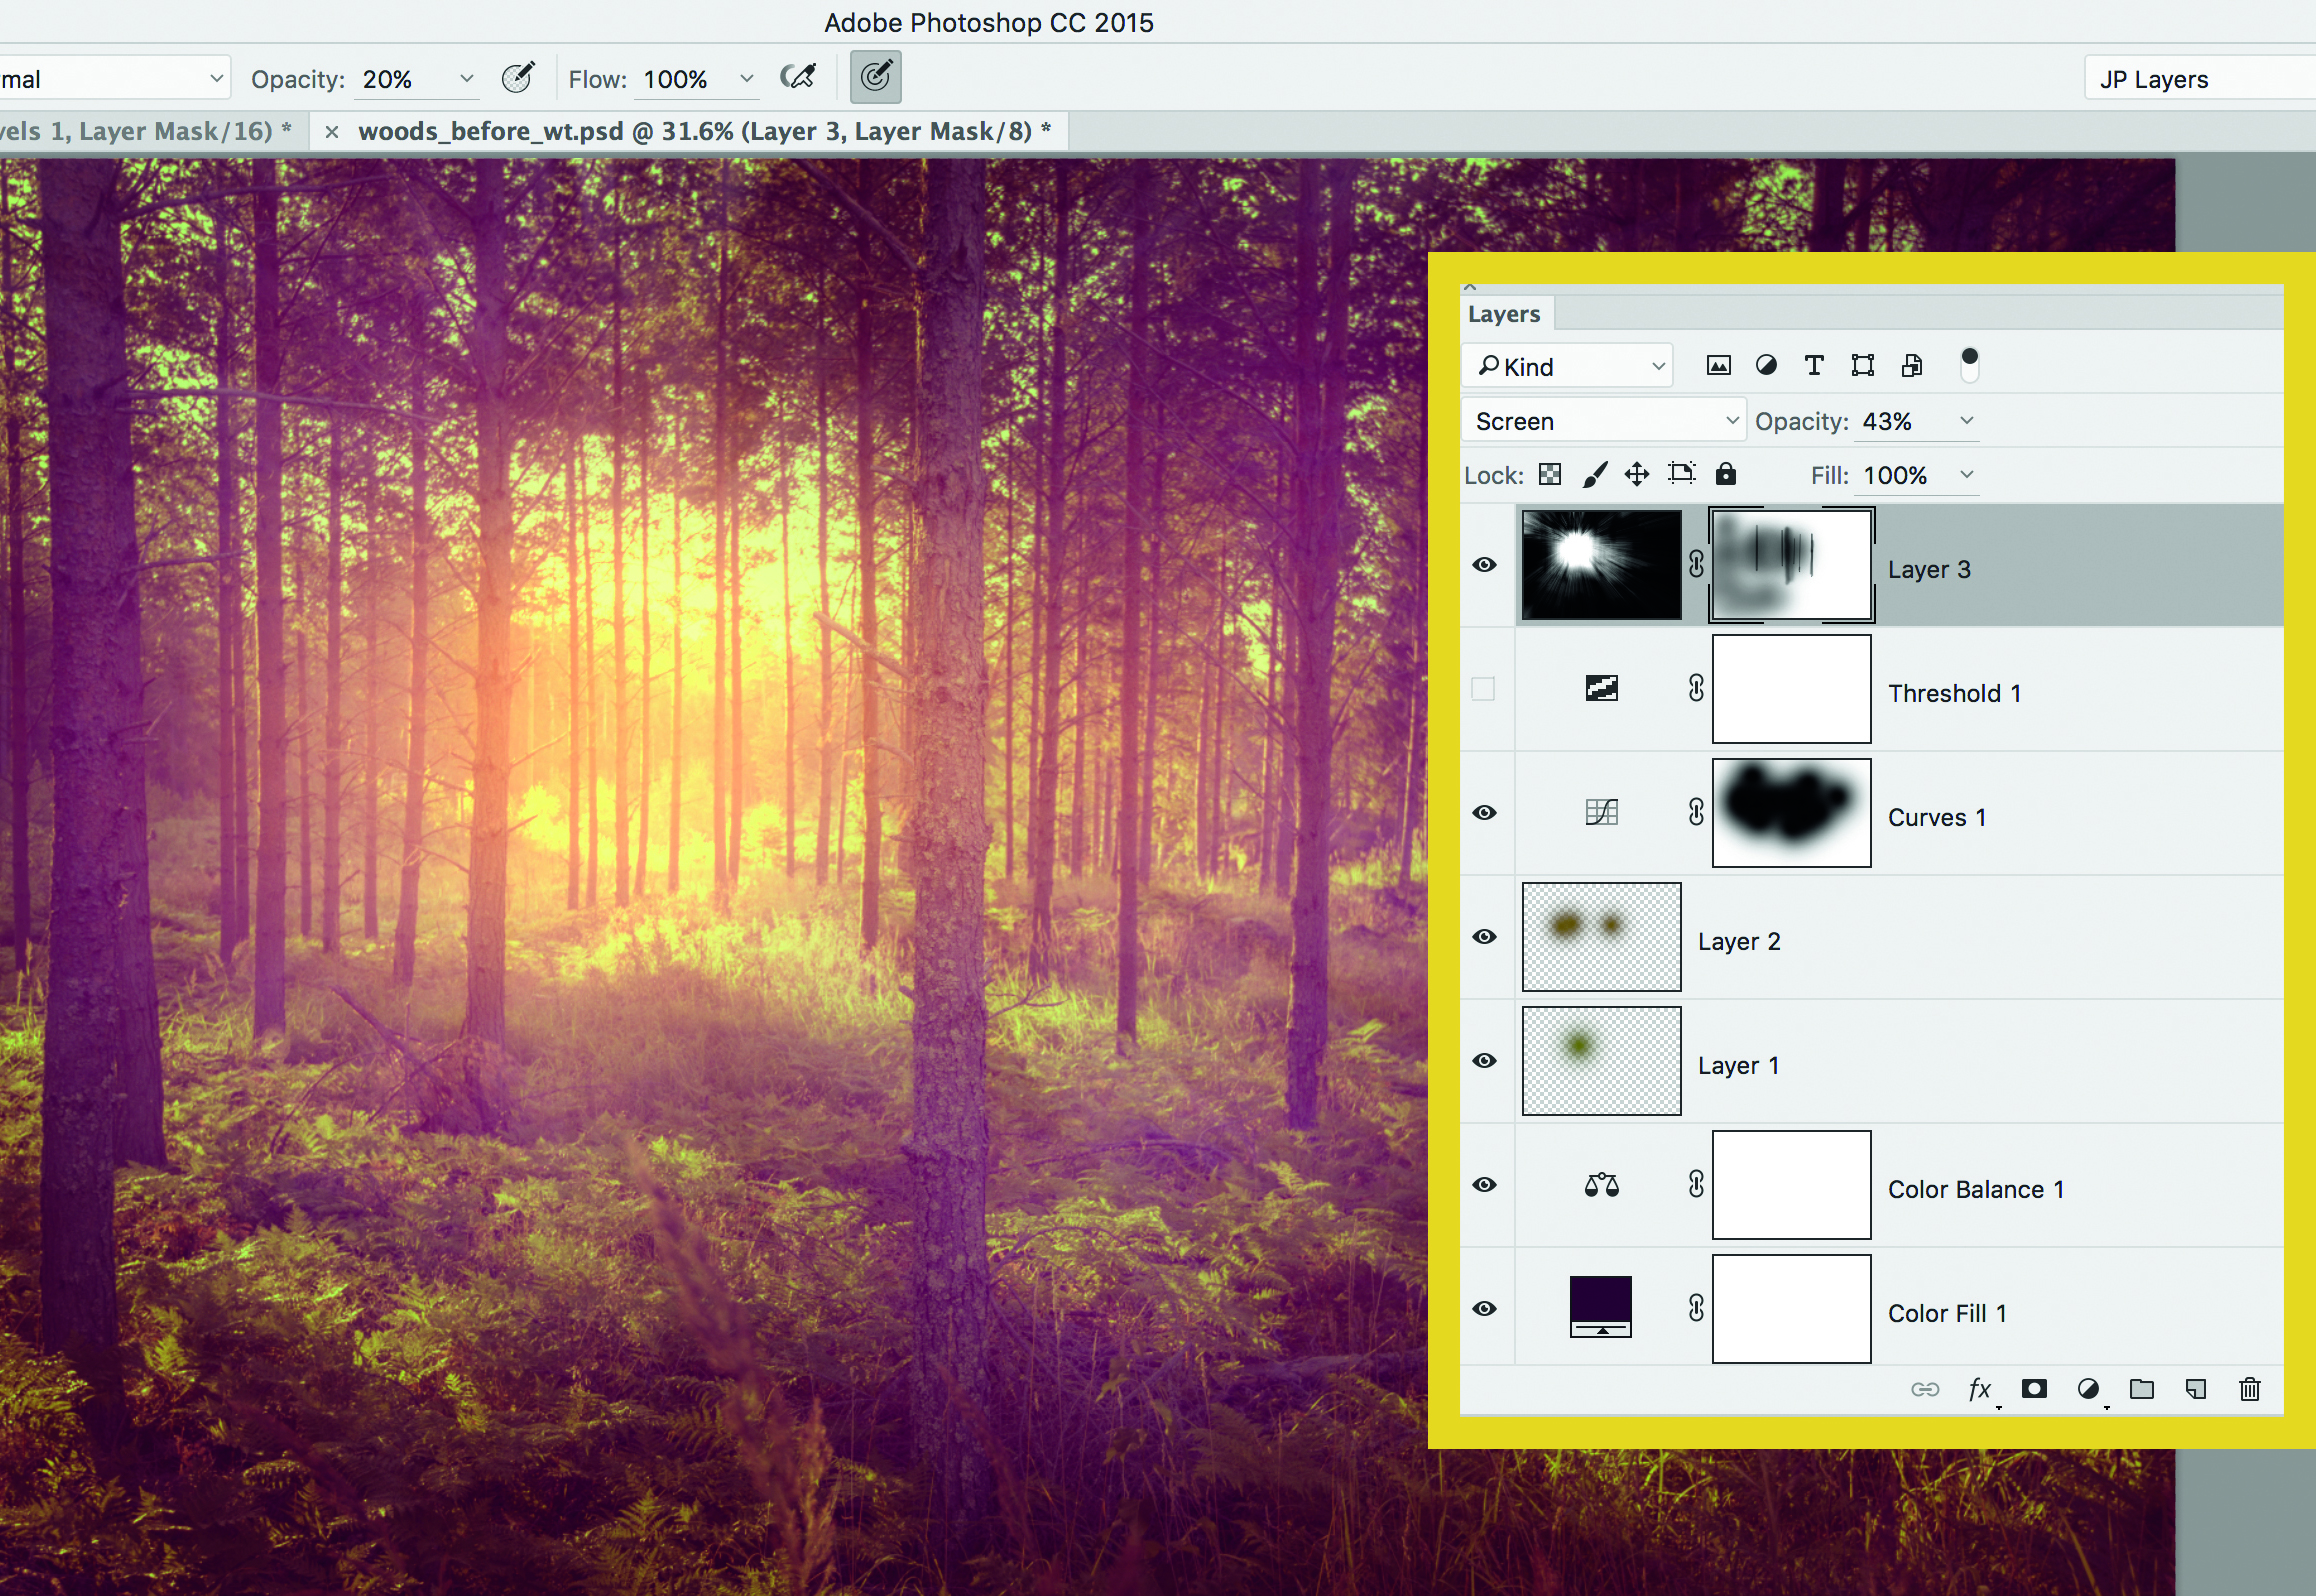
Change the Blending Mode to Screen, then lower the opacity to tone the effect down. Click the Add Layer Mask icon then grab the Brush tool. Set the colour to black and hit 4 for 40% opacity then paint to gradually tone down the blur effect so that it stays subtle.
After you add any adjustment layer, hit Ctrl/Cmd+I to hide the effect – then you can paint with white to reveal it wherever you like in the image
7 From day to night
Once you’ve created an effect like this it’s easy to go from day to night. First, add a Gradient Map adjustment layer (as in Step 1) and then customise the gradient so that the blend goes from black to dark blue (try #455E78 here). Next, fine-tune the lightness of the image using a Levels adjustment layer until it looks suitably moody. Finally, hit Ctrl/Cmd+Shift+Alt +E to merge a copy of all the layers, then grab the Burn tool, with Range set to Midtones and Strength at 20%, then paint to darken down the foreground, gently hiding the details that would naturally be in near-darkness.
Read more:
• Best photo-editing software
• Best laptops for photographers
• Best desktop computers for photo editing
• 11 home photo projects
• 44 tips cards to cut out and keep
• Photography tips for beginners
• Best budget laptops
• Best desks for home working
• Best video conferencing apps
The lead technique writer on Digital Camera Magazine, PhotoPlus: The Canon Magazine and N-Photo: The Nikon Magazine, James is a fantastic general practice photographer with an enviable array of skills across every genre of photography.
Whether it's flash photography techniques like stroboscopic portraits, astrophotography projects like photographing the Northern Lights, or turning sound into art by making paint dance on a set of speakers, James' tutorials and projects are as creative as they are enjoyable.
He's also a wizard at the dark arts of Photoshop, Lightroom and Affinity Photo, and is capable of some genuine black magic in the digital darkroom, making him one of the leading authorities on photo editing software and techniques.
