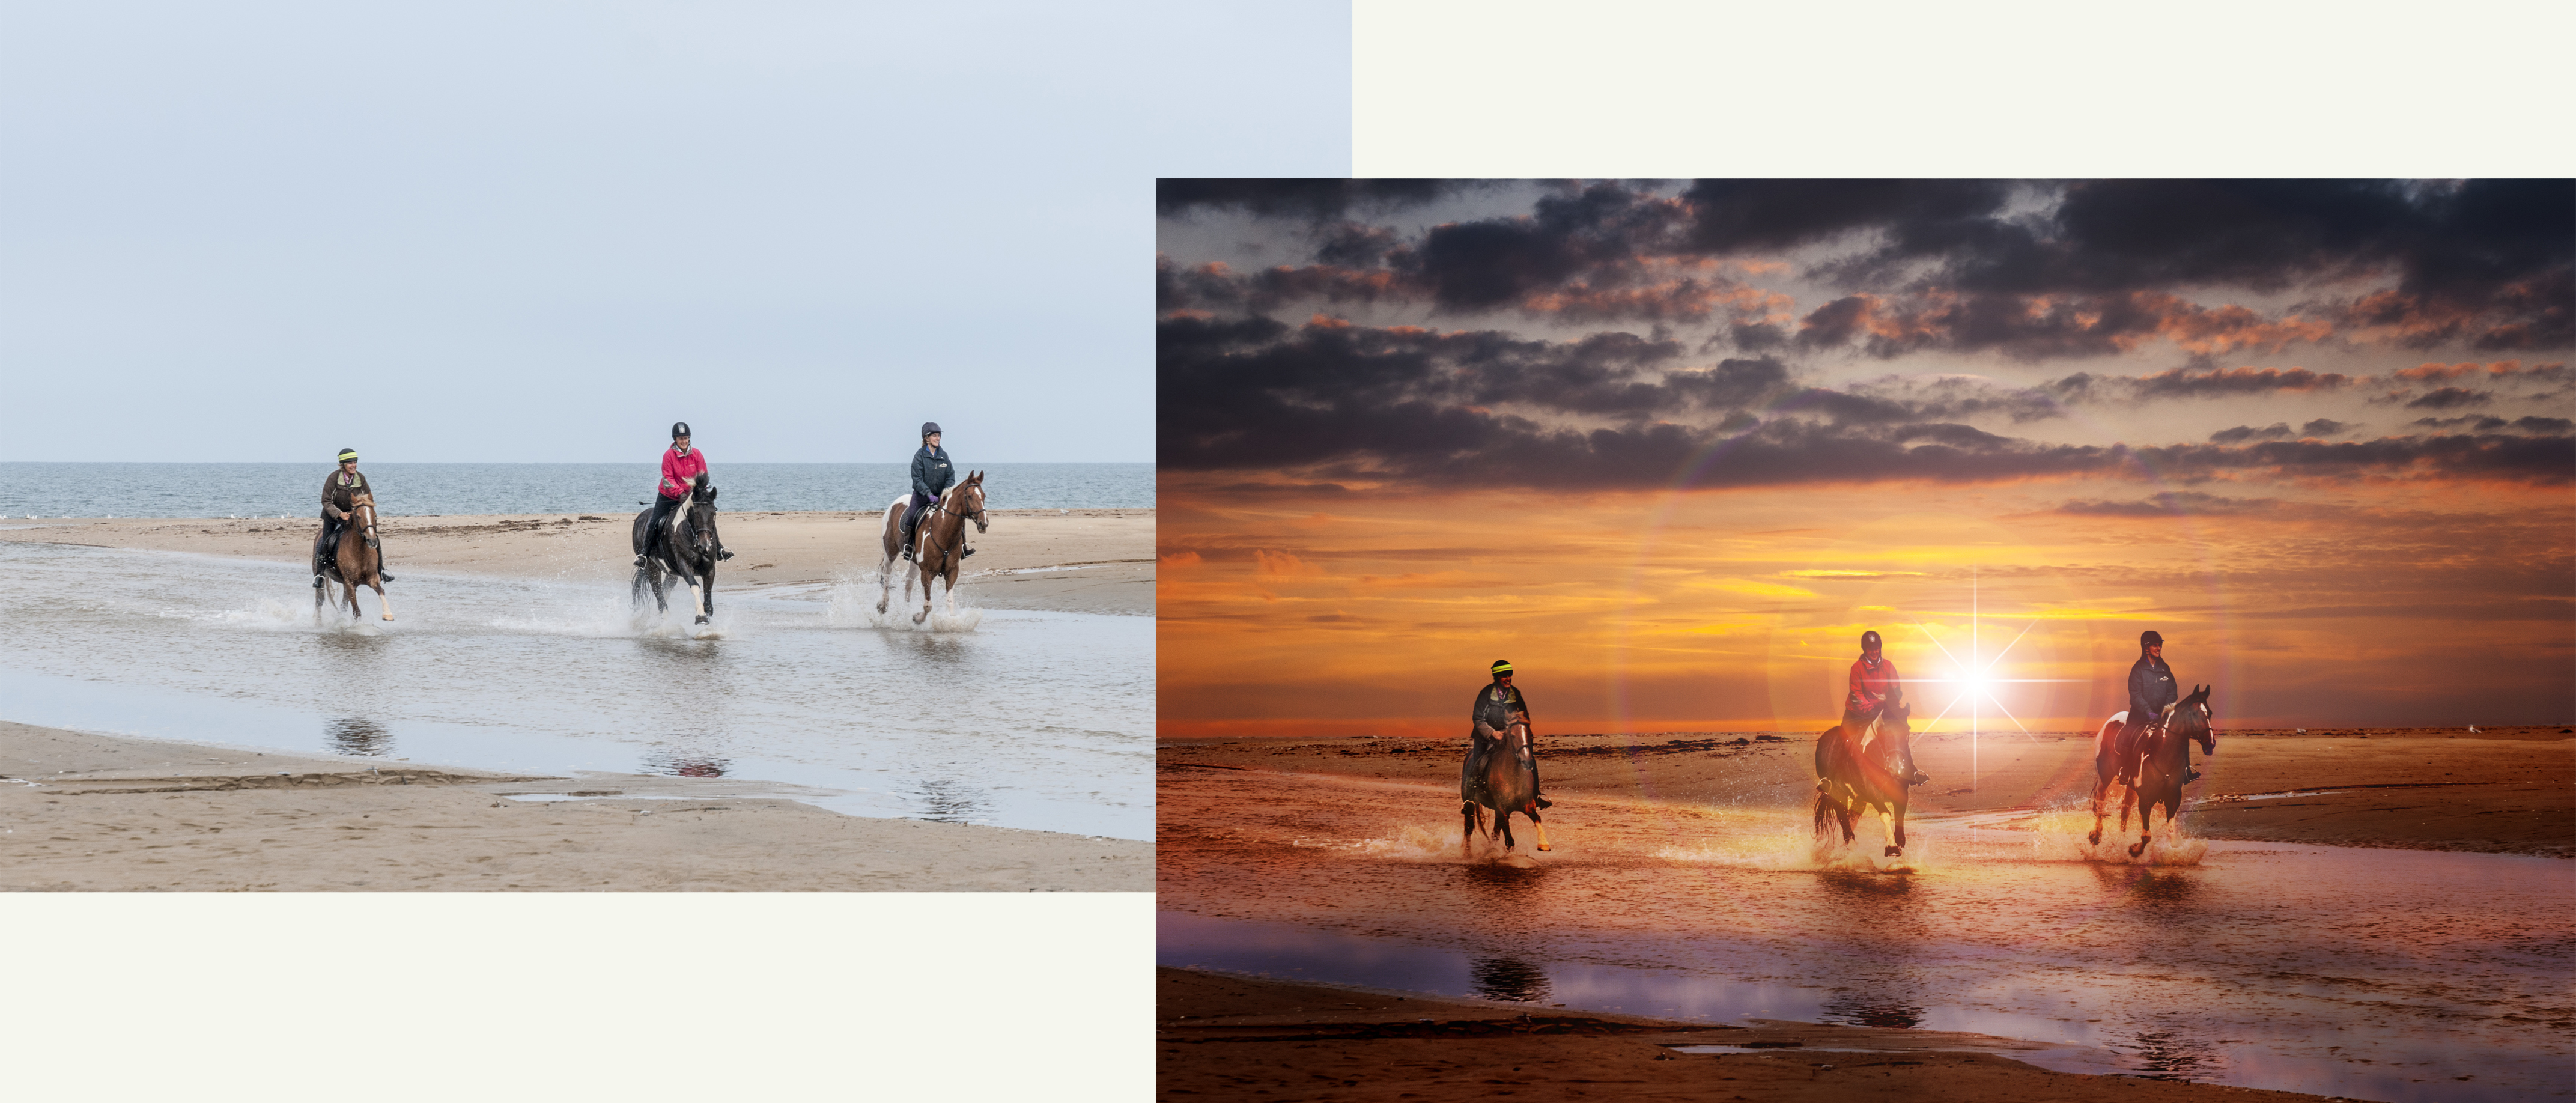
Nothing kills the mood of a shot quicker then a dull, bland sky. Whether it’s a cloudless expanse of uniform blue, or a dull, white sheet of nothing hanging above your scene, a dead sky often means a dead picture.
Tips and tutorials
• How to download Photoshop
• 100 Photoshop tips!
• 15 top Photoshop fixes
• More Photoshop tutorials
• Photoshop Elements tutorials
Free Photoshop stuff
• 55 free Photoshop brushes
• 63 free Photoshop templates
• 52 free Photoshop plug ins
• 63 free Photoshop actions
• Free textures for Photoshop
• Free frames and borders
Adding a new sky in post production is a surefire way to change the mood and increase the appeal of an image. Because this Photoshop fix is so useful, it’s a trick every photographer needs to know.
In its simplest form, transplanting a sky requires nothing more than pasting in a better one on a new layer, and blending the two layers together with the Eraser tool (or a Layer Mask) to fashion a seamless join. This will work successfully with flat, unbroken horizons and skies captured in similar lighting conditions, but when elements protrude above the horizon, or when the new sky is dramatically different in character to the old one, more advanced techniques are needed to get a good-looking result.
Here, we’ve picked a tricky project, as we’ve added a vibrant sunset to a scene taken on an overcast day. Making the two shots work together requires some significant changes to contrast and color, but the end result boosts the emotional appeal and takes the image in a different direction.
Try it with our start images which you can download from the link provided below. After you've followed all the steps you'll be ready to check your own shots with lackluster skies, and see how you could transform them.
• Landscape photography tips and techniques
• Best cameras for landscapes
• Best lenses for landscapes
Download the start files here if you want to follow the steps on your own computer
The best camera deals, reviews, product advice, and unmissable photography news, direct to your inbox!
Step by step: Change your outlook
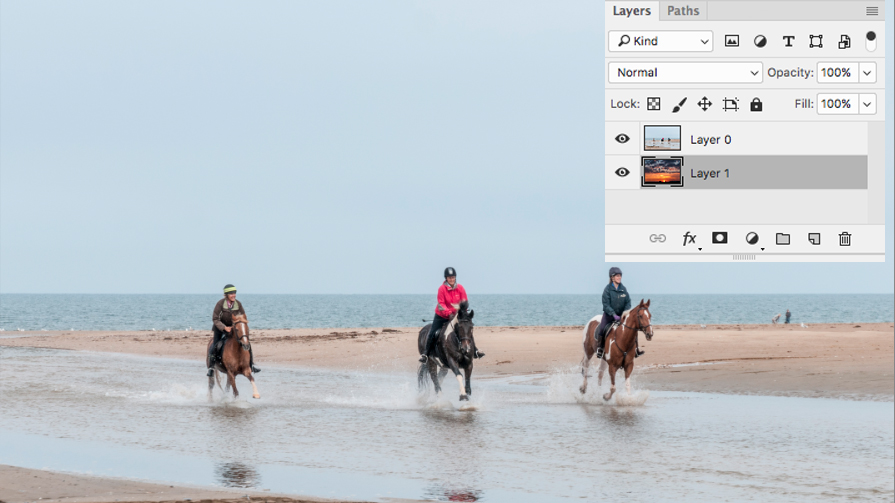
1. Open your image and new sky
Go to File > Open and load the image into which you would like to paste a new sky. Now open the Layers panel (Window > Layers). Hold the Alt key and double-click on the name of the Background layer. This will turn it into Layer 0 and make it editable. Now go back to File > Open and load the sunset sky you want to use (or our own Sunset.jpg start image).
When it’s on screen, press Ctrl/Cmd+A to select it, Ctrl/Cmd+C to copy it, and Ctrl/Cmd+W to close it. You’ll return to the main image, so now press Ctrl/Cmd+V to paste in the sunset. You need the main picture above the sky, so drag the sky downwards in the Layers panel so that it sits beneath the foreground in the layer stack. Now click back on the top layer to make it active.
2. Select the existing sky
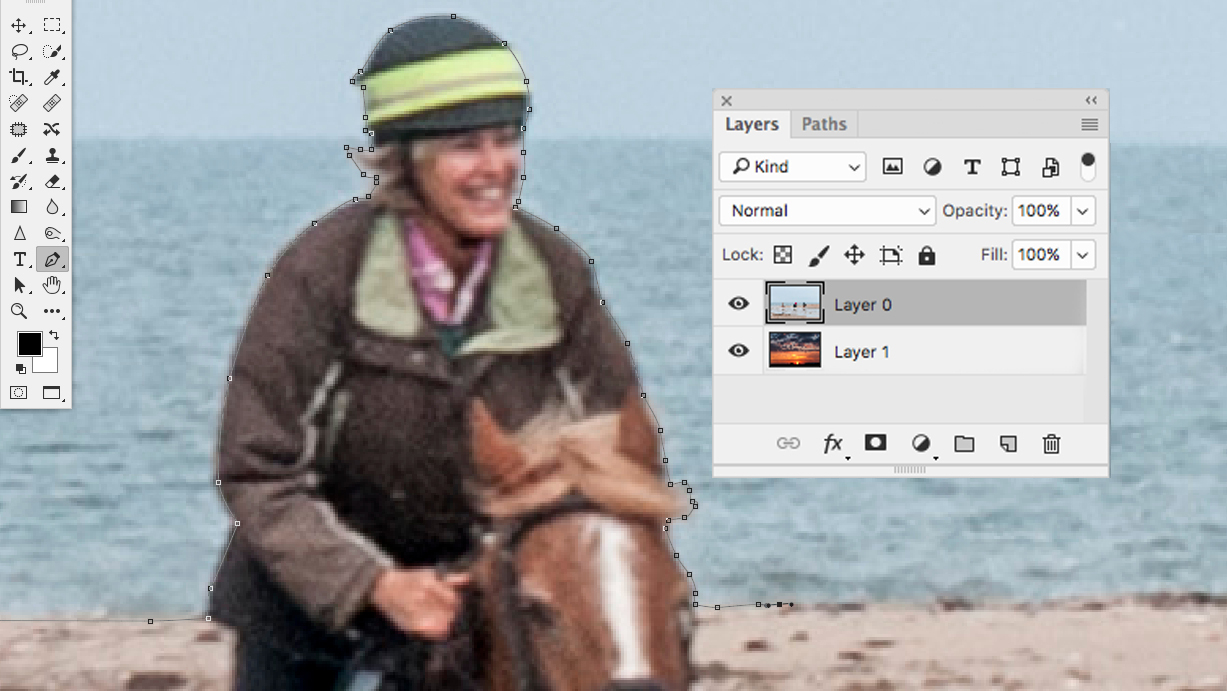
You need to create a hole in the image to allow the new sky to show through. On simple images you can use the Eraser tool, but for more complex pictures, you’ll need an accurate selection. Automated tools like the Magic Wand or the Quick Selection Brush may work on images with well-separated skies and hard edges, but we’ll do it manually.
Zoom in tight with Ctrl/Cmd+Plus to get a good view of the edge of the item you want to select. Now, with the Pen tool and starting on the extreme left, click along the horizon, dragging the mouse in the direction of travel to create gentle curves. When you get to any obstructions (such as the figures, above), carefully click around them, staying right on their edges.
3. Complete the Selection
Continue all the way to the right side of the horizon, then click around the very top of the image, taking in the whole of the sky. Click back to your starting point on the left hand horizon; when you hover the cursor over this, you’ll see a small ‘O’. Click once more and the path you’ve made with the Pen tool will be closed and completed.
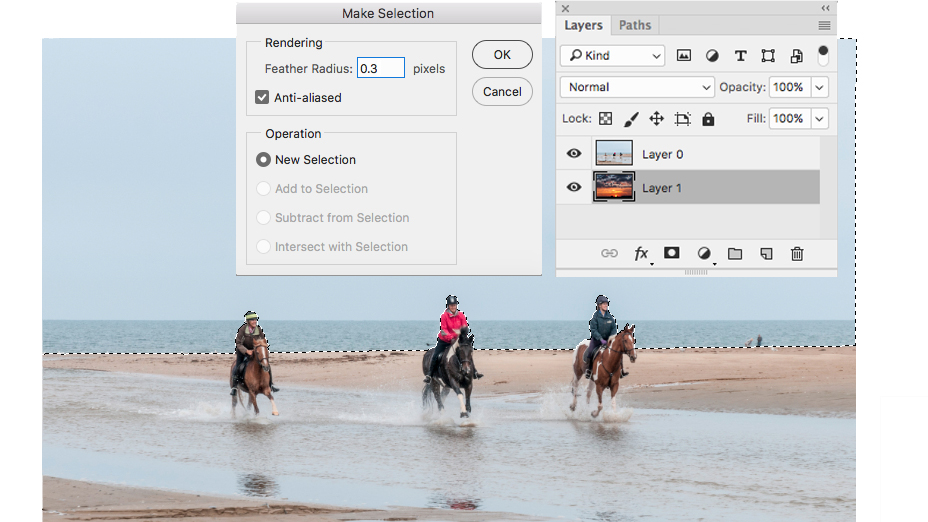
At present it’s a vector path. To turn it into a regular selection, right-click anywhere on the outline and choose Make Selection. In the dialog box, use a Feather Radius of 0.3px and ensure that New Selection is chosen. Click OK and you’ll see marching ants surround the sky. Provided you took your time with the Pen tool, you’ll now have a very accurate selection.
4. Add a Layer Mask
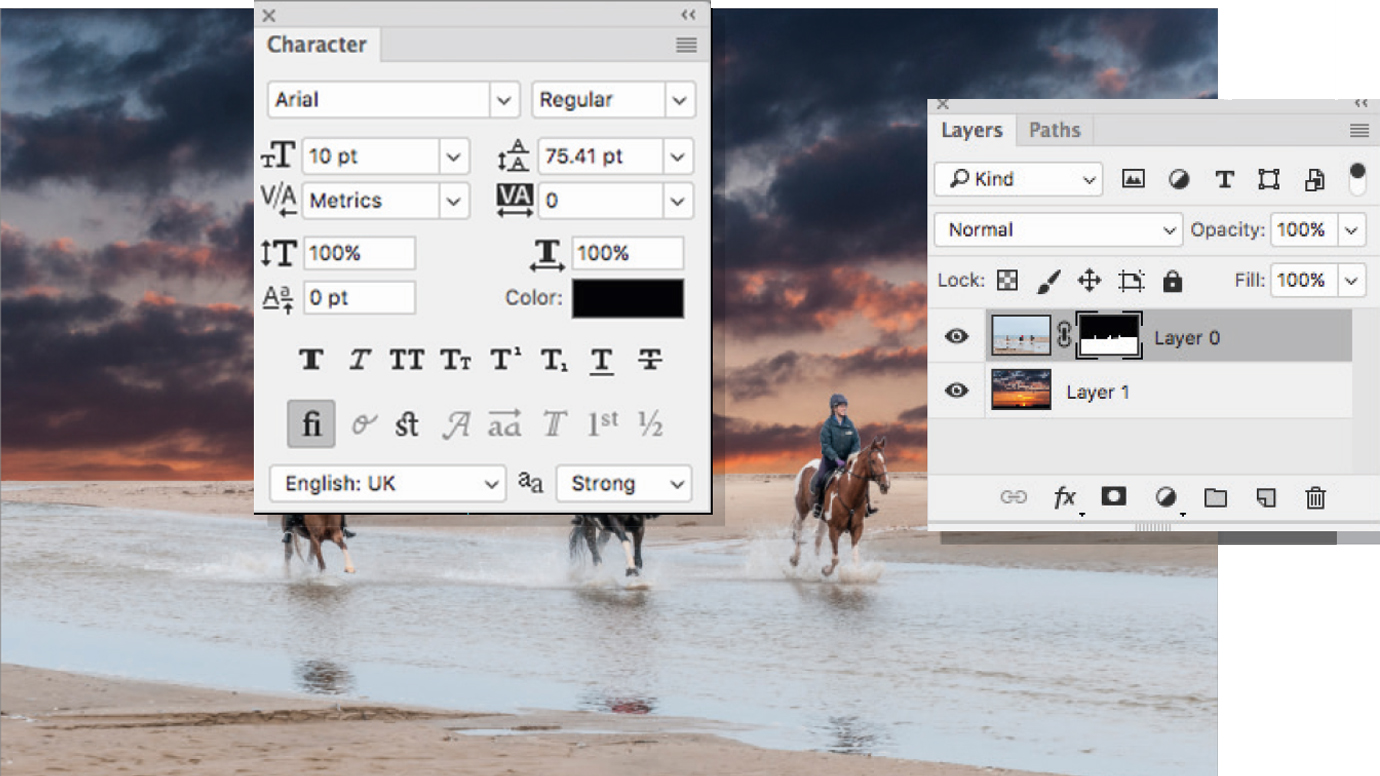
At present the sky is selected, but for the next stage, you need the inverse of this. In our example, this will select the foreground and horses. To swap the selection to this part, go to Select > Inverse or press Ctrl/Cmd+Shift+I. Click on the Add Layer Mask icon in the Layers panel, and the sky will show through the image.
If you get this step the wrong way round, and instead reveal the layer beneath through the wrong part of the picture, don’t worry. To fix it after applying a mask, all you have to do is click on the mask’s thumbnail in the Layers panel to make it active, and press Ctrl/Cmd+I to turn black into white, and white into black. This is always quicker than backtracking to ensure the selection is around the right part of the image.
Expert tip - Perfect your reflections
If you have puddles or streams in your foreground, reflecting your new sky in these areas will help lock your image together.
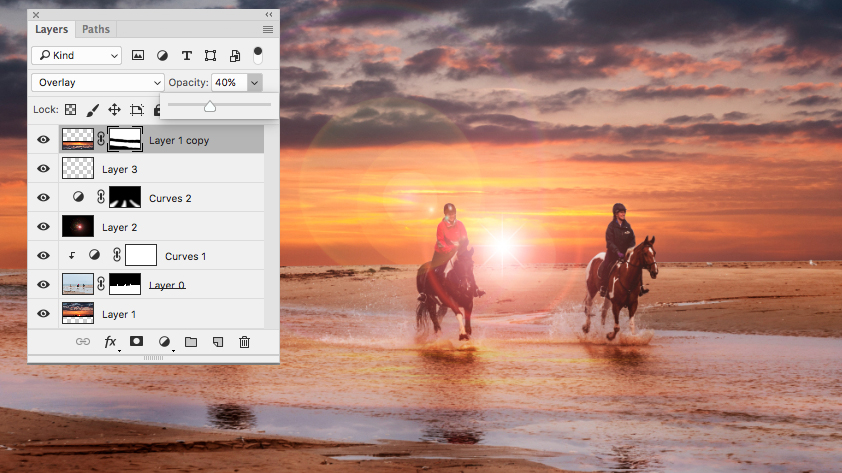
To do this, click on your sky layer, then press Ctrl/Cmd+J to copy it. Drag this new layer to the top of the layers stack, then change the Blend mode to Overlay. Reduce the layer Opacity to about 50%, then press Ctrl/Cmd+T to enter Free Transform mode. Pull the top handle down past the bottom handle to turn it upside-down, and position the reflected sky so it covers the water. To degrade the reflection, go to Filter > Blur > Motion Blur and add an Amount of 5-10 px with an Angle of 0.
To remove the reflection from areas where water isn’t present, click the Add Layer Mask icon. You’ll see a white rectangle appear alongside the upside-down sky. Select the Brush tool and use a soft-edged black brush of around 300-400px. Paint into the image to mask off the areas of land around the water. Reduce Opacity until it looks right.
5. Resize the new sky
The sky is now showing through the image, but it’s not looking remotely realistic.
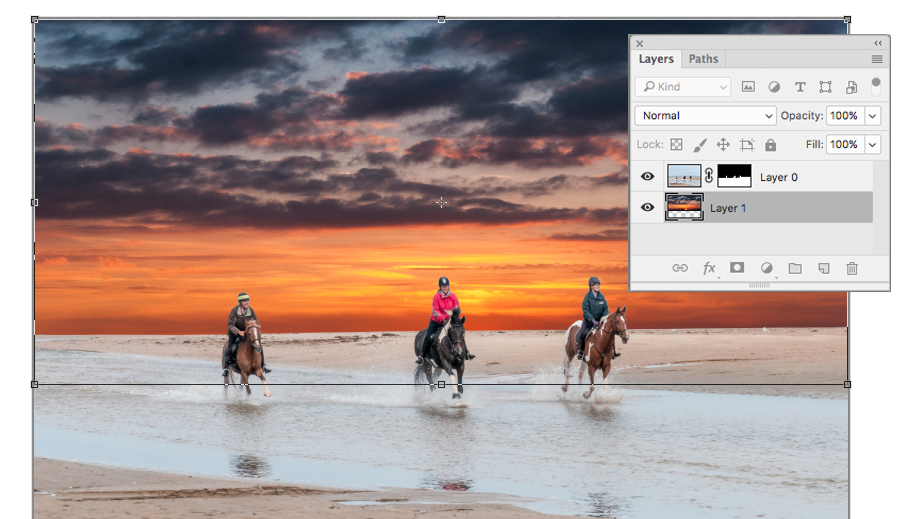
To get it into the right shape, click on the sky layer in the Layers panel to make it active, then press Ctrl/Cmd+T to enter Free Transform mode. Drag the handles of the bounding box to adapt the sky to suit your image. You may want to enlarge it to use just part of the sky, or stretch it out get a dramatic effect. On this example, we dragged up the bottom of the sky to squeeze more cloud detail and colour into the picture.
Once you’re happy with the sky’s position, press Return or double-click inside the Free Transform bounding box to set down the changes.
6. Change the picture’s contrast
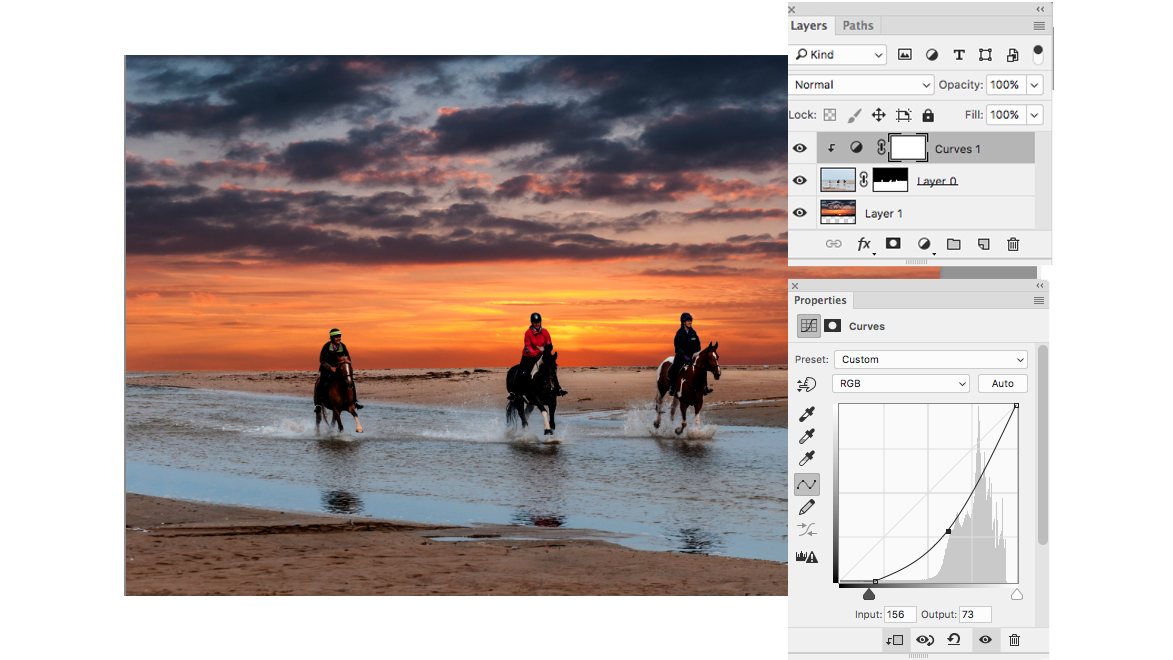
The main reason the new sky looks out of place is because the colours and contrast in the original scene are wrong for the sunset-style lighting. The contrast needs to be much stronger, and the colours need to be much warmer.
To address the contrast, click on the layer with the foreground to make it active, then click the Adjustment Layer icon. Choose Curves from the dropdown list, and in the dialog box, click the Clip Layer icon to make sure the changes are restricted to this layer alone. Now drag the line downwards to make the image darker, until the subjects are in semi-silhouette. You can also move the black point a little to the right to deepen the shadows.
7. Adjust the colours
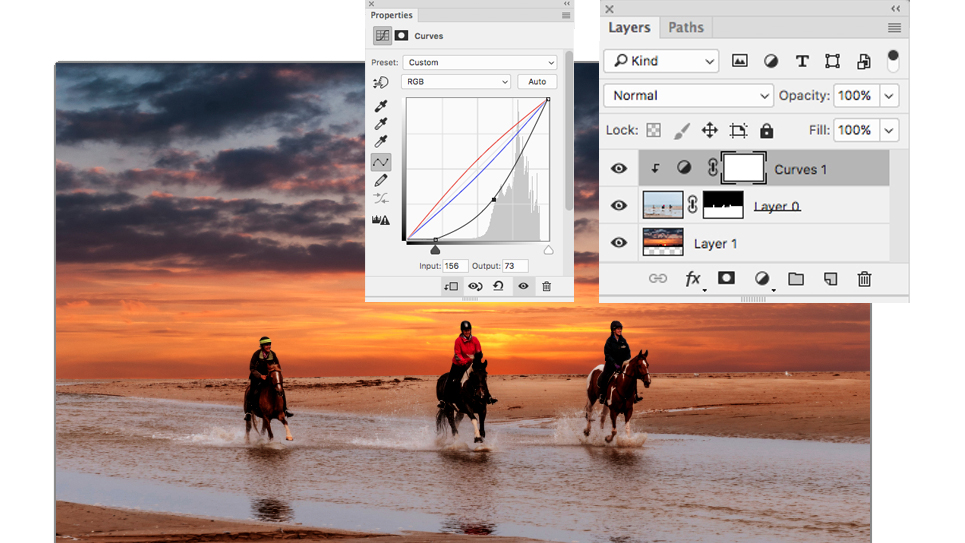
Staying in the Curves palette, click where it says RGB and select the Red Channel. Push the curve up a little to increase the Red content of the image. Now click where it says Red and select the Blue channel. Pull the curve in the opposite direction to add a Yellow colour cast to the image. The red and yellow hues will mix together to give a warm colour balance that’s a better match for the sunset backdrop you’ve added.
Because it’s an Adjustment Layer, nothing is fixed, so you can adjust the curves at any time by double-clicking the Curves icon to the left of the white rectangle.
8. Add a new sun
It’s now time to introduce a ‘sun’ to give a strong point of interest.
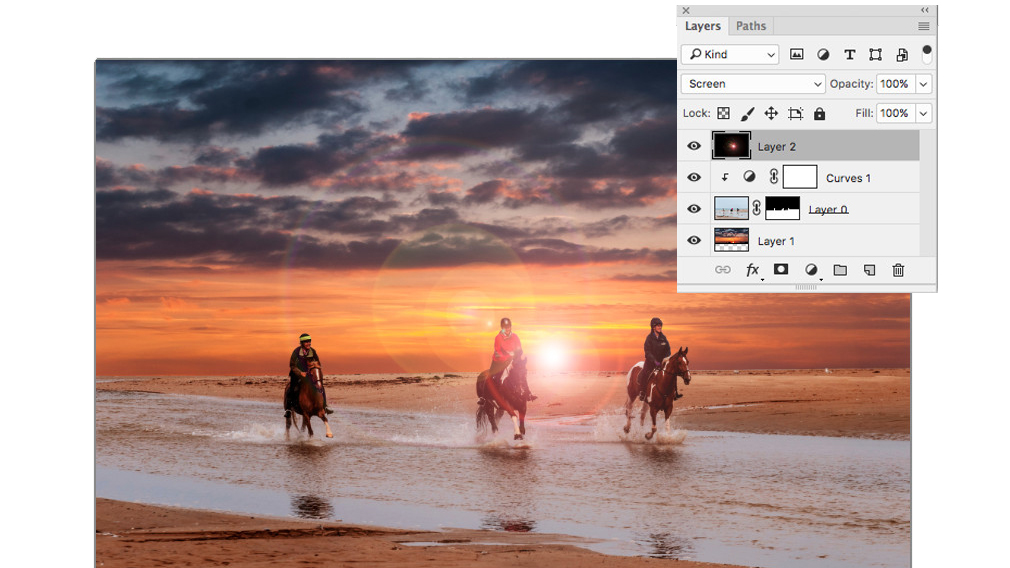
Click on the top layer to make it active, then press Ctrl/Cmd+Alt+Shift+N to create a new blank layer above it. Press D to reset the colours to black and white, then press Alt+Backspace to fill the new layer with black. The image will be obscured, but click where it says Normal and select the Screen Blend mode, and it will show through the black layer.
Go to Filter > Render > Lens Flare. Using the 50-300mm Zoom option with a Brightness of 100%, click on the preview where you want your sun to appear. Click OK, then use the Move tool or the cursor keys to fine-tune the position of your sun.
9. Create some subtle shadows
The last step on our example image is to create some subtle shadows. Of course, you may not need to do this on your image, depending on its contents.
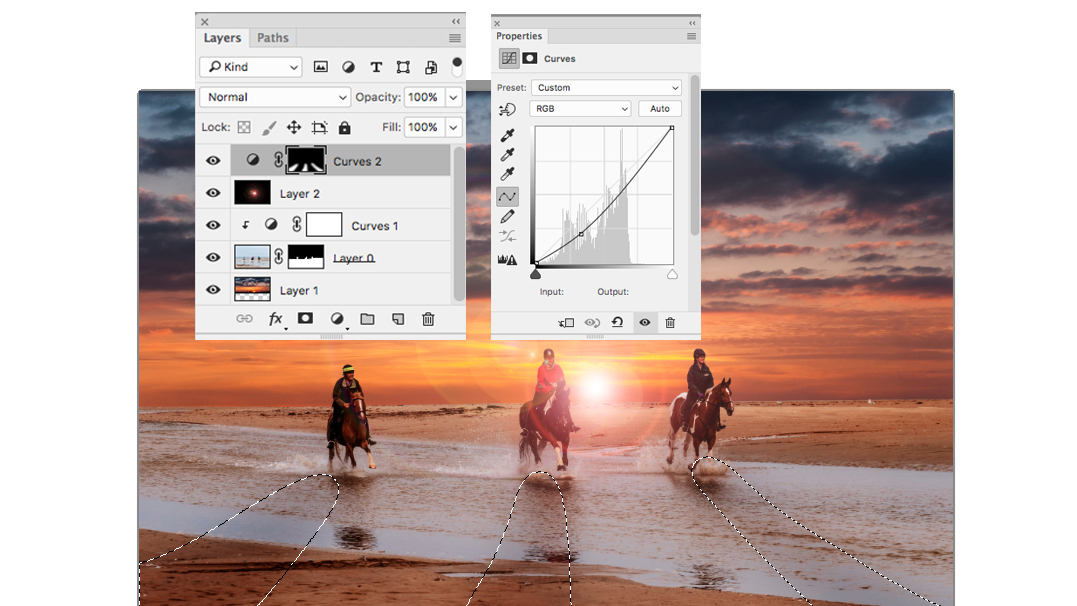
With the Lasso tool, draw a selection at the bottom of the image in the shape of a shadow cast by your subject; here, it's the horse on the left. Make sure it fans out according to the position of your digital sun. Once you’ve drawn your first shadow shape, hold Shift to add to the selection, and draw additional shadow shapes from any other subjects.
Next, click the Select And Mask button in the Tool Options bar at the top of the screen; in the dialog box, move the Feather slider to the right. This will soften the edges of your selections. Click OK, then click the Adjustment Layer icon, choosing Curves from the list. Pull the curve down to see the selected areas darken, giving the effect of shadows cast by the horses.
10. Expert tip – How to enhance your sun
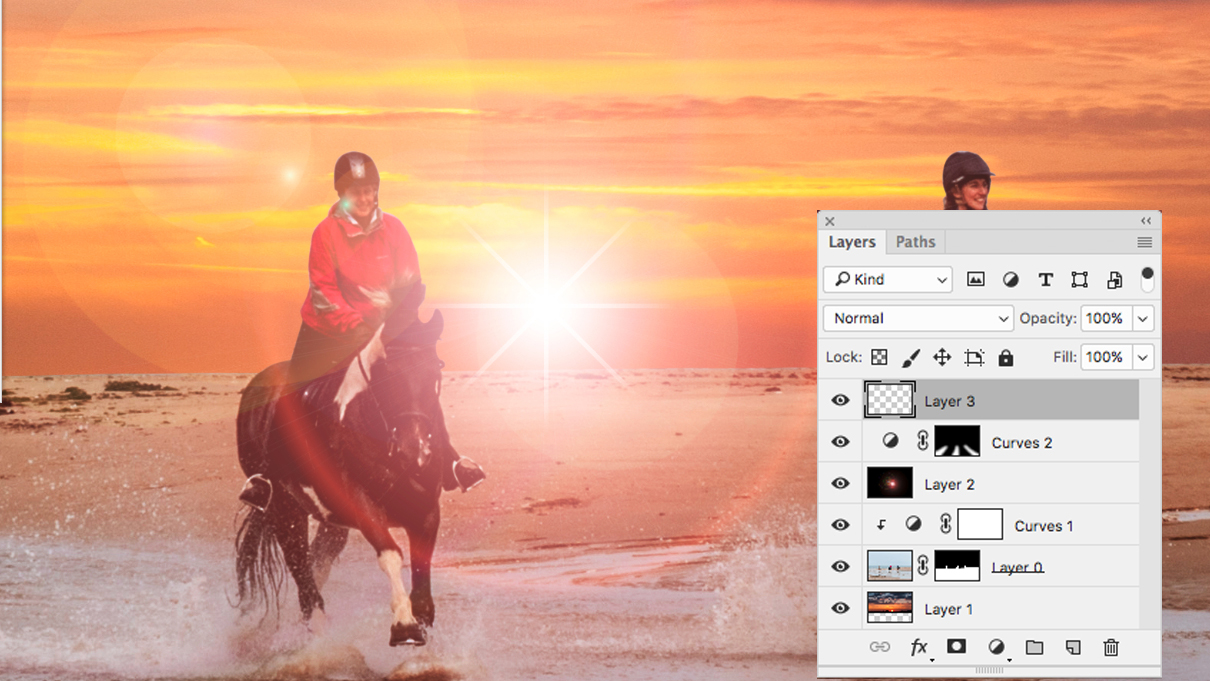
Here’s how to add a starburst to your light source. Click on your sun layer and press Ctrl/Cmd+Alt+Shift+N to make a new layer. Press D then X to make white the foreground color, and select the Pencil tool. Using a 6px pencil, click in the middle of the sun and, while holding Shift, draw a line to the left. Still holding Shift, and without releasing the mouse, extend this line by the same distance to the right.
Go to Filter > Blur > Motion Blur, and use a distance of 250px and an Angle of 0 degrees. Copy this layer with Ctrl/Cmd+J and press Ctrl/Cmd+T. Hold the cursor outside the bounding box and while holding Shift, rotate the line until it’s vertical. Press Return to confirm the changes, then press Ctrl/Cmd+E to merge the layers, forming a white cross. Press Ctrl/Cmd+J to copy the layer and press Ctrl/Cmd+T once more. Rotate this layer to 45 degrees (hold Shift to make this easy) and press Return. Press Ctrl/Cmd+E again to merge the layers.
Read more:
• Best photo-editing software
• Best laptops for photographers
• Best desktop computers for photo editing
• 11 home photo projects
• 72 tips cards to cut out and keep
• Photography tips for beginners
• Best budget laptops
• Best Chromebooks
• Best desks for home working
• Best video conferencing apps
Jon started out as a film-maker, working as a cameraman and video editor before becoming a writer/director. He made corporate & broadcast programmes in the UK and Middle East, and also composed music, writing for TV, radio and cinema. Jon worked as a photographer and journalist alongside this, and took his video skills into magazine publishing, where he edited the Digital Photo magazine for over 15 years. He is an expert in photo editing, video making and camera techniques.
