Lightroom series part 18: Get the hand-colored look in Lightroom
Give an ordinary landscape an otherworldly feel when you remove the colour and choose your own hues
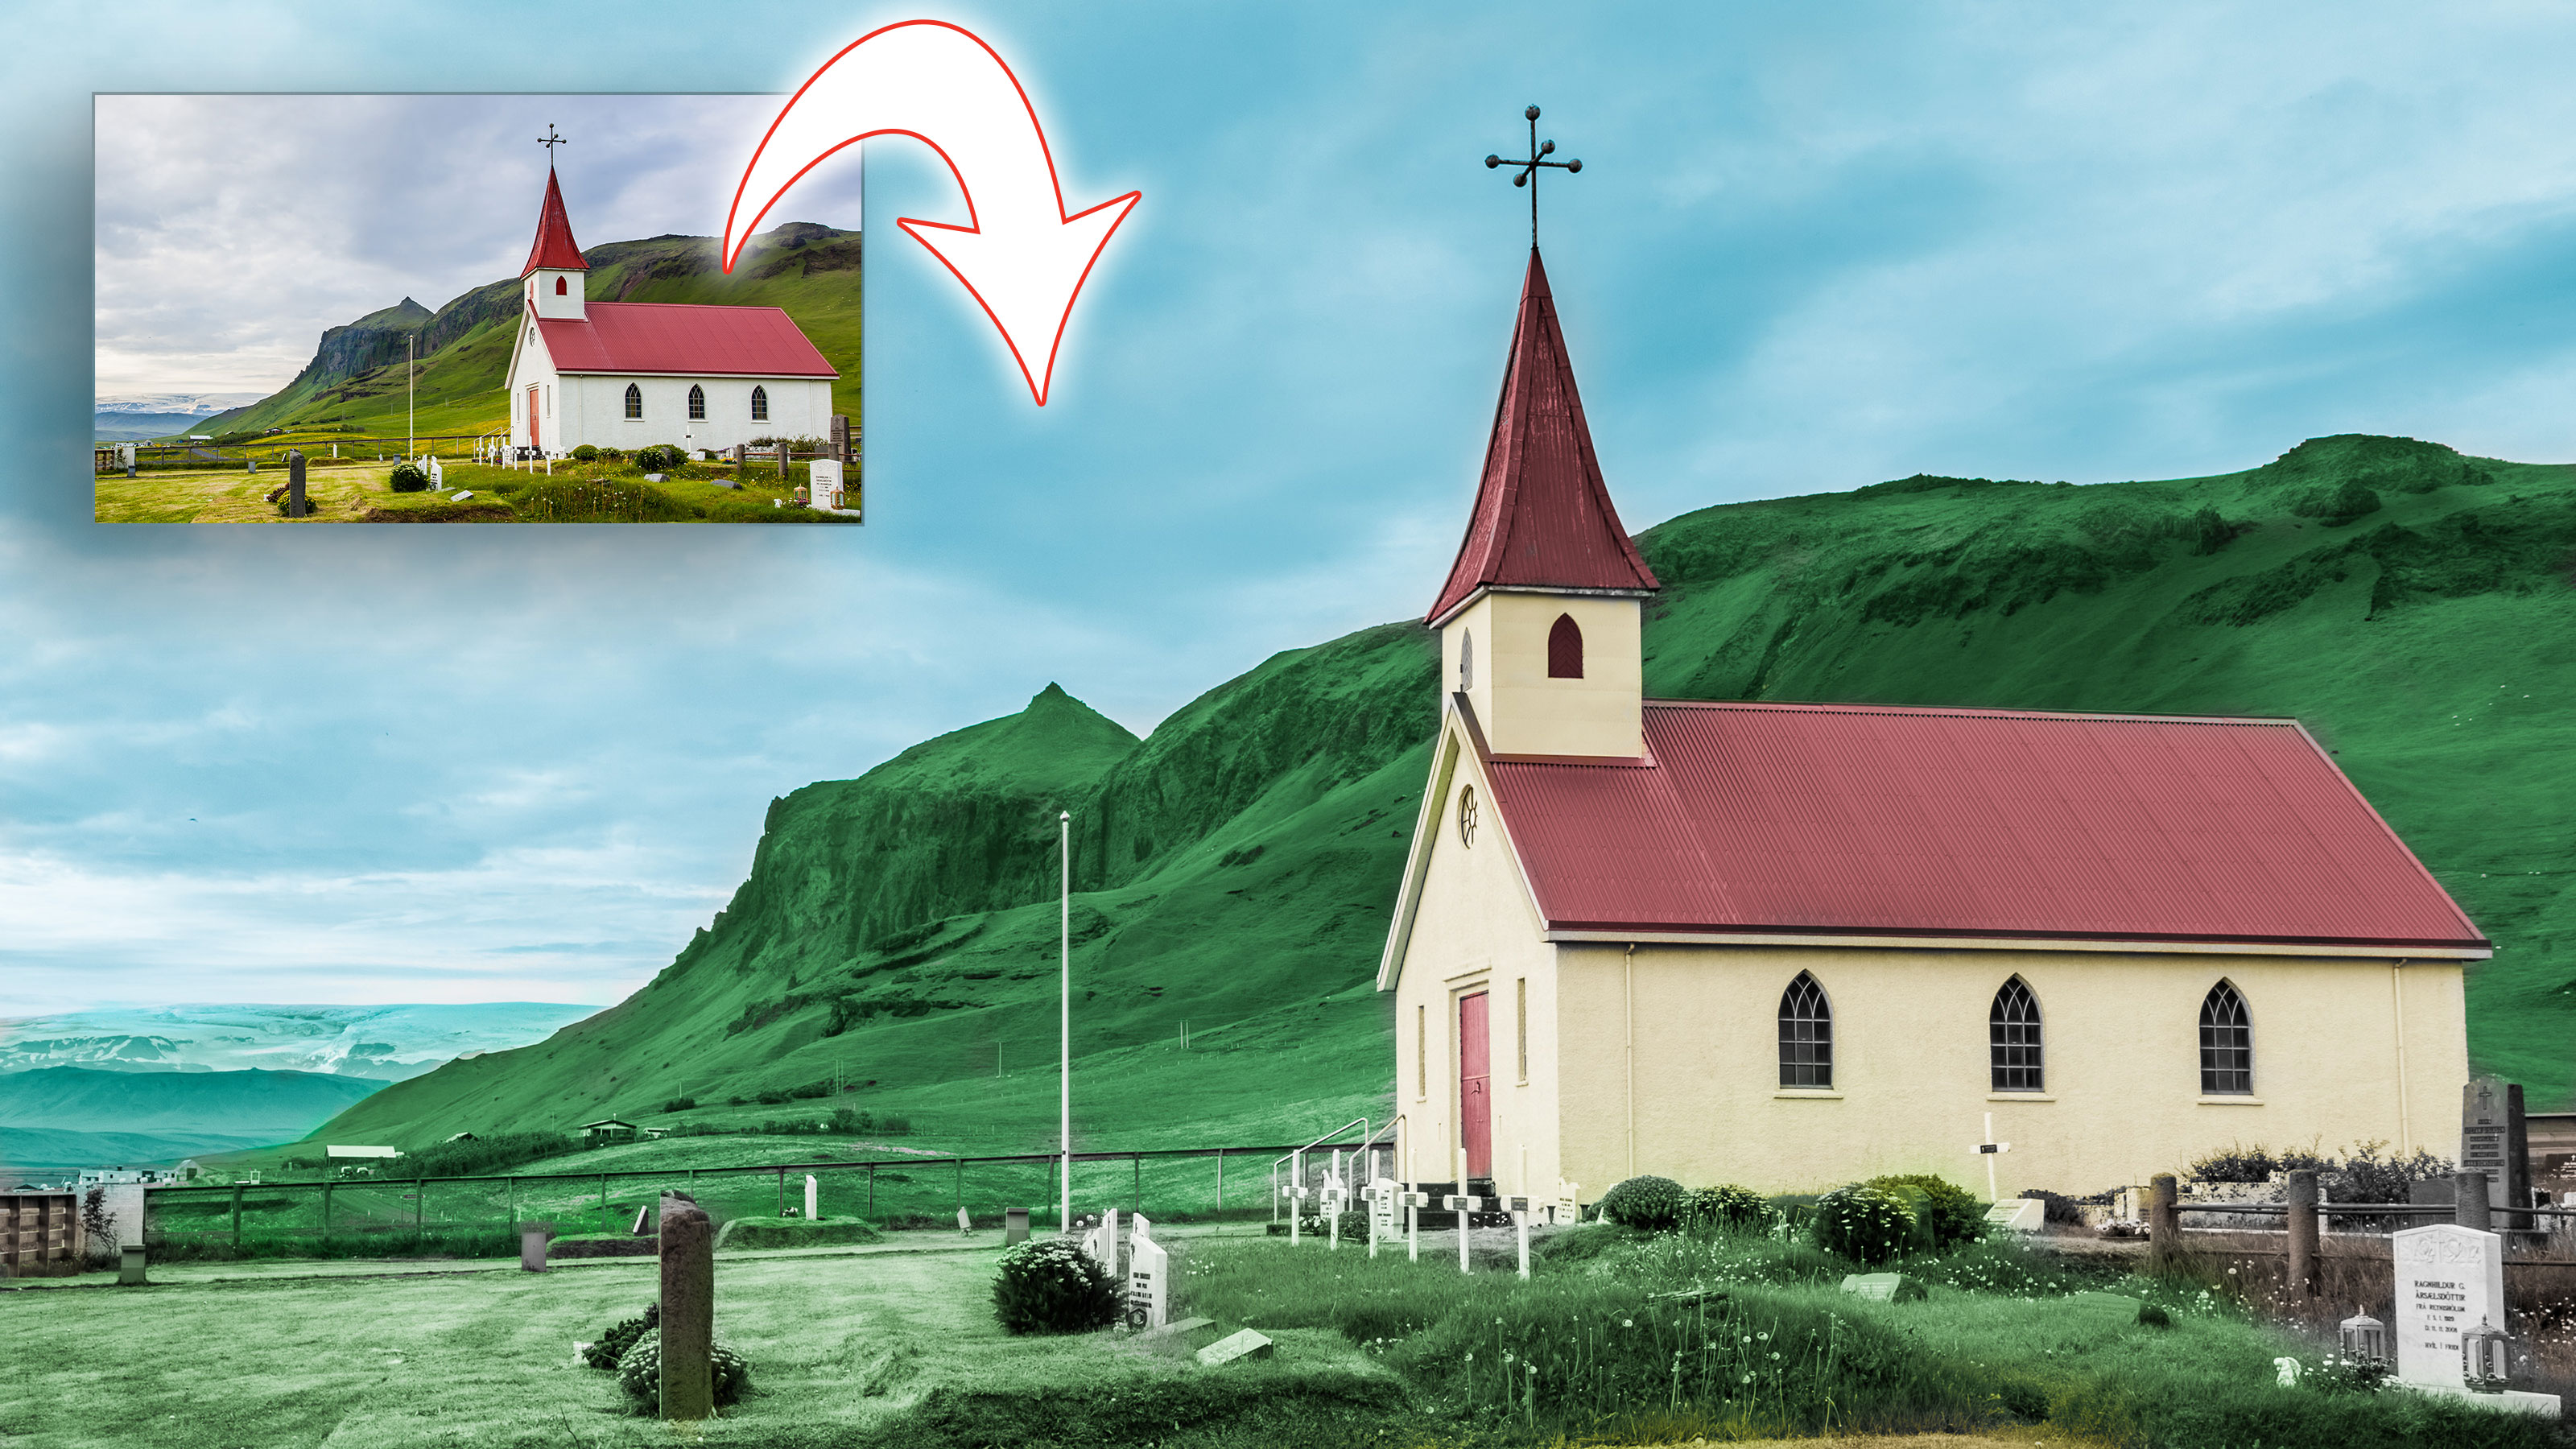
If you've seen films like The Wizard of Oz, you’ll immediately recognise the hand-coloured look. In the scenes between the black-and- white section of the film and the colour section, there’s a whole series of frames that were hand-painted.
Welcome to the 18th instalment of our Lightroom series, first published in Digital Camera magazine (see below for subscription offers).
If you are already a Lightroom user, you could discover some new tricks and processes you haven't tried yet. If you don't use Lightroom, then scroll down to the bottom where you'll discover how to get it and which Adobe Photography Plan is best.
Before the introduction of colour film, many black-and- white films were painstakingly coloured in, frame by frame, until the entire film looked like it was created in colour. Due to the size of the frame, a brush with a single camel hair was often used to do the colouring. The muted palette of these films gives a distinctive look. Fortunately it’s a lot easier now to create this look inside Lightroom, especially as you only have one frame to paint.
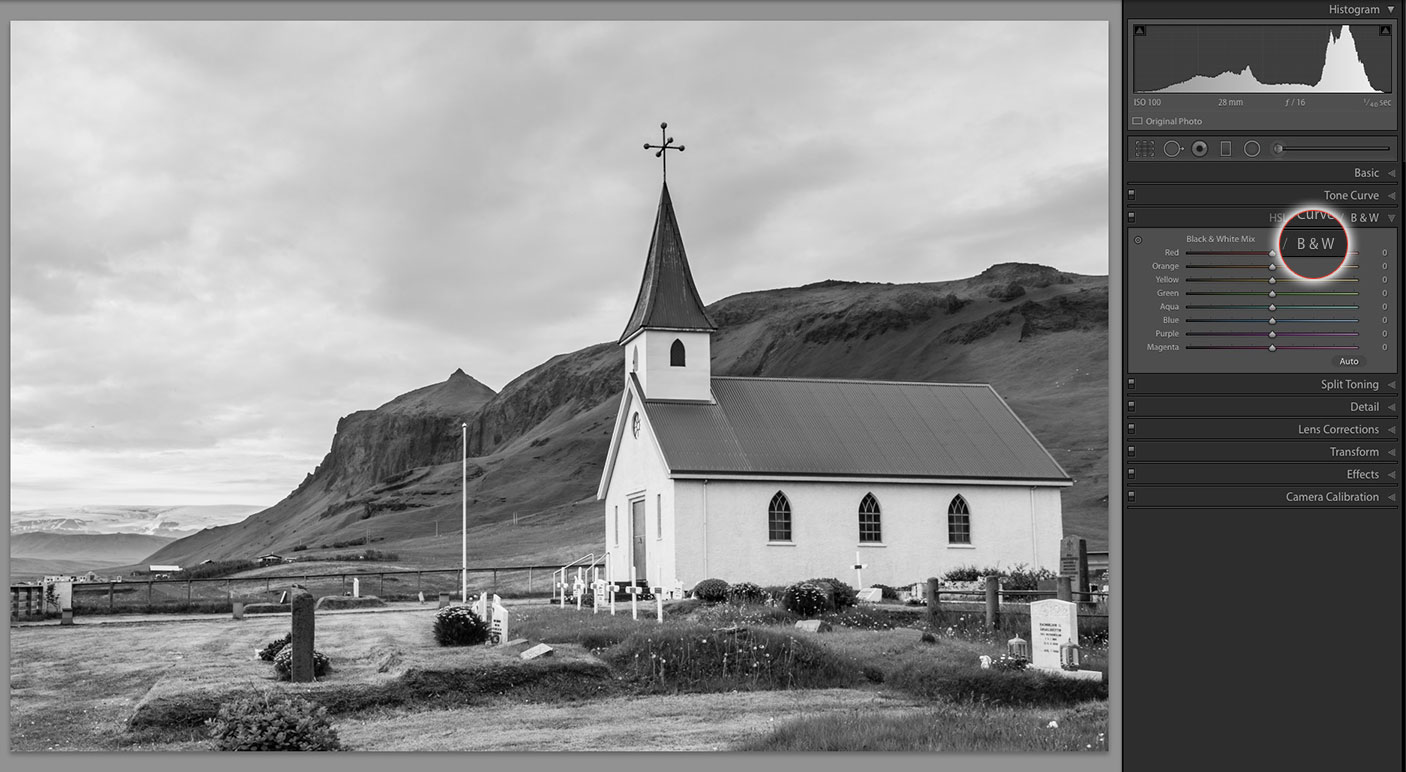
In this tutorial, you’ll see how you can use Lightroom to create a similar hand-painted look. First you’ll remove the existing colour with a mono conversion; then you’ll use the Adjustment Brush to reinstate the colours you want.
• See more Lightroom tutorials
1. Convert to mono
The first step is take the image to black and white. There are a few ways to do this in Develop: bring Saturation to -100; click Black & White in the Treatment section of Basic; press B&W in the HSL/Color/B&W panel; or press the V key.
The best camera deals, reviews, product advice, and unmissable photography news, direct to your inbox!
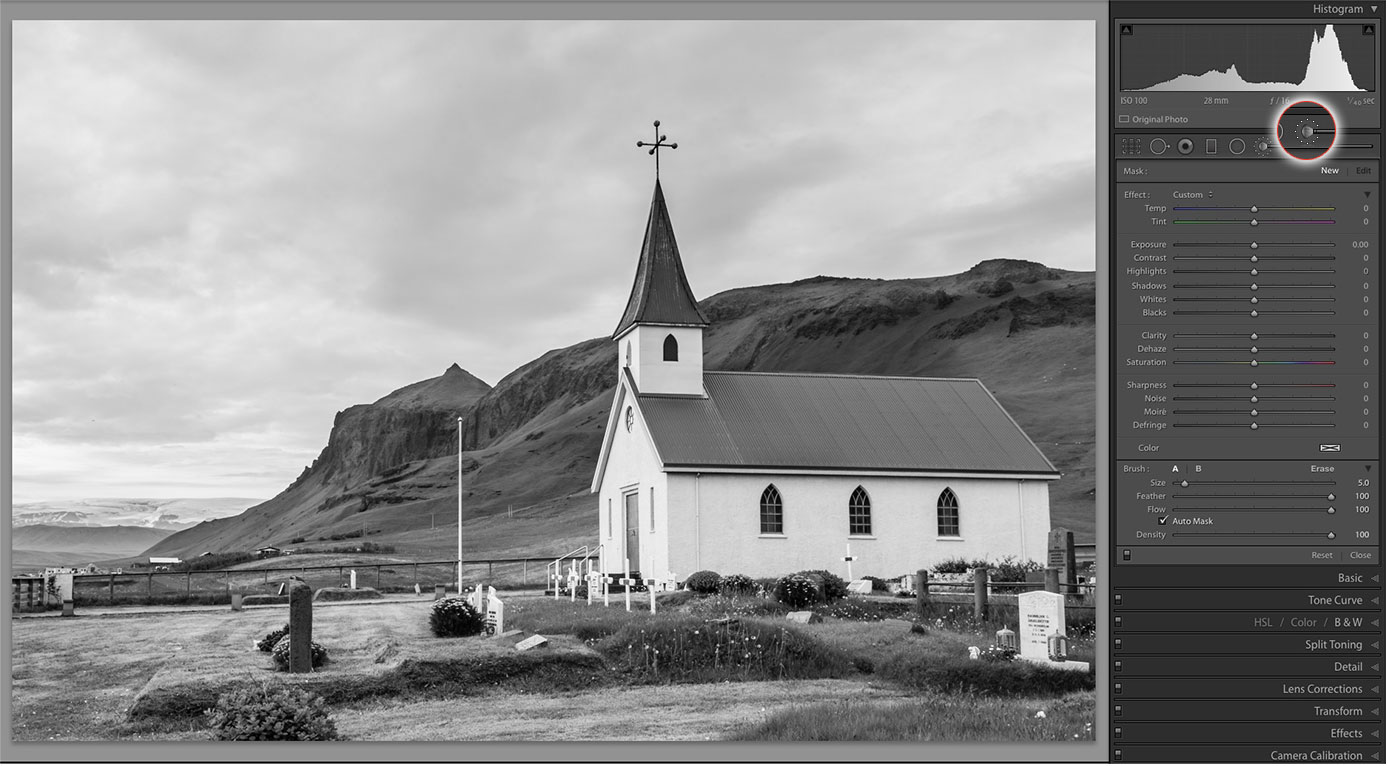
2. Prepare to paint
To paint in each area, you need to use the Adjustment Brush. Press K to activate it, or click on the brush icon under the Histogram. Change the size of the brush using the Size slider or the square bracket keys [ and ].
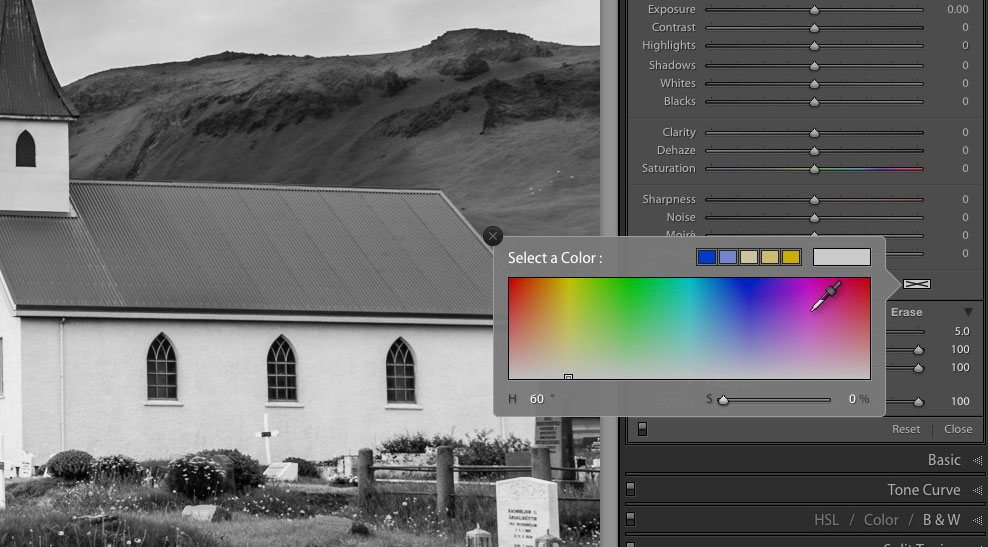
3. Choose a color
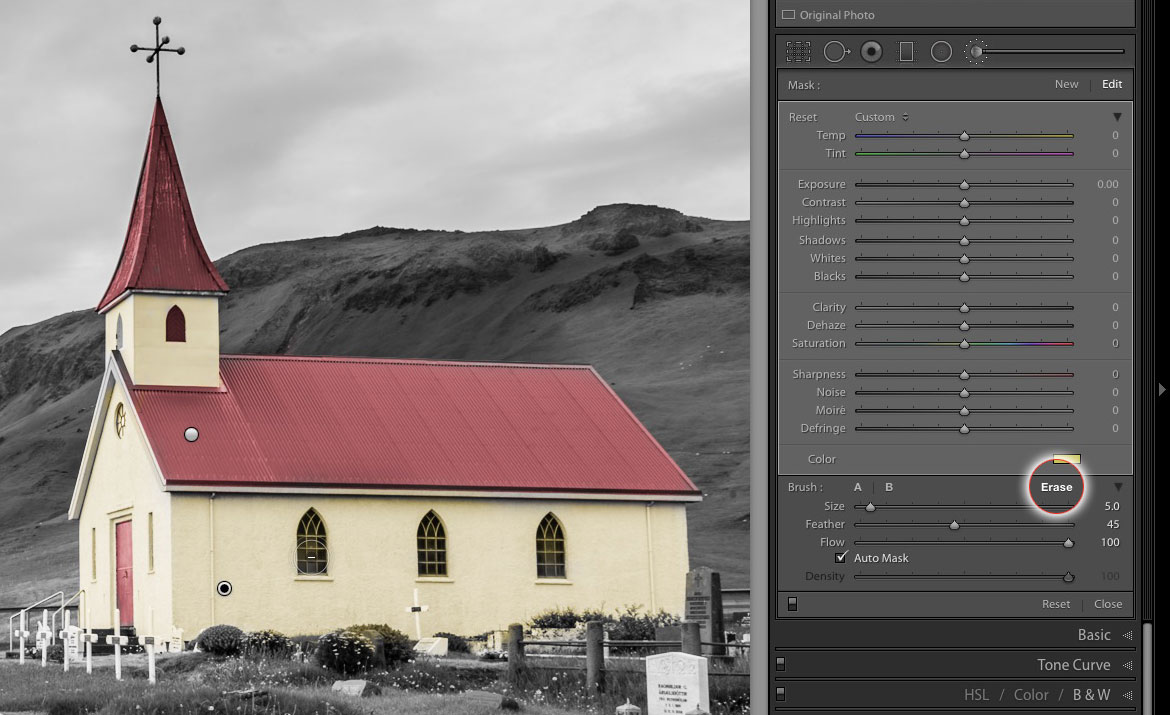
Double-click the Effect label in the panel to reset everything. (You’re only colouring, so everything else should be set to 0.) At the bottom of the panel, click the empty swatch. (It has an X in it.) This opens the Color Picker. Choose your first colour.
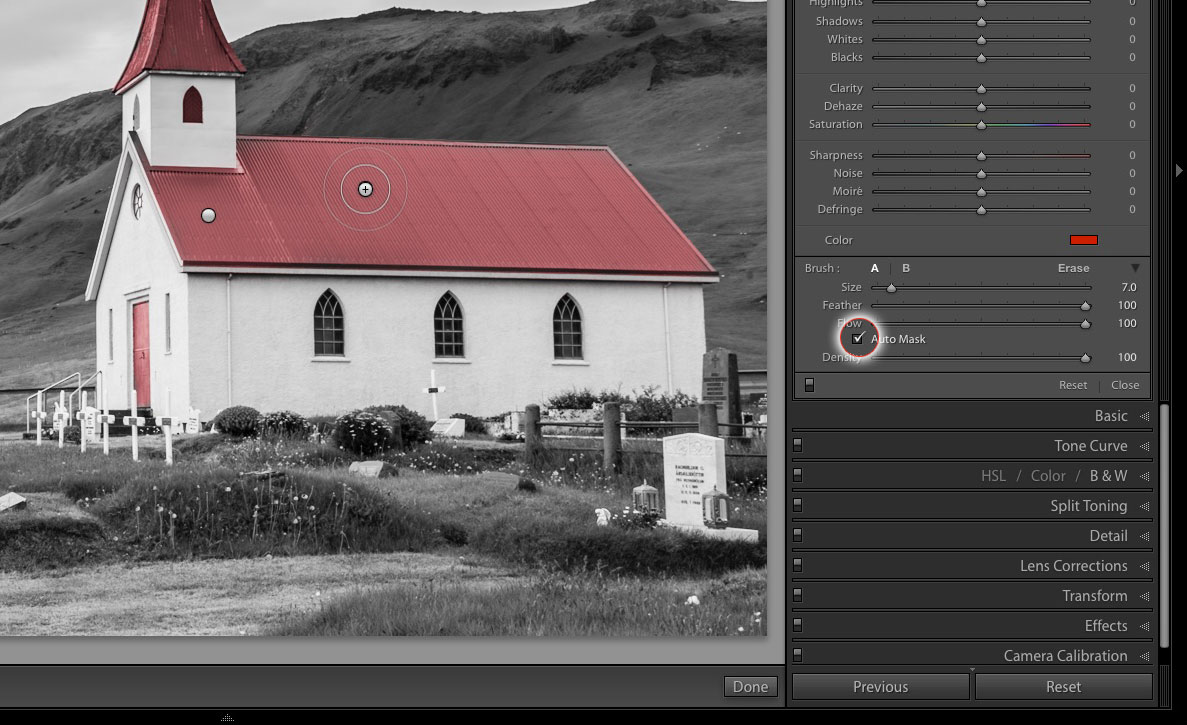
4. Get control over edges
To get an even line on edges, turn on the Auto Mask checkbox. This makes the color edge-aware, so you can paint near edges neatly. For larger areas, turn off Auto Mask, so you can fill them in quickly.
5. Correct mistakes
If you make a mistake as you paint, hold down Alt to switch quickly to the Erase tool. Brush over the mistake, then release the Alt key to continue. Alternatively, click on the Erase Brush to make your change.
6. Pick another color
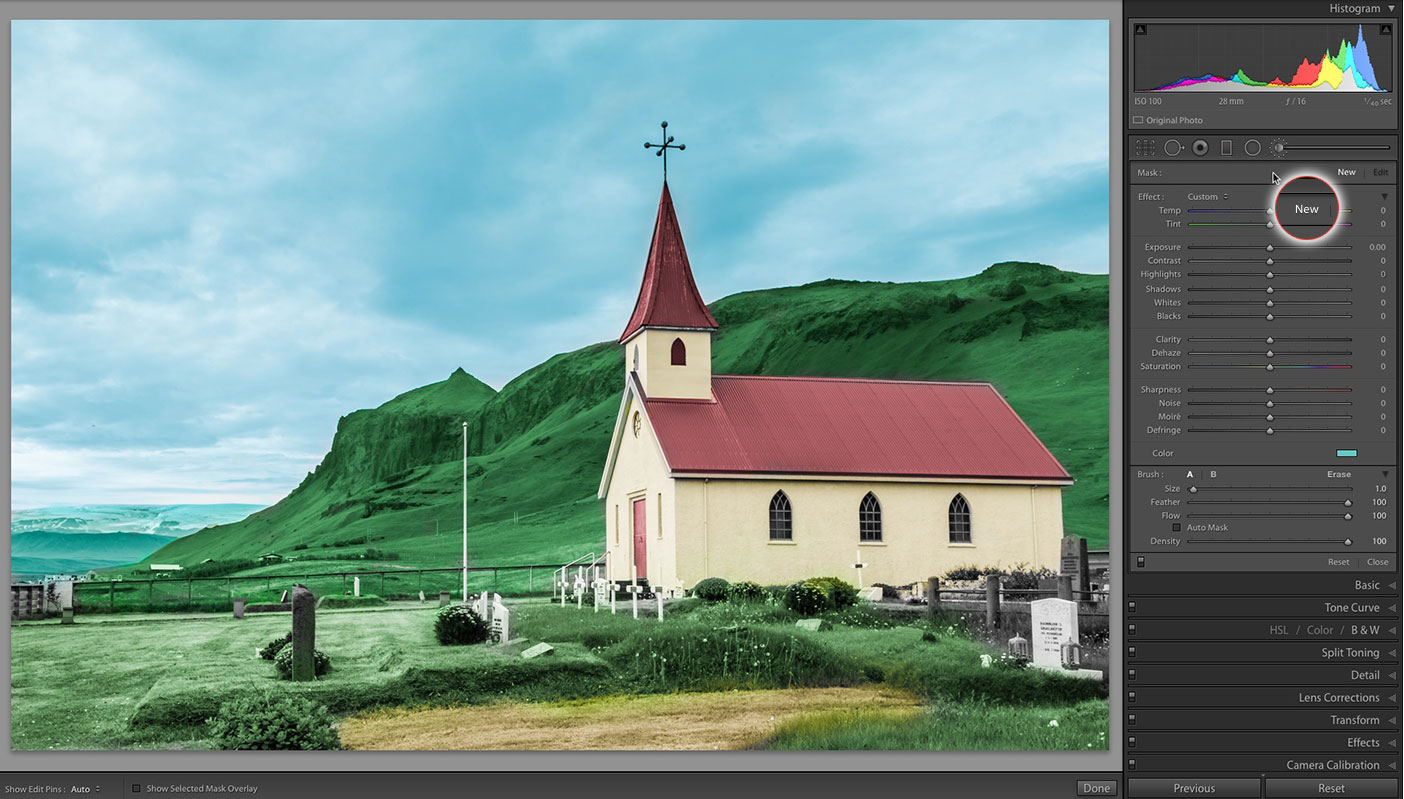
When you want to change the color, click the New button at the top of the panel, otherwise whatever you’ve already painted will take on the new colour. Choose another color by clicking on the swatch to bring up the Color Picker again.
Expert tip: Change colors later
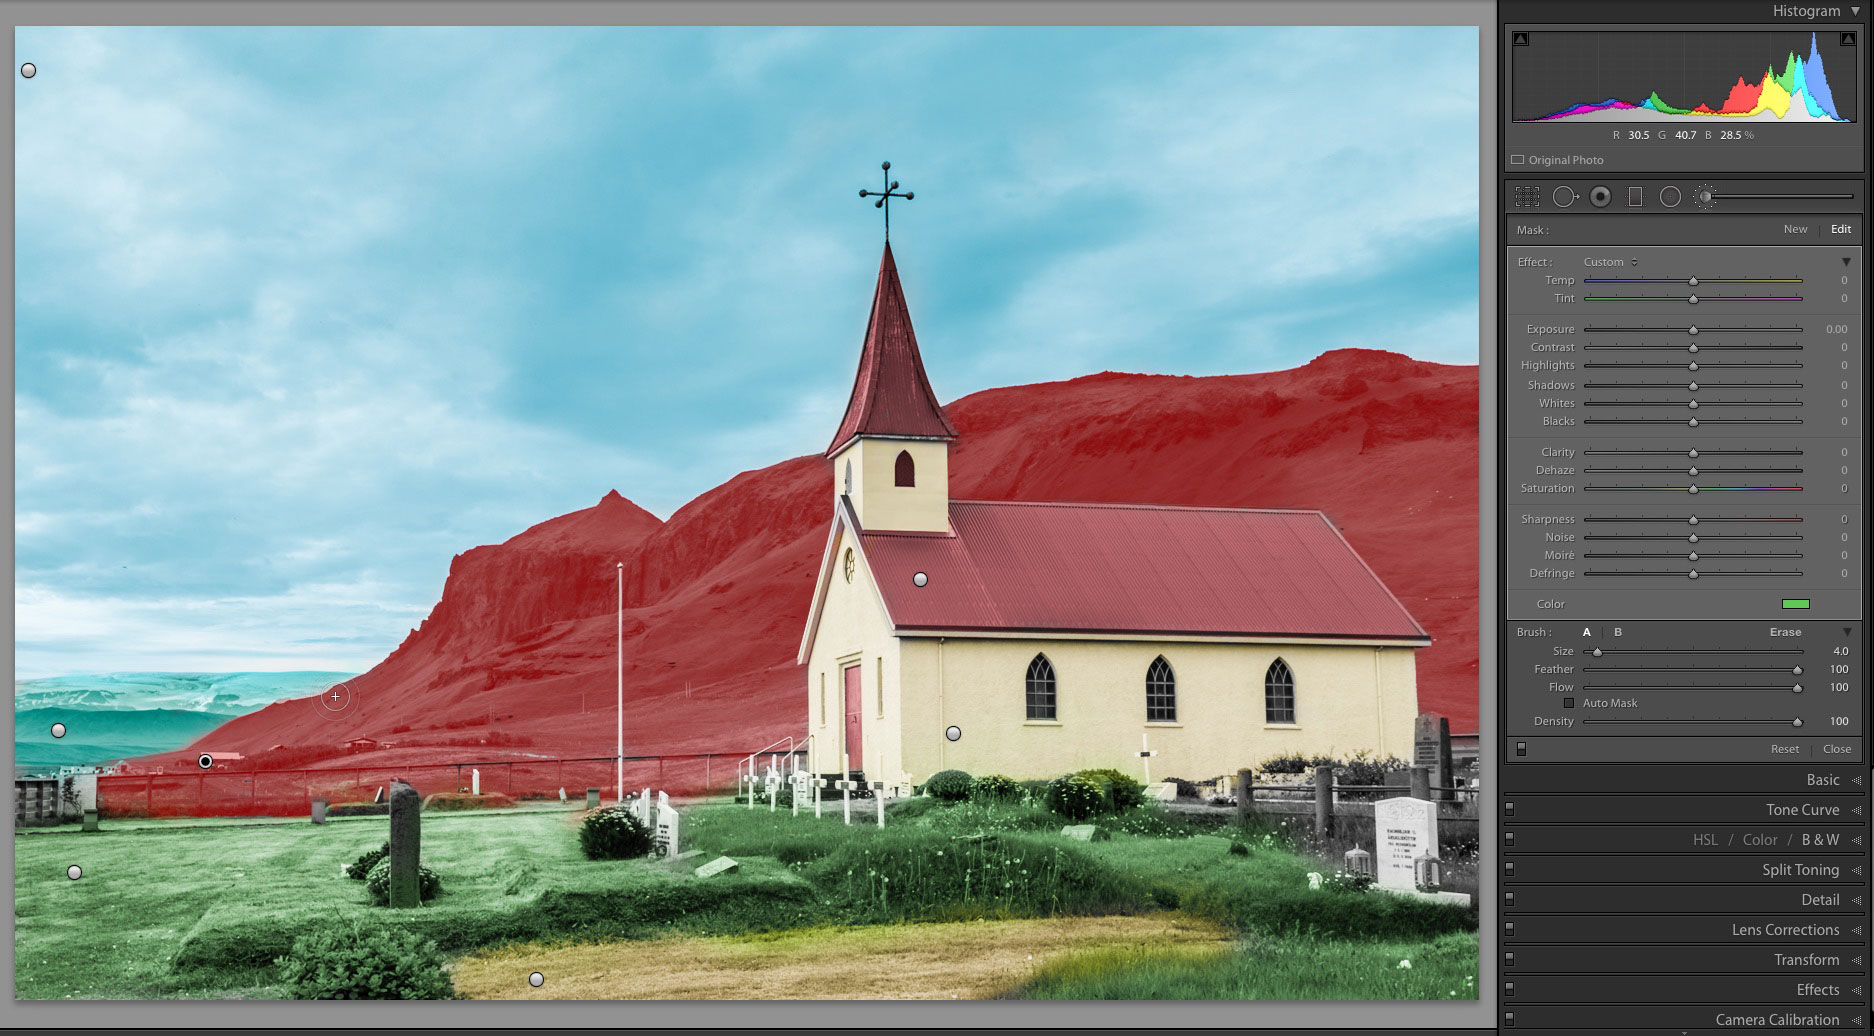
You’re not limited to the colors you’ve painted with. Every time you press New, a new grey pin gets created. Each pin represents a different color on your hand- painted photo. To change a color, click the pin that’s visible over the area you want to change. The center of the pin now has a black dot to indicate that it’s active. Click the swatch to bring up the Color Picker and choose a replacement color. If you can’t see the pins, press H to toggle their visibility. To see the mask, press O.
About Digital Camera magazine
This tutorial originally appeared in Digital Camera Magazine, the monthly newsstand magazine for all photographers. Why not subscribe to a print edition, and have the magazine delivered direct to your door every month?
Alternatively, we have a number of different digital options available, including:
• Apple app (for iPad or iPhone)
• Zinio app (multi-platform app for desktop or smartphone)
• PocketMags (multi-platform app ideal for Android devices)
• Readly (all-you-can-eat digital magazine subscription service)
If you wanted a printed version of any of our most recent issues we have a selection of back issues to choose from in our online store.
How to get Adobe Lightroom
Adobe Lightroom is available in two versions: the regular Adobe Lightroom Classic CC designed for desktop users, which is what we cover in this series, and a new cloud-based Adobe Lightroom CC, which stores your files online and offers a similar but reduced set of features. For regular desktop users we recommend Adobe Lightroom Classic CC.
Adobe offers three subscription based Photography Plans which you can click on below. We recommend either the regular Photography Plan, or the Photography Plan (1TB) which costs more but comes with 1TB online storage in case you decide to go with Lightroom CC.
For this set of tutorials and for anyone who likes to work on a single main computer, we recommend the regular Creative Cloud Photography Plan. This is the cheapest way to get started AND it comes with Photoshop CC too.
Read more:
• This is the best photo-editing software today
• These are the best laptops for photographers right now
• We help you choose the best desktop computers for photo editing
Sean McCormack is a commercial, and editorial photographer, book author, and regular contributor to Digital Camera magazine based in Galway, Ireland. He has extensive experience with Lightroom, dating back to its original beta version, and has tried out just about every plugin and preset available. His latest book is Essential Development 3: 25 Tips for Lightroom Classic’s Develop Module.
