Tips and tutorials
• How to download Photoshop
• 100 Photoshop tips!
• 15 top Photoshop fixes
• More Photoshop tutorials
• Photoshop Elements tutorials
Free Photoshop stuff
• 55 free Photoshop brushes
• 63 free Photoshop templates
• 52 free Photoshop plug ins
• 63 free Photoshop actions
• Free textures for Photoshop
• Free frames and borders
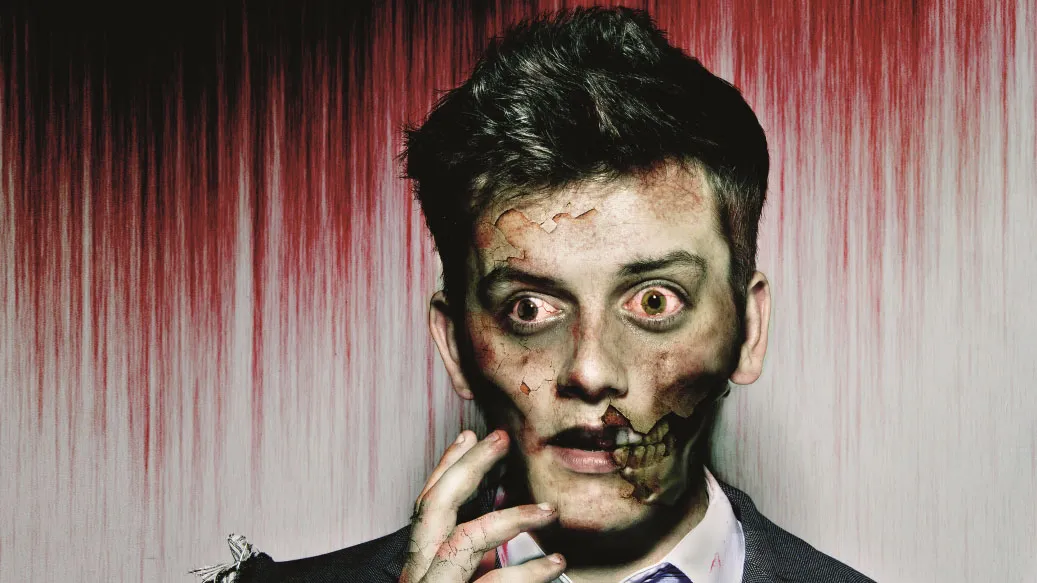
When it comes to invading popular culture, it seems that zombies will never die. In contemporary films and TV, prosthetic make-up is often augmented with digital elements, so that zombies can lose body parts without using amputee actors.
But thanks to Photoshop’s editing tools, we can now ‘zombify’ friends and family without the need for expensive prosthetics – and our subject won’t have to spend hours in a chair while make-up is applied.
We've supplied all the start files you need right here. Download them here and then follow our video tutorial and step-by-step guide.
• Get more photoshoot ideas
The mission: Turn a portrait into a zombie
Time: 40 minutes
Skill level: Intermediate
Kit needed: Photoshop, Elements
We’ll show you how to use Photoshop’s pixel-warping Liquify tool to make a healthy subject look decidedly disgusting, and demonstrate how to burn in shadows to emphasize the contours of the subject’s skull.
We’ll also show you how to composite a shot of cracked plaster onto your model’s face, then blend and mask that layer’s colors to evoke the gruesome effect of torn and peeling skin.
You’ll augment this torn skin effect by applying brush strokes to a Layer Mask to reveal rotting teeth from a skull shot on a separate layer, and learn how to generate the dramatic dripping blood backdrop in our image from scratch using the fiendish Fibers Filter.
There are plenty of other creative compositing techniques to get your teeth into, too. You just need the brains!
1. Lose some weight

Open a portrait picture. You can grab our start image here. To make it look like our zombie hasn’t eaten for weeks, go to Filter>Liquify. Grab the Forward Warp tool. In Tool Options, set Brush Size to 400 and Density to 50. Click and drag the brush tip to push the sides of your model's face below the ears inwards a little to create a more emaciated shape, then click OK.
2. Adjust skin tone

Go to Layer>New Adjustment Layer>Hue/Saturation. Set the drop-down menu to Reds and set Hue to +30. Reduce Saturation of the Reds to -16 for a paler pallor. Create another Hue/Saturation Adjustment Layer at the top of the stack and change the Hue of the Yellows to +20. Reduce the Yellows Saturation to –10. Drop the layer’s Opacity to 75%.
3. Non-destructive burning

To emphasize our zombie’s skeletal structure, click on the Create New Layers button at the bottom of the Layers Panel. Choose Edit>Fill. Set Contents to 50% Gray and click OK. Set the layer’s Blend Mode to Overlay and the gray will vanish. You can now apply the Dodge and Burn tools to this layer to lighten or darken the features in a non-destructive way.
4. Darken the midtones

Grab the Burn tool from the Tools Panel. In the Options Bar, set Range to Midtones. Choose a soft round tip with a Size of 200, and set Exposure to 14%. Spray the brush on the grey layer to darken the shadows around the eyes and over the cheekbones, accentuating the shape of the skull pressing against the zombie’s skin.
5. Brighten the highlights

To reveal some of the texture in the subject’s hair, select the Dodge tool. Set Size to 400, Range to Highlights and Exposure to 5%. Spray over the hair to make the highlights stand out more. Lighten the whites of their eyes to give them a ghoulish glow. Then set the Sponge tool to Desaturate with a Flow of 14% and spray on the Background layer to make the lips look less red.
6. Select the skull

Find and open a suitable skull image. You can grab our skull image here. Go to Window>Channels. Cmd/Ctrl+click on the RGB channel’s thumbnail. This will select the lightest pixels in the image. Choose Select>Inverse. Now the shadows and midtones will be selected. We can use these pixels to emphasize our zombie’s bone structure. Choose Edit>Copy. Go to the main layered zombie project and choose Edit>Paste.
7. Transform the skull

Set the skull layer’s Blend Mode to Multiply. Go to Edit>Free Transform. Type a value of 81.22% in the W (Width) and H (Height) fields in the Options Bar. Drag outside of the Free Transform tool’s bounding box to rotate the skull layer 2.95-degrees clockwise. Drag inside the bounding box to position the skull over his eyes, nose and mouth, then hit OK to apply the transformations.
8. Create defined cheekbones

Click on the skull layer. Click the Add Layer Mask icon at the bottom of the Layers Panel. Grab the Brush tool, choose a soft round tip from the Brush Preset picker, and set Size to 300. Set the brush tip’s color to Black. Click on the skull layer’s white mask. Spray over most of the skull to hide it, but leave the cheekbones jutting out to create a more skeletal look.
9. Create blotchy skin texture

To make a mottled texture for our zombie’s decaying skin, create a new layer. Grab the Brush tool, click on the Brush Preset picker and choose the Spatter 46 pixels tip. Choose a blood red foreground color. Click to spray red splodges onto various parts of the face. Use different tip sizes for variety. For a more subtle effect, set the layer’s Blend Mode to Darken, and reduce the Opacity to 29%.
10. Add flaking texture

Find and open a suitable flaking paint texture. You can grab our texture here. Use the Freehand Lasso tool to select a chunk of the wall and some surrounding flaking paint from near the top quarter of your image. Edit>Copy the selection, then Edit>Paste it into the main project. Choose Edit>Free Transform. Rotate the cracked wall by 126.6 degrees. Scale W to 77.75% and H to 87.60%. Hit OK to apply the transformation.
11. Blend and mask

Set the texture layer’s Blend Mode to Multiply so that the lighter paint takes on the skin color. Click the Add Layer Mask icon. Grab the Brush tool and choose a soft round tip from the Brush Preset picker. Set the Foreground colour to Black then click on the Layer Mask. Spray black strokes to hide parts of the layer and blend the cracked texture in with the skin.
12. Paste in the teeth

Go back to the skull image. Use the freehand Lasso tool to select some of the skull’s teeth, jaw and cheekbone. Edit>Copy the Selection, then Edit>Paste it into the main project. Reduce the pasted jaw layer’s Opacity to 50% so that you can align it with the subject’s face. You now need to use the Free Transform tool to scale, rotate and position the jaw layer in a similar way as shown.
13. Reveal the teeth

Add a Layer Mask. Click on the mask and press Cmd/Ctrl+I to invert it. This hides the jaw layer. Grab the Brush tool and use a white brush tip to reveal some of the teeth and jaw. Use a small tip with a harder edge to make the teeth follow the outline of the torn flesh. Set the Brush tool’s Opacity to 24% and use a black tip to gently blend the teeth edges with the background textures.
14. Distress the teeth

The teeth are too clean, so click on the jaw layer’s thumbnail and choose Image>Adjustments>Hue/Saturation. Tick Colorize. Set the Master Hue to 59 to tint them yellow. Set the Sponge tool to Saturate and dab it on the teeth to enhance the color. Use the Burn tool set to Shadows to increase contrast. Spray a red spatter brush on a new layer set to Multiply, with an Opacity of 52%.
15. Adjust levels

To make the teeth blend more effectively, we can change their tonal levels to match those of the main image. Click on the tooth layer and choose Image>Adjustments>Levels. Drag the gray midtone Input Level slider to 0.74 to darken the midtones, and reduce the highlight brightness by dragging the white Output Level slider to 228. Now click OK.
16. Bloodshot eyes

Select and copy some of your cracked paint texture and paste it onto the subject’s eye. Set the Blend Mode to Multiply. Use the Eraser tool, or a Layer Mask, to restrict the ‘veins’ to the eye. Go to Image>Adjustments>Hue/Saturation. Tick the Colorize box. Set Hue to 360 and Lightness to +23. Click OK.
17. Blood lines

Create a new layer and Edit>Fill it with white. Set the Tools Panel’s background color to white and the foreground color to red. Go to Filter>Render>Fibers. Set Variance to 4, Strength to 40. Click Randomize until blood drips from the top. Click OK. Set the layer’s Blend Mode to Color Burn. Add a mask and paint black over the figure to remove the drips of blood.
18. Finishing touches

Add more cracked textures to the cheeks and forehead as described in steps 10 and 11. For a more dramatic contrast, click the Create New Adjustment Layer icon at the bottom of the Layers Panel. Choose Levels. Set the white highlight Input Level to 213, drag the gray midtone slider to 0.86 and darken the black shadow Input Level slider to 14.
That's it. You've created a perfectly disgusting zombie portrait!
Read more:
63 free Photoshop templates
Create a scary Halloween portrait
How to retouch a portrait using Elements
Essential portrait photography tips

