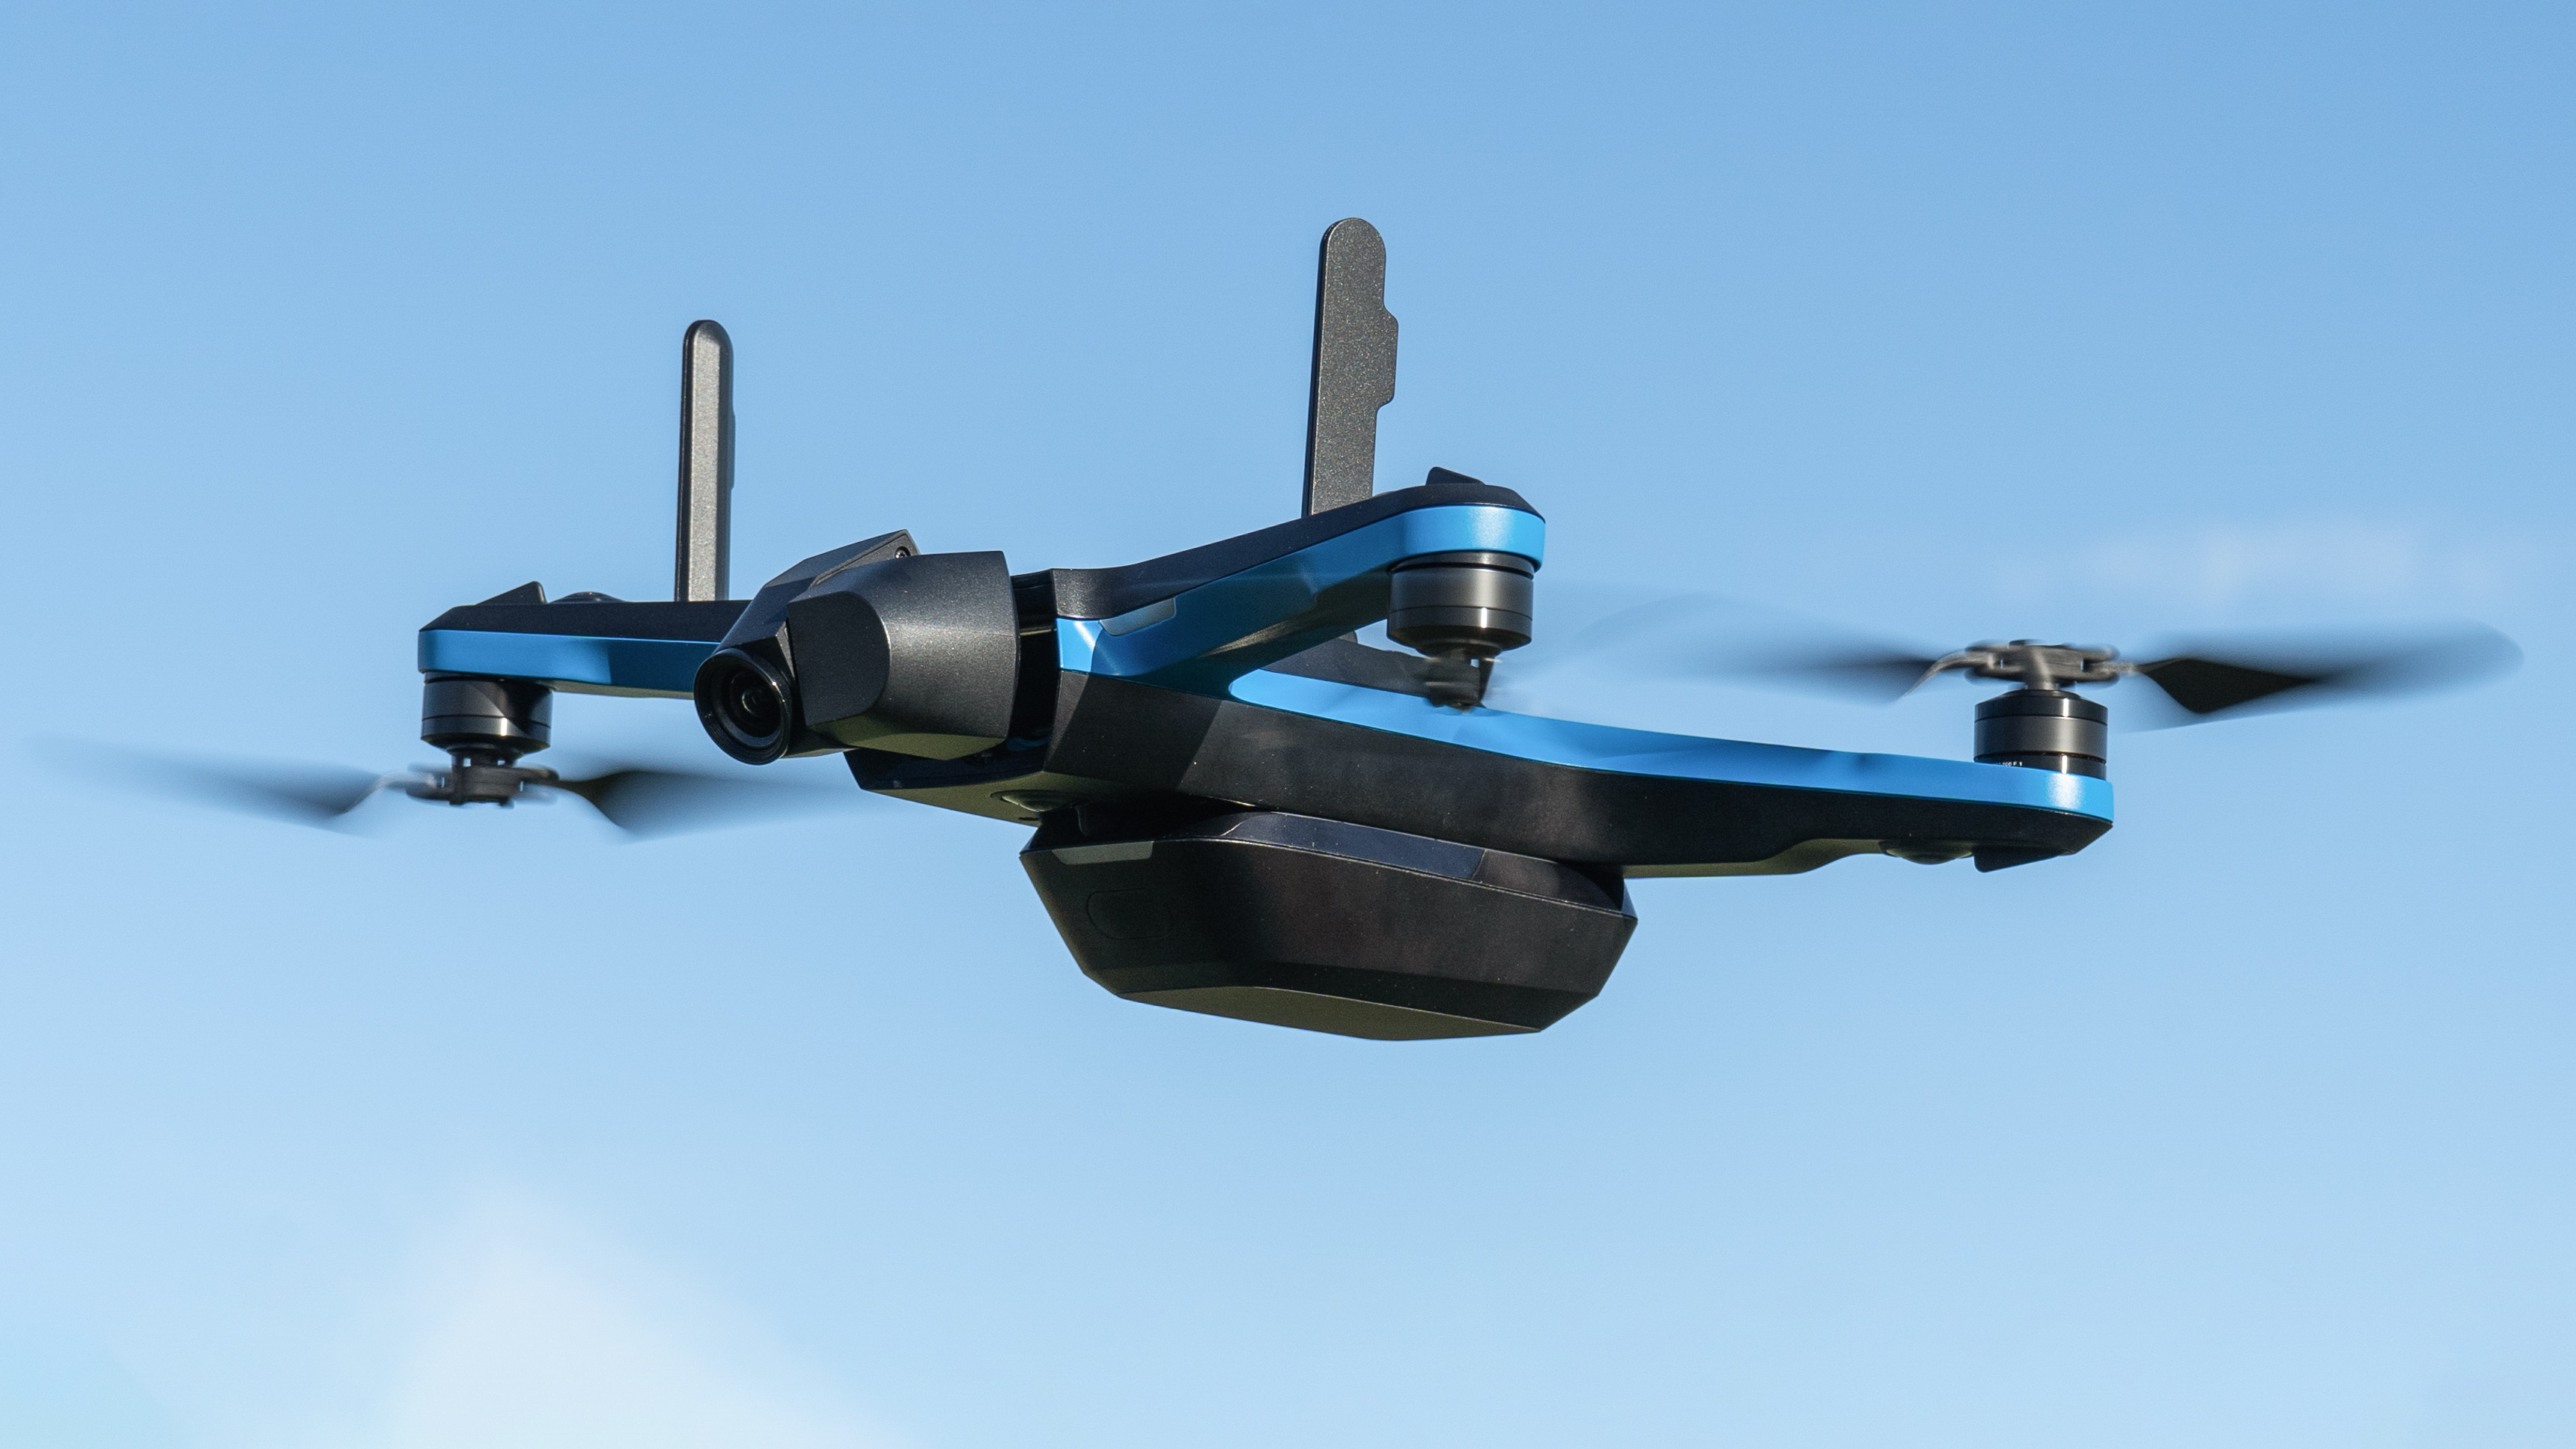
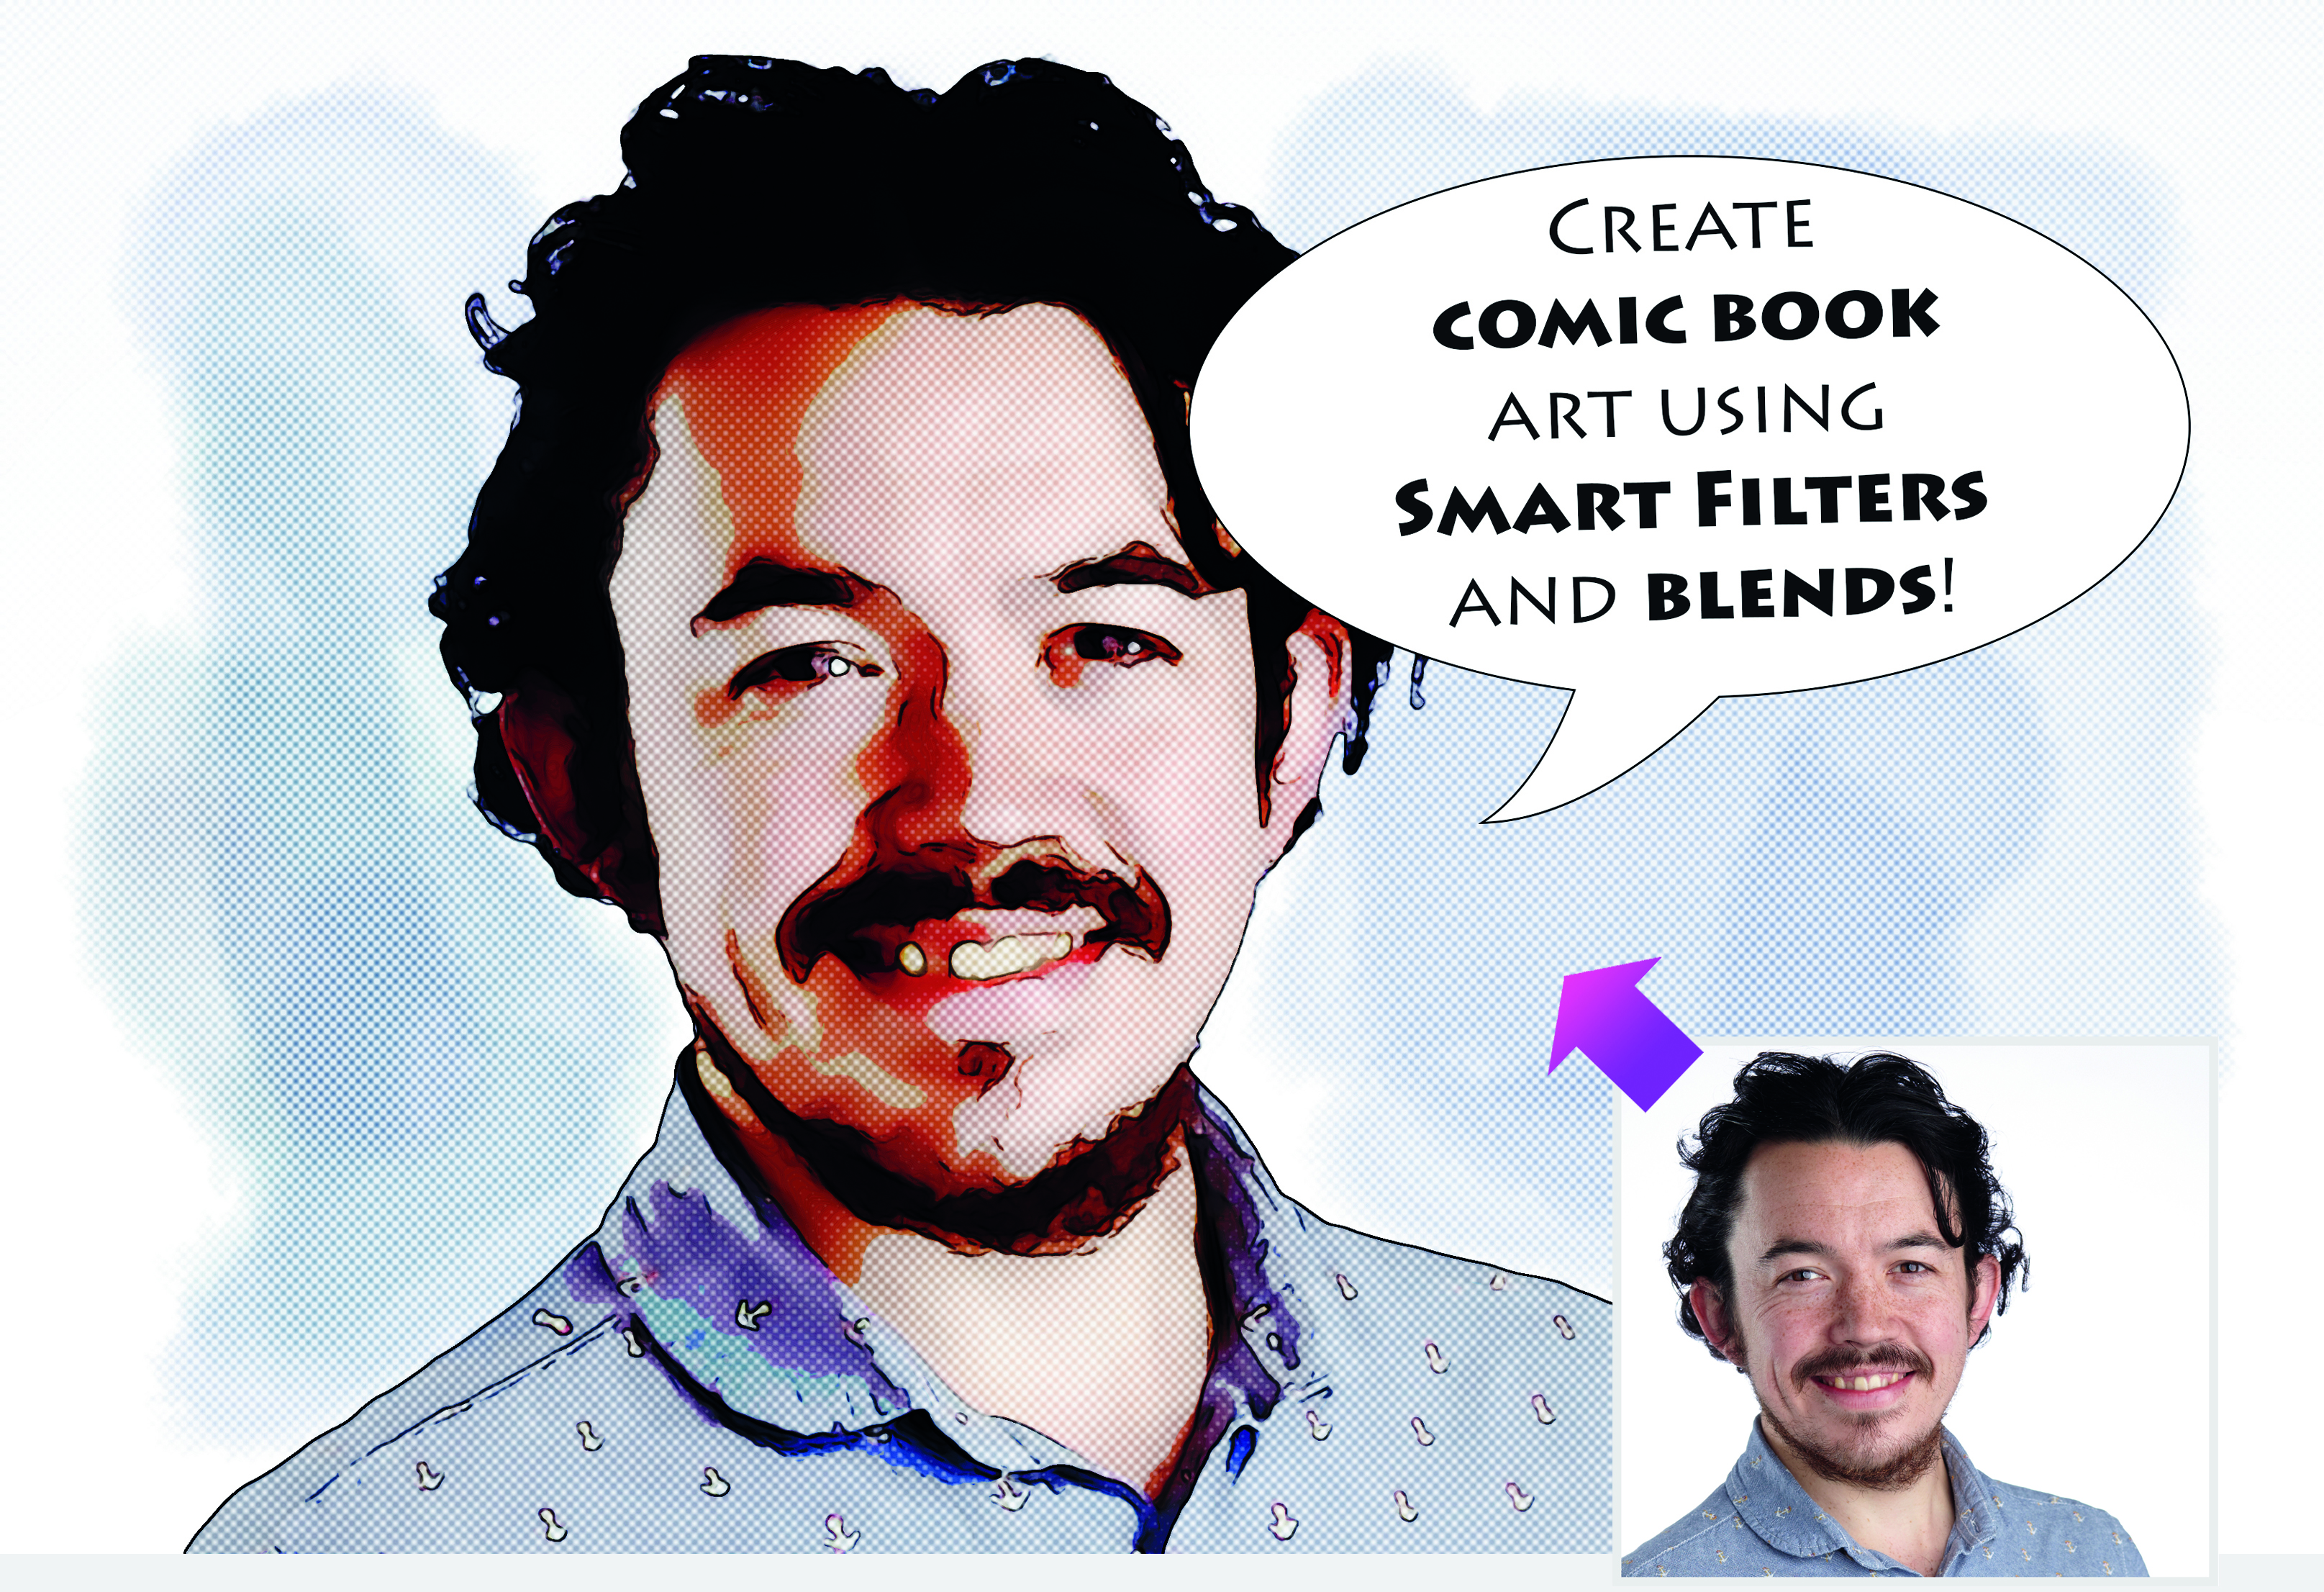
How to create a comic book portrait in Photoshop
Turn your portrait into pop art using Photoshop CC's Smart Filters and Blending Modes
Watch the video: create a comic book portrait in Photoshop
Tips and tutorials
• How to download Photoshop
• 100 Photoshop tips!
• 15 top Photoshop fixes
• More Photoshop tutorials
• Photoshop Elements tutorials
Free Photoshop stuff
• 55 free Photoshop brushes
• 63 free Photoshop templates
• 52 free Photoshop plug ins
• 63 free Photoshop actions
• Free textures for Photoshop
• Free frames and borders
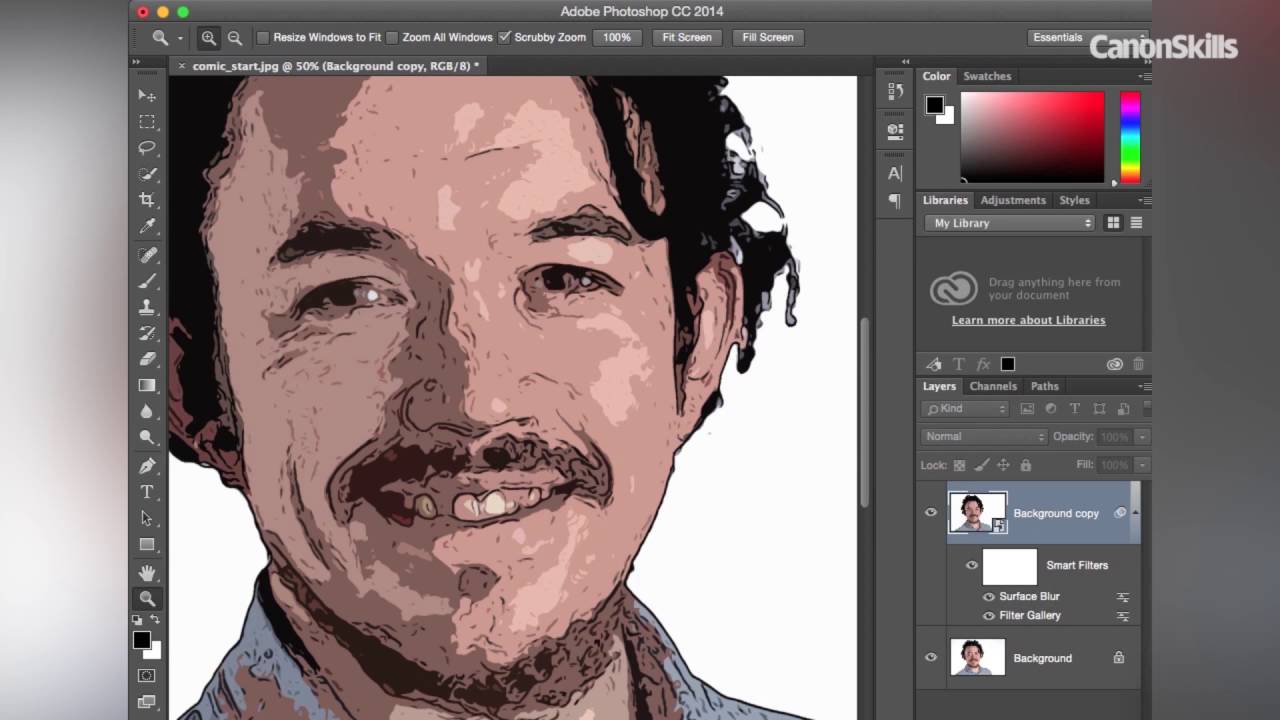
One way to create an eye-catching image is to give a photograph a stylized artistic makeover. A portrait shot against a plain background is perfect for this. By using Photoshop CC’s filters you can simplify the colors and tones in the picture to make them look as though they were drawn and inked by a comic book artist.
This technique is an effective way to produce things such as creative profile pictures to represent you on social media sites, or even a personalized birthday card design.
Article continues belowIn this walkthrough you’ll learn how to use the Filter Gallery to apply filters in layers, so that you can build up a more convincing and unique-looking art effect. For a comic book look, that means using simple washes of color and pen-like outlines around key facial areas.
• Get more photoshoot ideas
Download project files to your computer so you can follow along:
We’ll show you how to mix a filtered layer’s colors and tones with other layers using blending modes, to help create a more artistic look. We’ll also use filters to mimic the tiny colored dots (known as Ben-Day dots) that created the washes of color in classic comic books or posters. This helps give your filtered photo that pop art look.
The best camera deals, reviews, product advice, and unmissable photography news, direct to your inbox!
In this tutorial, you’ll also learn how to apply filters to your images in a non-destructive way by using Smart Filters. These allow you to tweak the settings of any filter at any time, and enable you to fine-tune the look that these filters produce.
• 15 Photoshop fixes: solve photo problems with Photoshop CC tips
STEP BY STEP: Marvel at this
Use Smart Filters and layers to create a unique comic book look
01. Smoothly does it
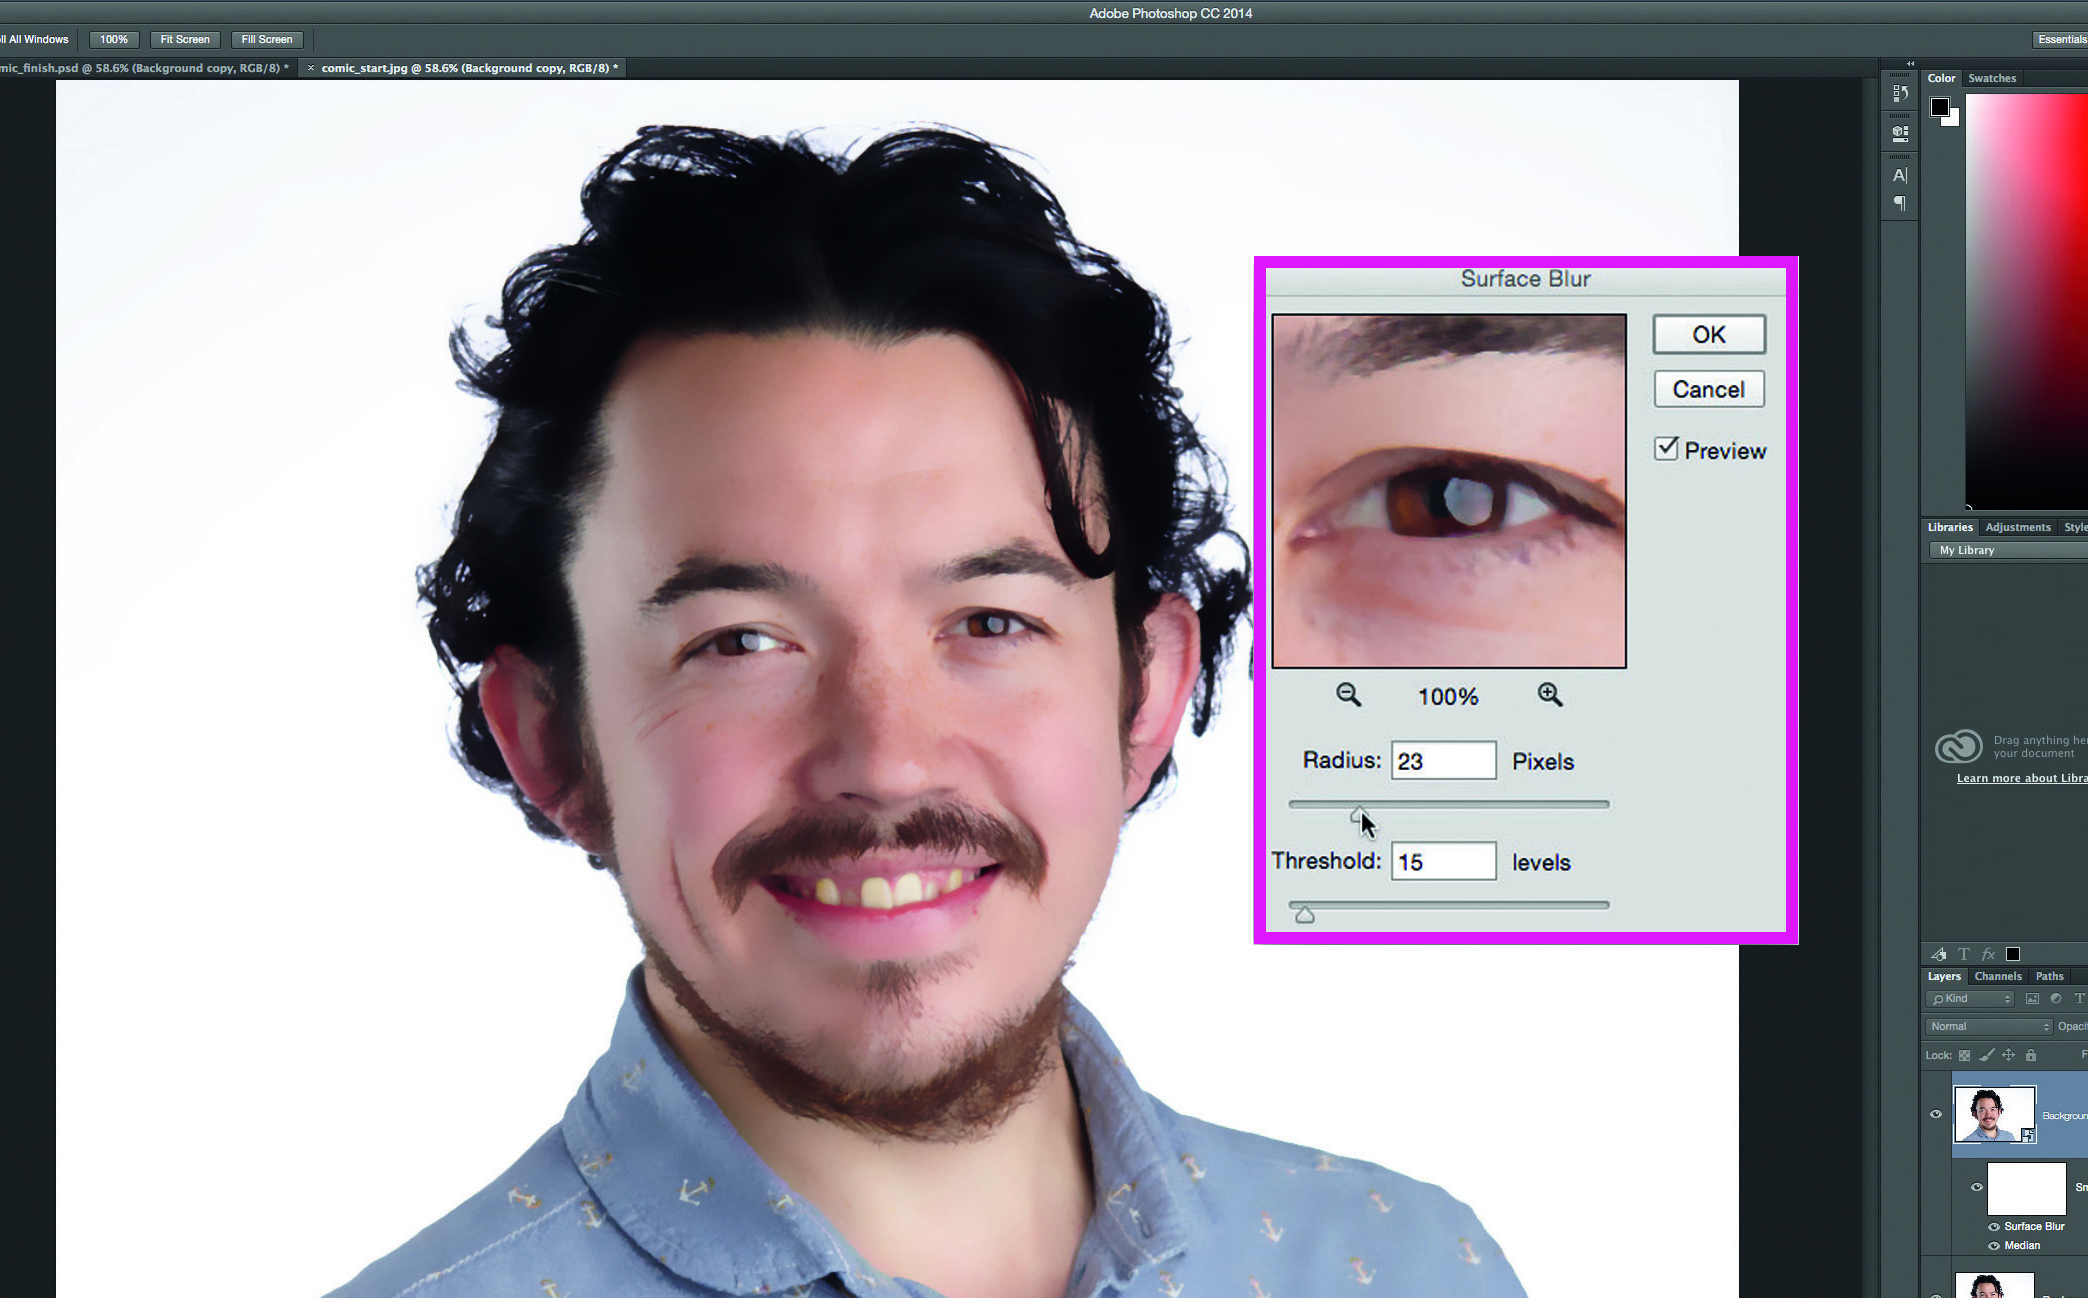
Open comic_start.jpg. Duplicate the ‘Background’ layer. Go to Filter>Convert for Smart Filters. Click OK. Go to Filter>Noise>Median. Set Radius to 2. Click OK. Go to Filter>Blur>Surface Blur. Set Radius to 23 and Threshold to 15 to smooth the skin. Click OK.
02. Switch to paint
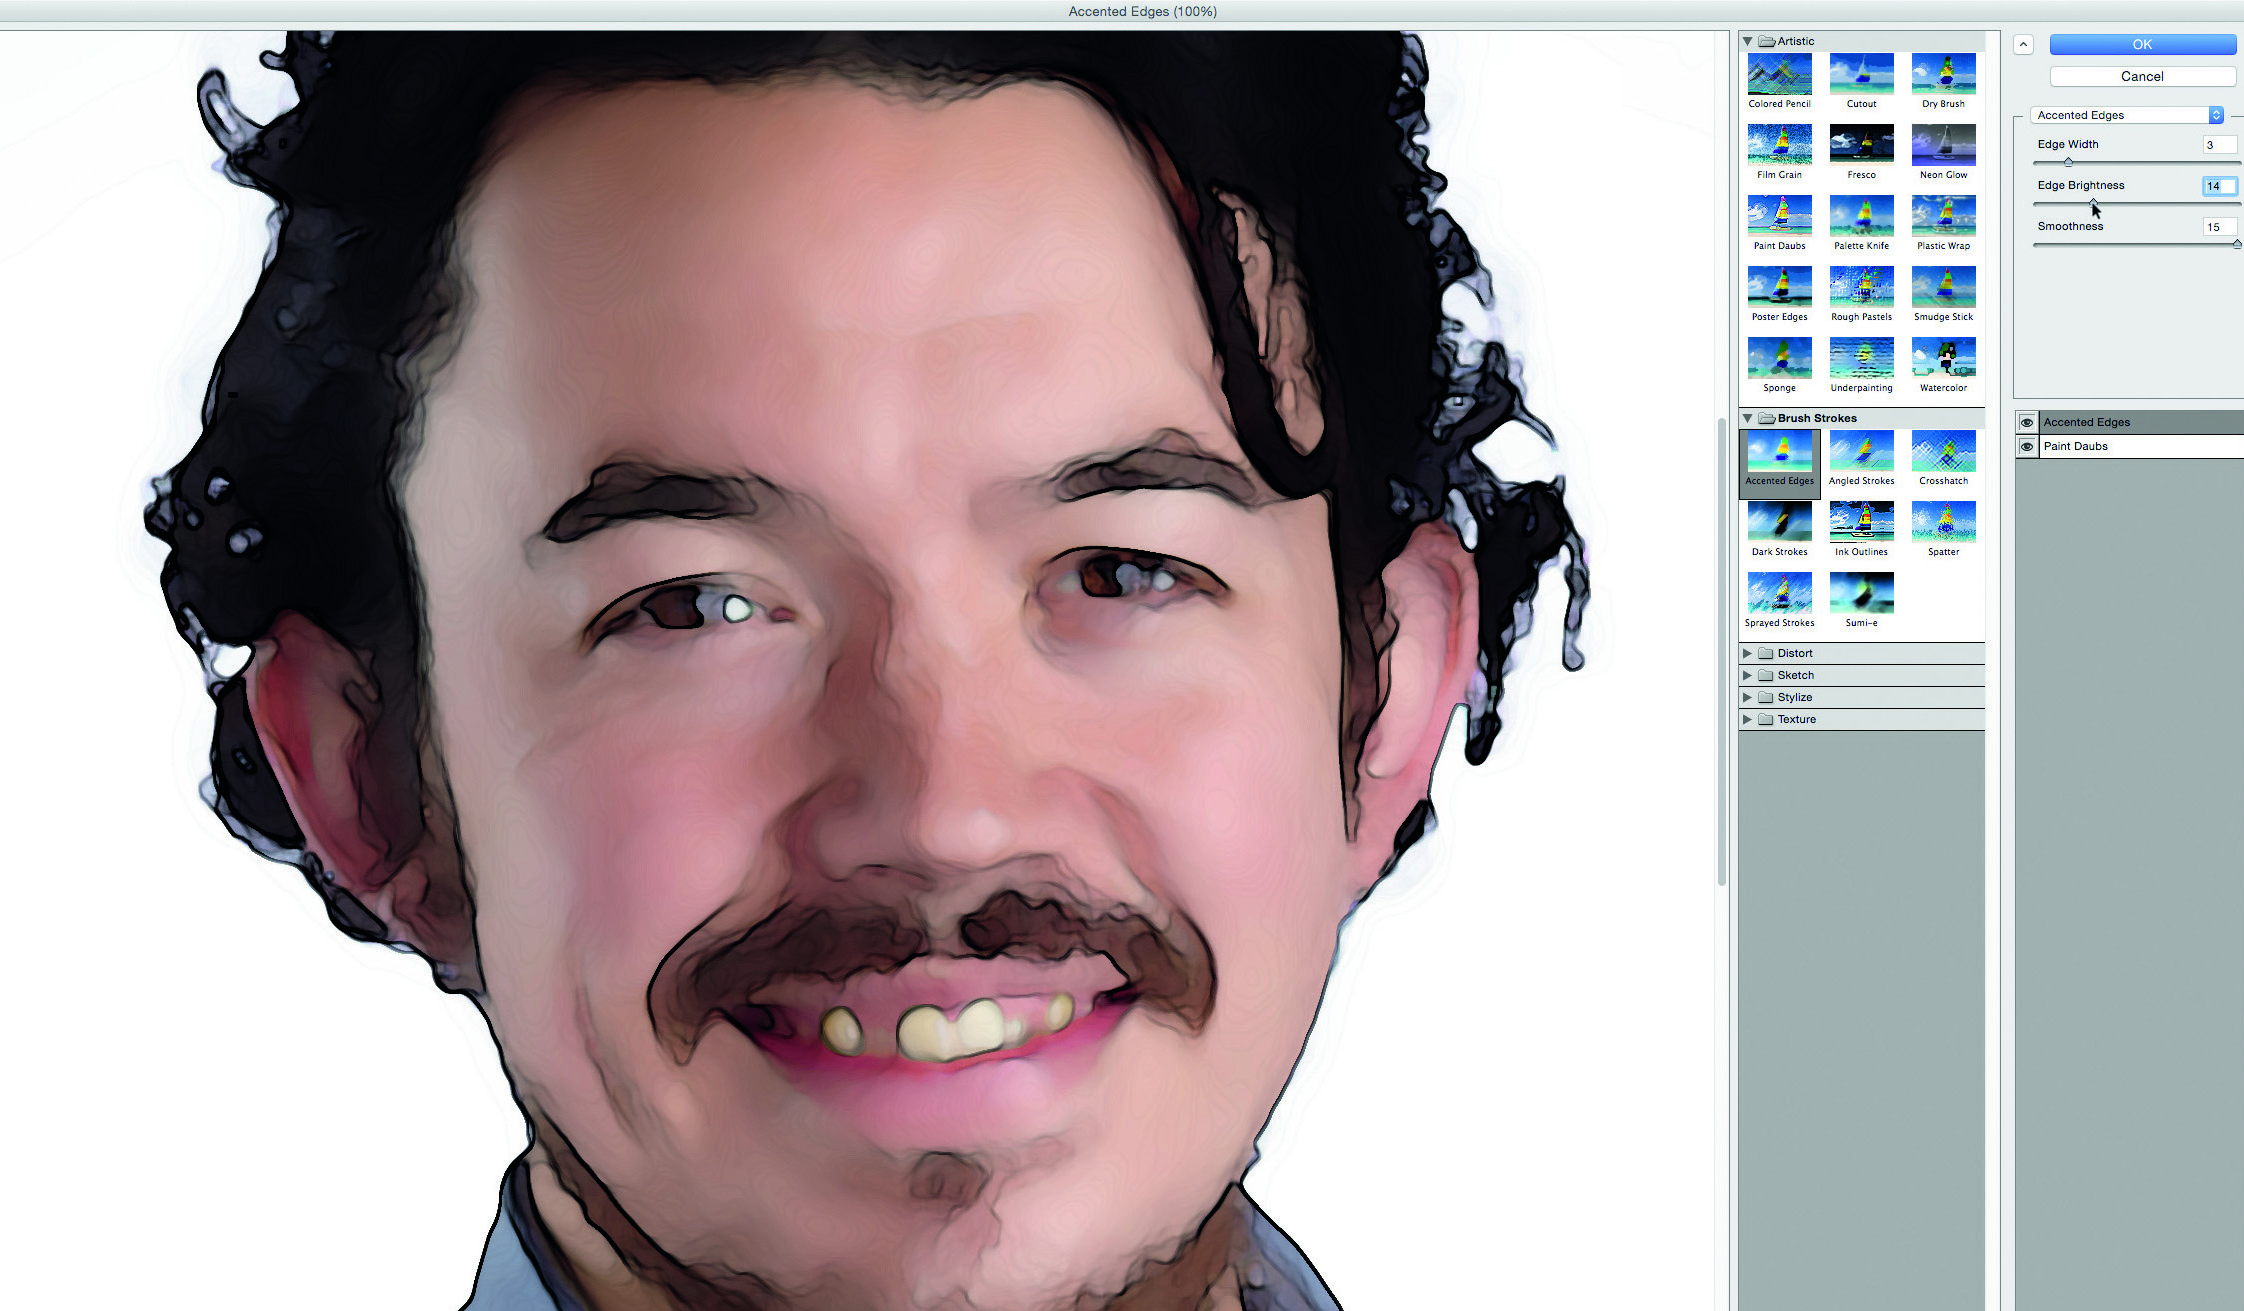
Go to Filter>Filter Gallery. Click on Paint Daubs. Set Brush Size 8, Sharpness 3. Set Brush Type to Simple. Click the New Effect Layer icon. Click the Accented Edges thumbnail. Set Edge Width to 3. Drop Edge Brightness to 14. Push Smoothness up to 15. Click OK.
03. Stamp it out
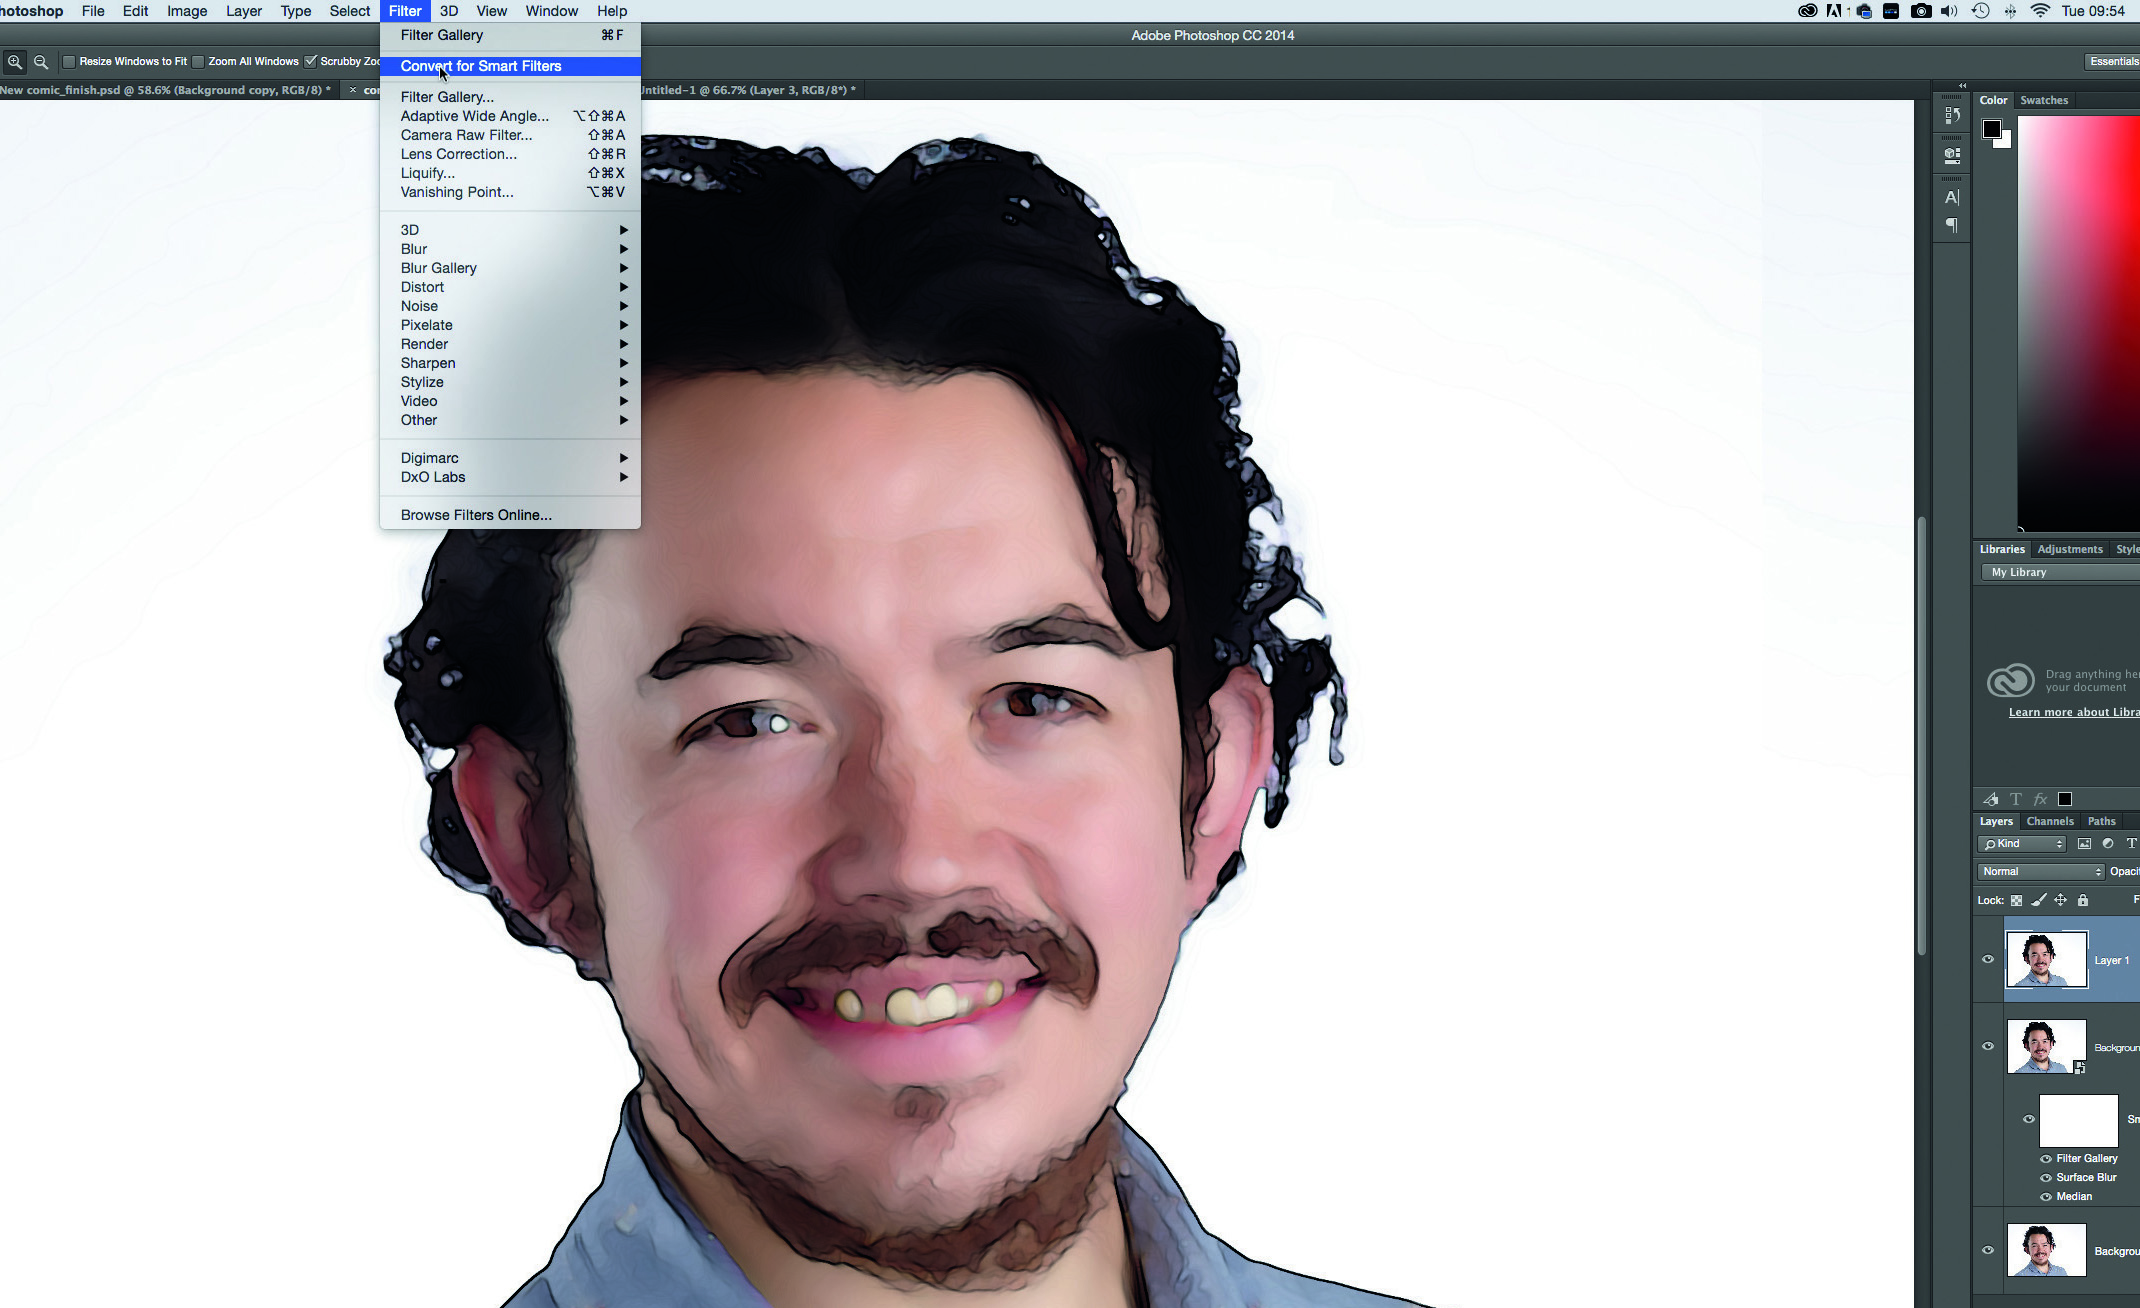
Click the ‘Background copy’ thumbnail at the top of the Layers panel. Press Shift+Ctrl+Alt+E. This Stamp Visible command creates a flat layer (‘Layer 1’) with the combined look of all the layers and filters below. Go to Filter>Convert for Smart Filters.
04. Focus on the egdes
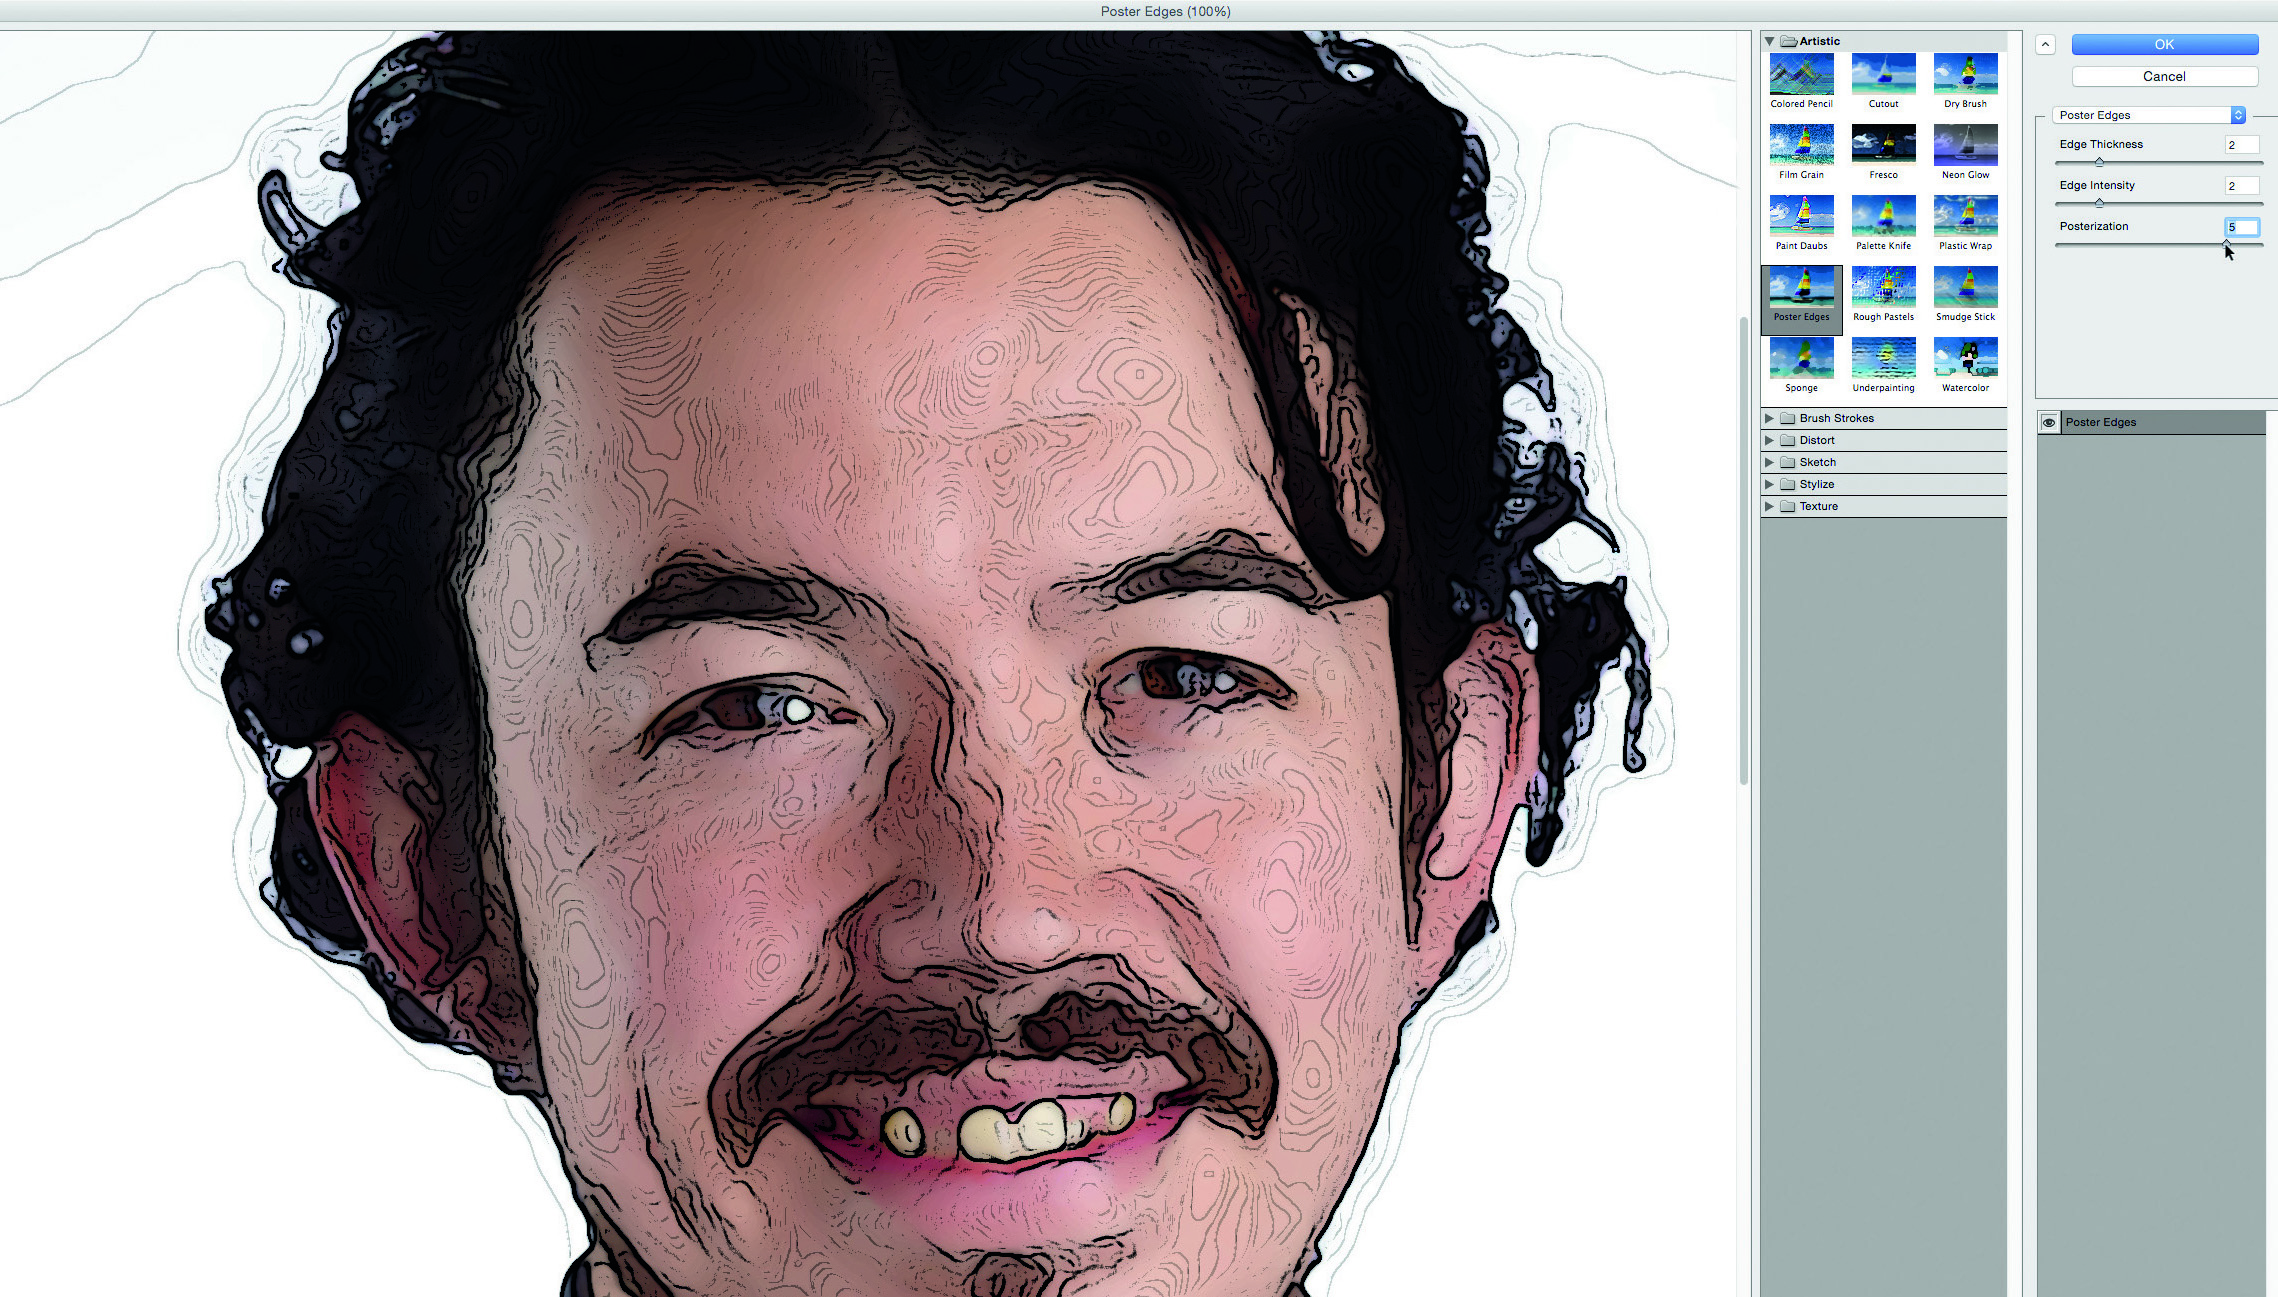
Go to Filter>Filter Gallery. Click on the Accented Edges effect layer, then on the trash can to delete it. Click on the Paint Daubs effect layer and replace it by clicking on the Poster Edges thumbnail. Set Edge Thickness 2, Edge Intensity 2, Posterization 5.
05. Make things simple
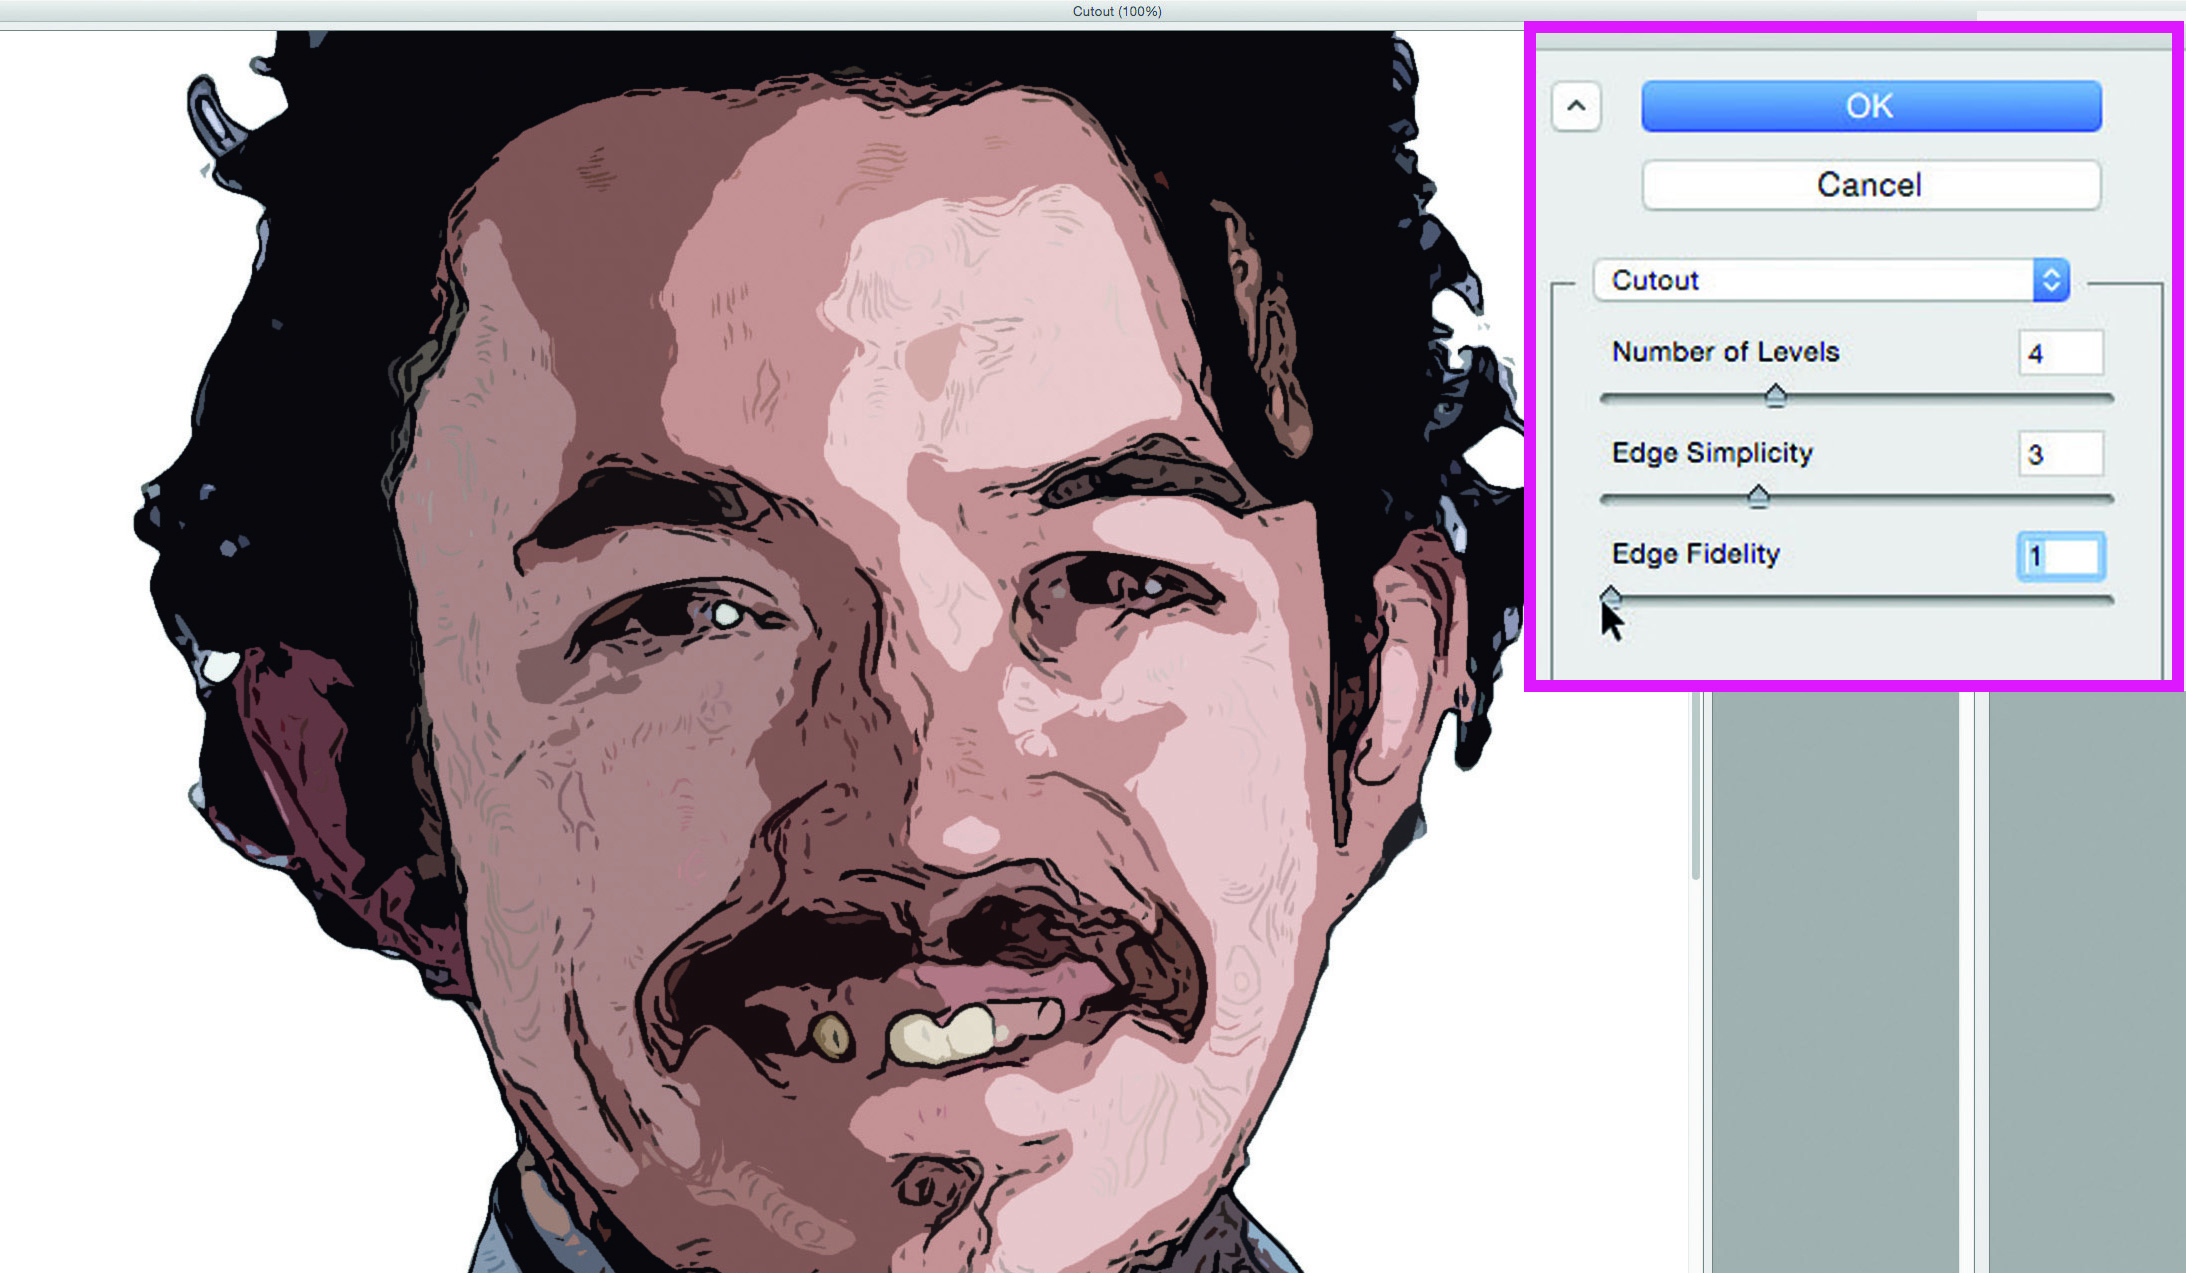
Click the New Effect Layer icon. Click on the Diffuse Glow thumbnail. Set Graininess 0, Glow Amount 5, Clear Amount 19. Click again on the New Effect Layer icon. Click the Cutout filter’s thumbnail. Set Number of Levels 4, Edge Simplicity 3, Fidelity 1. Click OK.
06. Use Smart Objects
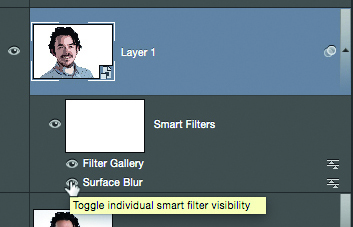
When you use the Convert or Smart Filters command to turn a layer into a Smart Object, Photoshop creates a hidden copy of the original layer, so you can access its unfiltered look at any time. You can turn specific filters on and off when working with a Smart Object layer by clicking the appropriate filter label’s eye-shaped icon in the Layers panel.
07. Rearrange the filters
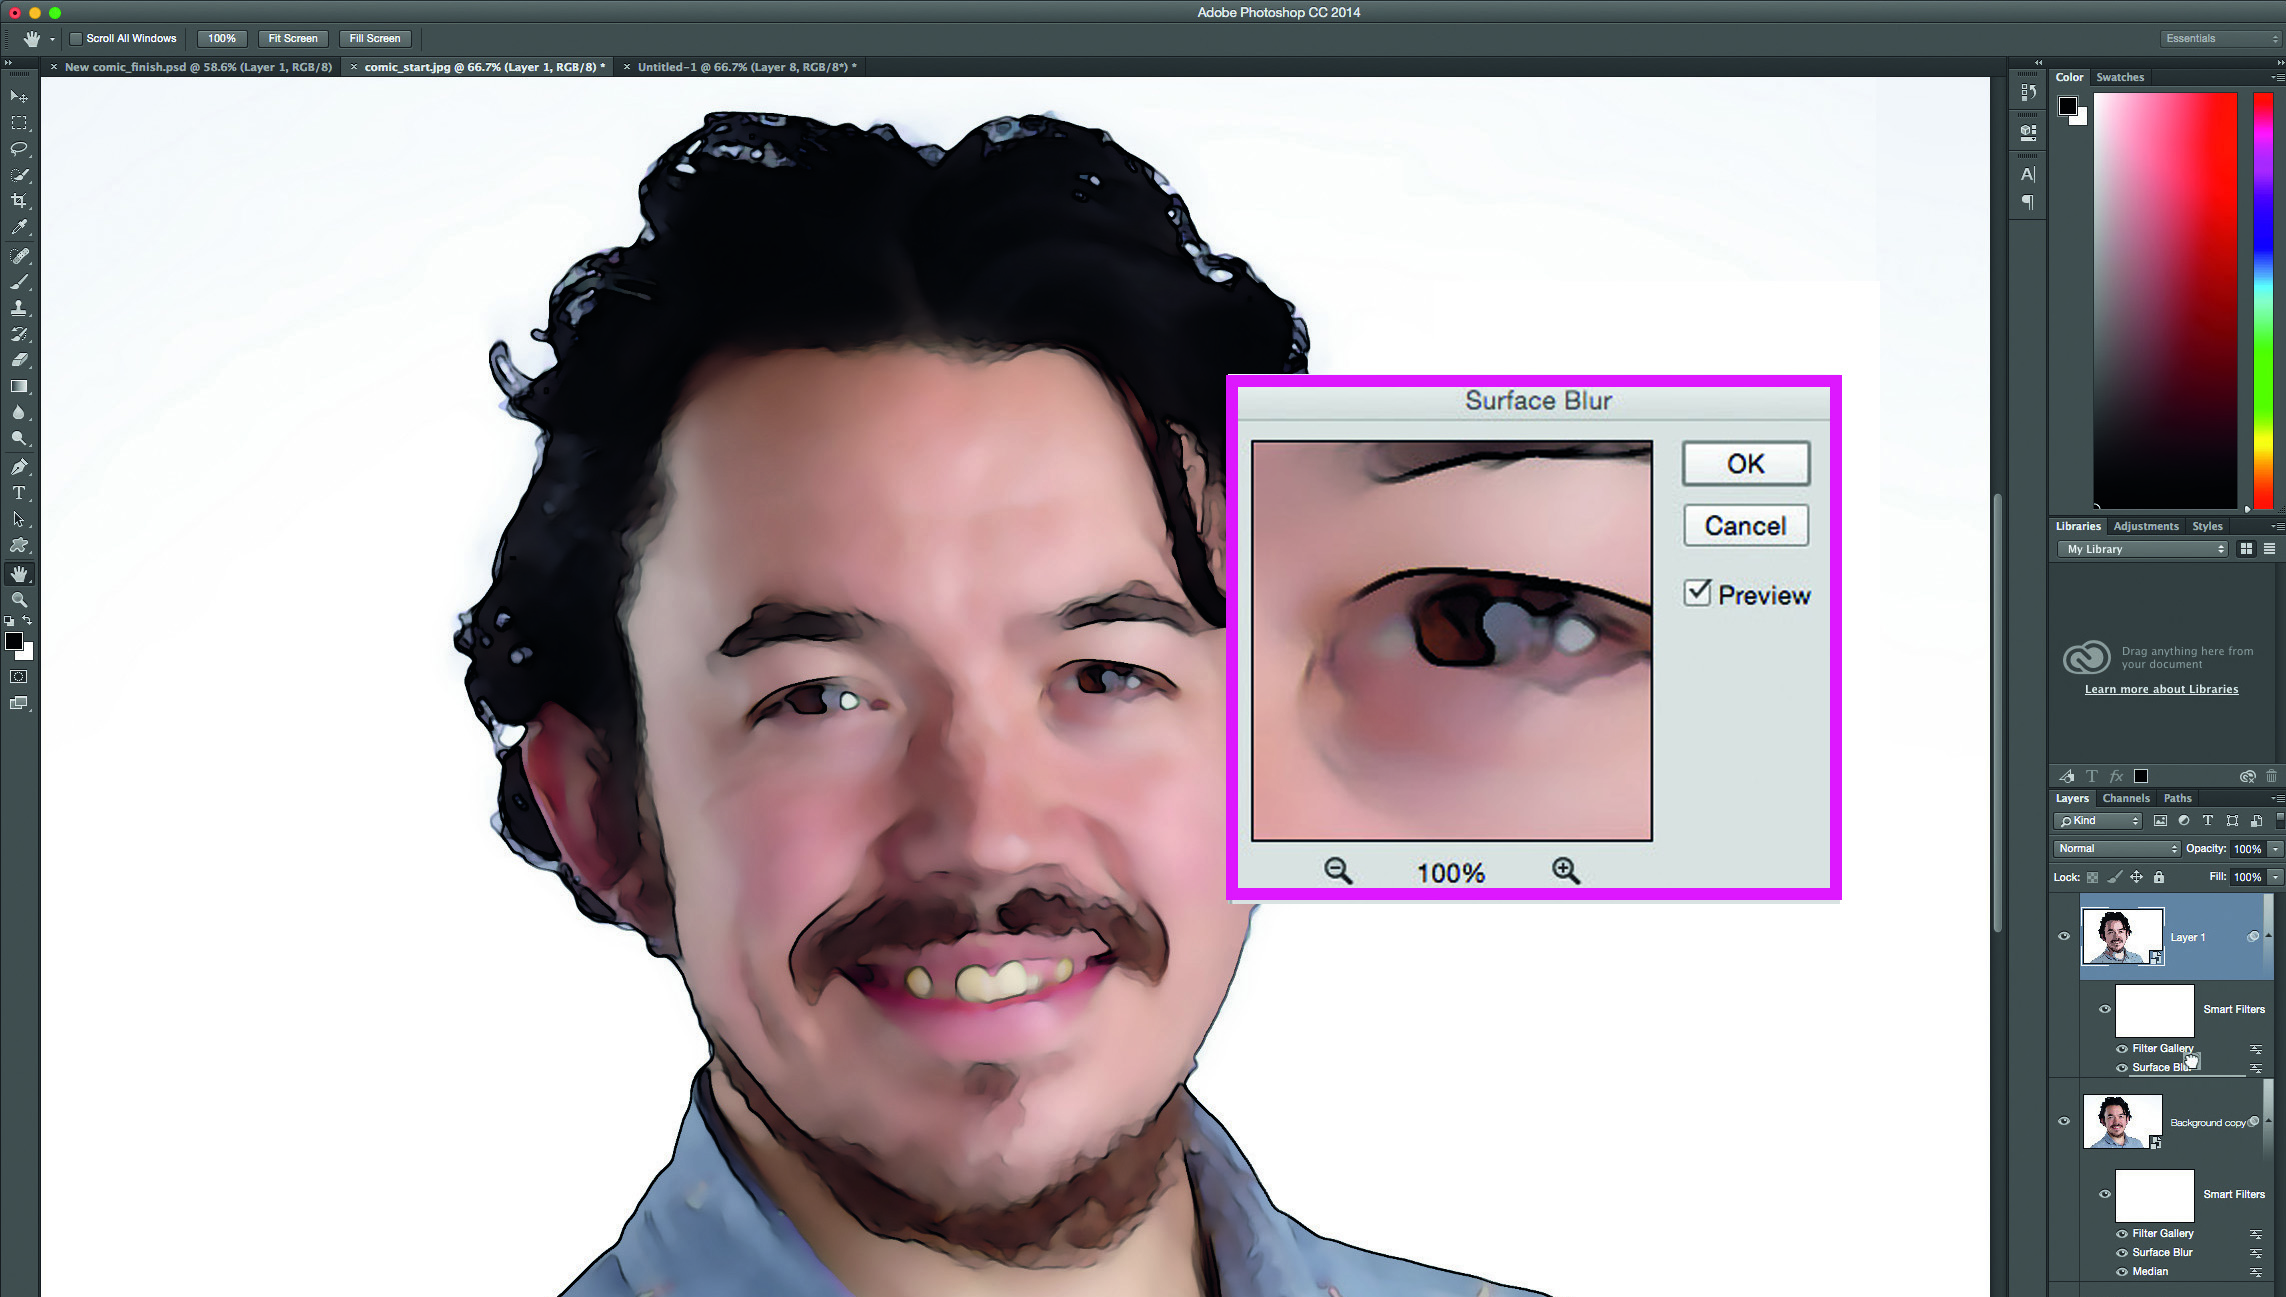
Pick Filter>Blur>Surface Blur. Set Radius to 8 and Threshold to 13 to create a simplified version of the subject’s features. Click OK. Drag the ‘Surface Blur’ label below the ‘Filter Gallery’ label to create a smoother version of the original photo.
08. Perfect blend
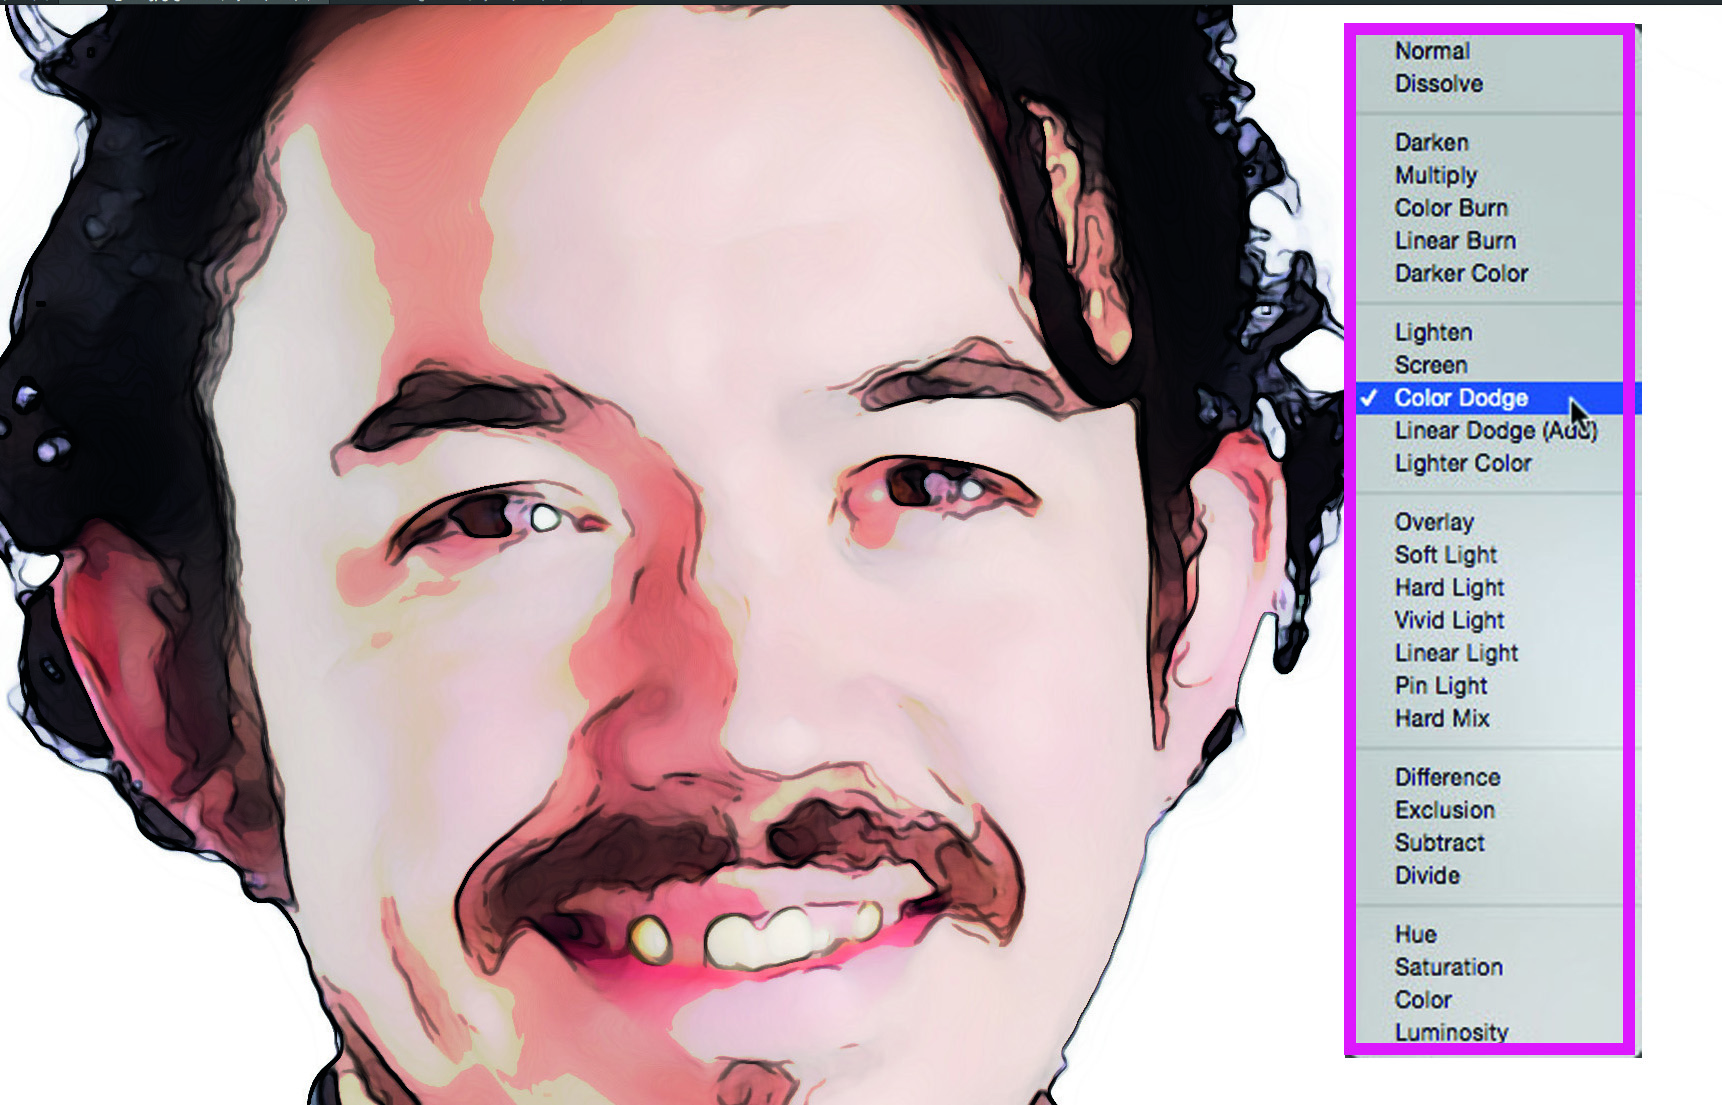
To blend the Cutout filter layer with the filters on the lower layer, set ‘Layer 1’s blending mode to Color Dodge. For a more subtle blend, set ‘Layer 1’s opacity slider to 49. Now the Cutout effect blends more subtly with the other filters, creating a more illustrated look.
09. Go dotty
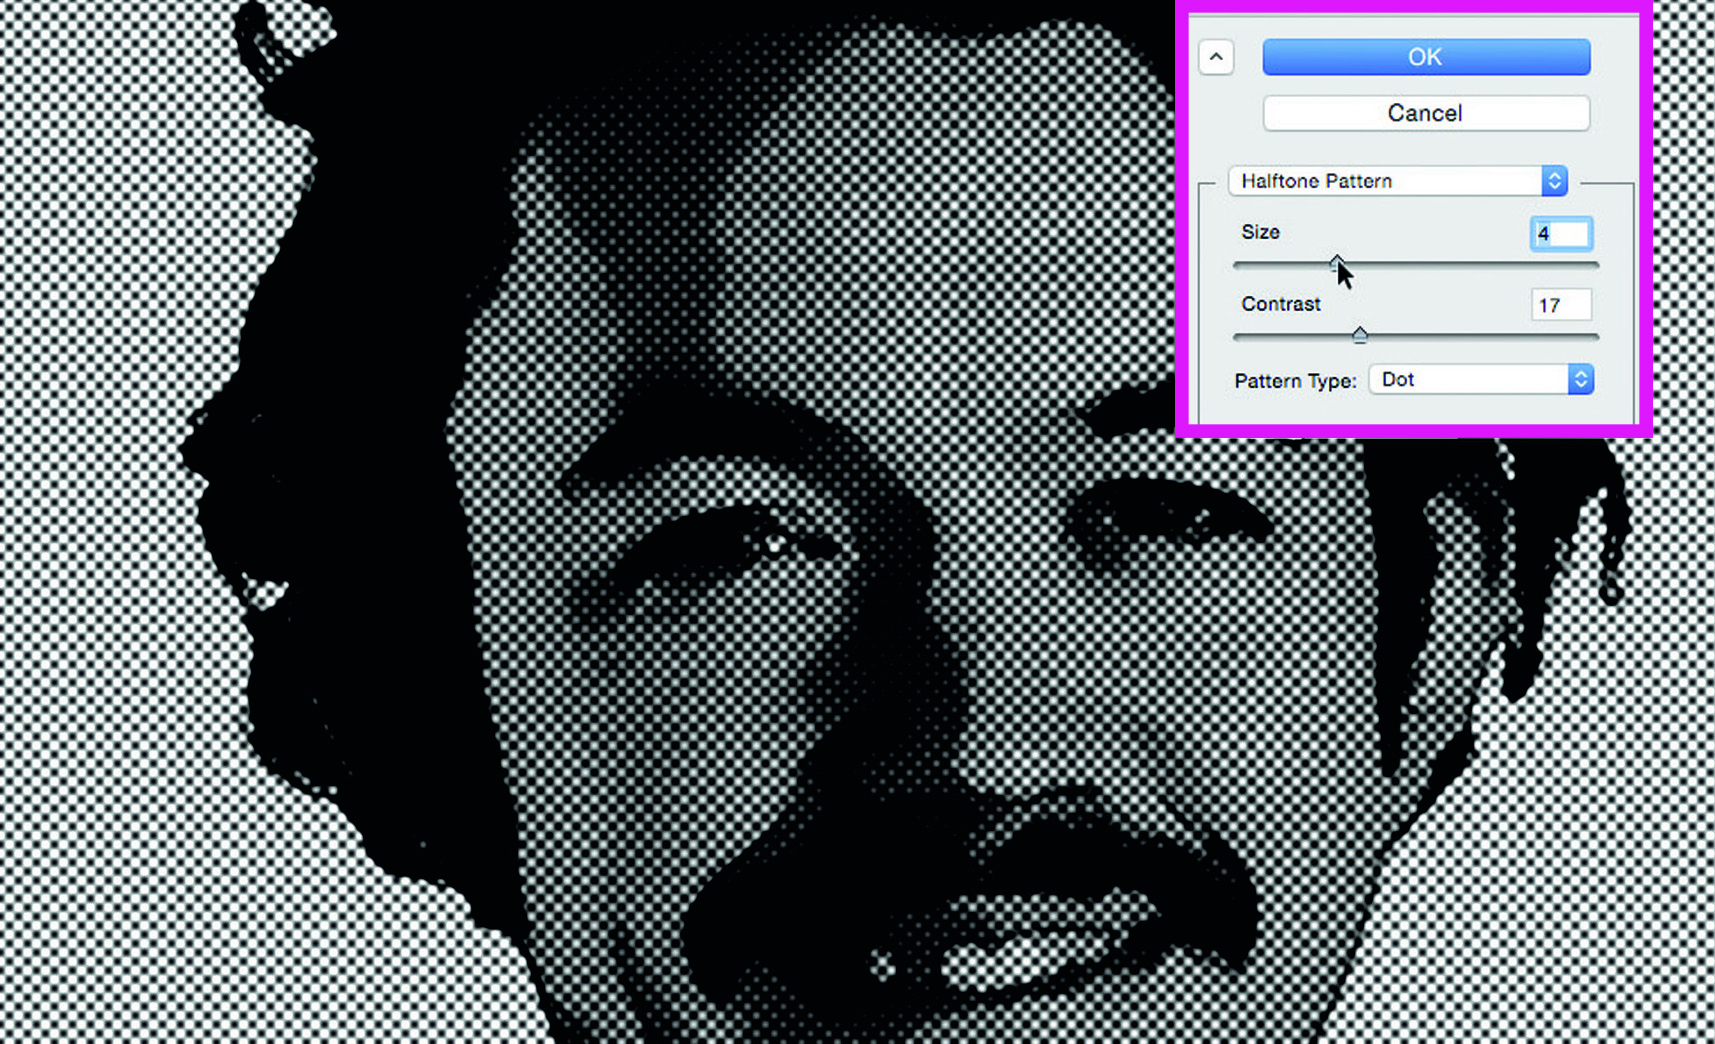
Click on ‘Layer 1’. Perform Stamp Visible. Go to Filter> Filter Gallery. Choose Halftone Pattern, set Pattern Type to Dot. Set Size 4, Contrast 17. Click OK. To combine dots with colours from the layer below, set ‘Layer 2’s blending mode to Overlay and 71% opacity.
10. Just add watercolor
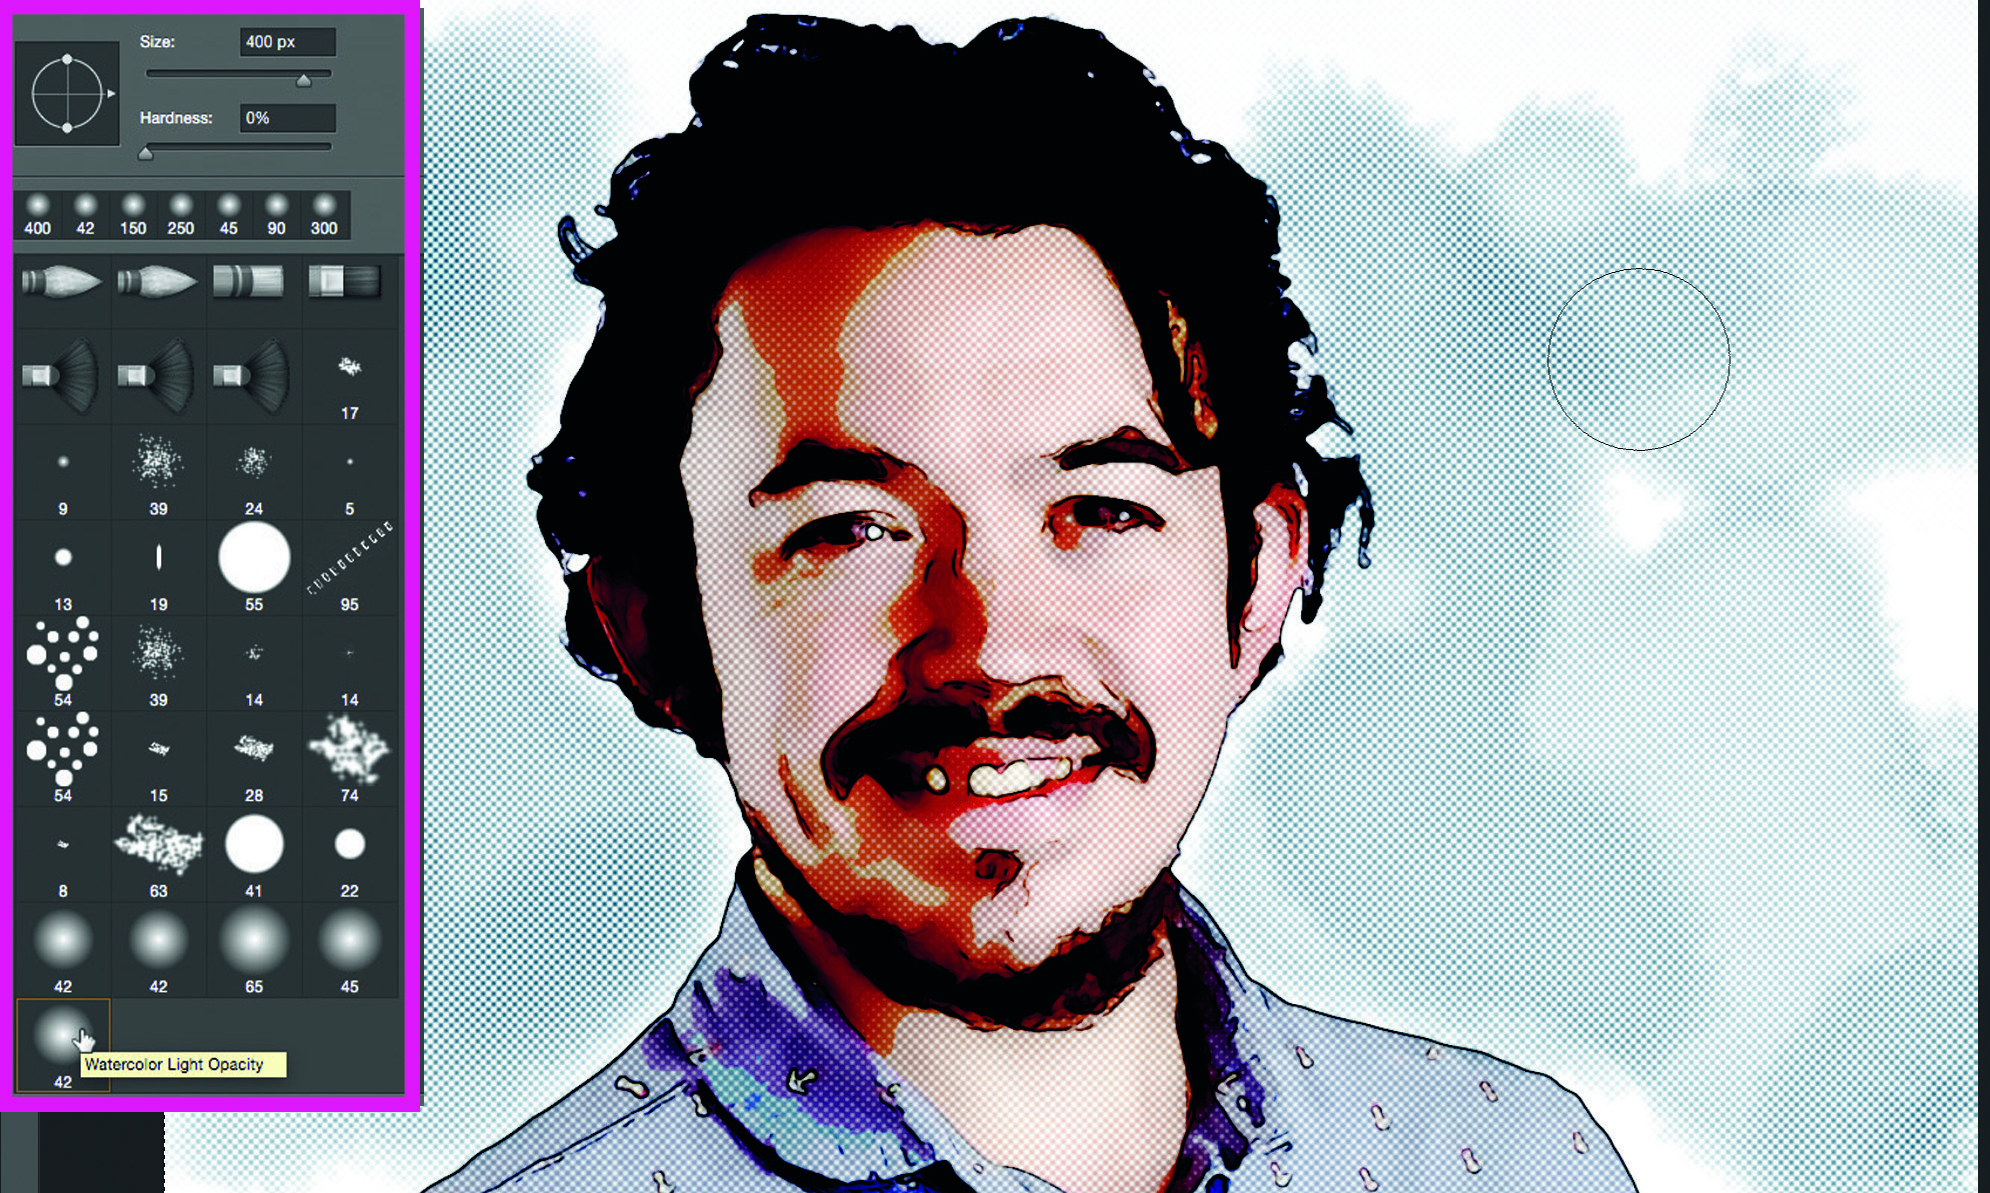
Go to Layer>New>Layer. Click OK. Drag transparent ‘Layer 3’ below ‘Layer 2’. Grab the Brush tool. In the Brush Preset picker, choose the Water Color Light Opacity tip. Set Opacity to 45. Set Size to 400. Spray a blue foreground colour onto the white background.
11. He speaks!
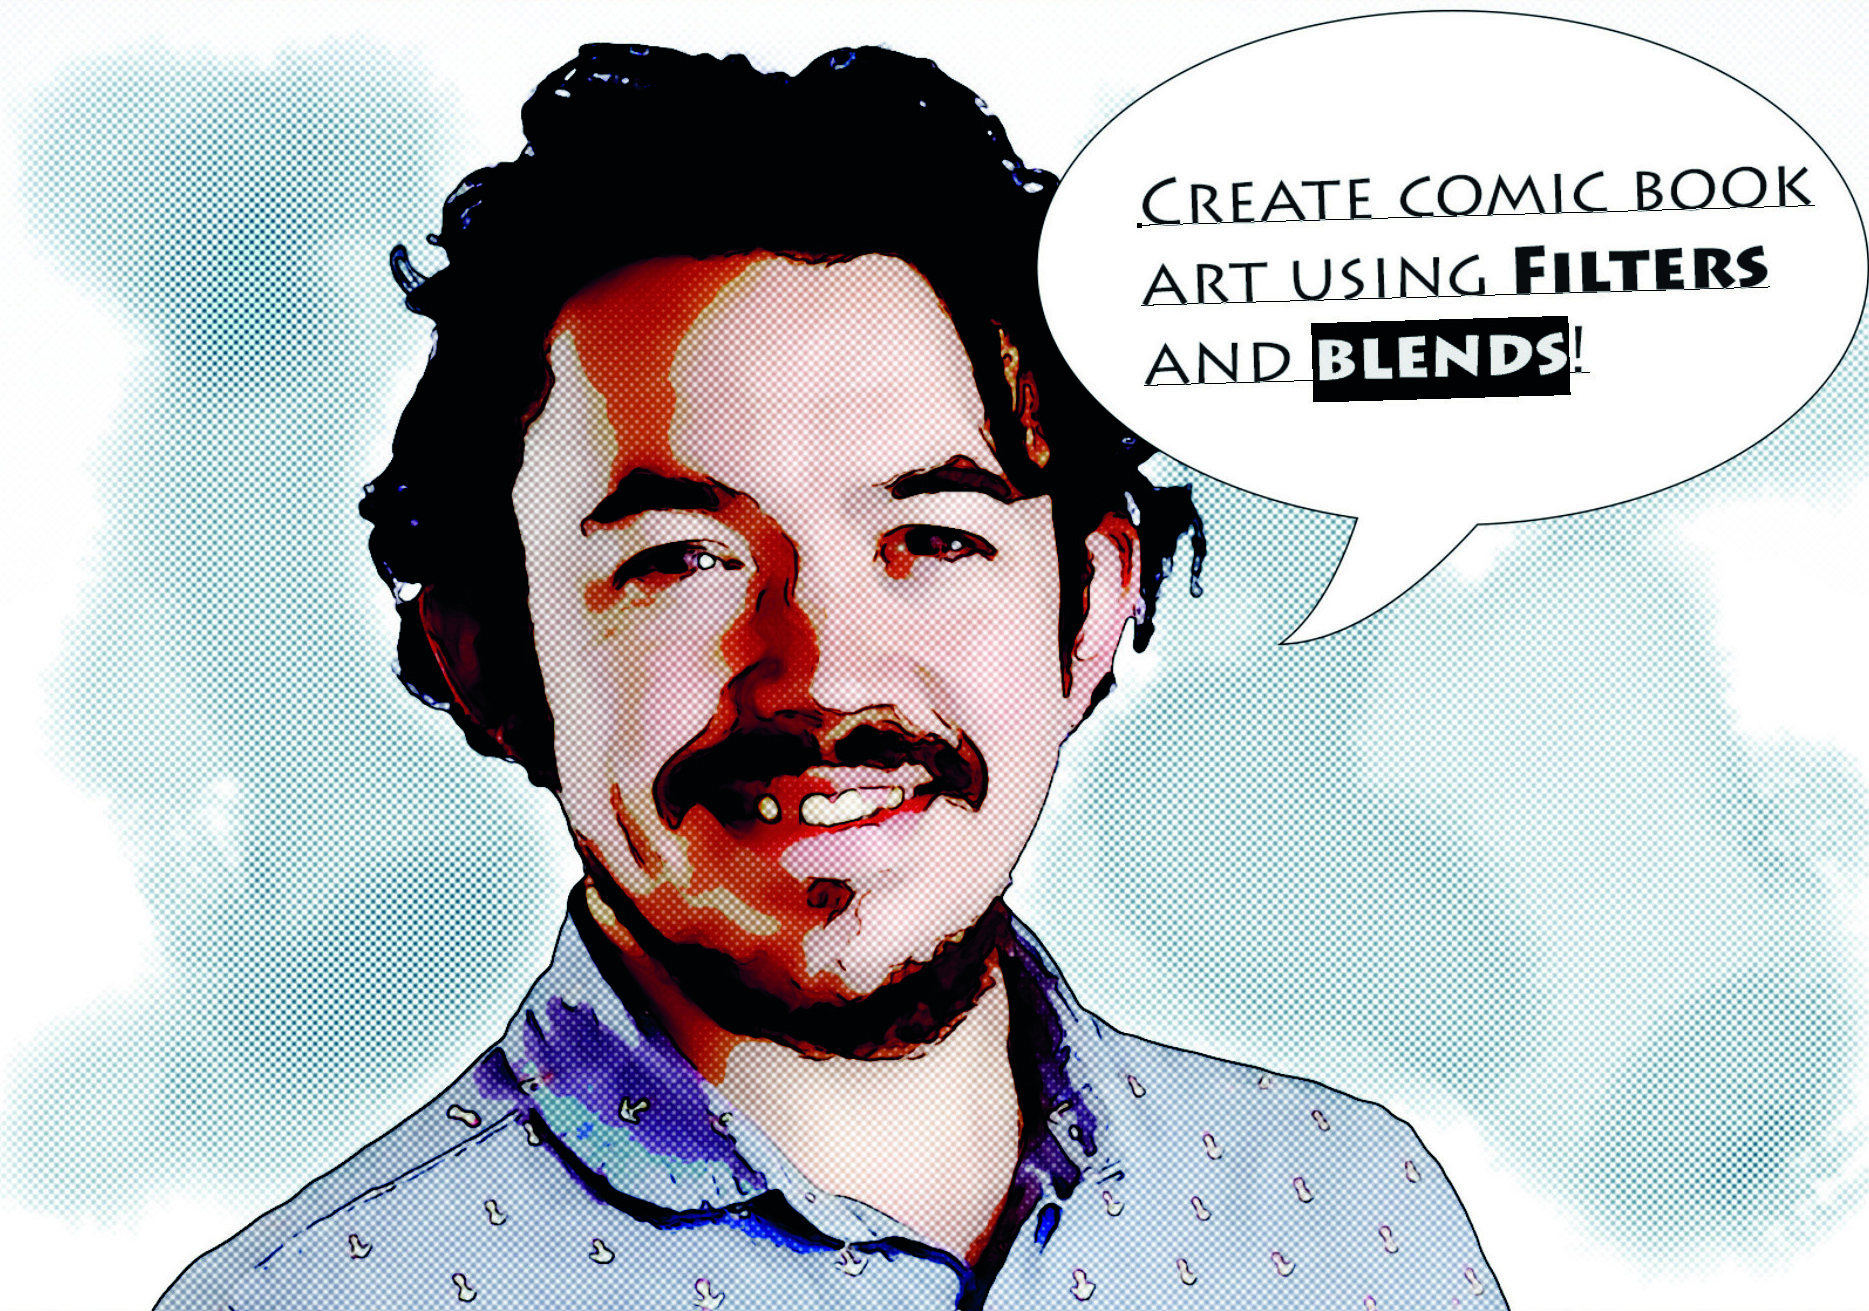
Select the Custom Shape tool. Select the speech bubble from the Custom Shape picker. Set Fill to white and Stroke to black. Set Stroke Width 90, Font Size 41. Draw a speech bubble. Create a new layer. Select the Horizontal Type tool and type some text.
12: Tweak the text
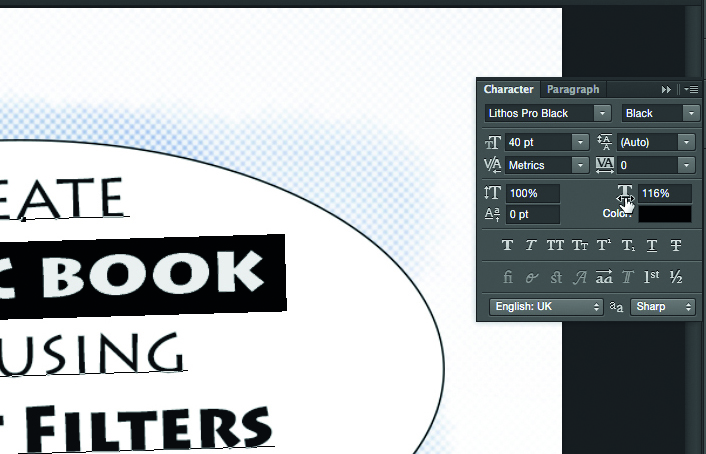
Your speech bubble’s font size will vary depending on the size and resolution of your photograph. Double-click on the text layer to select the text. As well as increasing the size of the font in points you can click on the Character Panel icon in the Options bar. This opens the Character panel. Here you can adjust the values in the Vertically and Horizontally scale boxes to enlarge the text so that it fits inside the bubble.
KEY SKILL: Stroke a path
Make the bubble look hand-drawn with an edge that varies in width
To start off, add a new transparent layer to the top of the stack. Select the Brush tool, and choose a Round Point Stiff Bristle brush tip. Set Size to 50. Set the foreground colour to black. Click on the ‘Shape 1’ layer. Click on the Paths panel. Double-click on the ‘Shape 1 Shape Path’ thumbnail. Click OK in the Save Path window to create a copy. Click back on the Layers panel. Click to target the new transparent layer. Click back on the Paths panel. Right-click on the ‘Shape 1 Shape Path copy’ and choose Stroke Path. Set the Tool drop-down to Brush. Tick Simulate Pressure. Finally, click OK.
Read more:
• Best photo-editing software
• Best laptops for photographers
• Best desktop computers for photo editing
• 11 home photo projects
• 44 tips cards to cut out and keep
• Photography tips for beginners
• Best budget laptops
• Best desks for home working
• Best video conferencing apps
George has been freelancing as a photo fixing and creative tutorial writer since 2002, working for award winning titles such as Digital Camera, PhotoPlus, N-Photo and Practical Photoshop. He's expert in communicating the ins and outs of Photoshop and Lightroom, as well as producing video production tutorials on Final Cut Pro and iMovie for magazines such as iCreate and Mac Format. He also produces regular and exclusive Photoshop CC tutorials for his YouTube channel.
