



Digital Camera World Verdict
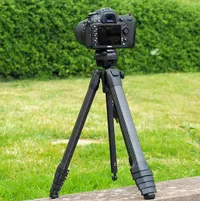
I feel that the Heipi 3-in-1 Travel Tripod W28S folds down nice and small for the journey but packs a lot of clever tricks. The most remarkable and revolutionary of them is an extending 3-pillar center column that you can also pull out altogether and use as a small secondary tripod in its own right, or as a selfie stick complete with a smartphone mount that’s concealed within the clever ball head. I love its versatility and that it’s very good value for a tricked-up carbon fiber travel tripod, even better value if you consider it as a buy-one-get-one tripod deal.
Reasons to buy
- +
Two tripods in one, plus stick
- +
Revolutionary 3-pillar column
- +
Quality carbon construction
- +
Clever head
- +
Integral smartphone mount
Reasons to avoid
- -
Modest maximum height
- -
Spindly bottom leg sections
- -
Doesn’t convert into a monopod
- -
Lots of flip locks
Why you can trust Digital Camera World Our expert reviewers spend hours testing and comparing products and services so you can choose the best for you. Find out how we test.
I’ve been using tripods for about 50 years but just when I thought I knew them inside out, something new has taken me by surprise. Based in Shenzhen, China, Heipi isn’t a company that’s really been on my radar but they’re now celebrating their 7th anniversary. The brand is the brainchild of an engineer who’s also a passionate wildlife photographer. Combining these two facets of his skills set, he launched his first tripod launch in 2019, and the company made a big splash three years later with a 3-in-1 travel tripod, based on a Kickstarter campaign that raised a million dollars in a mere 30 days, from 3,000 backers.
The new Heipi 3-in-1 Travel Tripod W28S that I’m reviewing here is the company’s new, updated and upgraded flagship tripod kit, joining the other tripods, tripod heads, clamps, mounts, magic arms and accessories already in the Heipi catalog. Innovative, cleverly designed and nicely built with impressive attention to detail, the W28S aims to be one of the best travel tripods on the market, or perhaps I should say that it aims to be two of the best travel tripods plus a selfie stick, all rolled into one travel-friendly package.

Heipi 3-in-1 Travel Tripod W28S: Specifications
Material |
Carbon Fiber / Aluminum |
Folded height |
45cm / 17.7in |
Maximum operating height |
152cm / 59.8in |
Minimum operating height |
6cm / 2.4in |
Folded diameter |
7.5cm / 3.0in |
Weight |
1.4kg / 3.0lb |
Load rating |
20kg / 44lb |
Sections per leg |
5 |
Leg section diameters (main) |
26, 23, 20, 17, 14mm |
Section clamps |
Flip locks |
Locking leg angles |
3 angles |
Feet |
Pads / spikes |
Case/bag included |
Bag |
Heipi 3-in-1 Travel Tripod W28S: Price
What price a pair of travel tripods plus a selfie stick and a low-profile ball head, all bundled into a single product and wrapped up in a stylish travel bag? The Heipi 3-in-1 Travel Tripod W28S lists at $399 / £349 / AU$649, which is very reasonable for just one carbon fiber tripod (the smaller one in the dual-tripod design is actually aluminum), especially considering that it’s such a comprehensive kit with such a rich feature set.
A comparably compact carbon tripod is available in the space-saving shape of the Peak Design Travel Tripod carbon fiber, which costs $599 / £599 / AU$1,169, and the newer Peak Design Pro Tripod which is even pricier at $900 / £800 / AU$1,500. On the face of it, the Heipi looks a proper bargain.
Heipi 3-in-1 Travel Tripod W28S: Design & Handling
The 2-in-1 or even 3-in-1 design, depending on which way you look at it, isn’t the only crafty concept behind the Heipi’s build. When I said I thought it was reminiscent of the Peak Design Travel Tripod carbon fiber, it’s not just because both are made from carbon fiber, but because they both have a similar space-saving design element.
For a while now, the travel tripod trend has been to have swing-up legs, which save space if you fully extend the center column and then invert the legs so that the feet encompass the head. It takes a bit off the stowage height but makes setup and takedown more of a time-consuming chore. Like the Peak Design, the Heipi doesn’t have swing-up legs but does have center column that uses the space between the legs, but in a different way. The Peak Design has a triangular section center column and specially shaped legs that wrap around it, thus filling the gaps.

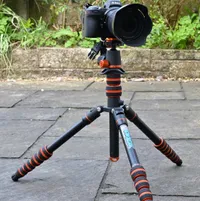
The Heipi doesn’t really have a center column as such. Instead of a central column that sits between the tripod legs, it has three triangular profile blades (for want of a better term), that take up the spaces between the legs, but on the outside. The net results is pretty much the same, in that all of the available space is used and nothing goes to waste in the pursuit of compactness.

From an operational perspective, the 3-pillar column works like any other center column, in that you can loosen a locking mechanism (this time a rotary dial at the top) and extend the column upwards. Just pay attention to the warning line at the bottom of each mini tripod leg, indicating the maximum safe extension height. Go beyond this and you can pull the center column out altogether and transform it into a mini tripod, complete with adjustable leg angle locks and a 1/4-inch threaded socket on each leg for attaching a accessories or a magic arm (Heipi can sell you one of those as well).

Not just for doubling up on tripods, removing the 3-pillar column has the advantage that you can invert it and slide it back in to the main tripod again, from underneath. This enables shooting right down to ground level, with the usual caveat that the camera is inverted. More on low-level shooting later but for now, I’ll reiterate that while the main tripod has carbon fiber legs, those of the 3-pillar column / mini tripod are made from aluminum.

Some like to twist, others prefer to flip. Again like the Peak Design travel tripod, the Heipi has slim profile flip locks which take up very little space and only stick out from the legs by a tiny amount, thanks to the way they’re shaped. A key difference is that they’re quite stiff to operate and it’s a real struggle to grasp them all in one hand and open them with a single gesture. You’re more likely to settle on working them one by one, which can take a while as there are no less than 12 of them altogether.

An upgrade to Heipi’s original flip lock design is that the new and improved version gives a stronger locking force with uniform pressure applied around the entire circumference of the leg sections. The new locks are also easier to detach for cleaning and maintenance. The leg sections themselves start with a reasonably sizeable 26mm diameter at the top, working downwards in 3mm increments to a relatively spindly 14mm at the bottom. The bottom sections do look and feel a little flimsy but that’s the price you usually pay for space-saving 5-section legs, compared with 3-section or 4-section legs. To be fair, I’ve seen thinner bottom leg sections on some up-market travel tripods.

Most tripods have three separate locking angles for each leg, which can help if you’re working around obstacles or setting up on tricky terrain. Many of them use spring-loaded locking mechanisms that you either pull out or press in. The Heipi adopts a mix and match approach, with locks that pull out for the main tripod and push in for the mini tripod. It makes sense as you can’t have anything that sticks out in the mini tripod legs, or they wouldn’t be able to slide all the way into the platform on the main tripod.

Many tripods feature a weight hook, which is useful for hanging ballast and reducing the risk of them swaying in a breeze. The Heipi has a variation on the theme in that it has a loop of weight rope instead. That’s all well and good if you’ve got a carabiner or some other method of attaching a weight but is arguably less convenient than just having a simple hook to hang something on. Naturally, the normal practice of fixing a weight hook on the bottom of a tripod’s center column wouldn’t work with the Heipi’s 3-pillar design.

Switching from top to bottom, the feet are formed from removable rubber pads. Unscrewing the feet reveals 30mm metal spikes which you can again unscrew and invert, so that they stick out from the bottom of the foot instead of from the top. This effectively transforms the feet from pads to spikes, the latter giving a firmer footing on loose ground.

The metal hooks have eyelets in them for inserting a tool and twisting them around to unscrew them from the top or bottom of the feet and reinsert them in the other.

Enough talk of legs, let’s move onto the head. It’s a rather clever one, after all. It can attach directly to either the main legs or small legs but in the normal configuration of the tripod, it’ll fit to the small legs which are then inserted into the main legs to form the 3-pillar column. Naturally, the only thing you can’t do is to attach the head to both sets of legs at the same time, as you only get one head in the kit and not two, unless you buy a second one separately. That said, pretty much any tripod head should be compatible with the kit, so long as it has a standard 3/8in threaded socket and its mounting disk fits within the 60mm diameter of the center column locking ring.

The low-profile ball head looks right at home when fitted to either tripod, as well as to the smaller when used in center column mode. In case you’re wondering, the platform of the main tripod has a spring-loaded, retractable mounting screw that neatly moves out of the way when the 3-pillar column is inserted.

The lock/release mechanism for the Arca type quick-release plate relies on twisting the upper section of the head. A protrusion on either side helps to enable a firm grip but there’s no additional security lock to avoid accidental release. The camera platform of the head also features a bubble level, to aid accurate leveling.

The underside of the QR plate reveals the attachment screw for the camera. It can be tightened or released with a hex key (supplied) or a coin, but there’s no D-ring for fastening it or undoing it with just a finger and thumb.

Another hidden gem of the design is that the ball head features a pull-out smartphone mount. Like other elements of the tripod, it’s spring-loaded for convenience. One thing that’s less convenient about it is that if you have even a thin cover on the back of your phone, you might need to remove it as there’s only a narrow gap to push it through. Even so, it adds credibility to the Heipi’s claim of working as a selfie stick.

The main ball action of the head relies on a single twist-clamp lever for loosening and locking it. The usual cutout in the ball socket enables 90-degree rotation of the camera for portrait orientation shooting, in the absence of an L-bracket. Slight negative points are that there’s no independent friction adjuster to tailor the action to alternative lightweight and heavy camera combos, and the locking lever needs to be fairly precisely positioned. You might well find that you need to pull it out, slip it over its splines and re-engage it again to avoid it fouling on other parts of the head.

One thing that I always like to see, and that’s present and correct in the Heipi ball head, is a separate pan-only lock. Not only does it have one, but it comes complete with a 360-degree scale marked in 5-degree increments. What’s more, a secondary screw with a hex head enables you to swap between smooth panning and high-precision 10-degree click steps. It’s a bit like using the aperture control ring on a lens that has a click/de-click switch.

One of my pet hates is instruction leaflets for all manner of gadgets, that have such tiny print that you can’t actually read them. I’m happy that the guide supplied with the Heipi is not only entirely legible, but includes color photos of various parts, functions and facilities, enabling a better understanding of the various features and facilities on offer.

The tools supplied with the tripod comprise hex keys in three different sizes, as shown below. That’s really all you need for any operational or maintenance task.

Everything wraps up safe and sound in a weather-proofed bag that’s supplied with the tripod. It’s a snug fit, so there’s no wasted space and the carrying size is as small as possible. It also has an adjustable, detachable shoulder strap that fastens to loops at either end of the bag with Velco strips.

Heipi 3-in-1 Travel Tripod W28S: Performance
I like my tripods to be big and small in equal measure. I want them to be tall enough at their maximum height for comfortable shooting (and I’m 6ft 5in), but nice and small when folded down so that they’re compact travelling companions. The Heipi serves mostly well on both counts. The maximum operating height with the 3-pillar center column fully extended is a fairly modest 152cm / 59.8in, but that’s still taller than a number of travel tripods that I can think of. Meanwhile, the folded height of just 45cm / 17.7in enables it to stow away in tight spaces, as does the 7.5cm / 3.0in diameter, courtesy of the space-saving leg/3-pillar column design.

A key performance benefit is the whole ‘dual tripods’ thing. The main tripod works well as a regular, go-to tripod for all sorts of shooting scenarios, while the mini tripod is great for tabletop use, ultra-low-level shooting (without inverting the center column) and for selfie stick action. In its regular configuration as one complete tripod with a 3-pillar center column, the Heipi has a hefty payload rating of 20kg / 44lb. That seems a bit ‘optimistic’ to my mind, given the relatively thin bottom leg sections, but I’m never likely to put that much load on it anyway.

The maximum height of a tripod is one consideration, but the minimum shooting height can be equally important from a creative perspective. Both of the main and mini tripods that make up the kit can shoot very close to the ground, with a minimum operating height of just 6cm / 2.4in. That’s thanks to the adjustable locking leg angles and the removable nature of the center column / mini tripod. However, I found that the mini tripod was quite prone to unwanted flexing and sagging when the legs were splayed to wider operating angles.

The head (or heads if you buy and use an extra one) can attach to both the main and mini tripods. The platform in the main tripod features a large bubble level to aid with leveling, and it’s a lot more useful than the miniscule bubble levels featured in some tripods. Correctly leveling the legs ensures that panning will also be on the level, rather than the camera going on the slant during the panning process. That’s an important consideration when shooting video, or a sequence of stills to stitch into a panorama.
The only slight issue with the large bubble level is that you have to raise the 3-pillar column a little to get a really clear view of it. Back on the plus side, both platforms in the main and mini tripods feature a grub screw for firmly locking the head in place. This can be very useful as it effectively guards against the head coming unscrewed on its main mounting screw if and when you’re panning in an anti-clockwise direction.

I’ve saved arguably the most crucial performance factor until last, and that’s the rigidity of the tripod and its resistance to unwanted flexing and vibrations. I’ve touched on this for the small mini tripod, which is made from aluminum, but the main carbon fiber legs have their own story to tell. And that story is that they’re made from a mix of T700 high-tensile fibers and T400 impact-resistant fibers, designed to enhance stability and weight loss. However, there’s no getting away from the fact that 5-section legs result in spindly bottom sections and I found that at or near its maximum operating height, the tripod was a little prone to flexing and vibration. However, it’s still more sturdy and rigid than many travel tripods on the market.

Heipi 3-in-1 Travel Tripod W28S: Verdict
There’s a lot to love about the Heipe 3-in-1 Travel Tripod W28S, and top of the list is that there’s not a lot of it. I like that it folds down nice and small, making it an ideal travel companion for the journey, which is mainly what travel tripods are all about. Thanks to the 5-section legs, it reaches a decent if modest maximum operating height, in conjunction with the 3-pillar extending center column, which itself is what sets the Heipe apart from the crowd of its 3-legged cronies. I’m so impressed that you can remove the center column and use it as a whole other mini tripod or selfie stick, that I’m frankly amazed the design isn’t featured far and wide in other tripods.
I’m not going to give the Heipe a completely glowing report, however. Little niggles include spindly bottom leg sections that impair rigidity at or near maximum operating height. Those 5-section legs also equate to a lot of flip locks to contend with, each of which is surprisingly stiff and unyielding. The Heipe also doesn’t conveniently convert into a monopod, although that’s certainly not unusual amongst travel tripods rather than full-sized sticks. All in all, this tripod, or perhaps collection of tripods, is a crafty design that’s very well implemented, and very good value at the price.
Features ★★★★★ |
Top of the features list is the 3-in-1 collection of large and small tripods, plus a selfie stick with smartphone mount, coupled with a clever ball head. |
Design ★★★★★ |
The 3-pillar column is a genuinely innovative piece of design that works really well in practice, and build quality is impressive for all parts of the kit. |
Performance ★★★★☆ |
It’s very good overall but the main tripod isn’t immune to flexing at or near its maximum operating height. That’s certainly not unusual among travel tripods. |
Value ★★★★★ |
Considering its comprehensive set of features, clever design and quality carbon fiber build, the Heipe is standout value for money. |

Alternatives