Sharpness is critical in almost any form of photography, and landscape photography is no exception. You might think you don’t need to worry about soft landscape photos, because you spend most of your time using a tripod and the subject’s not moving. But you’d be surprised at the myriad ways landscape photographers can end up with images that simply aren’t sharp enough. Ignore my landscape photography tips at your own risk.

Attach your lens hood when shooting in harsh sunlight to cut down the amount of haze and glare to increase contrast and perceived sharpness. The petal and tubular shapes are the most efficient design that blocks out flare without the hood appearing in the frame.
The foundation for capturing sharp images, handheld, is the reciprocal rule. However, many landscapes are captured at slower shutter speeds to blur moving water or clouds, or because they’re captured early in the morning or late in the evening when there’s less available light. Even when shooting on a tripod, slow shutter speeds make it possible to encounter camera shake and to make matters even more challenging, the best cameras for landscape photography tend to boast high-resolution sensors, which exaggerate the effects of camera shake.
Where you focus and what aperture you use can affect the sharpness of your landscape photography, too, and if you’re a DSLR photographer, you’ve got something called ‘mirror slap’ to worry about. So, if any of the above is news to you, do yourself a favor and read through my guide to landscape photography sharpness. Nobody wants blurry photos, well, not unless you’re an ICM landscape photographer.
Article continues below1. Set up on a tripod

The best tripod will help prevent camera shake from blurring your shots. Opt for a sturdy model and always extend the thickest leg sections first for better stability. Only extend the center column as a last resort as this is always the least stable part of the tripod. I also recommend picking up a remote shutter release so you can fire the shutter without touching your camera.
Even on a tripod, physically pressing the camera’s shutter button can cause enough movement to introduce camera shake, especially when shooting at longer exposures. If you don’t have a remote shutter release you can set a self-timer so you don’t have to touch the camera as you fire the shutter. However, if you’re using a DSLR then you might want to consider the next step.
2. Using a DSLR? Avoid ‘mirror slap’
If you’re using a DSLR, camera shake can occur from vibrations caused by the reflex mirror flipping up inside the camera to reveal the image sensor, which is known as ‘mirror slap’. There are several ways around this. Firstly, by shooting in live view. This is because the reflex mirror has to be flipped up, so as not to obstruct the sensor, and deliver the live feed.
Secondly, some cameras have a mirror-up mode. When activated, this means that pressing the shutter button will flip the reflex mirror up, and pressing it a second time will fire the shutter. This allows you to wait a few seconds between moving the reflex mirror and taking the shot to give any vibrations time to subside.
Finally, some cameras have an exposure delay mode. This works like a self-timer, by delaying the shutter from firing a few seconds after you press the shutter button. The difference is that it flips the reflex mirror up before the delay and then fires the shutter, again, allowing any vibrations time to subside.
3. Switch off image stabilization

Optical or in-body image stabilization allows the lens or sensor to be stabilized when hand-holding to reduce camera shake. Some systems have been known to introduce blur when used in conjunction with a tripod, attempting to correct for motion that simply isn't there.
Some manufacturers rate their image-stabilization systems for use with tripods, but rather than attempt to remember or research whether or not this is the case when I’m out in the field, I find it easier to simply get into the habit of turning off image stabilization every time I use a tripod and switching it back on thereafter.
4. Avoid diffraction

I like to capture landscapes between f/8 and f/11, but some photographers will opt to shoot at even narrower apertures, which can prove problematic. We know that narrower apertures produce larger depths of field, so it stands to reason that if you want more of your landscapes to be sharp, you’d opt for the largest DoF possible.
However, at very narrow apertures, lenses start to suffer from an optical distortion called diffraction, which reduces sharpness. The narrower the aperture, the more prevalent the effect. And while better quality lenses can exhibit less diffraction, all lenses suffer from it. By shooting at f/8 to f/11, you’ll be operating near enough to your lens’s sweet spot to reach near-optimal sharpness, while also producing a suitably large depth of field.
5. Sharpen your image in post

When you’ve taken your image it’s a good idea to sharpen the RAW file just before exporting when using photo editing software like Adobe Photoshop. However, it’s important to remember that sharpening shouldn’t be considered a quick fix for blurry images; it’s there to enhance an already acceptably sharp photograph.
How depth of field and focus effects sharpness
Your landscape photos might appear soft because you’re focusing in the wrong place. Usually, a landscape photographer’s goal is to create as much depth of field as possible, but where you focus will impact that. This is because depth of field provides diminishing sharpness in front of and behind your point of focus.
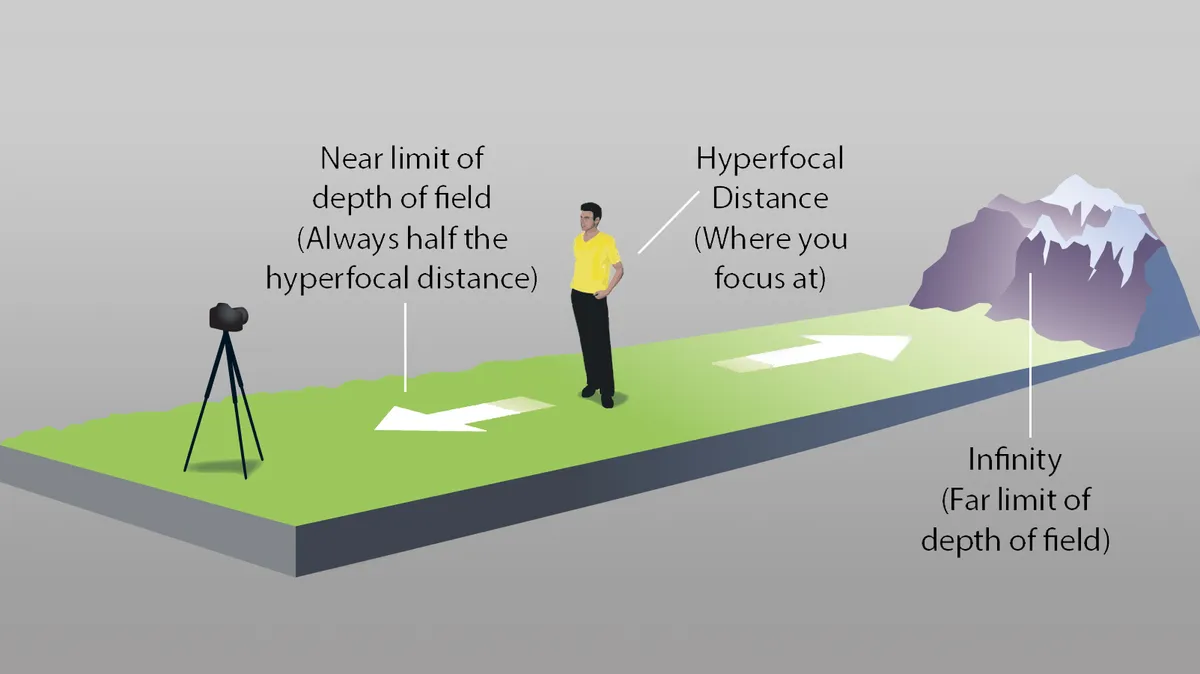
If you’re photographing a mountain landscape and you focus on the mountain, which will be the farthest object away from your camera, you’re not optimizing your DoF, because you’re essentially wasting the DoF that extends beyond the mountain. The optimal place to focus would be somewhere in front of the mountain, so you maximize as much DoF towards the foreground as possible, while still keeping the distant object acceptably sharp. The problem, then, is working out exactly where you focus to maximize DoF.
A method that a lot of photographers swear by is finding the hyperfocal distance. Thankfully, apps such as PhotoPills prevent you from needing to remember and indeed work out the mathematical formula to calculate your lens and camera combination’s hyperfocal distance. Still, I personally think that calculating hyperfocal distance is an overcomplication when using modern cameras, because you can instantly see the results, which means you can afford to use a little trial and error.
As such, I much prefer to employ the following two techniques. Firstly, and more commonly, I’ll simply focus a third of the way into the scene, take the shot and then zoom into the resulting image to check critical sharpness. If I’m using a wide-angle lens and I’ve got objects in the foreground that I want sharp, I’ll use double-distance focusing. This is where you eyeball the distance of the object that’s closest to the camera that you want sharp and focus roughly double that distance into the frame.
Can cameras and lenses affect sharpness?
Camera gear can affect sharpness, but it can’t make up for poor technique. Both better quality image sensors and optics can produce sharper and more detailed imagery, but the image must be technically sharp to begin with. What can make a big difference in terms of sharpness is both in-body and optical image stabilization. This will help you to capture sharper images at slower shutter speeds when shooting handheld.
However, you can have the best camera gear in the world, but if you’re introducing too much camera shake or not focusing properly, your images will still look blurry. It’s arguably even more important that you employ good practice when using top-quality camera gear with higher resolutions, since the ability to capture more clarity means camera shake is more prevalent and there’s less room to hide.
You might also like...
If you’re looking for landscape photography inspiration, here are 10 landscape photographers you should be following. Once you’ve found the right tripod, you might want to make sure you’re using the right tripod head. And if you’re looking to enhance your images in post, I created a Photoshop Action to instantly ‘glow-up’ my landscapes.

You must confirm your public display name before commenting
Please logout and then login again, you will then be prompted to enter your display name.
