
When you take a photograph, you set the lens to focus on a particular point in the scene that is a specific distance from the camera. How sharp the areas in front of and behind this focusing distance is determined by the aperture value that is set. Large aperture values, like f/2.8 and f/4 will give a shallow zone of sharp focus, and small apertures such as f/16 or f/22 will give a deep zone of sharpness. This zone of sharp focus is called the depth of field, and the hyperfocal distance describes the optimum focus point that will maximise sharpness from the foreground right through to the background.
In practical terms, it’s always used with small apertures, and most photographers like to stay one stop back from their largest f-number. The reason is when a lens is closed right down to its minimum aperture setting, it doesn’t perform as well, and can actually give a less-sharp image. So if your minimum aperture on a lens is f/22, then f/16 is the best choice to use if you want to get a super-sharp photo with a big depth of field.
Hyperfocal lens markings
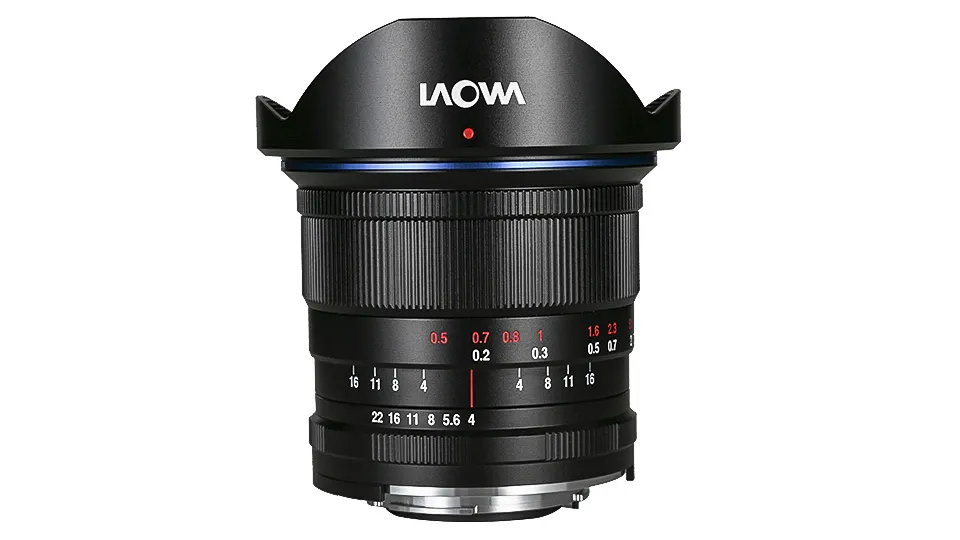
On older lenses with a full complement of barrel markings, you can set the hyperfocal distance in manual focus mode very quickly. Assuming you want to focus to infinity, just line up the outer f/16 marker with the infinity mark, and you can read off the closest distance that will be sharply focused with the inner f/16 mark. Even though the scene may look blurred in the viewfinder, the resultant shot will be sharp from the closest distance indicated right through to the infinity.
The snag in this simple and effective technique is that most modern lenses have dispensed with hyperfocal markings, and it's not really possible with zoom lenses at all, so how is it done with a shiny new optic?
Well, one method is to use a smartphone app that will allow you to input your camera model, focal length and aperture value. With the data in, the result will tell the distance to manually set the focus to achieve maximum sharpness from front to back. But if that sounds like a lot of hassle, there’s an easier way that involves a couple of test shots and a little bit of focusing trial and error.
Modern hyperfocal shooting

The simple route is to use aperture priority mode, and after dialling in f/16 (or one stop back from your minimum aperture), focus about one-third of the way up the frame (or half way to the horizon, whichever is easiest to estimate). This is likely to be the back of your foreground detail on a classic landscape. Lock your focus here and take a test shot. Check the result on screen and zoom in on the detail to see if your horizon is sharp. Now check the immediate foreground (the closest part of the scene you want to be in focus) to see if it is sharp, too. If all is good, you’ve done it!
Another way to check this on a DSLR is to use LiveView, as you’ll be able to see what is or isn’t sharp at the set aperture in real time, and can zoom in to the screen to check foreground and horizon details.
But if the close foreground is slightly soft, you’ll need to set the focus point a little nearer to the camera and reshoot before checking again. At the other end of the scale, if the horizon is soft, you’ll need to set the focus point a little further away. After a few test shots, you’ll have established the hyperfocal distance for your photo, and can rest easy, knowing that it couldn’t be any sharper!
If you can’t get both the foreground and the horizon sharp at the same time, then your foreground detail is too close to the lens and you’ll have to either use your minimum aperture value to extend the depth of field (bearing in mind that the overall sharpness may suffer slightly), or you’ll need to recompose with your foreground further away from the camera.
The only other way to solve such a problem is to use a focus stacking technique, where you take a series of shots at different focusing distances and blend them together in software to achieve a super-massive depth of field!
Read more:
• Best cameras for landscapes
• Best lenses for landscapes
• Best tripods
• Best camera backpacks
• DCW Dictionary of photography

