
• Colour correction engine
• Fast editor
• Real-time panorama editor
• Mask tool
• Anti-ghost algorithm
Panoramas are always hugely popular with landscapes photographers, and one of the best ways to make a panorama is to capture several images with a longer lens, and then stitch them together during post-processing.
Indeed, high-quality panoramas present a challenge – and it’s a challenge tackled by Kolor Autopano Giga 4.
Kolor has long been in the panoramic imaging solutions business and is a world leader in panorama, virtual tours and video-stitching software.
Article continues belowLet’s take a look at the company’s latest panorama software and just what it can do for you.
What is Autopano Giga 4?

Autopano Giga 4 is Kolor’s flagship dedicated photo-editing software for creating high-quality panoramic images.
It is compatible with 64-bit/32-bit systems Windows (7, 8 and 10), Mac (Yosemite, El Capitan and Sierra) and Linux (Ubuntu 16.04) platforms.
Packed with editing features yet easy to use, Autopano's import, edit and export process can take as little as a few minutes for a completed panoramic image.
Capturing panoramas
To capture a panorama, it’s best to shoot images in portrait format. When covering the same space it will require twice as many portrait format images as landscape format images, so you’ll get twice the resolution. You’ll also have more scope for capturing sky and ground areas, or be able to zoom in more and experience less lens distortion.
Ensure a good overlap of up to 20-30% from one image to the next. Autopano Giga 4 can handle a lot of images in one panorama, so there's no need for caution – just take your time and shoot methodically in order to avoid extra post processing work.
For use with Autopano Giga 4, we have made linear panoramas (horizontal shifts only) and multi-angle panoramas (with several images in a vertical movement, in addition to the horizontal shift).
Using a telephoto focal length can reduce lens distortions and helps to bring objects closer, though it will, of course, reduce the amount of the scene contained in the picture. You may need to shoot more images in these sequences.
All this said, Autopano Giga 4 can work wonders with poorly captured image sequences. Whether pictures are taken handheld with a smartphone or compact camera or even using a professional DSLR mounted to a panoramic head, Autopano Giga 4 can handle the image sequence.
The software works with images from any camera, including Raw files. Each panorama ‘group’ can hold as little as two images or as many as several thousand, making for potentially very high-resolution panoramas.
Our variety of panoramas are sequences made up of 10 images through to more than 70 images. We have experienced how quick and effective the software is in creating high-quality panoramas.
Importing
- Panorama groups can contain between two and several thousand images
- Support for Adobe Lens Profiles or external plugins for Lightroom/Bridge
- Compatible with virtually all Raw image formats
- Automatic detection of panoramas in a folder menu
With the panorama sequences captured, it's time to import the images. The whole image folder can be analysed, and each panoramic image sequence is automatically placed into a new Group.
At this stage a plugin can be applied. There are three free plugins available: Neutralhazer®, external stack processing and lens correction.
Neturalhazer deals with inevitable haze in the atmosphere that reduces the contrast in detail further away from the camera. There are further Adobe Photoshop and Lightroom Plugins available too.
Also, the group settings for Detection, Optimization, Panorama and Render can be adjusted, though the auto settings seem fine as they are.
Our largest panorama group contained 72 images, which is a lot of data. It took the software around one minute to detect and create a stitched panorama from this group, ready for editing. No concerns about software sluggishness here.
From the newly stitched panorama we can move on to make some edits – and this is where we see many of the interesting features of Autopano Giga 4.
Editing

- Auto stitching/manual stitching
- Geometry perspective correction tool for vertical and horizontal lines
- Fine-tune exposure and colour correction
- Manual or ‘auto-fit’ crop
- Anti-ghosting correction for overlapping and moving objects
- Preview icon (real-time overview of image)
While it's possible to click straight through to Render (Export) a new panoramic image, it is well worth making some edits – and Autopano Giga 4’s editing workspace offers a wide range of image improvements.
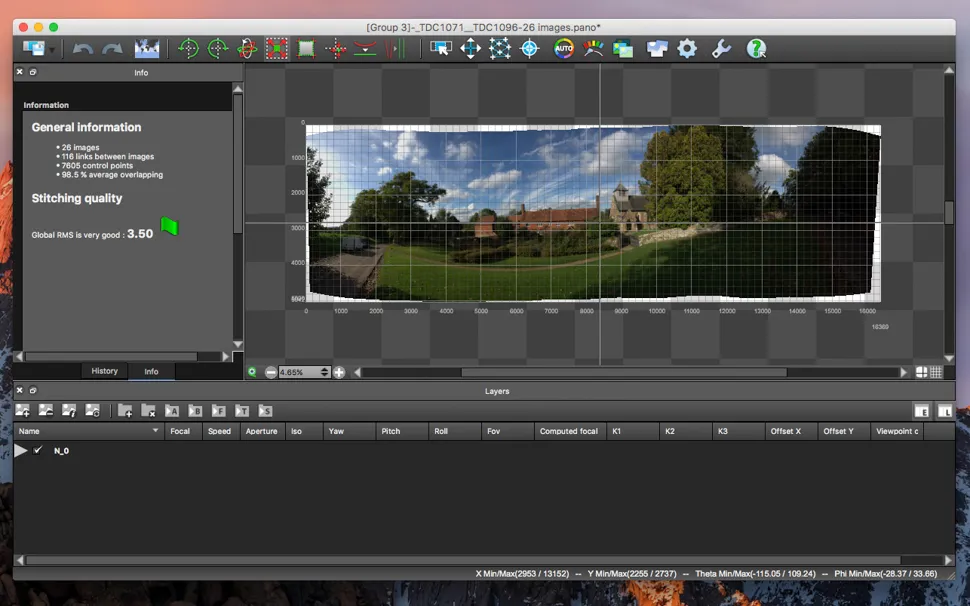
The software automatically aligns the images in the sequence through 'Control Points'. As you can see from our screen grab below, the control points from one image to the next are many – more than 70 in some cases. There is manual control over these control points too, though in our images we found little need to explore this comprehensive feature.

For every sequence it is worth making changes to exposure, levels and colour. The exposure of our featured images has been tweaked using the 'Anchors' edit tool, which can display overexposed and underexposed areas.
Each anchor can be adjusted independently, in order to recover highlight detail and brighten dark areas by increasing exposure, while still having an homogenous colour correction over the whole panorama. The end result is a pleasing, subtle HDR effect. These edits are quick and easy to make.
Alternatively, Exposure Fusion allows you to weight the exposure for a preference to dark or light tones, while also enhancing these tones.
In addition to manually cropping the panorama, you’ll also be able to make an ‘auto-fit’ crop, which is a super-handy method of selecting the maximum crop area that excludes all the parts of the panorama outside the picture.

Projection Settings contains ten profiles for different panoramic effects. ‘Spherical' is the most distortion free (when projected on a sphere, a virtual tour for instance), ‘Rectilinear’ projection to keep buildings straight and you also have popular effects like Little Planet.
Autopano Giga comes with an automatic algorithm that corrects the ghosts coming from moving objects, and a new mask tool allowing you to choose what you want to keep or remove in overlapping areas.

Then there’s rotate, automatic horizon correction, vanishing point selection, the yaw/pitch and roll transformation tool and the verticals tool. The latter is used for perspective correction that can be particularly obvious in buildings.
Let’s not forget that images can also be exported and then further edits made using other editing software.
Export
- Five blending profiles with a custom one
- Seven export formats supported including JPG, TIFF, PSD with layers
- Compatible with Panotour software for 360° virtual tours
In the Export panel, there's a choice of four blending profiles: simple, anti-ghost, exposure fusion and HDR.
Anti-ghosting will remove the 'ghost’ of overlapping and moving objects that appear in more than one place in the sequence. In our experience the anti-ghosting profile produces the most pleasing end results – and that's especially true if manual exposure adjustments have already been made.
We have included these first efforts with Autopano Giga 4 and are very pleased with the results. The software does the hard work for you, being optimised for any camera image file and combining images without obvious stitching.

The main part of our efforts in the Editing process has been applying exposure corrections – these are necessary in virtually all panoramas due to the wide range of tones from highlights to shadows, and thus the different exposure values of images. Being compatible with Raw files means that extreme highlight and shadow detail can be recovered.
In the example images we have not gone into manual stitching corrections, as we've not needed to; the auto results are reliable.
Not only do the panoramas look smooth and stitch free, they can be exported at a very high resolution. We have some JPEG panoramic images that are more than 40MB in size, including a linear one with dimensions of 25344 x 4977 pixels. That’s a lot of pixels!
From our smallest to largest panoramas, it took anything from a few seconds to a few minutes to export a new JPEG, which is quick.
Verdict

We have been able to automatically create well-exposed and high-resolution panoramas with no visible stitching. If you are looking for a comprehensive yet easy-to-use and powerful software for high-quality panoramas, look no further.
Pricing and information
Autopano Giga 4 is available as a limited version on a free trial, which can be downloaded here, after which it costs €199,00 exc. VAT for the full version. You can buy this on Kolor’s website.
Digital Camera World offers a 10% discount until 19 November 2017. All you need is the following discount code: DigitalCameraWorld10
For more information about the software, visit the Kolor website.

