We often think of white balance as a tool to correct colour casts and keep things as we can see them in real life because, in the majority of situations, that’s exactly what we require of it. But have you ever thought to use these settings creatively?
Stepping away from the default Auto mode and experimenting with the various white balance settings can add plenty of impact to images. You can use this to intensify the mood and feel of a scene or to change it completely and create more unusual abstract results – and the best bit about all of this is that you don’t need to go anywhere a computer.
If you’ve never tried it before, here’s a rundown of what you can do in camera, what subjects and images work best and how to fine-tune your images to get the best results.
What options are available?

Most white balance systems comprise an Auto setting, several presets such as Cloudy, Shade and Tungsten and the option to record a custom white balance setting by photographing a neutral target.
There is also usually a colour temperature scale which runs from about 2500-10,000K and the option to slightly bias the presets and/or the Auto setting to record images with a very slight cast, such as amber or magenta.
Modern cameras typically also allow you to shoot on an Auto setting with an additional focus on retaining any warmer tones in the scene.
Presets
The presets are a great place to start, particularly if your camera allows you to preview the results on screen as you cycle through the various options. This will give you an immediate idea of what works and what doesn’t in a given situation.
When shooting in daylight, for example, you’ll probably find the Sunny and Cloudy settings to be similar to the Auto reading, although switching to Shade should give you a more obvious warmth while switching to Fluorescent will treat images with a blue tint.
Colour temperature scale
For both very fine control over changes and the most extreme results, consider using your camera’s colour temperature control instead of the presets.
Although this works on the same principle as the presets – each preset setting such as Cloudy or Shade is nothing more than a setting on this scale – you can often push this further for more pronounced effects. So, you can give images a strong blue cast by selecting a low number such as 2500K or an orange/yellow glow at 10,000K.
Custom setting
The custom setting can be very useful when photographing a subject in testing lighting conditions although, as this only gives you one result to work with, it’s probably not the best option here. Really, you want to experiment with different result to see what works and what doesn’t, and for this you should focus on either the presets or the colour temperature settings.

What kind of images work well?
The kinds of images that work well for this depend on the effect you want to achieve, but you'll generally be attempting one of two things. You will either want to exacerbate the warmth, coolness or any particular cast that’s already present in a scene, or alternatively, you'll be looking to treat images with something completely different to change the mood completely.
If you’re looking to heighten the warmth of coolness in a scene, you should use images which already lean towards this but could just do with a slight boost. So, taking a sunset or a sunrise as an example, using the Cloudy white balance setting (or a point on the colour temperature scale that roughly approximates it) is a great way to take the natural warm tones already present to another level. Too much and it’ll look unrealistic, but with just a little boost it can make an already pleasing image look a little better.
Read more: 6 ways to get the most out of your kit lens
Scenes dominated by warmer hues such as reds and browns, perhaps autumn leaves, as well as gold subjects such as architectural details, also work well with the Cloudy setting, or the Fluorescent one for even more punch.
Likewise, using a warm setting, which introduces a cooler cast, is great when you want to accentuate the coldness of a scene. Frosty, early-morning images of a lake or other scenes containing water, for example, may look better with a slight blue cast, so you could try switching to the Incandescent setting to intensify this.


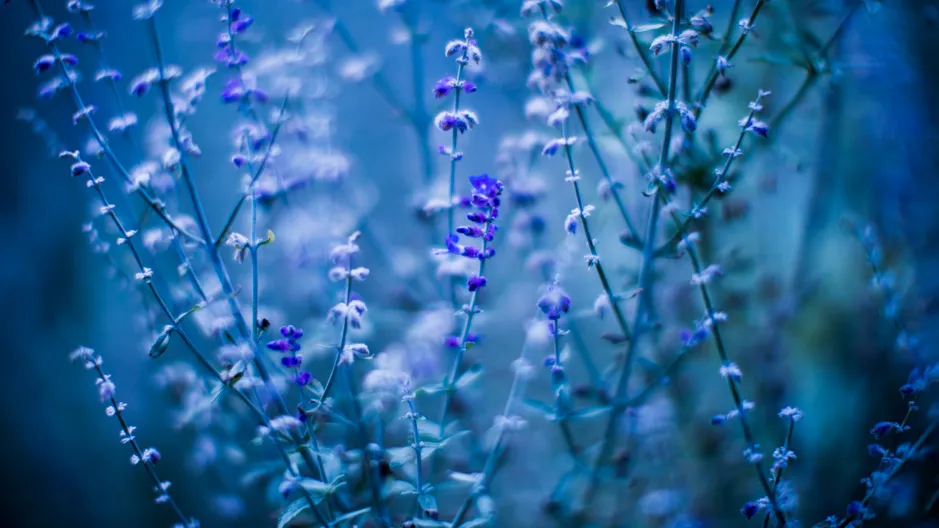
For more abstract results, it helps if the scene is either fairly neutral in colour or if it already leans towards the tint of your choosing, as these are more malleable to different changes.
This also applies the to the subject; the less identifiable something is to begin with, the more it will withstand extreme processing, as the viewer will have less of an idea of what it should look like.


Images captured with very shallow depth of field and plenty of blurred details work particularly well when treated in this way. These can also look great with additional vignetting, or at the very least, vignetting already present uncorrected, so check if you have any vignetting correction turned off if you want to apply this effect.
Giving your images a final polish

The above should give you a starting point for capturing differently toned images, but remember that the average camera will typically offer control over a range of additional parameters to make your images even more striking.
Depending on your camera, you may be able to adjust these using in-camera Raw processing after you’ve captured you image rather than having to make all of these adjustments before you shoot. This is great as you can make multiple copies of the same image with different treatments. In any case, shooting in Raw is the best course of action as you can process images non-destructively.
For abstract results or those involving fine details, look to boost contrast in camera to really enhance this. Some cameras offer a clarity slider, which can better define details without having the global effect on contrast that the contrast slider would, but you can use the sharpening slider instead for a more subtle effect.


If your cast isn’t quite as strong as you like, look to boost saturation in the colour settings. You may find the strongest setting overwhelms the other details in the scene, so experiment with a more moderate increase.
Read more: Cheat sheet: White balance presets

