The AI revolution is upon on, and as photographers, we are perhaps one of the most vulnerable groups to AI as it could render the camera obsolete. But rather than get all doom and gloom about where our AI future is headed, we can instead embrace the change and work out how it can work for us and not against us.
Adobe has been adding AI-powered tools to its suite of editing apps for several years now, but none have been nearly as powerful as the generative AI Adobe added to Photoshop (Beta) powered by Adobe's proprietary AI engine Adobe Firefly. There are many many ways to use Photoshop's new AI, but the simplest, and most immediately effective is the ability to expand a background on an image. Perfect for when you couldn't quite squeeze out the perspective that you wanted, or if your image doesn't quite fit the ratio for a particular use.
Adding a continuation of your background
First things first, to use Adobe's generative AI tool, you will need to install the Photoshop (Beta) app from Creative Cloud, this app should be available to anyone with an active subscription to Adobe's Photography Plan or Adobe's All Apps plan (and you can always download Photoshop for free, taking advantage of the 7-day free trial). Once this is installed, fire it up, and let's get creating.

You can use any image you like to expand the background on, but a few tips to get started. Try and pick an image where the background isn't too complicated and feels like it could naturally be expanded, images with lots of complex shapes or people might confuse the AI and give worse results, Adobe's AI is impressive but not perfect yet.
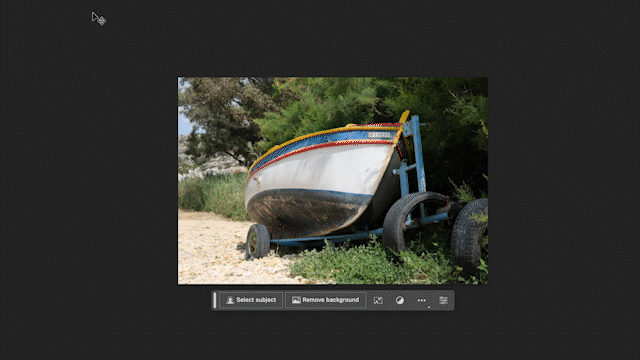
I am going to start with this very simple image of a boat amongst some trees, there are a few little details like the tires along the edge of the frame that will also be a test of what the AI does when expanding the background.

First, you will want to start by expanding the background by using the crop tool, simply drag the crop box outwards until you have enough of a border area to fill. You can do this in any way you would like, either in a certain aspect ratio or if you want more foreground or sky then you can change the crop to suit your image. I have decided for this test to just expand in all directions and see what happens!

Next, you want to select the new crop area, to do this, use your selection tool (the rectangular selection tool might work best here). Select the image leaving a few pixels inside the border of the original image as in the screenshot below. You then want to invert this selection so that instead of your original image, the newly cropped area is selected instead. You can do this by right-clicking and inverting your selection, or there is an 'Invert' button on the new generative AI toolbar that hovers below your image.
You will then want to click the button on this new toolbar below that says 'Generative Fill', it will then give you the option to describe what you want using text prompts, don't enter anything in this box as you want to give Adobe's AI control to work out the best way to expand the background. Then just hit 'Generate'.

After a short while of processing (depending on your computing power this might take a little while), Photoshop will fill in the edges of your image with new information. As you can see in the image below, Photoshop did an incredible job, it managed to add the missing section of the tire in the foreground, as well as adding a realistic-looking sky and line of trees in the top left corner.
In the side panel on the right, there are now three choices for AI-generated looks, you can flick through these and change them at will without destroying any of the original photo, as they live in a separate layer. If you don't like any of the options, or you just want even more choices, you can hit 'Generate' again in this side panel and it will give you three new options, and still keep the original three!

If you didn't quite get enough fill in your first attempt, you can also repeat this expansion as many times as you'd like without having to reset the image or start again. In the image below I expanded the background of the previous image again based on the already AI-generated border, and the results as you can see are astounding.


Adding a descriptive background
How about if you want a little more control over what is added to the expanded background? Well don't fret, there is a solution for that too.
Here you will want to be a little more selective about how you expand your background when cropping, it is worth thinking ahead of time how you want the final image to look. I am cropping to the left of the boat in this image as I intend to add a harbor to the image. Follow the same steps as above to crop your image, then using the selection tool make sure that the newly cropped area is selected again, with a slight overlap with the existing image so Photoshop can line up the edges nicely.
This time when you click 'Generative Fill' you will want to describe what you hope Adobe's AI is going to create for you. For this attempt, I decided to describe it as a 'sunny Italian village harbor'.

And just look at these results! Just wow. I am blown away by this. If you zoom in really close, then the results do start to fall apart as they do have a fake generated look to them, but at first glance and for a few minutes of work, this is truly phenomenal stuff.

AI tools are here and are meant to be experimented with, so go and try this for yourself, but also break the rules and see what happens, you might be surprised, you are only limited by your own imagination.
If you don't have access to Adobe's Photoshop (Beta) and generative AI you can follow the buying links below to subscribe to Adobe's Photography Plan (including Photoshop) and try it out for yourself.

