Watch the video: guide to infrared photography
Infrared light isn’t normally visible to the human eye, but in some circumstances it’s possible to capture it with your camera. The results can be stunning, lending a haunting appearance to outdoor scenes. The effect works particularly well on bright, sunny days in summer, when there are plenty of photosynthesizing leaves on the trees.
• More photography tips: how to take pictures of anything
Most digital cameras have an infrared blocker that’s great for regular photography, but obviously not for infrared work. Removing the filter from the sensor is a tricky and pricey process, so don’t try it at home!
A creative alternative is to use an infrared filter such as the Hoya Infrared R72 used here. These IR filters screw in to the front of the lens and cost from roughly £35 / $57 for smaller filter sizes, and increasing in cost for bigger diameters. The filter will block out most of the visible light, only allowing infrared through. You’ll get good results but will need to adapt the way you shoot, as the filter will be dark and dense.
1. Check the weather

Whether you’re using an infrared filter or a converted camera, it’s best to shoot on a bright day. If you do, the blue skies will be captured as sumptuous dark tones, while the photosynthesizing foliage will be recorded in white, almost snow-like hues.
2. Set up properly
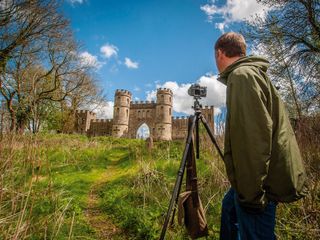
If you’re using a filter, exposures will be long due to the density of the add-on – 30 seconds at ISO100 and f/8 on a sunny day wouldn’t be unusual. A sturdy tripod is essential. If you're using a DSLR, it’s also a good idea to lock the mirror in the up position and use a cable release or self-timer.
3. Focus and compose

It’s difficult to see through the filter when it’s attached to your lens, so you’ll have to compose and focus your scene first. The exposure is likely to be skewed a little, so use the histogram to assess it correctly. You should focus and expose manually, too.
4. Prepare to process

Straight out of the camera, your infrared images will be bright red and need to be processed in the digital darkroom. You can make a simple black-and-white conversion (see step 6) or swap the Red and Blue channels for striking and surreal shades.
5. Convert colors
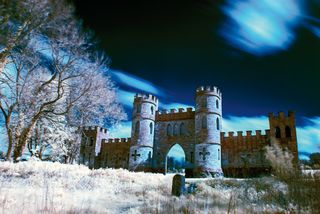
In Adobe Photoshop CC, go to Image > Adjustments > Channel Mixer, select the Red Output Channel and move the Red slider to 0 and the Blue slider to 100. Next, select the Blue Output Channel and set the Blue slider to 0 and the Red to 100. Now go to Image > Adjustments and choose Auto Tone.
6. Go mono

Infrared images are normally presented in black and white, so we’ve used a Black & White Adjustment Layer. Use a Curves Adjustment Layer to tweak the contrast and darken the sky. For the ethereal glow, add a Gaussian Blur layer and set the Blend mode to Soft Light.
Infrared camera conversion
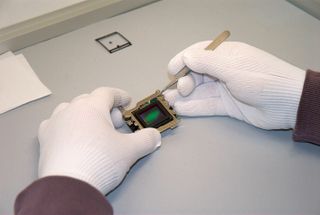
An alternative method to using an IR filter, is to have your camera converted for infrared photography. If you’ve got an old DSLR or mirrorless camera gathering dust at the back of a cupboard, removing the infrared-blocking filter from the sensor is a great way to give it a new lease of life.
Some companies will do this for you, including Advanced Camera Services and Life Pixel. The process can be expensive (about $300) and will of course mean that you’ll have a permanently dedicated infrared camera. The main advantage is that you won’t be restricted by long exposures.
More videos:
147 photography techniques, tips and tricks for taking pictures of anything
How to use an ND graduated filter for stunning landscape photography
Depth of field and hyperfocal distance in landscape photography explained
Northern Lights photography: tips and techniques for stunning images

