Watch video: Get the toy-town look in Photoshop CC
On a normal lens the plane of focus – the sharp parts of the scene – remains parallel to the camera’s sensor, and we move the plane forwards or backwards in the scene by focusing the lens. But a tilt-shift lens offers a different view. By tilting the front element, it’s possible to angle the plane of focus diagonally across the scene. This results in interesting depth of field effects, where the dynamic between what’s sharp and what’s soft can be manipulated in creative ways.
One such effect is the toy-town look. By using a high angle, tilting the lens diagonally and shooting down on a wide, sweeping scene, it’s possible to blur the foreground and background in an unnatural way. As we’re not used to seeing blur on wide scenes like this, it looks almost as if the scene is in miniature. This is because the shallow blur matches that of a close-up lens.
• Read more: Best photo editing software
If you don’t have access to one of these specialist lenses you can get similar results with Photoshop CC filters. The dedicated ‘Tilt-Shift Blur’ filter is the best starting point, but we can take it further by controlling the blur with selections and masks, to make it look as if the parts of the scene that would naturally be closer – like the steam – stay sharp while the areas behind it are blurred.

01 Use Tilt-Shift

Open tilt-shift_before in Photoshop. Go to the Layers panel and hit Cmd/Ctrl+J to duplicate the background layer, then right-click on the duplicate and ‘Convert to Smart Object’. Next, go to Filter>Blur Gallery>Tilt-Shift. Drag the centre point over the front of the train (download start image here).
02 Fine-tune the blur

Use the dial to control the strength of the blur. Drag the horizontal lines to change the transitions between sharp and soft. Increase the noise amount slider to add a touch of noise to the blurry areas so the grain matches the sharp parts. Hit OK.
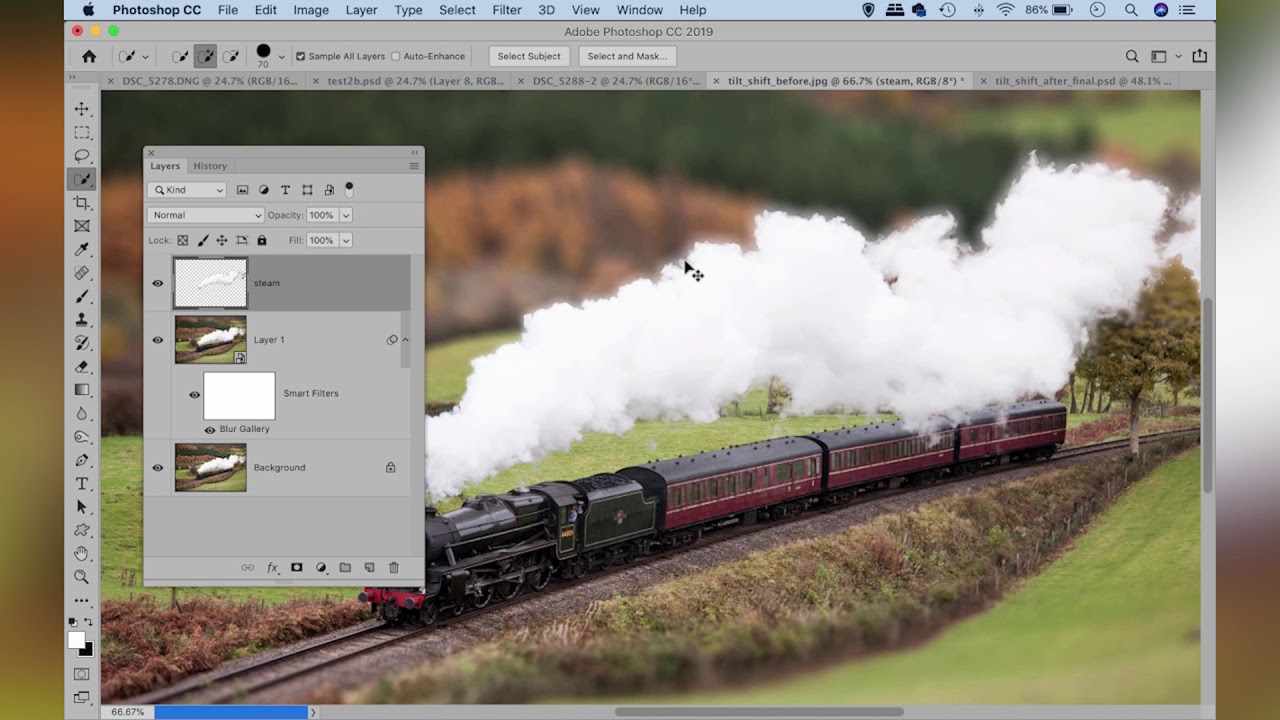
03 Select the steam

Here, our steam looks unnaturally blurry. Click the eye icon to hide the top layer and highlight the bottom layer. Grab the Quick Selection tool and paint over the steam to select it. Once done, hit Cmd/Ctrl+J to copy it to a new layer.
04 Open the smart layer

Drag the steam layer to the top and reveal the blurred layer. It looks sharper, but has blurry edges. Double-click the thumbnail on the blurred layer to open the smart object in a new window. Click the new layer icon in the Layers panel to create a new empty layer.
05 Clone away the edges

Grab the Clone tool and set Sample: All Layers at the top. We want to clone away the edge of the steam so that the blur doesn’t show in our main image. Alt-click to sample nearby from the trees and paint to clone. Once done, close the image and save when prompted.
06 Boost the tones

Finally, we’ll boost the contrast and colour for a more ‘toy’ look. Highlight the top layer, click the Create Adjustment Layer icon and choose Levels. Go to the Blend Mode dropdown in the Layers panel and choose Overlay. Lower the layer opacity to tone it down.

Read more
The best photo editing software: image editors for novices through to pros
The best photo-editing laptops: top laptops for photographers
10 best online photography courses – from beginner guides to masterclasses

