Lightroom series part 24: How to create a cool border and signature in Lightroom
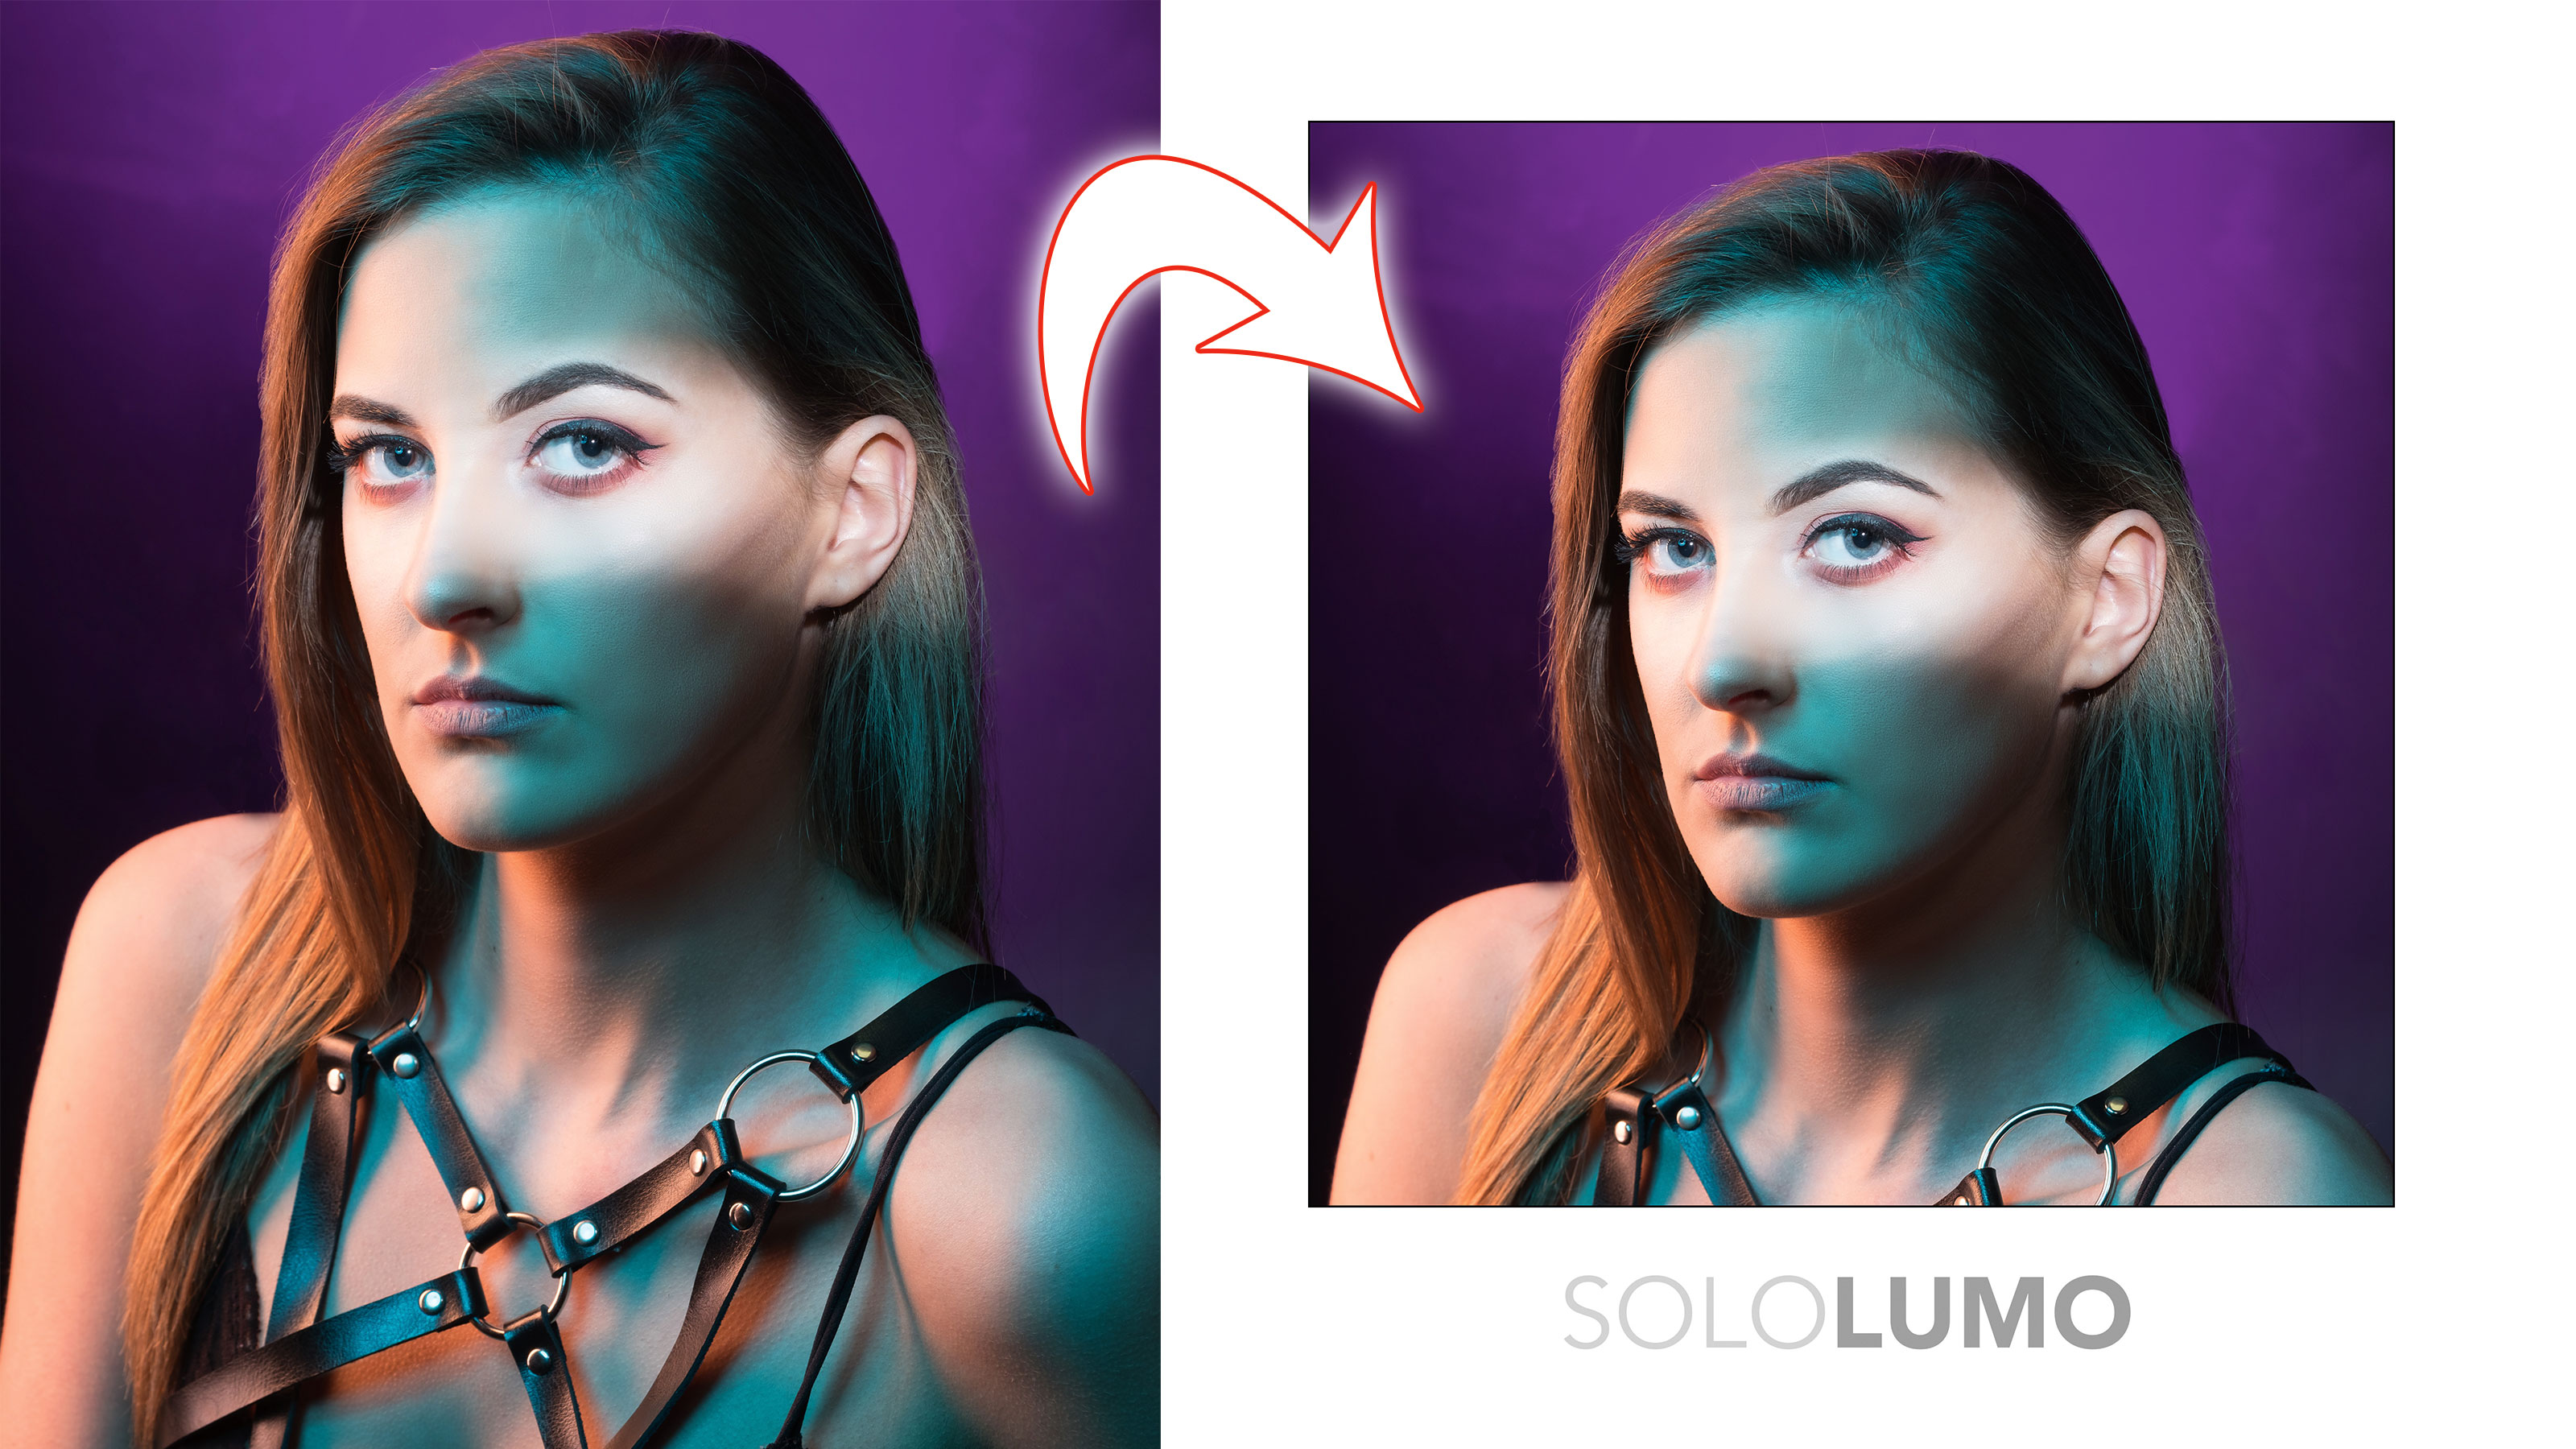
Create a matte border to show off your photos in the Print Module in Lightroom, and discover some automation tricks
The best camera deals, reviews, product advice, and unmissable photography news, direct to your inbox!
You are now subscribed
Your newsletter sign-up was successful
Lightroom's Develop module is great for all kind of fixes and finishes. Lightroom is a truly robust platform for managing all your edits as well. But what if you’d like to add a border or signature to a version of your photo?
I don’t mean overwriting the original, of course: I mean something that would look great online and let you stand out a little more.
Welcome to the 24th instalment of our Lightroom series, first published in Digital Camera magazine (see below for subscription offers).
If you are already a Lightroom user, you could discover some new tricks and processes you haven't tried yet. If you don't use Lightroom, then scroll down to the bottom where you'll discover how to get it and which Adobe Photography Plan is best.
You can’t add a border or a signature in the Develop module – but it can be done elsewhere in Lightroom. Before you create this matte border, you’ll need to have finished processing your image. Once done, you take the next steps in the Print Module...
N.B. This applies to Lightroom Classic CC, but not Lightroom CC, which does not have a Print Module.
• See more Lightroom tutorials
The best camera deals, reviews, product advice, and unmissable photography news, direct to your inbox!
1. Set up your style
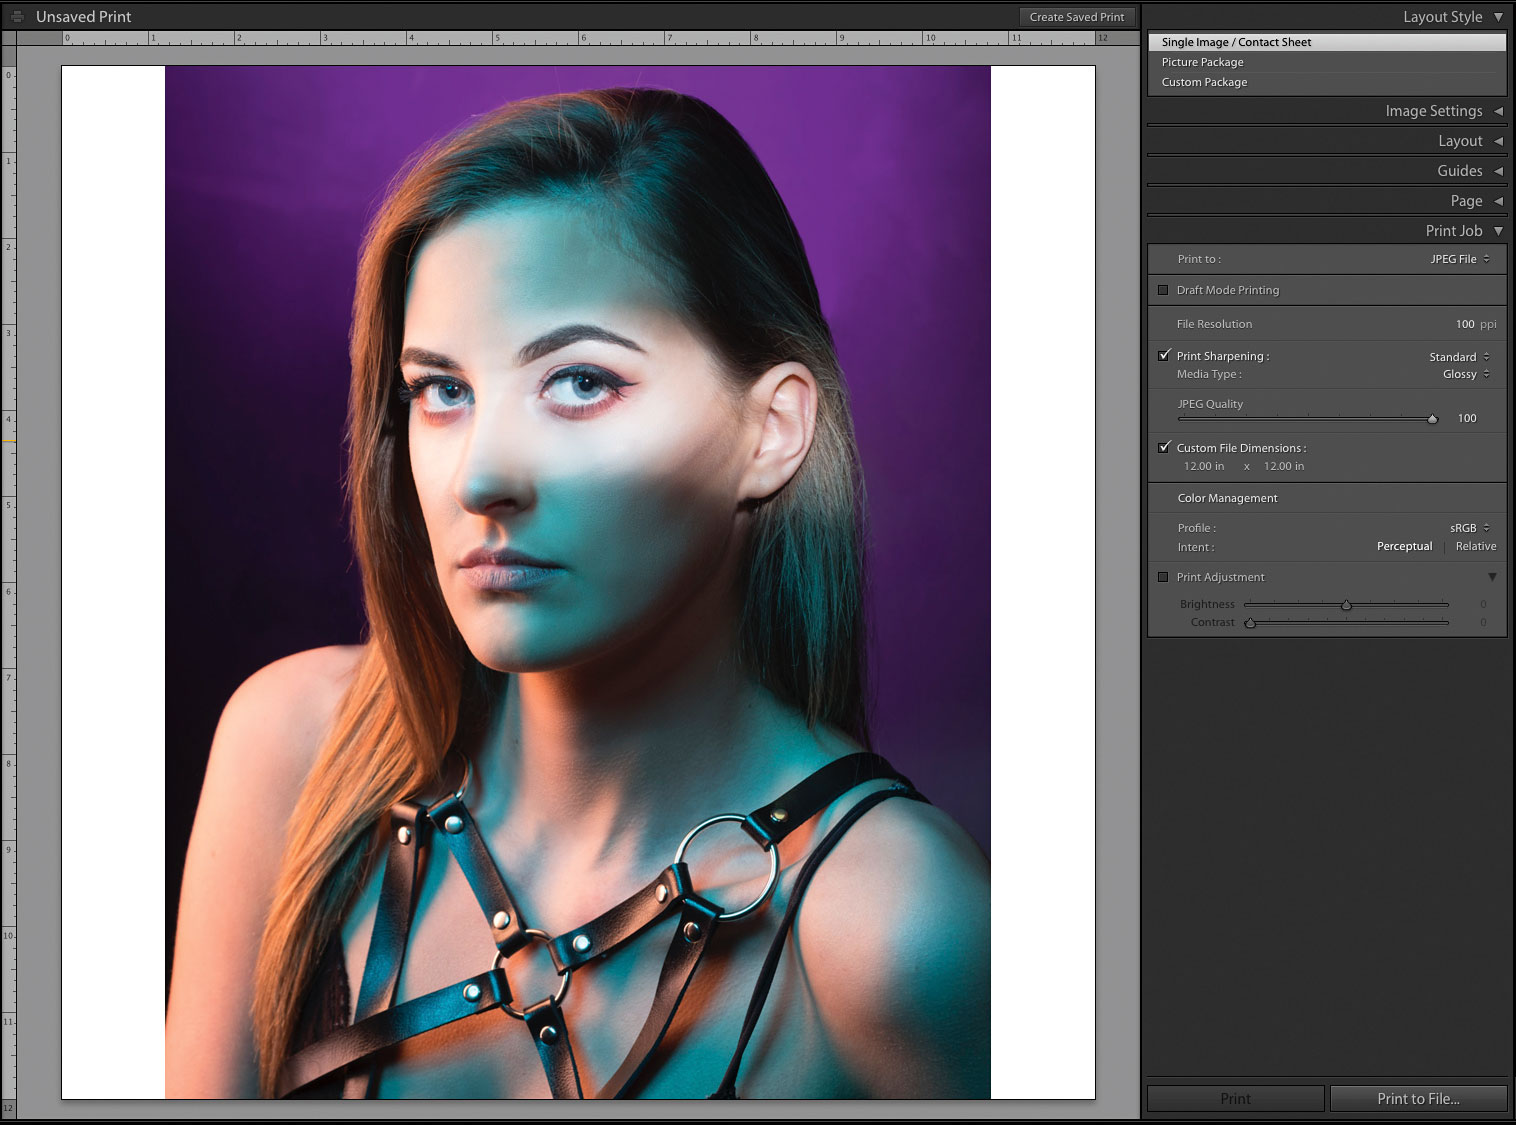
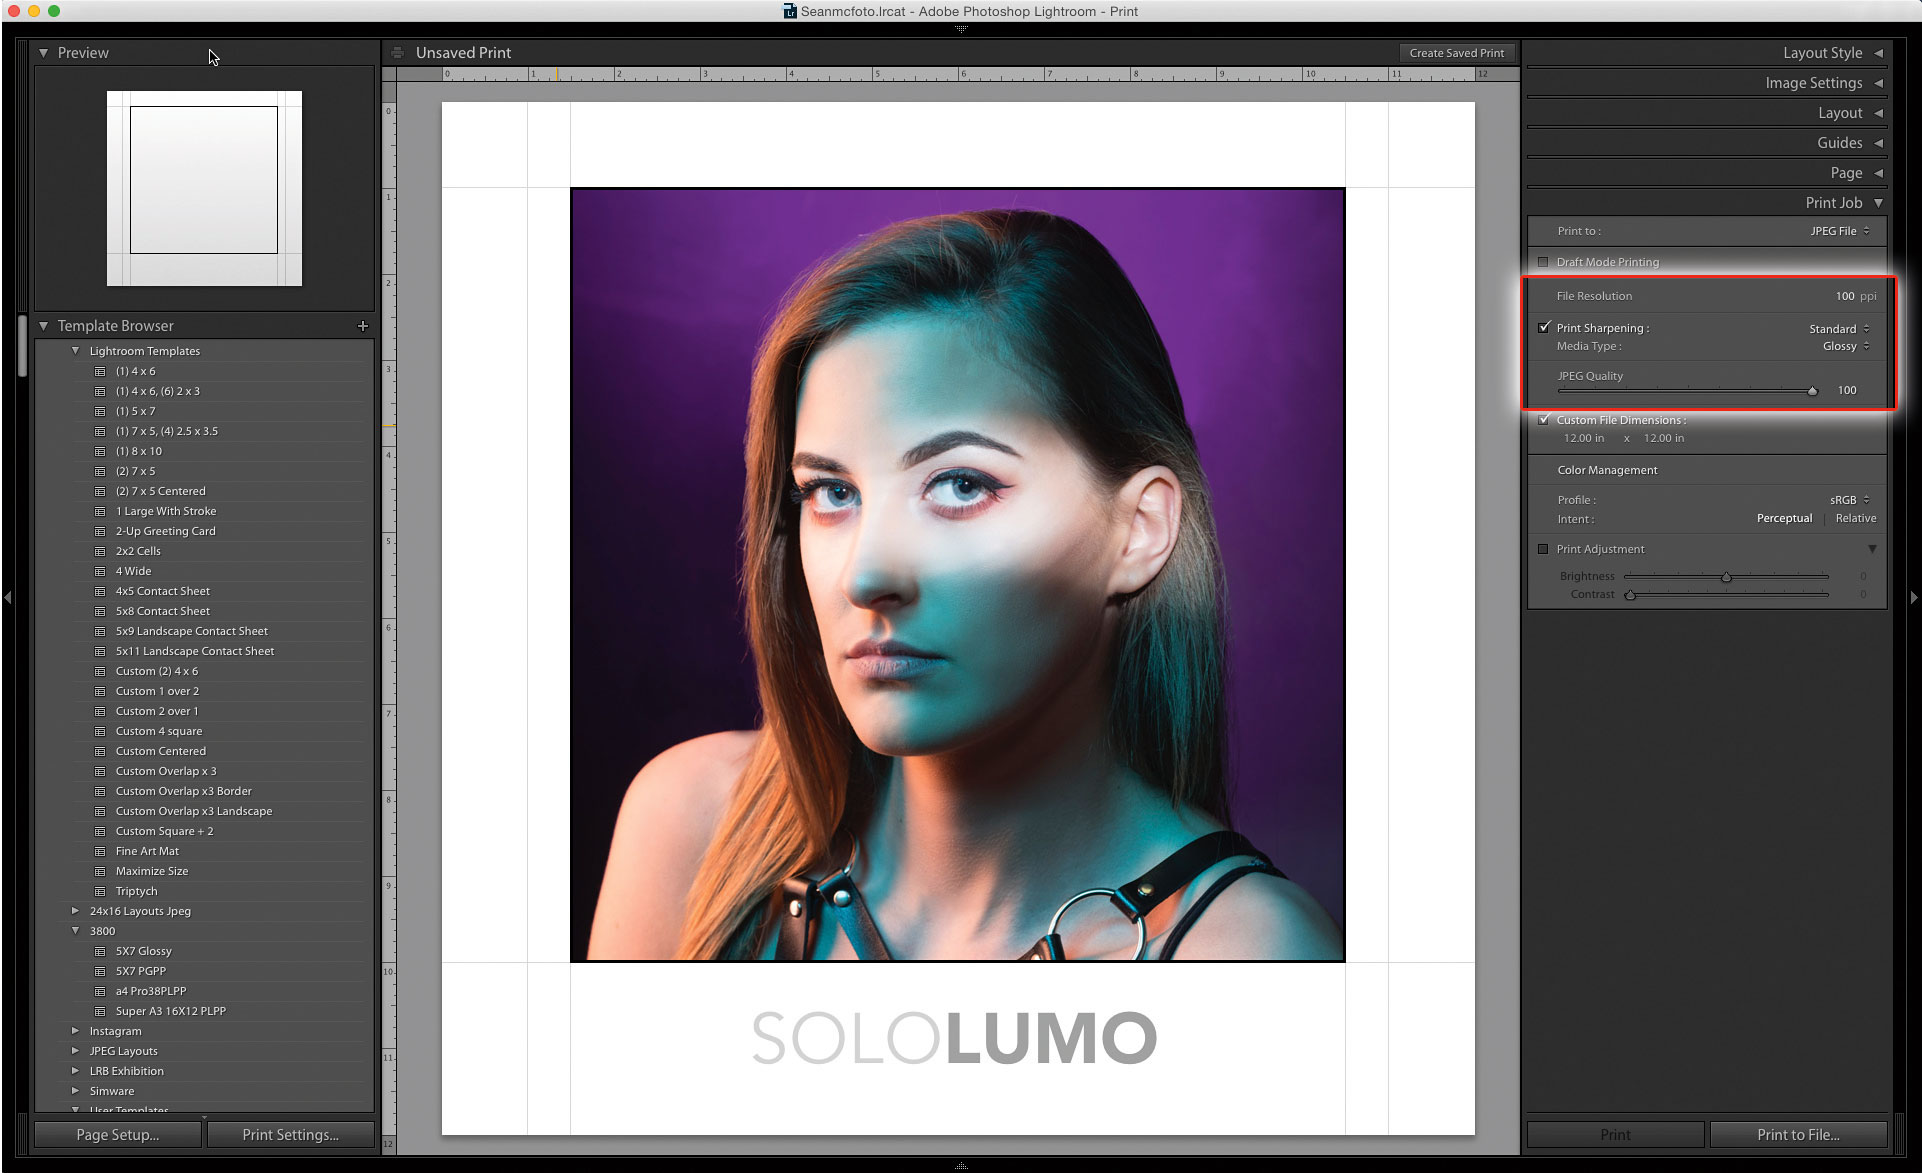
Go the Lightroom’s Print Module. In the Layout Styles, choose Single Image/Contact Sheet. Jump down to Print Job next. Here’s where you set the image size and shape. In the Print To: section, choose the JPEG option. For ease of sizing, set PPI to 100. Set Custom file dimensions to12x12 to give a 1,200 x 1,200px file.
2. Be square
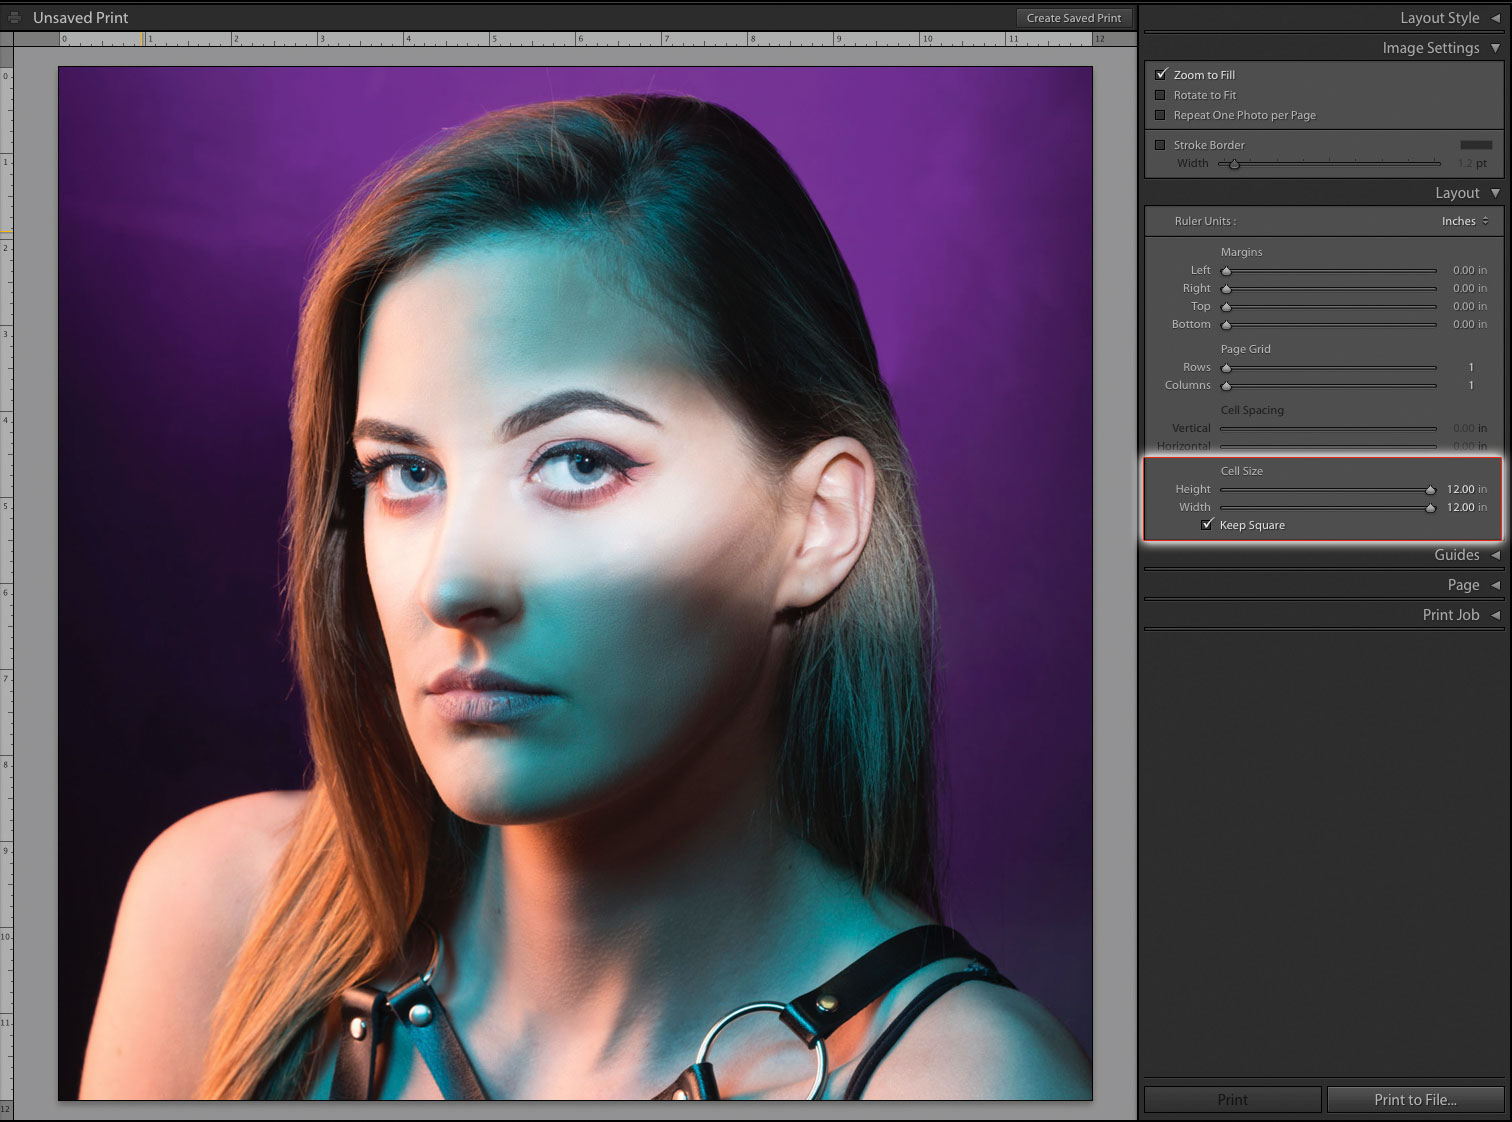
For this print, I'm going to go square in a square frame, so the next step is to check Zoom to Fill in the Image Settings box. This will make a full-bleed square photo. As you hover over the image, the cursor will become a hand. Drag the photo into place so it looks better. In Layout, tick Keep Square.
3. Set the margins
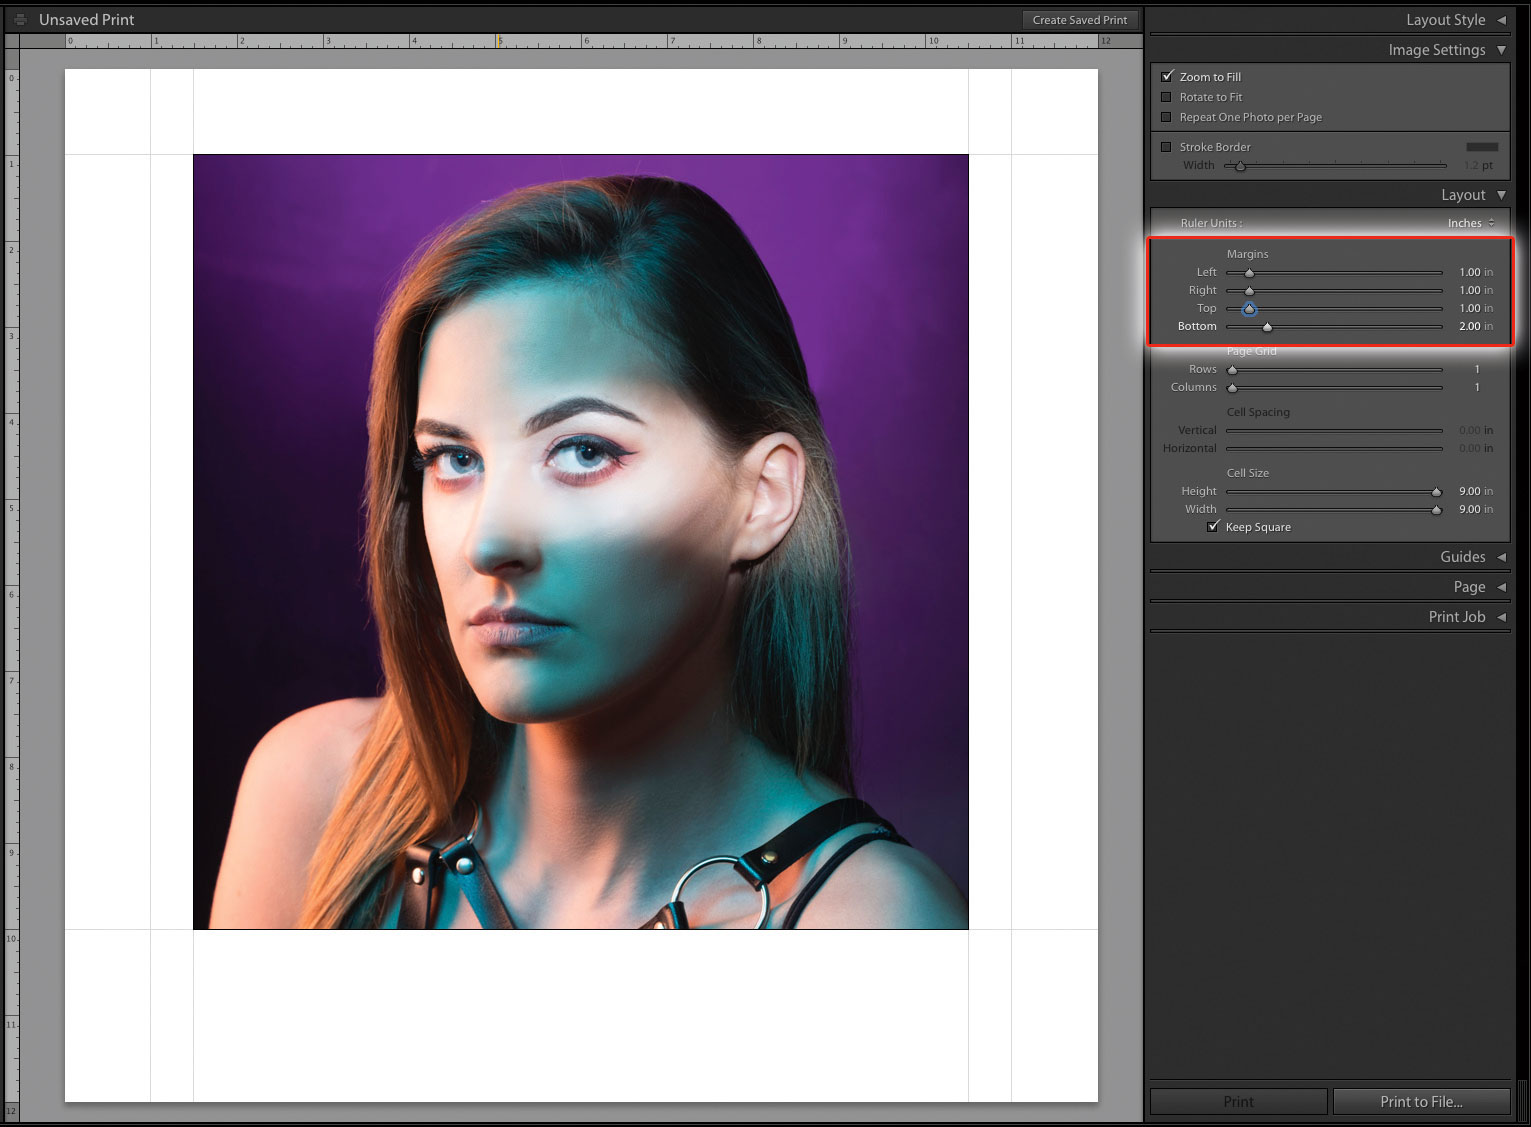
To create the border around the photo, you need to use the Margins sliders. Set the Left, Right and Top to 1 inch. Set the Bottom to 2 inches. Keep Square will force the photo to be 9x9 inches. Turn on Guides to see the layout lines better.
4. Border details
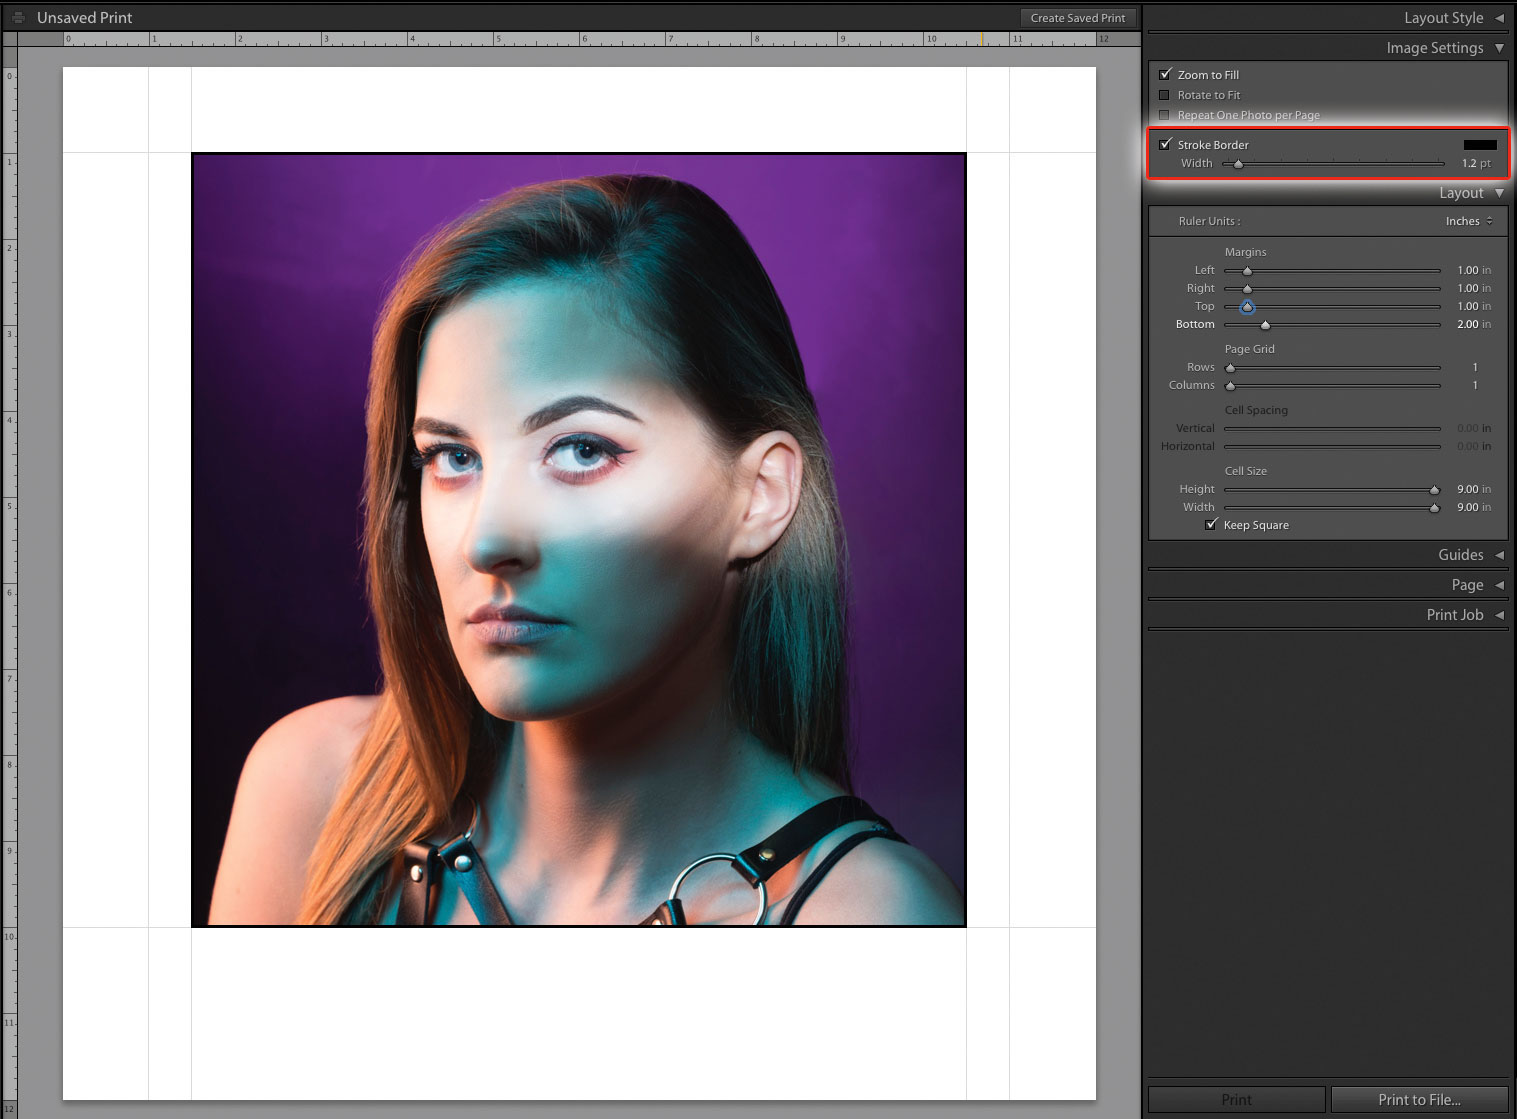
In the Image Settings, turn on Stroke Border. Use the slider to set the width of the border. I’ve gone for 1.2 pt, and I chose black as the colour for the border to match the white page colour. You could choose a black page in the Page panel, and use a white border.
5. Add a logo
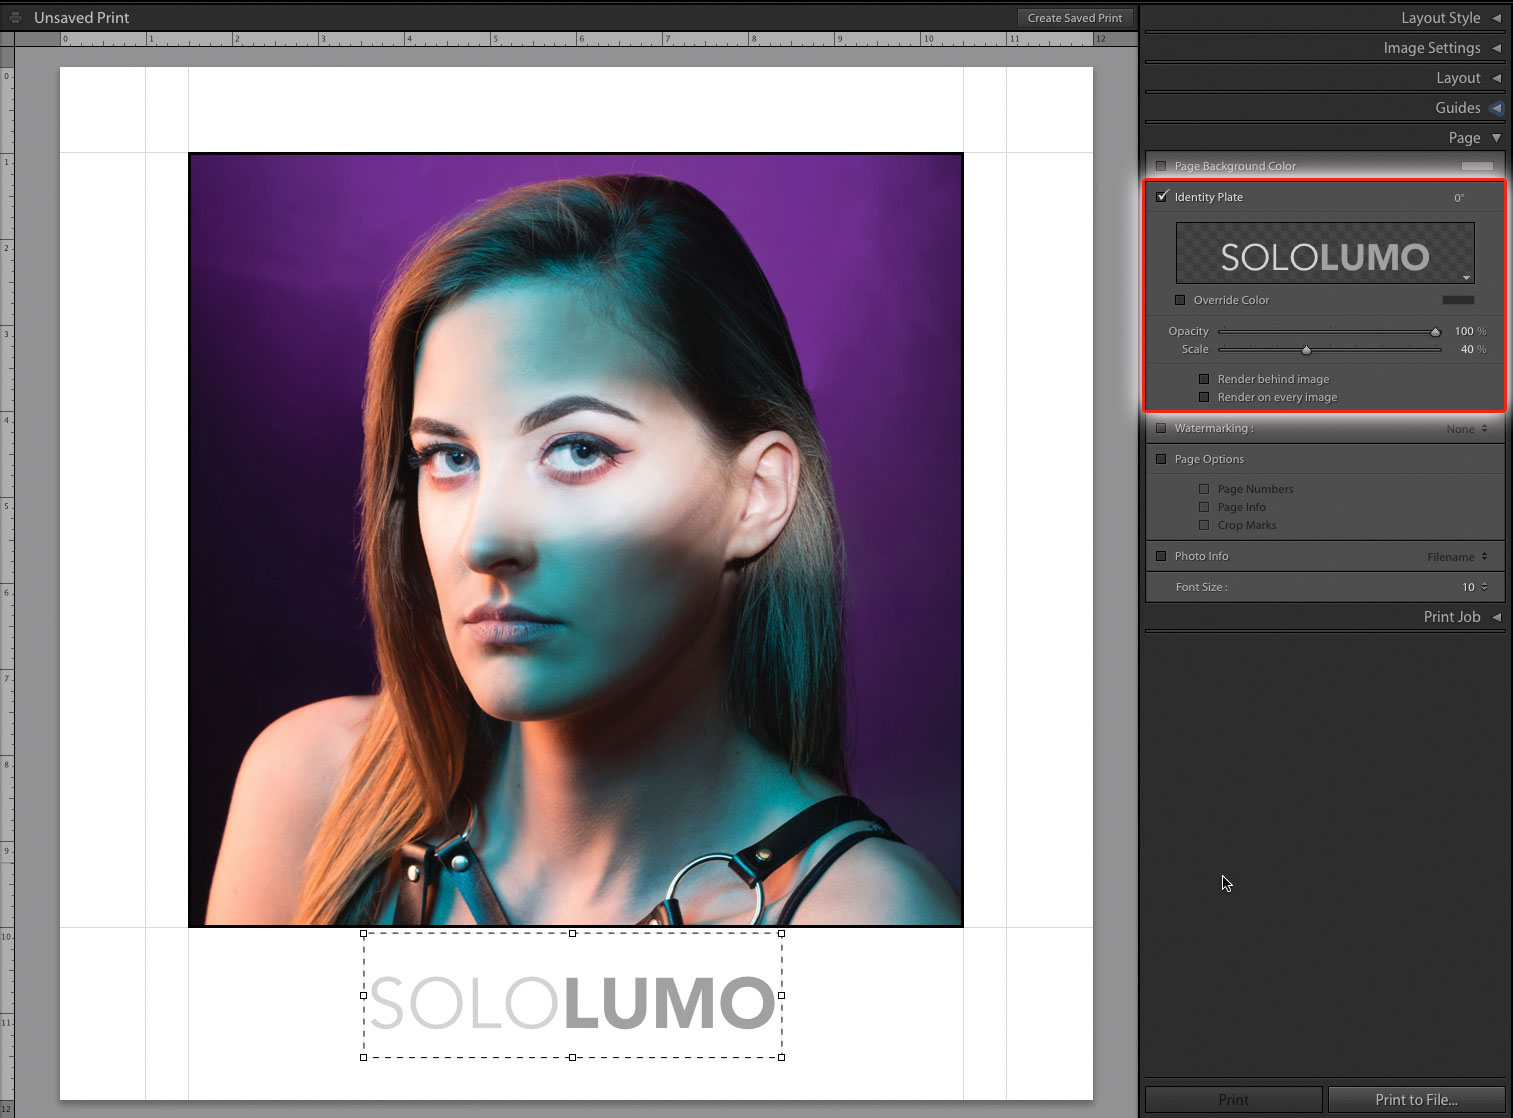
Open the Page panel and turn on the Identity Plate. To center the logo, first make it the same width as the photo, then drag the centre-top handle down to size it. Finally use the up arrow to position it below the photo.
6. Finish the template
The final step is to go back to Print Job. Set Print Sharpening to Standard, Glossy. Set Profile to sRGB, Perceptual. Set Quality to 100 for the absolute best quality. Then click Print To File to save the look to a new file. In the Template Browser, click this little + icon and create a template to reuse this look again and again.
Expert tip: Watch a folder
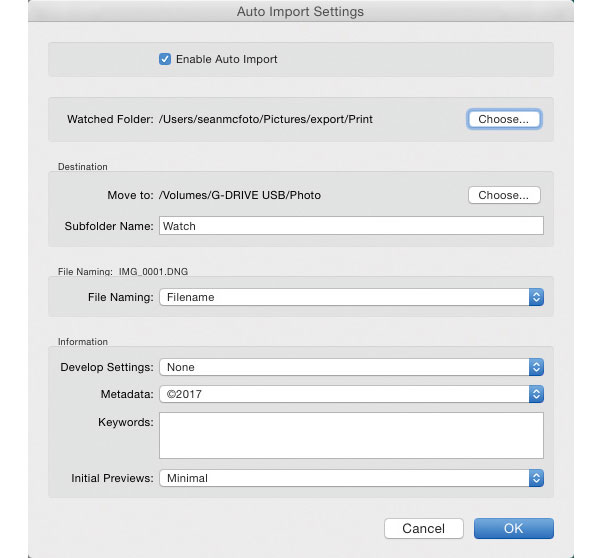
You can have any of the files you create this way come into Lightroom automatically using a Watched Folder. If you have one photo, Print To File creates a single photo in the folder you select. If you have more than one, it creates a folder instead. Create a new folder called Print With Finder [in macOS] or Print With Explorer [Windows], then go to File > Auto Import. Choose Print as the Watched Folder. Select a Destination for the printed files to go. If you print one photo using Print To File, print it into the Print folder. If you print more than one, call it Print and put it into the parent folder of your Print file. Click the Enable Auto Import checkbox. Use Print To File as required.
About Digital Camera magazine
This tutorial originally appeared in Digital Camera Magazine, the monthly newsstand magazine for all photographers. Why not subscribe to a print edition, and have the magazine delivered direct to your door every month?
Alternatively, we have a number of different digital options available, including:
• Apple app (for iPad or iPhone)
• Zinio app (multi-platform app for desktop or smartphone)
• PocketMags (multi-platform app ideal for Android devices)
• Readly (all-you-can-eat digital magazine subscription service)
If you wanted a printed version of any of our most recent issues we have a selection of back issues to choose from in our online store.
How to get Adobe Lightroom
Adobe Lightroom is available in two versions: the regular Adobe Lightroom Classic CC designed for desktop users, which is what we cover in this series, and a new cloud-based Adobe Lightroom CC, which stores your files online and offers a similar but reduced set of features. For regular desktop users we recommend Adobe Lightroom Classic CC.
Adobe offers three subscription based Photography Plans which you can click on below. We recommend either the regular Photography Plan, or the Photography Plan (1TB) which costs more but comes with 1TB online storage in case you decide to go with Lightroom CC.
For this set of tutorials and for anyone who likes to work on a single main computer, we recommend the regular Creative Cloud Photography Plan. This is the cheapest way to get started AND it comes with Photoshop CC too.
Read more:
• This is the best photo-editing software today
• These are the best laptops for photographers right now
• We help you choose the best desktop computers for photo editing
Sean McCormack is a commercial, and editorial photographer, book author, and regular contributor to Digital Camera magazine based in Galway, Ireland. He has extensive experience with Lightroom, dating back to its original beta version, and has tried out just about every plugin and preset available. His latest book is Essential Development 3: 25 Tips for Lightroom Classic’s Develop Module.
