Anyone with more than just a passing interest in photography will have heard of the ‘rules’ of composition, such as the rule of thirds, leading lines and perhaps even the golden ratio. These are useful to remember as they can be used to create images with more impact, but they don’t necessary suit every situation and sticking to them slavishly can stifle creativity.
If you’re lacking inspiration and not sure how to approach a subject in a more original way, here are six ideas that will help you to break free from what you know and end up with more creative compositions.
1. Find an unconventional angle

It’s easy to fall into the trap of taking all your images from eye level, but it can result in all of your shots having similar feel. Sometimes all it takes is a different position to create a far more powerful composition.
Article continues belowIf your camera has an articulated screen you can crouch down low and still see what’s going on, possibly capturing low-level subjects against a blurred background. Alternatively, you could angle your camera upwards for a more dramatic perspective.
Read more: How to get shallow depth-of-field effects with any camera
Take this even further: get up close to your subject and shoot straight up. This is great when using a wideangle lens and surrounded by modern architecture, but you could also use it to create silhouettes of flowerheads or even for more abstract compositions. For portrait and animal shots with a difference, why not do the opposite and shoot downwards, with your subject looking up towards the camera?
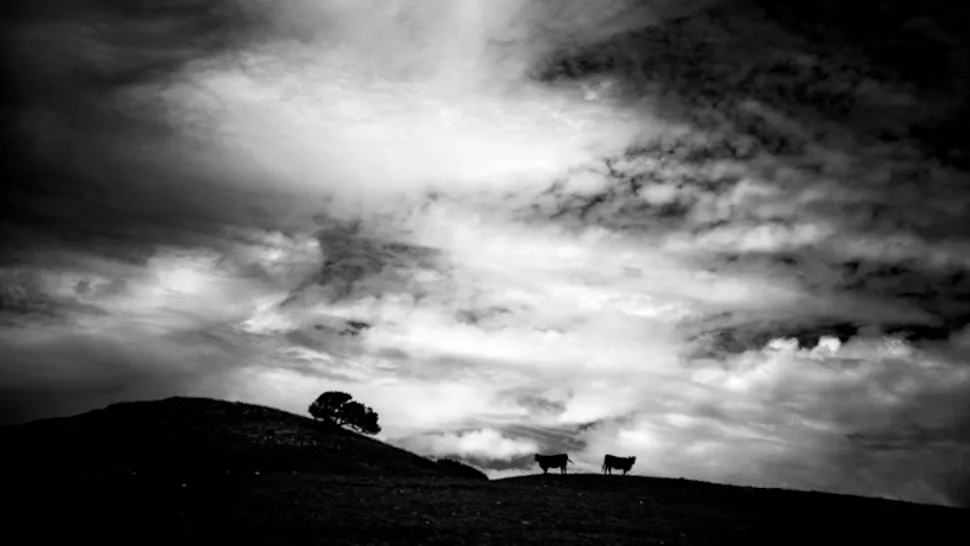
2. Embrace dead space

It's tempting to exclude areas of little interest around a subject and to create a tighter composition by just focusing on your subject itself, but deliberately including plenty of dead space can also be used for dramatic effects.
This can be used to create a natural frame which will focus attention on the subject, and it works particularly well in black and white. They key is to include plenty of it to deliberately create an unconventional balance.
Skies work particularly well. For colour images, look for clear, cloud-free skies and consider using a polariser to give them extra depth, while stormier, menacing clouds suit a high-contrast and/or simple black-and-white treatment.
3. Incorporate reflections and shadows
By incorporating shadows or reflections into your shots, you can transform a image of an otherwise plain subject into something far more striking.
With reflections you could use a glossy window or highly-polished surface, a still lake or even just a puddle. You can use these to form a symmetrical composition with your subject so that both are in the frame, or even to reflect a subject that’s out of it, such as a puddle reflecting a passer-by or a skyline in a pair of sunglasses.
Shadows can also be used to provide a balance in your frame, and this is a good technique to think about using very early in the morning or as the sun sets later on, where its position will help to create nice long shadows.
4. Don’t avoid converging verticals – embrace them

Converging verticals is an effect most architecture photographers try to avoid as it makes buildings appear to be toppling over. It can, however, be used to great effect, particularly when you’re armed with a wideangle lens.
You could try standing at the base of a skyscraper and compose your image so that its upper details disappear into the distance, leaving you with a strong foreground and a vanishing point.
Read more: 6 ways to get the most out of your kit lens
Of course, you could even experiment with a macro lens and everyday subjects with defined linear details to end up with something a little different, perhaps even something more abstract.
This technique also works well when the lines in the image lead to another subject. If you have a camera with a tilting LCD screen, you could try getting down low and shoot down boards on a pier as they travel towards a subject in the distance, or – carefully! – double-yellow lines as they approach a parked car or another subject.
5. Forget the rule of thirds and position subjects centrally

The oft-mentioned rule of thirds – that is, to divide your frame into horizontal and vertical thirds and place subjects on lines and intersections – is a useful rule to remember as it helps you to balance subjects with other elements in the frame.
This technique doesn’t, however, suit every scene, and sometimes doing the most obvious thing and positioning your subjects completely centrally is the best idea for the greatest impact.
From portraits and pets to flowers and other still-life subjects, try to shake off the idea that you always need to place subjects a third or two-thirds of the way into the frame place them centrally instead. Use your camera's central AF point and grid overlays as your guide to getting it spot on.
6. Choose a different aspect ratio

How often do you change your camera’s aspect ratio? Most people tend to stick to the default option without thinking about it. It’s useful to do this if you know you’ll be printing your images to a standard printing size, but with fewer people printing today than before, there’s little reason to always think in 3:2 or 4:3.
Most cameras today offer a choice between the 3:2, 4:3, 1:1 and 16:9, and if you tend to capture a range of different subjects you’ll probably find some suit the lesser-used options than the more obvious ones.
Switching to the 1:1 option is great for portraits, flowers and particularly effective when using with the previous tip. The 16:9 aspect ratio is an obvious choice for landscape photography but it’s also a great option for group shots, automotive photography, bridges and much more. Look at the shape of the subject and ask yourself whether it would naturally work better in a different frame.
Read more: How to understand everything written on your memory card

