
Newborn photography offers the chance to capture babies in their tiniest, sleepiest, most youthful state, and the results can be tear-jerkingly good. If you’ve been asked to photograph newborn babies, then you’re in for both a treat and a challenge. But great patience, sound technique and a little luck is required – especially when shooting twins, as we were!
We’ll explain how to approach the shoot, with advice on the right camera settings, the best lens choices and how to set up your own makeshift natural light studio in the home.
To undertake a newborn photo shoot in the home
Time needed: Two hours
Skill level: Intermediate
Kit needed: DSLR or mirrorless camera, reflector, blankets, beanbag
If you want the babies to look truly newborn, it’s best to schedule the shoot within the first two weeks after their birth. However, newborn twins may be different, as they often have to spend time in hospital. Ideally, schedule the shoot before they reach the 40-week stage.
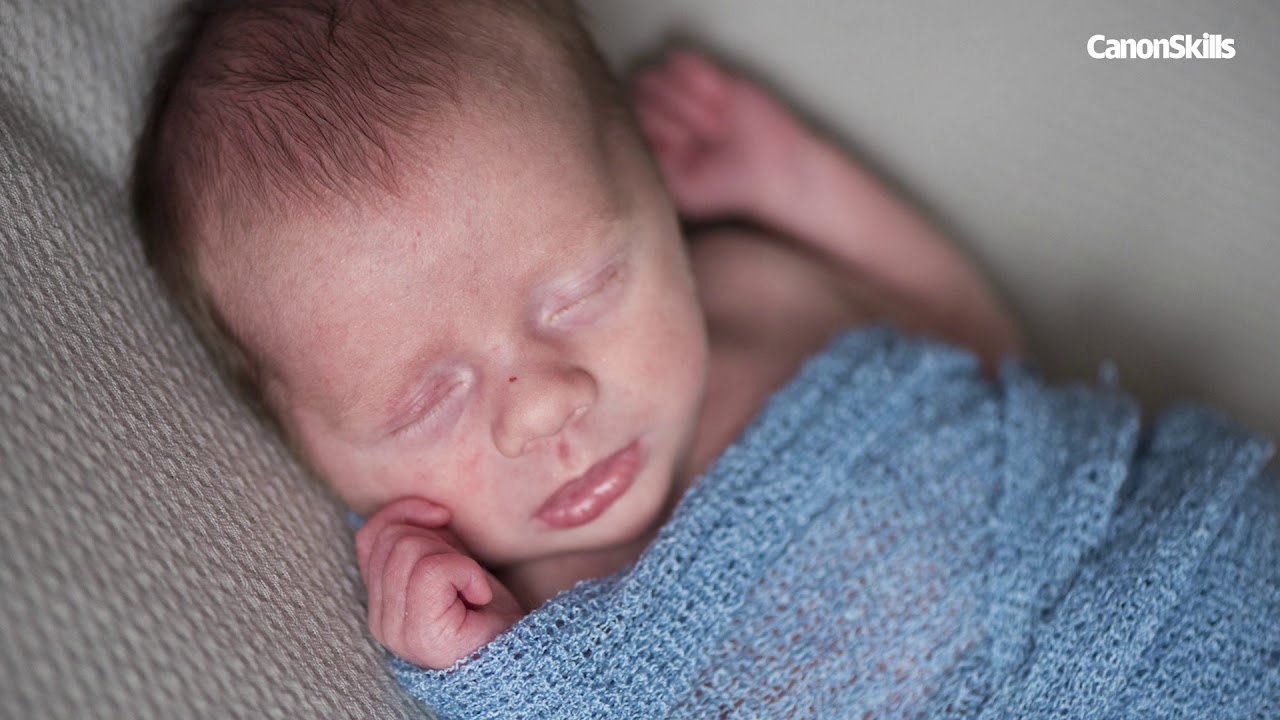
If you want the contemporary newborn look that’s very popular at the moment, consider bringing along a selection of textured blankets and colourful wraps, like the ones we’re using here, from Baby Props. Not only do they give you a smooth, clean backdrop for your portraits, but they can also help to keep flailing arms and legs in the right place!
Safety first
If you’ve seen a photo of a newborn baby perched on top of a guitar, a crate or anything precarious, it’s probably a composite. The baby’s safety is paramount, so don’t pose or position them in any way that could result in a fall or worse. If you do want to capture them posed on a precarious prop, set the camera up on a tripod. You can take one shot with the baby and parent (making sure the parent’s arms or shadow don’t obscure the baby), then take another shot of the prop on its own in the same position.
Get prepared

1. Blankets and props
We want a contemporary look for our photos, and a big part of this is picking the right colours and textures for the backdrop. A wrap or a hat can be a great way to add a splash of colour and texture to your shots.

2. Check the settings
Time is limited; babies need feeding and nappies need changing. So, get your setup sorted before bringing the baby in. Use a toy roughly the same size to check lighting, backdrop and camera settings are spot on.

3. Direct the light
Window light is ideal here – it’s soft, flattering and falls off slowly. The direction of light is crucial; a slightly side-on position to the window creates pockets of highlight and shadow to give depth to your subject’s features.

4. Bounce the light
Held opposite the window, a simple reflector lets us bounce light back into shadows, which evens out contrast for lovely soft lighting. If your reflector has gold/silver/white surfaces, white or silver is best here.

5. Camera settings
Set Manual mode with a shutter speed of 1/200 sec for sharp shots, and set a wide aperture to around f/3.5 (anything wider might be too shallow). You can now use Auto ISO so that the camera adapts the ISO to give a correct exposure.

6. Best lenses
A lens with a wide maximum aperture is crucial for the shallow-focus, soft-backdrop look. Prime lenses are good, as they offer wide apertures and great optics. We used a 50mm f/1.4 and a 100mm f/2.8 Macro lens.
Is flash dangerous?

A couple of years ago, several websites ran a dubious story with the headline: ‘Three-month-old baby left BLIND in one eye after family friend forgot to turn off the camera flash while taking a photo close up.’ Understandably, this left many parents concerned about the use of flash in baby photography. However, optometrists and health experts have completely de-bunked the story. Rest assured, flash will have no harmful effect on a baby – for one thing, it’s hardly any stronger than bright daylight. What’s more, if it were true, we’d hear about cases of this happening every day.
Setting up

1. In the home
A shoot like this is easily done at the family home, as we don’t need a huge space and we’re more likely to have relaxed babies and parents in their own home. Besides, as any new parent knows, getting out of the house armed with everything you need can be tricky!

2. Window light is best
We need to find a space with large windows, so a living room is ideal. If necessary, rearrange the furniture to create a space next to the window. Here the window is to the left of the camera. We don’t want direct sunlight shining through the window, so north-facing is best.

3. Beanbags
Newborns are unable to hold their bodies up, so the foundation of our set is vital. Some photographers swear by dedicated beanbags or even dog beds. It needs to be soft enough for the babies to be comfortable, but firm enough to hold them in place.

4. Make the set
Once the foundations are laid, we can clip blankets over the top to create a mini studio. A stretchy textured blanket like this dedicated baby prop is ideal. Stretch out the blanket to minimize creases, as this will save time having to tidy it up in Photoshop.
Top tips

1. Posing twins
Posing is often the biggest challenge, as newborns lack the strength to hold themselves up. Plan your poses but be prepared to improvise. If necessary, ask a parent to hold the babies in place, as we did. Try to hide the arm from the frame, or clone it out later.

2. Head towards the light
People look more natural if lit from slightly above, as this is how we’re used to seeing light falling on them from the sky. This applies even if the subject is lying down, so angle the head towards the window and feet away slightly, so light falls on the head from above.
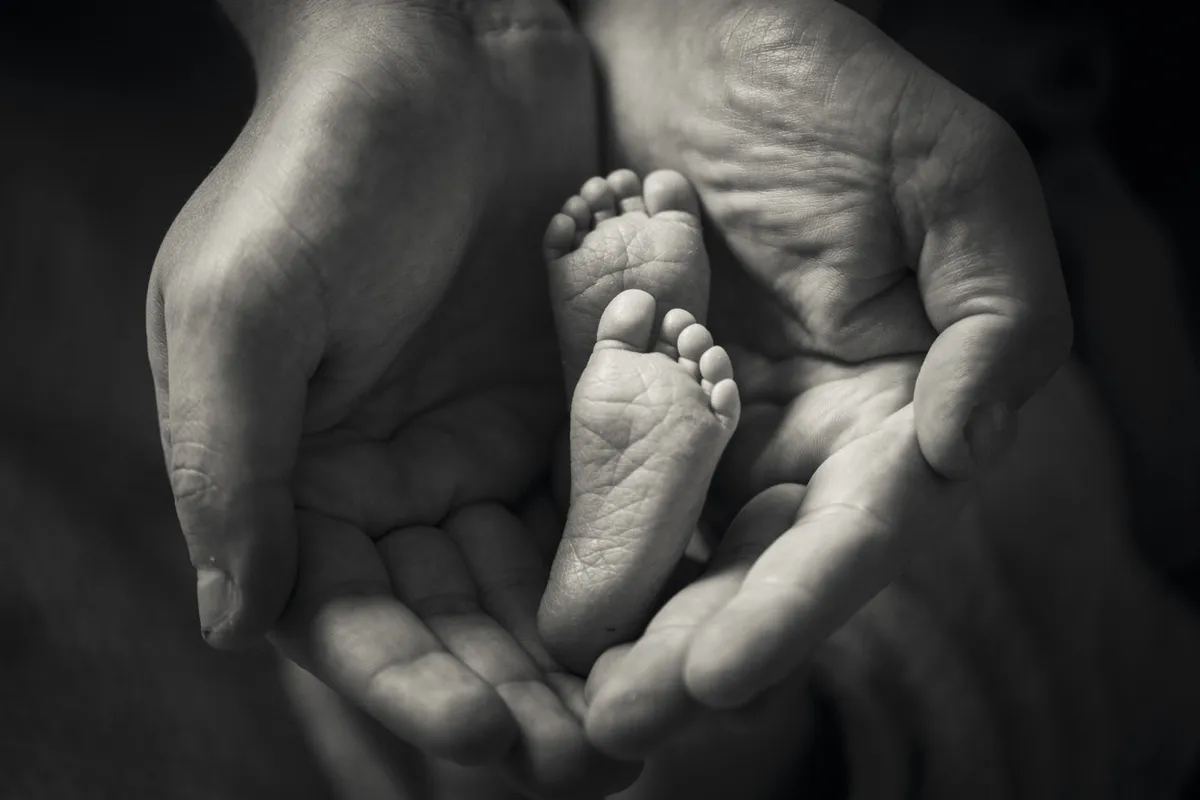
3. Details and scale
Detail shots can help to tell the story, and are easy compared to trickier wider portraits. It’s especially nice if you can include a sense of scale, by comparing the parent’s hands with the baby’s tiny fingers or toes. A black-and-white conversion is a good choice here.

4. Pin-sharp eyes
When the plane of focus is very shallow, we need to focus precisely on the closest eye, so move your focus point. Try to get the twins’ eyes on the same plane of focus. If not lined up, we can shoot two frames to ensure both sets of eyes are sharp, and combine later.

5. Retouch spots
A brief retouching job helps polish things off and hide distractions. Use Photoshop’s Spot Healing tool to remove small spots and marks, and switch to the Clone tool, set to 20% opacity, to gently smooth out rough patches or creases in the material.

6. White noise
Newborns spend a lot of time asleep, which is usually what we want for our shoot. But all the commotion might disturb them. A white noise machine is ideal, as it recreates the sound of the womb. You can play a white noise track on your phone or tablet.

7. Control the temperature
If you’re planning on taking off their clothes or blankets, the space you’re shooting in should be well heated – warm enough so you’ll only need a light shirt. Bring along a portable heater and, if necessary, position it close to your makeshift set.
Combining images
At times, you might want to make a composite from two or more shots. Maybe you have one shot where the face is perfect but the background is creased, while in another the backdrop is clean. As long as both shots are in rough alignment, piecing them together shouldn’t be too tricky. This is just a quick guide:
1. Open both images in Photoshop and make a rough selection of the clean area with the Lasso tool.
2. Right-click it and Feather by 20 pixels, then copy (Cmd/Ctrl+C) and paste in place (Cmd/Ctrl+Shift+V) into the other image.
3. Hit Cmd/Ctrl+T to transform, then use the box to fine-tune the positioning.
4. If necessary, add a layer mask and paint black to hide parts of the newly added layer.
Read more: Best portrait lenses

