Learn to work with wide apertures for better results
Shallow depth of field demands a little more effort to control, but offers a powerful tool for advanced compositions

The best camera deals, reviews, product advice, and unmissable photography news, direct to your inbox!
You are now subscribed
Your newsletter sign-up was successful
First Light
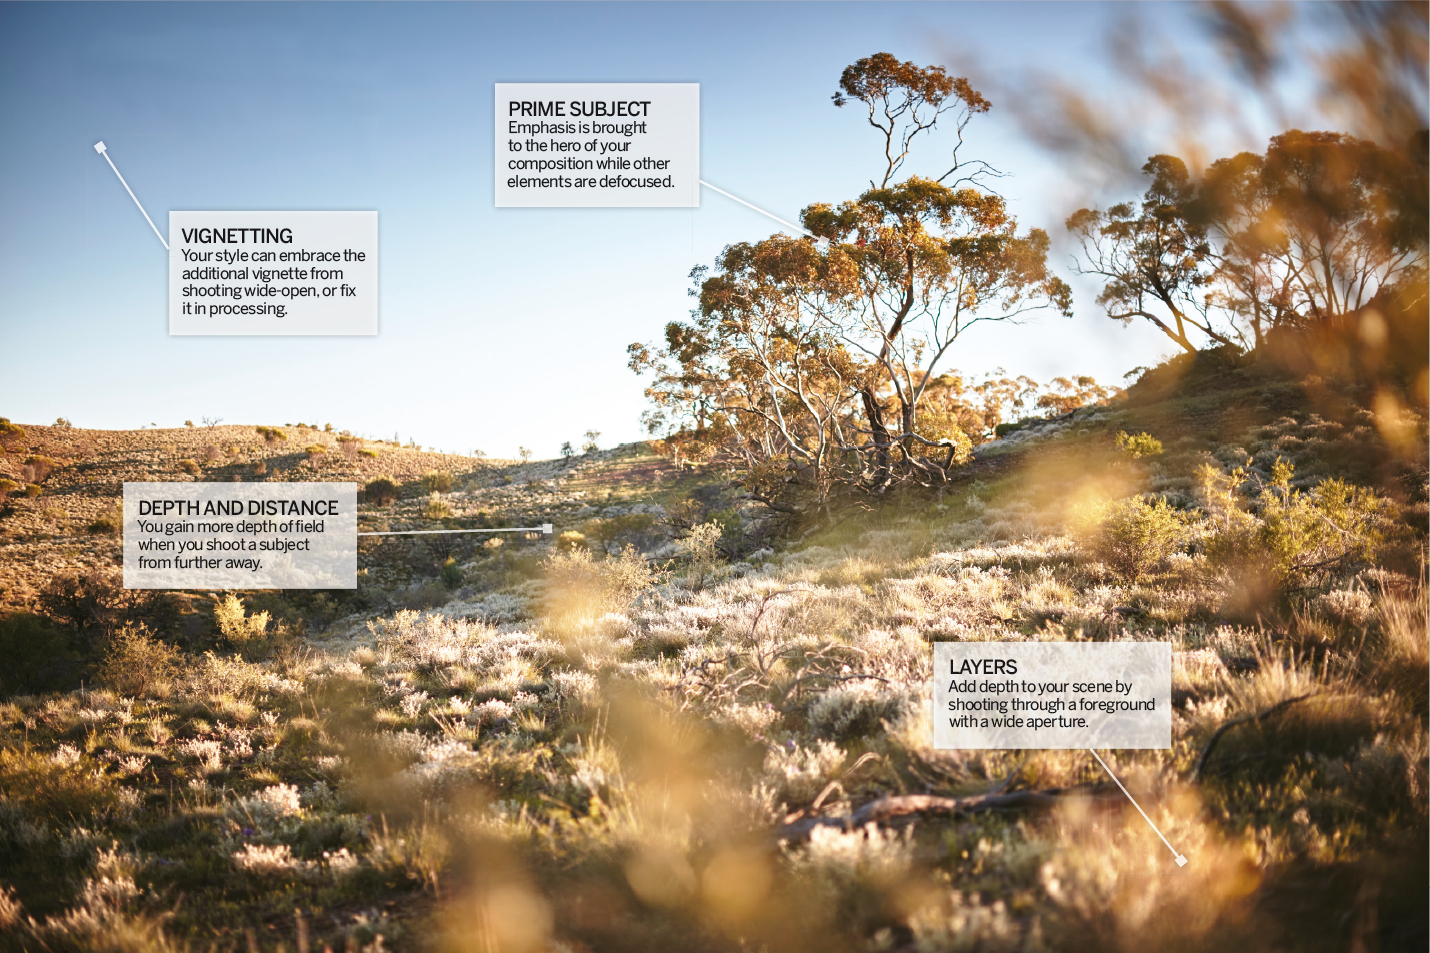
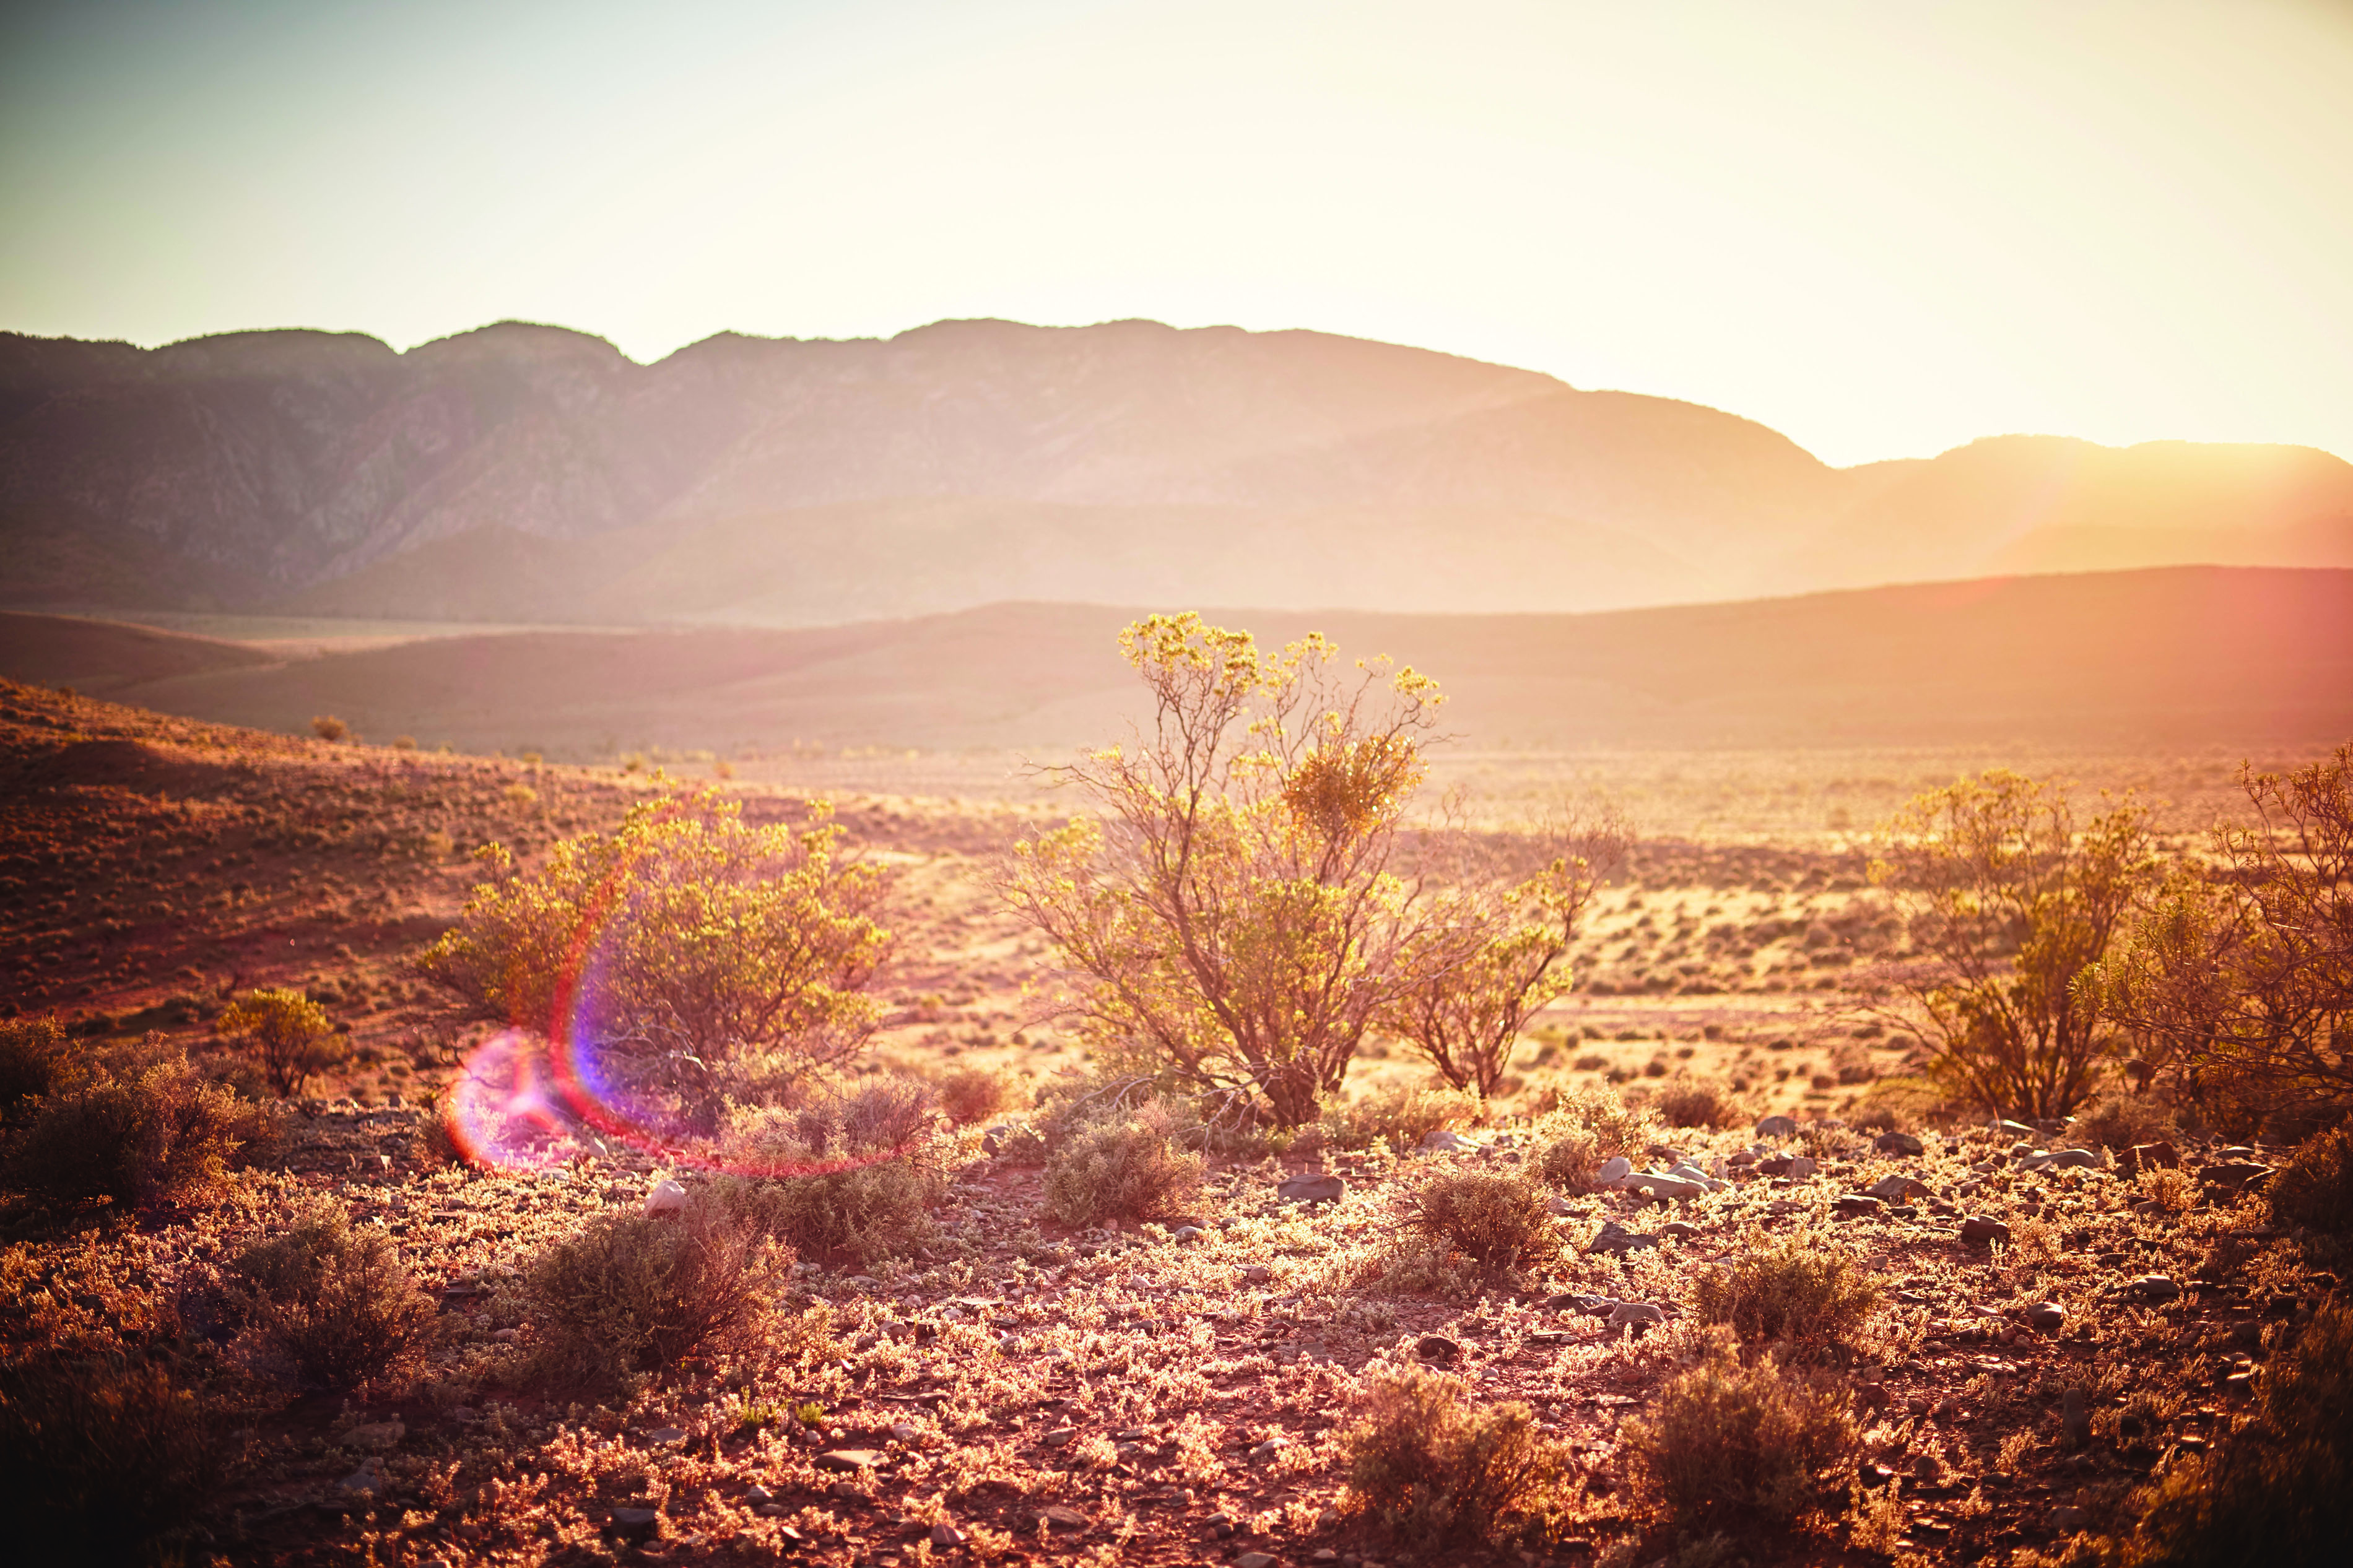
Subtle textures of the Flinders Ranges in South Australia, captured with the aperture wide open to harness sunlight and detail within the same composition
Working with wide-open apertures pushes you to think more carefully about your composition, and demands fine control over your camera. Mastering the silky effects of a soft background and rich bokeh means trusting your autofocus system and learning to drive it with intent. The right choice of lens for your photography is the starting point – and for this style of work, faster is definitely better.
Article continues belowDropping your f-stop just a little won’t reveal a big impact: you need to push out to very wide apertures to see the full effect. If you don’t have a lens that goes out to f2 or faster, it’s worth renting one for a weekend to experiment more fully. The difference between f4 and f2.8 is not always apparent, but shooting at f2 or wider will make a dramatic difference to your shots.
The great joy of using a wide aperture is the ability of create clarity from the chaos. A scene that would be too busy or complex otherwise can be tamed with the use of shallow depth of field. Portraits, still-life, macro and even landscapes can be explored with the core idea that ‘less is more’.
Shallow focus allows you to keep lots of layers and lots of elements in a composition, but still offer a sharp and strong subject.
CHOOSE A LENS

Above: Sigma 20mm f1.4 Art Series
The curved front element and fixed lens hood are a little inconvenient, but there isn’t a wider AF lens for shooting at f1.4 on your DSLR
Zoom lenses are designed to offer maximum convenience, but allow less potential wide-open
Zoom lenses are the outcome of a genuine engineering challenge, attempting to balance image quality with flexibility. It’s hard to design an affordable lens that can shoot with very wide apertures and still deliver a useful zoom range. Until recently, most wide-angle zooms have been constrained to the f2.8 mark, and even those have been expensive. Sigma recently released an f1.8 18-35mm zoom in its Art Series, which gives smaller APS-C cameras access to very shallow depth of field and the flexibility of a wide-angle zoom.
Your choice of focal length will determine the shallow depth of fi eld you get to play with
The best camera deals, reviews, product advice, and unmissable photography news, direct to your inbox!
The longer your focal length, the less depth of field you have to play with. This is why you can still get a soft background when shooting wildlife on a 400mm lens at f8, yet f8 on a 24mm lens can get you everything sharp from two metres away to infinity.
When you want shallow depth of field on a wide-angle lens, you have to push the f-stop very wide indeed, and often bring your subject closer to get the background softer. This is why 24mm f1.4 prime lenses are so popular.
At f1.4, you can shoot street photography but still pull the focus onto a specific subject within a scene. Selective use of depth of field becomes a powerful tool for composition, directing the viewer to what matters most.
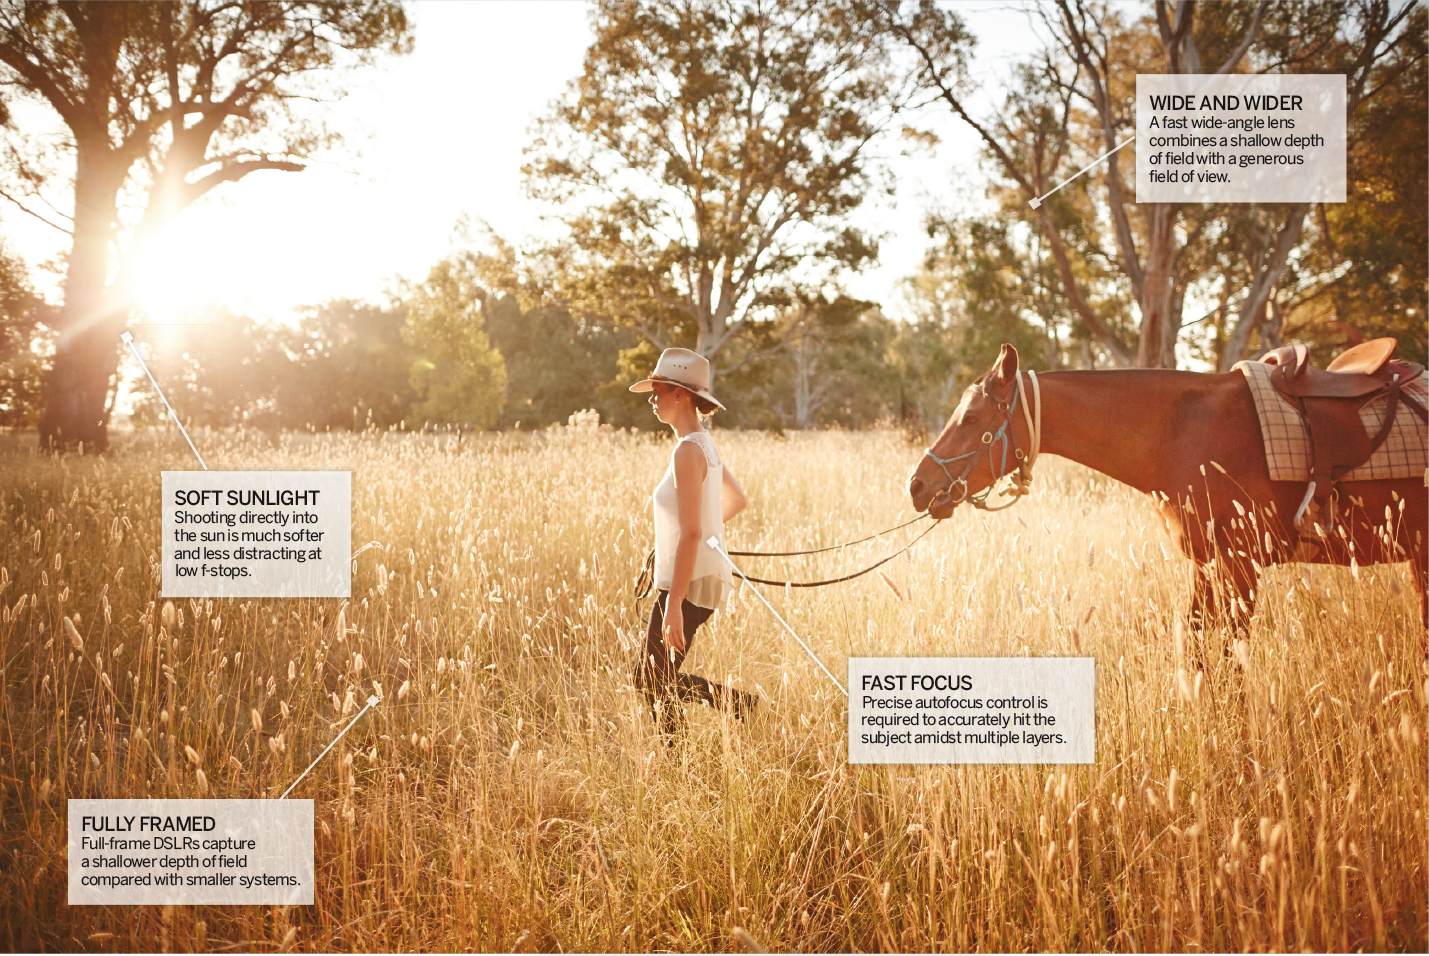
Even landscape photography can be explored through a wide-open aperture. Instead of holding all the foreground detail with a generous f-stop, you can use that shallow depth of field to ‘shoot through’ your foreground. Elements in the immediate foreground can be melted into bokeh, adding a layer that frames the scene beyond.
50mm is the sweet spot for wide aperture creativity. It’s a flexible perspective, and no other focal length can boast such affordable fast lenses. An f1.8 50mm lens is modest to walk around with, yet can handle everything from landscapes, to street scenes, or from still-life to portraits. You can move in close for tight compositions that emphasise a discerning depth of field, or step back a little from your portraits and push the background into bokeh.
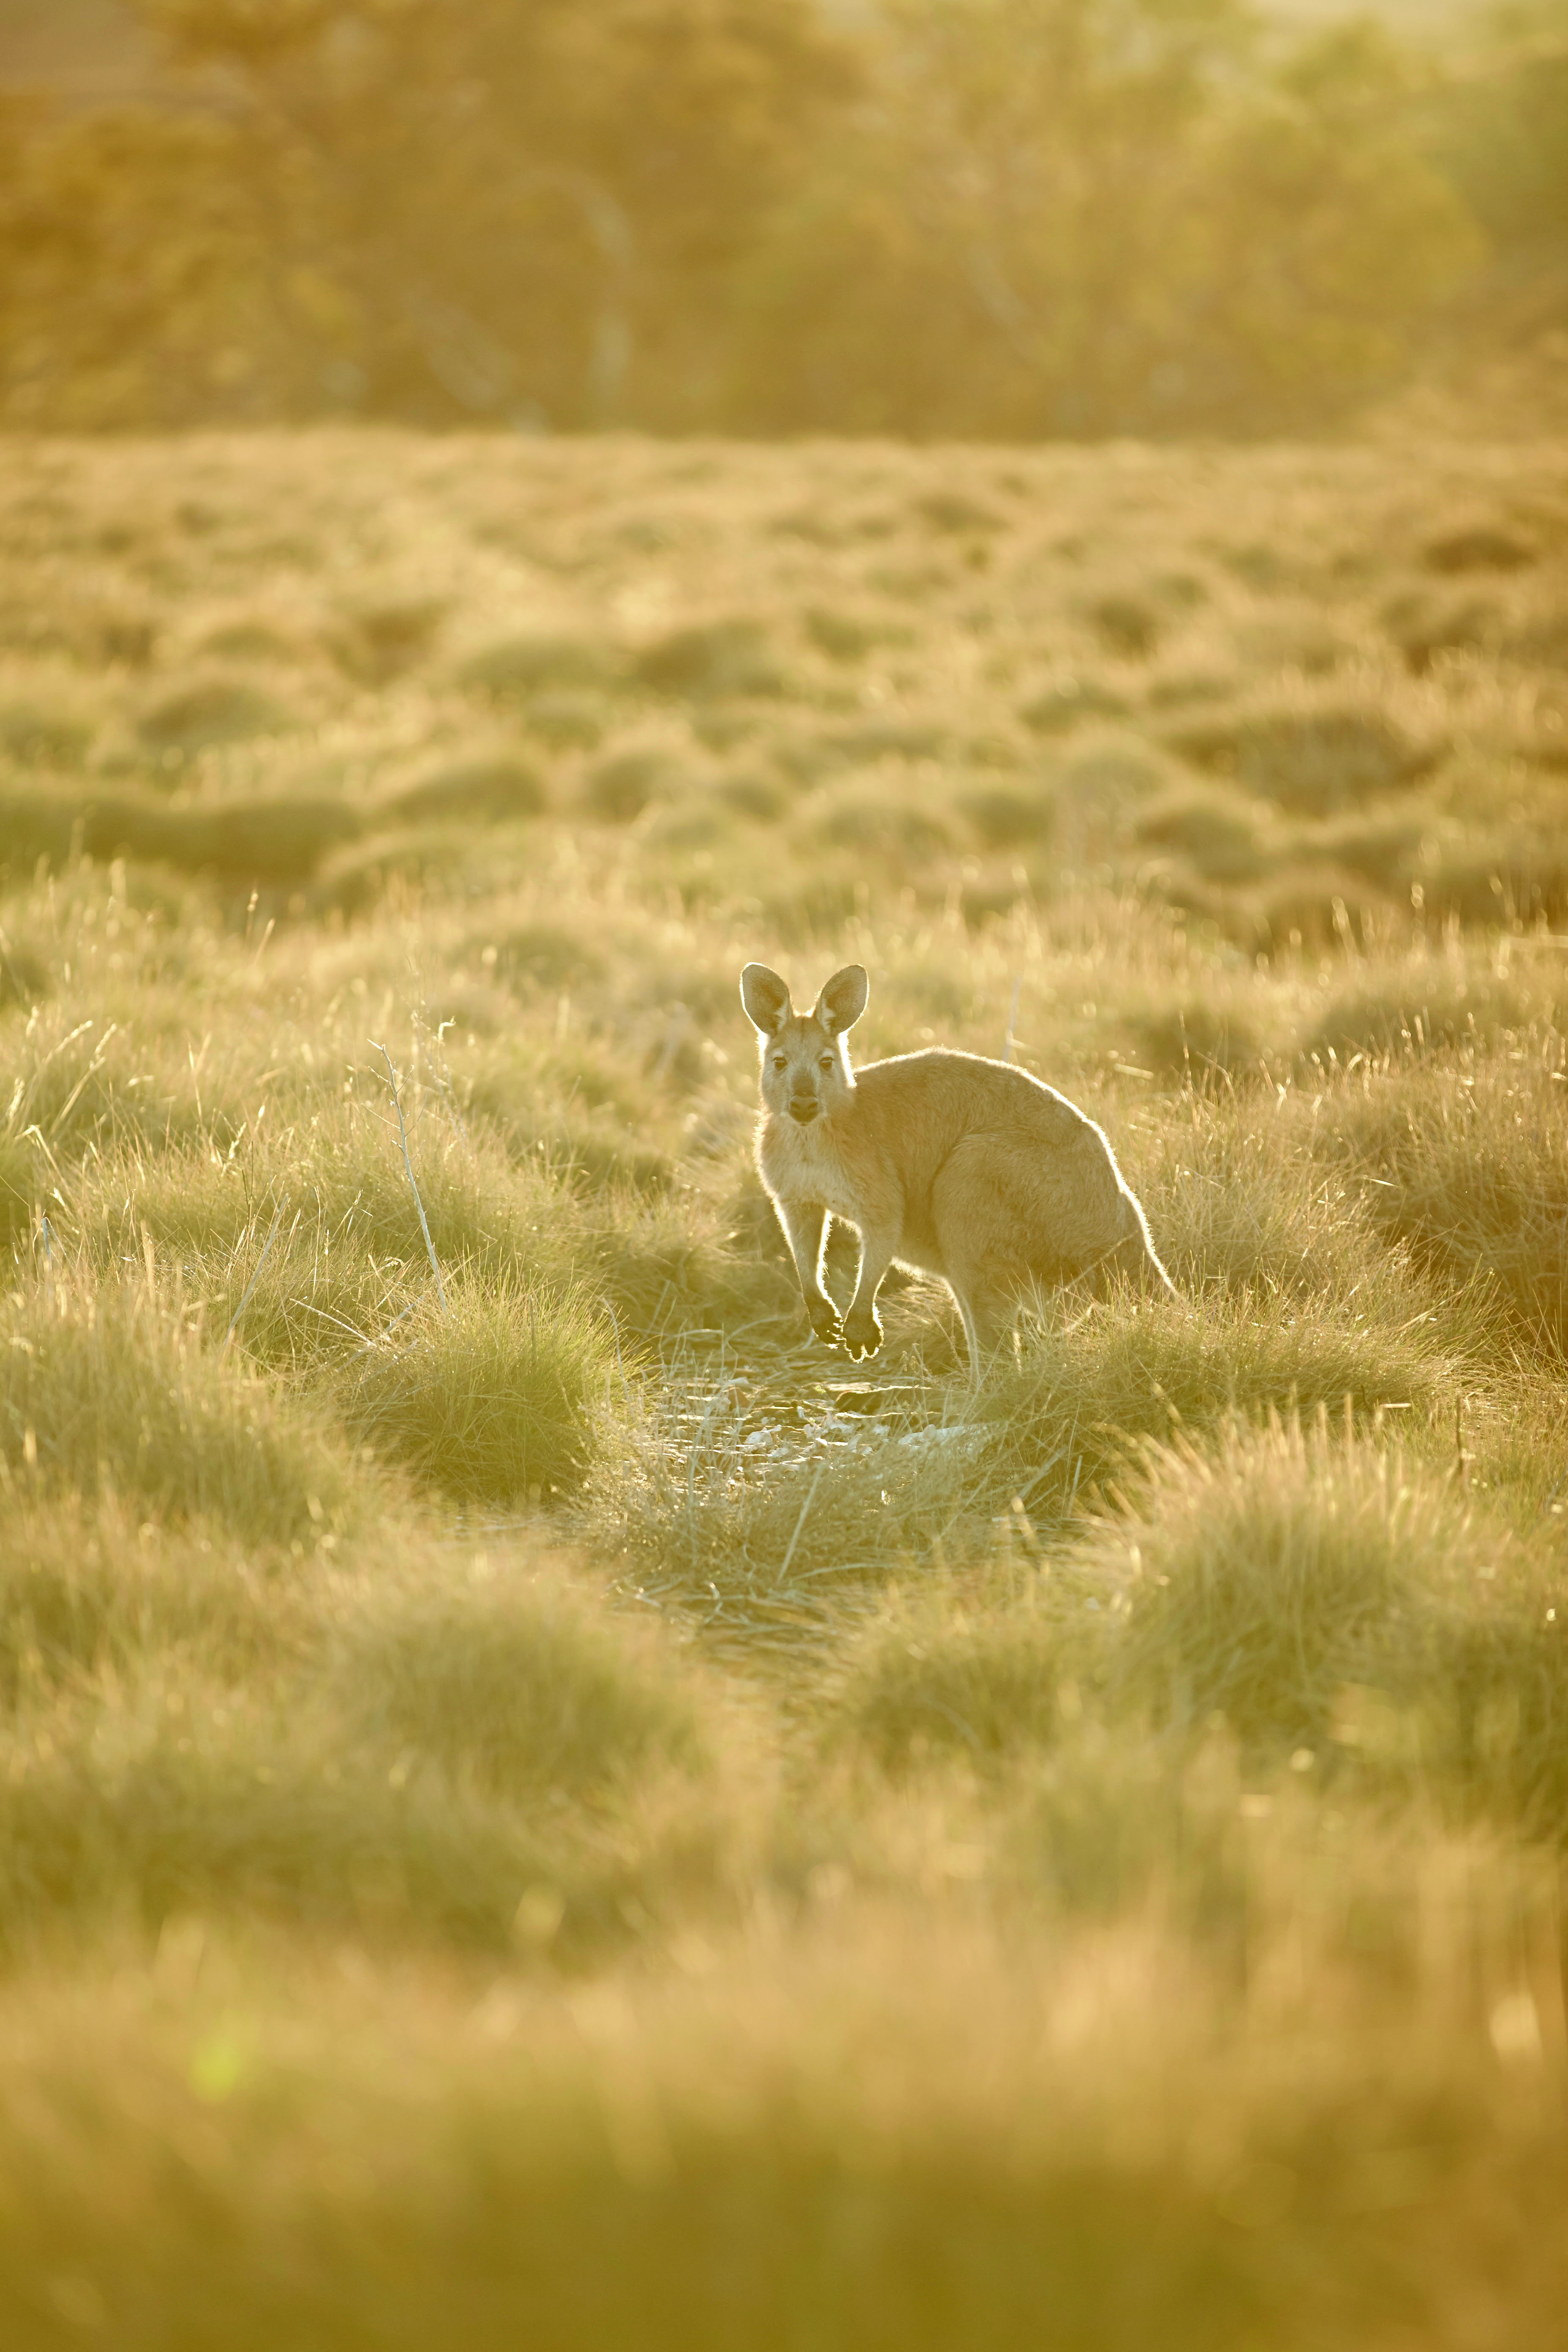
Telephotos are often essential for wildlife work – you can’t always get as close to a puffin as you would like. Once you start shooting around 400mm, however, even an f6.3 lens will give you some lovely bokeh. Going wide-open on a super telephoto doesn’t need f2 to get a great result.
Sensor Size
The smaller the sensor, the greater the depth of field it will produce. On a Micro Four-Thirds system such as a Lumix GH5 shooting with a 25mm f1.4, the depth of field looks more like a 50mm f2 on a DSLR.
GET CREATIVE
Three approaches to try with wide-open apertures

Intimate attention
Wide-angle lenses offer an intimate feel when combined with wide apertures. The camera is more deeply present in the moment, not merely eavesdropping from a distance.

Portraits and still-life
A 50mm focal length is the sweet spot for portraits. Shooting wide at f2 becomes a creative tool to highlight your subject within a complex and busy scene.
Wildlife focus
A 200mm telephoto at f2.8 offers an effective tool to isolate wildlife and throw a soft focus across foreground and background. The longer the telephoto, the more dramatic the bokeh.
FOCUS WITH CARE
You need to control precisely what stays sharp wide open
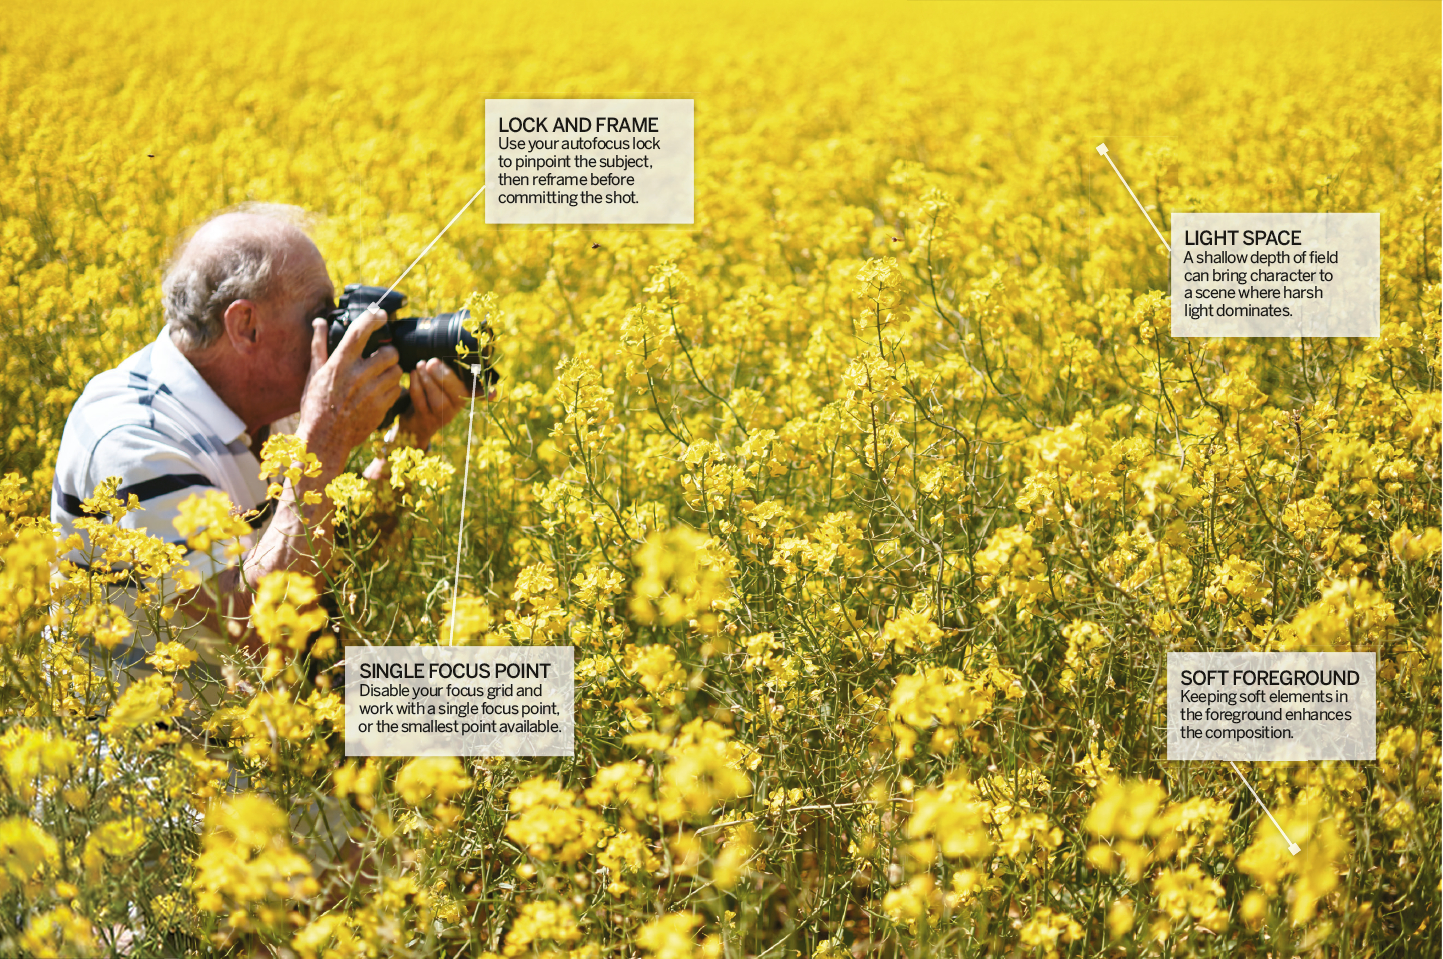
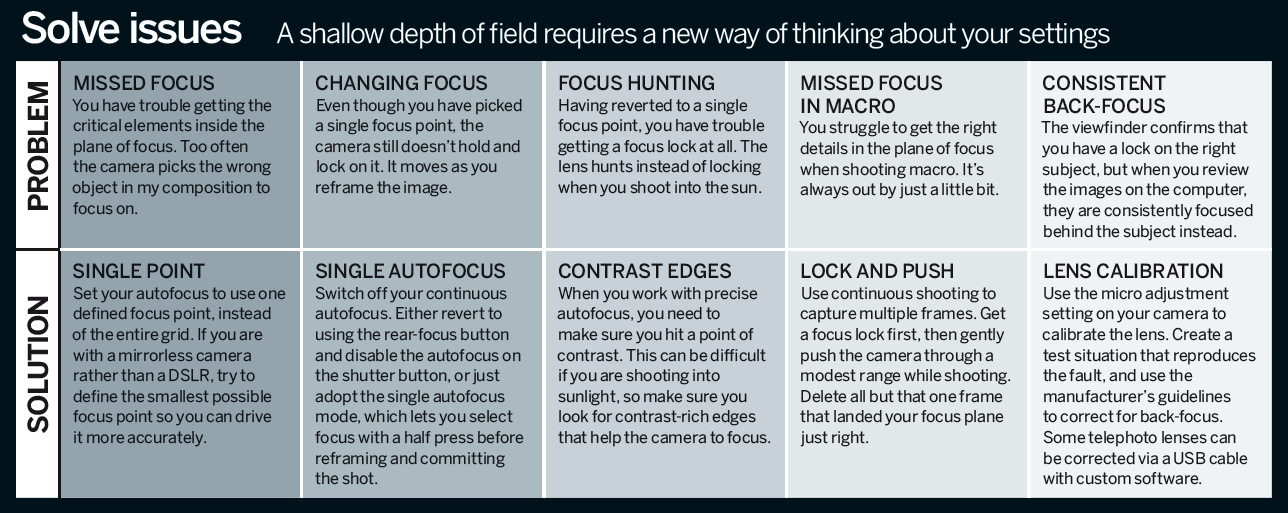
Control of your autofocus system is critical as you step towards a wide-open aperture. If you miss your target, you lose all value in the composition. Instead of letting the camera automatically select focus points across the grid, you need to take full control and tell the camera where you want the focus to land.
This means turning off the focus grid and setting a single point of focus to work with. It also means trusting the performance of your camera to grab a focus lock, sometimes in difficult situations. Getting to know how your camera responds to low contrast or backlit scenes is part of the learning curve.
Once you have set the camera to use a single focus point, you have two techniques to choose between. One is to push the active focus point around the frame as you compose, locking onto the desired plane of focus in the composition. This can be slow, and you may not always have a focus point exactly where you want it.
A more flexible and responsive technique is to stick with the centre focus point, but use the focus lock on your shutter or rear of camera. Select a part of the subject in your desired plane of focus, lock the autofocus and then re-frame the scene to suit your composition. As long as you don’t move backwards or forwards during the re-framing, you stand a good chance of hitting your subject even if it’s not in the centre of the composition.
When you work in the studio, you may have a more controlled environment, and a more stable subject to compose. Manual focus has some appeal in this situation. By shooting and reviewing your images in real time, ideally on a larger screen tethered to the camera, you can make fine adjustments to the focus and ensure perfection.
Continuous Bursts
Employ the continuous shooting mode on your camera so that each press of the shutter yields four or five frames. This helps you to vary the plane of focus slightly as you lean in or out.
FOCUS ON EYES
When you look at another person, it is the eyes that matter most
We are naturally drawn to the eyes of people and animals, and this applies to their portraits as well. The eyes are usually the most critical and engaging part of a composition, so it is essential to keep the nearest eye as sharp as possible. Use the eyes as the point for locking focus. The noise, hair, shoulders and anything else in the shot can be soft, but not that nearest eye. Even a subtle mis-focus can detract from the impact of an image.

Fingers sharp
Where you direct the focus will direct your audience to what’s important. This frame makes the hands the story instead of the musician.

Eyes sharp
Focusing on the nearer eye yields a well-defined portrait. There’s still enough information to show the subject is a musician.

Perspective in focus
By rethinking your perspective on the subject, you can pick a plane of focus where both the eyes and other details are sharp.
PLAN YOUR COMPOSITION
Change your tactics to control how much of a scene is sharp

Just one
Highlighting a single person amongst a group is a natural composition when working with a shallow depth of field.

Lined up
To get more than one person to pop, you have to line them up inside your plane of focus. This takes practice so plan on deleting a lot of shots, and shoot plenty of extra frames.
ENHANCE THE EFFECT
Putting a little space between your subject and the background will enhance your shallow depth-of-field result

Busy scene
Shooting at f2 allows the subject to pop out, but a little more space between her and the wine-wall would make it stronger.

Room to shoot
Moving the subject away from the background allows the wide aperture to soften the background.
CONSIDER YOUR DISTANCE
Wide apertures work best when your subject is close at hand
The further away your subject is, the more depth of field you get. If you shoot a subject an inch from the lens, your depth of field will be tiny compared with the same lens shooting a subject a metre away.

Both these shots are taken at f2, but standing right up to the bushes reduces the depth of field to little more than a leaf.
Stepping back to shoot the bigger scene at the same f-stop gives much greater depth of field, and we get the whole bush sharp.
SHOOT STILL LIFE
The sweet spot for food photography is a 50mm lens opened to f2
Food photography and other variations on still-life imagery benefit from a fast 50mm lens. If you shoot with a wide-angle lens, it becomes difficult to avoid perspective distortion, while even a modest telephoto of 100mm can compress and flatten a scene too much. 50mm is where the work gets done, and the sweet spot for most commercial work is around the f2 or f2.8 mark.
The reason for shooting still-life scenes wide open is to bring attention to a primary subject within the scene. If everything else falls away into soft focus, your primary subject will really stand out and grab attention. Our eyes will keep coming back to that part of the frame where the subject is sharp.
What happens in the soft focus areas is still important, however. Just because something in the background is outside the plane of focus doesn’t mean you can’t recognise it. When you style a still-life scene for photography, there may be many props used that will be out of focus, yet they still inform and complement the primary subject.
How soft your background becomes will depend on the f-stop, what angle you shoot across the subject, and the overall scale of the scene. Pushing the aperture to f2 or even wider will evoke the strongest bokeh. At some point the background becomes a creative element instead of being informative to the primary subject, which can be an appealing aesthetic.
The angle you shoot will effect the depth-of-field effect too. The closer you approach shooting at 90 degrees to the scene, the flatter your perspective, and the less drama you get from your chosen aperture. 45 degrees is a good starting point to experiment with.
There are some excellent 50mm lenses that shoot wide open at f1.4, but how often is that useful? The further you step back from a scene, the more tempting it can be to push the aperture fully wide. Shooting a single dish at the f1.4 mark, for example, can be too shallow and not yield enough sharpness to satisfy; but a bigger scene where the entire table is the shot can work at f1.4 if you want one dish out of many to pop in the frame.

f8
The elements that aren’t sharp in the frame are only a little bit soft and remain discernible. There’s little excitement in how the tray of muffins has turned out.

f4
The background is now much softer, directing us towards the muffins, but the middle row of muffins needs to pop a little more to really focus the attention.

f2
Our target row of muffins is dramatically sharper than those in front or behind. Note that a section of textile beneath the muffins is also inside the plane of focus.
LAYERS
A shallow depth of field allows you to bring elements into a frame you might usually try to keep out. Layers that turn soft in the foreground or background become bonus features of compositions when you work wide open. It’s a shift in how to think about composition – to try including elements instead of avoiding them.
Direct sunlight hitting the lens can be tamed with a wide aperture, converting those harsh flares into a more gentle effect
Every lens has its own flare character, but shooting wide-open will give you the softest rendition of that effect. Mixing lens flare with direct sun pouring into the frame can meld the two together. Letting the background fall into soft focus can complement a backlit scene overpowered by the light.

Full flare
At the narrow aperture of f8, there is some starburst evident across the horizon, and some well-defined flaring cuts across the landscape.
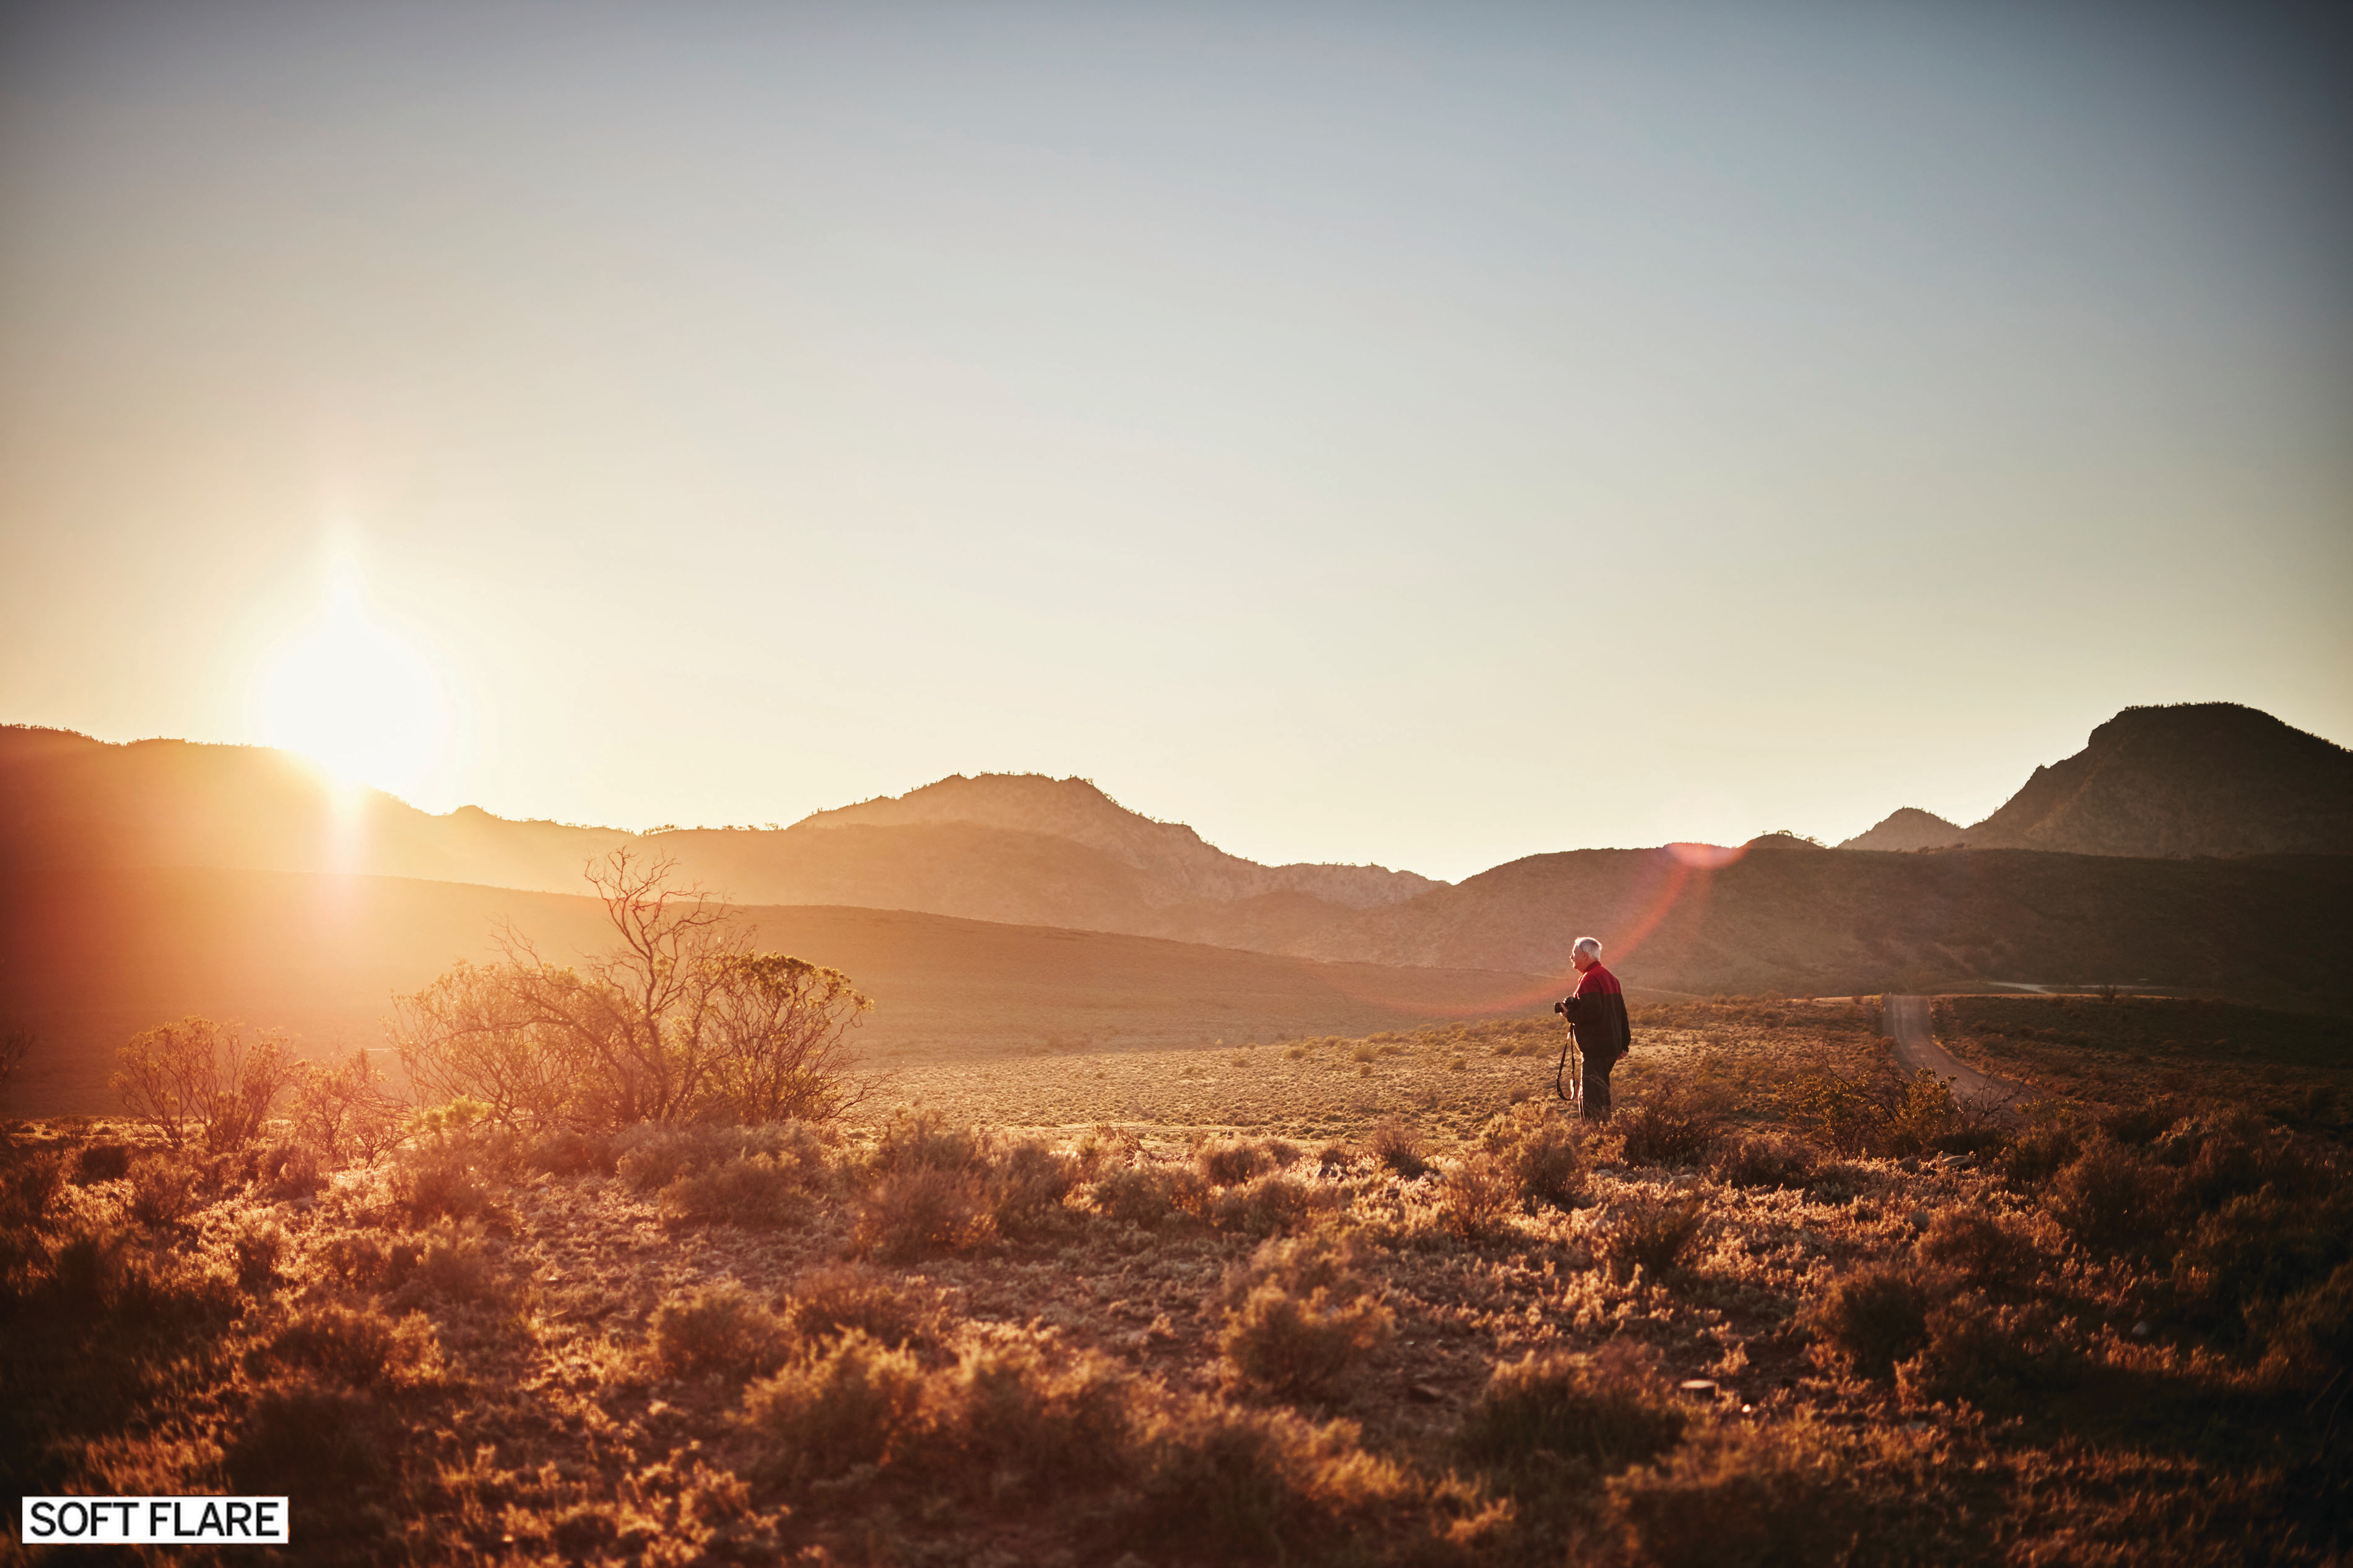
Soft Flare
The sun reverts to a glow that spreads into the scene, throwing an flare arc across the frame. The shallow depth of field makes our human interest dominant in the story.
EDIT WIDE APERTURES
Keep your adjustment layers feathered for softness and you’ll have plenty of latitude for fine-tuning the RAW files
Shooting wide-open gives you a very fine plane of focus, but often the line between sharp and soft is a broad one. The focus within your frame can shift gradually from a rich bokeh to razor-sharp detail. Defining the point where the depth of field starts and ends can be arbitrary.
This means that when you process your RAW image, it’s important to ensure your adjustment layers are equally gentle. Brushes and gradients should be strongly feathered to conceal the evidence of your changes. Whenever the shift of detail and light is broad and gradual, a gradient layer can give you a smoother effect than painting with a brush.
The softer the focus is in the background or foreground elements, the easier it is to creatively manipulate the mood of the image. You can darken edges for drama, counter the vignetting for balance, or apply a warm and over-exposed gradient to wash out a background where the sun bursts into frame. Strongly backlit scenes often benefit from a boost of shadow detail in the foreground.

Blue-Tongued Skink
Capturing the eyes is as important with wildlife as it is with people. You don’t have to miss the sharp plane by much to spoil the shot

Landscape Textures
The foreground is so important in landscape compositions. When nature doesn’t provide enough to satisfy, pull through some soft focus to adapt a simple bit of flora to add colour and depth
Shoot More than once
Never assume you got it right the first time. Even if you like what you see when reviewing the back of the camera, go back in and reshoot the scene a few more times just in case you missed the most critical detail in the plane of focus. Reassess the focus each time you reshoot.

Middle Fields
Pull out a piece of the landscape without losing the context of the scene. A shallow depth of field lets you hold onto the big picture while bringing all the attention to one strong element in the scene
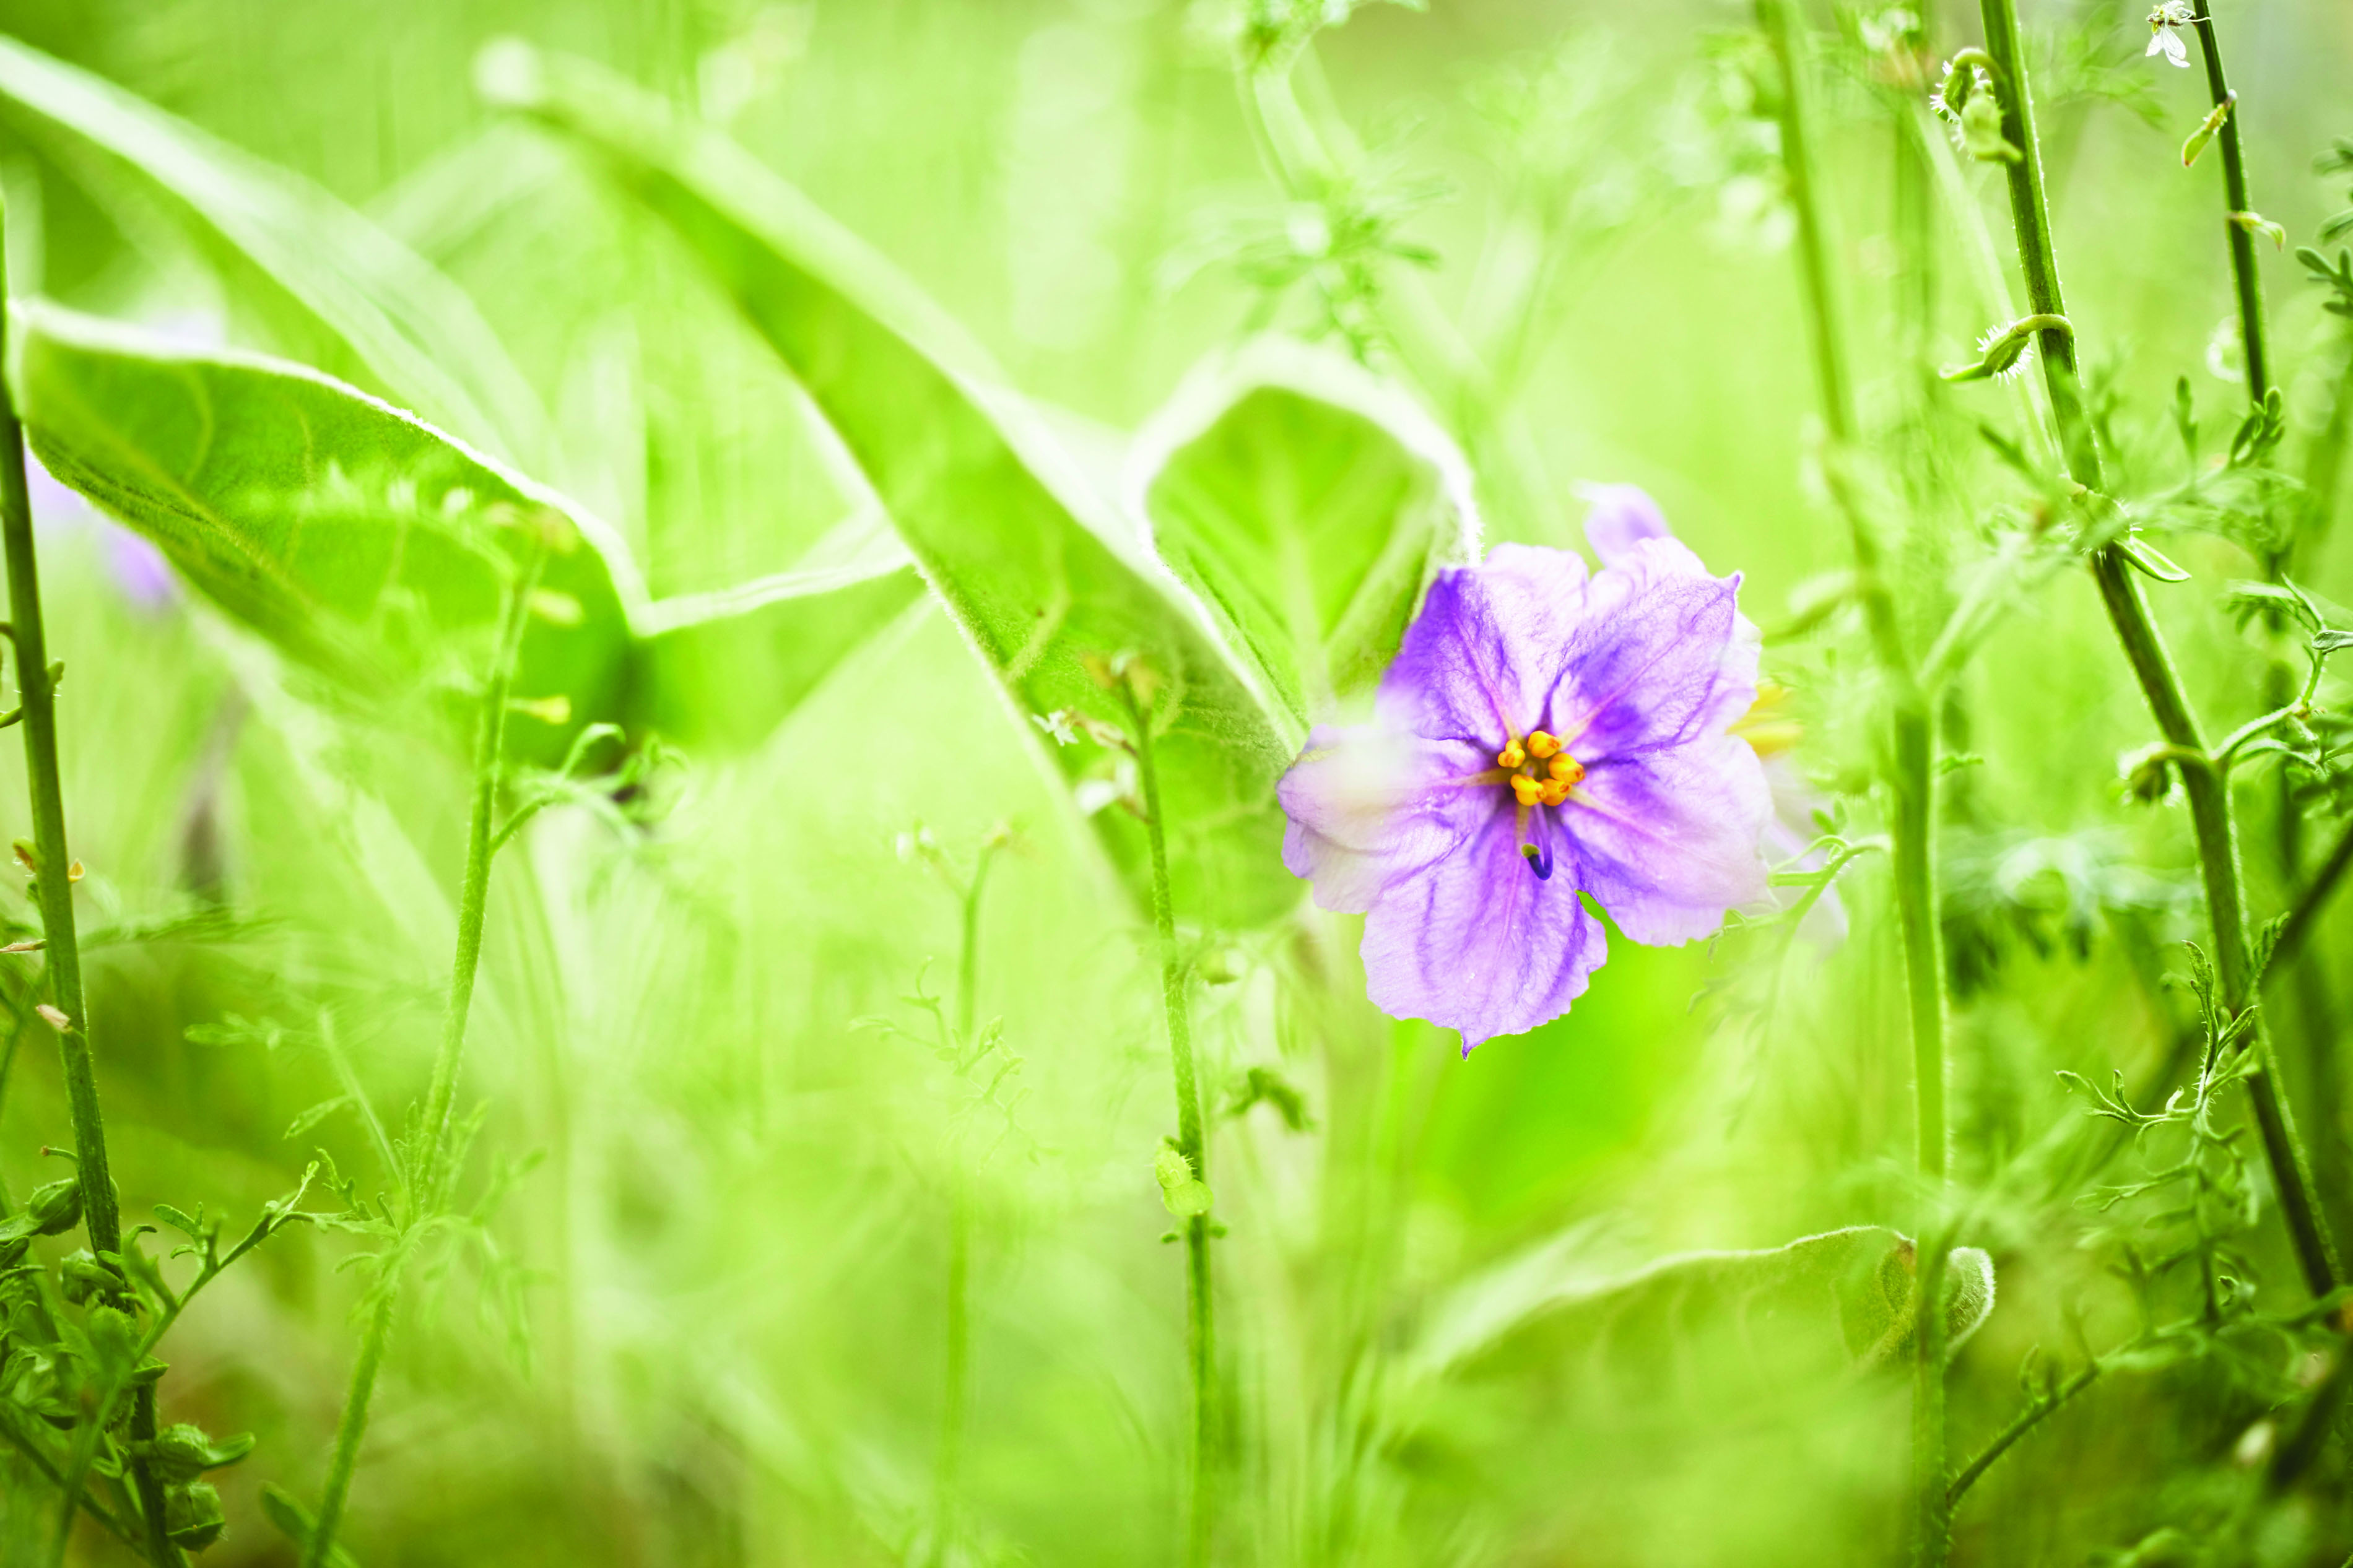
Flower Power
Pulling clarity out of chaos is the biggest trick wide apertures can give you. A simple flower can get lost within a jungle of flora, until you impose an f2 perspective and melt away the distractions
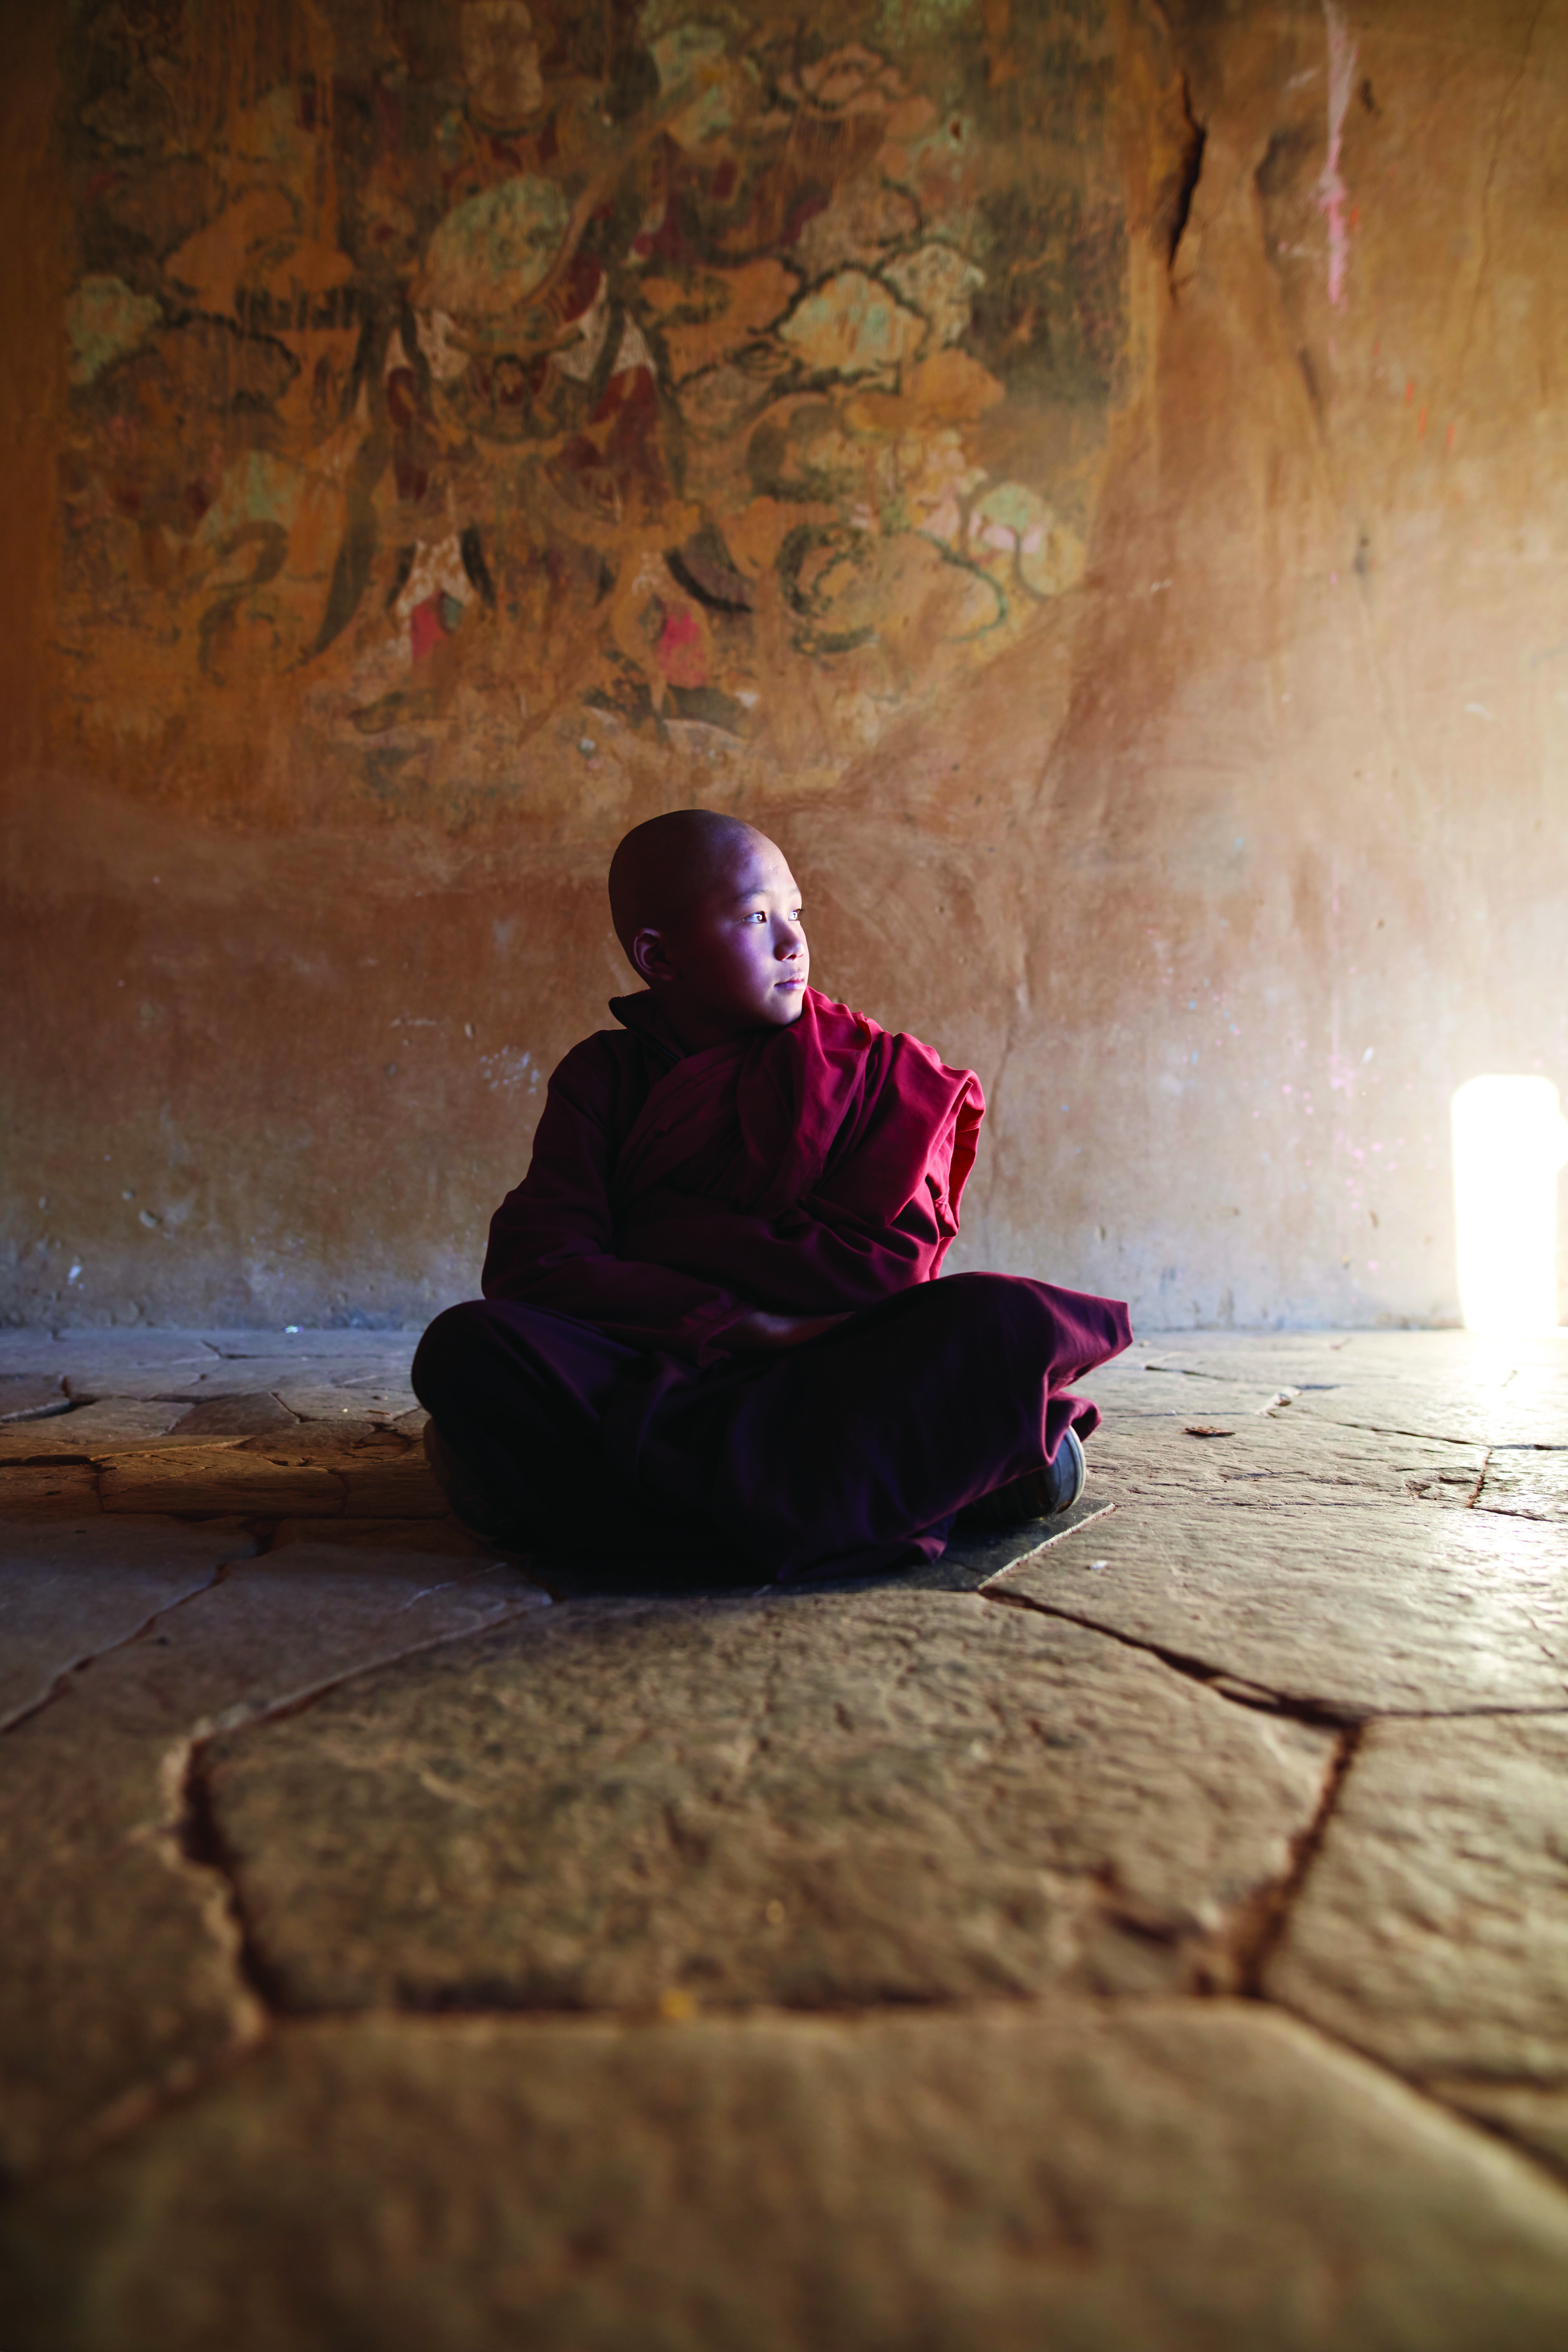
Novice Monk in Bhutan (before)
The RAW file presents a wide range of exposure zones that will test the dynamic range of the camera. One hotspot in particular detracts from the composition
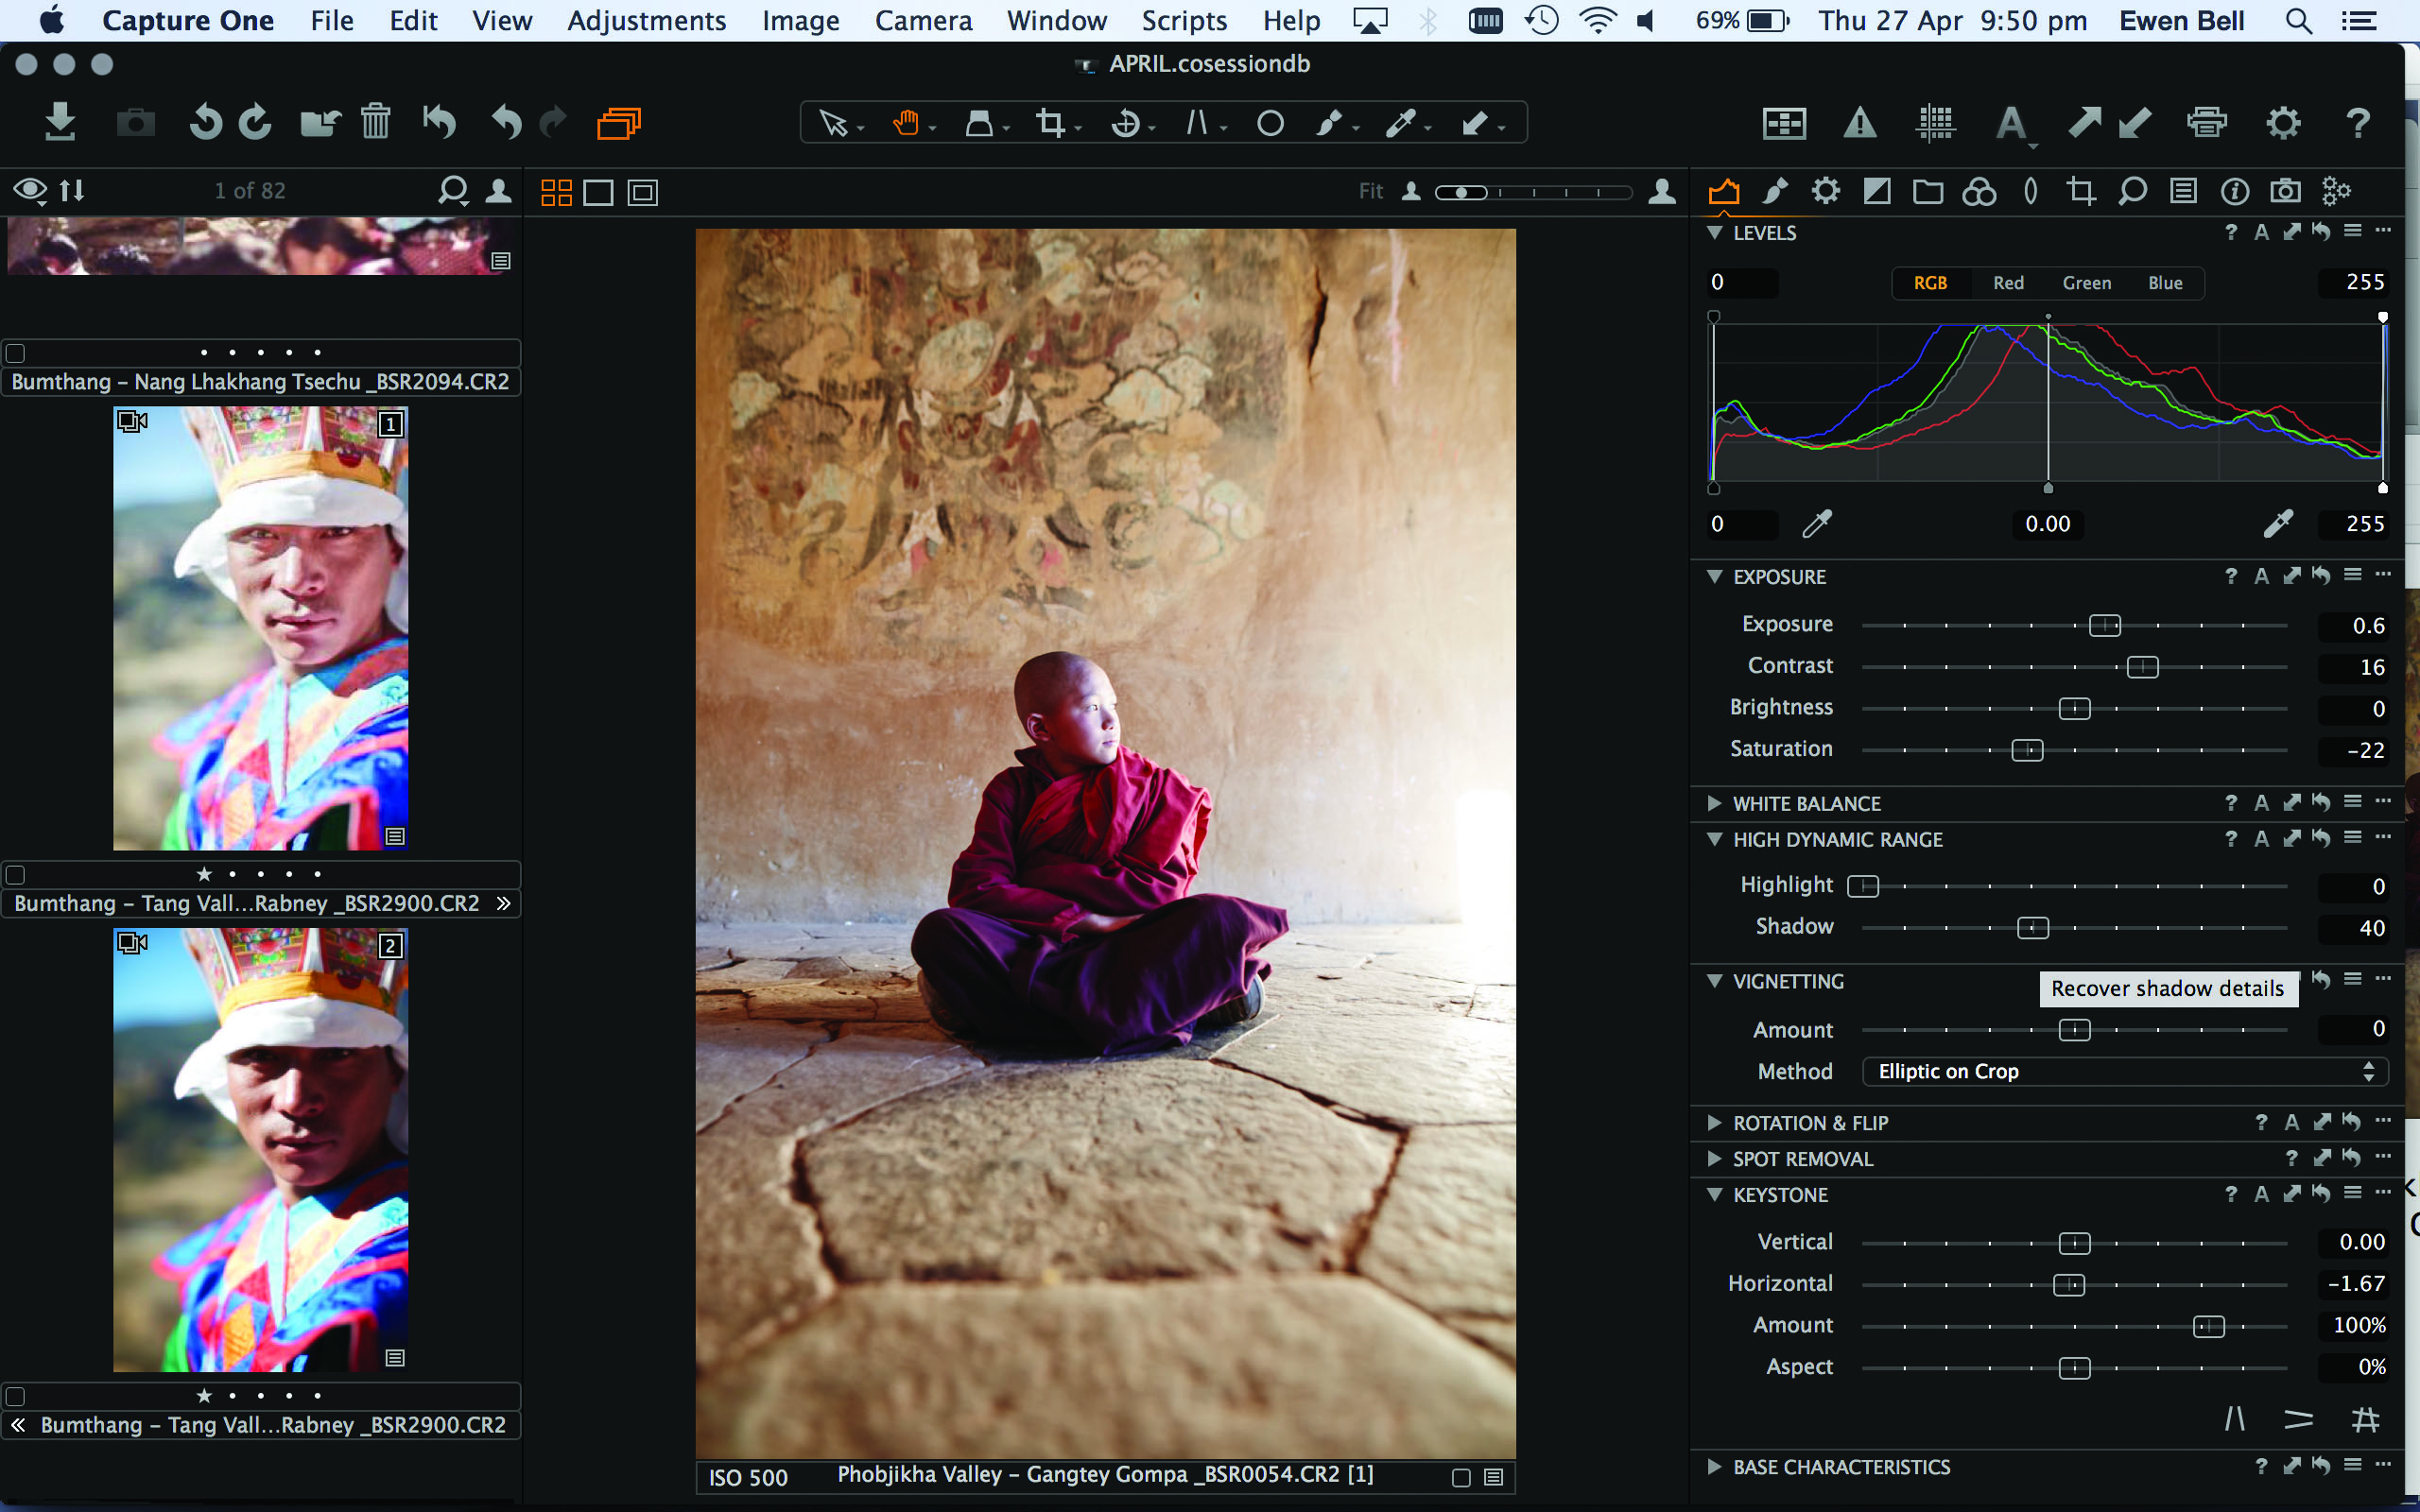
01 Apply your baseline Set the mood by setting your contrast, exposure, saturation and shadow detail. Reducing saturation and adding a little contrast helps to bring the sharpness out in the focal plane, without blowing out detail in colour-rich elements.
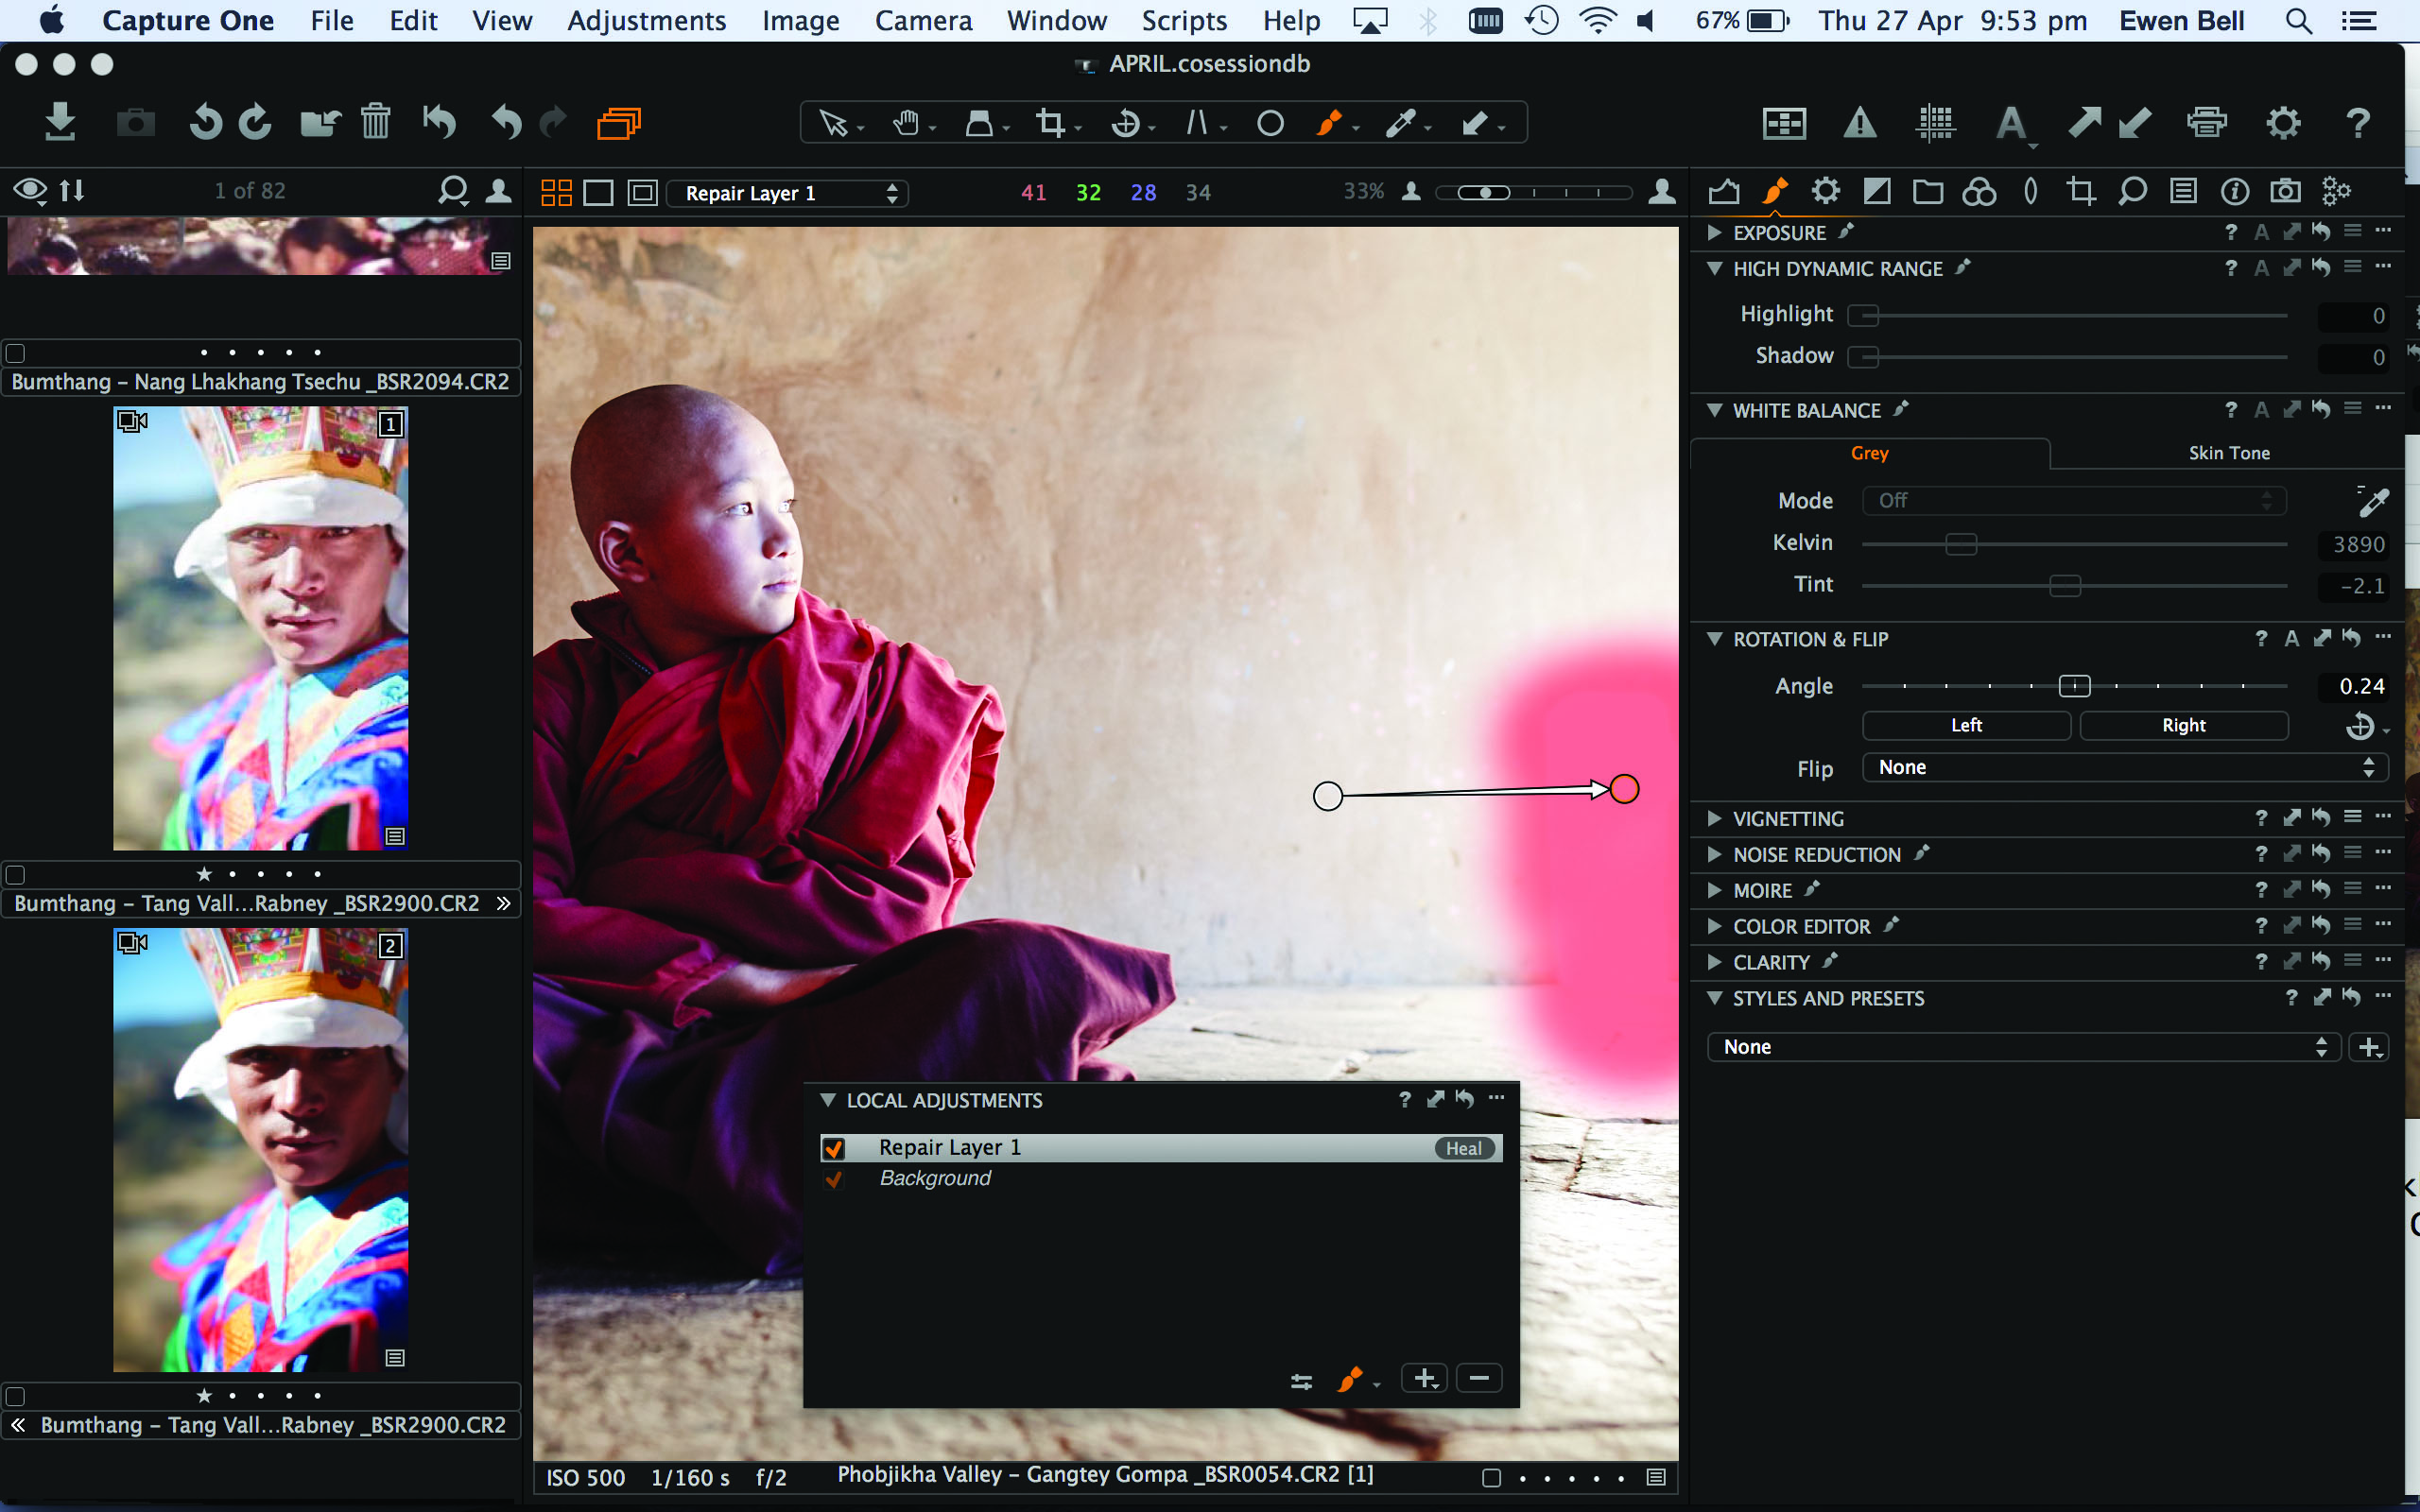
02 Clone and heal With a very soft cloning tool selected, you can easily tidy up unwanted objects in the background. In this image a block of light is grabbing attention on the right-hand side, so clone in parts of the wall and floor to diminish its impact.
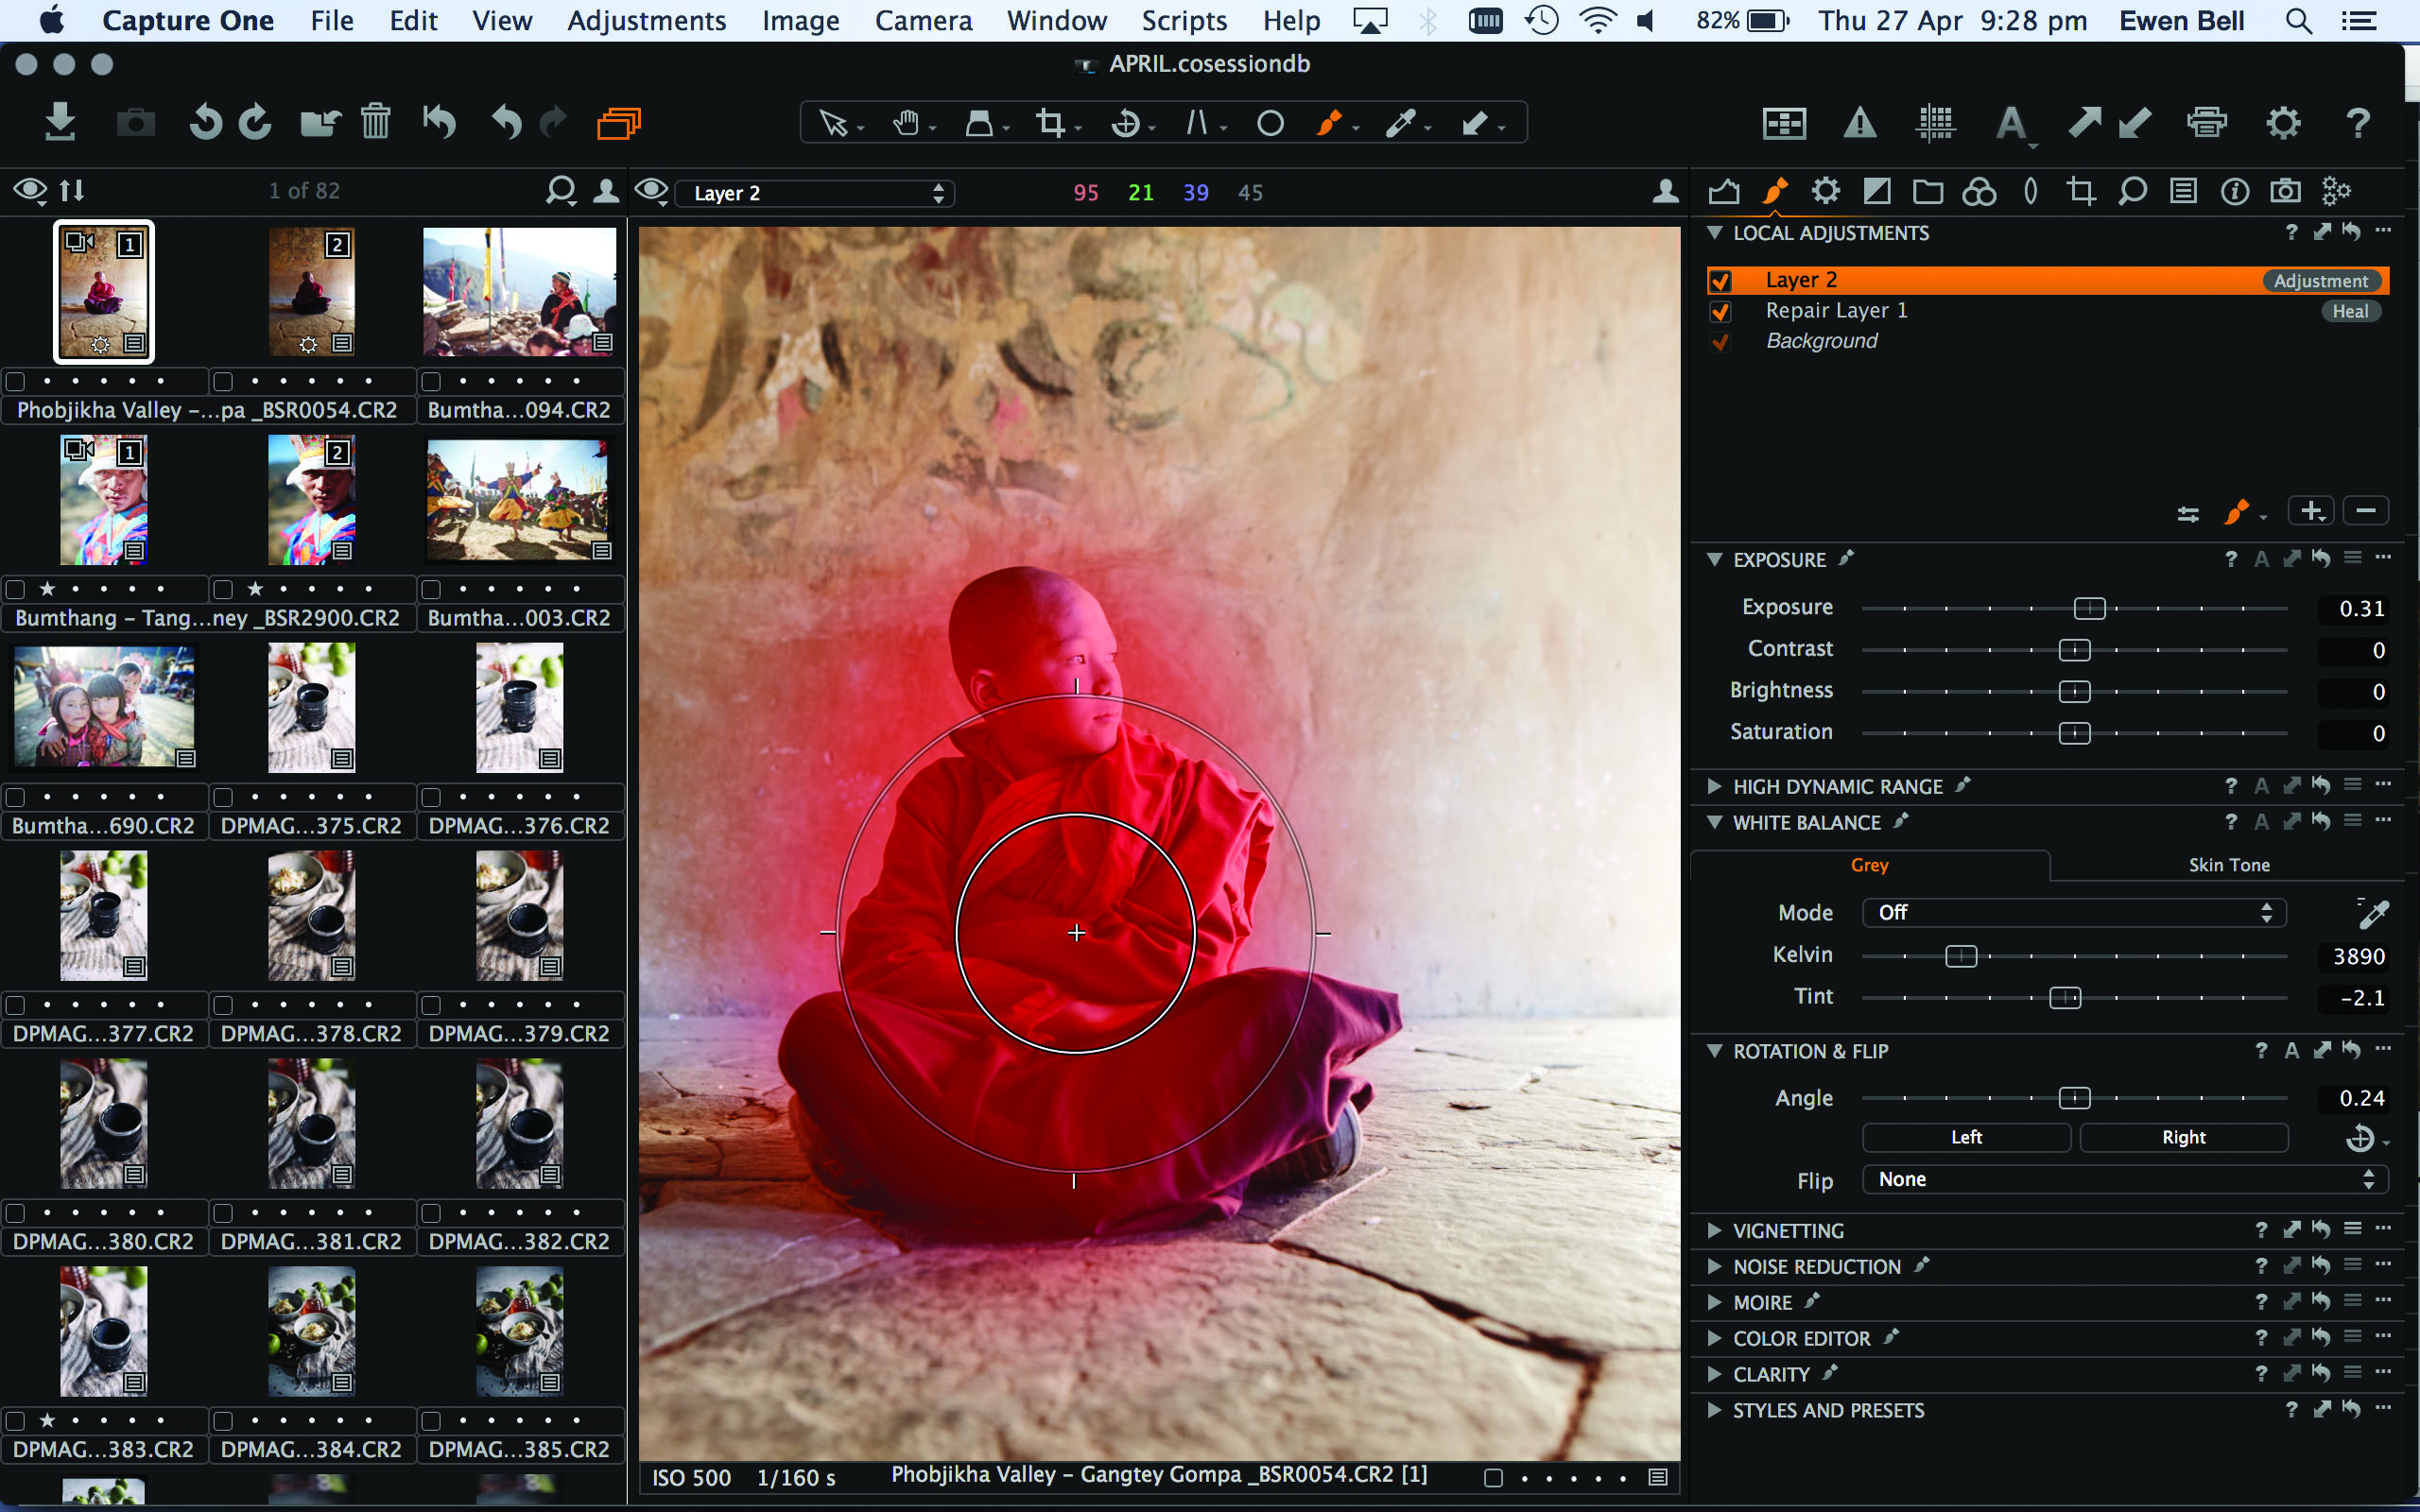
03 Tune the primary subject Add an adjustment layer to your primary subject and adjust the exposure to give sufficient prominence. If you add a little exposure to compensate for a backlit scene, retain definition with extra Contrast or Clarity.
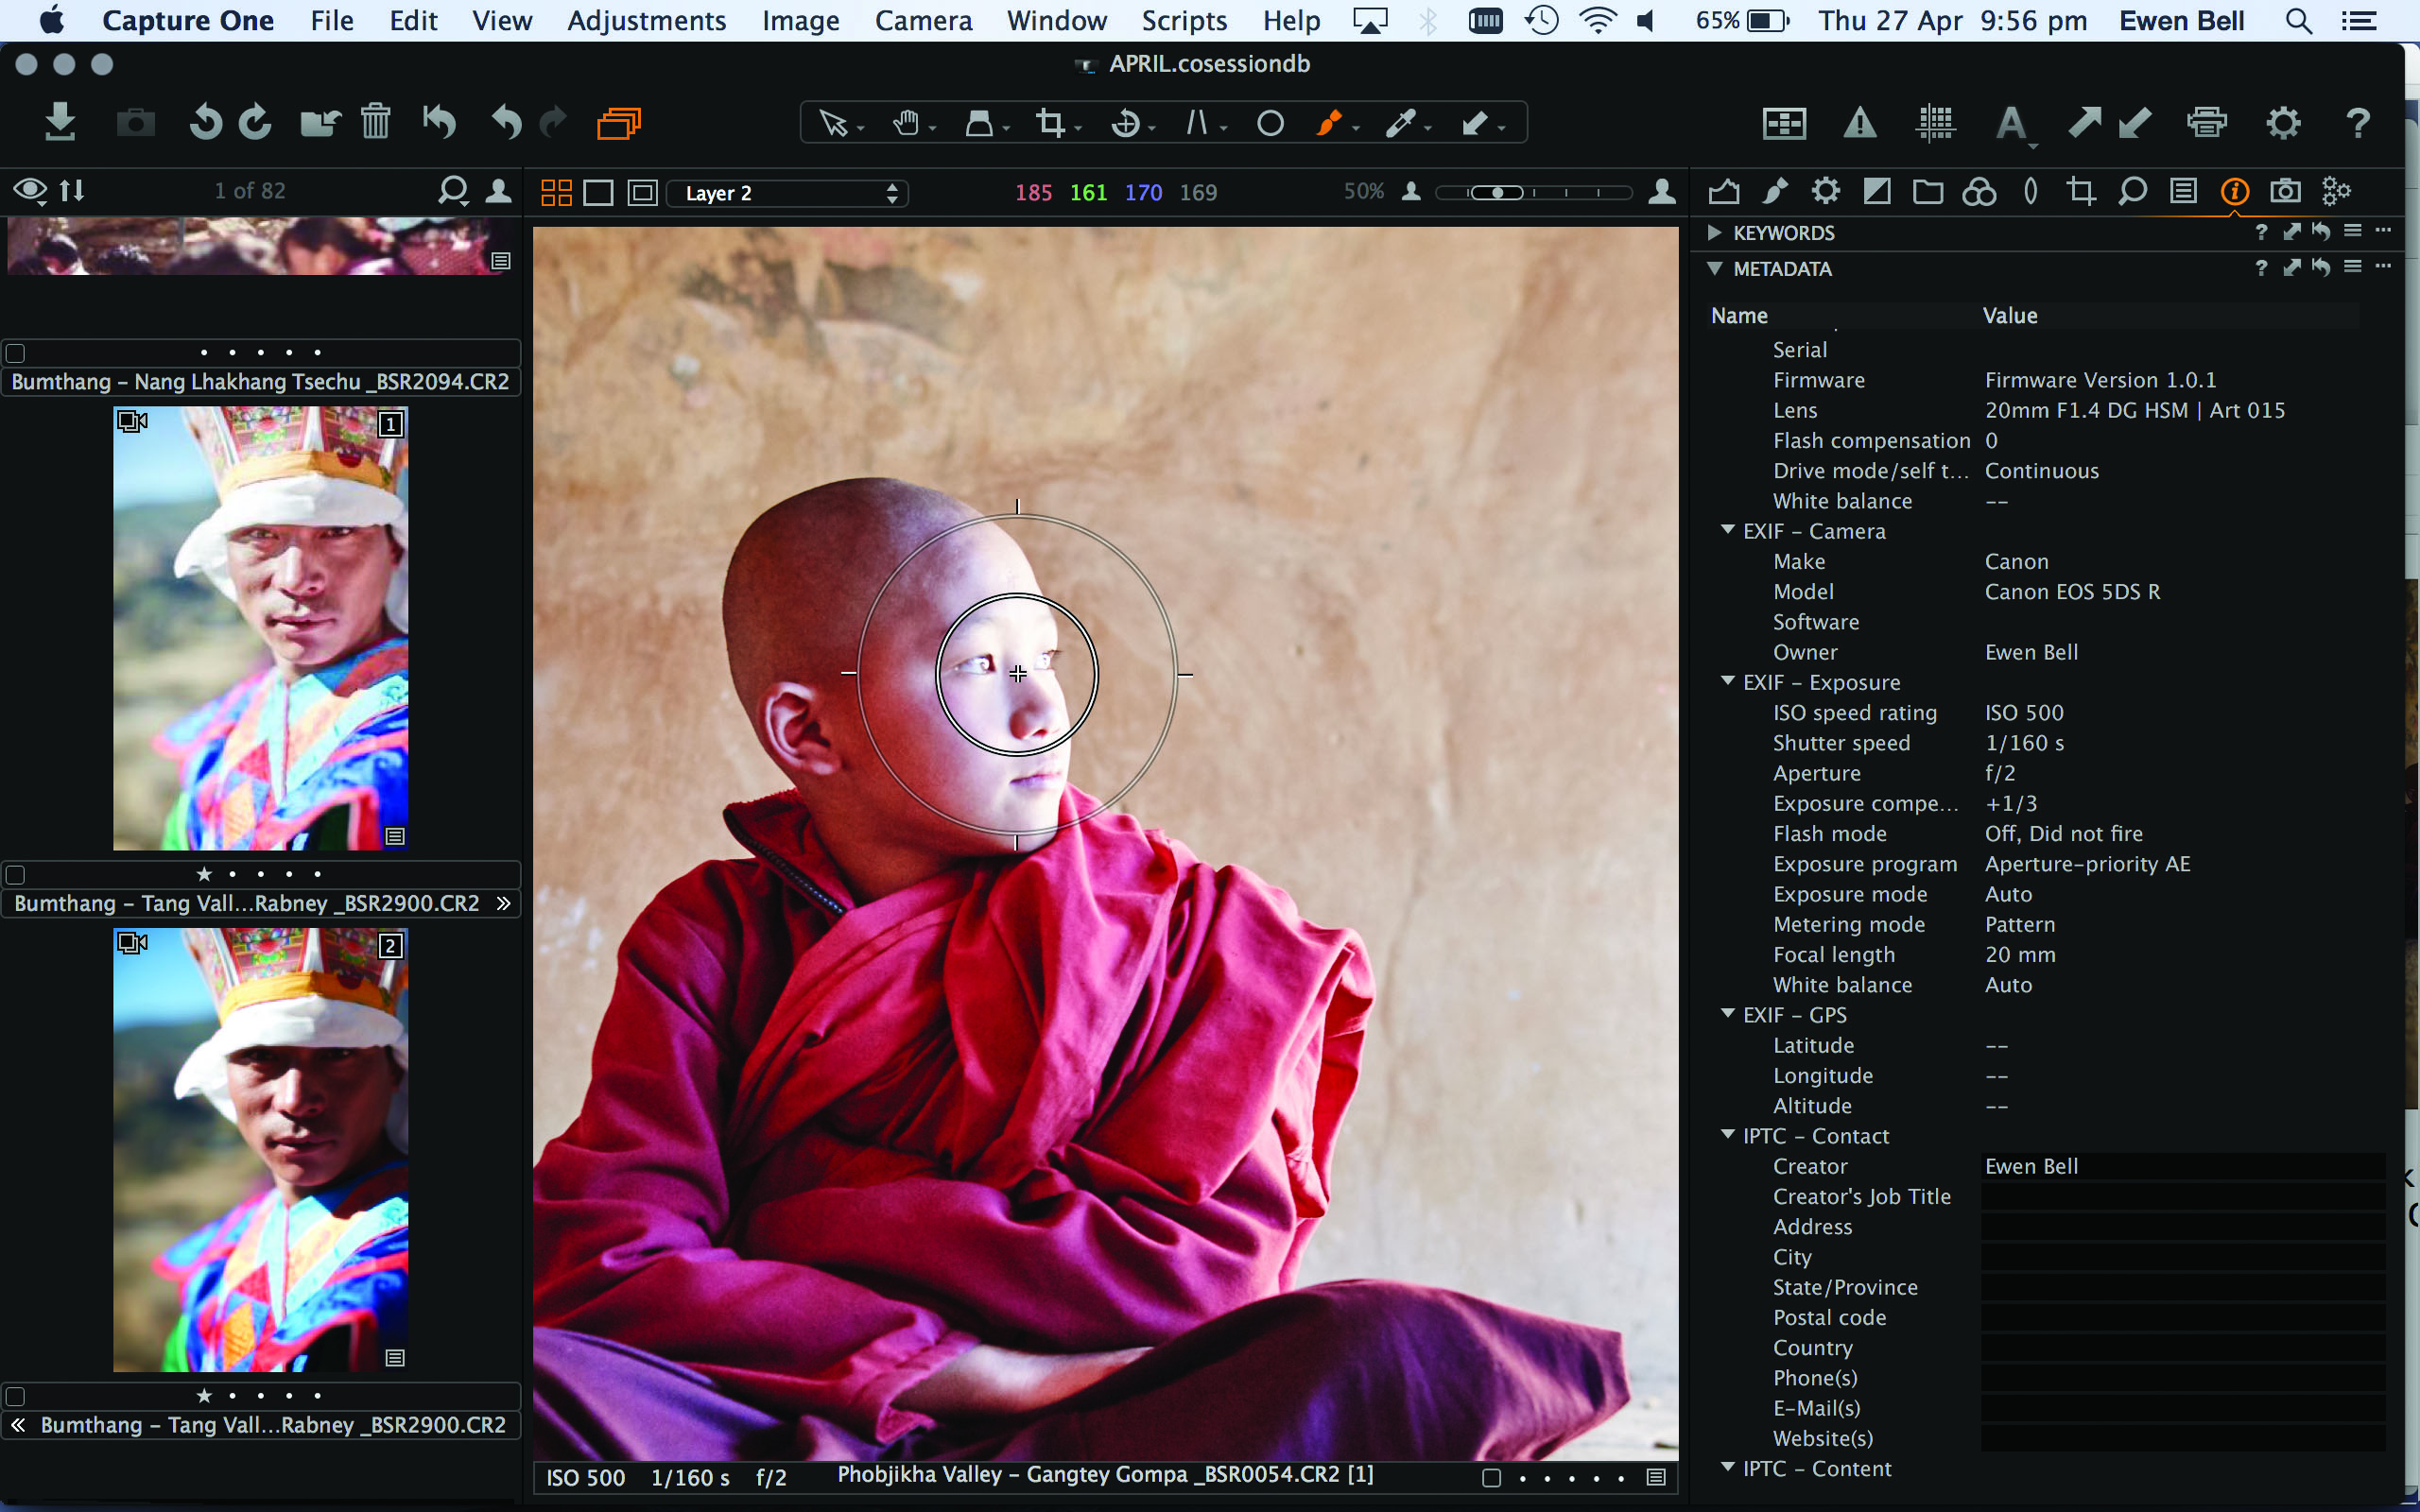
04 Check the focus Zoom into the critical part of the frame and make sure your RAW file is sharp where it needs to be sharp. Ideally you will have multiples of the same scene, so that you can simply can pick the RAW file that best nails the eye detail.
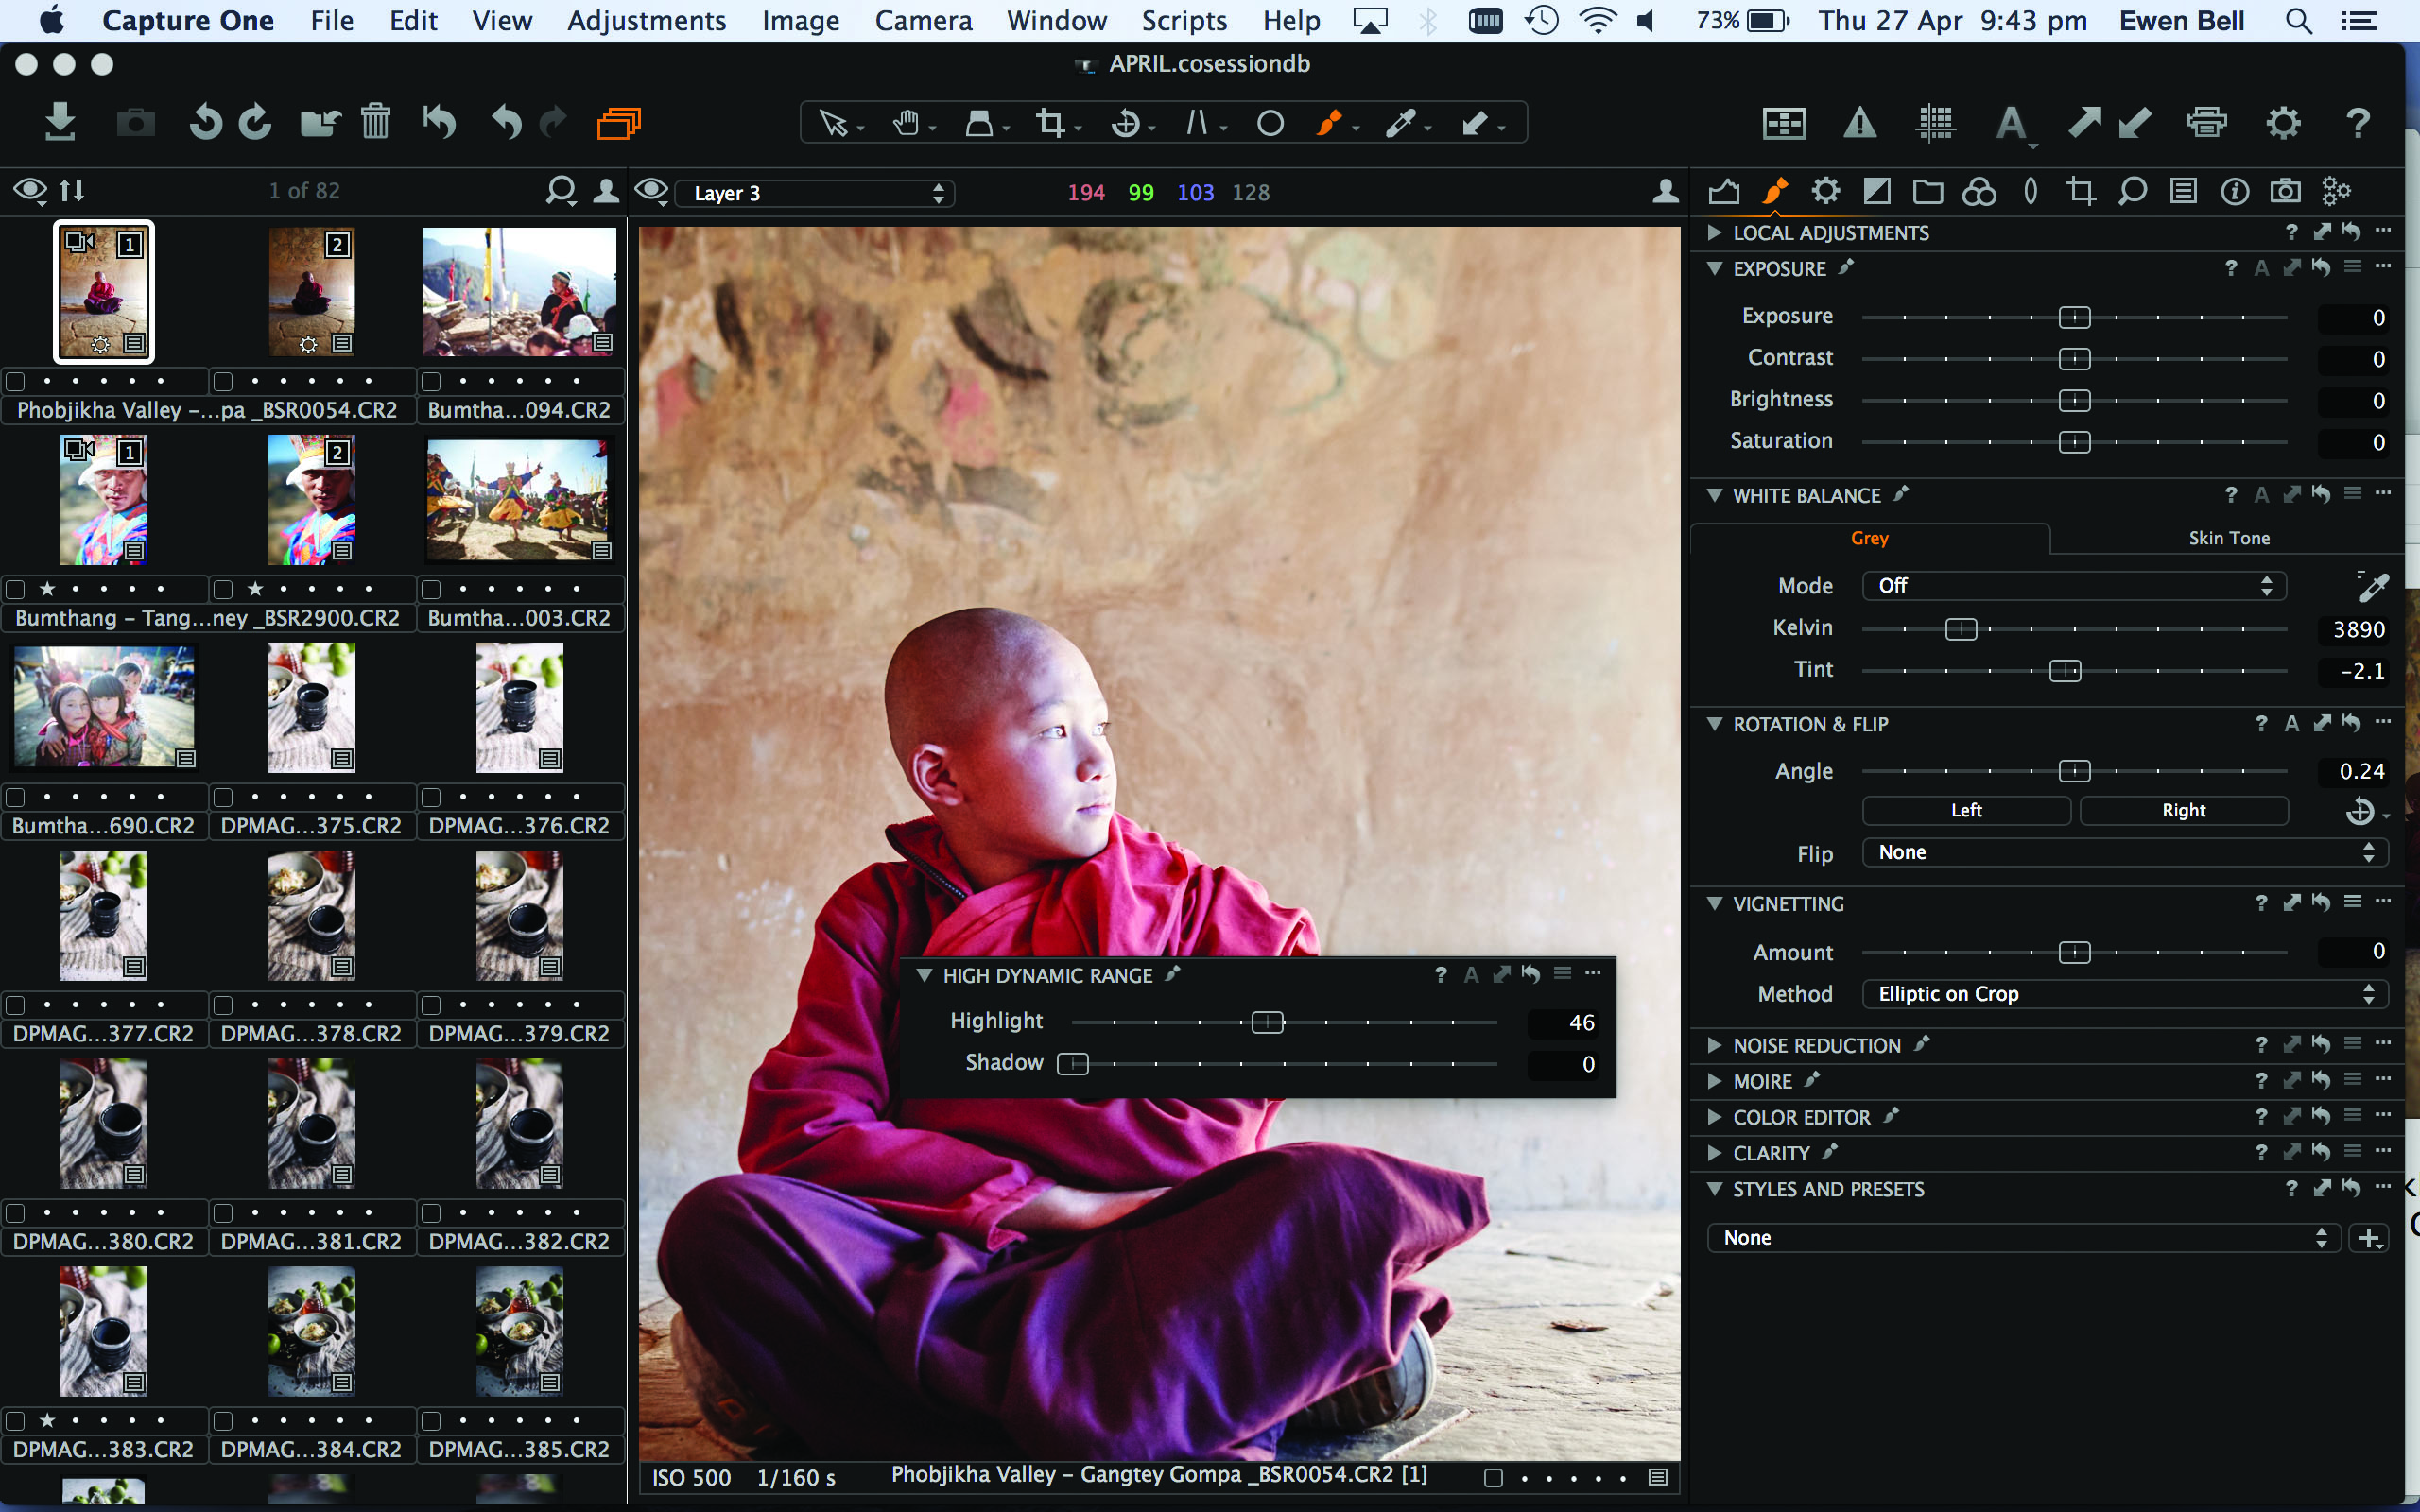
05 Watch the highlights Highlight blowouts are less critical in the soft parts of the frame, but problematic in areas where the subject is sharp. Using the High Dynamic Range controls applied to an adjustment layer, restore detail where needed.
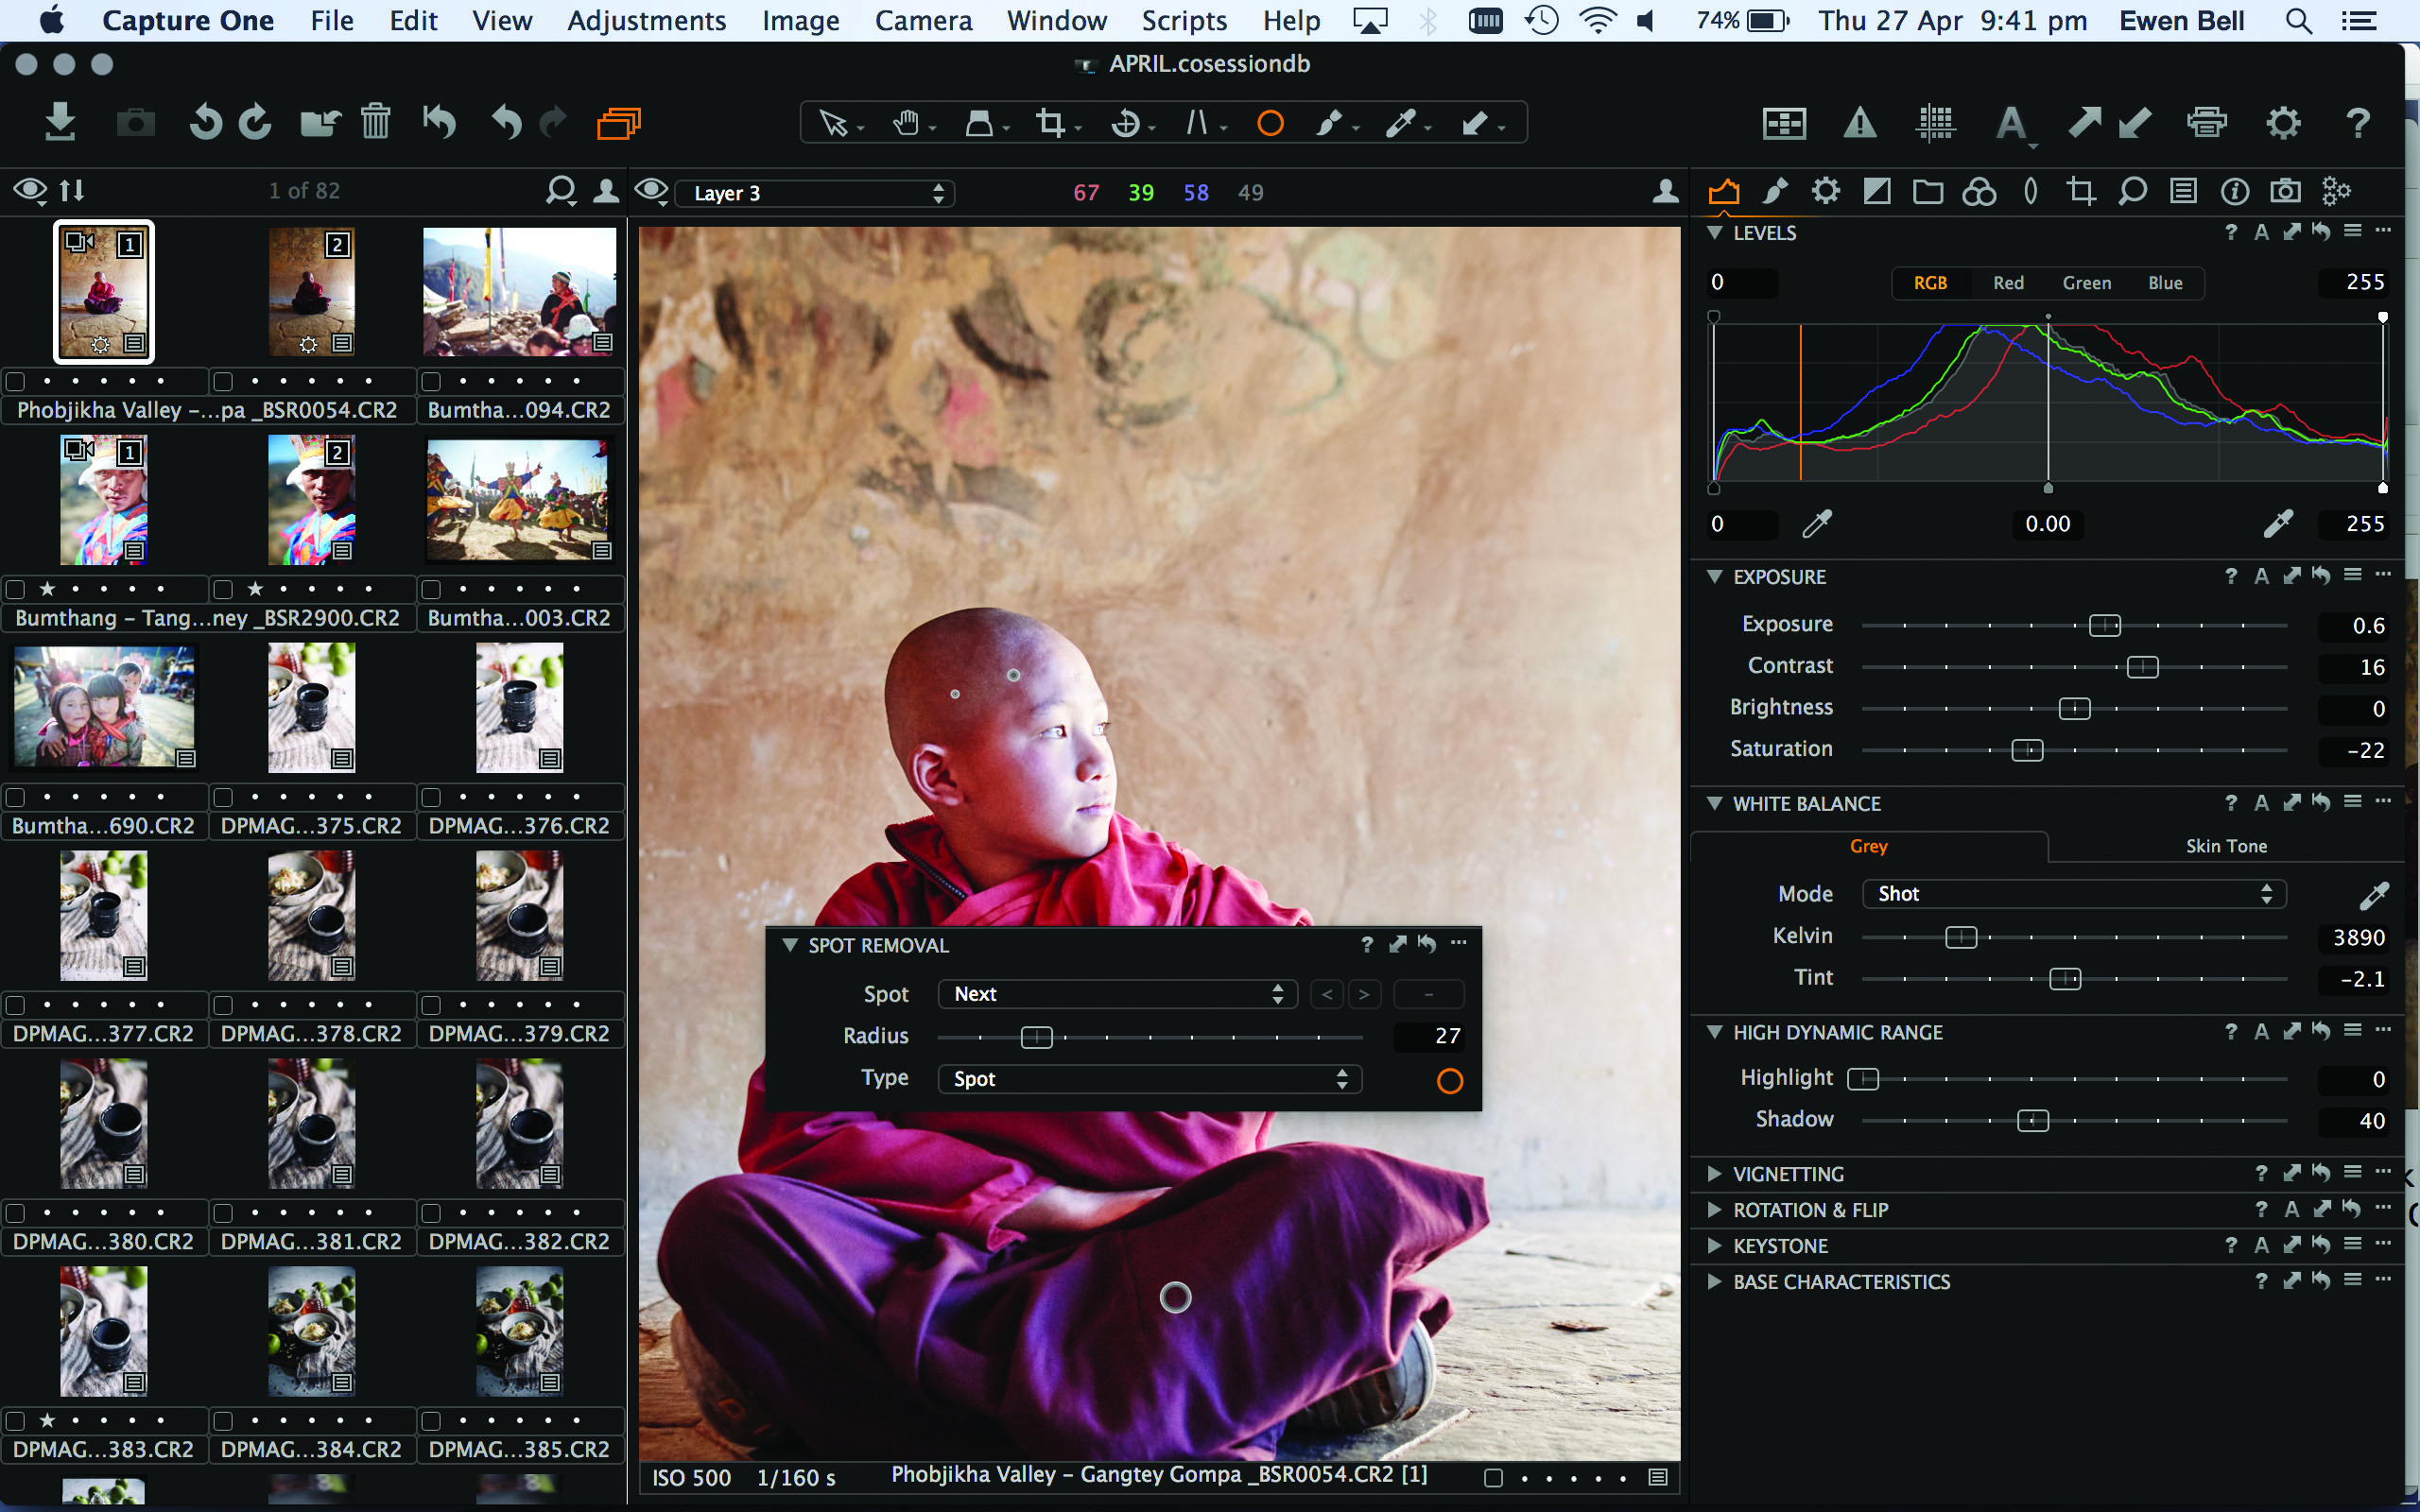
06 Remove marks Any small blemishes on the skin or on clothing will be more pronounced when there’s a limited amount of sharp detail in the frame. Use the Spot Removal tool to quickly tidy up distracting or untidy marks.
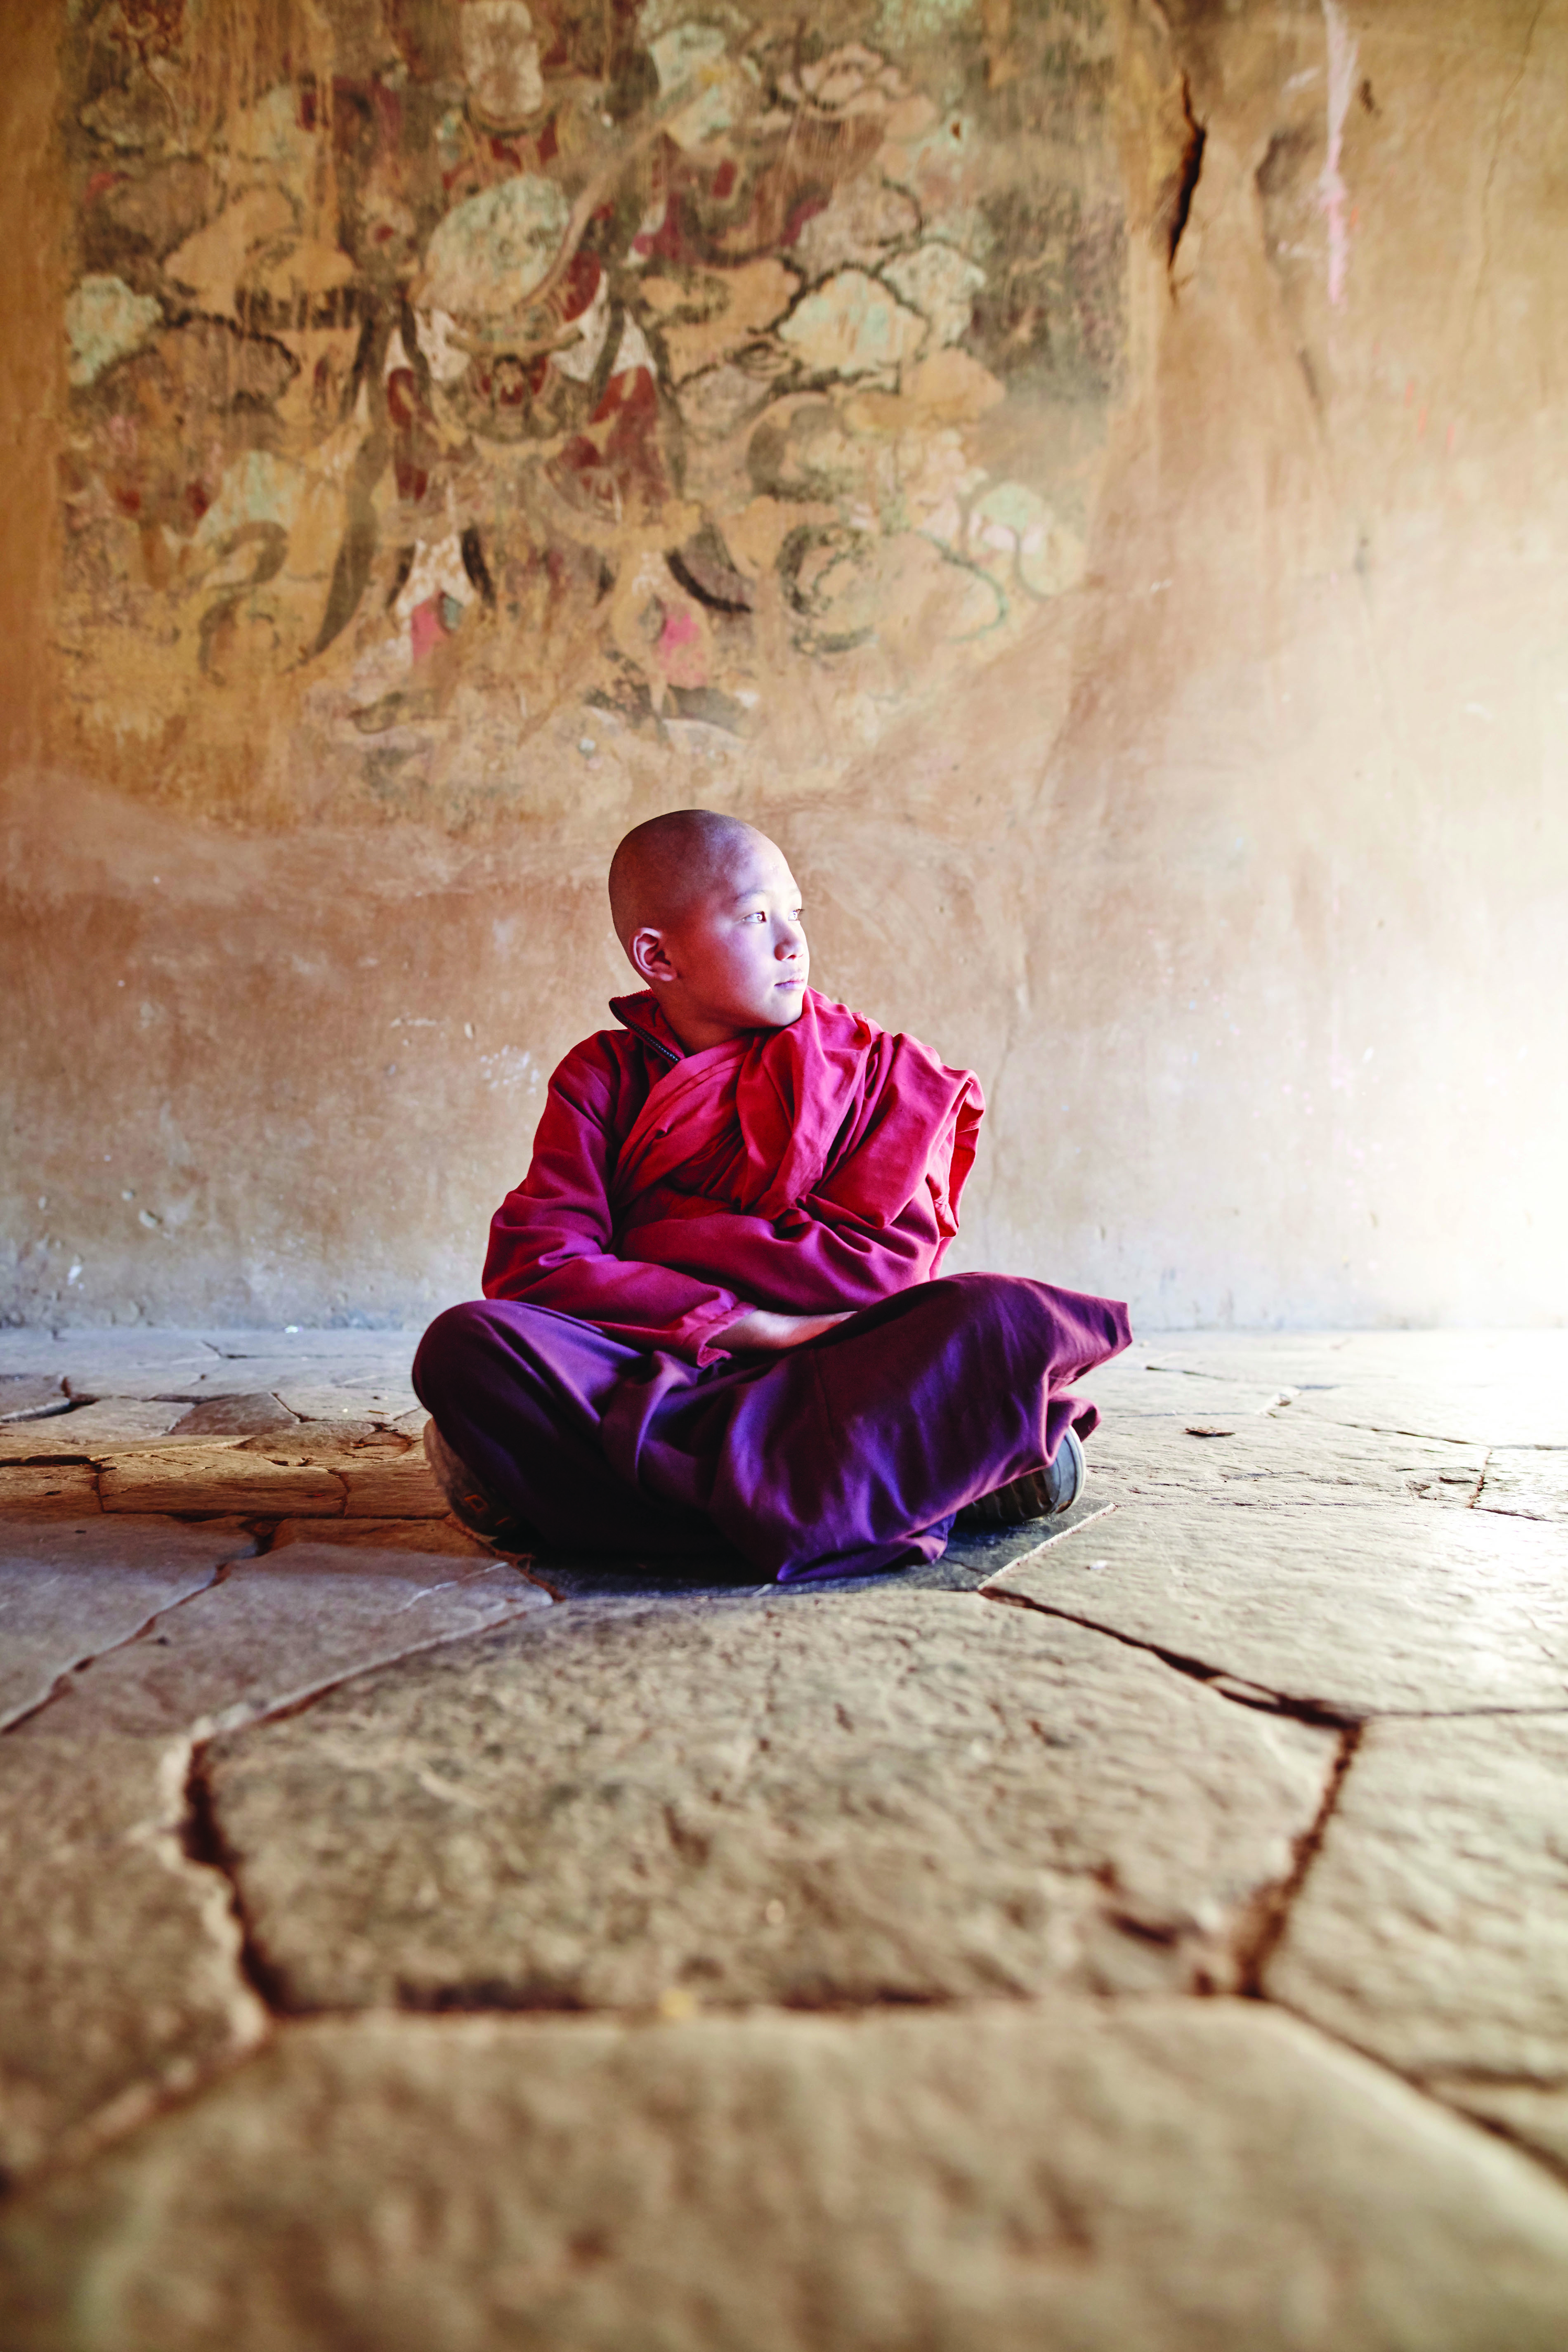
Novice Monk in Bhutan (after)
The final image is gently balanced and the angled light across the frame adds to the story, with the eyeline of the novice monk directed across the scene and into the light
Digital Photographer is the ultimate monthly photography magazine for enthusiasts and pros in today’s digital marketplace.
Every issue readers are treated to interviews with leading expert photographers, cutting-edge imagery, practical shooting advice and the very latest high-end digital news and equipment reviews. The team includes seasoned journalists and passionate photographers such as the Editor Peter Fenech, who are well positioned to bring you authoritative reviews and tutorials on cameras, lenses, lighting, gimbals and more.
Whether you’re a part-time amateur or a full-time pro, Digital Photographer aims to challenge, motivate and inspire you to take your best shot and get the most out of your kit, whether you’re a hobbyist or a seasoned shooter.

