The standard set-up for still-life or close up photography dictates that the camera needs to be close to your subject. While this enables the camera sensor to capture every minute detail, getting the lighting right at close range can be a real issue. Shining light directly at the subject can result in burnt-out highlights, for example, along with harsh shadows.
The easiest solution to avoid these lighting issues is to diffuse the light. A great way to do this is to use a light tent . There are lots of commercially available versions available (such as the Orangemonkie Foldio3, and the Lastolite ePhotomaker). However, it is quite straightforward to make one yourself – using the step by step instructions below.
• Best camera for product photography
Just a few materials are needed: a cardboard box, some white fabric and an angle-poise lamp. You’ll also need some tape, white paper, and a pair of scissors.
So with everything at the ready, here’s how to make your very own light tent.

1: Cut out the box
A square box is ideal, but don’t worry too much about the shape if you can fit what you want to shoot inside. Remove the top flaps, and cut large holes in three sides of the box.

2: Add an infinity curve
We now need a clean surface to rest our subject on. Create an infinity curve using white card, attached from the inner front to the inner top of the box to create a smooth sweep.

3: Create the diffusion panels
Cut out three pieces of fabric, just larger than the holes you cut in the box. Tape the first panel over the top of the box. Give the fabric a quick iron first to remove creases.

4: Add the side panels
Attach the remaining two panels to the sides of the box. You want to keep the opening at the front so that you can place objects inside, ready to be shot.
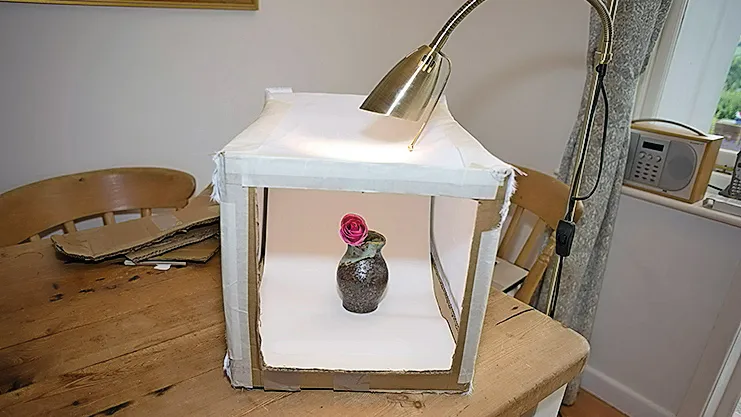
5. Test the tent with light
Place an object into the tent. With a simple light source like an angle-poise lamp, shine the light through the top. You should see a good even light across your subject.

6: Customize the lighting
A white backdrop creates a nice clean image, but you can pop in some colored paper over the infinity curve to vary your shots. You can also add lamps through the sides.
More ideas and hacks:
Photo hack: make your own speedlight softbox
Photo hack: make your own flashgun clamp
Photo hack: make your own beanbag camera support
The best light tents and still life tables
The best photography tips videos
Free lensing: get the Lensbaby look and take macro shots with a standard lens
Create colorful cross-polarization effects

