Use pop art to pep up your portraits with Photoshop
Bored of so-so head-and-shoulders shots? Mimic screen-printing techniques for a timelessly trendy Andy Warhol look!
The best camera deals, reviews, product advice, and unmissable photography news, direct to your inbox!
You are now subscribed
Your newsletter sign-up was successful
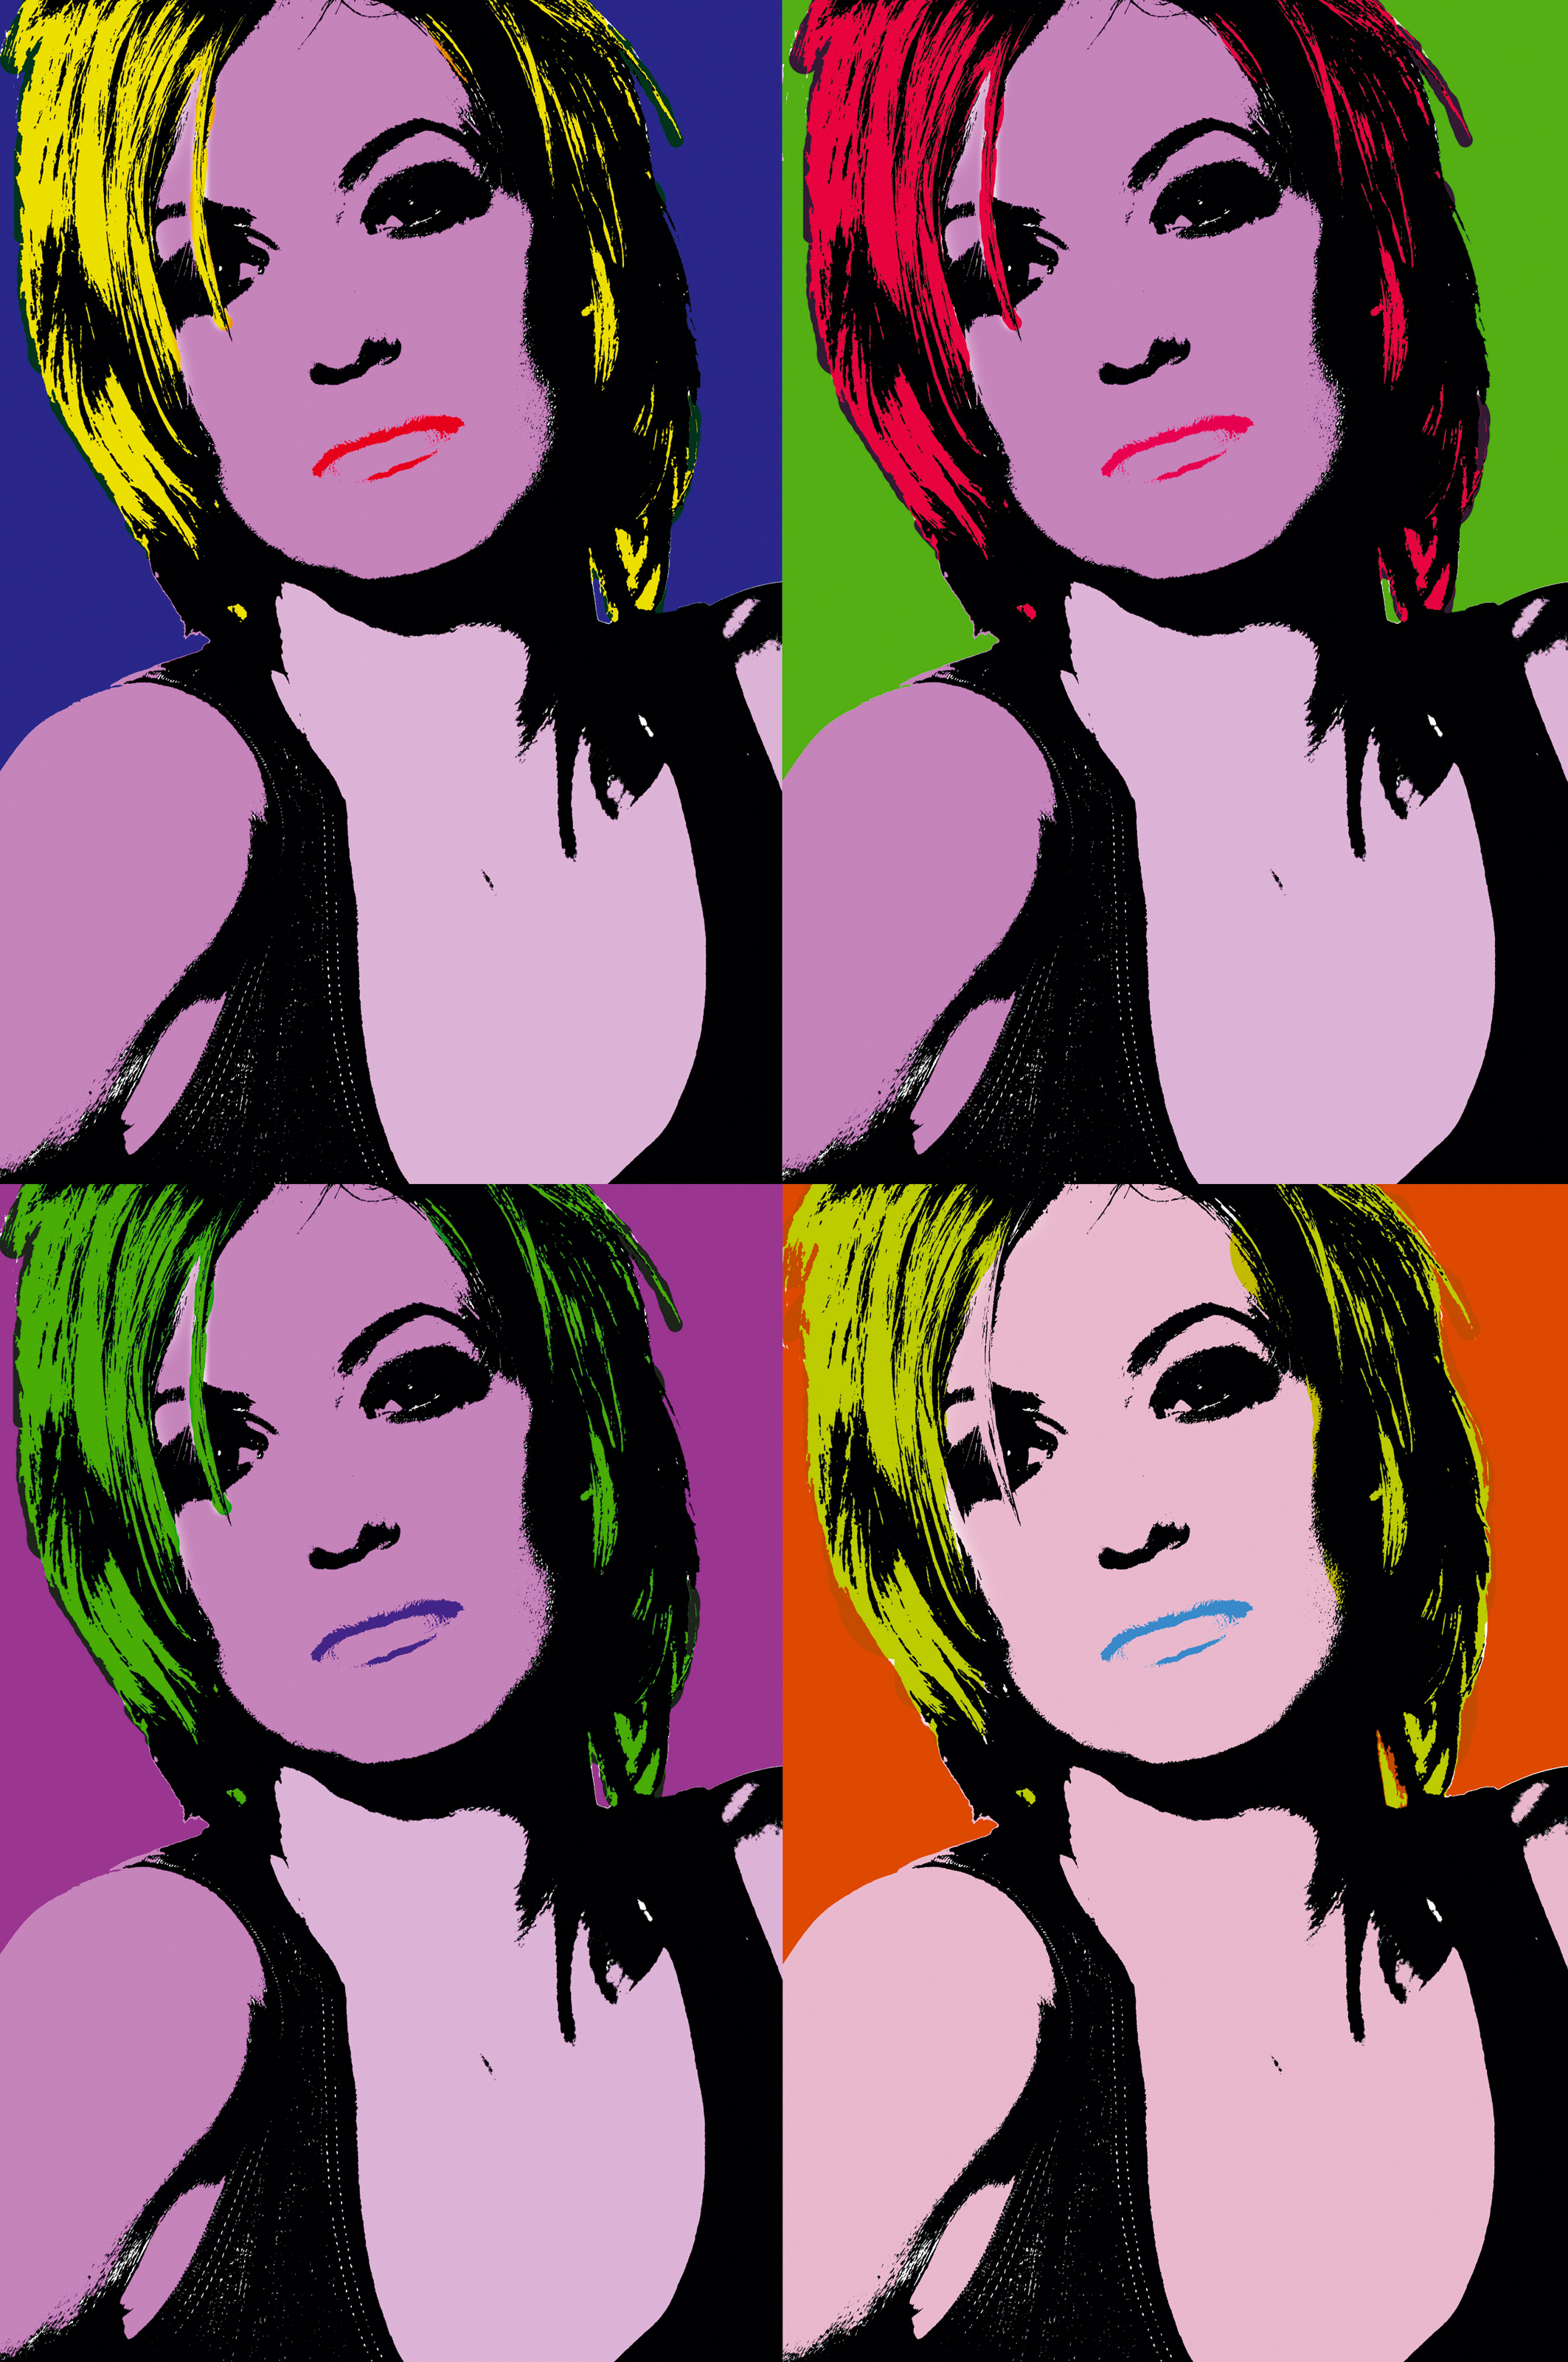
Artist Andy Warhol’s brightly colored images were created by cutting holes in paper to create stencils that revealed various parts of a monochrome photo. He then applied paint to the exposed sections of the photo and gradually built up an image made from different blocks of color.
By mixing photography and old-school artistic techniques such as screen-printing, Warhol created distinctive and colorful works that caught the imagination of the art world. His distinctive style was applied to all sorts of subjects, from tins of soup to portraits of Marilyn Monroe. He then increased the visual impact of his portraits by creating differently colored versions of the image and mounting them together on the same canvas.
You can use Warhol’s trick of combining photos with other media to create your own high-impact pop art pictures. Photoshop CC and Photoshop Elements have all the tools you need to mimic this creative screen-printing technique.
However, you won’t just slap a few filters onto a photo. Warhol’s images have a rough-and-ready look because of the way the paint was splurged through holes cut in paper. Here we’ll use Photoshop Elements’ Adjustment Layers and image editing tools to recreate this effect, and learn a quick way to re-color your pop art portrait to create multiple versions in minutes.
1: Delete the white background
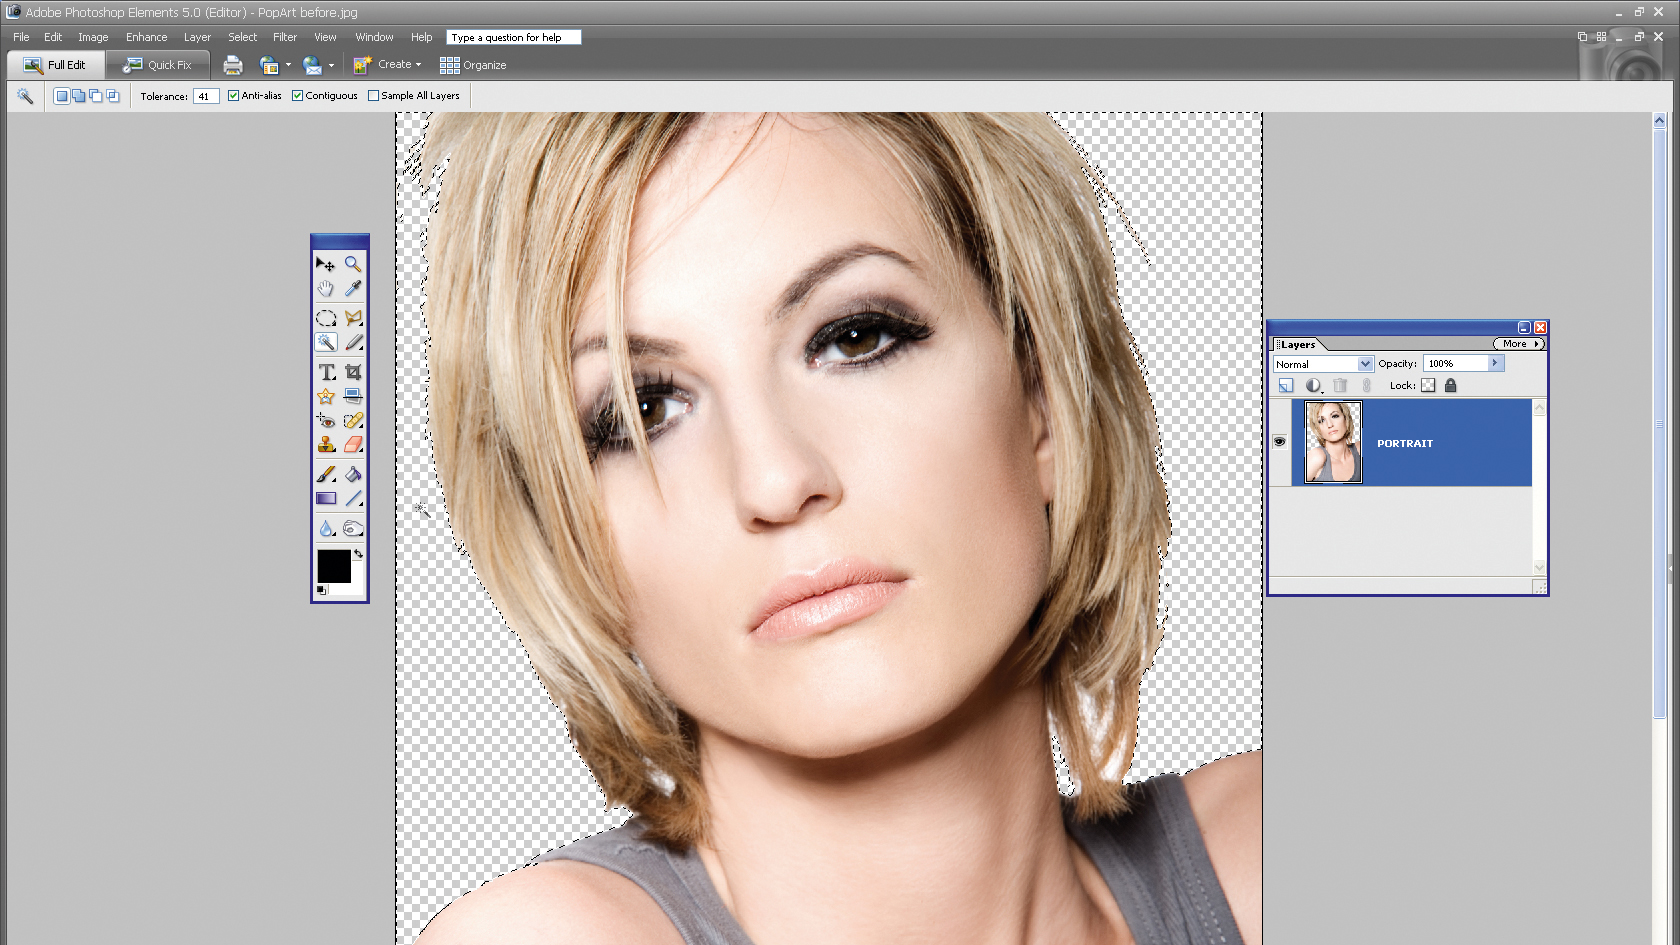
Open your headshot and double-click on the Background Layer thumbnail in the Layers palette to unlock it. Label the layer ‘Portrait’. Select the Magic Wand tool and set the Tolerance to 41. Hold Shift and click on the different sections of white background to select them, and then choose Edit>Cut to delete the selection.
2: Create a blue background
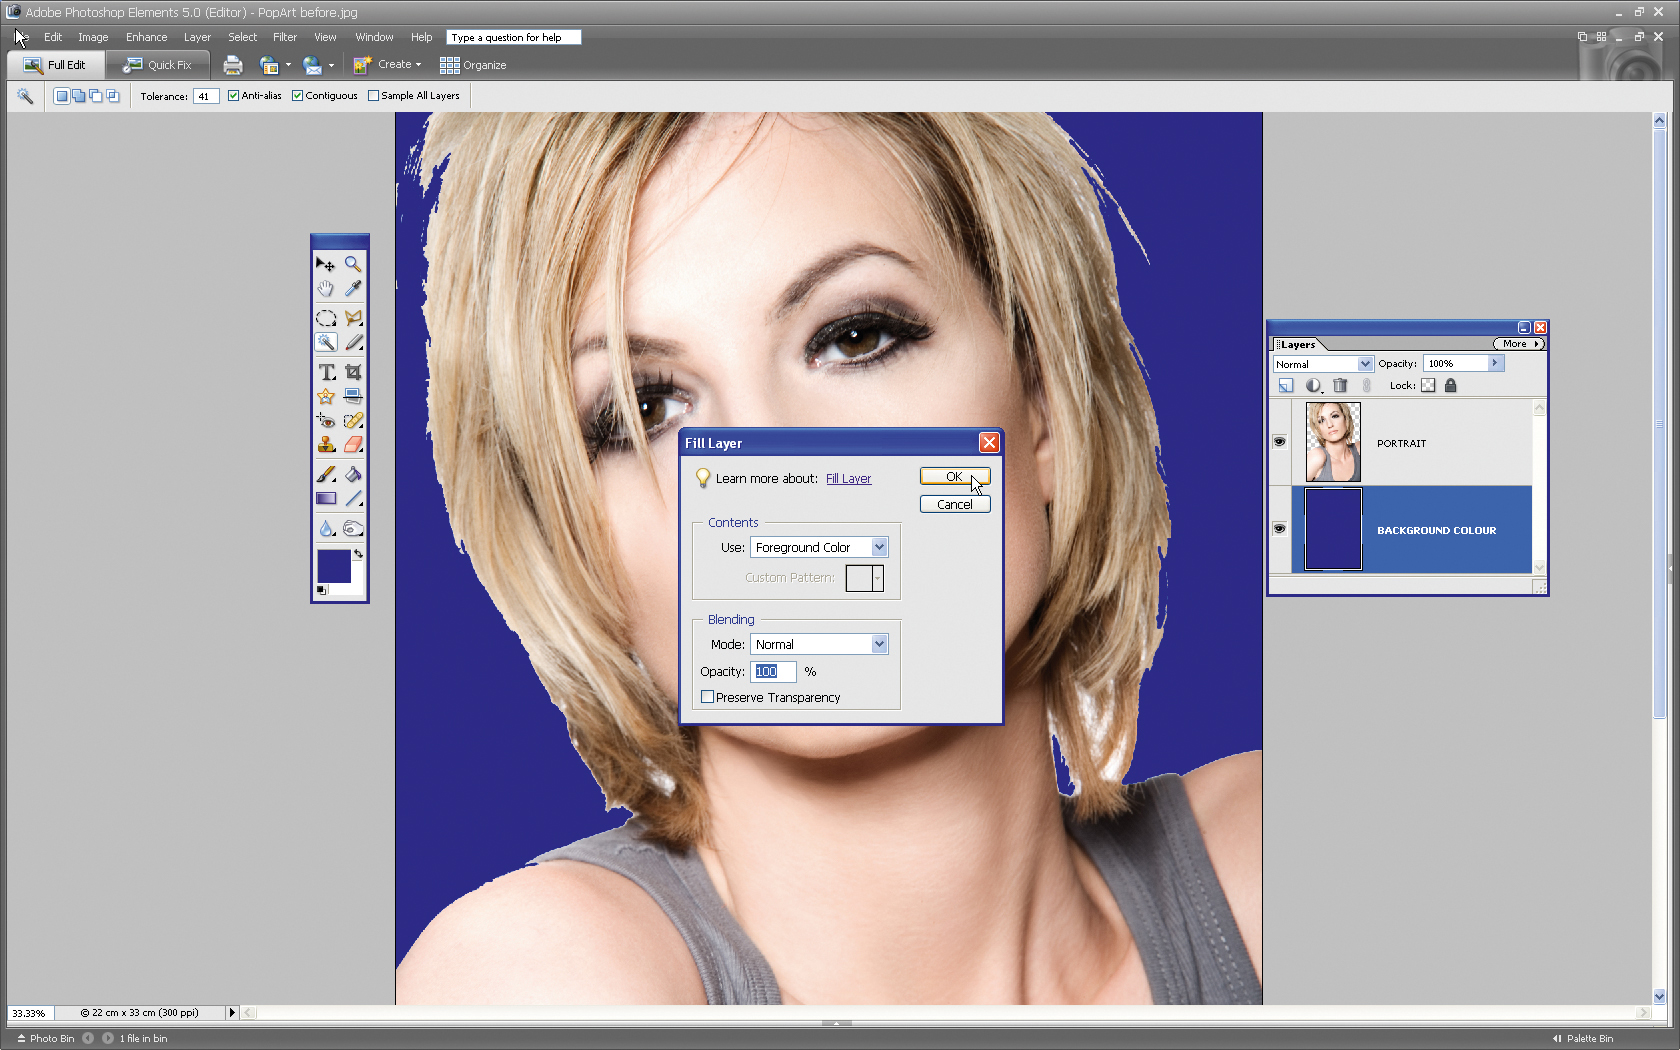
Press Ctrl+D to deselect the selection marquee. Click on the Create A New Layer icon at the top of the Layers palette. Label the layer ‘Background Color’ before dragging the Background Color layer’s thumbnail below the Portrait layer. Click on the toolbar’s Set Foreground Color icon and choose a blue. Choose Edit>FillLayer>ForegroundColor.
3: Go black and white
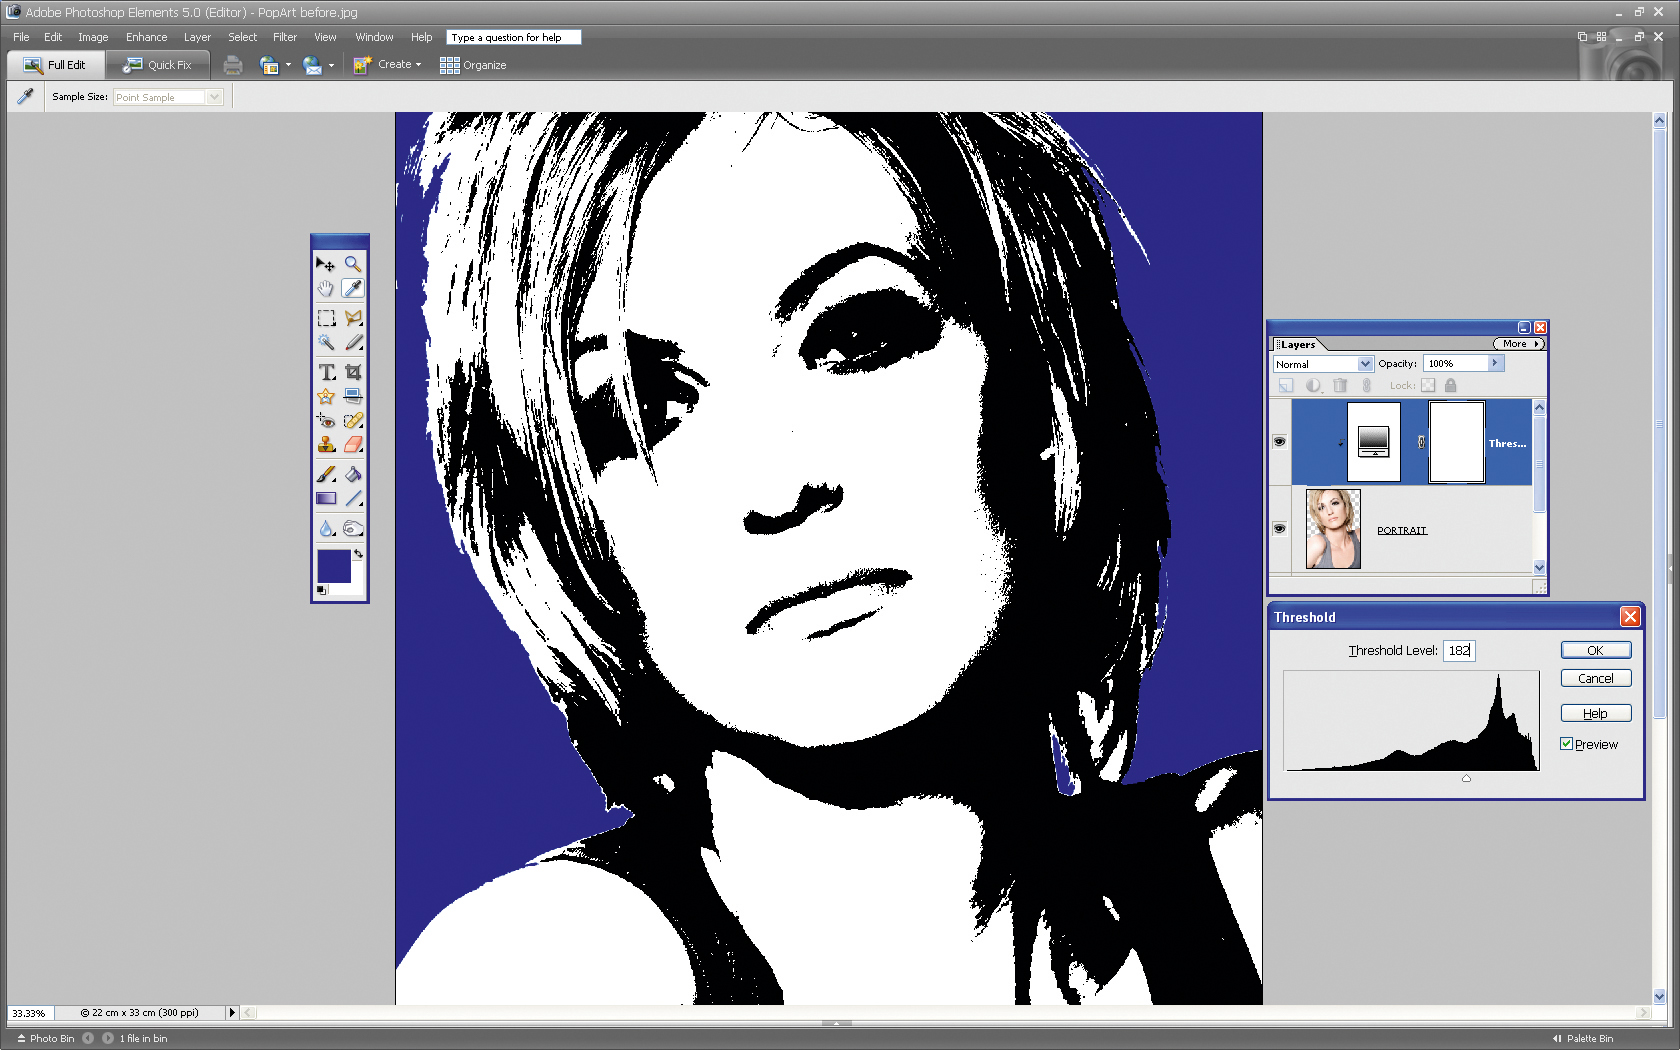
Go to Layer>NewAdjustmentLayer and choose Threshold. Tick the Group With Previous Layer box. This adds a new Adjustment Layer to the Layers palette. In the Threshold window set the Threshold Level to 182 to create a simplified black-and-white version of your original source image. Click OK.
The best camera deals, reviews, product advice, and unmissable photography news, direct to your inbox!
4: Inject some color
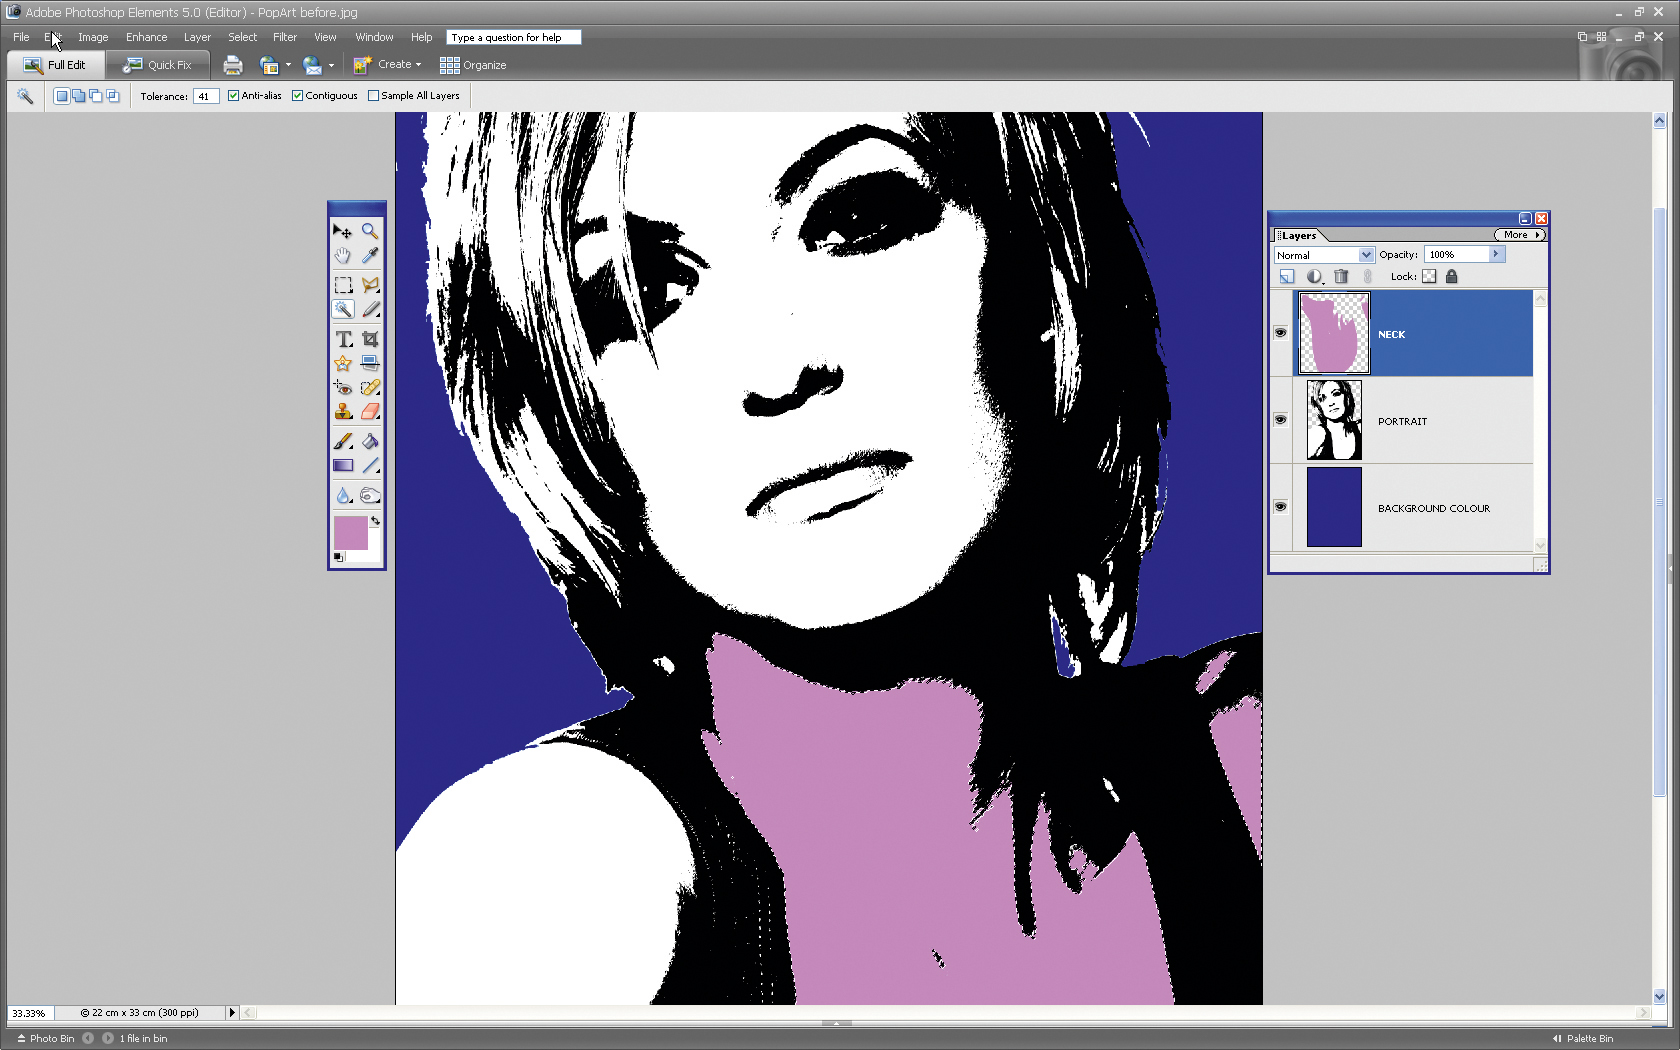
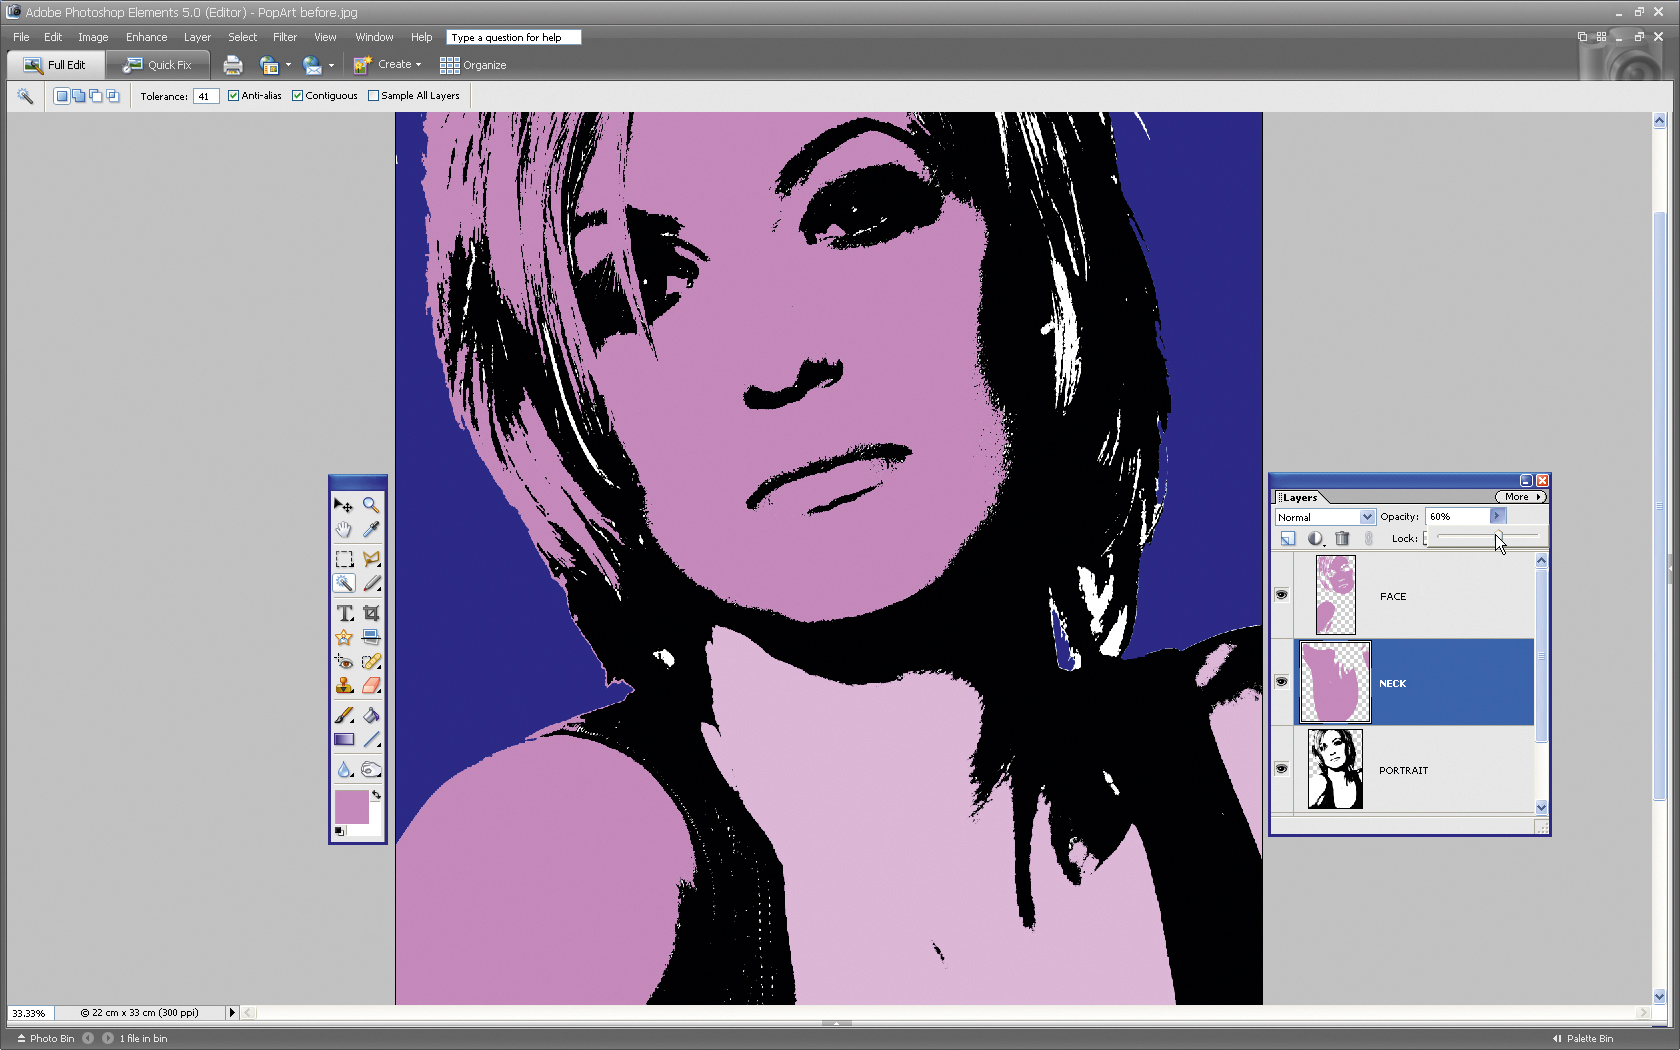
To apply the new Adjustment Layer to the Portrait layer, go to Layer>MergeDown. Grab the Magic Wand tool and Shift-click to select the white parts of the subject’s neck and right shoulder. Click the Create A New Layer icon and label it ‘Neck’. Now choose a pink foreground color and go to Edit>FillSelection. Choose Foreground Color and click OK.
5: Fill in the skin
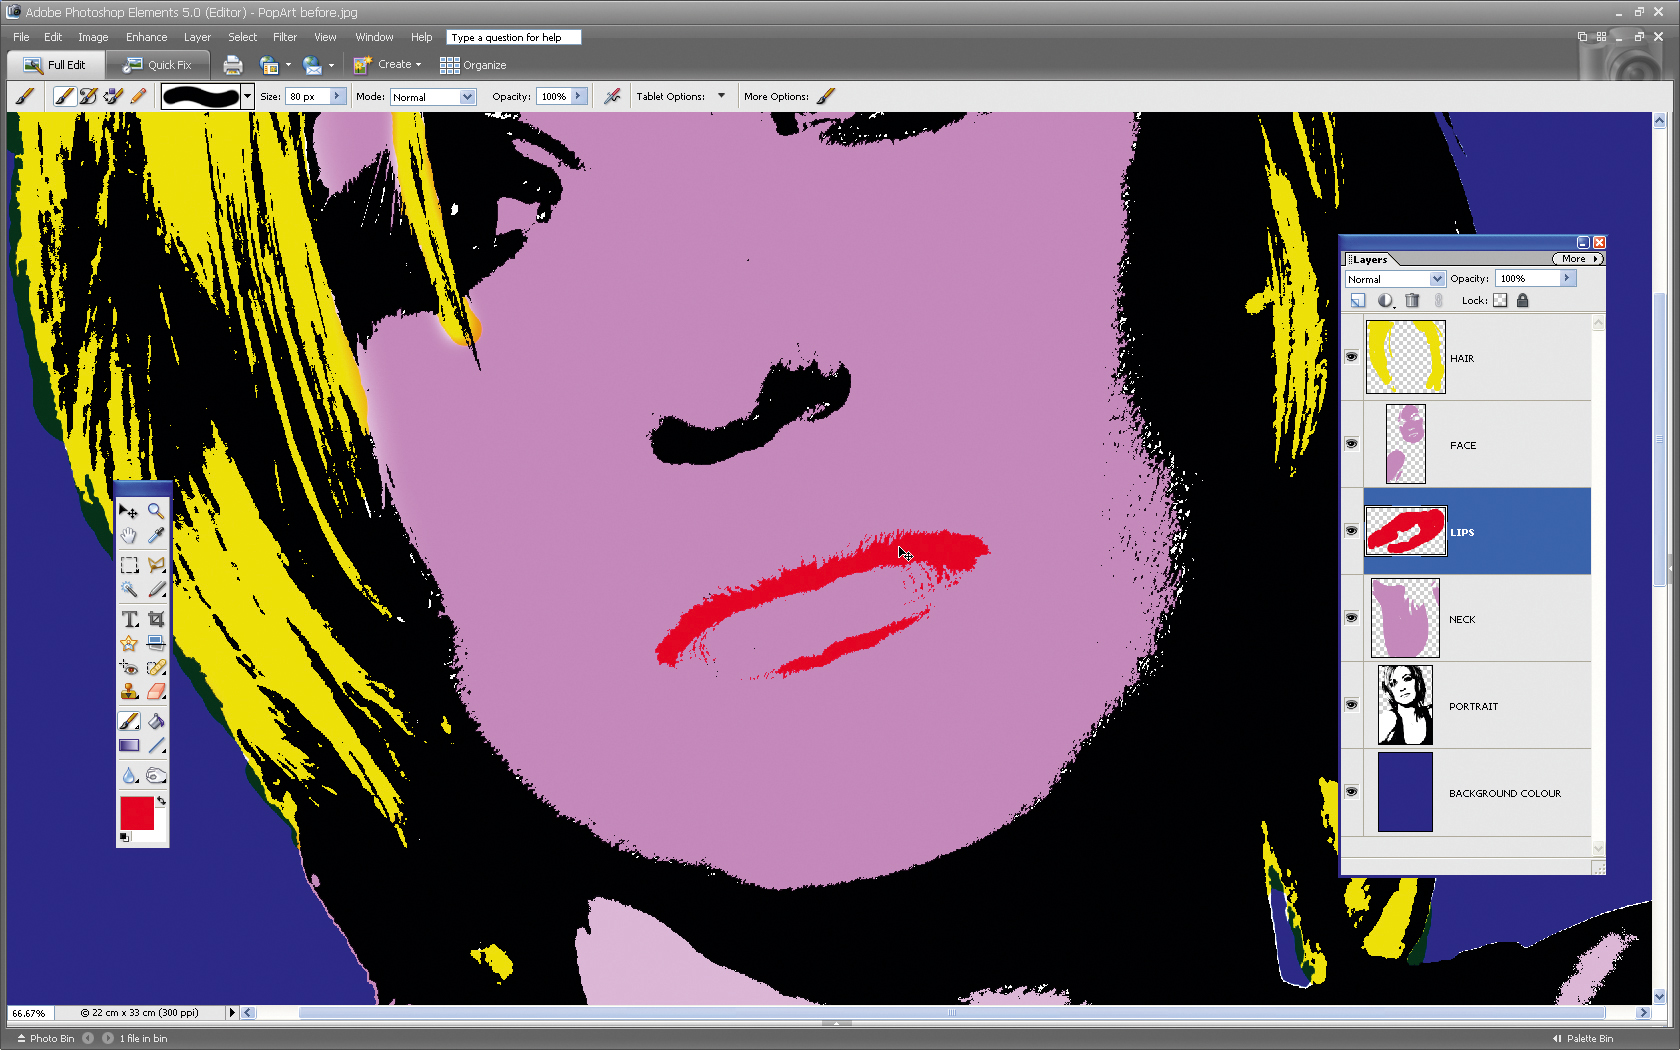
Create a new layer called ‘Face’. Target the black-and-white Portrait layer and use the Magic Wand tool to select the white parts of the face and the rest of the subject’s skin. Go back to the Face layer and fill the selection with more pink (Edit>Fill). To create varying skin tones, reduce the Opacity of the Neck layer to 65%.
6: Take care of the hair
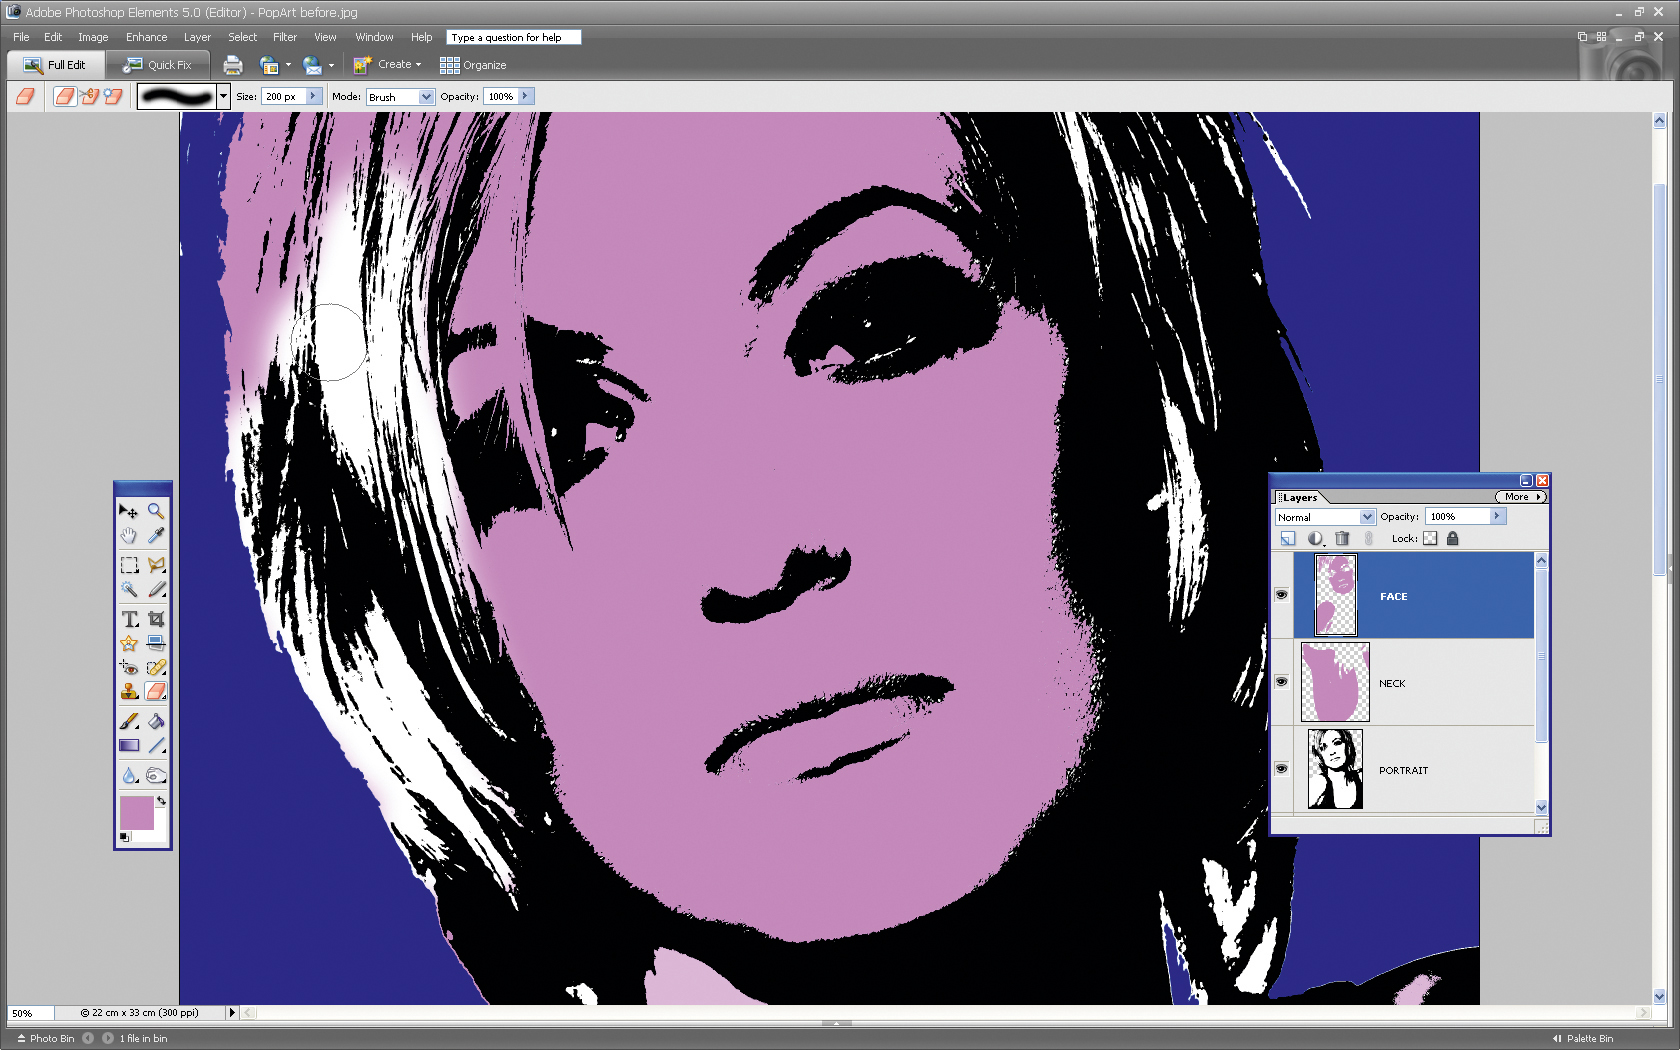
In order to stop the hair taking on the same color as the skin, select the Eraser tool. Click on the Show Selected Brush Presets icon in the Options bar and choose a soft-edged brush with a diameter of 200 pixels. Target the Face layer and spray out any pink that’s overlapping with the hair.
7: Paint in a new look
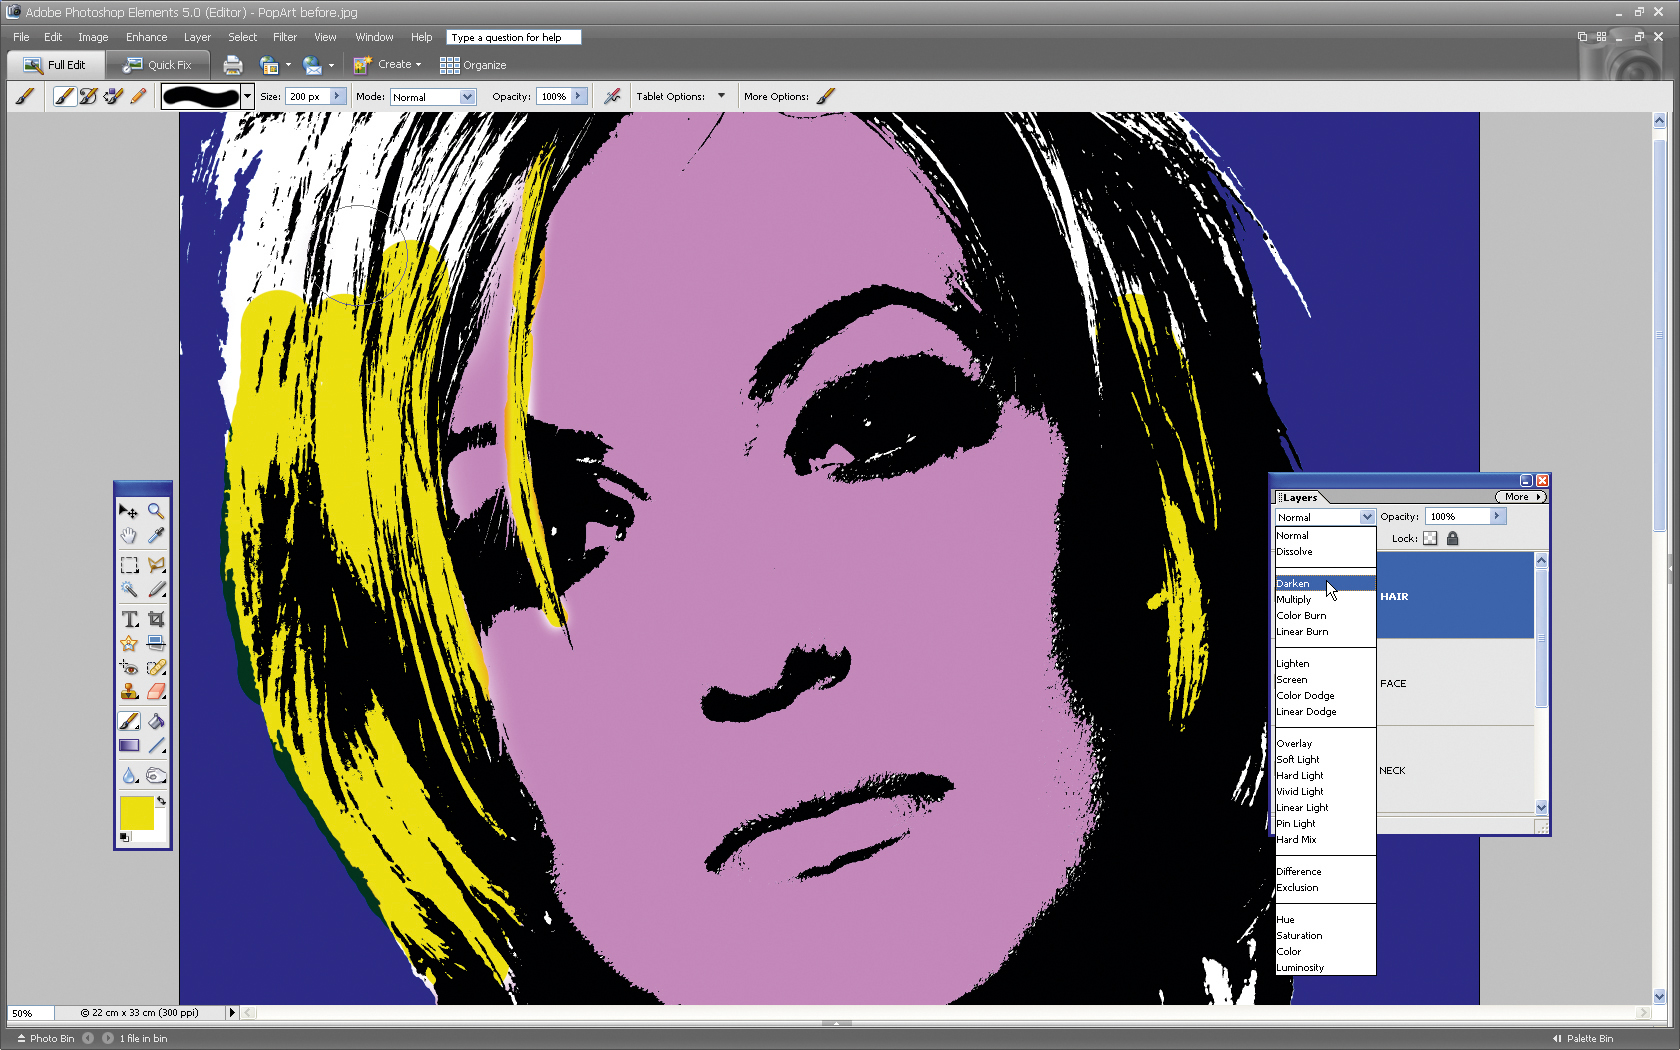
Create a new layer called ‘Hair’. Select the Brush tool and choose a strong yellow foreground color. Set the Hair layer’s Blending Mode to Darken so you can paint yellow into the white parts of the Hair layer. Don’t worry if the yellow bleeds into the blue and creates green splodges. This mimics what happens with genuine screen prints.
8: Luscious lips
Click on the Create A New Layer icon and label the layer ‘Lips’. Place the Lips layer below the Face layer in the Layers palette. Choose a bright red foreground color. Use the Brush tool to spray over the mouth and add striking red lipstick to the shot.
9: Create a new version
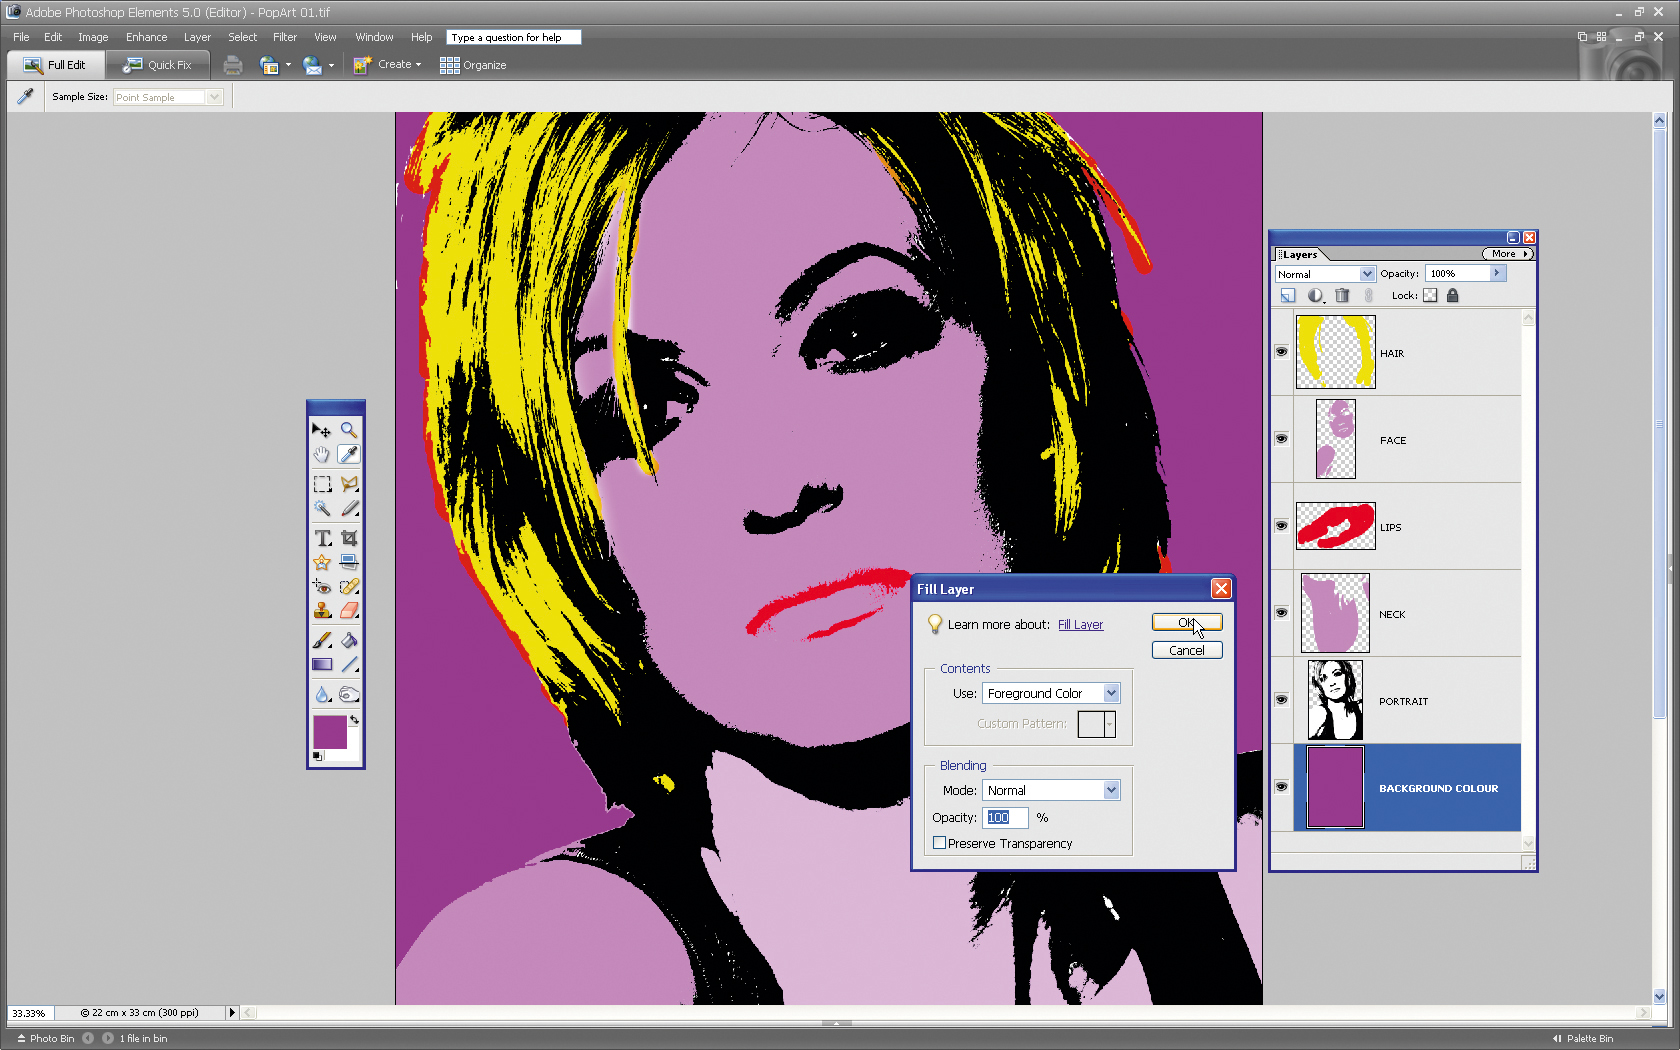
Andy Warhol was able to use the same stencils to create multiple versions of his pop art prints. You can do a similar job with your layered document. Go to File>SaveAs and call it PopArt01.psd. Target the blue Background layer and fill it with a new foreground color (Edit>Fill).
10: Change the color hue
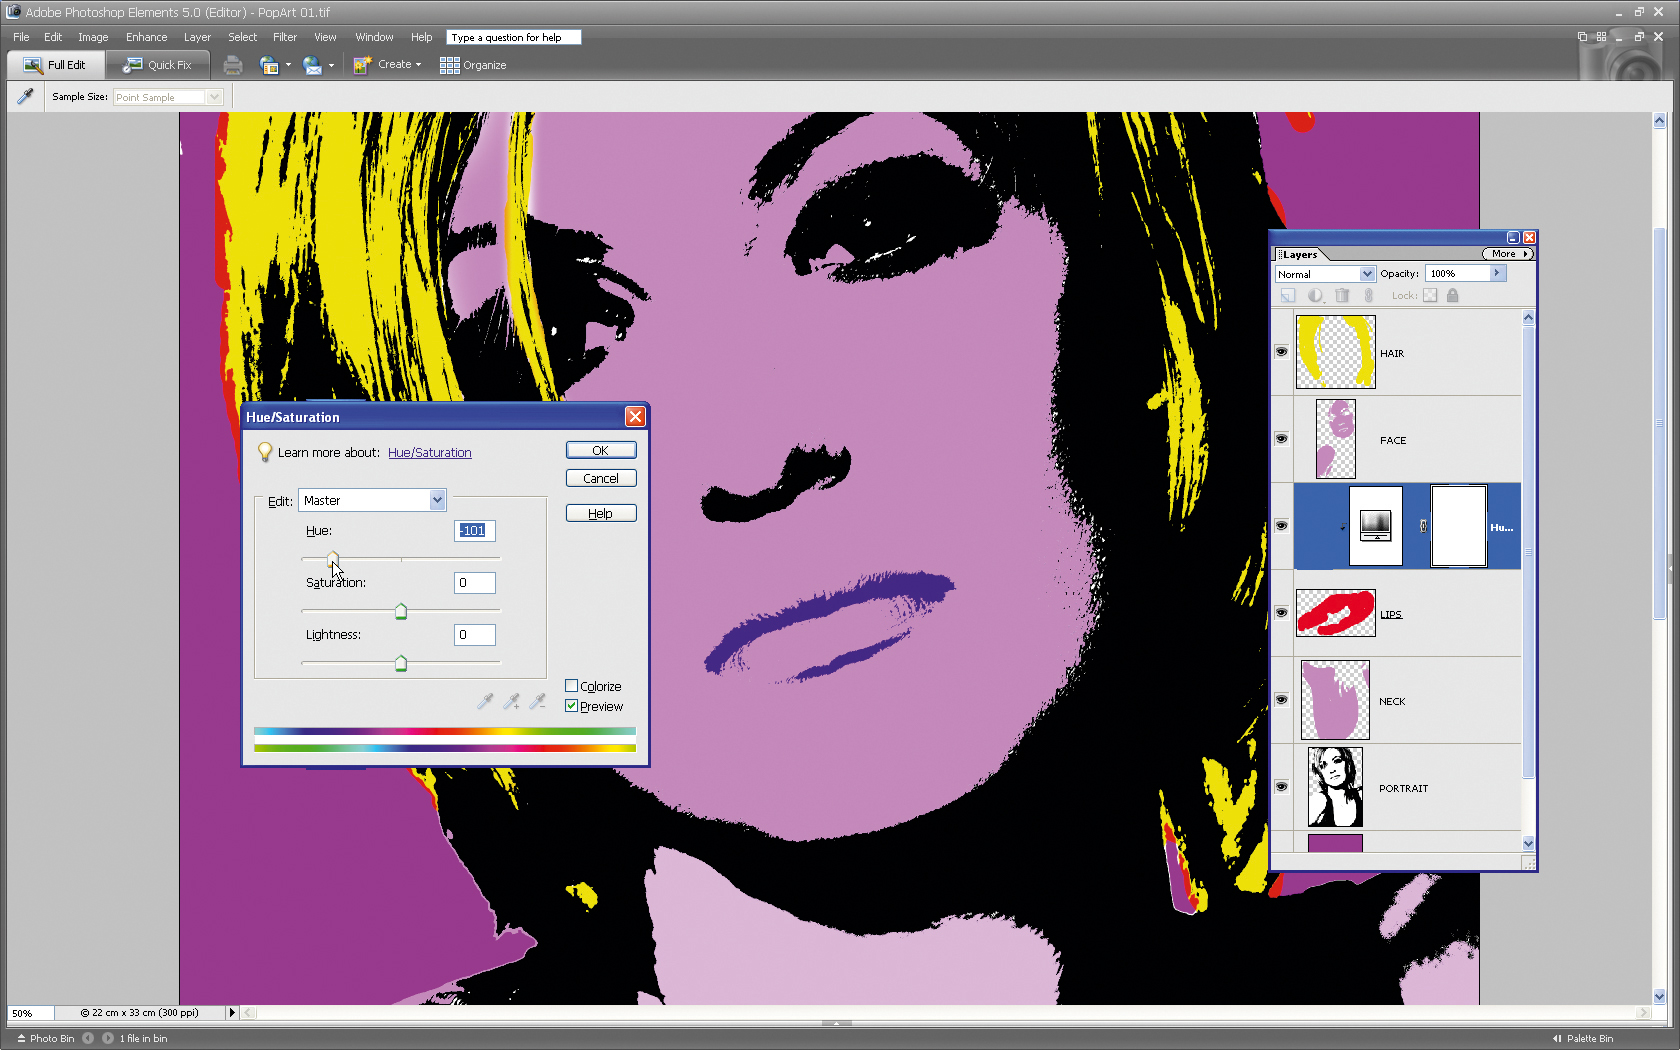
Now target the Lips layer. Go to Layer>New AdjustmentLayer>Hue/Saturation. Tick the Group With Previous Layer box and click OK. In the Hue/Saturation window, drag the Hue slider to -101 to turn the red lips blue. This is an extremely quick
way of changing a layer’s color.
11: Hair today...
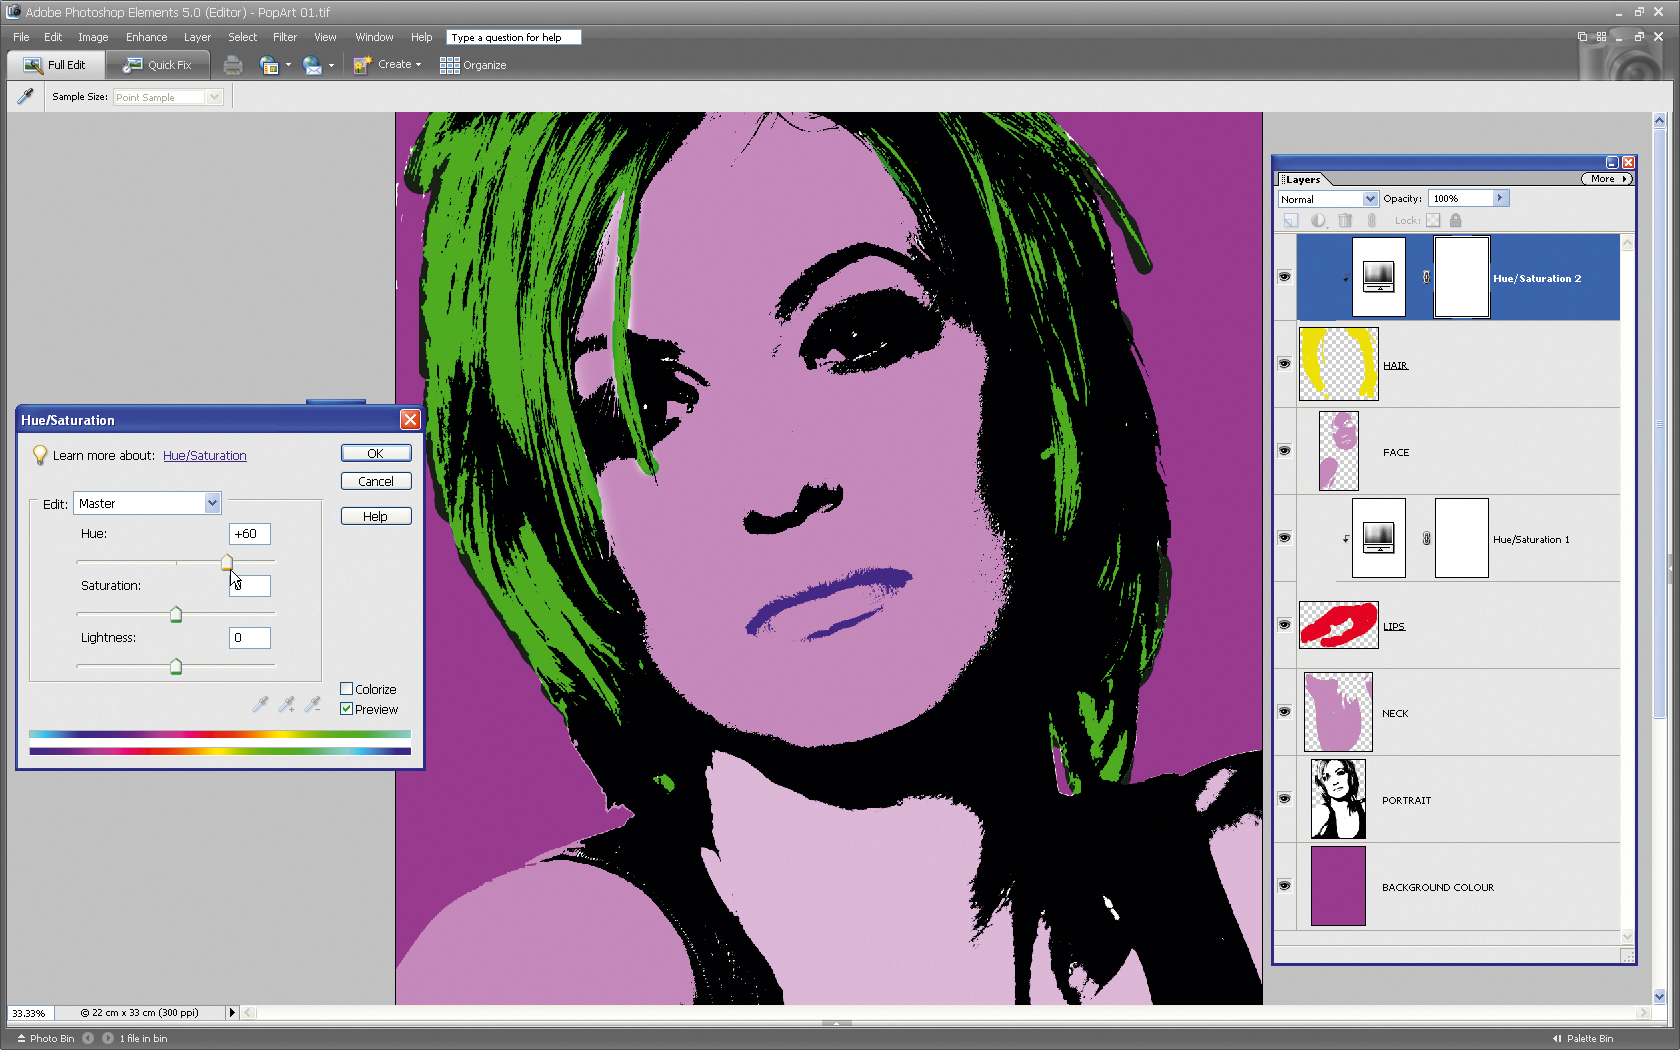
Use the Hue/Saturation Adjustment Layer technique to turn your yellow hair green. Clashing color schemes fit perfectly with the 1960s pop art style. Save your second image as PopArt02.psd. Create two more versions using the same techniques.
12: Four become one
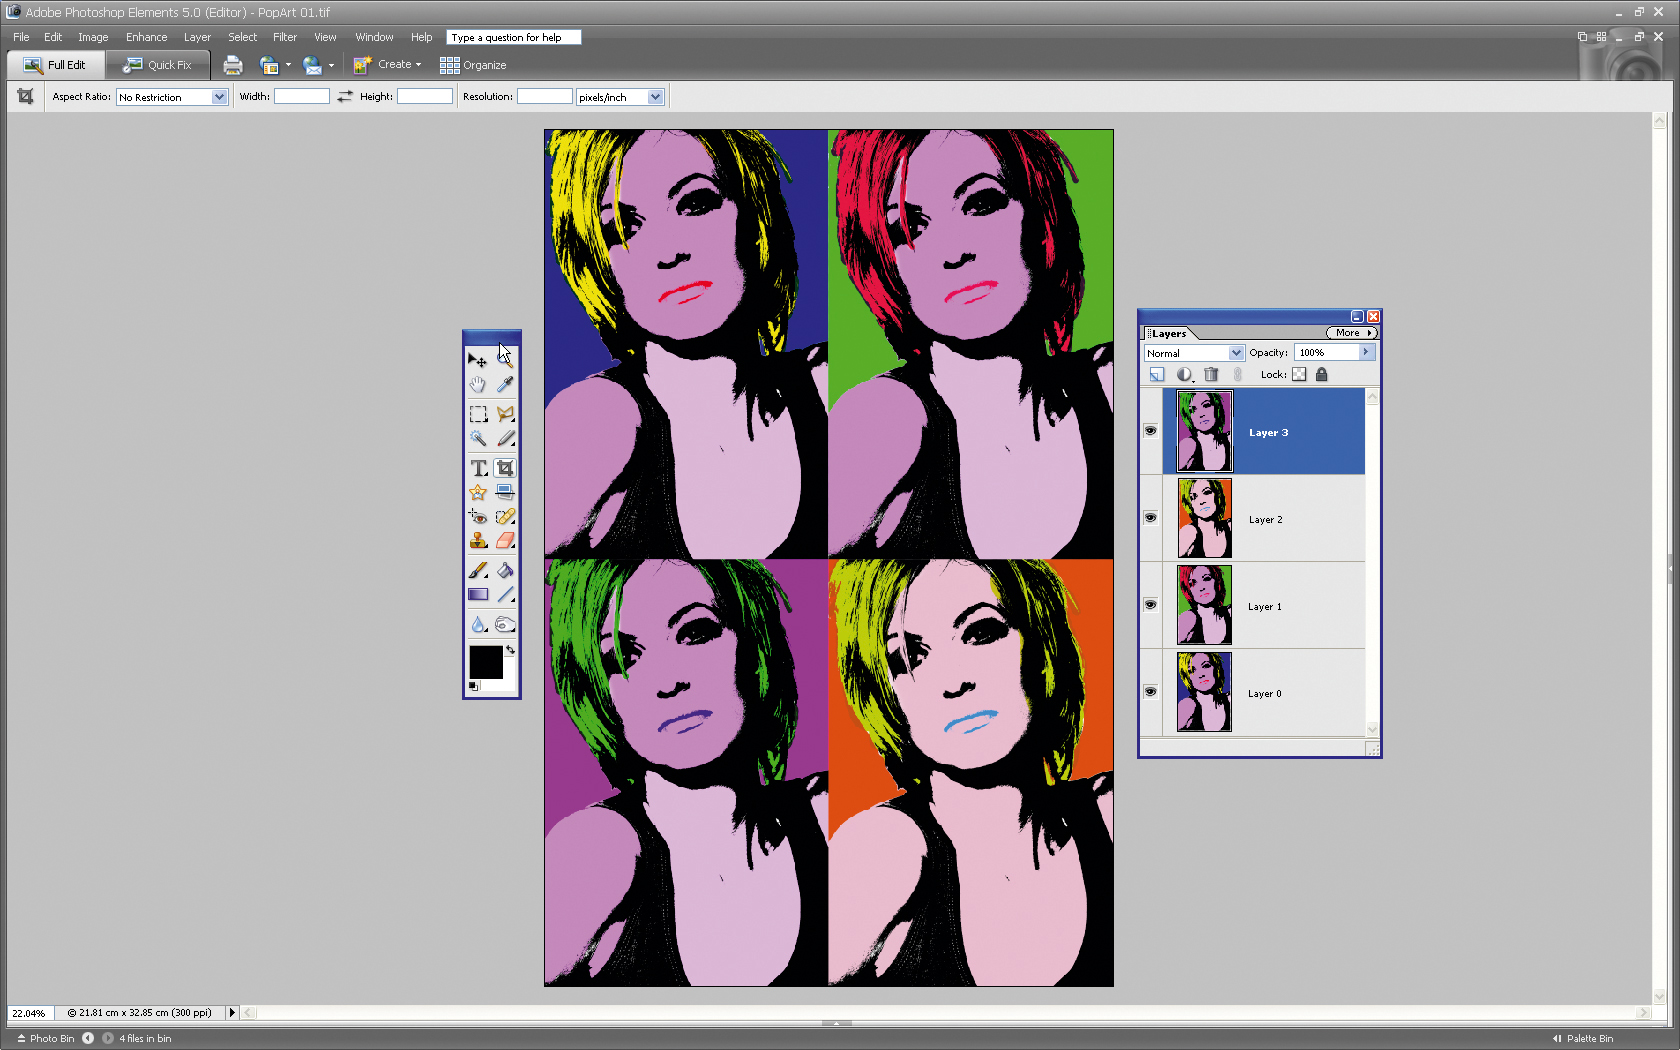
Open PopArt01.psd and go to Layer>Flatten Image. Select Image>Resize>Scale and Click OK. In the Options bar, type a value of 50% and hit Return. Now use the Move tool to position the image at the top left. Repeat the process with the other versions. On each image choose Select>All then Edit>Copy before selecting Edit>Paste to paste them into PopArt01.
More Photoshop tutorials: 100 editing tips
George has been freelancing as a photo fixing and creative tutorial writer since 2002, working for award winning titles such as Digital Camera, PhotoPlus, N-Photo and Practical Photoshop. He's expert in communicating the ins and outs of Photoshop and Lightroom, as well as producing video production tutorials on Final Cut Pro and iMovie for magazines such as iCreate and Mac Format. He also produces regular and exclusive Photoshop CC tutorials for his YouTube channel.
