Scroll down for your cheat sheet
Depth of field can be a tricky thing to master, and if you're starting out in photography the concept can seem somewhat daunting.
If you only tend to use one single lens and you take the same kinds of images, you may appreciate what kinds of setting give you the results you want.
Once you start to capture different subjects, perhaps experimenting with different lenses or camera systems, you may soon get lost.
For example, a landscape image captured with a wide-angle lens at f/11 can look completely different from a close-up shot taken with a macro lens at the same aperture.
The main reason for this is that the camera-to-subject distance will be vastly different between the two images – and this is one of the key ways depth of field can be controlled.
In such a situation, you need to use a smaller aperture to get the same kind of results when shooting closely to the subjects as you would when shooting further away.
You also need to pay attention to exactly where the camera is focusing, as this makes difference too. The extent to which things appear sharp in front of and behind the subject varies as you focus to different distances.
• Photography cheat sheet: how to understand f stops

If you're trying to focus on a single subject further away, a long focal length combined with a wide aperture is a good idea as the combination will help you to isolate your subject from its surroundings.
A long focal length also makes it appear that you're getting much shallower depth of field than you do with a wide-angle lens. What's actually happening here is that you're capturing very little of the background, which is effectively being stretched out further than if you were using a wide-angle lens for the same composition, which in turn makes this area appear more blurred.
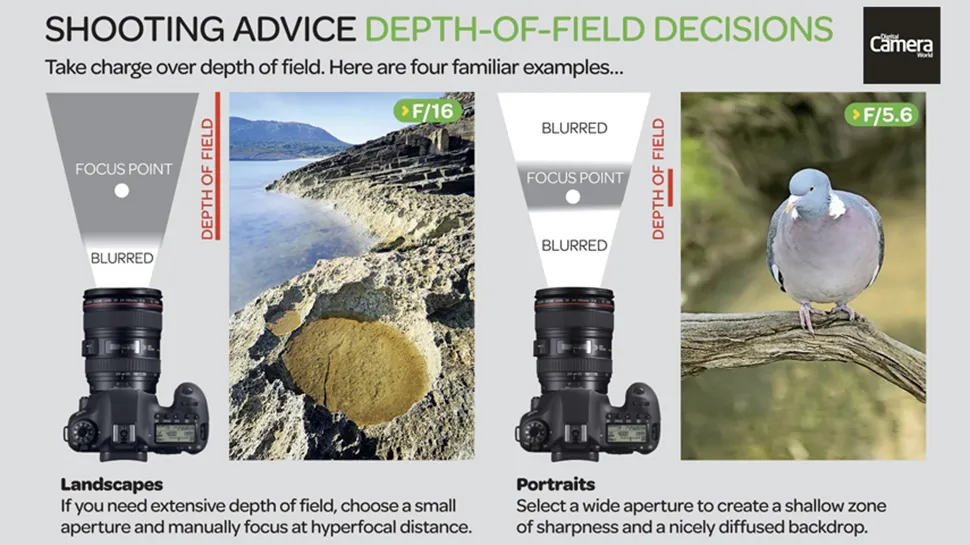
The four examples on the cheat sheet have been designed to give you pointers when you find yourself in common shooting situations. They show you the result of using a particular combination of aperture and focusing distance, relative to your subject.
Every shooting situation is different and so you shouldn't feel you need to stick to these ideas slavishly. But, if you're a little lost, it might give you the hand you need to end up with the image you want.
Read more
• More photography cheat sheets
• More photography tips

