Scroll down for your cheat sheet
Adjusting the aperture of your lens is one of the key ways in which we can influence the exposure triangle and affect how an image turns out. Aperture determines how much light can pass through a lens at a given shutter speed.
Most cameras allow you to adjust this through a control on the body, although some lenses have a physical ring around their barrel. Whichever way you perform this action, what happens is the same: several blades inside the lens move so that the opening creates changes in diameter.
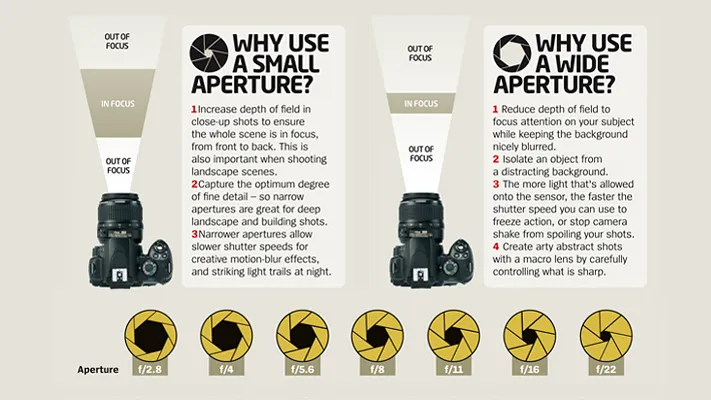
Wide, or large, apertures correspond with small f/ numbers, such as f/2.8 and f/4. Narrow, or small, apertures correspond with high f-numbers such as f/16 or f/22. Learn why small apertures have high f-numbers here.
When to use a wide or narrow aperture
There are several reasons why you may want to adjust this. First, as wide apertures let in more light than narrow ones, they're useful when you're photographing in low light. Here, typically want to want to let as much light in as possible, as you might struggle to get a fast enough shutter speed to get a sharp image.
Read more: Cheat sheet: Three key lessons for every new photographer
The reason for this is that shutter speed and aperture are directly related. As you make your aperture smaller, you need to have a longer shutter speed in order to let the same amount of light through to the sensor. Any more or any less and your image will be brighter or darker respectively.
If it helps, think of it like an hourglass. A small opening between the two chambers would only allow sand from the top to trickle down slowly. Make this opening wider, however, and it won't take as long for the same quantity of sand to pass through to the bottom.
You might also want to use a wider aperture when you want to isolate specific subjects from their backgrounds.
A portrait photographer, for example, would typically use a wide aperture of f/1.8 or f/2 so that all the focus can be placed on their subject at the expense of details in the background. This is known as having a 'shallow' depth of field.
Read more: Cheat sheet: Depth-of-field decisions
Meanwhile, a landscape photographer may use a much smaller aperture such as f/13 or f/16 so that everything in the frame is in focus, from the foreground right through to the background.
The cheat sheet below goes into more detail, so make sure to keep it handy – and keep us bookmarked so you can check back for more useful cheat sheets!


