Mist and fog offer potent opportunities for any landscape photographer. It’s a wonderful mood-setter, but the problem is, the conditions have to be just right.
Use a fog machine to add artificial mist to an outdoor scene
Time needed: 1 hour
Skill level: Advanced
Kit needed: Fog machine and fog liquid, power inverter, tripod, extension cable, car
Natural mist occurs when moisture in the air cools suddenly – think of warm breath on a cold day. The rapid cooling transforms the invisible gas to visible droplets. It generally happens where the warmer air hanging above a body of water comes into contact with cold land, or when a cold night air falls over warmer wet ground, for instance.
These kind of conditions happen fairly often, but if you want guaranteed atmosphere, why not take matters into your own hands? You might think of a fog machine solely as a cinematographer’s tool, used to heighten the atmosphere. But it’s great for stills too, and it isn’t as troublesome or expensive to set up as you might think.
A cheap fog machine like ours can be bought for less than £30/$50, and can transform an outdoor scene in seconds. Basic fog machines like this are mains-powered, but if we use a power inverter – a device that lets us use a car battery as a power socket – we can create fog anywhere within an extension cable’s length of the car.
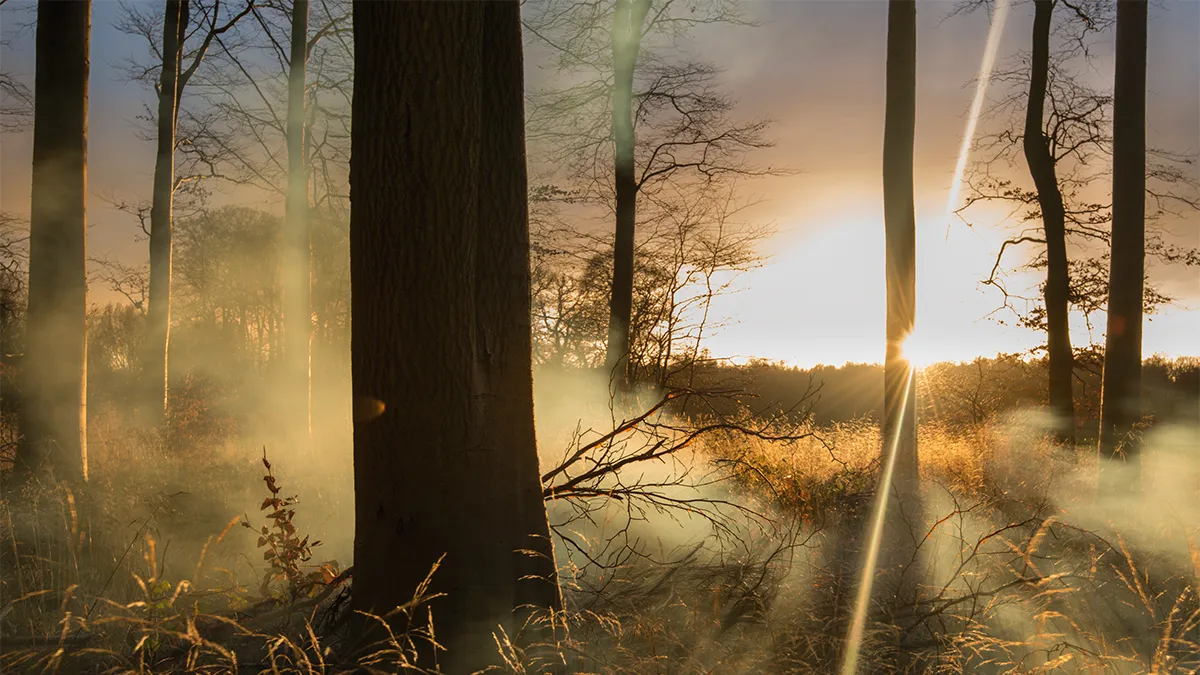
Fog and mist look wonderful when filtered through tree branches and leaves, which split off the light into well-defined shafts of light. So we headed out to the woods to give it a go.
Step-by-step guide: Fog up the forest
Learn how to create your own woodland mist with a fog machine, a power inverter and your car battery.

1. Get a fog machine
We need an inexpensive fog machine; you can buy these from around £30/$50. You also need the liquid for it, which is inexpensive and lasts for ages. The machine takes about five minutes to heat the liquid, then spurts out a stream of fog.

2. Make it portable
If you don’t want to be restricted by proximity to a mains plug socket, consider getting a power inverter. These turn your car battery into a usable source. Connect directly to the car battery and use an extension cable for extra reach.

3. Check the conditions
Wait for a still, windless day. Direct sunlight is best, as this results in strong light rays. Set up your camera facing into the bright light – a tripod isn’t essential, but can be useful. Use a tree trunk to obscure the sun from the lens.

4. Spray the scene
Spray the fog upwind so that it drifts across the scene, and move the position around so that it’s distributed in the foreground and background of the scene. The sun catches the particles in the air and shows up as beautiful shafts.

5. Catch some rays
It might be too thick, as in this shot. If so, wait for a few seconds for the fog to dissipate and then start shooting. If you want to capture shafts of misty light, compose the shot so there are shadowy areas in the frame – the light rays will show up more clearly.

6. Expose for highlights
When shooting towards the sun the foreground will naturally be in shadow, so expose for the highlights. Here we’re at 1/6sec, f/13, ISO 100. If you don’t want to shoot in Manual mode, use the Aperture Priority mode, and try fine-tuning brightness with exposure compensation.
Top tip: Cool it down

The fog that a machine like this produces is very light and dissipates quickly, so it won’t be able to stand even the slightest hint of wind. If you want the fog to emerge more thickly and stay lower to the ground as in the shot above, you need to cool it down. In colder conditions this will happen naturally, but when it’s warmer, a makeshift tube half-filled with ice cubes works perfectly. Direct the nozzle through the tube and the fog will be forced through the ice, emerging thicker and heavier from the other end.
Read more: How to shoot stunning landscapes by the light of the moon

